KS-X1 PRO User Manual - 4SMART
←
→
Page content transcription
If your browser does not render page correctly, please read the page content below
KS-X1 PRO User Manual
Cautions
Electric scooter is a recreational personal transporter. Before
mastering riding skills, you need to do practice. You will be
responsible for any injuries or damage caused by a rider’s
inexperience or failure to follow the instructions in this manual.

Please understand that you can reduce the risk by following all
the instructions or warnings in this manual, but you cannot
eliminate all the risks.

Please following the local traffic laws or restrictions when
riding into public areas.

Please always wear a helmet properly when riding to protect
your head, as well as other necessary protectors, such as
elbow pads, kneecap.

Please slow down the riding speed when riding on crossing,
going across the crowd, making a turn, climbing or downing a
hill, passing a school and other place that high speed may
bring damage to people.
Please do not allow kids of age below 12 to use the scooter on
pubic area. Riders under the age of 18 years old should ride
under adult supervision.

Please do not use the scooter in serious environments, to
avoid scooter

malfunction, which may cause damage to body or property,
such as Rainy, Snowfield, Grassland, Miriness, Fog, Smoke
and so on.

Please do not use the other chargers to charge E-scooter,
Only use King Song supplied charger.

Please do not charge E-scooter, if the charger or power outlet
is wet.

Please do not disassemble the scooter body or other modify
without professional person from distributors.

Please do not allow others to ride your e-scooter unless he/her
has carefully read and follow the instructions in this manual.
Contents

1. Product Details--------------------------------------------------------01
2. Features ----------------------------------------------------------------04
3. Button Usage ----------------------------------------------------------05
4. Assembly and Set-up------------------------------------------------06
5. APP Usage ------------------------------------------------------------07
6. Folding and Carrying-------------------------------------------------17
7. Adjusting the disc brake--------------------------------------------18
8. Adjust the handlebar------------------------------------------------19
9. Battery ------------------------------------------------------------------19
10. Clean and Maintenance-------------------------------------------20
11. Warranty--------------------------------------------------------------22
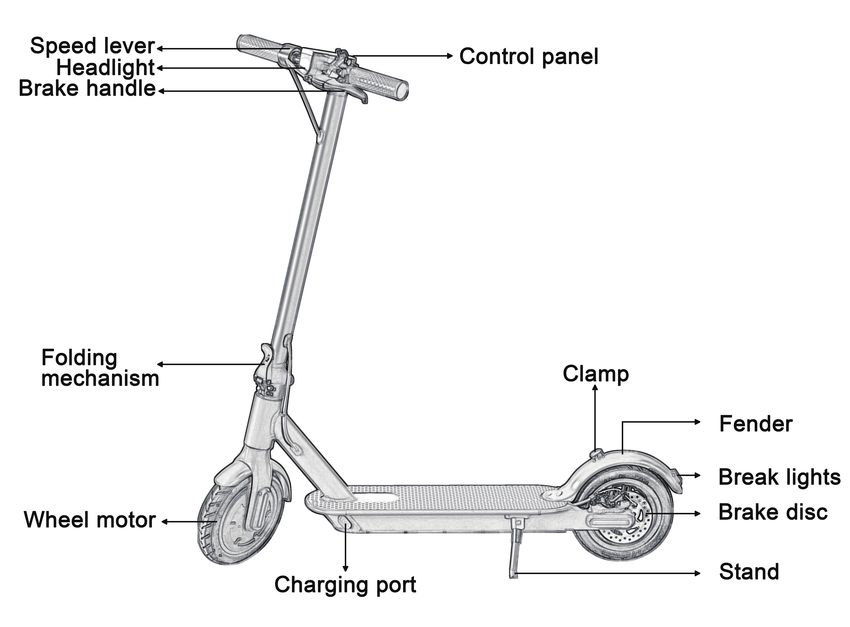
1. The Device & Accessories
       1.1 Diagram: KS-X1 PRO

     Accessories
     -----------------------------------------------------------------------------------

       Screws          Hex Wrench       Valve Stem Extension      Charging Adapter

01
1.2 Functions
021.3 Specifications
Model No KS-X1 PRO
Size 8.5 inch Inflatable Tyre
Top Speed 30 km/h
Mileage Around 45km
Gradeability Around 20°
Battery Capacity 37V, 12.8Ah
Running Condition -10℃/+80℃; 0-90% Humidity
Storage Condition -10℃/+50℃; 0-90% Humidity
Max Load 125kg
Charger Input: 100-240V; Output: 42V/2A
Charging Time Around 6hrs.
Motor 500W
Port Charge Port *1
Headlight 4W
Brake Light LED
Applicable Height 1200-2000mm
03Parking Mode Kick-stand
Cruise Control System control
Reminder Mechanical Bell
Accelerator Throttle Button
Brake EABS+Rear Disc Brake
Display LED
Battery Display 5 Bars in monitor
Dimension(Unfold) 1130*430*1190mm
Dimension(Folded) 1130*430*480mm
Net Weight 14kg
Packing List(pcs) User Manual*1, Certificate*1, Charger*1,
Screws *4, Hex Wrench*1, Valve Stem
Extension*1
2. Features
• Superior Aviation Aluminum Alloy.
• Real-time Temperature Monitoring, Short Circuit /
Low Voltage / Overcurrent / Overcharging Protection.
04• Digital Speedometer Display, Easy to Read Speed.
• Real-time 5 Bars Battery Display.
• 1~3 Speed Gear, Press Button to Switch.
• Malfunction Display.
3. Button Usage
• Power ON/OFF: Long press the button for 3 seconds, all
icons are lighting, showing speed & battery.
00 00
km/h
ECO D S
mph km/h
ECO D S
mph
• Headlight ON/OFF: Click the button (Headlight ON: )
00
km/h
ECO D S
mph
05• Click the button for two times to change the speed gear from
1 to 3 levels, LED display ECO / D / S. Max speed is
increasing when LED display from ECO to S.
00 00 00
km/h
ECO D S
mph km/h
ECO D S
mph km/h
ECO D S
mph
4. Assembly and Set-up
1. Fasten the handlebar stem 2. Attach the handlebar to the
on the headset, and put the stem
kickstand down
063. Tighten the screws onto 4. After the assembly, press
both sides of the stem with the power button to check if
the hexagon wrench it's working properly
00
km/h
ECO D S
mph
5. APP Usage
5.1 First Ride
Mobile device Requirement:
iOS 10.0 or above,
Bluetooth 4.0 or above.
Install the APP and register/login.
Android 4.3 or above,
Install the APP and register/login.
07iOS Android
Please give the corresponding permis sion
! to scooter APP, to ensure the APP can
run normally in your mobile device.
Open Bluetooth/location (or GPS), Click ‘Search’ - -> Click the
corresponding model KS-X1 PRO in device list to connect.
The E-scooter will beep when APP is connected with
E-scooter.
5.2 Learn to Ride
• Step 1: Check E-scooter Status
Check the environment whether it’s safe to ride without
hurting yourself or others.
Check the battery level and remain mileage in APP.
08• Step 2: Wear protective equipment.
• Step 3: Try to slide with one • Step 4: Touch the throttle
leg. slightly and try to put two
leg on the deck.
09• Step 5: During riding, try to • Step 6: Try to use the
release the throttle and pull headlight.
the brake lever.
5.3 Warnings
• Wear protective equipment. • Do not ride in rainy or cross
puddles.
10• Do not load over 125kg. • Ride slowly in special cases.
• Do not place one foot on the • Do not tread the back of the
deck or on the ground when fender.
riding.
11• Do not touch the disc brake • Do not leave your hands
during riding.
• Do not ride upstairs or • Do not hold a child during
downstairs, or over riding.
obstacles.
12• Do not ride on highway or • Do not ride with sharp turn.
motor vehicle road.
5.4 Cruise Control
Open cruise-control in APP, while you keep the same speed,
riding for 3~5 seconds, the E-scooter will be in cruise-control
mode(running at constant speed on flat road) Please use
cruise-control only on flat road, or you will fall down on other
roads.
135.5 Error Description
Display Defect Description Solutions
EO Wrong in 1. Check whether the display
communication control board is well connected;
2. Replace the display.
3. Replace the control board.
E1 Encounter obstacles 1. Release the accelerator and
that E-scooter can’t get stop braking.
over it 2. Restart.
3. Replace the brake lever.
4. Replace the accelerator.
E3 Hall is abnormal 1. Check whether the Hall wire
plug of the motor is loose.
2. Check whether the motor cable
is damaged.
3. Replace the motor.
4. Replace the control board.
E4 Brake system 1. Release the brake.
malfunction 2. Restart.
3. Replace the brake lever.
E5 Throttle fault 1. Release the accelerator.
2. Restart.
3. Replace the accelerator.
14BL Low voltage alarm 1. Stop riding and get scooter
charged.
2. Restart.
3. Check if firmware has been
wrongly upgraded.
4. Replace the control board.
BH High voltage alarm 1. Check whether scooter has
been fully charged, riding the
scooter at low speed, avoiding
braking suddenly when scooter
is fully charged.
2. Restart.
3. Check if firmware has been
wrongly upgraded.
4. Replace the control board.
BP Over voltage, 1. Check whether scooter has
emergency been fully charged, riding the
scooter at low speed, avoiding
braking suddenly when scooter
is fully charged.
2. Restart. Check if firmware has
been wrongly upgraded.
3. Replace the control board.
H1 Motor high temperature 1. Stop riding or riding scooter at
low speed, avoiding climbing.
152. Check whether the motor wire
is damaged, and whether the
temperature signal wire of the
motor wire is short-circuited to
the ground.
3. Replace the motor.
H2 Control board high 1. Stop riding or riding scooter at
temperature low speed, avoiding climbing.
2. Check the installation of control
board radiator.
3. Replace the control board.
H3 Control board super 1. Stop riding or riding scooter at
high temperature low speed, avoiding climbing.
2. Check the installation of control
board radiator.
3. Replace the control board.
LR Over current 1. Release the accelerator.
2. Restart.
3. Replace the control board.
S1 Short circuit 1. Get the motor disconnected
and restart up scooter. If this
alarm has not been cleared,
get control board replaced;
otherwise, all-clear, replace
the motor.
16S2 Lack of phase, 1. Restart and turn scooter on as
mos tube drive failure static, avoiding turning on
scooter while advancing.
2. Replace the control board.
SN Lack of series number 1. Check whether the firmware
version is correct.
2. Reset the serial number.
6. Folding and Carrying
Fold Open
Make sure that the scooter's turned off. To fold, unlock the
folding mechanism, and bend the handlebar stem to hook the
buckle on the rear mudguard. To open, press the bell trigger to
remove from the buckle, erect the handlebar and lock the
folding structure.
17Carry
Hold the handlebar stem with either one hand or both hands to
carry.
7. Adjusting the disc brake
Brake Cable
If the brake is too tight, use the hexagon wrench to loosen the
screws on the caliper, and slightly send back the brake cable
to shorten the exposed length, then tighten the screws. If the
brake is too loose, loosen the screws, and slightly pull out the
brake cable to lengthen the exposed length, then tighten the
screws.
188. Adjust the handlebar
If the handlebar and its stem sway during riding, use the
hexagon wrench to tighten the screws on the folding mecha-
nism.
9. Battery
9.1 Temperature Effect on Battery
Battery power will vary with the temperature, mileage per
charge will have slight difference under different temperature,
and following table is just for your reference.
Temperature(℃) -20 -10 0 10 20 30 40 50
174Wh using ratio 40% 60% 80% 90% 95% 100% 105% 110%
MPC(Km) 8 12 16 18 19 20 21 22
MPC: Mileage per fully charged.
199.2 Charging
The device has a built-in lithium battery, no extra battery
installation is required, just charge the device when it
indicateslow battery.
Plug in the power source after inserting the charger plug, this
can prevent potential risk to ensure a safer charger.
It takes around 6hrs to get 100% charged, when the red
lights turn into green, indicating the charging is completed.
If not in urgent need, please wait until charging complete
before unplugging, for after charging, the protection circuit
will perform flow equilibrium.
10. Clean and Maintenance
10.1 Clean and Maintenance
When charging
• Please place the E-scooter in cool and ventilate places to
release heat.
• Please avoid high temperature or moist.
• Please avoid water into the E-scooter to prevent electric
shock, especially water drops from the charger cable to the
the charging port.
When cleaning
• Please make sure the E-scooter is off.
20• Please use soft cloth to clean the E-scooter.
• Please don’t use water to wash the E-scooter or place
E-scooter in water.
When storage
• Please place the E-scooter in cool and ventilate places
(temperature -10~50℃, relative humidity 0~90%).
• Please don’t place subjects on the E-scooter or heavy
subjects to squeeze the E-scooter.
10.2 Battery Pack Maintenance
When the E-scooter is fully charged, please check the
voltage of the battery in APP. Normal voltage is 31V~42V.
If the voltage is not in this range, please contact the
distributor for battery pack maintenance.
Please charge the E-scooter at least one time each month,
to extend the battery pack lift time.
Please do not disassemble, assemble or change the battery
by yourself.
10.3 Regular Maintenance
Please do not disassemble or assemble the E-scooter
without the guide or help from professional maintenance
from the seller or distributors.
Please make a video or photo to distributors when the
21E-scooter run abnormally, as well as providing the serial
number.
11. Warranty
11.1 Limited Warranty
Sellers warrant the EUC by following limits.
Motor, Controller board for 365 days from the item
departure from factory.
Battery package for 183 days from the item departure from
factory.
11.2 Exclusion from Warranty
Above limited warranty DOES not include damage or lose
not caused item’s defectives (i.e. warranty only covers
manufacturer defectives, does not cover any damage,
unauthorized modification, improper operation,
disassembly etc.)
11.3 After Sale Service
Please contact the local sellers or distributors for after-sale
service.
22Kingsong Intell Co.,LTD Address : BLDG 7, NO 71 XINGHU RD, 8TH INDUSTRY PARK, HONGXING, YUTANG,GUANGMING,SHENZHEN Tel : +86-755-23193477 Fax : +86-755-23193248 E-mail : info@szkingsong.com
You can also read