MAINTENANCE & INSTALLATION INSTRUCTIONS - ONLY FOR ADMONTER NATURAL FLOORS
←
→
Page content transcription
If your browser does not render page correctly, please read the page content below
ENGLISH

More information at:
http://service.admonter.at

MAINTENANCE &
INSTALLATION INSTRUCTIONS

ONLY FOR ADMONTER
NATURAL FLOORS

                             08/2020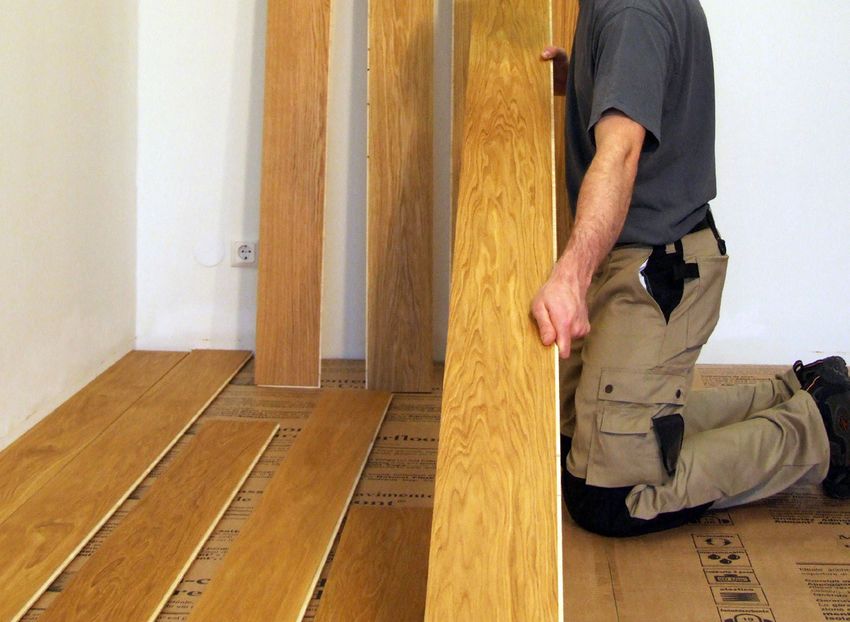
GENERAL REQUIREMENTS                                                                                                                               UNDERFLOOR COOLING
    The durability & wear resistance of any wooden floor is highly dependent on regular and correct care & maintenance. Which, if carried out          Underfloor cooling : In terms of building physics, the installation of a room cooling system at floor level is not ideal, preferably it should be
    correctly, will add years to the service life of your floor!                                                                                       installed in the wall and ceiling area. Basically, Admonter Floors are suitable for laying over underfloor cooling systems if it can be regula-
                                                                                                                                                       ted and detected so that a daily average of 65% relative humidity directly on the parquet floor is not exceeded and that the dew point is
    Prior to installation the floor needs to be stored acclimatised. Only open the packs directly prior to commencing installation. When using a       never even close to being reached. Although only to a moderate degree, the natural phenomena typical to wood such as gaps, cracks or
    tapping block, take care not to damage the surface of the flooring. We recommend the use of felt pads/castor cups for underneath chair             warping as during heating should then also to be expected. A single dew point measurement on the inflow pipe is in any case not
    and table legs; suitable mats (polycarbonate etc) must be used beneath moving castor wheels / under tyres in car showrooms. Avoid                  sufficient! Full-surface bonding with Admonter elastic adhesive is required.
    metal (chair and table legs etc) coming into direct contact with the floor, since chemical reactions and staining may occur. We recommend
    using a quality doormat at entrances, as dirt and grit can have a sandpaper-like effect. Excessive moisture should be avoided (wet shoes,          You´ll find more information on our information PDF “Admonter wide plank floors on under-floor heating and cooling systems“
    umbrellas left on floor etc) as it can cause swelling and discolouration. Always use a damp/well wrung out mop when carrying out care              http://www.admonter.eu/en/downloads/.
    and cleaning procedures. Always use two buckets – one for the care product and the other for clean water (change when dirty) to rinse
    the mop. Do not pour out the soapy water on the floor! Do not use micro-fibre cloths/mops. Never clean the floor with only water. Remove
    any spillages (alcohol, juice etc) immediately.

    Do not lay down rugs on the floors for the first few weeks. Please note that care should also be taken with anti-slip mats as their contents
    can cause chemical reactions and, when placed above under-floor heating systems, can lead to “hot spots”. Please note that the perfect
    room climate is one of 30 % - 65 % relative humidity - please see Admonter comfort chart on our website:                                                  LAYING INSTRUCTIONS – PREPARATION
    http://www.admonter.eu/en/downloads/.
                                                                                                                                                       In order to assure the proper installation of your floor, please consult document DIN18356
    Installation should only be done after all other interior works are finished (painting, tiles etc). If this is not possible, we recommend to use   for information regarding the correct preparation of the screeds (e.g. completely level, dry,
    Admonter Floorliner in order to avoid that the floor gets damaged or dirty. If the floor has been recently oiled and work is still being under-    clean). Uneven areas in the floor - please consult document DIN 18202 - (Please note
    taken please remember to remove the Floorliner during the night so that the floor can continue to dry.                                             the increased requirements when installing lock-it planks) should be levelled out using a
                                                                                                                                                       levelling compound.
    Stair nosings - If your stairs are subjected to heavy loads, we recommend separate step strips as additional protection. Your specialist
    dealer will be happy to advise you.                                                                                                                Pay attention to the specific properties of each screed. Installation maturity is achieved
                                                                                                                                                       when the moisture content measurement yields values of 1.8 % for cement and 0.3 %
                                                                                                                                                       for anhydrite screed, in any case, the corresponding relative screed air humidity must be
                                                                                                                                                       below 60% RH. Existing features of the sub-floor, such as construction / building gaps or expansion gaps in the screed, should not be
                                                                                                                                                       altered when laying your new floor. Depending on the room size additional gaps may be required. Measure the width of the room first and
                                                                                                                                                       then calculate the width of the last row. If the last row is less than 4 cm one should commence by preparing the first row.
           COLOUR CHANGES
                                                                                                                                                       It is particularly important to sort the individual planks by colour prior to installation (especially concerning SELECTION products). In doing
                                                                                                                                                       this, it is possible to deliberately influence the overall appearance of the room. An even, homogenous effect can be created by merging
    Natural wood products have a tendency of showing slight changes in colour when exposed to intense sunlight. Especially during the first            planks with similar tones. However, by placing planks with lighter and darker tones alongside each other, the contrast will create a rustic
    3 - 6 months (and then gradually over time), lighter timber will turn darker, while darker timber will become lighter. By following the specific   effect. Indeed, it is possible to create diverse effects depending on how the floor planks are installed. In order to avoid the installation of
    care & maintenance instructions for each wood type (f.e. Rhombus, Chevron), colour changes and staining can be reduced. Nevertheless               faulty planks, one should also check the quality during the sorting process. For the stair nosing process, organise the planks according
    variations in colour and wood structure cannot be avoided completely. Remove stains with utmost caution and avoid the use of scourers.             to colour. A selection of laying patterns can be found at http://www.admonter.eu/en/downloads/
    The smoking process naturally highlights the color differences caused by fluctuations in the tannic acid content of the tree. Due to the           Attention: for SELECTION FLOORS herringbone twin and chevron, initial care is necessary!
    change in pH during the smoking process, these tannins react with the atmospheric oxygen, which causes the desired color changes.
    Since the pH value does not suddenly change at the end of the smoking process and atmospheric oxygen is also omnipresent, natural                  Please also note the installation of Admonter products in the bathroom - detailed information can be found on our data sheet: „Admonter
    post-ripening processes occur. These ripening processes subside in the first few months until the desired color is achieved. This play of          in the bathroom“ at http://www.admonter.eu/en/downloads/
    colors can be seen on a small scale within a plank and over a large area from one plank to another.

                                                                                                                                                              PRESORTING
                                                                                                                                                       Before laying, it is particularly important to sort the planks by color. Afterwards, the type of installation can be used to influence the ap-
                                                                                                                                                       pearance of the room; if the planks are installed in a continuous manner, they give the floor a homogeneous character, if light and dark
           UNDERFLOOR HEATING                                                                                                                          planks are deliberately mixed, a lively, rustic appearance is achieved. This means that the same planks in one and the same room can
                                                                                                                                                       look completely different, depending on the installation.
                                                                                                                                                       PLEASE NOTE: Quiet or lively sortings each result in a different appearance.
    Admonter FLOORs are ideally suited to under-floor heating systems (the only exception being beech wood). A surface temperature of 29°
    Celsius must not be exceeded by either hot water or electrical heating systems. The use of temperature indicators is absolutely necessary.         The boards must also be checked for quality. If necessary, planks for edge friezes, stair edges etc. should be selected in color to match
                                                                                                                                                       the elements before starting the installation.
    Attention: By placing items that require a lot of floor space (e.g. larger furniture, low Futon beds, heavy carpets) over a heated floor
    surface one risks trapping the heat. This will invariably result in overheating! Screeds need to be dried out according to their standards         English association: Here the bars are laid in individual rows, but always offset by half of the parquet bar. As a result, the English associ-
    before the installation of the floor.                                                                                                              ation appears much calmer than ship floor parquet.
                                                                                                                                                       Wild dressing: The boards are always laid in individual rows. The bars are slightly offset in each row. How far the bars are moved is ar-
    You´ll find more information (also for the use of the FIDBOX) on our information PDF “Admonter wide plank floors on under-floor heating            bitrary, whereby the forehead joints must have the required minimum distances (small 30 cm / classic 50 cm).
    and cooling systems“ http://www.admonter.eu/en/downloads/.

2                                                                                                                                                                                                                                                                                                          3

                                                          www.admonter.com                                                                                                                                   www.admonter.com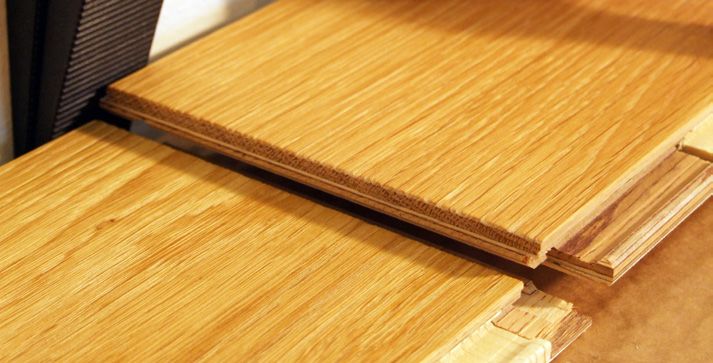
ONLY FOR A „FLOATING FLOOR“ LOCK-IT (3-LAYER SMALL)
Admonter natural underlay should be installed with the ribbed side facing down, avoid creating obvious seams and do not overlap. Join
the seams together with Admonter adhesive tape. In order to prevent moisture entering through the walls, we recommend you to pull a
section of the underlay up the side of the wall. Admonter natural underlay repels moisture, prevents mould, reduces impact sounds (e.g.
footsteps) and can be used in combination with any under-floor heating system. If required, an additional moisture barrier can be applied.
Type of installation „floating floor“ / Tongue & groove: 3-layer classic, 3-layer xxlong / Lock-it: 3-layer small, 3-layer classic
TONGUE & GROOVE INSTALLATION
LOCK-IT (3-LAYER CLASSIC)
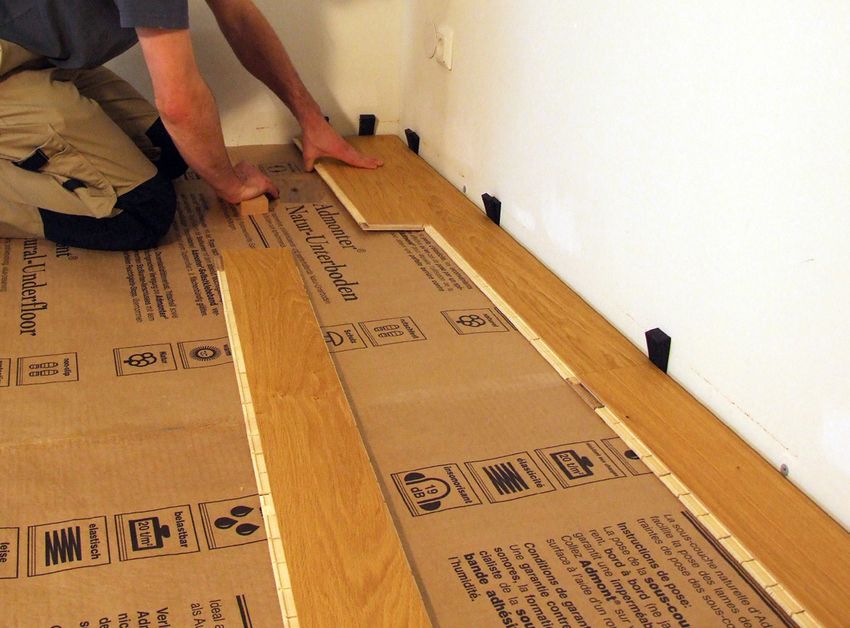
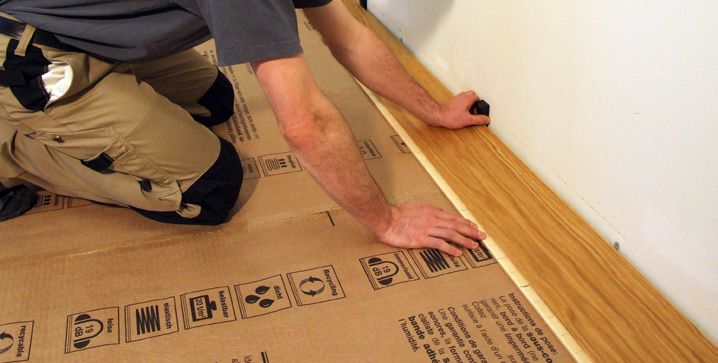
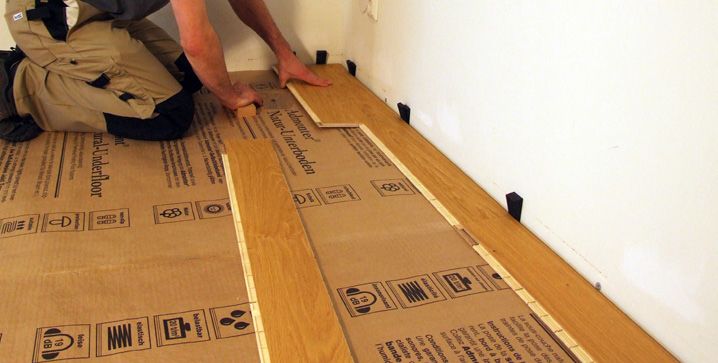
One should commence the installation in a corner of the room with the “tongue-side” of the plank facing the wall and then continue to
from left to right. Use wedges in order to keep a distance of approx.10-15 mm from the wall, thus allowing room for the floor to expand.
When installing the first plank, take extra care that it lies straight.
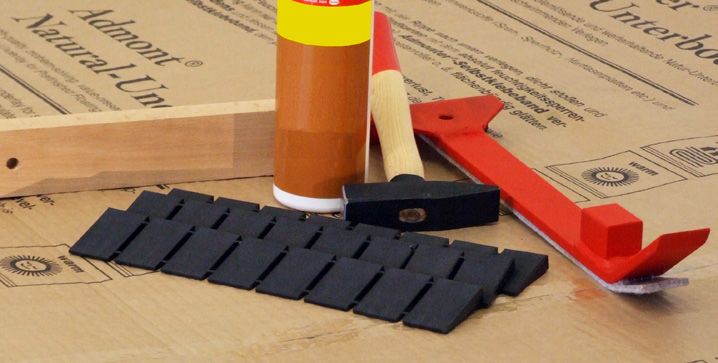
For the installation process we would recommend the use of the Admonter Installation set.
Firstly, take care to ensure the first row of planks is absolutely straight. The groove in the
plank should face the wall. Use wedges to keep a distance of approximately 10-15 mm from
the wall so that the flooring is able to expand. Apply glue along the upper side of the groove
on both the long and the short side of the plank. Knock the planks together with the aid of
a tapping block, first on the end and then on the side. Do not risk damaging the wood by
knocking directly on the surface. Remove any surplus glue immediately (using a clean cloth)
Remove all wedges after installation.
open locked
LOCK-IT INSTALLATION (3-LAYER SMALL)
One should commence the installation in a corner of the room with the “tongue-side” of the plank facing the wall and then continue to
from left to right. Use wedges in order to keep a distance of approx. 10-15 mm from the wall, thus allowing room for the floor to expand. 5Gs 5G
When installing the first plank, take extra care that it lies straight. To connect the short end between the boards of the first hardens.
Continue the first row by connecting the left end of the next plank to the right end of that which has been already installed. Cut the last
plank to size and use the left-over piece to start the second row. However, do ensure that the end joints are always staggered by at least
30 cm. This will not only create a better effect but also strengthen the floor. Continue the first row by connecting the left end of the next plank to the right end of that which has been already installed. Cut the last
plank to size and use the left-over piece to start the second row. However, do ensure that the end joints are always staggered by at least
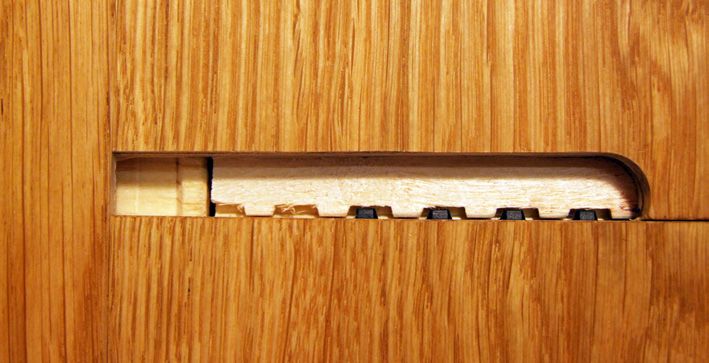
In order to connect the second row to the first, slide the plank in at ca. 30°, feed the tongue of the board into the matching groove and 50 cm. This will not only create a better effect but also strengthen the floor.
then fold flat. When interlocking the planks, take care not to break the tongues. Make sure that the planks are locked together correctly. In order to connect the second row to the first, slide the plank in at ca. 30°, feed the tongue of the board into the matching groove and
Repeat this process for the entire room. The planks for the last row should be installed by putting glue along the edge of the short side then fold flat. When interlocking the planks, take care not to break the tongues. Make sure that the planks are locked together correctly
and anchoring the board with weights until the glue has hardened. and pay particular attention to the positioning of the black tongues (approx. 0,5 cm oversize).
Attention: When installing the flooring over underfloor heating, a full surface stick down installation is required using a permanently flexible Repeat this process for the entire room. The last row can also be locked by hand. This is achieved by putting glue along the edge of the
adhesive. short side and anchoring the board with weights until the glue has hardened.
4 5
www.admonter.com www.admonter.com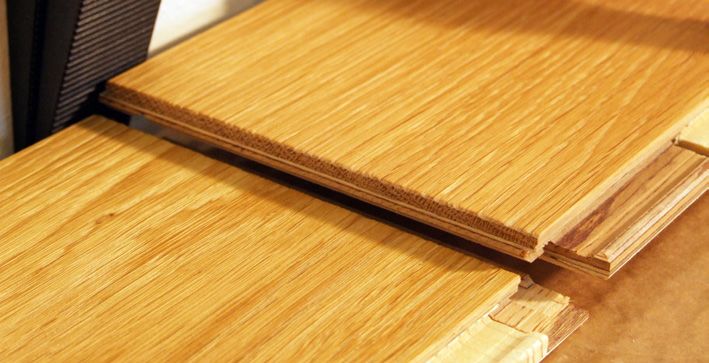
STICK DOWN INSTALLATION                                                                                                                            MAINTENANCE (RE-OILING) - NATURAL-OIL-SURFACE
    The advantages of a full surface stick down installation are the reduction of impact sound and a better efficiency of underfloor heating           Before any maintenance activities, the floor must be freed of loose dust and dirt by sweeping or vacuuming. If there is dirt, the floor should
    systems. Make sure that the correct (flexible!) adhesive is used, we recommend the use of Admonter adhesive.                                       be cleaned with Admonter Clean & Care. Shake the container well before use and wipe the floor with a damp cloth (mixing ratio: 10 liters
    With a tongue & groove installation of 3-layer planks glue has to be applied on the short ends of the planks. With all other planks an             of warm water to approx. 100 ml Clean & Care). We recommend wiping with a 2-bucket system: The mob, which is soiled by the wiping,
    additional application of glue on the short ends is not necessary.                                                                                 must be washed out of bucket 2 in clear water.
                                                                                                                                                       Then immerse the mob in bucket 1 again and continue the wiping process with the Clean & Care water mixture with a damp cloth. Allow
                                                                                                                                                       the floor to dry well before further maintenance work.

                                                                                                                                                              NATURAL OILED FINISH
                                                                                                     Stick down installation
                                                                                                                                                       Easy-Care: surface is already factory finished with an additional coat of oil, therefore no final coat of oil is required after installation!
                                                                                                     Tongue & groove: 2-layer small,                   Care instructions for special surfaces on request. Ongoing maintenance is necessary and is to be carried out according to the following
                                                                                                     3-layer classic, 3-layer xxlong                   description „Oiling natural oil surface“.

                                                                                                     Lock-it: 2-layer classic,                         Pro-Care: Initial care necessary!
                                                                                                     3-layer classic, 3-layer small
                                                                                                                                                       SELECTION HERRINGBONE TWIN and CHEVRON: Initial care is necessary to wet the chamfer. Suitable oils are included in
                                                                                                                                                       the order.
    Evenly distribute the adhesive on the surface with the help of a notched trowel and install the first row (matching adhesive comb included
    in every bucket of Admonter adhesive).                                                                                                             INITIAL CARE is the same as maintenance / re-oiling. You will find a precise description of this in the next point, „Care (oiling) - natural
                                                                                                                                                       oil surfaces“. It is important that you use the right maintenance oil for your floor.
    TONGUE & GROOVE INSTALLATION
    When installing the first row of planks with the „groove side“ facing the wall, take extra care that it lies absolutely straight (2-layer planks
    small with „right“ and „left“ milled sides can be installed in a herringbone style pattern.

    LOCK-IT INSTALLATION                                                                                                                                       MAINTENANCE (RE-OILING) - NATURAL-OIL-SURFACE
    Before installing the planks check the correct position of the tongue. When installing the first row with the „tongue-side“ facing the wall
    take extra care that it lies straight.
                                                                                                                                                       Depending on the amount of foot traffic, oiled floors will need to be re-oiled periodically.
    The second plank of the first row is aligned in a straight line, placed in the groove of the first plank at the end and then pressed down until
    the plank audibly and visibly clicks into place. From the second row, the boards are placed at an angle of 30 ° over the entire length in the
    groove of the previous row and then folded down until the black tongue engages clearly on the front.

    Use wedges to maintain the necessary edge clearance (depending on the room dimensions - usually 10-15 mm). Especially with ton-
    gue-and-groove floorboards, it is advisable to mark the next row or, for lock-it, the next two rows with a measuring stick or chalk line on
    the surface. Thanks to the precise adhesive application, the planks can then be knocked together on the front side and then on the long
    side with the help of a firewood (with lock-it if necessary), without this having to be dipped into the adhesive bed on the long side. Impacts
    on the cover lamella must be avoided to prevent consequential damage.

    Sections of the previous row can be used as the first plank of the next row, provided that they still have a minimum length of 30 cm and           Depending on the amount of foot traffic, oiled floors will need to be re-oiled periodically. Admonter maintenance oil natural clear shake well
    a minimum offset of 50 cm (with 2-layer small and 3-layer small 30 cm) can be maintained. Complete the relocation of the room in the               before use! Should be used sparingly (1 litre is sufficient for approx. 70 – 100 m²). Distribute the oil evenly with the use of an oil-sponge,
    same way.                                                                                                                                          soft cloth or spray can. The quantity of maintenance oil natural clear applied may vary due to the different absorption of the wood. Polish
                                                                                                                                                       the floor using a polishing machine and a white pad (different colour pads may be used depending on 3M products).
    Wedges must be removed after the adhesive has dried. In order to minimize the formation of gaps during the heating period, particular
    attention must be paid to compliance with the climate requirements. General installation instructions for the respective profile can also be       Small areas can be treated by hand using a white polishing pad or a soft cloth. Polish thoroughly. Do not apply the oil thickly. Ensure an
    found under „Floating installation type“.                                                                                                          even distribution of the oil in order to avoid differences in the overall shine once the floor has dried.

                                                                                                                                                       Allow the floor to dry for approx. 24 hours, taking extra care during this period to prevent any contact with moisture.

                                                                                                                                                       Depending on the polishing, the room temperature and the moisture level the drying of the floor can take 2 - 7 days. Please allow air to
                                                                                                                                                       flow into the room and combine with underfloor heating to help dry the floor faster. During this period you can walk on with clean slippers,
                                                                                                                                                       avoid any dirt!

                                                                                                                                                       Cover high traffic areas with cardboard. Do not clean the floor for the first 8 – 10 days, thus allowing the surface to harden completely.
                                                                                                                                                       After use, oil-saturated cloths must be soaked in warm water and then hung out to dry (Caution: could be flammable).

6                                                                                                                                                                                                                                                                                                       7

                                                          www.admonter.com                                                                                                                                   www.admonter.com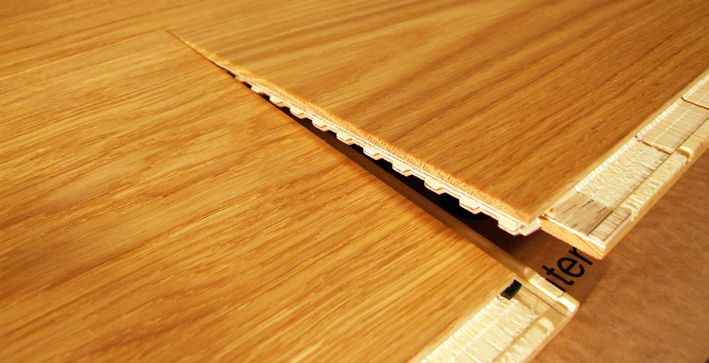
ENGLISH
           MATT LACQUER FINISH (WE RECOMMEND)
                                                                                                                                                 More information at:
                                                                                                                                                 http://service.admonter.at
    After installation add approx. 100 ml of Admonter Clean & Care to 10 litres warm water and wipe the floor in the direction of the grain,
    using a damp mop. Allow the floor to dry.
    After the floor has dried the floor can be polished by hand or using a polishing machine.

           REGULAR CARE & MAINTENANCE FOR NATURAL OILED AND
           MATT LACQUER FINISH

                                                     Depending on how dirty the surface is, it is recommended to wipe the floor surfaces. It
                                                     is very important here that the floor is damp and not wiped too wet.
                                                     Otherwise, it is sufficient to sweep the floor surfaces or clean them with a vacuum        MORE
                                                                                                                                                INFORMATION AT
                                                     cleaner.

    Add approx. 100 ml of Admonter Clean & Care natural clear to 10 litres warm water and wipe the floor in the direction of the grain, using
    a damp mop (around 1000 ml when the colour has faded or the floor looks dull).

    For a shinier effect allow the floor to dry for approx. 30 minutes and polish using a white pad* or soft cloth.

                                                                                                                                                www.admonter.com
    We recommend using two buckets – one for the care product and the other for clean water to rinse the mop.

    PLEASE NOTE: Admonter Clean & Care contains both cleaning and care substances, but in the case of naturally oiled floors is not suf-
    ficient as the sole care in the long term. * different colour pads may be used depending on 3M products.
    ATTENTION:
    • For care and maintenance of high traffic areas, please refer to our specific guidelines!
    • Reconditioning and local repairs should only be done by flooring professionals!

                                                                                                                                                                              ADMONTER
                                                                                                                                                                            Holzindustrie AG
                                                                                                                                                                         8911 Admont - Austria
                                                                                                                                                                           info@admonter.at
                                                                                                                                                                          www.admonter.com

8                                                                                                                                                                                                          9

                                                         www.admonter.com                                                                                                                        08/2020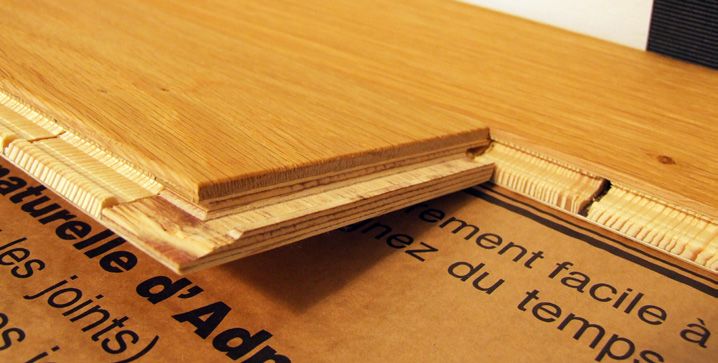
You can also read