METHODOLOGY AND GUIDELINES FOR THE INTRODUCTION OF 3D PRINTERS AS A TOOL IN TEACHING EXPERIMENTATIONS IN SECONDARY SCHOOLS
←
→
Page content transcription
If your browser does not render page correctly, please read the page content below
Pedagogical Resources IN Teaching
    Science, Technology, Engineering, Mathematics

       METHODOLOGY AND GUIDELINES FOR
              THE INTRODUCTION OF
             3D PRINTERS AS A TOOL
        IN TEACHING EXPERIMENTATIONS
             IN SECONDARY SCHOOLS
                                 Intellectual Output N. 2
                    Release of final validated Intellectual Output: September 2015

(The project is funded by ERASMUS+ Programme through INDIRE Italian National Agency. The content of this
material does not reflect the official opinion of the European Union, the European Commission and National
Agencies. Responsibility for the information and views expressed in this material lies entirely with the author(s).
Project reference N. 2014-1-IT02-KA201-004204)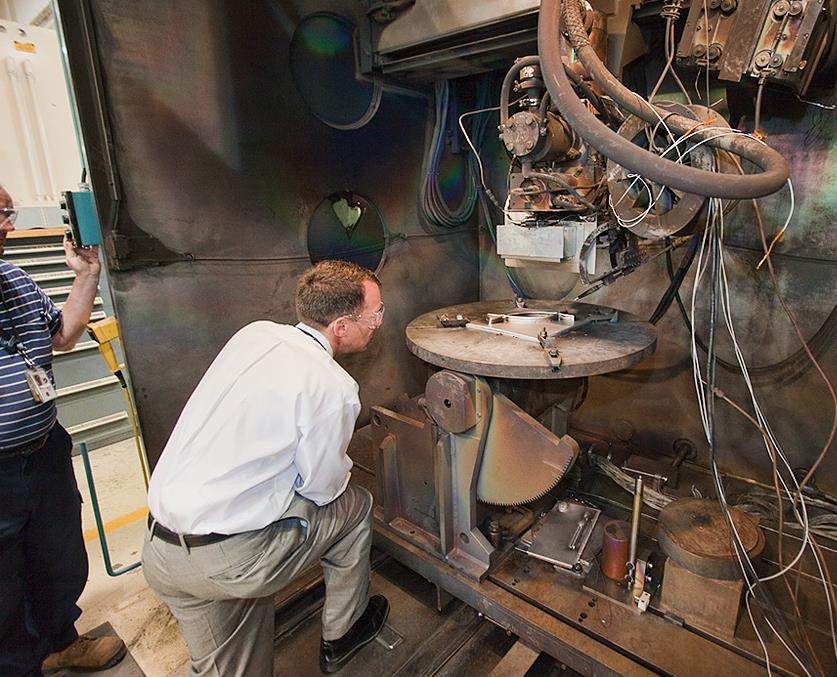
INDEX

PRINT STEM BRIEF OVERVIEW                                     Pag. 3

Chapter 1. What Is 3D Printing?                               Pag. 5
  1.1 Time line
  1.2 Benefits of 3D Printing
  1.3 Weaknesses of 3 D Printing

Chapter 2. 3D Printing Logistical Accessibility               Pag. 8
  2.1 Motivation for Students
  2.2 Teaching and Learning Strategies
  2.3 Technician Support
  2.4 Classroom Layout
  2.5 Group Sizes
  2.6 Student Behaviour
  2.7 Hazards /Risk Assessment

Chapter 3. 3D Printing Technology                             Pag. 14
  3.1 Extrusion
  3.2 Wire 3D Printing
  3.3 Powder 3D Printing
  3.4 Electron Beam Melting & Selective Laser Melting
  3.5 Powder Bed Printing
  3.6 Laminated object manufacturing (LOM)
  3.7 Photo Polymerisation and DLP
  3.8 Digital Light Processing

Chapter 4. 3D Printing In Schools                             Pag. 24
  4.1 Fused Filament Fabrication
  4.2 General Comments About FFF
  4.3 Suggested Printers
  4.4 Purchase Criteria
  4.5 Technical Criteria
  4.6 Socio-technical Criteria
  4.7 Summary

Chapter 5. Identification of Programmes for File Conversion   Pag. 35
  5.1 Slicers & 3D Printing Hosts
  5.2 Typical Basic Print Parameters

Chapter 6. Identification of 3D Programmes                    Pag. 41
  6.1 Overview
  6.2 Criteria For 3D Modelling Software
  6.3 Free 3D Software

                                                  1
6.4 3D Software To Purchase
  6.5 3D Freeform & Sculpturing Software
  6.6 Socio-technical Criteria

Chapter 7. Identification of Libraries                           Pag. 52
  7.1 Overview
  7.2 Some Of The More Known Libraries

Chapter 8. Creating Teachers Team and Experimentation Projects   Pag. 62
  8.1 The Teachers Team
  8.2 Downloadable design or teacher designs
  8.3 Mapping out of STEM Project
  8.4 Possibility of Use
  8.5 Key Factors For STEM Projects
  8.6 Linear Approach
  8.7 CAF Approach
  8.8 Design Approach
  8.9 Exam Specifications

                                           2
PRINT STEM BRIEF OVERVIEW
Among the causes of early drop-out from upper secondary school by students with a low level of basic
competences, there is failure in the learning of mathematical and scientific literacy competences and,
more generally, of formal and coded languages. According to the "Strategic Framework for European
Cooperation in Education and Training (ET2020) Council Conclusions", the objective is to lower the
share of 15-year old European students with insufficient abilities in mathematics and science to less
than 15 % by 2020. In 2009, in Europe, the figure for students with insufficient abilities in science-
related subjects, according to the PISA standard, was 17%, the share of European students who did not
reach a sufficient score in mathematics was 21%.

Mathematics in particular, but other scientific subjects as well, are often perceived by students as
something abstract, unrelated to their daily experiences and perceptions. This disconnect leads to lack
of interest towards such disciplines and to progressive abandonment of subjects that provide an
important asset in the European labour market, which is a market that offers many employment
possibilities to people with those skills. For this reason, it is fundamental to develop new teaching
methods that promote interest and motivation for mathematics and scientific disciplines. 3D printers
are the new frontier in experimental teaching: the possibility of realizing three-dimensional models of
objects conceived by the students or of mathematical or scientific concepts or objects, opens new
opportunities for motivating and arising the interest of students in these disciplines.

PRINT STEM project is developing programmes and associated devices for replicable use of 3D
printers, by also transferring and adapting good practices of partner countries who have already tested
their effectiveness in their respective schooling/training systems. As regards the learning difficulties
observed in abstract contextualization and reflective observation, the technology will help to overcome
them, making it possible to focus primarily on the active experimentation and concrete experience of
shapes and object that imply a deeper knowledge of formal languages.

PRINT STEM expected results:

1) analysis-study of the potential application of 3D print technology to experimental teaching of
mathematics and science, dealing with the main problems of "low achievers", in terms of lack of
attention and low interest (Intellectual Output 1);

2) guidelines for the setting up of an interdisciplinary team of teachers for experimental teaching with
3D printer. This way teachers will be guided towards new teaching approaches and will be invited to
plan different possible applications for 3D printer technology in the teaching of their subjects
(Intellectual Output 2);

3) conduction of 5 extracurricular project work programmes (independent learning and pupil-led
experimentation) and accessible as OER, in the field of design and of product engineering technology, to
discover the beauty of "making" using an interdisciplinary approach (Intellectual Output 3);

                                                   3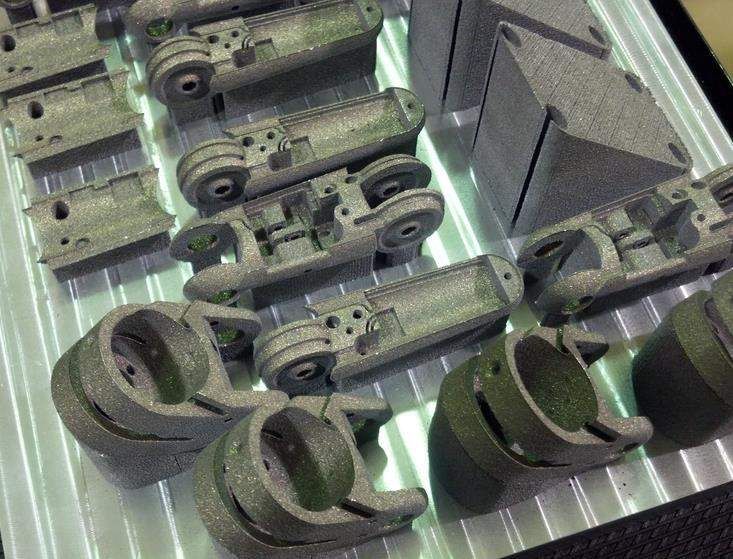
4) conduction of 5 experimentations aimed at the mediation of abstract concepts in mathematics
teaching (teach-led experimentation), accessible as OER (Intellectual Output 4);

5) conduction of 5 experimentations aimed at the mediation of abstract concepts in the teaching of
physical and natural sciences (teach-led experimentation), accessible as OER (Intellectual Output 5).

For further information, please visit http://www.printstemproject.eu/

Responsible Partner of the present Intellectual Output: Kirkby Stephen Grammar School

                                      List of Partners
    PARTNERSHIP                                                                    COUNTRY
    Project Coordinator: Istituto d'Istruzione Secondaria Superiore "A.Berenini"   Italy
    Cisita Parma Srl                                                               Italy
    Istituto Istruzione Superiore “C. E. Gadda”                                    Italy
    Forma Futuro Scarl                                                             Italy
    Kirkby Stephen Grammar School                                                  UK
    Danmar Computers Malgorzata Miklosz                                            Poland
    Asociacion De Investigacion De La Industria Del Juguete, Conexas y Afines      Spain
    Sabanci Kiz Teknik ve Meslek Lisesi                                            Turkey
    1epalchanion                                                                   Greece
    Evropská rozvojová agentura, s.r.o.                                            Checz
                                                                                   Republic

                                                 4
Chapter 1. What is 3D Printing?
The inkjet printer was invented in 1976. Charles Hull adapted inkjet printing technology to create
stereo-lithography, a printing process which is able to turn 3D software models into 3D products.
3D printing is the common name for Additive Manufacture. This is where a model is built up layer by
layer. A wide range of materials can be used, including: plastics, metals and rubber.
Source : DATA Key Resources

1.1    Time Line for Additive Manufacture:
1976 The inkjet printer is invented
1983 The start of 3D Printing using Stereo lithography
1988 The first 3D Printer using Fused Deposition Modelling invented
1993 Powder bed 3D Printing invented
2005 Open Source collaboration on line
2006 Selective Laser Sintering used for customising products
2008 Thingy Verse starts
2009 DIY kits start being sold.
2011 3D Printing in gold and silver
2012 3D-Printed prosthetic jaw.
2014 Patients jaw rebuilt using 3D Printing.
Source: Infographics.com and BBC

3D printing is a new way of producing products. The general term used to describe 3D Printing in all its
guises is Additive Manufacturing. As mentioned previously a product is built by adding layers. The
definition and quality of the product is dependant on the size of the extruder or layering height as well
as the resolution of the design software.

To contrast Additive Manufacturing with predominantly Subtractive Manufacturing techniques: More
traditional school processes have relied upon taking blocks of material and cutting parts of them down
to required sizes and shapes etc. Even casting for example usually requires a pattern to be made using
subtractive methods first and even if the casting process is seen as a genuine additive process casting
has a number of limitations which make 3D Printing more advantageous.

                                                    5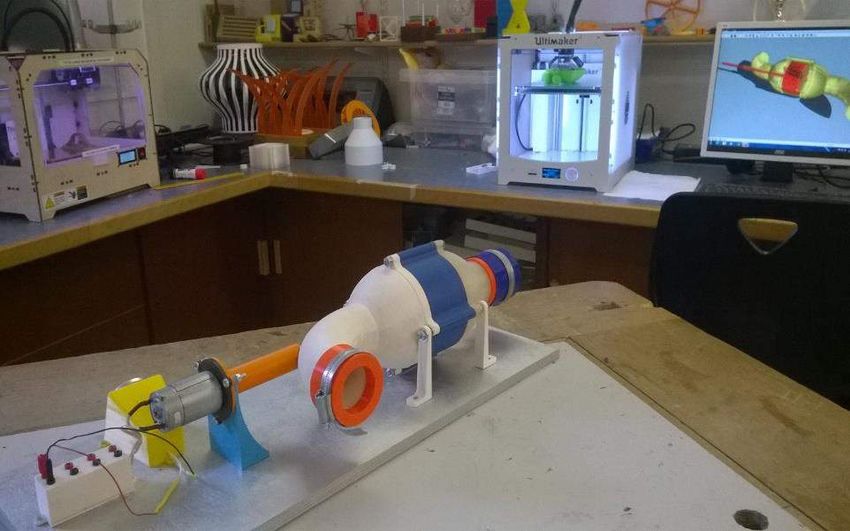
These advantages usually come down to manufacture of more complex forms, the potential to reduce
waste and the manufacture of components which would be virtually impossible to make in any other
way.

However for the first time ever 3D printing offers the ability to have products manufactured anywhere
in the world. No longer would it be necessary to have industrialised centres distributing products
around the world. This could now be done by sending 3D “virtual designs” through the internet and
having these manufactured at the point of need. These designs could also be customised or modified for
more specific or needs within its operating environment.

Manufacturing could be transformed from Just In Time Logistics to Just in Time Manufacturing as
suggested by © Big Innovation Centre (The Work Foundation and Lancaster University). This would
also have an impact on the quality of life. The carbon footprint of products could be significantly reduced
as products could now be manufactured where needed or within the locality. Busy transportation
network and infrastructure would be reduced too. By providing students with the opportunities to
realise the potential of this manufacturing process we are supporting future generations in improving
the quality of life for themselves and future generations.
Source: Three Dimensional Policy: Why Britain needs a policy framework for 3D printing

1.2    Benefits for 3D Manufacturing

Customisation
This is where a product can be partially re-designed to specifically suit a new environment or new needs.

Reduced Stocks
Manufactures and retailers would operate with less stock producing only when needed. Other
components or raw materials for the printing would still be required. Just in Time Manufacturing would
now be much more immediate.

Reduced Capital Costs
                                                    6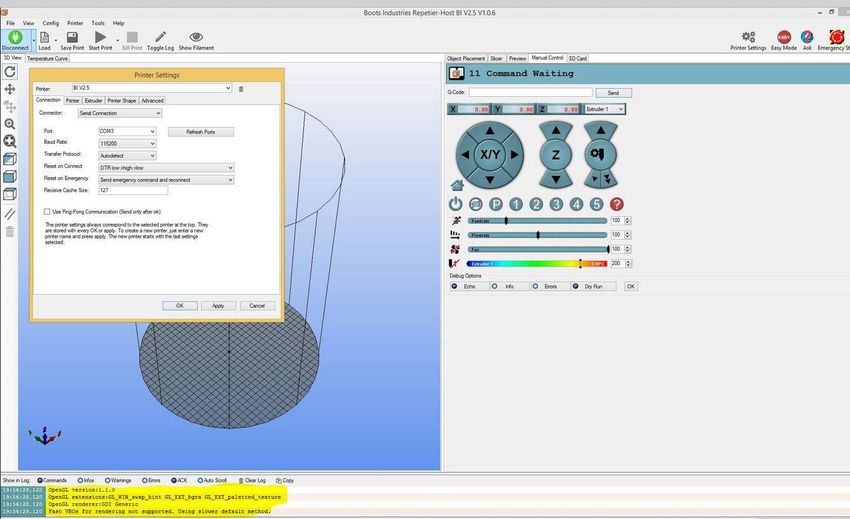
Large scale capital investment in factories and machinery would be reduced. However investment in the
printer itself would still need to be accounted for, as would the raw materials for each print.

Reduced Transport Costs
Distribution of the products and the components, which make up the products, would be significantly
reduced.

Environmental Benefits –
3D printing should enable companies to reduce the carbon footprint of themselves and their products
due to the reduced transport costs.

1.3     Weaknesses of 3D Manufacturing

Can Be a Slow Process
At the moment large components can take significant amounts of time to produce. This will be an area
where print development engineers are already focusing.

Responsibility
If 3D printed products go wrong who will be responsible for the fault. Will this lie at the hands of the
designer, print manufacturer or the person who is actually responsible for down loading the print

Real World Proofing
So far a lot of the expected impacts on manufacture are conjecture. Finding out if the process works
practically will be the next step in assessing if the technology is practical if at all possible.

Assembly.
Depending on the sort of products to be manufactured will mean what other components will be needed.
Some of these will not be practical to be manufactured totally using 3D Printing.

                                                       7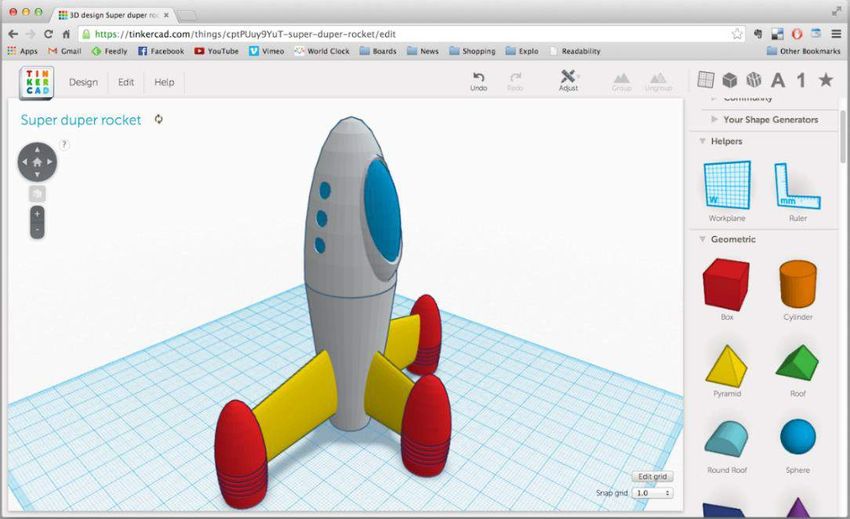
Chapter 2. 3D Print Stem Logistical Accessibility

In order to deliver an effective STEM programme using the 3D print technology it is crucial that
organisations consider the logistical accessibility. Failure to do this could impact on the quality of lesson
delivery and the creative learning process, thus leading too the lowering in standard of learning
outcomes and ultimately a failure to meet the original project objectives.

However it is clear that organisations have many differences that must be considered before logistical
decisions are made. Differences in size, culture (International and nationally), legal requirements, staff
resourcing, building infrastructure, student background, behaviour and dynamics will all dictate the
ultimate accessibility of the 3D print technology. Institutions must try to overcome any constraints or
threats caused by these dynamics, in order to access the practical impact of 3D printing on pupil
performance in STEM.

Within each institution, all staff and parties involved in the project must be consulted and all practical
scenarios considered. However, in making decisions, learning objectives must drive the logistic; if
logistics drive learning then there is a danger of watering down the pedagogical approach.

2.1     Motivation for Students
The original reasoning behind the application of this technology in the classroom was to improve the
learning outcomes of underachieving 15 year old children in the STEM subject. A hypothesis behind this
reasoning is that they cannot access the STEM curriculum due to the teaching strategies imposed on
their learning, that does not suit their learning style (In many cases teachers who by definition achieved
academic success during their own time at school, may have suited a particular learning, such as an
auditory approach and therefore perpetuate this in their own teaching, possibly disadvantaging their
cohort.). Kinaesthetic learners who often underachieve in conventional, 'chalk and talk', lessons need to
be physically active, visually stimulated and doing jobs to access the curriculum. For this reason, in order
for 3D printers to impact on this style of learner the 3D printer whenever possible must be accessible
and operated by the learner. By having ownership of the hardware the student controls their own
learning, becomes more motivated to achieve physical outcomes through seeing the impact of their
theoretical work building into a physical tactile object. By being able to constantly move between the

                                                     8
workstation, the printer and other learning resources allows for the growth of a creative and stimulating
classroom environment. Without this accessibility and ownership of the process, learners may lose
track of the learning objectives, leading to a reduction in motivation. Allowing student access is an
uncomfortable prospect for some teachers, particularly in institutions where pupil behaviour can be
challenging and unpredictable, but if managed and supported effectively may well improve the
performance of the target group of underachievers.

                   A suitable classroom environment enhances the creative process.

               Ownership of the process is a strong motivational factor for the student.

                                                   9
2.2 Teaching and Learning Strategies
When writing programmes of study the teacher will need to consider and plan how and when the printer
will be used to improve the learning outcome. In teacher led lessons where the focus is on 'made logic'
it may not be necessary to have constant access to the printer. However, during pupil led learning, where
experimentation and refinement is a central learning strategy, pupil easy access is crucial. Despite all
the recent media publicity indicating, 'the skies the limit' manufacturing, 3D printers ,as is the case with
any technology have limiting constraints that need evaluating, and considering at all stages of a project.
Through operating, watching, making mistakes and recording information from the process a more
informed pupil will be able to develop and refine their own outcomes much more quickly than in a
situation where the technology is located remotely.
2.3 Technical Support
It is clear that despite the improving usability of 3D printers these devices need physical maintenance,
constant software upgrades and troubleshooting intervention for effective and reliable operation. It is
useful for the teacher to understand simple troubleshooting techniques, but within the actual lesson
parameters they must not be distracted from their teaching and learning objectives (This is a scenario
often observed and recorded in lessons reliant on technology, particularly involving ICT.) If the technical
support is not readily available then the teacher must find a solution. This may result in the printer
being located remotely in a technician’s workshop or office, for ease of monitoring or the arrangement
of a regular classroom support and maintenance slot, particularly during the teaching day.
10Regular technical support is essential to increase the output of outcomes and allow teachers to teach.
2.4 Classroom layout
If located in the classroom environment the printer should be located in a position for ease of access and
demonstration. The size of the printers (The Ultimaker 2 Go for example, is small enough to carry by
hand at 258mmx250mmx287mm) does not necessitate the need for specialised trolleys or tables and
although generally robust, some form of sturdy carrying case is strongly recommended if required to be
moved between different classrooms or departments.
2.5 Group Size
The size of teaching group sizes, clearly impacts on the access to the printers. In group sizes of over 15,
the access for individual learners to the hardware would not be possible within the normal lesson
context unless multiple devices are utilised. Small sub groups of around 5 students could be formed who
would then work independently of the main group, with the support and supervision of a technician or
teaching assistant enabling a far more manageable learning environment.
2.6 Student behaviour
From previous experience in operating 3D printers at Kirkby Stephen and Settlebeck the machines are
11robust and not easily damaged if operated incorrectly, unlike more conventional CNC machinery.
However in institutions where student behaviour may cause malicious damage or careless use, staff may
need to review the supervision and operating procedures or restrict access to individuals or small
groups allowing for a more controlled environment. Any restrictions must be considered very carefully
in order not to impact on student motivation and learning outcomes. Indeed a more trusting approach
and empowerment of the process to the learner may well improve attitudes and behaviour resulting in
improved academic success.
2.7 Hazards / Risk Assessments
The operation of 3D printers involves little hazard or risk and is comparable to using a typical office or
domestic appliance. However in order to comply with European or national regulations it is expected
that each organisation carries out a full risk assessment using their own protocols and formats. The
market for 3D printers is continuing to develop with new models regularly introduced and specifications
changing, necessitating the need for regular individual reviews. During process we would recommend
that the following possible hazards are assessed, and adequate control measures are put in place.
Heat
Danger of Electrical Shock
The printing devices should comply with current CE regulations, with regards to adequate insulation
and ‘earth’ requirements, correct fusing, accessible power isolation and the implementation of regular
PAP (portable appliance testing.) testing is undertaken and documented.
Moving Parts
In our experience our 3printers belt drive systems exert minimal force below a level that would cause
any harm or injury and the devices do not need guarding or interlocking for this particular risk. However
it is important that the moving parts are not tampered with during operation due to the risk of damage
to the printer.
Burn Hazard
As all 3D printing processes involve heat, both on the build plates and extruder nozzle and therefore
possible burn hazards, adequate control measures such as warning labels and access to cold running
water should be provided to reduce risk of injury.
12Inhalation of Harmful Fumes
Although the 3D printing process involves minimal release of harmful fumes, particularly when using
material such as PLA, other materials such as ABS are documented with a higher associated risk, when
used in a small unventilated space. It is recommended that the machines are placed in reasonably large
well ventilated area in order to reduce fume hazard. If only a small unventilated space is available, then
a suitable fume extraction system must be installed.
13Chapter 3. 3D Printing Technology
The general overarching term for 3-D printing technology is known as additive manufacturing. 3-D
printing technology covers a wide variety of processes, materials and technologies. We are perhaps
more aware of printers such as Maker Bot which use one sort of technology, call FDM. However industry
has a wider variety of technologies, materials and processes which are perhaps lesser known.
Manufacturers who use additive manufacturing will have selected specific printing technology for their
specialist areas of manufacture. Some of these will be prohibitively expensive and inappropriate for
educational use. However I have listed some below in order to give a more fuller background to the
details of additive manufacturing.
3.1 Extrusion
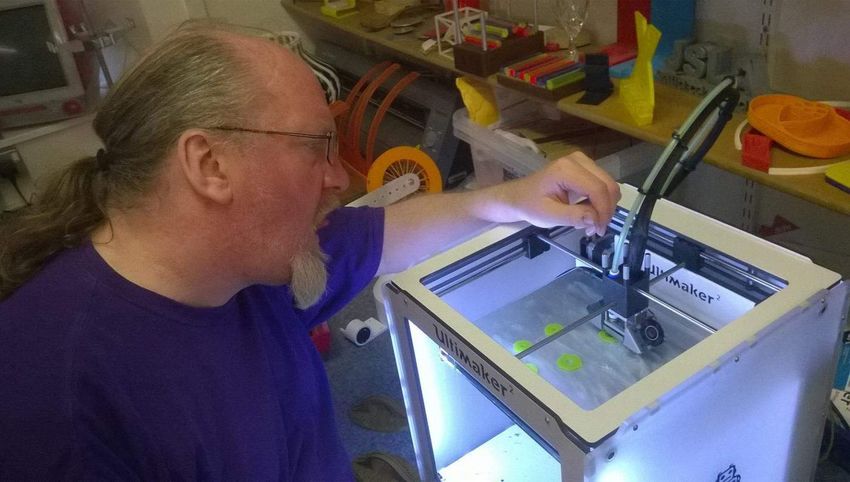
FFF
This is an important technology and is starting to become quite widespread. Fused Filament
Fabrication(FFF), at its most basic, is where a melted material is built up in layers on a platen. FDM,
Fused Deposition Modelling is a similar manufacturing process but is attributed to Stratasys Inc.
Typical materials include: ABS, PLA, silicon rubber and porcelain.
Typical 3D machine manufacturers include: Maker Bot, Ultimaker
A typical Extrusion Technology Printer that could be used in education.
143.2 Wire 3D Printing
Electron Beam Freeform Fabrication
This may be a little too expensive for educational use as this process has been pioneered by NASA to
produce near net shaped parts. These are parts which require very few finishing techniques. The
technique uses an electron Beam to melt wire in a vacuum. The process has primarily been developed
for use in space. The basis of this sort of technology was vacuum welding.
Typical materials include:
Aero-space alloys
Typical 3D machine manufacture:
NASA EBF3
153.3 Powder 3D Printing
Direct Metal Laser Sintering, Selective Heat Sintering & Selective Laser Sintering
This uses expensive technology to create metal components by sintering powder to build layers of
sintered, not melted, metal into the component. DMLS uses a powder metal to cover a platen. The laser
then melts the powder and an arm wipes another layer of powder over the existing printer layer. SHS &
SLS use a bed of powdered metal for the component to be manufactured in.
A picture showing lazers fusing titanium together.
Using this type of process very complex components as can be manufactured. This is mainly for the
aerospace industry however all the applications can be seen in Formula One racing cars, dental and
medical fields.
16Typical Materials include Stainless, Inconel and Titanium.
Typical 3D machine manufactures:
Typical products manufactured from titanium for Aerospace industries.
3.4 Electron Beam Melting & Selective Laser Melting.
Again these processes are prohibitively expensive for educational institutions. Basically they use the
same concept that is melting powder or vaporised metals and layering them on top of one another. More
often than not this process is performed within a controlled and environment, that is one that is either
a vacuum or an inert gas.
17Art and technology meet, products manufactured impossible in anyother way.
3.5 Powder Bed Printing
An inkjet print head moves across a bed of powder, depositing a liquid on the powder in selected places
to form the shape in layers. A thin layer of powder is spread across the completed section with a wiper
arm and the process is repeated with each layer bonding to the last. When the model has been completed
it needs to be depowered. This is where any unused powder or partially bonded powder is blown or
18brushed off the surface of the model. Another process, which makes the prototype more structurally
sound, is to infiltrate the model with other liquids. This can be done in a vacuum chamber. Surfaces can
also be smoothed and then painted to give a more realistic finish.
Originally water was used on gypsum-based powders. This was effective but models tended to lack
strength. Various other powders can be used and again these can be strengthen by using other binders
which can be infiltrated into the completed models. The trouble with these systems are the mess and
time needed to print and cure the model.
This is called post-processing regimes. The processes vary. Burning or melting may be used to
consolidate or coalesce the powder or remove the initial binder. Colour printing may be done. More
recent developments have included making objects from sand and calcium carbonate which can form a
sort of synthetic marble. Sugar and water can be used to form sweets!
This sort of 3D printing process is generally faster than other additive manufacturing technologies such
as Fused Deposition Manufacturing. Another advantage is that supports are not necessary if
overhanging parts need to be printed as the powder will support the structure. However, de-powdering
itself can be a delicate, messy, and time-consuming task and any hollow sections will need to have holes
in them somewhere to let the powder out. However a negative aspect of powder bed printing is the
lower strength of components.
Powder bed and inkjet 3D printers can be expensive compared to fused deposition 3D printers but
recent models introduced by Yvo de Haas and open source can cost as little as £1300.
3.6 Laminated object manufacturing (LOM)
This Rapid Prototyping Process is where layers of an adhesive coated paper, plastic or metal are
progressively placed down to build up a model. The shape is cut out using a knife or laser. These
printers are usually cheap to run and can produce larger size models. However thay can be a little crude.
19Diagram of LOM showing how it works, courtesy of Google images.
3.7 Photo polymerisation and DLP
20Vat Photo-Polymerisation is where a large vat of liquid has UV light moved over the surface of the liquid
to chemically set the liquid into the desired shape. The UV light effectively cures the resin. A platform
moves the model down layer by layer to build up the model. As can be seen in the diagram a mirror
accurately moves the UV light across the surface of the resin.
Advantages:
High level of accuracy.
Good finish.
Relatively quick process
Large build areas: 1000 x 800 x 500 mm
Heavy objects up to 200kg
Disadvantages:
Expensive machines
Expensive resins
Post processing time can take time
Removal from resin can also be lengthy
Requires support structures
Post curing for parts to be strong enough for structural use
21Photopolymerisation – Step by Step
Build platform lowered from the top of the resin vat downwards layer by layer.
A UV light cures the resin layer.
The platform continues to move downwards.
Additional layers are built on top of the previous.
After completion, the vat is drained of the resin and the object is removed
http://www.lboro.ac.uk/research/amrg/about/the7categoriesofadditivemanufacturing/vatphotopoly
merisation/
3.8 Digital light processing
DLP — or digital light processing — is a similar process to Photo-Polymerisation in that it is a 3D
printing process that works with photopolymers. The major difference is the light source. DLP uses an
arc lamp, with a deformable mirror device (DMD), which is applied to the entire surface of the vat of
22photopolymer resin in a single pass, making it a reasonably fast process. However the resins on both
sorts of process can be very expensive and prohibitive for educational establishments. £50 for 1 litre of
resin.
23Chapter 4. 3D Printing in Schools
Effectively there are only 3 methods for printing which, as education establishments, we need to
consider. These are FFF or FDM, Fused Deposition Modelling as it can be referred to; powder bed
printing and Photo polymerised printing.
4.1 Fused Filament Fabrication
At present these are the most popular types of printers in schools, particularly in the UK. The typical
examples are now quite well know but eg’s are Maker Bot and Ultimaker. The reasons why FFF
technology is popular is due to a number of reasons. These are cost; simple tested technology; relative
robustness; cheap running costs; wide range of models and manufacturers; good web support with
forums; libraries and wide spread use, making purchasing relatively easy.
Picture showing 1st and 2nd generation Ultimaker 3D Printers.
4.2 General Comments About FFF
Advantages
Low cost of materials.
Low cost printers available.
24 Wide variety of machines to choose from.
Bed sizes vary from A5 sizes to A3 sizes and beyond.
High strength models.
Shortish build times.
Easy to operate.
User friendly.
Multi-colour modelling possible.
Easy to maintain.
Readily available filament.
Small printers can be portable.
Disadvantages
Material or structures needed to support overhangs.
Support material must be removed with possible damage to model.
Can go wrong.
Setting up ie levelling build plate can be time consuming.
Earlier printers can be a bit temperamental.
4.3 Suggested Printers
There are many websites which recommend a variety of 3D printers. The information below has been
sourced from 3D Hubs. This is an open sourced website where different people have given feedback
about printers they have.
The printers have been categorised as Enthusiast Printers only. However this has been chosen as
comments in the first Questionnaire suggested that a number of printers would be better than a larger
more expensive machine. Many of these machines have been tested by single users. However the
Ultimaker 2 has been on a long term test by Dr Dave Jermy at Settlebeck school. It has proved to be a
reliable and durable printer with excellent build qualities. Using this as a guide it would also suggest
that a number of these printers have similar characteristics.
25Choosing an appropriate printer for educational use and one for your own specific establishment needs
to be based around your educational needs. Any decision about the printer will ultimately be a
compromise. It may be more appropriate to discuss with other educational establishments nearby
about their printers and form support networks if purchasing the same printers.
4.4 Purchase Criteria
Criteria for the selection will need to be drawn up by different institutions depending upon their needs.
These criteria fit into two main areas Technical and socio-technical. The following criteria may need to
be used to judge as to whether a printer should be purchased. The list is my no means exhaustive.
4.5 Technical Criteria
Reliability
This has to be one of the most important issues. Having reliable technology which is able to work
without resorting to continually setting up, levelling build plates, loading and unloading filament etc is
very important in an educational setting where failure to meet deadlines can be disruptive
educationally. Coupled to this is the time allocation or personnel allocation which would be required to
fix the printer. Reliable and durable printers will cost less in the long term, as less attention will be
needed to maintain, tweek and fix it.
Dual head printers
Dual headed printers can be found on quite cheap models and give the ability for different colours to be
deposited on one another but also to interlock quite complex designs. This may initially be a function
which is not required but could be experimented with later on.
Computer Connectivity
Another important issue in the classroom or educational setting. Initially 3D Printers used SD cards and
cabling in order to access the required designs. Wi Fi and USB are now becoming wide spread. The use
of SD cards in educational setting means yet another piece of equipment needs to be looked after and
accounted for, worth considering. If Wi Fi is used then this gives the option for the Printer to be remotely
located in a clean environment. Something which can improve the reliability of the 3D Print itself.
26Plug n Play
Easy to set up and quick to get printing
Filament Drive Motor Location
This is important depending on the type of filament intending to be used. TPE or Thermoplastic
Elastomers often work better when the filament motor pulls rather than pushes the filament into the
extrude nozzles. However some push technology manufacturers have now over come problems
associated with this.
Spare parts availability
The technology is moving so quickly models can date within a few years. Larger 3D Printing companies
should have better spares availability. New to market companies may not. However open source
forums are usually very good at providing solutions to issues which may arise. A large forum may be a
more important consideration.
Dimensional Accuracy and Stability
Warping can cause significant issues with large or flat builds, wasting significant amounts of time and
resources. This has been one of the areas of much discussion on forums. Using adhesives, mirrors and
dissolved ABS or PLA in a solvent. In education this should be a key consideration. To some extent
experimenting with different methods of reducing this problem may be necessary.
Print speed
Larger prints will take considerable amounts of time no matter how quick the printer works. It therefore
makes sense to leave the printer working overnight. Smaller mid-sized prints may be able to be turned
around quicker during the day if a printer works quickly or the resolution is reduced.
Print speeds are still such that in education projects have to be designed and integrated to ensure that
pupils are not waiting for the print to finish. This links in with software conversion programmes which
allow multiple files to be printed out in one go. Check it out man.
Software Costs
27Open source verses manufacturer specific. In many ways open source makes more sense as it is widely
accessible and free. Conversion software has been developed, for example Cura which is able to support
an number of different 3D Printer manufacturers.
Print libraries
Always handy to have. Whether you are designing your own products, modifying existing ones or simply
printing somebody else’s design having the ability to do this can be inspirational.
4.6 Socio-technical Criteria
Initial Cost
This is obviously dependant on the amount of money available. However it is worth considering three
points: is it worth buying 2 printers: one expensive one or starting with the cheapest one possible and
deciding how to continue. In Dave Jermy’s experience as an international 3D Printing expert “it is nearly
always better to have two printers rather than an expensive 3D Printer”. The advantage of having a
number of printers is simply to do with the throughput of prints that can be done. This means multiple
prints can be completed quickly. For example if the 3D Printer is left on over night and has been
configured to print a whole classes work this will be a lot quicker than single prints throughout the day.
Printers can be run simultaneously or one can be being loaded whilst another is waiting for the next
class or being unloaded.
Amount of Use
3D Printing project inevitably have bottle necks, times during the project when the 3D Printer is needed
continuously. However when other projects or topics are being covered it may not be used for days.
Timing and completion of projects need planning as any slight problem can rapidly lead to deadlines not
being met as time allocations become compounded.
Projects could be developed which can take place over an academic year. For example pupils could do
some design work at the start of the year and print these out over the remainder of the year. Group
work could be considered too.
28Who will use it?
Getting pupils to use the 3D Printer is an important part of the design and manufacturing process.
Allowing pupils to engage with the technology can only have a positive effect on the learning experience,
leading to a greater understanding and creativity in the design and application of this technology.
3D Printing technology (FFF) is relatively safe to use as there are few parts which could cause injury.
Very often acrylic covers are needed to protect the print from cool air or drafts which can affect the
quality of the print, making the technology even safer.
Having pupils who are capable of using the technology can be an excellent way for teachers to gain
support. Pupils in class could act almost like technicians, loading unloading and setting manufacturing
parameters. Alternatively pupils could develop additional skills and knowledge, which can be used by
the teacher to actually improve the teachers understanding of the technology.
Manufacturer support
This is obviously an essential criteria when selecting any printer. Selecting a manufacturer who has
sales and support within the country, where it is intended to be used, will make any technical issues
simpler and easier to rectify. However as the 3D Printing market becomes more competitive remote
support over the internet may be just as good. Down loading up to date versions of software or
mechanical improvements should all be provided by a large cutting edge manufacturer. Very often
online communities are also able to support in this way and can provide more down to earth and
practical advice.
On line community
As mentioned previously online support can be an excellent way of gaining solutions to technical issues.
Some of the larger manufactures very often encourage forums to promote and support their products.
Having a large network of forums specifically dedicated to your printer could be another important
criteria for choosing one specific printer manufacturer. 3D Hubs is one such example.
Libraries
File types tend to be saved as STL files making them accessible for most printers. Printer manufactures
usually have open source websites where models can be downloaded too. Again as STL files.
29Ease of use
When teaching in class issues of reliability and ease of use are vital to the smooth running of 3D printing
projects. First generation printers often needed a lot of attention and skill to set up. Fifth generation
printers are now far more sophisticated and have software, which will do this automatically.
Another problem common to some printers are the printer head nozzles, which can clog. Again the ease
with which this can be sorted is important for the smooth running of projects.
Filament changing needs to be considered too. On most printers this is a relatively straight forward
process. However some printers need the filament to be trimmed to help the extruder motors take it
up. This is not too onerous task and can be completed in a few minutes.
Possible FFF 3D Printers
Below are a list of ten manufactures considered to be amongst the best as reviewed by users on 3D Hubs
website. This information will be constantly changing as new models are added or reviewer’s opinions
change.
Manufacturer Printer Build Volume Price approx.. Overall performance
Makergear Makergear M2 203x254x203 Euro1300 Outstanding
Flashforge Creator Pro 145x225x150 Euro 1200 Excellent
Builder Builder Dual 220x210x164 Euro 1700 Excellent
Feed
Wasp Delta Wasp 200x200x200 Euro 2500 Excellent
Ultimaker Ultimaker 2 225x230x205 Euro 2200 Excellent
BQ Witbox 210x297x200 Euro 1500 Excellent
Type A Type A 305x305x305 Euro 2400 Very Good
Machines Machines 1
Aleph Objects Lulzbot Taz 4 275x298x250 Euro 2000 Very Good
Wasp Power Wasp 195x260x190 Euro 1500 Good
Airwolf Airwolf HD2x 200x280x300 Euro 3500 Good
30Materials
There are two main materials, PLA and ABS. These are both Thermoplastics, which means that they can
be heated and moulded, continually, i.e. over and over again. Both these materials are available in a wide
variety of colours. However for a material to be useful for 3D Printing, it has to pass three different
tests;
initial extrusion into Plastic Filament.
extrusion and trace-binding during the 3D Printing process.
end use application.
However there are more materials being introduced all the time. New materials also offer a wider
variety of properties and post-printing modification. Amongst them are rubber or metal based materials
which can be finished to appear like metal. Dissolvable filament is also available.
Storage
Both ABS and PLA should be sealed off from the atmosphere to prevent the absorption of moisture from
the air. This does not mean your plastic will be ruined by a week of sitting on a bench. However long
term exposure to a humid environment can have detrimental effects, both to the printing process and
to the quality of finished parts. If the polymers have absorbed moisture:
ABS - will tend to bubble and spurt from the tip of the nozzle when printing; visual quality of the part,
part accuracy, strength and the risk of a clogging in the nozzle. Are all more likely. ABS can be easily
dried using a source of hot dry air.
PLA – will bubble or spurt at the nozzle. It may also discolour and a reduction in 3D printed part
properties. PLA can react with water and undergo de-polymerization. PLA can also be dried using warm
hot air as too high a temperature could alter it’s material structure. For many 3D Printers, this need not
be of much concern.
Part Accuracy
ABS and PLA are capable of producing dimensionally accurate parts. However:
31ABS – the biggest issue with ABS is the curling up of the edges of the print. To reduce this heating the
print surface and ensuring it is smooth, flat and clean goes a long way in eliminating this issue. Various
solutions can be useful when applied beforehand to the print surface. For example, a mixture of
ABS/Acetone, or a shot of hairspray.
For fine features on parts involving sharp corners, such as gears, there will often be a slight rounding of
the corners.
PLA - demonstrates much less part warping. For this reason it is possible to successfully print without
a heated bed and use more commonly available Masking tape as a print surface. PLA can also produce
stronger bonds between layers.
4.7 Summary
PLA - The wide range of available colours and glossy feel make it popular to pupils. The environmental
aspect can also be used as a teaching / learning experience, as it has plant based origins. PLA can have a
higher printing speed, lower layer heights, and sharper printed corners. Combining this with low
warping on parts it makes it a popular material for schools.
Advantages of PLA
Cheap affordable polymer £ 40 per Kg
Can give a smooth shiny surface finish
Bio-degradable
Gives off very little fumes
Low toxicity
Low UFP’s
Reduced distortion compared to ABS
Disadvantages of PLA
A little more brittle than ABS
Melts at a lower temperature, (this may be an advantage if welding)
Softens at 50deg’s, lower than ABS
Slow to cool (may need a fan to blow onto the print.)
More difficult to glue than ABS
32Typical application of PLA
Necklace curtsey of Thingiverse
ABS - Its strength, flexibility, machinability, and higher temperature resistance make it attractive for
more durable models or products. The additional requirement of a heated print bed means there are
some printers simply incapable of printing ABS with any reliability.
Advantages of ABS
Tougher and stronger polymer than PLA.
Able to be used in higher stressed models.
Doesn’t need a cooling fan.
Filament tolerances are tighter.
Can be bonded using solvents or adhesives.
Higher heat resistance.
Can be painted and sanded.
Disadvantages of ABS
Must use a heated print bed
Prone to curling, cracking and delaminating
Fumes unpleasant and require fume extraction.
Petroleum based plastic making it less environmental friendly
Can degrade in sunlight.
33Typical ABS Model
Gear wheels using greater strength of ABS
Health Issues Associated with 3D Printing Polymers
Limited research on the health effects of 3D Printing have been done. However there is research been
done into UFP’s, Ultra Fine Particles, of which PLA and ABS when melted will emitted.
Elevated UFP concentrations are linked to adverse health effects, including cardio-respiratory mortality,
hospital admissions for stroke, and asthma symptoms. However this will only be in large
concentrations. PLA emits typically 10 times less UFP’s than ABS. PLA is seen as being non-toxic and
far more environmentally friendly due to it being derived from plant-based materials.
ABS is more durable and rigid but appears to be a less favourable choice when compared to PLA for use
in the classroom. Some manufactures say that ABS 3D Prints should not be used in offices or school
buildings without some sort of extraction system. However these extraction systems do not need to be
expensive or elaborate and could be some sort of simple hood over the printer with a forced air
circulation and filter.
34Chapter 5. Identification of Programmes for File Conversion
5.1 Slicers & 3D Printer Hosts
STL is the standard file type used by most additive manufacturing processes. This is the file type which
will be saved from the 3D design software package, eg Sketchup.
Before printing a 3D model from an STL file, it must first be examined for "manifold errors," this step is
called the Fixup. Manifold errors are where surfaces or facets don’t meet or overlap. Software
programmes such as Netfab, Meshmixer, Cura and Slic3r are examples, which will correct these issues.
Once this has been done the next stage is to convert the model into a series of thin layers or slices. This
is then converted into G-Code. This G-Code can then be used to print from. However usually Client
Printing Software is nearly always needed to turn the G-Code into instructions, which the printer can
interpret and print from. It is here that print parameters can be selected for the printer.
Most commonly the slicer and the client software are combined, making the conversion from STL file to
3D Print straight forward and simple. Repetier-Host and ReplicatorG are examples of these.
You cannot build the model smoother than the STL file, so if the STL is coarse and faceted, this is what
the final model will be like. When exporting to STL in your CAD package, you may see parameters for
chord height, deviation, and angle tolerance. These are the parameters that affect the faceting of the STL.
The more detailed the STL, the larger the file size, which will affect processing time. Sometimes
manufactures will also give options for quick or detailed prints, this will obviously affect conversion
time as well as print times. However some manufactures will give you approx. print times so you can
make decisions about what sort of print you want.
5.2 Typical Basic Printing Parameters
Below are a list of typical basic parameters which will need to be considered before printing out. More
advanced settings are also available but will not be considered as these will need individual experience
with each different printer.
35Layer Height
This is the height at which the layers will be put down onto the bed of the machine to build up the model.
Issues about nozzles catching layers as they are put down and the slump that the plastic will undergo
when extruded will be factored into the manufactures default settings. Layer height can also affect the
adhesion of subsequent layers.
Shell Thickness
When models are made that are supposed to be solid they will in actual fact be hollow. The thickness of
the outside surface of this shell will be considered here; as the whole object will not be solid plastic all
the way through but will be partly in filled.
Retraction
When there is a change between the x & y axis Cura retracts a certain amount of the filament to stop any
blobs forming.
Bottom / Top thickness
Similar to wall thickness as these 2 manufacturing perimeters may need to be altered to improve the
strength of the print as well as provide a good base for the print to be built from.
Fill Density
As previously mentioned solid objects are not in actual fact solid as this would be a waste of plastic and
possibly lead to distortion and or delamination. Instead objects have a criss cross pattern to provide
support and strength. Usually this can be set at around 10%.
Print Speed
Fast print speeds are what most users want. However this can lead to low quality prints with flaws or
printers not being able to manufacture reliable prints. As a rule of thumb the slower the print the higher
the quality.
Nozzle Temperature
As the name suggests this is the temperature at which the nozzle works at to extrude the filament. This
will be dependant on the type of filament being used as PLA and ABS for example have different melt
temperatures.
36Build Platform Temperature
This is only applicable on printers with heated platforms as some printers using PLA can print without.
PLA can use lower temperatures than ABS however factory pre-sets should always be tried first.
Supports
When prints have overlapping parts or surfaces, supports will need to be used to stop the plastic
slumping or the model from being impossible to print.
Platform adhesion
There is a lot of discussion about this. Some printers simply use a high heat temperature film, such as
kapton tape or even mirrors to print onto. Others use simple paper glues whilst other groups of users
recommend using solvent dissolved ABS. Only through experimentation will the best method be found.
Diameter
This can refer to the diameter of the nozzle for extrusion and the filament size too. PLA and ABS usually
come in 2 main sizes 1.7mm and 3mm and this applies to the nozzle diameter too
Flow
This refers to the speed with which the printer will extrude the plastic. Filament diameter and nozzle
diameter all affect one another and are interrelated. Again manufacturing pre-sets will really be the
best. However some specialist materials such as metal, rubber or wood may require different settings,
very often, internet forums will be able to make provide suggestions about this information.
Ultimaker; Cura
This is a free open software print controller developed by Ultimaker. This can be used by other printers.
It’s easy to use and simple to use. A good choice for schools and beginners.
37KISSlicer
This can be used on a number of 3D printers. This is a free download. However if more complexity and
specialist support is needed a bought version is available.
Although the “front end” of the KISSlicer looks a little complex it has the usual print settings, skin
thickness etc. However more specialist settings are also shown in tabs.
38One of the screen images which will be seen when using KISSlicer. Although a little complex looking, it
soon becomes apparent that all previously mentioned Production Parameters are available. Other
information and more advanced settings will be available hidden behind tabs.
Repetier Host
This again is a free download / open-source for 3D printing. This is the typical screen image where
selection of printing settings are available. KISSlicer or Skeinforge are the software programmes which
will scan the STL file to ensure that the models are free of defects or unprintable surfaces and turn this
into G-Code. Typical settings and options are available as per most 3D Printing software programmes.
39A close up of the user interface to alter settings for printing.
Replicator
This is an open source 3D printer software programme which can be used
to convert STL files to G-Code files ready for printing. A number of 3D
Printer manufactures have printers which are compatible with these.
This uses Skeinforge to check and convert STL files to printerable objects.
40The programme allows the object to be manipulated, with regard to size, orientation and other typical
manufacturing parameters. This software is still quite serviceable but is becoming one of the older 3D
Printing conversion programmes.
41Chapter 6. Identification of 3D Programmes
6.1 Overview
There are a vast range of 3D Programmes for use in schools, colleges, and industry. Some 3D modelling
software can be very expensive costing E800 or more with, annual renewal fees too. This sort of cost
makes it difficult for schools to afford, unless they are specialist colleges where engineering is being
promoted or the school is sponsored by a manufacturing industry such as schools in and around
Coventry UK where Jaguar Land Rover have large engineering, manufacturing plants.
3D Modelling software up until the late 1990’s was the sole preserve of engineering companies and was
used extensively in the motor vehicle industries to not only design parts but to also test and evaluate
them for weight, strength and aesthetics. However a number of these 3D modelling programmes have
become available to schools and colleges as free downloads. Many are available for home use too. Much
of this software is either dumbed down from industry or is dated or is about to be updated. One of the
first companies to do this was PTC with Pro-Desktop. This was a complex piece of 3D software and
required quite a lot of experience to use. Pupils found this frustrating and difficult to use.
Most schools and colleges may have existing 3D software programmes. Pupils may already be familiar
with these and will want to continue using them. As a teacher many may have invested both time and
money into both using, learning and trouble shooting the software. Teachers will have set tasks, projects
and teaching aids to support pupils. Many schools and colleges may need to make the decision as to
whether or not to continue with this software. It may provide the impetus to change to more
appropriate software.
This is one of the key issues with 3D modelling software; ease of use. Much of the modelling software
can be very difficult to use and requires a lot of practice, something which pupils will have little time to
do in 1 hour lessons. Any selection of 3D software must use this as a criteria to judge the effectiveness
of the software and whether or not to use it.
As mentioned, with PTC Pro-Desktop, these programmes usually have a product life cycle which means
that they become dated and are either developed further in a way which means that it is necessary to
re-learn or support is withdrawn and no further development work is continued, in effect becoming
obsolete.
3D modelling and software is now so common that many issues of compatibility are unlikely. STL files
tend to be the industry standard which are used to export the print files. It is the file conversion after
42this into G-Code or other file types that are most likely to cause problems, with these, in some cases
being specifically dedicated to particular manufacturers. However, as discussed in the software
conversion section of this document, there are, again, a number of free downloads and software
programmes which will do this in a very easy to manage way.
3D modelling software by it’s very nature requires a reasonable amount of processing power. The speed
with which alterations can be made or designs changed and updated can lead to buffering and
processing problems which can be time consuming, again leading to students becoming frustrated and
the amount of effective lesson and learning time being significantly reduced.
Pre-designed models or libraries of existing components or printable models could be useful for
printing, modifying or providing inspiration for projects. The free software packages with open source
libraries can have extensive models which are easily accessible. Very often open source software
packages have an online community, which can support users through tutorials or forums where
specific questions can be answered. U-Tube tutorials can be very helpful to teachers and pupils who
may need help with specific modelling tools or just as class lessons to develop pupil skills.
6.2 Criteria For 3D Modelling Software
Cost Can the school or college afford the initial cost or annual renewal costs.
Freeware Is it appropriate for the school to use dated or dumbed down versions of existing
software.
Existing Software Schools may prefer to use their existing software as pupils and teachers have
invested time and knowledge.
Ease of Use How easy is it for pupils to learn the use of this software.
Compatibility Is the software compatible with 3D Printing. Does it need to be compatible with
other modelling or rendering software.
Computers Are the schools existing computers able to run the software with the minimum
of trouble and buffering.
Libraries Is there a readily available library of existing products.
Communities Are there communities which exist for help and support.
Tutorials Does the software have a large enough following for tutorials and support tasks.
43Parametric Parametric software has a system that interrelates with the way and order in
which you build up a model and so can be a little more complex to learn.
However this is the system usually used by the engineering industry.
6.3 Free 3D Software
Autodesk 123D
Autodesk has a number of applications, 123D Design is a typical 3D modelling piece of software however
it is able to work with other applications such as 123D Catch this is able to generate 3D Models from
photo’s or 123D Meshmixer, which is able to mix different models and work as a sculpting tool. The
advantage of a suite of software packages like this is that there is greater flexibility with the ability to go
between different packages making alterations as well as creating different presentations for
assessment purposes.
Below is a sample of Autodesk 123D Design.
44You can also read