OPERATION MANUAL MANUAL TYRE CHANGER - WILTEC WILDANGER ...
←
→
Page content transcription
If your browser does not render page correctly, please read the page content below
Operation Manual

                               Manual Tyre Changer
                                                   61309

                              Illustration similar, may vary depending on model

Read and follow the operating instructions and safety information before using for the first time.

Technical changes reserved!
Due to further developments, illustrations, functioning steps and technical data can differ insignific -
antly.

Updating the documentation
If you have suggestions for improvement or have found any irregularities, please contact us.
The information contained in this document may alter at any time without previous notice. It is prohib-
ited to copy or spread any parts of this document in any way without prior written allowance. All rights
reserved.
The WilTec Wildanger Technik GmbH cannot be held accountable for any possible mistakes in this
operating manual, nor in the diagrams and figures shown.
Even though, the WilTec Wildanger Technik GmbH has undergone biggest possible efforts to ensure
that the operating manual is complete, faultless and up to date, mistakes cannot be entirely avoided.
If you should find a mistake or wish to make a suggestion for improvement, we look forward to hearing
from you.

Send an e-mail to:

service@wiltec.info

or use our contact form:

https://www.wiltec.de/contacts/

The most recent version of this manual in various languages can be found in our online shop via:

https://www.wiltec.de/docsearch

Our postal address is:

WilTec Wildanger Technik GmbH
Königsbenden 12
52249 Eschweiler
Germany

Do you wish to pick goods up? Our pick-up address is:

WilTec Wildanger Technik GmbH
Königsbenden 28
52249 Eschweiler
Germany

To shorten the waiting time and allow for a rapid on-site transaction, we ask you to call us previously
or placing your order via the webshop.

E-mail: service@wiltec.info
Tel:+49 2403 55592-0
Fax: +49 2403 55592-15

To return orders for exchange, repair or for other purposes, please use the following address. Atten -
tion! To allow for a smooth execution of your complaint or return, it is important to contact our cus -
tomer service team before returning the goods.

Returns Department
WilTec Wildanger Technik GmbH
Königsbenden 28
52249 Eschweiler

E-mail: service@wiltec.info
Tel:+49 2403 55592-0
Fax: +49 2403 55592-15

© by WilTec Wildanger Technik GmbH             Item 61309                                        Page 2
http://www.WilTec.de
http://www.aoyue.eu                                                                            02 2021-1
http://www.teichtip.de
Introduction
Thank you for purchasing this quality product. To minimize the risk of injury we urge that our cli-
ents take some basic safety precautions when using this device. Please read the operation in -
structions carefully and make sure you have understood its content.
Keep these operation instructions safe.
Safety notes
Read all safety notes and instructions and make sure that you have understood them. Non-
compliance with the instructions can lead to serious injury. Keep the operating manual for fu-
ture reference.
Keep the work area clean and well lit. Cluttered workbenches and dark or untidy areas invite
accidents. Keep bystanders and children away when operating the tool. Distractions can lead
to a loss of control. If required, keep barriers or shields ready.
Ensure that the tyre changer is placed on an even and solid surface, which is able to hold the
weight of the device including the tyre and other equipment used.
Do not let children or other unauthorised people operate the tyre changer or play with it.
Do not operate the tyre changer with force. The device will operate safer and better, if it is op-
erated with the speed and capacity it is designed for.
Read and follow all safety notes and instructions, which can be found in the manuals of the
tyre manufacturers before operating the tyre changer.
Use the right tools for the individual tasks needing to be carried out. Do not try to use a smal-
ler tool to carry out the work of a bigger industrial tool. There are specific purposes for which
this tool has been designed. It will carry the work out better and in a safer speed, when used
as designated. Do not modify this device in any way and do not use it for anything else other
than its intended purpose.
Be careful at all times. Pay attention to what you are doing and be cautious when using tools
and machinery. Do not use tools and machinery if you are tired or under the influence of alco -
hol, drugs or medicaments which can affect your consciousness.
A short moment of inattentiveness when handling a tool or machinery can lead to serious in-
jury.
Wear adequate clothing. Do not wear any loose clothing or jewellery. Tie long hair together.
Do not lean over too far. Make sure you have a stable stand and can keep your balance at all
times. A secure positioning and keeping balance allow better control over the device in unex -
pected situations.
Use a protective gear. Wear protective glasses and full-face protection when assembling or
operating the device.
Examine the tyre changer before every use. Check for loose screws, misalignment or jammed
moving parts, etc. Also check for torn or broken parts and whether unusual noises or vibra -
tions occur. Have any problems checked and if necessary repaired before operating the
device again. Do not use damaged devices.
Quad and ATV tyres
Note: Quad/ATV tyres are more difficult to mount and demount due to their small diameter.
But also, the tyres are soft and bend easily when pressing the side walls slightly.
If the bead breaker (10) slips off the tyre, hold it in its place and work your way around the rim
to press the side walls down step for step.
Place lubricant between the tyre and the rim so that it can slide off easier.
If the tyre has a high rim with a small inner diameter so that the rim does not reach above the
round plate of the centre post (1) and cannot be placed on the spider post (4) or if the lug pin
(3) runs through the hole, you should still be able to use the device to mount and dismount the
tyres. Most rims are tightened via the post cap. With the cap on, one should still be able to
hold the rim in its place to be able to mount and dismount the tyre as mentioned.
© by WilTec Wildanger Technik GmbH Item 61309 Page 3
http://www.WilTec.de
http://www.aoyue.eu 02 2021-1
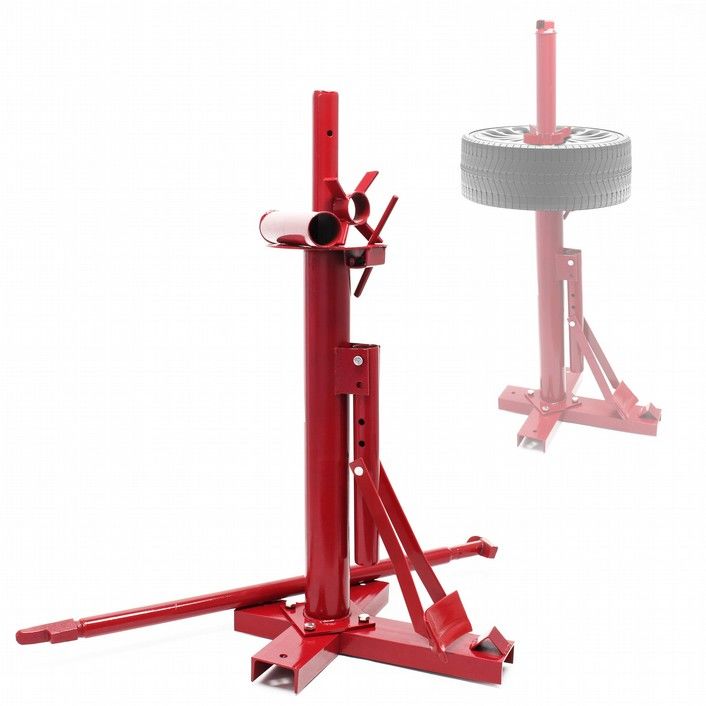
http://www.teichtip.deExplosion view and parts list № Name Qty. № Name Qty. 1 Centre post 1 8 Hexagonal nut (M10) 6 2 Post cap 1 9 Side bases 2 3 Lug pin 1 10 Bead breaker 1 4 Spider post 1 11 Lock washer 4 5 Hexagonal screw (M10×65) 4 12 Post base 1 6 Big hexagonal screw (M10×25) 4 13 Mounting/demounting bar 1 7 Bead breaker handle 1 © by WilTec Wildanger Technik GmbH Item 61309 Page 4 http://www.WilTec.de http://www.aoyue.eu 02 2021-1 http://www.teichtip.de
Assembly and operating instructions

Technical specifications

Produktanwendung                              Suitable for all tyres measuring 20.3 cm (8”) and light lorries,
                                              such as 19 cm (7.5”) × 40.6 cm (16”) and flotation tyres up to
                                              31.8 cm (12.5”) L × 40.6 cm (16”).
              Basis                           12.7 × 45.7 (5” × 18”)
              Holes for ground mounting       ⌀ 1.1 (7/16”) (4 pieces)
 Sizes (cm)

              Mounting/demounting bar         94 (37”) L × ⌀ 5 (115/16”)
              Support surface for the tyre    ⌀ 19 (7½”) × 0.47 (3/16”) (thickness)
              Legs                            3.81 (1½”) × 7.62 (3”) × 0.38 (0.15”) (wall rail)
              Centre post                     7.3 (27/8”)

Removal of tyres

          1. Before starting, use a rubber lubricant (not included in the delivery) to simplify the mounting
             and dismounting of the bead/tyre.
          2. Deflate the tyre entirely.
          3. To be able to push the bead off the tyre rim, lay the tyre flat onto the base. The triangular stop -
             per ensures that the tyre cannot slide.
          4. Place the flat end of the mounting/demounting bar (13) into the bead breaker handle (7).
          5. Place the bead breaker (10) on the tyre against the side of the rim. During the process, it
             might be possible that the height of the bead breaker needs to be adjusted. This is done by re-
             moving the screws (5) and then placing the bead breaker on the right height. Then place the
             screws back again.
          6. To remove the bead from the rim, push the mounting/demounting bar (13) down. If the bead
             does not come off at once, turn the tyre over and try it in several places again.
          7. Turn the tyre around and repeat the steps 1–6.

Mounting and dismounting tyres

          1. After the bead has been removed, place the tyre with the valve stem upward on the machine
              and the lug pin (3), which pokes out of the rim.
          2. Place the spider post (4) onto the centre post (1) with the conical side, which goes into the
              wheel hub.
          3. Screw the post cap (2) onto the centre post (1). Lock the spider post (4) by hand. Tightening it
              by hand should be sufficient. However, if you do require more strength, place the flat end of
              the mounting/demounting bar (13) through the top side of the post cap and use additional
              leverage force to remove the post cap further.
          4. As soon as the tyre is securely held in place, push the flat end of the mounting/demounting
              bar (13) between the tyre and the rim. This should be carried out with the flat end.
          5. Work your way around the centre post (1) with the mounting/demounting bar (13) to demount
              the bead entirely.
          6. Pull the tyre to the upper side of the bead. Then place the flat end of the mounting/demounting
              bar (13) between tyre and rim as previously done. Repeat the process to remove the tyre from
              the rim entirely.
          7. Repair the tyre. Then mount the tyre back to the rim again.
          8. Hang the end of the mounting/demounting bar (13) over the edge of the rim.
          9. Press the tyre forward over the edge of the rim in the spot where the mounting/demounting
              bar (13) is placed.
          10. Position the side wall so that it slides over the flat bit of the end on the hook of the mounting/
              demounting bar (13).
          11. Push the tyre against the rim by hand. With the other hand, pull the mounting bar (13) clock-
              wise around the centre post (1) until the side wall begins to mount to the rim. It should only be
© by WilTec Wildanger Technik GmbH                     Item 61309                                         Page 5
http://www.WilTec.de
http://www.aoyue.eu                                                                                     02 2021-1
http://www.teichtip.de
moved by a few centimetres until you can let go of the tyre and can use both hands on the
mounting/demounting bar.
12. Continue around the rim until the tyre is mounted over the edge of the bead. Repeat this pro -
cedure on the second side wall, to mount the tyre entirely.
Important! As soon as the side wall starts to sit whilst mounting the tyre, it needs to stretch more and
thus is harder to mount. To avoid this, push the tyre down so that it cannot sit on the top edge of the
rim.
Note: The bead, which is located on the upper side of the mounting/demounting bar (13), holds the
bar hooked into the edge of the rim. The tyre bead is on the upper side (flat piece of the mounting end
of the bar) and against the bent lug pin (3) when you mount the tyre to the rim.
Important notice:
The reprint or reproduction, even of excerpts, and any commercial use, even in part of this instructions
manual require the written permission of WilTec Wildanger Technik GmbH.
© by WilTec Wildanger Technik GmbH Item 61309 Page 6
http://www.WilTec.de
http://www.aoyue.eu 02 2021-1
http://www.teichtip.deYou can also read