Beach Dreams - FEBRUARY 2021 - Brandywine Valley Quilters
←
→
Page content transcription
If your browser does not render page correctly, please read the page content below
QuiltMuseum.org/BlockOfTheMonth
                                               FEBRUARY 2021

Beach Dreams
inspired by School   Block Challenge 2021
                                                 Quilt: Beach Dreams by Becky Glasby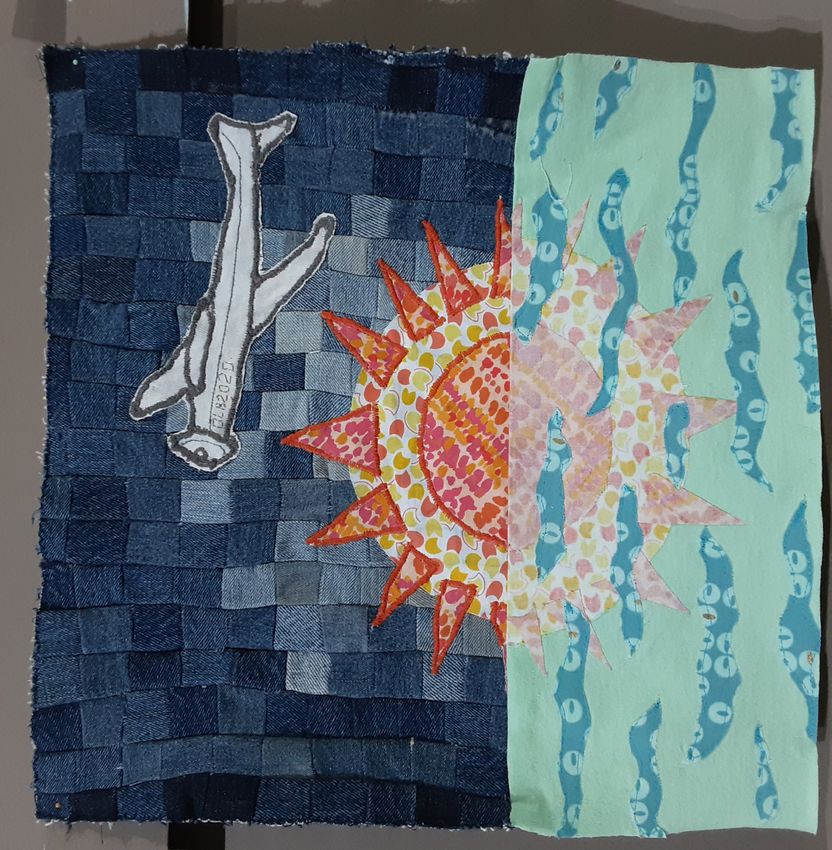
FEBRUARY 2021
Featured Artist: Becky Glasby
                         Becky Glasby is a self-taught quilter who
Becky Glasby             turned her love of quilting from a personal
                         hobby into a professional career when she
                         moved to Paducah to start working at the
                         National Quilt Museum as the Director of
                         Education.

                         At the museum Becky works to inspire the
                         next generation of quilters and promote
                         the art of quilting through: youth & adult
                         tours, hands-on programs, off-site visits,
                         community collaborations, the Block of the
                         Month Club program, and coordinating the
                         annual School Block Challenge for students
                         across the country.

                         Becky enjoys sharing her love of quilting with
                         everyone she meets, and loves encouraging
                         creativity in other quilters.

                         Blog: https://bumblebzs.blogspot.com/
                         Instagram: @bumblybzs

                         Website: https://QuiltMuseum.org/SBC

                                                               Page 2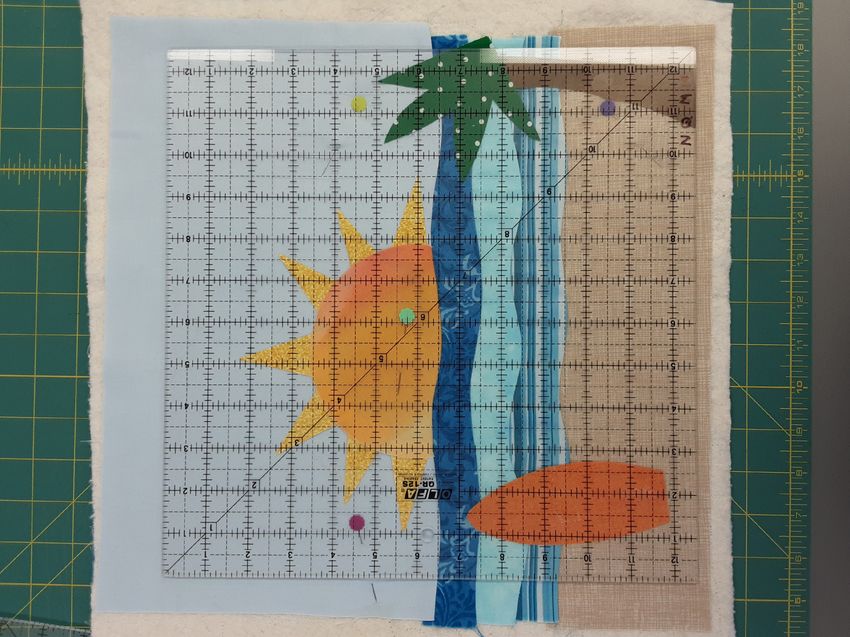
FEBRUARY 2021

Inspiration
This month we draw inspiration from several youth-created blocks that are part of the 2021
School Block Challenge. This annual contest is open nationwide to students in grades K-12
and is sponsored by Moda Fabrics, who provides the three challenge fabrics that we distrib-
ute each August to interested teachers, parents, families, youth leaders, etc.

Students are asked to create a 16” x 16” quilt block using a recognizable piece of each chal-
lenge fabric. They can add other fabrics as desired, and blocks must include some type of
hand or machine stitching. Entries are then exhibited in the museum galleries at the start of
the year, allowing our visitors to explore the students’ creativity in fabric.

Each year, SBC entries cover a wide range of topics, sometimes the same idea appearing
across grade levels and locations. This year there were several which centered around the
beach. These four blocks are the basis for our pattern this month, from the beach to the sun
rising or setting into the waves, and the personal details that make each block unique: surf-
board, airplane, lighthouse, and palm trees.

                                                                                         Page 3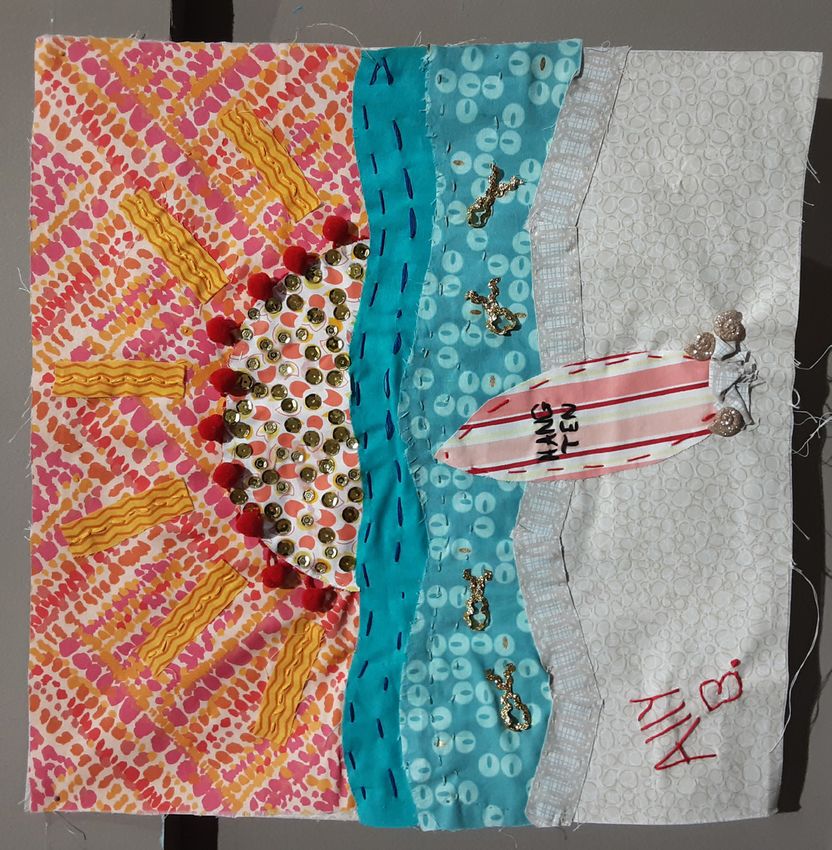
FEBRUARY 2021

Inspiration

                                   Entry #321 “Surfs Up”
                                   by Allison Bucaroff, CA
                                   5th-8th Grade Category

“I did this because it reminds me of a place that we go to in the summer. I sewed most of the
pieces on and finished in 2 days.”

                                                                                        Page 4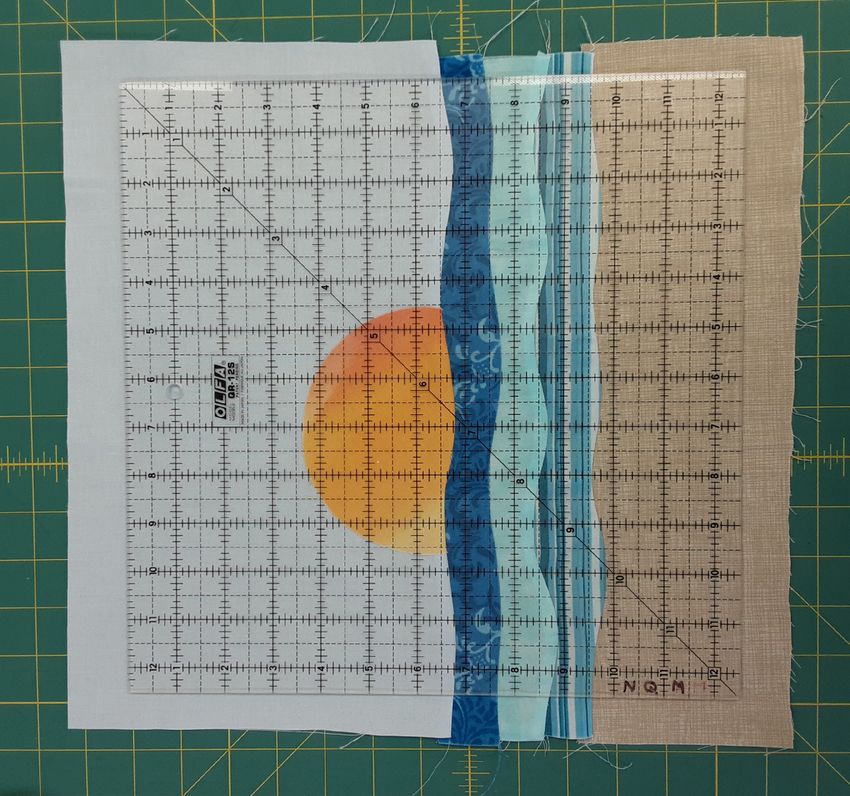
FEBRUARY 2021

Inspiration

                           Entry #336 “Morris Island Lighthouse”
                                  by Hannah Williams, MO
                                   5th-8th Grade Category

“This summer we went on vacation to the beach. It had a lighthouse at the far end of the
island. We walked out as far as we could and this quilt block is what it looked like. The light-
house was out away far from shore. It looked really cool as the sun went down. The colors of
the fabric reminded me of a sunset at the beach. I cut out the palm tree, sun, bird and light-
house. I used fusible adhesive and ironed the pieces on top of my background fabric. Then, I
blanket stitched around them. I attached a white bead on the lighthouse to make it look like a
light shining. It took me about 6 hours to do the whole thing.”

                                                                                          Page 5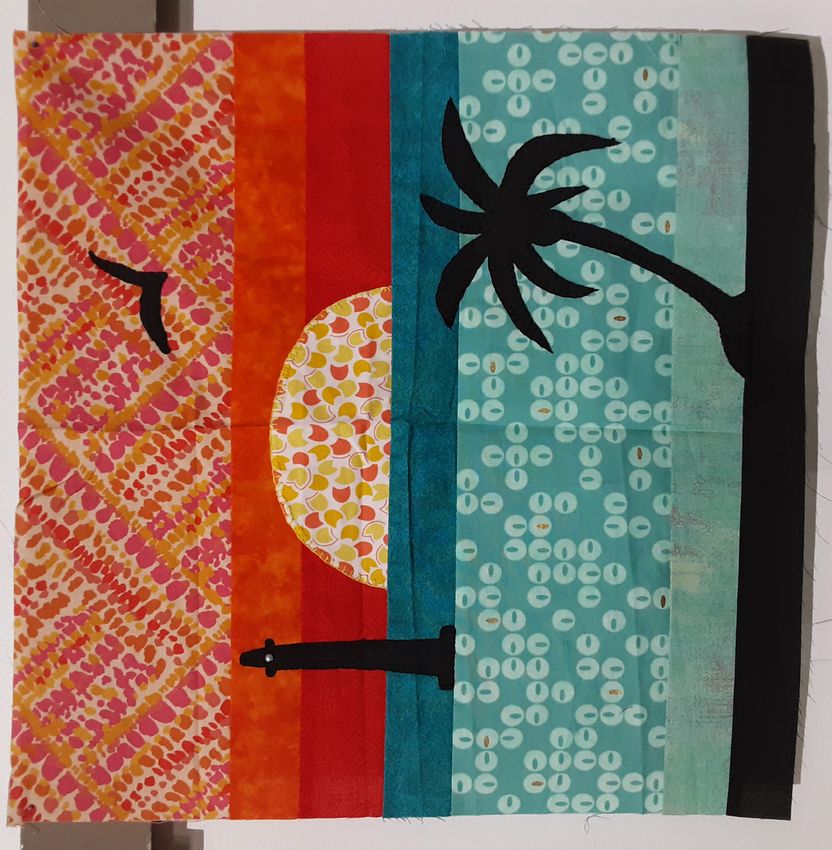
FEBRUARY 2021

Inspiration

                                   Entry #358 “Sunset Flight”
                                     by Owen Bandstra, IL
                                    5th-8th Grade Category

“I did the sky by piecing together the denim squares and used worn spots to give the fading
look. I wanted it to fade so it would be darker away from the sun and lighter closer to the sun.
The reason I did the sun this way is because I love being in God's nature and sunsets on the
water are some of my favorites. I used the fabrics in reverse to create the effect of a reflection.
I really like the water because of its beauty and fun. I wanted to show movement in the water,
so I cut strips of the supplied fabrics to look like waves. The idea for the ultralight airplane is
because I love them for their simplicity and because my dad and I are interested in them. We
also want to learn to fly them together. I drew out the plan for this airplane because I thought
it would be more recognizable. Even though I had some hard spots and frustrating moments
the entire project has been lots of fun. I am looking forward to doing it again next time.”

                                                                                             Page 6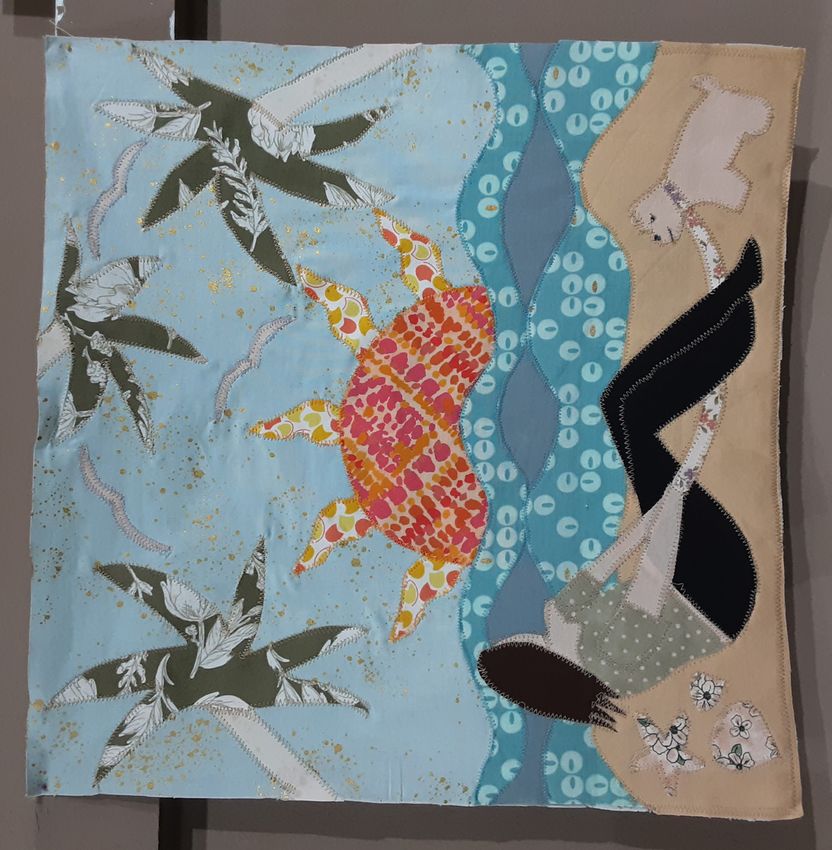
FEBRUARY 2021

Inspiration

                                  Entry #509 “Seaside Paradise”
                                         by Jana Pak, NC
                                    9th-12th Grade Category

“Everyone has their own paradise. Whether it be the beach, mountains, city or countryside, we always
long to spend more time at our paradise. For me, my paradise is the beach, and when the Covid-19
pandemic first hit, I soon realized that I could no longer enjoy the freedom of feeling the ocean
breeze, walking down the boardwalk, and observing the waves crashing to shore. The longer quar-
antine remained, the more I yearned for the seaside and the more I regretted taking beach trips for
granted. Everyday, as I peered out my bedroom window, I wished that my view was the seashore and
that the same humid and salty breeze would blow here too. But, reality always breaks it all. In hopes
to reminisce my seaside memories and to allow my imagination to break free, I've created this quilt
block.
The techniques I used in order to make this block were zigzag stitches, lock stitches, appliqué, and
overlapping. Overall, I spent around 3 weeks brainstorming and about 1 ½ weeks placing everything
together. I also learned the importance of ruminating on how the block creation process will go first,
before I start making the quilt, because once I knew what I needed to do, it became much easier when
making the block. Although I cannot visit the beach like before, this quilt block has gifted me the op-
portunity to reflect back on my happy times relaxing at the shore and to be grateful that I can express
myself through visual art.”
                                                                                                   Page 7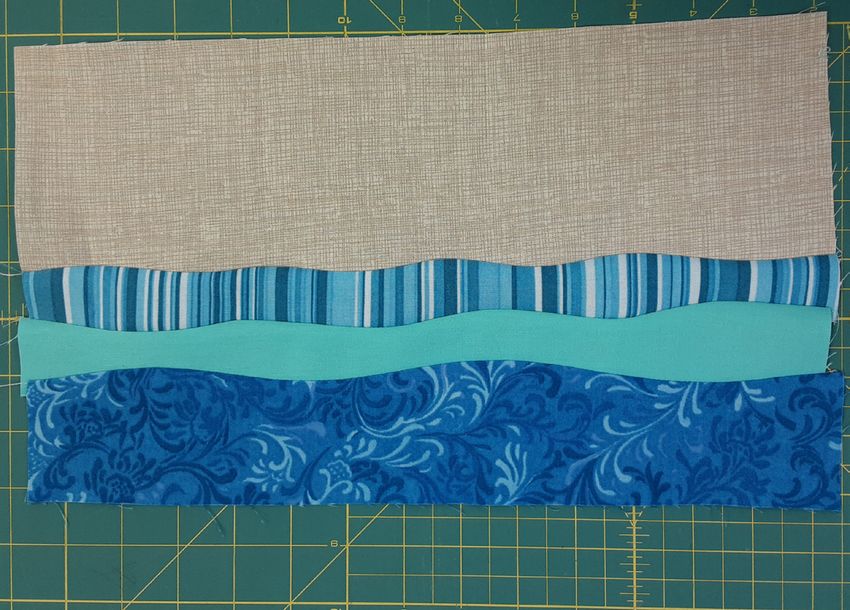
FEBRUARY 2021

Sample Block

                                                    Sample by: Becky Glasby

     Fabrics:
     3 - rectangles 3” x 14” in blues for   1 - 2” x 8” yellow for sun rays
     the waves                              1 - 5” square in green for palm
     1 - rectangle 4 ½” x 14” in tan for    tree
     the sand                               1 - 3” x 6” rectangle in brown for
     1 - rectangle 9” x 14” for the sky     tree. Cut a trunk shaped piece.
     1 - circle, with diameter approx.      1 - 3” x 6” rectangle for surfboard.
     5” for the sun

                                            Batting: 15” x 15” piece
                                            Backing: 15” x 15”

                                                                                   Page 8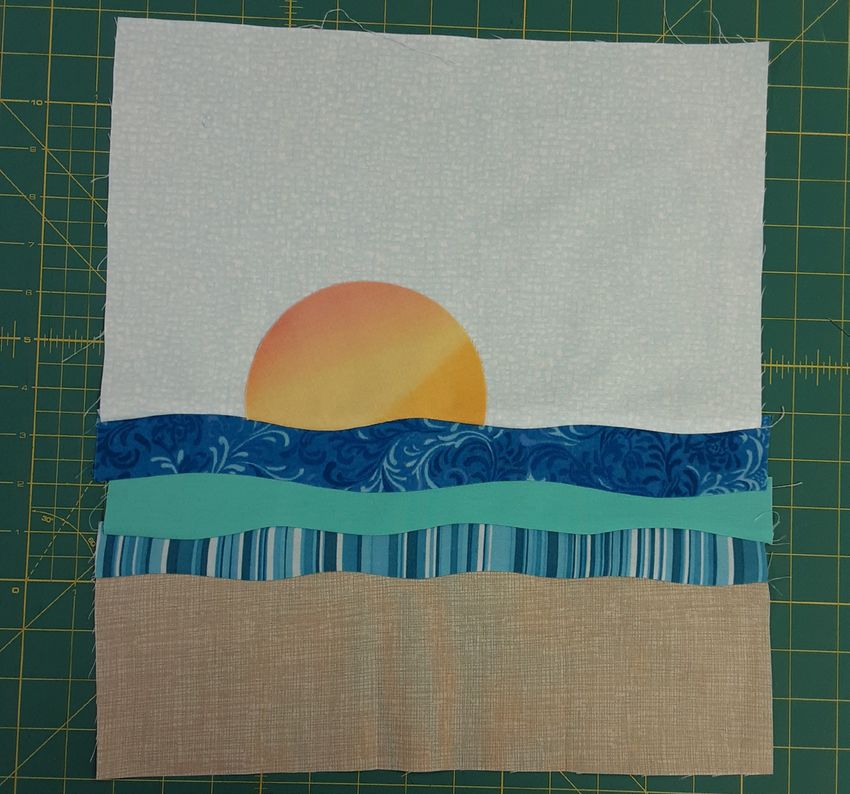
FEBRUARY 2021

Instructions
                       1. Place the water fabrics in order of
Photo 1                    preference A-C, with A being the closest
                           to the sky (photo 1).

                       2. Place fabrics A and B right sides UP,
                           overlapping each other along the long
                           side by about 1” to 1 ½” (photo 2 a&b).

          Photo 2a   Photo 2b

                                                             Page 9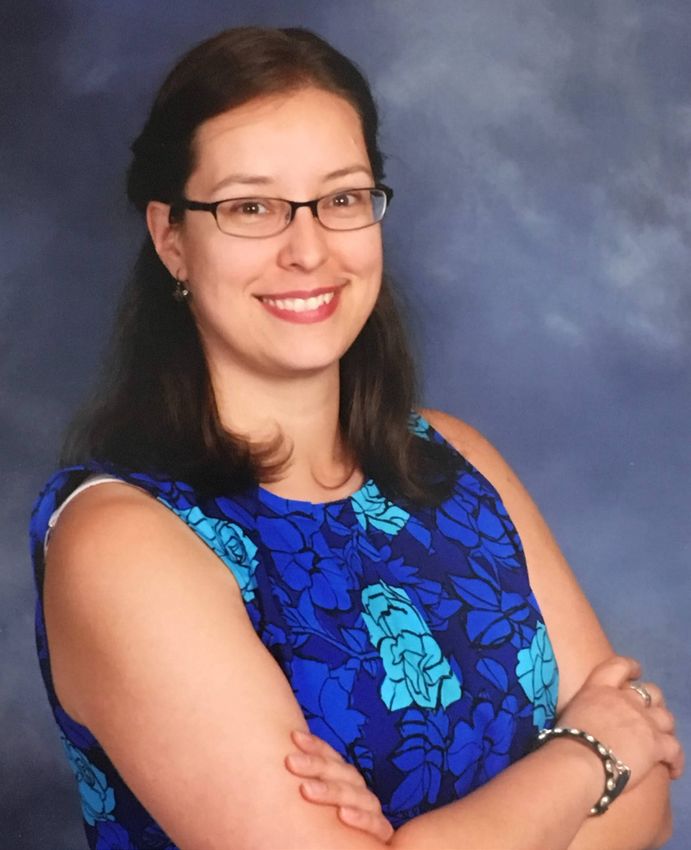
FEBRUARY 2021

Instructions
               3. Carefully cut a gentle wavy line with the
Photo 3
                  rotary cutter through both pieces where
                  they overlap. Remove the cut off bits
                  from both pieces (photo 3).

               4. Flip piece A Right Sides Together with
                   piece B. Pin the centers of the peaks
                   first (photo 4). Then pull the valleys up
                   to match piece B and pin in place. Add
                   more pins as needed. As pins are added,
                   the fabric strip will not be flat at this
                   stage (photo 5).
Photo 4

Photo 5

                                                    Page 10
FEBRUARY 2021
Instructions
5. Use a ¼” seam to sew the pieces
Photo 6 together. Focus on sewing from pin to
pin, so take it slowly. Be sure to keep the
raw edges together as much as possible
for a smooth seam. Once it’s sewn,
press the seam towards piece A (photo
6).
Tip: A stylus or tweezers may help you
hold pieces in place as they get close to
the needle.
Photo 7 6. Repeat Steps 2 - 5 to add piece C (photo
7).
7. Repeat Steps 2 - 5 to add the sand fabric
to the remaining long side of piece C
(photo 8).
Photo 8
Page 11FEBRUARY 2021
Instructions
8. Take the circle for the sun and lay it right
Photo 9a
side UP on the sky fabric. When it’s
where you want it, pin in place
(photo 9 a). If there’s any of the circle
hanging over the sky fabric, trim it to be
straight (photo 9 b).
Photo 9b
Page 12FEBRUARY 2021
Instructions
9. Repeat steps 2 - 5 to add the sky to the
Photo 10 waves, along piece A (photo 10).
The block will be larger than 13” square
at this point. If you have a 12 ½” sq. ruler
place it on top of the block, but DO NOT
TRIM YET. This is just to help visualize the
final block size, and allow you to decide
how much sky or sand to include
(photo 11).
You can also cut strips of paper and tape
them together to create a 12 ½” square
frame if you don’t have this size ruler.
Photo 11
Page 13FEBRUARY 2021
Quilting
A walking foot is great if you have one since we’re quilting through several layers of fabric. I
used the walking foot for both the straight lines, and zig-zag stitching on the block. The details
will be raw edge appliquéd through all the layers, meaning they will be quilted at the same
time.
1. Layer the beach-scape with batting and backing fabric and baste together.
2. Use a straight stitch setting, and increase the stitch length. Quilt organic, wavy lines through
the ocean waves. Follow the edge of the seams with the walking foot or use your hands to
maneuver the fabric side to side to create the organic wavy lines.
3. Cut out sun rays as desired from the 2” x 8” strip of yellow fabric. Place these freestyle
around the sun, tucking them underneath the sun fabric.
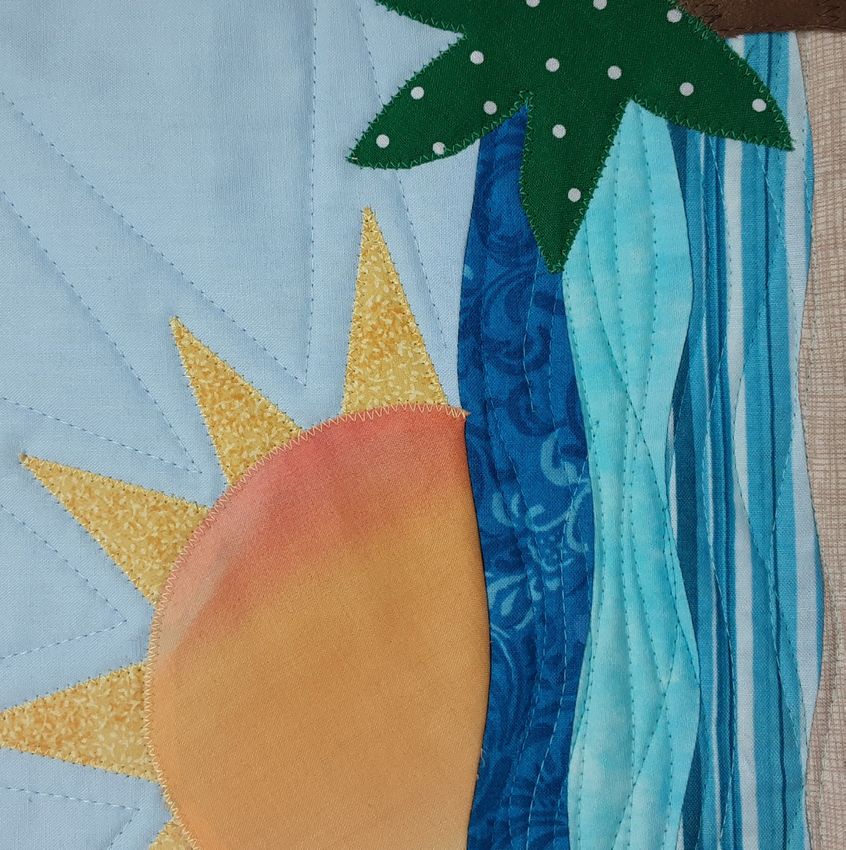
Close-up Detail
Page 14FEBRUARY 2021
Quilting
4. Using a small zig-zag stitch, stitch around
Photo 12 the curve of the sun first, then around
the sun rays to secure them.
5. Stitch straight lines in the sky to echo the
sun ray angles.
6. Cut out the surfboard and tree pieces.
Place them as desired on the block.
Use your 12 ½” square ruler (or paper
window) to keep these shapes inside the
final block size. When they are in place,
pin (photo 12).
7. Use a small zig-zag to stitch the surfboard
and palm tree in place.
8. Once you’re satisfied with the quilting
and appliqué details, use the ruler to
trim the block to be 12 ½” x 12 ½”
square.
Finished?
Fantastic!
Page 15You can also read