Organic Gardening with Children and the 5 Senses
←
→
Page content transcription
If your browser does not render page correctly, please read the page content below
Organic Gardening with Children
and the 5 Senses
Children learn from growing things…
• Provide children with a garden of their own to initiate a culture
of care, love and respect through the use of the five senses
• Engage children in each stage of the garden’s growth to witness
the ever-changing life cycles of nature (prepping, sprouting, planting,
stewarding, harvesting)
• Children who are involved in growing food are more likely to
engage in healthy eating habits
Taking care of tiny hands, mouths, noses, ears and eyes
TOUCH Hands in the dirt
• Use healthy organic soil free of chemical fertilizers
• Worms are not just slimy, they are garden friends
• Add texture with different feeling leaves and shaped
rocks, pebbles, stepping stones and mulch
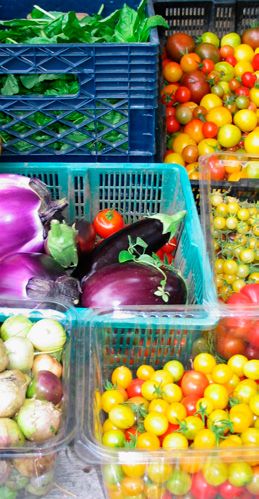
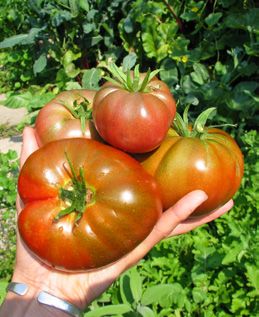
TASTE Eating is the best gift a garden can give
• Picking and eating directly from the garden develops a
greater appreciation of fresh and healthy food
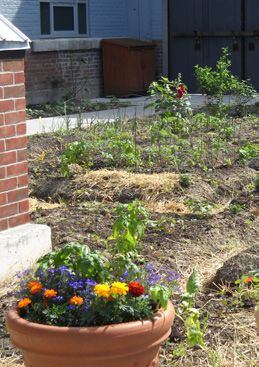
• Use organic growing techniques like pairing flowers with Gardens are magical, fun,
vegetables to control pests instead of using harmful pesticides and always full of surprises!
• Easy to grow plants: Basil, Strawberries, Peas, Tomatoes
LISTEN Incorporate the sense of sound into your garden
• Plant species that attract beneficial insects and listen to
their noises (buzzing pollinators love sunflowers)
• Rustling tree leaves and flowing water add another
dimension to the garden
SMELL Herbs are wonderful at sharing their scents
• Scented plants will help deter unwanted critters
• Companion plant two species to lure pests away from
the more desirable plants (e.g. cucumbers and nasturtium) evergreen.ca Supporter
• Easy to grow: Lavender, Lemon Balm, Mint
Evergreen is a national not-for-profit
that inspires action to green cities.
SEE Select plants with vibrant colours
Get involved or donate today.
• Add birdfeeders or berry trees and watch birds
“taste” from the garden EvergreenCanada
• Easy to grow: Marigolds, Nasturtium and Morning Glories EvergreenCanadaTV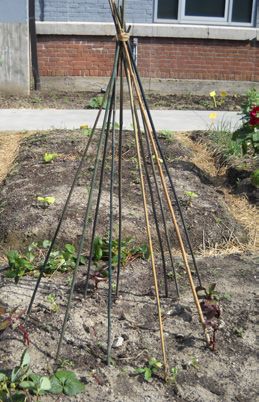
ORGANIC FOOD GARDENING
A Guide to Green City Living

                               Organic gardening works with nature to grow plants
                               without the use of synthetic pesticides and fertilizers.
                               Instead, organic gardeners feed the soil with organic
                               matter, and use techniques such as crop rotation and
                               plant selection to promote healthy growth. Using an
                               organic approach maintains healthy soil, water and air
                               naturally, providing a healthy environment for plants,
                               animals and people.

                               Planning the Garden
                               No matter how big or small your space, start with a garden visioning
                               session to get the creative juices flowing. This step is about brainstorming
                               possibilities, and then matching them up with the realities of your garden
                               space, local growing conditions, and your own time constraints.

                               A Note on Design
                               Design your beds to maximize the number of plants you can grow.
                               A wide, raised bed can hold significantly more plants than a long and
                               narrow bed. For example, a 1 x 4 foot bed may hold a single row
                               of beets, while a bed measuring 2 x 2 feet has room for several shorter
                               rows and will allow for staggered positioning. Although both beds take
                               four square feet of garden space, the wide-bed design holds three times
                               as many plants.

                               Building the Soil: Start from the Ground Up
                               Great organic gardens start with great soil that can retain essential
                               nutrients and water. Soil testing kits are readily available at hardware
                               stores and garden centres, and don’t require any specialized skills. Don’t
                               panic if your soil’s pH varies from the optimal range, or if the texture
                               is unbalanced. You’ll simply need to choose your plants carefully and
                               perhaps use some soil amendments to create better growing conditions.
                               The best way to restore balance to any soil is to add organic matter
                               (compost).
Three Ways to Build Great Soil
Feed it with compost: Add finished compost or ”compost tea” (made
by mixing finished compost with water and letting it sit for a couple of
days) to your soil before planting and around each individual plant.

Sheet mulch over the winter: Put your garden “to bed” after the
harvest by covering it in a thick layer of mulch. The mulch will
decompose, adding nutrients and preparing the soil for spring planting.

Grow a green manure crop: Grow one crop that can later be dug into
the soil to add nitrogen. Plants that work well are those that are able
to “fix nitrogen” (turn atmospheric nitrogen into a useable form for
soil and plants) such as clover or alfalfa. Cut the crop when it is three
or four inches tall, and use a digging fork to turn the plants and their
roots completely into the soil. Cover the newly dug bed with a blanket
of organic mulch until planting time.

Preparing the Bed
If you’re starting from scratch, the first step is to get rid of the turf
grass (and weeds) covering your would-be garden. There are several
ways to do this:

Sheet Mulching: A “no-dig” gardening method that allows planting
directly into or on top of the ground. Cover the planting space (lawn,
weeds, open ground) with several layers of varying organic material,
ending up with a “sheet mulch” of at least 12–18 inches. Sheet mulching
is best done in the fall to allow time for the organic matter to break
down before spring sowing.

Double Digging: A fast (though labour-intensive) method of creating
permanent raised beds with relatively good drainage and fertility.
Loosen the soil more than 12 inches down in two separate layers;
switch the lower layer of “subsoil” with the top layer (also known
as “topsoil”). Organic matter gets mixed throughout.

Raised Bed: A mound of loose, well-prepared soil that is generally
about 6–8 inches high. Adding edgings of brick, boards or stones for
permanent beds, or re-form them each year. They are ideal if you’re
working with heavy soils with poor drainage, contaminated soils,
or if you are limited by space or mobility issues.

Did You Know?
A year’s supply of vegetables and fruit for one person can be produced
on an area as small as 100 square feet.
It’s Time to Plant!
                                           Some crops can be seeded directly into your garden, while others are best
                                           transplanted as seedlings. Seedlings need to acclimatize or ”harden off”
                                           before being planted—place them outdoors during the day, in a partially
                                           sunny spot, for one week before transplanting.

                                           Succession Planting takes advantage of the fact that some vegetables grow
                                           more quickly than others. For example, if you plant spinach seeds in between
                                           your rows of carrots, the spinach will be ready for picking in six weeks, while
                                           the carrots will continue to develop.

                                           Inter-Planting combines specific plants to avoid negative interaction,
                                           such as competition for space or light. For example, onions, carrots and
                                           lettuce have different leaf forms, light requirements and rooting depths.
                                           When grown together, the three plants all have access to sun, and their
                                           roots don’t compete for space.

                                           Companion Planting matches up mutually-beneficial plants to attract
                                           pollinators, improve soil, and protect crops from pests and disease. For
Tip:
                                           example, the Three Sisters—pole beans, corn and squash—are traditionally
Once the season is in full swing, visit    planted together. Corn acts as a support for the beans, while the squash
the garden often, and get to know your     serves as mulch, preventing moisture loss and suppressing weeds, and the
plants. Start a garden journal where you   beans ‘fix’ nitrogen in the soil.
can record things like weather, what and
when you planted, when certain pests
                                           Planting in Tough Spots
emerged and how much you harvested.
                                           Generally speaking, most edible plants do best in full sun and well drained
                                           soils. If you’re stuck with sub-optimal garden conditions, here are some
                                           recommendations:

                                           Depleted Soil     Shady Spots                   Soggy Soil        High heat, Dry Soil
                                                             (4–6 hours direct sunlight)   (Poor drainage)

                                           Arugula           Blackberry                    Angelica          Amaranth
                                           Blackberry        Chives                        Bee Balm          Dill
                                           Bronze Fennel     Currant                       Lemongrass        Garlic chives
                                                             (black or red)
                                           Dill              Kale                          Mint              Hot pepper
                                           Lemon Balm        Leafy greens                  Watercress        Jerusalem Artichoke
                                           Nasturtium        Mint (in a pot)                                 Lavender
                                           Oregano           Parsley                                         Okra
                                           Radish            Peas                                            Oregano
                                           Sage              Rhubarb                                         Prickly pear cactus
                                           Mexican Sour      Spinach                                         Purslane
                                           Gherkin
Mulch is Magic
                                         • Straw is excellent for veggies—apply a 4–6 inch layer that will last
                                           throughout the season, leaving a small mulch-free circle around the
                                           base of each plant to discourage rodents. Other mulch types include
                                           pine needles, leaves, newspaper and wood chips.
                                         • At the end of the season, apply a layer of mulch over the entire garden
                                           so it can break down and add valuable nutrients to your soil for the
                                           following spring. When it’s time to plant, either remove the mulch
                                           that remains, or work it into your soil to boost the organic matter.

                                         Want to Know More?
                                         1) You Grow Girl: The Groundbreaking Guide to Gardening. Gayla Trail.
                                            Simon and Schuster. 2005.
                                         2) How to Grow More Vegetables than You Ever Thought Possible on Less
                                            Land than You Can Imagine. John Jeavons. Ten Speed Press. 2004.
                                         3) The New Self-Sufficient Gardener: the Complete Guide to Planning,
                                            Growing, Storing and Preserving your own Garden Produce.
                                            John Seymour. DK Publishing. 2008.
                                         4) Organic Gardening: www.organicgardening.com
                                         5) Garden Guides: www.gardenguides.com

                      Evergreen is a national not-for-profit that inspires action to green cities.
                                           Get involved or donate today.

                                           evergreen.ca
                                416-596-1495 | 1-888-426-3138 | info@evergreen.ca

Sponsor   Program Supporters

                                           An agency of the Government of Ontario.
                                            Relève du gouvernement de l’Ontario.
CARING FOR PLANTS ORGANICALLY
A Guide to Green City Living

                                             Maintaining your garden organically will keep it growing
                                             happily throughout the season without negatively
                                             impacting your local environment. Check on your garden
                                             as often as possible: pull weeds as soon as they come
                                             up, add mulch where it’s thin, water when it’s dry, look
                                             for signs of pests and diseases, and check for produce
                                             that’s ready to harvest.

                                             Watering
                                             • Most gardens don’t need more than 1 inch of water per week. Young
                                               seedlings require shallow, more frequent watering while established
Water Saving Tips:                             plants require deeper watering weekly. Let the soil dry out before
• Water your plants with grey-water            watering to encourage deeper root systems.
  (used dish, bath or laundry water), or
                                             • Water in early morning or late afternoon—avoid mid-day sun!
  water left over from cooking, tea, etc.
                                               Water only at the base of the plant, gently and close to the soil.
• Set up a rain barrel, or scatter buckets     Avoid getting water on the leaves.
  in the garden during a heavy rainfall.
                                             • Assess how much water your plants are getting using a rain gauge,
• Conserve moisture by mulching
                                               or stick your finger deeply in the soil (the soil should be moist to
  around each plant.
                                               the tip of your finger, as surface soil is not an indicator).

                                             Fertilizing
                                             Organic Fertilizers help build a healthy soil system, which in turn
                                             produces healthy, vigorous plants without harming the surrounding
                                             ecosystem.

                                             Start by working nutrient-rich compost into the bed as you prepare
                                             it for planting each year. Get to know your plants, and learn
                                             to identify the signs of nutrient deficiencies; a nitrogen deficiency will
                                             slow growth down and often cause older leaves to turn yellow, while
                                             remaining foliage is often light green.

                                             If a plant shows signs of a deficiency, small amounts of the appropriate
                                             nutrient may be added to the soil once every two weeks. Be careful not
                                             to over-fertilize! Too little is better than too much. When in doubt,
                                             use a fertilizer with balanced nutrients, such as finished compost
                                             or worm castings.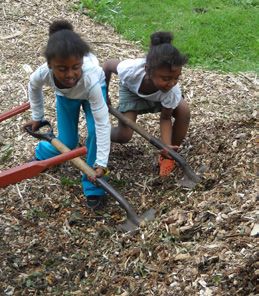
Tip:                                         Organic Fertilizers: What’s Available?
Install large and heavy stakes, trellises,   For Balanced Nutrients (NPK=Nitrogen/Phosphorus/Potassium):
tepees and other sturdy supports while       Use finished compost, worm castings, or a multi-purpose organic
preparing your planting beds to avoid        fertilizer (commercially available) including blood, fish and bone meal.
disturbing roots. Lightweight supports
(small stakes & string) can be installed     Add Nitrogen: Use manure, (different types have varying levels of
after your garden has been planted.          nutrients, so be careful) add coffee grinds to your compost or directly
                                             to the soil, or plant a fertilizing cover crop (“green manure”). Green
                                             manure crops include borage, legumes, and other nitrogen-fixing plants.

                                             Add Potassium: Use rock potash (10.5% potassium), seaweed meal or
                                             liquid seaweed (2.3% Potassium + trace minerals). To add Potassium
                                             over time, work wood ash into your soil regularly.

                                             Add Phosphorus: Use bone meal (20% to 30% phosphorus) or rock
                                             phosphate (approximately 2 to 4lbs. of rock phosphate for every
                                             100-sq-ft of ground, or approximately 2.5lbs added to 25lbs. of compost).

                                             Supporting Vegetables
                                             Many vegetables or flowers will collapse under their own weight if they
                                             are not provided with support. Training your plants to grow vertically
                                             will keep them off the ground and away from pests, while also saving
                                             valuable garden space.

                                             Stakes: Drive a simple stake or pole into the soil near the base
                                             of the plant, and the vines will instinctively latch onto them.
                                             Tie the stems of tall or heavy plants to the stake for support.

                                             Tepee Trellises: Tepees make excellent supports for beans, peas,
                                             tomatoes, and heavy-fruited crops such as squash. Use three to six
                                             poles that have been cut 10–12 feet long, and tie them together at
                                             the top. Place the bundle over the top of the planting area, separate
                                             the poles, (ideally so they’re next to the base of your plants) and stick
                                             the poles 1–2 feet into the ground.

                                             Fence Trellises: Drive a post into the ground at each end of a row,
                                             placing other posts along the row as needed. Connect the posts with
                                             lighter support materials such as string, twine, netting or wire mesh.

                                             Cages: Contain sprawlers such as cucumbers and tomatoes by caging
                                             them. A simple cage can be constructed from scrap wood or sturdy wire
                                             mesh. Round or square cages two to three feet in diameter and three to
                                             four feet high will contain a variety of vines.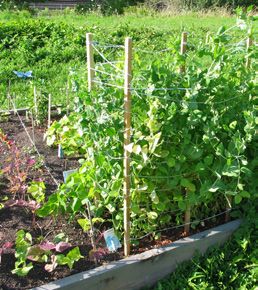
Pruning and Pinching
Many vegetable and fruit plants respond well to pruning or pinching.
By removing some branches, and promoting a particular pattern of growth,
you can give your plants better access to light and air, and help them fend
off disease, resulting in bigger, healthier fruit.

PRUNING
In addition to promoting healthy growth, pruning can help remedy
a range of problems:

• Excess foliage and little fruit: using sharp bypass pruning shears, make
  an angled cut close to where the branch meets the main stem. Removing
  fruitless branches will direct energy towards fruit production.

• Abnormal height with sparse foliage: Often referred to as being “leggy,”
  cut growing stems back to the first or second branch to promote dense,
  compact growth and flower production.

• Infection or infestation: prune away the affected foliage and discard or
  burn it. Sterilize your pruning shears between each cut by cleaning them
  with isopropyl alcohol.

PINCHING
Pinching off buds, flowers or immature fruit can help encourage growth
and fruiting in many herbs and vegetables.

• For fruit-bearing vegetables, pinch off a third to one-half of the flowers as
  they appear. The remaining fruit will be larger and will mature more quickly.

• After fruit has set, pinch away any fruit that crowds, is deformed
  or diseased, or receives limited light and air circulation.

• Pinch away all foliage in contact with, or surrounding the fruit.

Using Companion Plants
Companion plants, when planted near one another, can help attract
beneficial insects, ward off pests, and encourage healthy plant growth. Just
as some plants affect each other positively, other plant combinations can
limit the growth of one another in some way. For example, when tomatoes
and corn are planted together, they tend to compete for nutrients and
attract the same kind of harmful worm. Getting to know your plants and
observing which ones grow well together can be a great way to encourage
healthy growth and manage pests and disease the organic way.

For more information and a quick guide to companion plants visit:
http://www.companionplanting.net/
Harvesting
                                         To get the fullest flavour from fruits and veggies, harvest just before
                                         they reach maturity. With every minute that passes after produce is
                                         picked, quality and food value decrease, so bring them in from the
                                         garden just before you plan to eat or process them.
                                         • Some vegetables can be picked and used before they are completely
                                           mature. Try young onions, beets, carrots, cabbages, and the leaves of
                                           head lettuce that has not yet formed heads.
                                         • The more you harvest, the more you grow. If you don’t pick lettuce
                                           it will go to seed. Chard and other heat tolerant plants can be cut
                                           continuously all summer long.
                                         • Crops that are harvested latest in the season are the easiest and best
                                           to store. Eat your first harvestings of beets and carrots in the summer
                                           months, and plan to save the second harvest for canning and freezing.

                                         Want to Know More?
                                         1) How to Grow More Vegetables than You Ever Thought Possible on Less
                                            Land than You Can Imagine. John Jeavons. Ten Speed Press. 2004.
                                         2) The New Organic Grower – A Master’s Manual of Tools and Techniques for
                                            the Home and Market Gardener. Eliot Coleman. Chelsea Green. 2005.
                                         3) The New Self-Sufficient Gardener: The Complete Guide to Planning,
                                            Growing, Storing and Preserving your own Garden Produce.
                                            John Seymour. DK Publishing. 2008.

                      Evergreen is a national not-for-profit that inspires action to green cities.
                                           Get involved or donate today.

                                           evergreen.ca
                                416-596-1495 | 1-888-426-3138 | info@evergreen.ca

Sponsor   Program Supporters

                                           An agency of the Government of Ontario.
                                            Relève du gouvernement de l’Ontario.
You can also read