OWNER'S MANUAL E-BIKES NORTH AMERICA - Riese ...
←
→
Page content transcription
If your browser does not render page correctly, please read the page content below

OWNER‘S MANUAL E-BIKES
NORTH AMERICA
COPYRIGHT

Copyright 2017 RIESE & MUELLER GMBH

The information contained in this manual and/or any of its parts, sub-parts or chapters, is the
intellectual property of RIESE & MUELLER GMBH and is protected by domestic and internation-
al copyright and other intellectual property laws.

The information contained herein is provided for the operation, service and troubleshooting
of the product described herein.

Any duplication, reproduction, translation, micro filming, storage in electronic or magnetic
form, processing as electronically or magnetically stored media, copying or dissemination of
these
materials and/or the information contained herein, or any part thereof, except for the internal
use of RIESE & MUELLER GMBH or its authorized external suppliers, consultants or agents,
without the prior written consent of RIESE & MUELLER GMBH, is hereby strictly prohibited.

All rights and remedies are hereby expressly reserved.

Violators will be prosecuted.

RIESE & MUELLER GMBH shall have no liability whatsoever arising from or connected in any
way to the so prohibited use of the information contained herein by any person or entity,
wherever located, for whatever reason.

RIESE & MUELLER GMBH reserves the right to change, delete or otherwise alter or modify any
information contained herein, or the product itself, at any time and for any reason, with or
without notice.

2
IMPORTANT INFORMATION

This manual describes how to use your Riese & Müller E-Bike in a safe manner. It is essential that
whoever owns or uses the E-Bike has read this manual before riding the E-Bike for the first time.
This also applies to anybody who considers himself or herself to be an experienced bicycle rider.
In some aspects E-Bikes substantially differ from regular bicycles.

There is an example illustration of an E-Bike (and an E-Cargo bike respectively) on either of the
inner sides of this manual’s cover describing the vehicle’s most important components and parts.
For easier navigation and reference we do recommend to leave these inner sides open while
reading this manual.

This manual and all other included manuals for brakes, gears, suspension, electric drive and
optional accessories are an integral part of the E-Bike.

Read all the manuals carefully. Store all manuals close to where you store your E-Bike to have
them handy if questions arise.

In case this E-Bike is solwd or given to another person as a gift or even only for temporary use,
all manuals must be given as well.

This manual also describes simple do-it-yourself inspections for the E-Bike.

This manual, however, is no substitute for a complete workshop manual.

All service and repair work on any Riese & Müller E-Bike shall always be performed only by
an authorized dealer.

In case anything in this manual is not clear or if you need further information regarding a
function of the Riese & Müller E-Bike, please contact your authorized dealer or Riese & Müller
customer service (www.r-m.de, Tel. +49 6151-36686-0).

                                                                                                    3
SAFETY INFORMATION

Riding an E-Bike can be hazardous. Therefore, never overestimate your abilities or the
capabilities of your E-Bike when riding it.

By riding an E-Bike you assume the risk of personal injury and damage to the E-Bike.

To reduce this risk, read the “Safety” section, starting on page 9, before riding your
E-Bike for the first time.

This manual cannot possibly describe every conceivable hazardous situation that may arise
while riding an E-Bike. The person riding the E-Bike is therefore solely responsible for the
use of their E-Bike and any injuries or damage that result from such use.

NOTICE FOR PARENTS AND
LEGAL GUARDIANS OF MINORS

The use of E-Bikes by persons under the age of 16 is strictly forbidden.

Parents and guardians of minors are fully responsible for making sure that the minor has
read and understood all of the contents of all manuals for the E-Bike.

Parents and guardians of minors are furthermore fully responsible for the results and
consequences of any use, misuse, accidents, injuries or damages caused by minors.

4
SAFETY INFORMATION

This manual uses the following signal words to alert to potential hazards. The meaning of the
signal words is listed in the table below.

                       Indicates a hazardous situation that, if not avoided, could result in
    WARNING
                       death or serious injury.

                       Indicates a hazardous situation that, if not avoided, could result in minor
     CAUTION
                       or moderate injury.

                       Indicates information considered important, but not hazard-related
 NOTICE
                       (e.g. messages related to property damage).

                       The symbol is used to provide other useful information or clarifications.

                                                                                                     5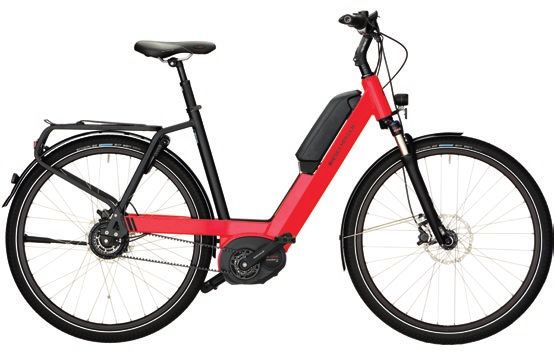
CONTENT

1. WHAT IS AN E-BIKE?                                        8
   1.1. E-Bike drive system                                  8
   1.2. Brakes                                               8
2. SAFETY		                                                  9
   2.1. Safety Gear                                          9
   2.2. Who is authorized to use the E-Bike?                 9
   2.3. Safe riding and accident prevention                 10
   2.4. Safe off-road riding                                10
   2.5. Legal requirements                                  10
   2.6. Intended use                                        11
		      2.6.1. Maximum gross weight and permissible loads   12
		      2.6.2. Weight specifications                        13
   2.7. Lifespan of your E-Bike and its components          14
3. ADJUSTING YOUR E-BIKE                                    15
   3.1. Frame size selection                                15
   3.2. Seat position                                       15
   3.3. Handlebar position                                  17
   3.4. Brake levers                                        16
   3.5. Suspension                                          18
4. BEFORE THE FIRST RIDE                                    19
   4.1. Delivery and handover of your E-Bike                19
   4.2. Getting familiar with your E-Bike                   19
5. SAFETY CHECK BEFORE EVERY RIDE                           20
   5.1. Quick release levers                                20
   5.2. Saddle and seat post                                21
   5.3. Handlebar and stem                                  22
   5.4. Transporting items with your E-Bike                 23
   5.5. Wheels                                              24
   5.6. Brakes                                              25
   5.7. Bosch battery                                       27
   5.8. Lighting and reflectors                             28
6. CHILDREN 		                                              29
   6.1. Transporting children                               29
   6.2. Children riding E-Bikes by themselves               29

6
7. OPERATION 30
7.1. During every ride 30
7.2. Shifting system 30
7.3. Brakes 31
7.4. Adjustable stem 32
7.4.1. Angle adjustment 33
7.4.2. Height adjustment 34
7.5. Racks 35
7.6. Lighting 35
7.7. Suspension 36
7.8. Integrated lock 39
8. MAINTENANCE AND REPAIRS 40
8.1. Regular maintenance 40
8.2. Initial inspection 40
8.3. Maintenance you can do by yourself 41
8.3.1. Cleaning your E-Bike 41
8.3.2. Brake Inspection 42
8.3.2.1. Test of setting of the brake levers 42
8.3.2.2. Brake hoses 42
8.3.2.3. Brake rotor 42
8.3.2.4. Brake pads 43
8.3.3. Headset 43
8.3.4. Chain 44
8.3.5. Belt drive 44
8.3.6. Tires 44
8.3.7. Wheels 45
8.3.8. Suspension 46
8.3.9. Lighting 46
8.4. Maintenance that must be carried out by your authorized dealer 47
8.4.1. Changing and replacing components 47
8.4.2. Service and maintenance schedule 48
8.4.3. Torque Settings 50
8.4.4. Torque Settings for E-Cargo Bikes 51
8.4.5. Torque Settings for adjustable Stems 51
9. WARRANTY TERMS AND CONDITIONS 52
10. INFORMATION REGARDING PARTS THAT ARE SUBJECT TO WEAR AND TEAR 56
11. E-BIKE PASSPORT 58
11.1. E-Bike Data 58
11.2. Delivery Record 59
11.3. Service Record 60
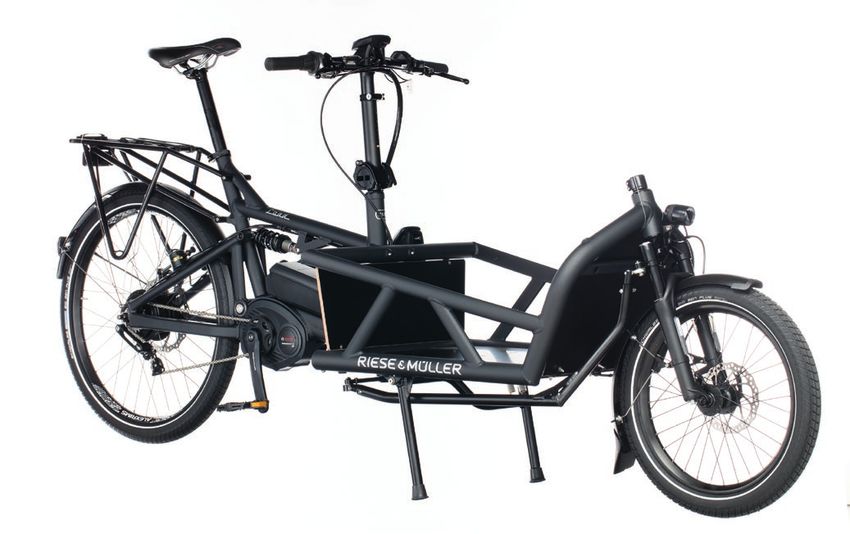
7Saddle, p. 21 Shifter, p. 30 Brake levers, p. 16, 25
Stem, p. 22
Seatpost, p. 21 Headset, p. 43
Frontlight, p. 28, 46
Suspension fork,
p. 36–38, 46
Tires, wheels,
Rear shock absorber p. 24, 45
p. 36 – 38, 46
Belt drive, chain
p. 40 Disc brake rotor,
p. 42
Crank arm Rim, p. 45
Pedal
Shifting system, p. 30
Rear rack, p. 35
Control panel, p. 8 Bosch display, p. 35
Handlebar, p. 22
Tail light, p. 46
Bosch batteries, p. 27
Brake and shifter cables
Quick release
wheel attachment, p. 20
Gear hub
Kick stand
Disc brake caliper
Disc brake, (rim brakes Bosch electric drive, p. 8
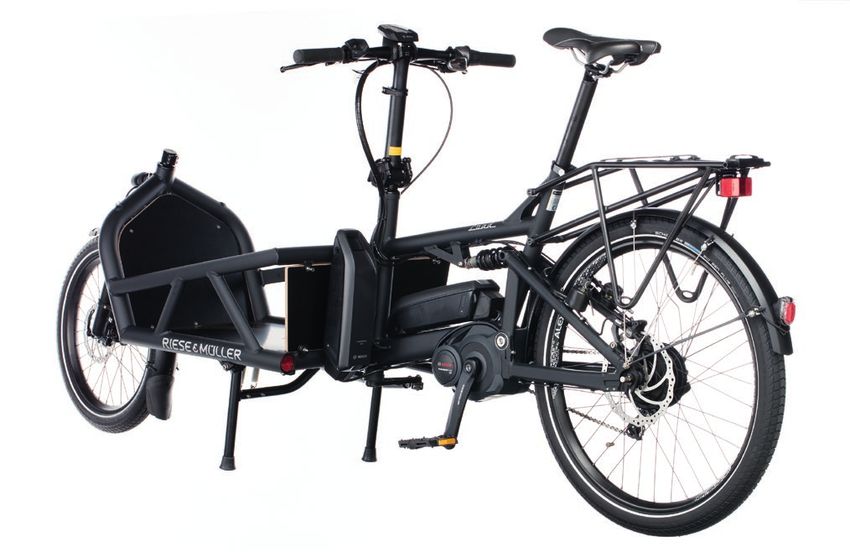
not visible at this E-Bike), p. 25, 31, 42Saddle, p. 21 Brake levers, p. 16, 25
Seatpost, p. 21
Stem:
Rear shock absorber
height adjustment, p. 33
p. 36 – 38
angle adjustment, p. 34
Headset, p. 43
Front rack, p. 35
Frontlight, p. 28, 46
Belt drive, chain
p. 40
Suspension fork,
Shifting system, p. 30 p. 36–38, 46
Bosch display, p. 35 Handlebar, p. 22
Control panel, p. 8 Shifter, p. 30 Rear rack, p. 35
Bosch battery, p. 27
Quick release
wheel attachment
p. 20
Tail light,
p. 46
Gear hub
Disc brake
caliper Pedal Rim, p. 45
Disc brake, p. 25, 31, 42 Crank arm Tires, wheels,
p. 24, 45
Kick stand Bosch electric drive, p. 81. WHAT IS AN E-BIKE?
An E-Bike is a bicycle with an electric drive system that gives the rider assistance.
1.1. E-BIKE DRIVE SYSTEM
NOTICE
Make sure you use your Bosch drive and batteries correctly and don’t cause damage.
Read the separate Bosch manual supplied with your E-Bike to get familiar with all details
of the Bosch drive.
All Riese & Müller E-Bikes are equipped with a Bosch drive system. The drive system consists of
an electric drive, a battery and a control panel at the handlebar.
The electric drive powers the rear wheel either with a chain or with a belt drive (dependent on
the particular E-Bike model).
The drive system automatically assists you, when you start to pedal. The assistance ends when
you stop to pedal or when you are going faster than the maximum allowed system speed
(20 mph or 28 mph).
You can adjust the assistance level via the control panel at the handlebar. You can also turn the
assistance off and ride the E-Bike like a regular bicycle.
The battery must be charged separately using the supplied charger. You cannot charge the bat-
tery by pedaling. Some E-Bikes are equipped with an optional second battery.
1.2. BRAKES
Dependent on which E-Bike model you have, your E-Bike is equipped either with disc brakes or
rim brakes. The E-Bikes shown as examples on the inner sides of the cover of this manual are
equipped and shown with disc brakes.
82. SAFETY
WARNING
lways wear protective clothing, safety gear and a well-fitting helmet to protect against severe
A
injuries in case of an accident.
Observe and follow all instructions of the helmet manufacturer.
Prior to every ride, perform a safety check.
Use your E-Bike only as intended.
Never ride under the influence of alcohol, drugs or prescription medication.
ff-road riding is more hazardous and requires greater skills. Make sure to avoid serious injuries
O
by practicing on easy terrain first.
e sure to be seen by other drivers and other traffic when riding at night or when visibility is
B
bad. Do not ride unless your lighting system is switched on and fully operational.
After a fall or an accident, have the E-Bike inspected and, if necessary, repaired by
an authorized dealer to ensure safety and prevent further accidents.
2.1. SAFETY GEAR
Wear protective clothing when riding your E-Bike. Such clothing must provide good visibility and
reflect light. Do not wear loose-fitting clothes to avoid entanglement with your E-Bike or cover-
ing the lighting system or reflectors.
Protective gear is available for each part of your body. Always wear biking gloves, sturdy shoes
and protective goggles. Riding without protective clothing and other protective gear increases
the risk of serious injury.
2.2. WHO IS AUTHORIZED TO USE THE E-BIKE?
The minimum age for anybody to ride an E-Bike is 16 years.
All riders must be healthy enough as well as both physically and mentally fit to control an E-Bike.
They must be able to negotiate traffic in a safe manner and in compliance with all applicable laws
and regulations.
92. SAFETY
2.3. SAFE RIDING AND ACCIDENT PREVENTION
1. Before to every ride, perform the safety check described in the section 5 on page 18, “Safety
check before every ride”.
2. Adjust your riding style and speed to the weather and the conditions of the road.
3. Do not overestimate your abilities.
4. Avoid riding on slippery ground and when visibility is poor. Heightened attention is required in
the rain and on wet or loose ground like sand, gravel, etc. because of the increased risk of slip-
ping in curves or falling when applying the brakes.
5. Always follow all traffic rules applicable in your city and state.
6. Never ride while under the influence of alcohol, drugs or prescription medication.
7. Be careful as plastic and rubber pedals
often become very slippery when wet! Your foot may slip off, causing severe injury.
8. If the pedals on your E-Bike are fitted with rubber or plastic toe cages, make yourself familiar
with the grip they provide.
2.4. SAFE OFF-ROAD RIDING
Riding your E-Bike off-road poses greater hazards and therefore requires greater skills and some
practice on easy terrain.
Start by riding on easy terrain and become accustomed to the way your E-Bike handles off-road.
Keep in mind that the conditions of the ground may change at any time while riding off-road. Pay
attention to animals and other people. Never ride all alone in remote areas.
2.5. L
EGAL REQUIREMENTS
Make yourself familiar with the local and regional laws and regulations applicable for the
use of E-Bikes.
Be aware that different rules may be in place for fast E-Bikes (maximum assisted
speed = 28 mph) as opposed to slow E-Bikes (maximum assisted speed = 20 mph).
Different states may have different laws and regulations regarding the wearing of helmets, hav-
ing a driver’s license or speed limits of your E-Bike like. Even if not required by law, always wear a
well-fitting helmet.
Be aware that you may not be allowed to ride your E-Bike in all places.
It is the rider’s sole responsibility to be familiar with and comply with all applicable laws
and regulations.
102.6. I NTENDED USE
WARNING
No E-Bike is suitable for all potential applications or purposes.
Choose the E-Bike that matches your intended application best.
Using your E-Bike for an unintended purpose is hazardous.
E-Bikes from Riese & Müller are intended and suited for a wide range of applications.
The following is a description of this range of applications.
The Riese & Müller E-Bikes “Charger mountain” and “Delite mountain” are designed for
category 2. All other Riese & Müller E-Bikes are designed for category 1.
Category 1: Day-to-day use
Category 1 E-Bikes are suited for: Riding on bike lanes, paved streets and roadways.
The front and rear wheels maintain constant contact with the ground.
Not suited for: Riding off-road, riding over stairs, jumps, wheelies, competitions.
Category 2: Off-road use
Category 2 E-Bikes are suited for: All applications of category 1 plus moderate off-road riding.
Skilled riders can master unpaved roadways and minor jumps off a maximum height of 12 inches
(1 foot).
Not suited for: heavy-duty off-road operation, downhill, slope style and freeride biking, competi-
tions, tricks and stunts.
112. SAFETY
2.6.1 Maximum gross weight and permissible loads
WARNING
Avoid accidents, serious injuries and damage to your E-Bike.
Never overload your E-Bike.
Never exceed the permissible gross weight of your E-Bike.
Your E-Bike has a maximum permissible gross weight. The maximum permissible gross weight
must never be exceeded. If you do not stay below the maximum permissible gross weight limit
you are using your E-Bike in an improper and impermissible fashion that can lead to accidents,
injuries and severe damage to your E-Bike.
The maximum gross weight is the sum of your E-Bike’s weight plus the weight of the trailer, the
biker and the load you put on the racks.
The manufacturer assumes no liability and your warranty will be voided if you fail to use your E-
Bike as intended, if you do not adhere to the safety instructions or if you fail to have any defects
repaired properly. Furthermore, the manufacturer assumes no liability for and declines to provide
any warranty in case of installation errors, willful misuse, accidents and failure to observe the
instructions on maintenance and care.
The table 2.6.2. on page 13 shows the maximum permissible weight limits of the different models
of Riese & Mueller E-Bikes.
122.6.2. Weight specifications
E-BIKE MODEL MAXIMUM WEIGHT OF MAX. WEIGHT MAX. LOAD MAX. LOAD ON
GROSS WEIGHT E-BIKE OF RIDER ON REAR RACK FRONT RACK
140 kg 26.6 – 27.3 kg 110 kg 20 kg
Avenue ––
308 lbs 59 – 60 lbs 242 lbs 44 lbs
140 kg 26.7 – 27.5 kg 110 kg 20 kg
Culture ––
308 lbs 59 – 61 lbs 242 lbs 44 lbs
140 kg 23.0 – 28.0 kg 110 kg 20 kg
Delite ––
308 lbs 51 – 62 lbs 242 lbs 44 lbs
Delite 140 kg 23.0 – 26.0 kg 110 kg 20 kg
––
mountain 308 lbs 51 – 58 lbs 242 lbs 44 lbs
140 kg 25.7 – 26.8 kg 110 kg 20 kg
Homage ––
308 lbs 57 – 59 lbs 242 lbs 44 lbs
140 kg 25.9 kg 100 kg 20 kg
Kendu ––
308 lbs 57 lbs 220 lbs 44 lbs
190 kg 32.6 – 35.1 kg 110 kg 20 kg 100 kg
Load
418 lbs 72 – 78 lbs 242 lbs 44 lbs 220 lbs
200 kg 34.9 – 52.9 kg 110 kg 20 kg 100 kg
Packster
441 lbs 77 – 117 lbs 242 lbs 44 lbs 220 lbs
140 kg 19.9 – 26.6 kg 110 kg 17 kg 3 kg
Charger
308 lbs 44 – 59 lbs 242 lbs 37 lbs 6 lbs
Charger 140 kg 19.9 – 23.0 kg 110 kg 17 kg
––
mountain 308 lbs 44 – 51 lbs 242 lbs 37 lbs
160 kg 27.2 kg 135 kg 17 kg
Charger GH ––
353 lbss 60 lbs 297 lbs 37 lbs
140 kg 24.8 – 25.8 kg 110 kg 30 kg 3 kg
Cruiser
308 lbs 55 – 57 lbs 242 lbs 66 lbs 6 lbs
140 kg 24.3 – 26.2 kg 110 kg 17 kg
Nevo ––
308 lbs 54 – 58 lbs 242 lbs 37 lbs
140 kg 21.9 – 22.5 kg 110 kg 20 kg
Roadster ––
308 lbs 48 – 50 lbs 242 lbs 44 lbs
130 kg 24.9 – 26.1 kg 100 kg 25 kg 3 kg
Swing
286 lbs 59 – 60 lbs 220 lbs 55 lbs 6 lbs
135 kg 21.9 – 23.8 kg 110 kg 20 kg
Tinker ––
297 lbs 48 – 52 lbs 242 lbs 44 lbs
132. SAFETY
2.7. LIFESPAN OF YOUR E-BIKE AND ITS COMPONENTS
WARNING
E-Bikes are subject to wear and tear.
ring your E-Bike to your authorized dealer for regular inspections and timely
B
replacement of safety relevant components like handlebar, stem or suspension fork.
fter reaching the end of their product lifetime, the components of your E-Bike may fail abruptly
A
and cause falls and serious injuries.
If subjected to moderate use, the E-Bikes from Riese & Müller have a product lifetime of 10 years
or 20,000 miles. The wear and tear of an E-Bike, however, largely depends on the load, the road
conditions and the riding style.
When exposing your E-Bike to a lot of stress (e.g. total vehicle load of 242 lbs or more, riding over
unpaved roadways or curbstones, riding in dirty and corrosive environments) on a regular basis,
you may experience that the lifetime of your E-Bike shortens to about 10,000 miles.
When your E-Bike has reached the end of its product lifetime, it is no longer roadworthy and safe.
Please note that components such as the handlebar, stem, and suspension fork or rear shock ab-
sorber have a significantly shorter product lifetime. Actual product lifetimes of these components
are also subject to the above mentioned conditions. Please consult your authorized dealer who
can determine whether and when a component has to be replaced.
143. ADJUSTING YOUR E-BIKE
Before you can go on your first ride, your authorized dealer must adjust your new E-Bike to your
height, proportions and individual requirements.
3.1. F
RAME SIZE SELECTION
Your authorized dealer shall select the frame size that is appropriate for you. Make sure that the
standover clearance of your E-Bike fits your body and proportions. A minimum standover clear-
ance of 2” to 5“ is recommended.
• Place the E-Bike between your legs.
• Measure the distance indicated by the arrow.
• This is the standover clearance.
Standover clearance
3.2. SEAT POSITION
Your authorized dealer shall explain and set the seat position that fits you best.
When adjusting the height of the saddle yourself, proceed as follows:
• Rotate one pedal to its bottommost position
• Sit down on the saddle and place your heel
on this pedal. Your leg must now be fully
extended.
•If the leg is not fully extended, the saddle is
too low.
•If the heel does not reach the pedal,
the saddle is too high.
Heel on the lower pedal
153. ADJUSTING YOUR E-BIKE
•Sit down on the saddle.
•Make sure that the tips of both of your feet
reach the ground.
•If the tips do not reach the ground or if you
feel unsafe, the saddle is too high.
Feet with tips on the ground
•Check the seat post height.
Correct!
Correct: Hidden minimum insertion mark of the seat post
•The seat post must not be extended too far.
Make sure that the line that indicates the
minimum insertion is not visible.
minimum
insertion mark
Wrong!
Wrong: Visible minimum insertion mark of the seat post
163.3. HANDLEBAR POSITION
Your authorized dealer shall explain and set the appropriate position of handlebar, grips and all
control elements such as brake and shift levers and the Bosch display.
On E-Bikes with an adjustable stem, the authorized dealer must adjust the stem to the position
that fits you best and explain how to use the adjusting mechanism.
3.4. BRAKE LEVERS
Check and make sure that you can operate the front brake with the same brake lever (right of
left) in the way that is familiar to you. If you are used to having the front brake operated with the
lever on the other side, ask your authorized dealer to mount the brake cables in the appropriate
fashion so you can operate the front brake with the hand you are used to and, of course, the rear
brake with the other hand, as you are used to.
The factory set-up is that the left brake lever is operating the front brake (as shown below).
Left brake lever Right brake lever Left brake lever Right brake lever
= front brake = rear brake = rear brake = front brake
Factory set-up Modified set-up (brake cables switched), if so desired
173. ADJUSTING YOUR E-BIKE
3.5. SUSPENSION
WARNING
A suspension setting that is too soft leads to more compression of the suspension and less dis-
tance between the pedals and the ground.
Make sure that the suspension is set accurately for the rider’s weight.
Suspension settings that are too soft may result in unexpected and hazardous ground contact of
your pedals and lead to a crash and injuries.
Suspension settings that are too hard may result in loss of traction and lead to a crash and
injuries.
Your authorized dealer shall explain and set the suspension. Review and follow the instructions
in the included manuals from the suspension manufacturer.
184. BEFORE THE FIRST RIDE
4.1. DELIVERY AND HANDOVER OF YOUR E-BIKE
Your authorized dealer shall get your E-Bike ready to ride and for safe operation. The authorized
dealer shall, furthermore, perform a final check and a test ride with your E-Bike. The delivery and
handover of your E-Bike must be documented in the E-Bike’s delivery record (see section 11.5. on
page 55).
4.2. GETTING FAMILIAR WITH YOUR E-BIKE
WARNING
Avoid injuries to yourself and others.
Using your E-Bike in an inappropriate manner may lead to loss of control and hazardous
situations.
Read all instructions and get familiar with all components of your E-Bike before you ride on
public roads or in traffic.
Read all instructions and manuals of this E-Bike carefully and make sure you understand every-
thing.
Pick a location with little traffic to make yourself familiar with the functions and operation of your
new E-Bike. Pay particular attention to the operation of the brakes, shifters and the electric drive
system.
Read all instructions for the correct use of quick-releases and make sure you fully understand
them.
Read all instructions and safety messages that are attached to the quick release levers at the
front and rear wheels.
In addition, read and understand chapter 5.1. on page 18.
If you experience problems with the operation of your E-Bike, contact your authorized dealer.
195. SAFETY CHECK BEFORE EVERY RIDE
The following is a list of important checks that you must perform before every ride.
5.1. QUICK RELEASE LEVERS
WARNING
Avoid crashes and injuries.
Improper use of a quick release lever for a wheel may cause the wheel to fall off during the ride.
Improper use of other quick release levers may cause the saddle or handlebar stem
to become loose.
Quick release levers can be opened easily. Be sure to carefully read and understand the instruc-
tions attached to the quick release levers or delivered separately with your E-Bike.
If you have any questions ask your authorized dealer.
It is very important for your safety that you check all quick releases of your E-Bike even if you
parked it unattended for only a short time only. You have to be sure that all quick releases are
properly closed before you start riding your E-Bike.
1. Close all existing quick release levers at
wheels, seat post and stem. Make sure that
the levers do not protrude.
Correct!
2. C
losing the lever needs only a little force
in the beginning and a lot of force when the
lever is nearly closed.
Wrong!
203. If it is too hard to fully close the lever, open
the lever again and loosen the adjustment
nut at the opposite side a little bit by turn- Adjustment
ing it counter clockwise.
4. If the quick release lever can easily be
pushed to the closed position, this means
the clamping force is insufficient.
Open the lever again and tighten the ad-
justment nut at the opposite side a little bit
by turning it clockwise.
5. WARNING Never try to fasten a wheel
by rotating the quick release lever as shown
on the right. Detachment of the wheel as a
result of improper use of quick release can
result in serious injury. Always use the
adjustment nut on the other side.
(Source: Shimano techdocs)
5.2. SADDLE AND SEAT POST
Check whether the saddle and seat post are properly secured. Try to twist or move the saddle.
The saddle or seat post must not move. If your E-Bike is equipped with a seat post clamp with
quick release, you have to check whether the saddle is set to the correct height (see section 3.2.
on page 15).
215. SAFETY CHECK BEFORE EVERY RIDE
5.3. HANDLEBAR AND STEM
Correct!
1. Make sure the handlebar is at a right angle
relative to the front wheel.
2. Place the front wheel between your legs
and try to twist the handlebar. If you can
twist the handlebar, you must tighten the
quick release of the height adjustment. If no
quick release exists, you must immediately
contact your authorized dealer to check the
bolts. Wrong!
3. Try to twist the handlebar toward the stem
to make sure it does not rotate. If you can
twist the handlebar, you must immediately
contact your authorized dealer to check the
bolts.
4. Check whether the grips as well as the
brake and shift levers are properly secured.
It must not be possible to twist them rela-
tive to the handlebar.
5. Check whether the handlebar can be
turned in both directions without resistance
and without jamming or pinching any of
the hoses or cables.
6. If your bike comes with an adjustable stem,
check whether all pins are engaged and
all quick release levers are properly closed
(see section 7.4. on page 32).
Adjustable stem
225.4. TRANSPORTING ITEMS WITH YOUR E-BIKE
WARNING
Overload can lead to loss of control, hazardous situations or severe injuries.
The E-Bike may handle differently when loaded, especially with heavy loads.
The braking distance of a loaded E-Bike may increase significantly.
Never exceed the maximum permissible load of the E-Bike.
Make sure you never exceed the maximum permissible load (see section 2.7.1. on page 12).
Always secure all loads properly so that there are no loose fasteners that can become entangled
in the wheels or other moving parts of the E-Bike.
235. SAFETY CHECK BEFORE EVERY RIDE
5.5. WHEELS
WARNING
Verify before every ride that the wheels are securely fastened
If not fastened securely, one or both wheels can fall off and can cause a crash,
accident or severe injuries.
1. Check the air pressure of your tires. The air
2.0 – 4.0 bar / 30 – 55 psi
pressure that must be maintained is
indicated on the side of the tire. Do not
overinflate or underinflate your tires.
2. Check the wheels for smooth and free
turning. Turn both wheels and focus on the
rim and the tire. Make sure the rim does
not rub against the rim brake pads and is
not damaged or deformed. Make sure the
tire does not rub against any other parts.
Rim brake pads do not rub at rim
3. Lift the E-Bike so that one wheel is off the
ground. Hit the top of the tire a few times.
Make sure the wheel is not loose or comes
off.
4. Repeat these steps on the other wheel.
(Source: Shimano techdocs)
245.6. BRAKES
WARNING
Avoid accidents and serious injuries caused by faulty brakes.
Keep the brakes clean and in good working order.
If there is a problem with the brakes, do not ride your E-Bike and take it to your
authorized dealer for inspection and repair
To check proper functioning of the brakes,
Correct!
pull both brake levers. Make sure you feel a
distinct pressure point and that you cannot
pull the levers all the way to the grip.
Your hand is hidden in both illustrations
for better visibility of the brake levers.
Correct: Lever does not touch grip
Wrong!
Incorrect: Lever too close to the grip
255. SAFETY CHECK BEFORE EVERY RIDE
If your E-Bike is equipped with rim brakes, the
rim brakes must not touch the tire (see arrow).
Check that the brake pads and the rims or Correct!
brake discs are in good working order and not
worn out. For details refer to section 8.3.2. on
page 38.
Correct: Rim brake pads do not touch tire
Wrong!
Incorrect: Rim brake pads touch tire
265.7. BOSCH BATTERY
NOTICE
An E-Bike battery is heavy. It may fall down and become damaged.
Be sure not to drop the battery and to always secure it in its bracket.
Read the separate manual for the Bosch drive system to get familiar with the battery.
In the Bosch manual the battery is referred to as “battery pack”.
Every time you insert a battery, make sure it
is seated firmly by pressing it into its bracket
until it locks in place with an audible click.
Press battery into locked position
Remove the key from the lock and briefly
try to pull the battery out to ensure that it is
properly and securely locked in the bracket.
Try to pull battery
275. SAFETY CHECK BEFORE EVERY RIDE
5.8. LIGHTING AND REFLECTORS
Check whether the headlight and tail light work properly and whether the headlight has been
adjusted correctly.
Correct adjustment is shown in this illustration.
11 yards
WRONG
CORRECT
WRONG
Consult your authorized dealer if you have any questions regarding the correct setting of the
range of the headlight.
Make sure that all reflectors are present and uncovered.
286. CHILDREN
WARNING
When transporting a child, your E-Bike will handle differently. The braking distance
will increase as well.
ractice riding with a child in a safe location without traffic. Practice and familiarize yourself
P
with the handling of the E-Bike until you feel safe and comfortable riding with a child.
6.1. TRANSPORTING CHILDREN
Make sure before every time you transport a child that:
• You use only a child seat or trailer that is tested and certified by the respective manufacturer
for use in combination with an E-Bike.
• Any child seat or trailer you use is securely attached to your E-Bike. If you have any questions,
consult your authorized dealer.
• The child is strapped in securely with safety belts.
• The child is wearing a helmet at all times.
• You do not exceed the maximum permissible gross weight of your E-Bike.
• You do not exceed the maximum permissible gross weight of the trailer.
• Saddle springs must are covered so that children cannot stick in their fingers.
• It is impossible for any part of the child’s body to become entangled in the spokes or any other
moving parts of the E-Bike.
• You take your child out of the child seat when the E-Bike is parked.
• You never leave a child unattended when seated in the child seat or trailer.
6.2. CHILDREN RIDING E-BIKES BY THEMSELVES
Parents and guardians are responsible for their children. Make sure that all of the following
requirements have been met before your child is riding your E-Bike or any other E-Bike.
• The child is at least 16 years of age.
• Your authorized dealer has properly adjusted the E-Bike to the height and proportions
of your child.
• The standover clearance (see section 3.1. on page 14) of the E-Bike fits to your child.
• The E-Bike used by your child is regularly maintained and kept in good and safe working
condition at all times.
• You have instructed your child on the applicable traffic rules and on how to act responsibly in
traffic.
• You have read this manual together with your child and explained its contents.
• Your child is wearing a helmet when riding an E-Bike.
• The helmet fits your child properly.
• The helmet is replaced after each fall.
Never allow your child to ride off-road unless accompanied by an adult.
297. OPERATION
The following is a list of important checks that you must perform before every ride.
7.1. DURING EVERY RIDE
You must observe the following during every ride to maintain your safety:
• Always hold the handlebar firmly with both hands to keep control of your E-Bike and to avoid
hazardous situations, accidents and injuries.
WARNING Riding a defective E-Bike could decrease your control and cause you to fall.
• If your E-Bike behaves in an unusual manner or you hear an unusual noise, immediately stop
the E-Bike and identify the problem. Make sure any problem is rectified before you ride again.
• Bring your E-Bike to your authorized dealer after any impact for a thorough inspection or any
necessary repair, adjustment or service.
7.2. SHIFTING SYSTEM
Select gears that best allow you to pedal at a speed that feels comfortable to you regardless
of the incline. When shifting gears it is important for you to keep pedaling steadily and without
excessive force until you reach the next gear. Refrain from switching gears while pressing the
pedals with great force.
Dependent on the particular model, E-Bikes from Riese & Müller use two kinds of shifters:
Twist grip: Rotating the right grip towards the
driver leads to an easier gear and rotating
the left grip away from the driver leads to an
easier gear. The grip indicates which gear you
are currently using.
Rapid Fire shifter: The thumb on the right side
shifts to easier gears and the index finger on
the right side shifts to harder gears.
NOTICE
Read the included instruction manual supplied
by the gearshift manufacturer or have your
authorized dealer explain its operation to you.
307.3. BRAKES
WARNING
Modern E-Bike brake systems like disc brakes and hydraulic rim brakes are very powerful.
Carefully make yourself familiar with the brakes.
Safely practice emergency braking in a traffic free area until you feel confident that you can
control your E-Bike and its brakes in hazardous situations that could lead to accidents and
severe injuries.
Be aware that wet or rainy conditions affect the brakes and lead to longer braking distances.
Do not brake forcefully on loose ground, such as sand, gravel or loose dirt to prevent the front
wheel from slipping or locking.
Brakes will heat up during breaking. Use the brakes only intermittently on long downhill rides.
Briefly release the brakes at regular intervals to allow the brakes to cool down.
The brakes will otherwise become very hot and may even fail.
Brake pads and rotors become very hot during use. A brake rotor has sharp edges.
Avoid injuries and never touch a brake rotor that is hot or rotating!
You use the brakes to slow down or stop your E-Bike. The safety of any braking maneuver
largely depends on your abilities. For this reason, it is important and part of the duties of your
authorized dealer when you pick up your new E-Bike to carefully explain to you how to operate
the brakes correctly.
The front brake can transfer a much greater braking power because of the weight shift towards
the front during breaking. When braking, be sure to keep the front wheel from locking.
Otherwise your E-Bike may flip over or slip and you will fall. Apply both brakes at the same time,
keeping the above in mind.
When braking on loose ground, such as sand, gravel or loose dirt, be very careful when applying
the front brake to prevent slipping or locking of the front wheel.
317. OPERATION 7.4. ADJUSTABLE STEM Some E-Bikes from Riese & Müller are equipped with an adjustable stem. The stem is either height-adjustable or both height- and angle-adjustable. The adjustment is made without tools, and the stem is fastened and secured with lock pins and quick release levers. Stem with height adjustment Stem with height and angle adjustment 32
7.4.1. Angle adjustment

     WARNING

Make sure prior to every ride that the pin is engaged properly and the quick release levers
are closed all the way.
Stop immediately if the stem shifts position by self during your ride.
Do not longer use your E-Bike and consult your authorized dealer immediately to have
the stem inspected.
Failure to close the stem fixation properly may result in hazardous situations, accidents,
injury or death.

If you want to adjust the stem, proceed as
follows:
1.		Open both quick release levers A on the
     stem hinge.
2.	Press and hold the button B.
    Set the stem to one of the three angle
                                                         A
    positions C. Release the button B and make
    sure the button engages. To check, rock the
    stem back and forth a little.
3.    WARNING Only use the three stem                   C
   positions C that are secured by the button B!

  Failure to make sure that the button B has                                                 B
  properly engaged and has locked the stem
  in place, may result in the stem coming
  loose while riding and lead to hazardous
  situations, accidents and injuries.
4.	When the stem is locked in place, the red
   lines on the side of the stem hinge line up
   on top of each other (see lines D).                                                       D
4. Close both quick release levers A.
                                                                A
                                                                    A

                                                                                                 33
7. OPERATION
7.4.2. HEIGHT ADJUSTMENT
WARNING
Make sure that prior to every ride that the pin B is engaged properly and the quick release lever
is closed all the way.
Stop immediately if the handlebar shifts position by itself during your ride.
Do not longer use your E-Bike and consult your authorized dealer immediately to have the stem
inspected.
Failure to close the clamping at stem and/or handlebar properly may result in hazardous
situations, accidents or injuries.
1. Open the quick release lever A.
2. Press the lock pin B and adjust the height of
the stem. With the lock pin B having been
pressed, the stem can be moved to differ-
ent height settings.
3. Depending on the stem type there are 5
or 6 different height settings available
4. Choose the correct height setting and make A
sure that the lock pin B engages again.
5. WARNING Choose only stem height B
settings that are secured by the engaged
lock pin B!
o position in between the holes are secu-
N
red by the lock pin B and therefore are not
safe. Failure to properly engage the lock
pin B may result in hazardous situations,
accidents and injuries.
6. Close the quick release lever A.
347.5. RACKS
Never exceed the maximum permissible loads for the rear and front racks. For details refer to
table 2.6.2. on page 12.
An E-Cargo bike may be equipped with additional optional accessories. Follow the additional
instructions in the included manuals for these accessories.
7.6. LIGHTING
The light on all E-Bikes from Riese & Müller is switched on and off on the Bosch display. Read
the included Bosch manual for more information.
357. OPERATION
7.7. SUSPENSION
WARNING
A suspension setting that is too soft leads to more compression of the suspension and less
distance between the pedals and the ground.
Make sure that the suspension is set accurately for the rider’s weight.
Suspension settings that are too soft may result in unexpected and hazardous ground contact
of your pedals leading to a crash and injuries.
Suspension settings that are too hard may result in loss of traction and lead to a crash
and injuries.
Always keep the crank arms horizontal when riding through curves or passing over bumps in the
road. This keeps the pedals from making contact with the ground.
Practice to make sure the pedals never touch the ground. Practice at slow speed and in a
traffic-free area.
If the pedals scrape the ground, you may fall and sustain serious injuries.
Good: Crank arms horizontal Hazardous: Crank arms not horizontal
Your authorized dealer shall explain and set the suspension. Review and follow the instructions
in the included manuals from the suspension manufacturer.
36Adjustment of the suspension is recommended to be done by your authorized dealer who
has the expertise and special tools necessary to properly adjust the suspension settings.
Don’t try it yourself unless you have all the tools and fully understand what to do. In any
case, if in doubt, contact your authorized dealer. For more details on how to adjust the
suspension, please refer to the separately included instruction manual supplied by the
suspension manufacturer.
The hardness of the air suspension can be
adjusted with the included suspension pump.
It changes the air pressure in the suspension
of the front fork or the rear shock absorber.
Suspension pump at the front fork
Suspension pump at the rear shock absorber
The hardness of rear shock absorbers with
steel spring can be adjusted by rotating the
ring A. For more information please refer to
the manuals from the suspension manufac-
turer.
A
Rear shock absorber with steel spring
377. OPERATION
On some E-Bike models you can block the
suspension with the lock out levers B for
rides on smooth ground. If the suspension is B
blocked out, the E-Bike rides like an “old style”
bicycle.
For more information, follow the separately
included instructions provided by the
suspension manufacturer.
B
Lock out levers at front fork and rear shock absorber.
387.8. INTEGRATED LOCK
Some E-Bikes from Riese & Müller are equipped with a cable lock integrated into the frame.
To use this lock to secure your E-Bike proceed as follows:
1. Pull the lock cable A out of the frame.
2. Place the lock cable A around a bike rack,
fence, sign post or similar.
3. Be careful to not scratch the frame
while pressing the end of the cable into A
the lock B.
4. Remove the key C from the lock.
C
The same key is used for the cable lock and
the battery lock. B
398. MAINTENANCE AND REPAIRS 8.1. REGULAR MAINTENANCE To ensure safe and trouble free operation of your E-Bike, it must be properly maintained and cared for on a regular basis. Please refer to the service and maintenance schedule in section 8.4.2 on page 44 for detailed maintenance guidelines. Some maintenance can be performed by either you or your authorized dealer. All other main- tenance must be carried out by your authorized dealer only. Refer to the service and maintenance schedule in section 8.4.2 on page 44 where the mainte- nance intervals specified are based on moderate use of your E-Bike (approximately 300 miles per month). Your E-Bike must be serviced at shorter intervals if you frequently ride in rain, snow or off-road. Even if you ride it only a few times a year, your E-Bike needs to undergo an inspection at your authorized dealer once a year. 8.2. INITIAL INSPECTION A new E-Bike must be inspected after its initial use because screws, shift cables or spokes may have settled a little, making a readjustment necessary. Bring your E-Bike to your authorized dealer after approximately 6 weeks or 300 miles for an initial inspection and any necessary ad- justments. 40
8.3. MAINTENANCE YOU CAN DO BY YOURSELF

     WARNING
Avoid inadvertent activation of the electrical system that may result in injury.
Always remove the battery before carrying out any maintenance or other types of work on your
E-Bike or before you transport the bike.
The electrical assistance starts as soon as the crank arms are moved forward.

The following is a description of the maintenance that you can perform yourself. Please refer
to the service and maintenance schedule in section 8.4.2 on page 44 for detailed maintenance
guidelines and maintenance intervals.

8.3.1. Cleaning your E-Bike

     WARNING
Keep brake pads and rotors clean and uncontaminated by any lubricant or wax.
 o not apply any care products or lubricant to brake pads, brake discs and the braking surfaces of
D
the rims.The brakes may otherwise fail leading to hazardous situations, accidents and injuries.

Clean your bike regularly using clear water and a soft cloth or sponge. Do not use any abrasive
cleaning agents or high pressure washer as their use may damage surfaces or moving parts.

     While cleaning, check your E-Bike for any cracks or deformations.
     If you detect any damage, contact your authorized dealer.

                                                                                                  41
8. MAINTENANCE AND REPAIRS 8.3.2. Brake Inspection 8.3.2.1. Test of setting of the brake levers To check proper functioning of the brake, pull the brake lever. Make sure you feel a distinct pres- sure point and that you cannot pull the lever all the way to the grip. Otherwise, the brake needs to be adjusted. For more information on how to adjust the brake, follow the separately included instructions provided by the brake manufacturer. If you cannot readjust the brake lever, you must contact your authorized dealer for assistance. 8.3.2.2. Brake hoses All Riese & Müller E-Bikes are equipped with hydraulic brakes. Inspect all brake hoses and make sure they have no kinks, damage of any kind and do not leak. 8.3.2.3. Brake rotor Brake rotors must be free from grease and oil. Contact your authorized dealer if you have any questions regarding the cleaning and care. 42
8.3.2.4. Brake pads
Check the thickness of the brake pads. When worn down to their minimum thickness, the brake
pads must be replaced by your authorized dealer.

The pad carrier of the disc brake pads must never touch the brake disc. For more information
on the minimum thickness, refer to the separately included instructions provided by the brake
manufacturer.

                                                                                       New brake pad
     2mm                    0,5mm
      10/128 “              2/128 “

  New                         Worn
  brake pad                   brake pad                Worn brake pad

Minimum thickness of disc brake pads                 Minimum thickness of rim brake pads

8.3.3. Headset
Apply the front brake and place the thumb
and forefinger of your other hand around the
upper headset bearing.

Move your E-Bike forward and backward.
If there is play in the bearing, you will notice
that the parts of the headset are shifting.
If this is the case, the headset bearing must
be readjusted by your authorized dealer.

                                                     Checking the headset play

Lift your E-Bike up at the front until the front wheel is in the air. Move the handlebar to the left
and the right. The steering must turn smoothly and without resistance. If the steering is stiff to
any noticeable extent, the headset bearing must be repaired by your authorized dealer.

                                                                                                       43
8. MAINTENANCE AND REPAIRS
8.3.4. Chain
Make sure to clean and lubricate the chain at least every 300 miles. After riding in the rain, it
might be necessary to lubricate the chain more frequently. Purchase a suitable lubricant from
your authorized dealer.
Check the chain tension on E-Bikes with gear hubs. Try to move the chain up and down in the
center between the front and the rear sprockets. If the chain can be deflected by more than ¾“,
bring your E-Bike to your authorized dealer to retighten or replace the chain.
8.3.5. Belt drive
Perform an inspection of your belt for visible damage every 300 miles.
For more information refer to the separately included manual supplied by Gates.
8.3.6. Tires
WARNING
Avoid accidents, falls and serious injuries.
Do not overinflate or underinflate your tires.
If the tire pressure is too low or too high, the tire may burst or detach from the rim.
Check the air pressure once a month using an air pump with gauge. You will find the minimum
and maximum pressure on the sidewall of the tires (see section 5.5 on page 22. The air pressure
in the tire must be greater than the minimum value and not exceed the maximum value.
Check the tires for wear, tear or damage and true running. A worn tire will provide less traction
on wet or dirty ground. It is also less puncture resistant. Only your authorized dealer may change
the tires.
E-Bikes from Riese & Müller are equipped with OEM tires that are highly puncture-proof.
For questions regarding the repair of a puncture, contact your authorized dealer.
448.3.7. Wheels
On E-Bikes equipped with rim brakes the rim
is subject to wear.
Check whether the wear indicator A is visible
along the entire length of the left and right
sidewalls of the rim.
Check whether the rims are damaged or
deformed. If this is the case, the damaged or
A
worn rims must be replaced by your author-
ized dealer. Wear indicator
Rims must be free from grease and oil. If you have any questions regarding cleaning, contact
your authorized dealer.
Check whether the rims are running true.
To do so, lift the wheel off the ground and
spin the wheel with your hand.
Hold an object (e.g. pen) up close to the rim.
Check whether the rim is running true.
If the rim is noticeably out of true and wob-
bles, contact your authorized dealer. He must
true the wheel.
Wheel running true check
458. MAINTENANCE AND REPAIRS
8.3.8. Suspension
Refer to and follow the instructions provided in the separately included manual supplied by the
suspension manufacturer.
Check the suspension fork and the rear shock
and make sure that there is no oil leaking.
In any case of leakage you must contact your
authorized dealer.
Use the included suspension fork pump to
check the air pressure in the air suspension
elements to be sure that the pressure has not
changed since the last time it was checked.
If the pressure has changed, use the pump to
renew the pressure. Oil leakage at the fork
Squeeze and release the suspension fork while applying the front brake. Squeeze and release
the rear shock by leaning yourself on the saddle and then getting off. If you can clearly hear or
feel play in the suspension, you must contact your authorized dealer to inspect the suspension.
8.3.9. Lighting
Check the setting of the headlight. The headlight must not be set too high so as not to blind on-
coming traffic. The headlight must not be set too low because otherwise you will not be unable
to see far enough in the dark. For details on how to adjust the headlight, refer to section 5.7 on
page 24.
Check the tail light for tight fit.
For questions regarding legal compliance of your E-Bike with all applicable state and local
laws regarding lighting, please contact your authorized dealer.
468.4. MAINTENANCE THAT MUST BE CARRIED OUT
BY YOUR AUTHORIZED DEALER
All maintenance that requires the use of special tools or professional expertise shall be per-
formed only by your authorized dealer and is marked with an “x” in the service and maintenance
schedule in section 8.4.2 on page 44.
8.4.1. Changing and replacing components
The components fitted on your Riese & Müller E-Bike have been designed to complement one
another. Some of these parts have been dimensioned specifically to fit E-Bikes.
If any of these components are worn or damaged, make sure that they are replaced by your
authorized dealer with the same components or components of similar quality, strength and
durability.
478. MAINTENANCE AND REPAIRS
8.4.2. Service and maintenance schedule
If the inspection reveals defects immediate action is necessary.
For questions and concerns, please contact your authorized dealer.
PART STEP
Lighting Check function and secure fit
Tires Check air pressure
Check for damage, uneven or not true running
Verify minimum tread depth and check for damage
Brakes Check lever stroke, pad thickness and pad position relative to the brake surface
Check all fittings / connections
Brake lines Visual inspection for leakage
Brake rotors Check thickness
Suspension fork Check for play and leakage
Clean and lubricate
Rear shock absorber Check for play and leakage
Clean and lubricate
Rear swing arm Check function and bearing play
Rims Check true running
Check wear indicator
Wheels Check true running
Check spoke tension, retighten axle nuts
Chain Clean and lubricate
Check wear and replace if necessary
Belt drive Check wear, replace if necessary
Pedals Retighten fitting, check bearing play
Chainwheel, sprocket Check wear and replace if necessary
Handlebar, stem Visual inspection
Replace
Handlebar grips Check secure fit
Headset bearings Check bearing play
Re-lubricate
Hubs Check bearing play, lubricate
Hub gear Check function
Saddle clamp Retighten fitting
Seatpost Clean, lubricate seat tube
Switchgear Clean, lubricate, check function
Quick releases, thru axles Check secure fit
Screws and nuts Check secure fit
Mudguard mount Check secure fit
Shift cables Check function / replace
48• Service and maintenance steps can be carried out by you as long as you have the
technical skill and the proper tools such as a torque wrench.
✖ Work shall be carried out by your authorized dealer during the annual inspection.
BEFORE EVERY RIDE MONTHLY ANNUALLY OTHER INTERVALS / REMARKS
•
•
•
• Min. thread depth: 1 mm
•
✖
•
✖ After every second replacement of the brake pads.
•
✖ See specification of the suspension manufacturer.
•
✖ See specification of the suspension manufacturer.
✖
•
•
•
✖
• After riding in rain
Every 1,000 km / 600 miles
✖
✖
✖ Every 1,000 km / 600 miles
✖
✖ After a fall, 12,500 miles / 20,000 km or 5 years,
whichever occurs first
•
•
✖ Not necessary for cartridge bearings
✖
✖
✖
✖
• ✖
•
✖
• ✖
✖
498. MAINTENANCE AND REPAIRS
8.4.3. Torque Settings
PART FITTING TORQUE ft.lb / Nm
Coaster brake arm Mounting screw 35–53 / 4–6
Brake lever Mounting screw 44–53 / 5–6
Rear shock absorber Mounting screw 62–80 / 7–9
Freewheel Sprocket cassette lock ring 256–433 / 29–49
Delite carrier Mounting screw 71–88 / 8–10
Swingarm bushing Locking screw 44 / 5
Hydraulic brakes *)
Crankset Crank bolts 310 / 35
Chainring bolts 71–97 / 8–11
Rear hub Axle nut Shimano gear hub 265–398 / 30–45
Axle nut Nuvinci gear hub 265–354 / 30–40
Axle nut Rohloff gear hub 265–310 / 30–35
Pedals 310 / 35
Kickstand Mounting screws 88–106 / 10–12
Rohloff gears *)
Tail light Mounting screws 88–106 / 10–12
Seat post Saddle clamp *)
Seatpost clamp 80–106 / 9–12
Shifter Derailleur shifter mounting screw 35–44 / 4–5
Twist shifter mounting screw 9–18 / 1–2
Derailleur Mounting screw 71–88 / 8–10
Cable fixing screw 35–53 / 4–6
Guide pulley bolts 27–35 / 3–4
Mudguards All mounting screws 27–35 / 3–4
A–Headset stem Handlebar clamp with 4 screws **)
Stem clamp bolt **)
Bosch system *) 44–53 / 5–6
*) see the separate enclosed manual of the component manufacturer
**) see marking on component
508.4.4. Torque Settings for E-Cargo Bikes
PART FITTING TORQUE ft.lb / Nm
Frame Connection front/rear frame 4 x M10 screws 265–354 / 30–40
Connection front/rear frame 2 x M8 screws 177–221 / 20–25
Front fork Steerer clamp above the headset 2 screws 106–124 / 12–14
Clamp for steering rod at right stanchion 4 x M5 screws 44–53 / 5–6
Steering linkage Front and rear steering linkage 2 x M6 screw and nut 80–106 / 9–12
Kickstand Counter nuts M8 106–124 / 12–14
Eye bolts and M5 nuts for kickstand spring 44–53 / 5–6
8.4.5. Torque Settings for adjustable Stems
PART FITTING TORQUE ft.lb / Nm
Clamp stem to steerer 4 clamping screws M6 62–80 / 7–9
Angle adjustment 2 front clamping screws M6 62–80 / 7–9
2 rear clamping screws M5 27–35 / 3–4
2 set screws at quick release levers 9/1
519. WARRANTY TERMS AND CONDITIONS
TWO (2) YEAR LIMITED WARRANTY
NOTICE: THIS TWO (2) YEAR LIMITED WARRANTY GIVES YOU CERTAIN RIGHTS. PLEASE READ THE
FOLLOWING CAREFULLY. ALL RIGHTS NOT EXPRESSLY GRANTED ARE RESERVED BY THE
MANUFACTURER (RIESE & MUELLER GMBH).
The manufacturer provides a limited warranty and warrants its products and/or components
and accessories that were purchased from an authorized dealer in and for use in the Fifty (50)
United States of America, the District of Columbia or Puerto Rico and Canada, to be free from
defects in material and workmanship from the date of purchase of the product for the following
time period:
Two (2) Years
For the warranty to be effective, the purchaser must register the purchase of the E-Bike
online at: www.r-m.de/en-us/service/warranty
Upon registration of the purchase of the E-Bike with RIESE & MUELLER, the frame and swing arm
will be covered against breakage by an additional 3 years of warranty for a total warranty period
of Five (5) years from the date of purchase.
The Lithium-Ion Battery Pack „Power Pack“ is guaranteed to have at a minimum 60% of its nomi-
nal capacity after 500 (five-hundred) full charging cycles or after 1 (one) year counted from the
date of purchase by the original purchaser.
Parts and components that are not manufactured by RIESE & MUELLER GMBH and their future
availability, are warranted as determined by the respective manufacturers and set forth in the
respective manufactures warranty terms and conditions.
THIS LIMITED WARRANTY IS IN LIEU OF ANY OTHER WARRANTIES, EXPRESS OR IMPLIED,
INCLUDING ANY IMPLIED WARRANTY OF MERCHANTABILITY OR FITNESS FOR A PARTICULAR
PURPOSE, USE OR OTHERWISE, AND OF ANY OTHER OBLIGATIONS OR LIABILITY ON THE
MANUAFCATURER’S PART.
This warranty applies only to the original retail purchaser and is not transferable from the original
purchaser to subsequent purchasers.
This warranty applies only to RIESE & MUELLER E-Bikes purchased from an authorized dealer.
52You can also read