Product Mixing & Installation Guide - Repointing with Lime Mortar
←
→
Page content transcription
If your browser does not render page correctly, please read the page content below
Repointing with
              Lime Mortar

Product Mixing & Installation Guide
Why should I repoint a masonry building?
Depending on the buildings age and the amount of attentive care given to it over the course of
its history the repointing of mortar joints maybe necessary. Proper care of masonry walls
includes upkeep of deteriorated mortar joints just to name one example. Without such upkeep
water infiltration problems may arise, creating the possibility of devastating structural problems,
aesthetic qualities of a building may suffer, and historical context maybe lost forever.

Should my building even be completely repointed?
LimeWorks.US recommends doing as little intervention as possible in regard to the pointing
mortar if in fact the large majority is still intact. A homeowner should replace only what is
missing wholly, or eroded back more than 3/8”, with fresh mortar, which will match very
closely to the original mortar in composition, color, texture and tooling. We call that process
“Patch pointing” and it is a cost conservative as well as functionally superior option over
pointing the whole building in an incorrect manner. The total repointing of a building is often
unwarranted. Small shrinkage cracks evident in old lime mortar is not a reason to execute
complete repointing

What kind of material should I use?
Today there are a variety of mortars a homeowner can easily purchase and use to repair their
buildings. Nearly all of those off-the-shelf mortars are based on Portland cement, (a hard, brittle
and impermeable material that can aid in accelerating deterioration rather than protect many
vintage masonry buildings built with lime based mortar. If your building was built before 1940
it may have been exclusively built with lime as the primary binder. Cement-based, and lime-
based mortars are not equal and should not be treated as such. Lime mortar “breathes”, by
processing moisture within a wall back out to the atmosphere rather than trapping water in the
wall like a Portland cement mortar is known to do, when the remaining backup mortar is lime-
based. When water is trapped in a masonry wall it can freeze and expand, thus resulting in
pushing masonry units out of position and even cracking the units. This makes a relatively small
problem of what were only deteriorated mortar joints into a possibly larger maintenance issue,
costing multiple times more than the misguided and improper repair carried out.

About               Mortar
Ecologic Mortars are simply a prepared blend of Natural Hydraulic Lime, properly graded sand
and pigments to which you just add water, mix and go to work. NO Portland cement is present
or required in Ecologic mortar to make them work. Ecologic Mortar will reach over 750 psi
without additives and still maintain a high liquid and vapor permeability, which allows mortar
joints to breathe and allows moisture to escape. Ecologic Mortar comes in 9 stock colors each of
which can be used on their own as a repointing mortar or blended together to create a custom
colored mortar. Use the LimeWorks.US Color-Matching System “Mortar kit” to begin to
identify which of the 9 stock Ecologic mortar colors, or 4 sample blends might be used to begin
to formulate the base starting point when simulating the mortar to be used for repointing your
older building.
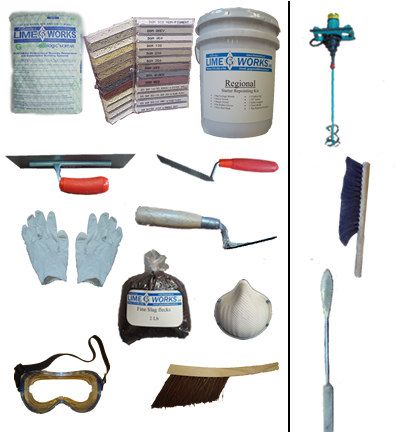
Starter Tools for Repointing                          Add-On-Tools

                                                                  Drill mixer
    Mortar           Mortar Kit
                                   5 gallon Pail

                                   Margin Trowel
 Stucco Trowel
                                                         Brush
                            Jointer

                                 Silica Dust Mask
   Rubber Gloves

                  Regional Inclusions

                                                                 Leaf/Square Slicker
                                 Churn Brush
   Safety goggles
                 Starter “Take-away” Repointing kit
                 1-Bag Ecologic Mortar             1-5 Gallon Pail
                    1-Stucco Trowel                 1-3/8”Jointer
                    1-Margin Trowel             1-Safety Glasses
                  2-Pair Rubber gloves             1-Churn Brush
                   2-Silica Dust Mask        1-Container of Inclusions
                      1- Mortar Kit          for Regional Modification
         Available at Shows & demonstration workshops
Repointing with Ecologic Lime mortar in small batches
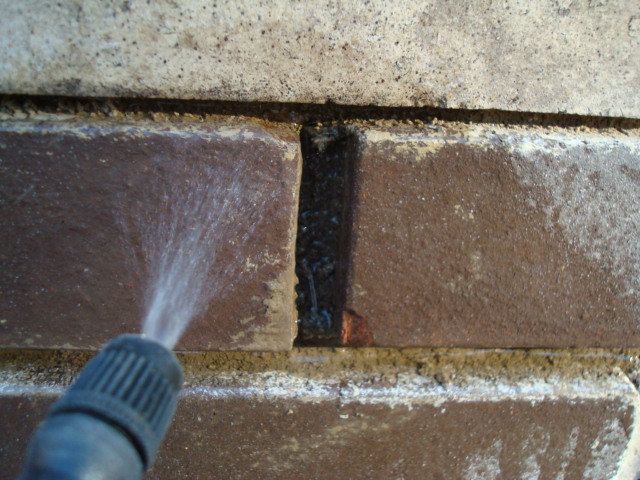
Step 1
Make sure mortar joints are
appropriately cleaned out to
receive fresh Ecologic Lime
mortar. Please refer to
www.LimeWorks.US for tips on
appropriate joint preparation
methods.
Step 2
Soak masonry with water until
thoroughly saturated and let sit
until there is no standing water.
Wetting allows the new mortar
to cure slowly rather than dry
out. This step is critical to a
successful repointing project
Step 3
Begin by putting on goggles, rubber
gloves, and dust mask!
Add ½ of the appropriate amount of
water to a 5-gallon pail. Approximately
4½ cups of water are required to a
gallon of dry Ecologic Lime mortar by
volume.Step 4
Add 1- gallon of dry
Ecologic Lime Mortar
into the 5-gallon pail that
now contains half of the
required mixing water.
(2-1/4 cups)
Step 5
Using a pumping motion blend Mortar
with the A drill mixer for approximately
2-3 minutes. (Collomix drill mixer
w/paddle is recommended)
Remove the mixer placed in the
off position. Scrape the side of
the bucket with the margin trowel
to ensure all dry material is
incorporated into the mix!
Step 6
Set the drill mixer aside in the off
position. Transfer the mortar a to
2nd 5-gallon bucket while adding
the remaining amount of required
mixing water. Total mixing water
added now is approximately 4-
1/2cups
Step 7
Mix mortar for another 2-3
minutes. The mortar should be
dry enough to form a ball
when squeezed in the
hand. Mortar should
not be crumbly or
soupy!Step 8
Using a Margin Trowel apply
thoroughly mixed repointing
mortar onto your Hawk or
Stucco Trowel. Using a jointer
slide the mortar into the bed
joint with enough force to bond
the new mortar to the old.
Step 9
Once the bed joint is thoroughly
packed with the repointing mortar and
slightly overfilled, apply mortar to the
head joint, also packing thoroughly
and slightly overfilling with the
jointer.
Step 10
Using the jointer cut off
excess mortar. Next
firmly press against the
joint with the jointer to
reveal a slight edge of
the surrounding brick.
Step 11
After the new mortar is thumbprint
hard, lightly brush across the mortar
joints with a horsehair brush to
remove loose particles. To antique
the joint tap the very stiff mortar
joints directly with a churn brush.
DO NOT SWIPE SMEAR WET
JOINT!Glossary of terms Repointing – The process of replacing deteriorated or weathered mortar between masonry units Bed joint – The horizontal mortar joint that masonry units lay on Head joint – The vertical mortar joint between two masonry units Collar joint – The cavity behind masonry units between the wythes of a masonry wall Mortar – A plastic workable material traditionally made of lime and sand used to lay up masonry units Wythe – Each successive layer of vertically laid masonry units. Portland cement – An artificial binder made of limestone and clay burnt at very high temperatures. Possesses hydraulic (water-setting) properties. Is known to be hard, brittle, impermeable, and reaches its initial set in about 2 hours. Non-hydraulic Lime - A natural binder made of limestone burnt at low temperatures. Does not have any hydraulic properties. It is an “air” lime that sets with air by drawing in carbon dioxide from the atmosphere over a 6 week period in a process called carbonation. (This is AKA as “Lime Putty” and is a traditionally weak material). Natural hydraulic Lime (NHL) - A natural binder made of limestone with natural chemical impurities that allow it to have hydraulic setting properties, but remains highly vapor permeable, malleable and able to act as a catalyst to process water out of a masonry wall. Reaches its initial set in about 6 hours. Masonry unit - stone, clay bricks, terra cotta or cemenitious block used in the construction of a masonry wall.
For Questions:
E-Mail gogreen@LimeWorks.US OR
Call 215.536.6706 for help, for professional onsite consultation, training, and
workshops or to discuss the details of your application
For a Custom Prepared Mortar Simulation:
Go to www.LimeWorks.US and at left menu fill out our form found at “Send us a
sample”
Mail via regular USPS:
LimeWorks.US, PO Box 151, Milford Square, PA 18935
To order:
     Call 215.536.6706
     Fax 215.536.2281
      Email Order@LimeWorks.US

                                Helpful Tips
     Do all your prep work before you start repointing
     Start from the top of the wall and work your way down
     Use the appropriate sized jointer for the job. The appropriate size
      jointer should be a 1/16’ smaller than the joint.
     Make up enough mortar to use within 1 hour of pointing work.
     Cover your work from the sun, strong wind & rain using dampened
      burlap to encourage a slow cure.
     Slow cure lime mortar work by lightly misting the protected work
      with dampened burlap twice a day for three days.
                                         DISLAIMER
 All LimeWorks.us publications are offered on a complementary basis and as a general guide
     for our customers. The purchaser is solely responsible to determine suitability of any
LimeWorks.us products, tools or equipment for any intended use and purpose. LimeWorks.us
makes no warranties, express or implied, as to the suitability of any of its product offerings for
an intended purpose or to the accuracy or completeness of any of the information contained in
its publications. Lime Works.US assumes no responsibility for damages whether incidental or
 consequential which may occur as a direct or indirect result of the use or misuse of any of its
       products, tools or equipment offered. By proceeding to use any of the purchased
  LimeWorks.us product offerings the purchaser agrees to use the items at their own risk and
both indemnifies and holds harmless Lime Works.US against any liabilities, costs or expenses
                  resulting from the purchase, use or failure in any application.
You can also read