Remote Support Real-Time Dashboard Integration
←
→
Page content transcription
If your browser does not render page correctly, please read the page content below
Remote Support
                           Real-Time Dashboard Integration

©2003-2021 BeyondTrust Corporation. All Rights Reserved. Other trademarks identified on this page are owned by their respective owners. BeyondTrust is not a chartered bank or trust company, or   TC:7/19/2021
depository institution. It is not authorized to accept deposits or trust accounts and is not licensed or regulated by any state or federal banking authority.
REMOTE SUPPORT
REAL-TIME DASHBOARD INTEGRATION
Table of Contents
Real-Time Dashboard Installation and Configuration 3
Prerequisites for the Real-Time Dashboard Integration 4
Applicable Versions 4
Network Considerations 4
Prerequisite Installation and Configuration 4
Microsoft IIS Setup for Real-Time Dashboard Integration 5
Install Websocket Support into IIS 5
Download Web Platform Installer 5.0 5
Set Up Reverse Proxy 5
Create a Self-Signed Certificate 5
Create an SSL binding 6
Configure BeyondTrust for the Real-Time Dashboard Integration 7
Verify the API Is Enabled 7
Create an API Service Account 7
Configure the Real-Time Dashboard Plugin for Integration with BeyondTrust Remote
Support 8
BeyondTrust Appliance B Series 8
Real-Time Dashboard Instance 9
SALES: www.beyondtrust.com/contact SUPPORT: www.beyondtrust.com/support DOCUMENTATION: www.beyondtrust.com/docs 2
©2003-2021 BeyondTrust Corporation. All Rights Reserved. Other trademarks identified on this page are owned by their respective owners. BeyondTrust is not a chartered bank or trust company, or TC: 7/19/2021
depository institution. It is not authorized to accept deposits or trust accounts and is not licensed or regulated by any state or federal banking authority.REMOTE SUPPORT
REAL-TIME DASHBOARD INTEGRATION
Real-Time Dashboard Installation and Configuration
IMPORTANT!
You must purchase this integration separately from your BeyondTrust software. For more information, contact BeyondTrust sales.
This document describes how to install and configure the BeyondTrust Real-Time Dashboard. The Real-Time Dashboard is a web-based
dashboard which shows the current state of your B Series Appliance in real time. This diagram illustrates how the dashboard operates:
When the end-user accesses the Real-Time Dashboard from the web, the request is handled by Internet Information Services (IIS), which
acts as a reverse proxy to the dashboard application. The dashboard application runs as a Windows Service on a local port. The
dashboard communicates with the BeyondTrust Appliance B Series over port 443.
SALES: www.beyondtrust.com/contact SUPPORT: www.beyondtrust.com/support DOCUMENTATION: www.beyondtrust.com/docs 3
©2003-2021 BeyondTrust Corporation. All Rights Reserved. Other trademarks identified on this page are owned by their respective owners. BeyondTrust is not a chartered bank or trust company, or TC: 7/19/2021
depository institution. It is not authorized to accept deposits or trust accounts and is not licensed or regulated by any state or federal banking authority.REMOTE SUPPORT
REAL-TIME DASHBOARD INTEGRATION
Prerequisites for the Real-Time Dashboard Integration
To complete this integration, please ensure that you have the necessary software installed and configured as indicated in this guide,
accounting for any network considerations.
Applicable Versions
l BeyondTrust Remote Support: 17.x and newer
Network Considerations
The following network communication channels must be open for the integration to work properly:
Outbound From Inbound To TCP Port # Purpose
BeyondTrust
BeyondTrust Appliance
Middleware Engine 443 BeyondTrust API calls.
B Series
Server
Prerequisite Installation and Configuration
l The Real-Time Dashboard is a BeyondTrust Middleware Engine plugin.
For more information on installing and working with the BeyondTrust Middleware Engine, please see the BeyondTrust Remote
Support Middleware Engine Installation and Configuration document at www.beyondtrust.com/docs/remote-support/how-
to/integrations/middleware-engine.
l The host computer must be a fully patched Windows Server 2012 R2 or later.
l Microsoft IIS must be setup as described in "Microsoft IIS Setup for Real-Time Dashboard Integration" on page 5.
l For best results, the B Series Appliance and the server hosting the BeyondTrust Middleware Engine should have synchronized
clocks. Clock drift between the servers could cause inaccurate time durations to appear on the dashboard.
l CA-signed SSL certificates are recommended for production deployments. While self-signed certificates can be used for product
staging and test deployments, a self-signed certificate is NOT recommended for production use.
SALES: www.beyondtrust.com/contact SUPPORT: www.beyondtrust.com/support DOCUMENTATION: www.beyondtrust.com/docs 4
©2003-2021 BeyondTrust Corporation. All Rights Reserved. Other trademarks identified on this page are owned by their respective owners. BeyondTrust is not a chartered bank or trust company, or TC: 7/19/2021
depository institution. It is not authorized to accept deposits or trust accounts and is not licensed or regulated by any state or federal banking authority.REMOTE SUPPORT
REAL-TIME DASHBOARD INTEGRATION
Microsoft IIS Setup for Real-Time Dashboard Integration
To use the Real-Time Dashboard, Microsoft Internet Information Services (IIS) must be installed. The steps below describe how to set up
IIS to act as a reverse proxy to the Real-Time Dashboard, with a minimal amount of configuration.
Install Websocket Support into IIS
While websocket support is not strictly required, a websocket connection is preferred for its efficiency. If enabled in IIS and supported on
the user's browser, a websocket connection is used for the dashboard.
1. From the Server Manager dashboard, click on Add Roles and Features.
2. In the wizard, click through the first few screens until you get to Server Roles.
3. Select Web Server (IIS). If prompted to add extensions, click OK.
4. Leave the Features options at the default.
5. Under Web Server Role (IIS) > Role Services, expand the Application Development section and select WebSocket
Protocol.
6. After completing the installation, restart IIS services.
Download Web Platform Installer 5.0
1. Download and install the Microsoft Web Platform Installer 5.0 from www.microsoft.com/web/downloads/platform.aspx.
2. Using the Web Platform Installer, install URL Rewrite 2.0 and Application Request Routing 3.0 into IIS.
3. After this installation, restart IIS services or restart the server.
Set Up Reverse Proxy
These instructions assume that the Default Web Site application will be used. However, it is possible to create a new web site at a specific
context path, as well.
1. In the IIS Manager, go to the Default Web Site.
2. Double-click on URL Rewrite.
3. Click Add Rule(s).
4. Choose Reverse Proxy. If prompted to enable proxy functionality, click OK.
5. Enter localhost:53487 as the server name, leaving the other options as default.
6. Restart the Default Web Site.
Create a Self-Signed Certificate
Note: This step is only for product staging and test deployments. A CA-signed certificate is recommended for production use.
1. In IIS Manager, select Web Server.
2. Double-click on Server Certificates.
3. Under Actions, click on Create Self-Signed.
4. Enter a name for the certificate (e.g., Default SSL).
SALES: www.beyondtrust.com/contact SUPPORT: www.beyondtrust.com/support DOCUMENTATION: www.beyondtrust.com/docs 5
©2003-2021 BeyondTrust Corporation. All Rights Reserved. Other trademarks identified on this page are owned by their respective owners. BeyondTrust is not a chartered bank or trust company, or TC: 7/19/2021
depository institution. It is not authorized to accept deposits or trust accounts and is not licensed or regulated by any state or federal banking authority.REMOTE SUPPORT
REAL-TIME DASHBOARD INTEGRATION
5. Select Web Hosting for the certificate store.
6. Click OK.
Create an SSL binding
Note: This step is only for product staging and test deployments. A CA-signed certificate is recommended for production use.
1. In IIS Manager, select the Default Web Page.
2. Select SSL settings.
3. Select Bindings.
4. Select type https.
5. Select port 443.
6. Select the SSL certificate (from the example above, Default SSL).
7. Click OK.
8. Click Close.
SALES: www.beyondtrust.com/contact SUPPORT: www.beyondtrust.com/support DOCUMENTATION: www.beyondtrust.com/docs 6
©2003-2021 BeyondTrust Corporation. All Rights Reserved. Other trademarks identified on this page are owned by their respective owners. BeyondTrust is not a chartered bank or trust company, or TC: 7/19/2021
depository institution. It is not authorized to accept deposits or trust accounts and is not licensed or regulated by any state or federal banking authority.REMOTE SUPPORT
REAL-TIME DASHBOARD INTEGRATION
Configure BeyondTrust for the Real-Time Dashboard
Integration
Several configuration changes are necessary on the B Series Appliance to implement the Real-Time Dashboard. All of the steps in this
section take place in the BeyondTrust /login administrative interface. Access your Remote Support interface by going to the hostname of
your B Series Appliance followed by /login (e.g., https://support.example.com/login).
Verify the API Is Enabled
Management API Configuration
This integration requires the BeyondTrust XML API to be enabled. This
feature is used by the BeyondTrust Middleware Engine to communicate
with the BeyondTrust APIs.
Go to /login > Management > API Configuration and verify that Enable
XML API is checked.
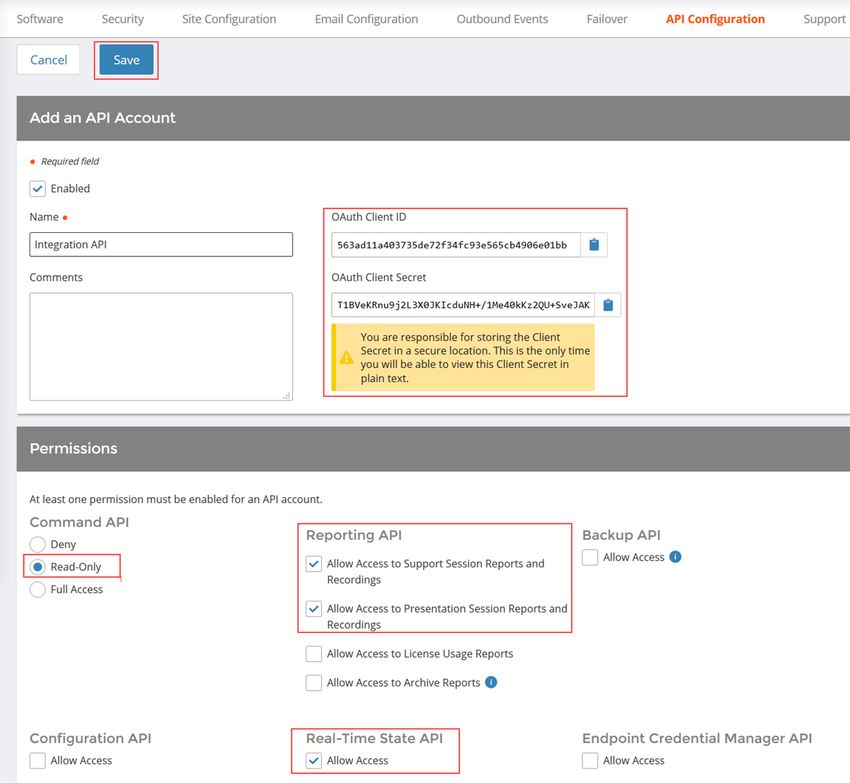
Create an API Service Account
1. Go to Management > API Configuration and click Add to create a new API account.
2. Provide a name for the API account.
3. Under Permissions, check Read Only to the Command API.
4. For the Reporting API, check Allow Access to Support Session
Reports and Recordings and Allow Access to Presentation
Session Reports and Recordings.
5. For the Real-Time State API, check Allow Access.
6. Be sure to copy the values for both the OAuth Client ID and OAuth
Client Secret for use in a later step.
SALES: www.beyondtrust.com/contact SUPPORT: www.beyondtrust.com/support DOCUMENTATION: www.beyondtrust.com/docs 7
©2003-2021 BeyondTrust Corporation. All Rights Reserved. Other trademarks identified on this page are owned by their respective owners. BeyondTrust is not a chartered bank or trust company, or TC: 7/19/2021
depository institution. It is not authorized to accept deposits or trust accounts and is not licensed or regulated by any state or federal banking authority.REMOTE SUPPORT
REAL-TIME DASHBOARD INTEGRATION
Configure the Real-Time Dashboard Plugin for Integration with
BeyondTrust Remote Support
Now that you have configured Microsoft IIS and the B Series Appliance, the next steps are to deploy and configure the Real-Time
Dashboard plugin.
For more information on installing and working with the BeyondTrust Middleware Engine, please see the BeyondTrust Remote
Support Middleware Engine Installation and Configuration document at www.beyondtrust.com/docs/remote-support/how-
to/integrations/middleware-engine.
1. Copy the provided plugin ZIP file to the server hosting the BeyondTrust Middleware Engine.
2. Extract the plugin ZIP file to the Plugins folder in the directory where the BeyondTrust Middleware Engine is installed.
3. Restart the BeyondTrust Middleware Engine Windows service.
4. From the server, launch the middleware administration tool. The default URL is http://127.0.0.1:53231.
5. The Real-Time Dashboard Plugin shows in the list of plugins. Click the clipboard icon to add a new configuration.
BeyondTrust Appliance B Series
The first portion of the plugin configuration provides the necessary settings for communication between the plugin and the BeyondTrust
Appliance B Series. The configuration sections include:
1. Plugin Configuration Name: Any desired value. Because multiple
configurations can be created for a single plugin, allowing different
environments to be targeted, provide a descriptive name to indicate
how this plugin is to be used.
2. Appliance Id: This can be left as Default or can be given a custom
name.
3. B Series Appliance Host Name: The hostname of the
BeyondTrust Appliance B Series. Do not include https:// or
other URL elements.
4. BeyondTrust Integration API OAuth Client ID: The Client ID of
the OAuth account.
5. BeyondTrust Integration API OAuth Client Secret: The Client
Secret of the OAuth account.
6. Locale Used for BeyondTrust API Calls: This value directs the B
Series Appliance to return session data in the specified language.
7. Disabled: Enable or disable this plugin configuration.
8. Allow Invalid Certificates: Leave unchecked unless there is a
specific need to allow. If enabled, invalid SSL certificates are
allowed in calls performed by the plugin. This would allow, for
example, self-signed certificates. This is not recommended in
production environments.
9. Use Non-TLS Connections: Leave unchecked. TLS cannot be disabled for this type of plugin.
10. Real Time Events Types: Specify which events the plugin processes when received by the middleware engine. The following
should be checked:
SALES: www.beyondtrust.com/contact SUPPORT: www.beyondtrust.com/support DOCUMENTATION: www.beyondtrust.com/docs 8
©2003-2021 BeyondTrust Corporation. All Rights Reserved. Other trademarks identified on this page are owned by their respective owners. BeyondTrust is not a chartered bank or trust company, or TC: 7/19/2021
depository institution. It is not authorized to accept deposits or trust accounts and is not licensed or regulated by any state or federal banking authority.REMOTE SUPPORT
REAL-TIME DASHBOARD INTEGRATION
a. Real Time Data Unavailable
b. Real Time Data Available
c. Real Time State Changed
Real-Time Dashboard Instance
The remainder of the plugin configuration provides the necessary settings for communication between the plugin and the Real-Time
Dashboard instance. The configuration settings include:
1. Company API Name: The value found on the /login > Status > Information page of the BeyondTrust Appliance B Series.
2. CSAT Polling Interval: (Optional) The interval in minutes for the plugin to pull customer surveys to obtain a customer satisfaction
average. If this functionality is not desired, leave blank or set to 0.
3. CSAT Question Name: (Optional) The Question Name of the survey question to use for customer satisfaction levels. This is
found by going to /login > Public Portals > Exit Surveys and editing the desired question.
4. Public Sites to Poll for CSAT: (Optional) A comma-separated list of public site IDs to poll for CSAT responses. If your
BeyondTrust setup has only one public site, you can leave this field blank or enter 1. Otherwise, go to /login > Public Portals >
Public Sites and edit each site you wish to include; the site ID appears in the URL. For example, if the URL is
https://support.example.com/login/public_site/5/edit, then the site ID is 5.
5. Allowed Support Teams: (Optional) A comma-separated list of support team code names to include in the dashboard. This is
considered an allow list of teams. Code names are found by going to /login > Configuration > Support Teams. If left blank, all
teams are allowed.
6. Ignored Support Teams: (Optional) A comma-separated list of support team code names to exclude from the dashboard. This is
considered a deny list of teams. Activity related to these teams is ignored by the real-time state API. Code names are found by
going to /login > Configuration > Support Teams. If left blank, no teams are ignored.
7. Valid Session Start Methods: The types of sessions to show in the dashboard.
8. Real Time API Idle Timeout: The connection to the real-time state API is restarted if no data has been received within this
number of minutes. If this functionality is not desired, leave blank or set to 0.
9. Waiting Session SLAs: Used to describe service-level agreements for waiting sessions by team. If a session has exceeded the
SLA, an exlamation icon appears next to that session.
10. Real Time Dashboard Web Address: The local address on which the dashboard runs (e.g., http://localhost:53487/).
11. Format of representative names displayed in the Real Time Dashboard: The preferred format for displaying names in the
Real-Time Dashboard.
12. Enable session details pop-up: If enabled, the Real-Time Dashboard contains links in various panels to view details about
closed sessions.
After saving the configuration, click the test icon next to the new plugin configuration. No restart is needed.
SALES: www.beyondtrust.com/contact SUPPORT: www.beyondtrust.com/support DOCUMENTATION: www.beyondtrust.com/docs 9
©2003-2021 BeyondTrust Corporation. All Rights Reserved. Other trademarks identified on this page are owned by their respective owners. BeyondTrust is not a chartered bank or trust company, or TC: 7/19/2021
depository institution. It is not authorized to accept deposits or trust accounts and is not licensed or regulated by any state or federal banking authority.You can also read