SAFARI MONTAGE G3011 BROADCAST ENCODER - INSTALLATION AND SETUP GUIDE
←
→
Page content transcription
If your browser does not render page correctly, please read the page content below
SAFARI MONTAGE®
         G3011
   BROADCAST ENCODER

INSTALLATION AND SETUP GUIDE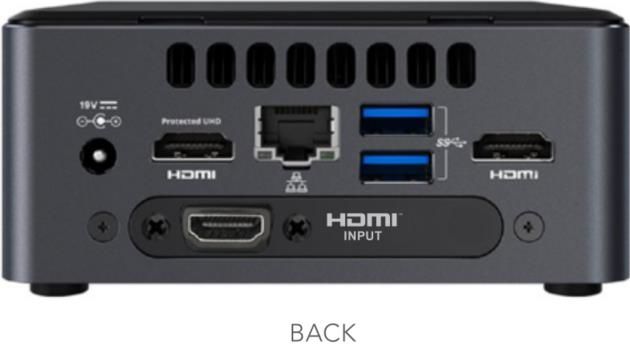
SAFETY PRECAUTIONS

    The presence of this symbol is to alert the installer and user to the presence of uninsulated
    dangerous voltages within the product’s enclosure that may be of sufficient magnitude to produce a
    risk of electric shock.

    TO REDUCE THE RISK OF FIRE OR ELECTRIC SHOCK, DO NOT EXPOSE THIS DEVICE TO
    RAIN OR MOISTURE, AND DO NOT OPEN THE DEVICE. REFER SERVICING TO QUALIFIED
    PERSONNEL ONLY.

•   DO NOT apply power to the unit until all connections have been made, all components have been
    installed and all wiring has been properly terminated.
•   DO NOT terminate, change or uninstall any wiring without first disconnecting power from the device.
•   This device is supplied with the appropriately rated power cord. The use of any other power cord
    could cause damage and invalidate the manufacturer’s warranty.
•   DO NOT connect the power cord to the device if the power cord is damaged.
•   DO NOT cut the power cord.
•   DO NOT plug the power cord into an AC outlet until all cables and connections to the device have
    been properly connected.
•   The device should be installed in an environment consistent with its operating temperature
    specifications. Placement next to heating devices and ducts is to be avoided as doing so may cause
    damage. The device should not be placed in areas of high humidity.
•   DO NOT cover any of the device’s ventilation openings.
•   DO NOT cover or obstruct the device’s fan or fan openings.
•   If the device has been in a cold environment allow it to warm to room temperature for at least 2 hours
    before connecting to an AC outlet.

G3013-C                                             2                                      Revised 10/4/2021
Product Description
The SAFARI Montage Broadcast Encoder is a small form factor, single-input HD encoder that
combines support for HLS Adaptive Bitrate (ABR) HTML5-native playback, traditional UDP
multicasting, and low latency video streaming to public CDNs such as YouTube Live and Vimeo.

These next generation encoders integrate seamlessly with SAFARI Montage IPTV & Live Media
Streaming solutions to support delivery to mobile devices, Chromebooks, and all the latest browsers.
They provide full, native HTML5-compatible playback and dynamically serve the optimal stream and
bitrate to each client – all without the need for a plugin.

The SAFARI Montage Broadcast Encoder is ideal for streaming school news and supports up to 120
clients (classrooms) directly. When paired with this encoder, SAFARI Montage IPTV & Live Media
Streaming solutions will dynamically select the optimal streaming format through client auto-detection,
delivering UDP multicast or HLS ABR unicast streams.

Unpacking and Inspection
Ensure that all items are removed and inspected prior to discarding any packing material.
Thoroughly inspect the unit and all contents to make certain all components are present and no
damage has occurred in shipping, paying particular attention to connectors. If there is any sign of
damage to the unit or items are missing, please contact SAFARI Montage Technical Support. SAFARI
Montage Technical Support is available Monday – Friday from 8 a.m. to 6 p.m. Eastern Time, and they
may be contacted by telephone at 800-782-7230 or online via http://www.safarimontage.com/support/.

Package Contents

   •   SAFARI Montage Encoder with:
          o (1) AC-DC Power Adapter
          o (1) 6’ HDMI Cable
          o (1) 6' Network Cable

G3013-C                                            3                                     Revised 10/4/2021
SAFARI Montage® Encoder Specifications
AC-DC Adaptor
Power AC input: 100-240 V
DC output: 19V/3.4A
Video Encoding H.264/AVC
HLS ABR: 576p, 720p, 1080p
UDP Multicast: 1080p
Video Encoding Resolutions
CDN RTMP: 720p
Bitrates: Variable
Audio Encoding AAC @ 128 kbps
HDMI Digital
Audio Input
3.5 mm Analog (with optional USB adapter)
Network 10/100/1000 Base-T Ethernet
Dimensions 4.5” (W) x 4.6” (D) x 2.1” (H)
Warranty 3 Years
Environmental 0° C to +40°C
Weight 1.6 lbs.
6' RJ45 Cat-5e Patch Cable
Included
6' HDMI Cable
CDN Streaming & Centralized
IPTV Maintenance or IPTV Streaming Software Upgrade Plan (SUP)
Management Requirements
G3013-C 4 Revised 10/4/2021Installation and Configuration
Please read these instructions in their entirety before you begin:
1. Review any questions with Technical Support in advance. Please note that SAFARI Montage
Technical Support is available Monday – Friday from 8 a.m. to 6 p.m. Eastern Time, and they
may be contacted by telephone at 800-782-7230 or online via
https://www.safarimontage.com/support/.
SAFARI Montage® System Requirements:
• SAFARI Montage® v7.5 or greater
• SAFARI Montage® IPTV or Selective Video Streaming license
• Clients must meet the System Requirements found at:
https://www.safarimontage.com/support/releases/sm-7.5.x.aspx#system
Before You Begin:
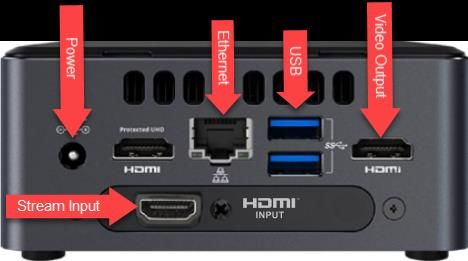
2. Make all connections before powering the encoder.
3. Note that all Encoders ship with a default:
o Static IP address: 191.53.51.216
o Gateway: 191.53.51.1
o Netmask: 255.255.0.0
4. SAFARI Montage strongly recommends that video sources be connected directly to the Encoder
with the supplied cabling and cannot provide support for third-party distribution and/or switching
equipment placed in-line between the video source and the encoder.
5. The encoder is designed to work with input sources set to 30 or 60 FPS. Please make certain
your video source equipment is set for 30 or 60 frames per second.
6. SAFARI Montage is not responsible for damage caused by electrical surges and recommends
that equipment be protected by installing surge protection where appropriate. Surge protection
is required for Coaxial Cable inputs and is highly recommended for HDMI inputs. For further
information please review our Surge Protection documentation.
7. The encoder supports both multicast and unicast deployment, with a recommended concurrent
unicast user count numbering 125 or fewer. Please take the time to review our Multicast and
Unicast Considerations documentation before configuring SVS streams within SAFARI
Montage.
G3013-C 5 Revised 10/4/2021Initial Network Configuration:
1. Connect a monitor and keyboard to the encoder.
2. Connect the encoder to the network.
3. Power the encoder via the supplied power adapter or cord.
4. Configure the network settings as required to conform to the local network addressing scheme.
a. The console menu will display when the encoder’s boot process completes.
b. Press 1 and enter to go to the Network Settings…
c. Press 1 and enter again to go to Network Cards (IP Address)…
d. Press 1 and enter to go to NIC (eno1)
e. Press 1 and enter to Disable DHCP and Assign Static IP
G3013-C 6 Revised 10/4/2021f. Enter the desired static IP address and press enter
g. Enter the subnet in CIDR notation and press enter
h. Enter the Gateway IP address and press enter
i. Enter DNS server(s) leaving a space between each address
j. The information will be saved and applied to the unit.
k. The static IP will be reflected in the menu when it reloads
G3013-C 7 Revised 10/4/2021Configure Host Name
With a monitor and keyboard connected to the encoder:
1. Press 1 and enter to go to the Network Settings…
2. Press 3 and enter to go to Host/Domain
3. Press enter to begin the configuration
4. Enter the host name and press enter
5. Enter the domain name (including the top level domain) and press enter
6. Wait for the encoder to finish changing the domain name, and hit enter when prompted to return
to network configuration
7. Verify that the Host (FQDN) displays the host name you configured
Configure SAFARI Montage Controller
Select encoder settings can be managed from the SAFARI Montage controller through Pathways SM.
To do this, the encoder must be given the appropriate host name of the controller. With a monitor and
keyboard connected to the encoder:
1. Press 13 and enter to go to the SAFARI Montage Controller… menu
2. Clear any existing controller by pressing c (clear) and enter
3. Press e (edit) and enter to begin configuration
G3013-C 8 Revised 10/4/20214. Enter the FQDN or IP address of the SAFARI Montage controller and press enter
5. Ensure the controller’s FQDN or IP address appears in the > section
6. From a separate computer, login to your SAFARI Montage controller and navigate to Admin >
Pathways SM > Broadcast Encoders and verify that this encoder appears in the list
Time Configuration:
Set the unit to proper local time to ensure correct playback. Time can be set by going to the Time
Information (option 2) menu from the main console menu.
NOTE: It is recommended that local NTP servers are used with all SAFARI Montage hardware to
ensure accurate time settings.
G3013-C 9 Revised 10/4/2021Using With SAFARI Montage:
To configure in SAFARI Montage® Selective Video Streaming:
1. Login to SAFARI Montage as an administrator.
2. Navigate to Admin > Selective Video Streaming > Video Streaming.
3. Click on the New Stream link.
4. Select a school, enter a descriptive name, and enter the streaming URL in one of the
following formats:
Example SVS
Supported URLs
Description URL
ABR Stream http://x.x.x.x/0/master.m3u8
576P HLS Stream http://x.x.x.x/0/vs0/manifest.m3u8
720P HLS Stream http://x.x.x.x/0/vs1/manifest.m3u8
1080P HLS Stream http://x.x.x.x/0/vs2/manifest.m3u8
UDP Stream udp://@239.x.x.x:>multicast port<
Replace “x.x.x.x” with the IP address of the encoder.
5. Set Type (for recording) to M3U8 for ABR and HLS streams, and H.264 RAW TS for UDP
streams.
6. Configure additional stream settings as desired and click on Add to save the new stream.
7. Click on the stream name to navigate to the stream detail page.
8. Click on the Play icon to verify playback.
G3013-C 10 Revised 10/4/2021Using Within a Web Browser:
Use the following example URLs to view the streams within a browser.
Example Direct
playback URLs
Description URL
ABR Stream http://x.x.x.x
576P HLS Stream http://x.x.x.x/0/576.html
720P HLS Stream http://x.x.x.x/0/720.html
1080P HLS Stream http://x.x.x.x/0/1080.html
Replace “x.x.x.x” with the IP address of the encoder.
Connecting to a CDN:
Connecting a Stream to a CDN can be done through the console menu.
1. From the main menu press 6 and enter to go to CDN Support.
2. Press 1 and enter to Add CDN Support to HDMI Input 0
3. Enter the CDN URL and then press enter
4. Enter the CDN Key and then press enter
5. Within the next scheduler period (once a minute) the system should notice the stream is
configured to broadcast to a CDN and start trying to push to it.
NOTES:
• Consult your CDN provider for CDN URL and Key.
• Only one CDN key can be assigned to a Stream.
Enabling Multicast Streaming:
Configuring a multicast UDP stream can be done through the console menu.
1. From the main menu press 7 and enter to go to UDP Support.
G3013-C 11 Revised 10/4/20212. Press 1 and enter to Add UDP Support to HDMI Input 0
3. Enter a valid multicast address udp://239.0.0.1 – udp://239.255.255.254
NOTE: it is recommended that the last 3 octets of the multicast address match the encoder’s IP
address.
4. Enter a valid multicast port number (e.g. 1234)
5. The encoder will then save the settings, begin multicasting, and return to the UDP Support
menu
NOTE: Other settings not covered in this document can be configured from the console menu.
G3013-C 12 Revised 10/4/2021You can also read