Securing the Management Plane - Version 21.6.1, 25 June 2021
←
→
Page content transcription
If your browser does not render page correctly, please read the page content below

Securing the Management
Plane
Version 21.6.1, 25 June 2021
Securing the Management Plane

Registered Address                 Support                  Sales
26, Kingston Terrace, Princeton,
New Jersey 08540, United States
                                                            +91 80 4850 5445
http://www.rtbrick.com             support@rtbrick.com      sales@rtbrick.com

©Copyright 2021 RtBrick, Inc. All rights reserved. The information contained herein
is subject to change without notice. The trademarks, logos and service marks
("Marks") displayed in this documentation are the property of RtBrick in the United
States and other countries. Use of the Marks are subject to RtBrick’s Term of Use
Policy, available at https://www.rtbrick.com/privacy. Use of marks belonging to
other parties is for informational purposes only.

                                                                                    1
Securing the Management Plane
Table of Contents
1. Overview . . . . . . . . . . . . . . . . . . . . . . . . . . . . . . . . . . . . . . . . . . . . . . . . . . . . . . . . . . . . . 3
2. RtBrick Token . . . . . . . . . . . . . . . . . . . . . . . . . . . . . . . . . . . . . . . . . . . . . . . . . . . . . . . . . 5
2.1. JSON Web Tokens . . . . . . . . . . . . . . . . . . . . . . . . . . . . . . . . . . . . . . . . . . . . . . . . . . 5
2.1.1. Structure . . . . . . . . . . . . . . . . . . . . . . . . . . . . . . . . . . . . . . . . . . . . . . . . . . . . . . 5
2.1.1.1. Header. . . . . . . . . . . . . . . . . . . . . . . . . . . . . . . . . . . . . . . . . . . . . . . . . . . . 5
2.1.1.2. Payload . . . . . . . . . . . . . . . . . . . . . . . . . . . . . . . . . . . . . . . . . . . . . . . . . . . 6
2.1.1.3. Signature . . . . . . . . . . . . . . . . . . . . . . . . . . . . . . . . . . . . . . . . . . . . . . . . . . 6
2.1.2. Putting all together . . . . . . . . . . . . . . . . . . . . . . . . . . . . . . . . . . . . . . . . . . . . . 7
2.1.2.1. AccessToken . . . . . . . . . . . . . . . . . . . . . . . . . . . . . . . . . . . . . . . . . . . . . . . 7
2.1.3. JWKS Validation . . . . . . . . . . . . . . . . . . . . . . . . . . . . . . . . . . . . . . . . . . . . . . . . 8
2.2. OIDC Authentication. . . . . . . . . . . . . . . . . . . . . . . . . . . . . . . . . . . . . . . . . . . . . . . 10
3. Role Based Access Control (RBAC) . . . . . . . . . . . . . . . . . . . . . . . . . . . . . . . . . . . . . . . 12
3.1. CTRLD Authorization Configuration . . . . . . . . . . . . . . . . . . . . . . . . . . . . . . . . . . 12
3.1.1. Activate or Deactivate Authorization in CTRLD . . . . . . . . . . . . . . . . . . . . . 12
3.2. RBFS Authorization configuration . . . . . . . . . . . . . . . . . . . . . . . . . . . . . . . . . . . 13
3.2.1. RBFS Role Configuration via REST. . . . . . . . . . . . . . . . . . . . . . . . . . . . . . . . 13
3.2.2. RBFS Authorization CLI Configurations . . . . . . . . . . . . . . . . . . . . . . . . . . . 14
4. SSH with TACACS+ . . . . . . . . . . . . . . . . . . . . . . . . . . . . . . . . . . . . . . . . . . . . . . . . . . . . 16
4.1. RTB-PAM Token. . . . . . . . . . . . . . . . . . . . . . . . . . . . . . . . . . . . . . . . . . . . . . . . . . . 16
4.2. SSH User Prompt . . . . . . . . . . . . . . . . . . . . . . . . . . . . . . . . . . . . . . . . . . . . . . . . . 17
4.3. User Login Flow . . . . . . . . . . . . . . . . . . . . . . . . . . . . . . . . . . . . . . . . . . . . . . . . . . . 17
4.3.1. RTB . . . . . . . . . . . . . . . . . . . . . . . . . . . . . . . . . . . . . . . . . . . . . . . . . . . . . . . . . 18
4.4. In-Band and Out-of-Band TACACS user SSH Login . . . . . . . . . . . . . . . . . . . . . 19
4.4.1. In-band TACACS user SSH Login . . . . . . . . . . . . . . . . . . . . . . . . . . . . . . . . . 19
4.4.2. Out-of-band TACACS user SSH Login . . . . . . . . . . . . . . . . . . . . . . . . . . . . . 19
4.5. Configuring TACACS+ for RBFS . . . . . . . . . . . . . . . . . . . . . . . . . . . . . . . . . . . . . . 19
4.5.1. Example: TACACS User Configuration in the TACACS Server . . . . . . . . . 20
4.5.2. Troubleshooting NSS User Lookup Issues. . . . . . . . . . . . . . . . . . . . . . . . . 21
4.5.3. SSH User Login Logs . . . . . . . . . . . . . . . . . . . . . . . . . . . . . . . . . . . . . . . . . . . 21
4.6. Role-based Access Configuration . . . . . . . . . . . . . . . . . . . . . . . . . . . . . . . . . . . . 21
2Securing the Management Plane
1. Overview
The Securing Management Plane feature provides the capability to restrict the
access to the management plane only to authenticated and authorized subjects.
The authentication identifies a subject, and the authorization validates if the
subject is allowed to execute the action.
Figure 1. External Dataflow
The figure-1 shows the data flow when accessing an rtbrick-switch. Each call
against the switch in more detail against the API Gateway Daemon (APIGWD) of the
switch has to be authenticated with an access token. There is only one exception
when accessing the CTLRD’s UI; it is possible to be redirected to an OpenIDConnect
Authenticator.
The APIGWD validates the access token against an JSON Web Key Set (JWKS)
(https://tools.ietf.org/html/rfc7517). This key set can be loaded from a file locally
on the system or auto discovered via the OpenIDConnect server.
A valid access token, in the sense of syntactically correct but also successfully
validated signature by one of the JSON Web Key of the JWKS files, leads in an
authenticated user. If the validation is unsuccessful, the call will be rejected.
The access token contains scopes which are used internally for the authorization
checks. The authorization is a role based authorization where the scopes equal to
the roles.
Internally the access token is converted to an RtBrick token, and all the
communications inside the switch is authenticated via this RtBrick token.
3Securing the Management Plane The dataflow inside of the switch can be seen in Figure 2. The scopes of the access token are copied to the RtBrick Token. Figure 2. Internal Dataflow 4
Securing the Management Plane

2. RtBrick Token
2.1. JSON Web Tokens
JSON Web Token (JWT) is an open standard (RFC 7519) that defines a compact and
self-contained way for securely transmitting information between parties as a
JSON object. This information can be verified and trusted because it is digitally
signed. JWTs can be signed using a secret (with the HMAC algorithm) or a
public/private key pair using RSA or ECDSA.

For more information about JSON Web Token, see https://jwt.io/introduction/.

2.1.1. Structure
In its compact form, JSON Web Tokens consist of three parts separated by dots (.),
which are:

  • Header
  • Payload
  • Signature

Therefore, a JWT typically looks like the following.

 xxxxx.yyyyy.zzzzz

2.1.1.1. Header
The header typically consists of two parts:

  • The type of the token, which is JWT
  • The signing algorithm that is being used, such as HMAC SHA256 or RSA

The suite of specifications on JWT provisions a few different options to identify
particular cryptographic keys. The most straightforward mechanism is the "kid"
claim. This claim can be added to the header of the token. It is intended to contain
a string-based key identifier.

For example:

 {
     "alg": "HS256",
     "typ": "JWT",
     "kid": "0815"
 }

                                                                                   5
Securing the Management Plane
Then, this JSON is Base64Url encoded to form the first part of the JWT.
2.1.1.2. Payload
The second part of the token is the payload, which contains the claims. Claims are
statements about an entity (typically, the user) and additional data.
There are three types of claims:
• registered
• public
• private
Registered claims
These are a set of predefined claims which are not mandatory but
recommended, to provide a set of useful, interoperable claims. Some of
them are: iss (issuer), exp (expiration time), sub (subject), aud (audience),
and others.
Public claims
These can be defined at will by those using JWTs. But to avoid collisions they
should be defined in the IANA JSON Web Token Registry or be defined as a
URI that contains a collision resistant namespace.
Private claims
These are the custom claims created to share information between parties
that agree on using them and are neither registered or public claims.
An example payload is as follows:
{
"sub": "1234567890",
"name": "John Doe",
"iat": 1516239022,
"exp": 1600000000,
"scope": "user"
}
The payload is then Base64Url encoded to form the second part of the JSON Web
Token.
2.1.1.3. Signature
To create the signature part you have to take the encoded header, the encoded
payload, a secret, the algorithm specified in the header, and sign that.
6Securing the Management Plane
For example if you want to use the HMAC SHA256 algorithm, the signature will be
created in the following way:
HMACSHA256(
base64UrlEncode(header) + "." +
base64UrlEncode(payload),
secret)
The signature is used to verify the message wasn’t changed along the way, and, in
the case of tokens signed with a private key, it can also verify that the sender of the
JWT is who it says it is.
2.1.2. Putting all together
The output is three Base64-URL strings separated by dots that can be easily
passed in HTML and HTTP environments.
2.1.2.1. AccessToken
The Access Token is a JSON Web Token. The token is typically sent in the
Authorization header using the Bearer schema. The content of the header should
look like the following:
Authorization: Bearer
The API Gateway also supports sending the token as Cookie, but this is not
described here, that is only used for the CTRLD web UI.
The token has to have the kid claim in the header. This kid is used to find the right
JSON Web Key (JWK) from one of the JSON Web Key Sets (JWKS).
APIGWD searches for the jwks file under
/etc/rtbrick/apigwd/access_secret_jwks.json, but it is also possible to provide an
additional oicd endpoint. By that the keysets are searched in the provided order:
• local file specified by command line -access-token-jwks-file-name
• oicd auto discovery -oidc-issuer
The scope claim contains the roles the user has. For example:
7Securing the Management Plane
{
"sub": "1234567890",
"name": "John Doe",
"admin": true,
"iat": 1516239022,
"exp": 1600000000,
"scope": "user operator"
}
This user has the roles user and operator.
2.1.3. JWKS Validation
The example below shows how to create a public/private key set file (for example
with https://mkjwk.org/)
Example PubPrivJwks.json:
8Securing the Management Plane
{
"keys": [
{
"p": "-
3WNqU2aWKy8Q7mblRpw_aOknW47YvZKVNQzlWdijXW5E1hQ5c6sfjqo92pq5mNKJ_Xkl71xHyp-
WBfw-xJqZ9pUuG4jnUiKgzYHvkccDF5XIMrpA67VnBozmyLckQOKEXesRD2hacrjb-
T89dcIZQHBUK1RYXGRxHCM_hPeBok",
"kty": "RSA",
"q": "07STzbuUh6p_iN2wzTegIQdnXBLnzPObCKt-KLSjkLtrZMv2YxM2yhMs-
56SsLR7EICFRAB2vdCzlovXKShubU9NSKgVI38qpGV9hii8rqN5N3dEM4Gscp_TR36ex1NoSC6kHB
F2hsyPfgD7U-txguZr6w9MN6rK4bAcg0TWGM0",
"d": "IWcC4aKuPVlVGZeBhb3mla1mOsOcJuLxjpkZAu-
QaQO7phWzeGLEfln3tojKtIK6e11FEz137ow75Je0_oMAzE-
eTAMyseUTHZhn4LhmIdOwnsp9OZrMbNmLFpaF_rGYb0630xg27GdR4gC_lZvMuy1uCP1sr8Iyl1uj
N7n_6ETMYbdXPLOtEAB4Dag6XFTjy1l8aVvBxpscm8gKg64fgBGRvGY6PiUfqY3gaq_vX9SOOHVPN
5WoShKA4fguxukRBiLLYNxDMDb3-h8pd1_fr2WayDzmcIXpxvVjRVZHt71C-
0Uhap6eRDMQocZXih8IdNV8zHUF_LeciE36fIb3oQ",
"e": "AQAB",
"use": "sig",
"kid": "access",
"qi": "3His_DaBkf_r7uDx9-
8BOhOQPhcudT95XC9WyS5MrYIBtgqQi6IscHIqvtXFpjmPRey-
chO7p9msOAB_T8j_mg1l6UWOx6j4h_fyHEbOwRqfNemKng2Hs0uCrwpjgGf2eXzaBY8T9HlbFlTJA
AARGh_PePBi-F-IfAxGayj4hiM",
"dp": "NJuYYpZAt1KUJJsdSKl6gCYPV3xrYj3iuTKYBCbYAH5jlP-
CFUIS5mnBVdnmuYKGTivsgi55DysluapwmSZ2KnoMBXXNb6dwixjvr8hSvuex1MN-
0m1udTUqHMfDW3dhGFxwJuq57VcsFAnVPl2ZfQBMAGPyRa-r7mwZo0Jmzfk",
"alg": "RS256",
"dq": "XL-
4IWIU6Hrh9OxrEP1VwiKkPcpqk3gGa_31_49kOXxiyH4zK6S3VECibHpEefYYFFq6B9jMLMzKYSJS
2U1FU85yZWp-GFcWL3_nRmeCgmBMMuilkIs3KeCrh58JoPoBrd4BN-rOqq_kDagQc-
uqh1a74PeKxLimucmWNExsH-E",
"n": "z_NDmLu8M3KGvxvfJt8CAhdLdsqkskfY7vf9X9pW1LE_r31_HU85-
l6NNHeUWYbSNe6lt9YODnL8-
vTT6oCgre96byvpdYZ7Ki5KGe4fU96x0_ZF5LceUQc4l5dx6aptNi9mWgcZ9nkc2Xh83ASg9otG2Y
oYsAnI1cO0TjzV9cMI7u7VON6SON9wbWFY01--ixMqxRAZuEJjbg4QAdL7DndRQXvmq1m7lv-
nnPPQ0a7ZTg7NZDEn5lMmadUlTVl5uvSNsACtC49R5kEkNCc1Hc-
3gootU5VyVPBx6IFHtNC2BiGasQAUpsDXZl7YtvBZwzYZwznUlluPiKLDk-4TtQ"
}
]
}
The APIGWD only needs to know the Public part:
9Securing the Management Plane
{
"keys": [
{
"kty": "RSA",
"e": "AQAB",
"use": "sig",
"kid": "access",
"alg": "RS256",
"n": "z_NDmLu8M3KGvxvfJt8CAhdLdsqkskfY7vf9X9pW1LE_r31_HU85-
l6NNHeUWYbSNe6lt9YODnL8-
vTT6oCgre96byvpdYZ7Ki5KGe4fU96x0_ZF5LceUQc4l5dx6aptNi9mWgcZ9nkc2Xh83ASg9otG2Y
oYsAnI1cO0TjzV9cMI7u7VON6SON9wbWFY01--ixMqxRAZuEJjbg4QAdL7DndRQXvmq1m7lv-
nnPPQ0a7ZTg7NZDEn5lMmadUlTVl5uvSNsACtC49R5kEkNCc1Hc-
3gootU5VyVPBx6IFHtNC2BiGasQAUpsDXZl7YtvBZwzYZwznUlluPiKLDk-4TtQ"
}
]
}
Now to create a token you can use https://keytool.online/, and paste the
PubPrivJwks.json into the RSA Key Field and provide as Payload.
For example:
{
"sub": "1234567890",
"scope": "user operator",
"name": "John Doe",
"admin": true,
"exp": 1600000000,
"iat": 1516239022
}
This results in the following token:
eyJraWQiOiJhY2Nlc3MiLCJ0eXAiOiJKV1QiLCJhbGciOiJSUzI1NiJ9.eyJzdWIiOiIxMjM0NTY3
ODkwIiwic2NvcGUiOiJ1c2VyIG9wZXJhdG9yIiwibmFtZSI6IkpvaG4gRG9lIiwiYWRtaW4iOnRyd
WUsImV4cCI6MTYwMDAwMDAwMCwiaWF0IjoxNTE2MjM5MDIyfQ.mP0mXR96-
9gYIzh6_2saUQckKDwpC7jDFpo2m0g9YAj4DkSf4xDoxBqMRwFkntLC6NV0sxyUNzC-
nv5yBretJAbbX_hCMS5Jk392piCVMt9ucbwnCKs6xaJDJmMHI1qxyf7lCgd9nIlawme4_nQnMJ4N9
RdVeIuyv1siuNUOo9RdSE4cX2JIzlrjgoZmtcU-
nq_I7S2QTkdro2e1wPZKktTMAoG6VjGb7ieIQ5XyLKNQt9PWSZ2sHkd85MxXMRUWUcrEagW6JrV3u
ixeT3QTZ3g9Y6Qb4XDPH3EXUoAHJ0V26rpqXDsB_nmNvI5CVvCUcaZLPYoSEzBUPa9NaFIBcg
The apigwd can decode that token and validates the token with the corresponding
key in the specified JKWS file.
2.2. OIDC Authentication
If you use OpenID Connect for Authentication, that the Token is generated by the
10Securing the Management Plane
OIDC Connect server.
It is important to understand how the validation of the tokens works. Either the
JWKS file which corresponds to the OIDC server is located locally on the system, or
the OpenID Connect Server (issuer) is specified.
The first configuration possibility we already discussed. If the oicd connect server
is specified the server provides an endpoint where the clients can download the
public keys.
As an example for this configuration of an oidc-issuer here an excerpt of:
/etc/rtbrick/apigwd/config.json
"oidc_issuer" : "http:///auth/realms/",
"client_id" : "",
"client_secret" : "",
"redirect_url": "",
Specific information about the issuer can be found at http:///auth/
realms//.well-known/openid-configuration.
If you also specify the client secret and the client id, this allows the APIGWD to
redirect to the login page of the OIDC server. This is needed for browser-based
applications like CTRLD UI.
11Securing the Management Plane
3. Role Based Access Control (RBAC)
Role Based Access Control (RBAC) is an approach to restrict the system access to
authorized users. The authorization model is role-based. There will be three items
in a role-based modeel: sub, obj, and act.
• sub: the user (role) that wants to access a resource.
• obj: the resource that is going to be accessed
• act: the operation that the user performs on the resource
The RBAC Data Model is implemented in RBFS, and it allows you to define
Permission or User Roles to various type of resources.
The model contains:
• Resource Type: The type of resource we are talking about (for example, BDS
Table, BDS Object, REST)
• Resource: The identifier of the Resource (for example, Table Name, Rest
endpoints). Regular expressions are allowed.
• Permissions: Indicates the action that a user is allowed to perform on the
resource. The Permissions are CRUD (Create, Read Update, Delete). The
permission gets a semantic with respect to the resource type.
• Role: The role of a user who tries to access a resource.
3.1. CTRLD Authorization Configuration
3.1.1. Activate or Deactivate Authorization in CTRLD
"auth_disabled": true
It is possible to specify the permissions in CTRLD exactly in the way specified
above.
Where sub is the role a user needs to have, obj species the url endpoint the user
wants to reach, and act is the HTTP Method the user wants to call on the endpoint.
For example:
12Securing the Management Plane
{
"permissions": [
{"sub": "supervisor", "obj": "/*", "act": ".*" },
{"sub": "reader", "obj": "/*", "act": "GET"},
{"sub": ".*", "obj":
"/api/v1/rbfs/elements/{element_name}/services/{service_name}/proxy/*",
"act": ".*"}
]
}
This means: * The user with the role supervisor is allowed to access all rest
endpoints, and act on them with all HTTP methods. * The user with the role reader
is allowed to access all rest endpoints, but can only call the HTTP GET method. * All
authenticated users are allowed to access the proxy endpoint with all HTTP
methods.
To configure that policy CTRLD offers 2 endpoints:
• PUT /api/v1/ctrld/authorization/permissions
• GET /api/v1/ctrld/authorization/permissions
Please refer to API Documentation for more information.
3.2. RBFS Authorization configuration
3.2.1. RBFS Role Configuration via REST
{
"objects": [
{ "attribute": { "role": "operator", "permission": "create|read|delete",
"resource_regex": "global.*", "resource_type": "object" } },
{ "attribute": { "role": "operator", "permission": "create|read|delete",
"resource_regex": "global.*", "resource_type": "table" } }
],
"table": { "table_name": "secure.global.authorization.config", "table_type":
"authorization_config_table" }
}
{
"objects": [
{ "attribute": { "role": "user", "permission": "-|read|-",
"resource_regex": "global.*", "resource_type": "table" } },
{ "attribute": { "role": "user", "permission": "-|read|-",
"resource_regex": "global.*", "resource_type": "object" } }
],
"table": { "table_name": "secure.global.authorization.config", "table_type":
"authorization_config_table" }
}
13Securing the Management Plane
• role : Represents role in the system
• resource_type : Represents resources in the RBFS (table|object).
• resource_regex : Regex for the resources to be accessed.
• permission : Bitmap representing permissions to create, read and delete.
create|read|delete
Action BDS Table BDS Object
Create Create a BDS Table Create/Update a BDS Object
Read Read Table Header Objects or Read BDS Objects
Metadata
Delete Delete a BDS Object Delete a BDS Object
3.2.2. RBFS Authorization CLI Configurations
Global user role configuration:
set system authorization global
permission
role Represents role in the system
resource_type Represents resources in the RBFS (table/object).
resource_regex Regex for the resources to be accessed.
permission Bitmap representing permissions to create, read and
delete.
-/-/-
-/-/delete
-/read/-
-/read/delete
create/-/-
create/-/delete
create/read/-
create/read/delete
Example
14Securing the Management Plane
admin@rtbick: cfg> set system authorization global admin table global.*
permission create/read/delete
Lawful user role configuration
set system authorization lawful
permission
role Represents lawful interceptor (LI) role in the system
resource_type Represents resources in the RBFS (table/object).
resource_regex Regex for the resources to be accessed.
permission Bitmap representing permissions to create, read and
delete.
-/-/-
-/-/delete
-/read/-
-/read/delete
create/-/-
create/-/delete
create/read/-
create/read/delete
Example
admin@rtbick: cfg> set system authorization lawful fbi table local.*
permission -/read/-
15Securing the Management Plane
4. SSH with TACACS+
RBFS provides a custom pluggable authentication module that gets invoked by the
stock sshd on login. The necessary configurations are pre-installed on RBFS.
RtBrick-PAM, referred to as RTB-PAM helps in landing the TACACS authentication
on the appropriate user in the Ubuntu container and helps in providing necessary
details for the secure management plane feature.
Once the PAM client requests TACACS for the authentication, with successful
authentication TACACS responds with a few RtBrick specific details.
{
# RBFS role
rtb-role : operator”
rtb-deny-cmds: “clear bgp peer”
rtb-allow-cmds: “show optics”
priv_lvl : some_level
}
On successful authentication, the RTB-PAM module creates a token (JWT) for the
logged-in ssh user.
4.1. RTB-PAM Token
Token created by the RTB-PAM module contains the same claims that are defined
under the RtBrick Token section, and this token is signed with the secret_jwks.json
key. The rtb-role is converted to the scope role of the RtBrick Token, the
deny/allow commands are converted into the claims rtb-deny-cmds and rtb-allow-
cmds. Once the token is created, it is transferred to the environment variable.
setenv RTB_TOKEN = {
"sub": "83692",
"iat": 1516239022,
"exp": 1517239022,
"name": "Admin User",
"preferred_username", "user1",
"scope": "operator tacacs_priv_lvl_8"
"rtb-deny-cmds": "^clear bgp peer"
"rtb-allow-cmds": "show optics"
}
After the RTB-PAM token is created, the CLI prompt appears. If a token is not
created for the logged-in user, then the user cannot perform communication with
the BD.
16Securing the Management Plane
4.2. SSH User Prompt
After you successfully log into RBFS via SSH, you can see the rtb-token using the
shell environment. For example, an SSH prompt may look like the example below.
rtbng@b908f71f63b7:~$ env
SSH_CONNECTION=172.18.0.1 33136 172.18.0.3 22
LESSCLOSE=/usr/bin/lesspipe %s %s
LANG=C.UTF-8
USER=rtbng
PWD=/home/tacacs12
HOME=/home/tacacs12
SSH_CLIENT=172.18.0.1 33136 22
SUDO_USER=rtbng
PRIV_LVL=1
SSH_TTY=/dev/pts/1
SUDO_PROMPT=[sudo] password for rtbng:
MAIL=/var/mail/rtbng
TERM=xterm-256color
SHELL=/bin/bash
SHLVL=1
LOGNAME=rtbng
PATH=/usr/local/sbin:/usr/local/bin:/usr/sbin:/usr/bin:/sbin:/bin:/usr/games:
/usr/local/games
LESSOPEN=| /usr/bin/lesspipe %s
_=/usr/bin/env
RTB_TOKEN=eyJhbGciOiJIUzI1NiIsImtpZCI6InJ0YnJpY2siLCJ0eXAiOiJKV1QifQ.eyJleHAi
OjE0NTE2MDczMDAsImlhdCI6MTQ1MTYwNjQwMCwiaXNzIjoicnRicmljay1hcGktZ3ciLCJuYW1lI
joiQmhpc2htYSBBY2hhcnlhIiwicHJlZmVycmVkX3VzZXJuYW1lIjoiYmhpc2htYSIsInNjb3BlIj
oic3lzdGVtIiwic3ViIjoiOTllOGI0YTEtM2E2Yi00YzI5LWJlZGItN2U3N2NjOTFjZTZiIn0.NOO
AcafmHfgx-QFwiC-_VGokbvUwrTOjhfpD9px3hMY
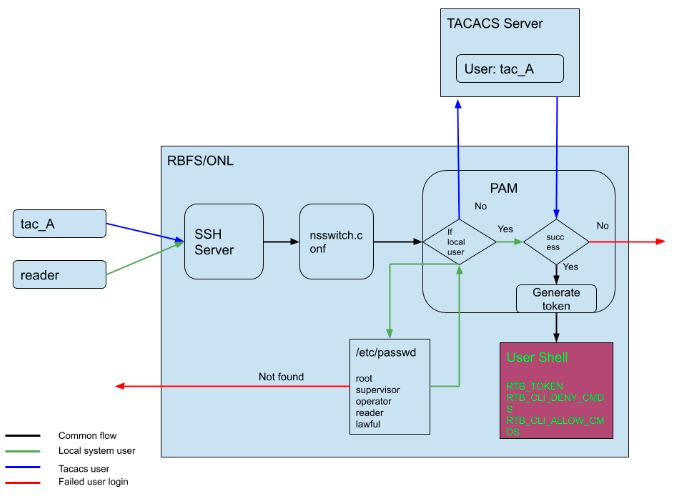
4.3. User Login Flow
The figure below shows the user login flow.
17Securing the Management Plane
Linux pre-configured users and groups
User Name Group Name Privilege
supervisor supervisor level 15
operator operator level 7-14
reader reader level 0-6
4.3.1. RTB
rtb is the REST based CLI utility in the RBFS. Currently the rtb utility is enhance to
read the token from the RTB_TOKEN environment variable, and use this token in
its authorization header of the REST query to the BD.
The RTB_CLI_DENY_CMDS and RTB_CLI_ALLOW_CMDS regular expression strings
are passed to the back-end with every rtb command, and the back-end evaluates
them against the commands that are to be executed and against the completion.
Currently the validation for the allow and deny commands is
available only for "rtb " command, and not for the
commands executed in the application telnet.
18Securing the Management Plane
4.4. In-Band and Out-of-Band TACACS user SSH
Login
4.4.1. In-band TACACS user SSH Login
A TACACS user can login using SSH to rbrick container through inband
management. RBFS should be configured with inband-management TACACS
server for TACACS user login.
4.4.2. Out-of-band TACACS user SSH Login
TACACS user can login via SSH to ONL though out-of-band management. RBFS
should be configured with out-of-band management TACACS server for TACACS
user login.
4.5. Configuring TACACS+ for RBFS
To configure TACACS+ server for RBFS, enter the the following commands.
Syntax
set system authorization tacacs server-ip type secret-plain-text
set system authorization tacacs server-ip type server-port
Command Arguments
IP address of the TACACS Server
secret-plain-text> Secret plain text string. The secret string input can be
plaintext format. If string starts with 1 then system considers
it as encrypted string and stores key as it is. Also if secret
string starts with 0, then system considers it as secret in
plaintext and hence it stores in the system in encrypted
format.
system tries to connect to server running on port number 49.
Example
19Securing the Management Plane
root@rtbrick: cfg> set system authorization tacacs 111.1.1.1 out-of-band
secret-plain-text testkey
root@rtbrick: cfg> set system authorization tacacs server-ip 10.0.0.1 type
inband server-port 1234
A TACACS user is not allowed to login without TACACS server
configuration.
The example below shows the running configuration after you configure TACACS.
{
"rtbrick-config:system": {
"authorization": {
"tacacs": [
{
"ipv4-address": "111.1.1.1",
"type": "out-of-band",
"secret-encrypted-text": "$202a74ca845585855b6f8df57cdbf7858"
}
]
}
}
}
4.5.1. Example: TACACS User Configuration in the TACACS
Server
The example below shows the server configurations for rtb-allow-cmds and rtb-
deny-cmds.
accounting file = /var/log/tac_plus.acct
key = tacacskey
user = user {
login = cleartext "user"
member = Network_User
}
group = Network_Operator {
default service = permit
service = exec {
priv-lvl = 10
rtb-deny-cmds = *
rtb-allow-cmds = *
}
}
priv-lvl is a mandatory attribute in the TACACS user configuration.
20Securing the Management Plane
Multiple cmd-regexes can be configured with each regexes separated by
semicolon (;).
Example:
rtb-deny-cmds = ;cmd
4.5.2. Troubleshooting NSS User Lookup Issues
To look up the TACACS username with all NSS methods, enter the following
command:
ubuntu@rtbrick:~$ sudo getent passwd
To look up the local user within the local user database, enter the following
command:
ubuntu@rtbrick:~$ sudo getent -s compat passwd
To look up the TACACS user within the TACACS+ server database, enter the
following command:
ubuntu@batman:~/development$ sudo getent -s tacplus passwd
If TACACS does not appear to be working correctly, You can enable debug logging
by adding the debug=1 parameter to one or more of these files:
/etc/tacplus_servers
/etc/tacplus_nss.con
4.5.3. SSH User Login Logs
The transaction logs of users (in the PAM module) are available in the following log
file.
/var/log/auth.log
4.6. Role-based Access Configuration
To configure a global user role, enter the following command:
21Securing the Management Plane Syntax set system authorization global permission To configure a Lawful user role, enter the following command: Syntax set system authorization lawful permission 22
You can also read


