Self-Stretching - Cure Duchenne
←
→
Page content transcription
If your browser does not render page correctly, please read the page content below

Self-Stretching
Performing a daily stretching routing can be your most effective way to prevent or delay loss of flexibility with Duchenne muscular
dystrophy. When performed correctly, daily stretching can delay the onset of muscle contractures. Ultimately, it is possible to prolong
physical ability and independence with a daily stretching routine.
The following sets of stretches can be performed by an individual on his/her own, dependent upon physical abilities, as a daily
self-stretching routine.
General Rules of Stretching
• Stretching should not be painful • As the muscle relaxes, increase the pressure
• Stretches should be held for 60 seconds and repeated • A daily routine is most effective
Lower Extremity Stretches Upper Extremity Self-Stretches
1. Hamstring Stretch - Wall
Lay at the corner of two walls, place a 1. Wrist Extension Stretch
heel on the wall and the other leg along While seated, place palms down at your
the wall on the floor. Slowly move closer side. Slowly move hands backward until
to wall until a stretch is felt in the back a stretch is felt. Hold for 60 seconds,
of the thigh. Hold for 60 seconds and relax, reposition, and repeat.
repeat 1-2 times.
2. Gastrocnemius (Achilles) 2. Wrist and Finger Extension
While standing at a wall, position one While seated, place palms together
foot in front of the other. Lean forward in front of chest, slowly lower hands,
while keeping the back knee straight keeping elbows out until a stretch is felt.
and toes pointed forward. Hold for Hold for 60 seconds, relax, reposition,
60 seconds, relax, then repeat. and repeat.
3. Soleus Stretch
While standing at a wall, position one
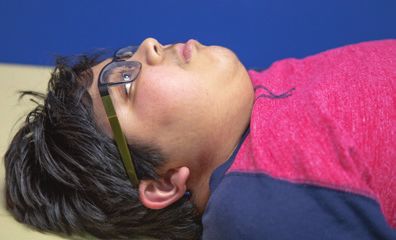
foot in front of the other. Slowly lean 3a. Neck Extensor
forward while bending the back knee While laying on back, position neck in a
and keeping toes forward and heel on comfortable position looking forward.
the ground. Hold for 60 seconds, relax,
then repeat.
4. Trunk Rotation
While laying on back with knees bent,
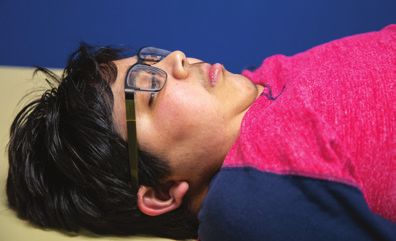
swing legs to one side, allowing the hips 3b. Neck Extensor
and lower back to rotate in the same Tuck the chin down while extending the
direction. Hold for 10-20 seconds, then back of the neck. Hold for 5-10 seconds,
rotate to opposite direction and hold relax, and repeat 5-10 times.
for 10-20 seconds. Repeat on each side
10-20 times.
CureDuchenne.org | ©CureDuchenne 2020
Massage Therapy

Massage therapy* refers to many manual techniques done by a licenses and specific trained professional
with the intent of normalizing soft tissue to promote health, muscle relaxation, healing and other
benefits. Massage techniques can be used in home programs to produce some of the same health and
mobility benefits. For more information, visit CureDuchenne.org/care/videos/

  Physiologic Benefits of Massage                                     Contraindications for Massage

  •   Prevention/Treatment of injury.                                 DO NOT MASSAGE WHEN THERE ARE:
  •   Muscle Relaxation.                                              •   Sores, cuts, burns, boils, infectious rash.
  •   Release of restrictions.                                        •   Inflamed joints, tumors or undiagnosed lumps.
  •   Increased circulation.                                          •   Injured areas including bruise, sprain,
  •   Enhanced immune system function.                                    fracture, dislocation.
  •   Pain relief.                                                    •   Endangerment sights: back of knee, elbow,
  •   Improved respiration.                                               xiphoid process.

  •   Sensory stimulation.                                            •   Acute illness especially when accompanied by
                                                                          viral infection and/or fever.

5 Effleurage Massage Steps**

                                 STEP 1: Maintaining
                                 mild pressure, the hands                                              STEP 4: Hands move
                                 start together in the                                                 upward together.
                                 middle.

                                 STEP 2: Hands move in                                                 STEP 5: Hands move
                                 opposite directions, with                                             downward together.
                                 mild pressure.                                                        Then, repeat from Step 1.

                                 STEP 3: Move hands
                                 back together.

*All interventions, including massage, have their cautions. Please read the list of “Contraindications for Massage” and consult a
physician before beginning a new routine and/or if new symptoms arise after starting a routine.

**The following is a suggested, simple routine that can be implemented on a regular basis by a caregiver. Advisement from Victoria
Laster, BA, NMT, CPMT – First Touch Neuromuscular Pediatrics

                                                                                       CureDuchenne.org | ©CureDuchenne 2020
One Person Transfer

                                                                                      Two Person Transfer

                                                                                                     Lift Systems

Transfer Safety
A transfer refers to moving a person from one position to another. For a person with Duchenne, moving
from one position to another can become very difficult without the assistance of someone else and/or
use of specialized equipment. For more information, visit CureDuchenne.org/care/videos/

Several key factors to consider when determining the correct transfer: (1) The individual’s cognitive
ability to contribute to the transfer. (2) The individual’s current physical function during the transfer.
(3) The individual’s clinical restraints.

Prior to any transfer, the following steps are recommended:

 Equipment Preparation                                        Caregiver Preparation

 •   Position chair very close to the                         •   Maintain a wide base of support.
     transferring surface.                                    •   Use your legs, not your back.
 •   If individual is transferring from a                     •   Engage your core muscles.
     wheelchair, engage the brakes and/or
                                                              •   Stay as close to the individual being
     turn off the power controls.
                                                                  transferred as possible.
 •   Move the foot and armrests away.

One Person Transfer
When conducting a one-person transfer, transferring someone with significant weakness is best done and
most safely performed when moving the individual from a higher surface downward to a lower surface.
Transferring upward adds strain to the caregiver and increases the risk of injuring the individual.

                                        ONE PERSON TRANSFER INSTRUCTIONS
                                        Have the individual facing you. The individual, using both arms, hugs your
                                        neck over your shoulders. The caregiver wraps one arm tightly around
                                        the individual’s back until the caregiver’s hand has a secure grip on the
                                        individual’s ribs. Then, the caregiver uses his/her other hand to secure a grip
                                        under the individual’s thigh to tightly secure the body close to the caregiver,
                                        then lift and transfer.

                                                                              CureDuchenne.org | ©CureDuchenne 2020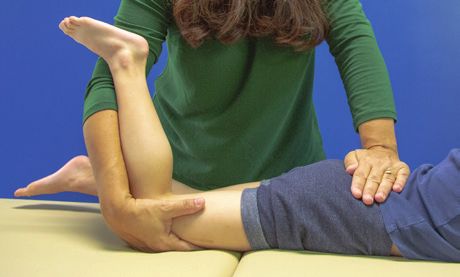
Two Person Transfer
When two able bodied people are available to perform the transfer, they are able to distribute the
weight of the individual being transferred which helps to reduce the strain on the caregivers. It is easiest
and safest to do a two person transfer between two surfaces of similar height.

   TWO PERSON TRANSFER INSTRUCTIONS
   One caregiver will stand behind the individual, and the other
   will stand in front. Crossing the individual’s arms, the caregiver
   behind the individual slides his/her hands under the individual’s
   arms and grips both wrists with the caregiver’s palms facing
   downward. The caregiver standing in front will place both hands
   under the individual’s thighs. Both caregivers should count
   aloud to ensure simultaneous lifting.

Lift Systems
Here are a variety of transfer systems and types of transfer slings available to safely and comfortably
transfer someone from one location to another. A sampling of lift options includes:

            Mobile Lift                             Free                            Fixed Ceiling Lift
        (Manual or Electric)                      Standing                          & Track System

                                                                     CureDuchenne.org | ©CureDuchenne 2020
Daily Passive Stretching
Performing a daily stretching routing can be your most effective way to prevent or delay loss of flexibility with Duchenne muscular
dystrophy. When performed correctly, daily stretching can delay the onset of muscle stiffness. Ultimately, it is possible to prolong
physical ability and independence with a daily stretching routine.
General Rules of Stretching
• Stretching should not be painful • As the muscle relaxes, increase the pressure
• Stretches should be held for 60 seconds and repeated • A daily routine is most effective
Lower Extremity Stretches
1. Hamstring Stretch - Supine
Flex the hip 90 degrees and stabilize at the knee. With other hand, slowly raise the lower leg until stretch is
felt in the back of the thigh. Hold for 60 seconds, reposition and repeat for 60 seconds.
2. Gastrocnemius Stretch - Supine
While lying on back, place small roll under the knee to avoid hyperextension of the knee. Grasp the heel and
pull to stretch the Achilles then flex the foot. Hold for 60 seconds, reposition and repeat for 60 seconds.
3. Soleus Stretch - Prone
While lying on stomach, flex knee 90 degrees. Stabilize the lower leg. Grasp the heel and foot and press
down to stretch the calf. Hold for 60 seconds, reposition and then repeat 60 seconds.
4. Hip Flexor/IT Band Stretch – Prone
Stabilize the pelvis with one hand. Cradle the knee with the other hand. Pull it up then toward the other leg.
Hold for 60 seconds, reposition then repeat for 60 seconds.
Upper Extremity Stretches
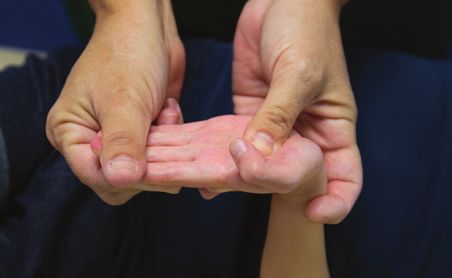
1. Wrist And Finger Extension
Hold the palm with two hands and slowly extend the wrist. Move one hand towards the fingers continuing
to extend the wrist and the fingers. Hold for 60 seconds, reposition and repeat 60 seconds.
2. Forearm Supination Stretch
Stabilize elbow at side of body. Bend elbow 90 degrees. Hold above the wrist and turn the arm to palm up
position. Hold for 60 seconds, reposition then repeat for 60 seconds.
CureDuchenne.org | ©CureDuchenne 2020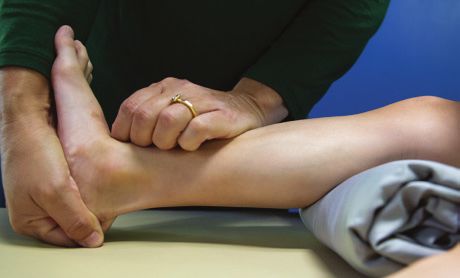
Aquatic Therapy

Aquatic therapy* is a skilled treatment by a physical therapist specially trained to use the water environment to benefit the
individual client in many ways. For more information, visit
CureDuchenne.org/care/videos/

The pool is great for those with Duchenne muscular dystrophy. It provides many benefits including:
• Buoyancy to reduce stress on muscles and joints.
• Mild resistance for low grade muscle work.
• Respiratory exercise to maintain and/or increase capacity and breath control.
• A fun, suitable place for social interaction with others.

Home-Based Pool Activities
Gliding                                      Breath Control                              Relaxing and Stretching
• Have him clasp his hands above             • Encourage that he takes the biggest       • While floating face up, do “snow
  his head and push off the wall to            breath he can before playing any of         angels” slowly and with the full
  see how far he can glide with one            the following activities:                   range of motion of his shoulders
  breath or until his body floats to         • Search for pool toys under water.           and hips.
  the surface.                                 Place them within arm’s reach and         • While he is floating with his hands
• To decrease the work for the                 give him an order that he must pick         above his head, hold his hands and
  shoulders, have him place his                them up. For example: say, “Go              slowly pull him across the pool in
  hands at his side before pushing off         under and get the red, yellow and           a zig-zag line creating a snake-like
  the wall.                                    orange rings then come up.”                 motion of his body.
• While gliding he can pretend to            • Sing songs or yell while                  • Using the steps, he can do his calf
  swim like a shark, frog, dolphin,            under water. See if you can identify        and hamstring stretches with ease.
  snake, etc., to get more mobility            what each other is singing/saying.
  in many directions (up/down/               • Practice bubbles under water
  sideways) and make it more fun.              until breath runs out. For a breath
                                               control activity, see if he can let one
                                               big bubble out at a time.
                                             • Float face-down until he runs out
                                               of breath and roll to a back-float
                                               position. Take deep breaths working
                                               on rib expansion and then roll back
                                               to a face-down float.

*Always monitor the physical demands of any pool program and consult a healthcare professional as needed.

CureDuchenne.org | ©CureDuchenne 2020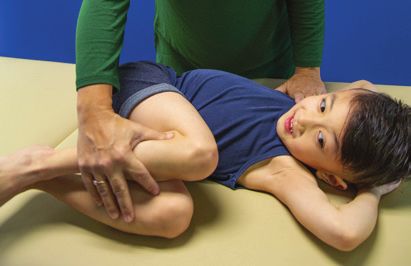
You can also read