Blood Pressure Simulator w/iPod - No 775
←
→
Page content transcription
If your browser does not render page correctly, please read the page content below
No 775
  Blood Pressure
               ®
Simulator w/iPod
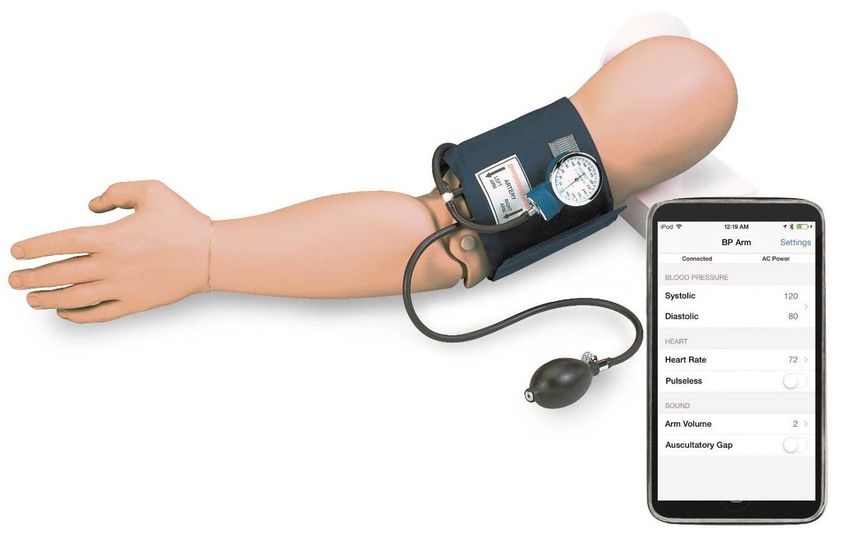
Thank you for purchasing Simulaids’ Blood Pressure Simulator. Please read through these
instructions to assist you in understanding the features.

Assembly

Assemble the arm by placing the arm next to the upright portion of the stand and thread
the bolt into the arm; secure it by hand tightening. Once the arm is attached to the stand,
plug the black cord with the 4 pin connector into the multi-pin connecting port on the back
of the control box. The power cord for the a/c inverter is also plugged in to the control box
in the appropriate receptacle, labeled DC.

Power Supply
The control box has batteries included for an easy portable mode. To prolong the life of
the AA batteries you can plug the 110 volt a/c inverter included with the trainer into a
standard a/c outlet and attach the inverter cord to the control box under the “DC” label.
When the BP Simulator is plugged in,, the “Plug” icon will display on the screen
indicating that you are not operating on batteries. NOTE: When the unit is operating in
“Plug”, the AA batteries do not recharge. The “low battery” icon will appear when the
batteries are low.

When the unit is powered up, the default settings of 120 systolic, 80 diastolic and a volume
setting of 2 will be active.

IMPORTANT: if the low battery indicator is on you may experience a freezing up of the
iPod®. Replace the batteries in the B/P Arm control box to eliminate the freeze ups. To
replace the six AA batteries, unscrew the feet of the control box and remove the cover and
access the battery pack, which lies within a foam receptacle.
When installing the battery pack be sure to securely position the pack within the foam
receptacle in order to prevent damage during movement of the unit.

B/P Cuff
Your trainer comes with a special fitted B/P cuff, but you may use any standard
sphygmomanometer. To use a different cuff you must cut the tubing and insert the “T”
connector to have the three way tubing assembly available for the replacement cuff. Once
you have positioned the cuff on the upper arm, attach the loose end of the assembly to the
barbed connector on the control box under the “B/P” label. This must be done so that the
pressures exerted by the cuff are translated to the sensing devices inside the control box,
otherwise you will not be able to determine variations in the B/P settings.

Auxiliary Sound
An external speaker system can be used for amplification of the auscultated sounds
associated with blood pressure taking by plugging the universal sound cables into the
connection on the control box labeled “EXT SPKR.” Use this feature for broadcasting
sounds to the entire classroom during initial training exercises.

Auscultation
There is a speaker in the antecubital fosse of the arm that emits the sounds necessary for
taking blood pressures. Placing any stethoscope over that speaker allows one to listen for
the commencement of sounds, the Ausculatory Gap, if activated, the Korotkoff sound
changes, and the cessation of sounds.

Palpation
The radial pulse will activate when the iPod® is attached to the control box. You can teach
systolic B/P via palpation using this feature. Note that when you begin to inflate the B/P
cuff, the radial pulse will stop at about 8 mmHg until you are within the systolic/diastolic
range of your settings. If you go above systolic, you will have no pulse – release the
pressure and you’ll have a radial pulse once you reach systolic – the pulse stops just short
of the diastolic pressure setting so that the auscultation of the sounds at the antecubital
fosse are not hindered by the transmission of sound through the forearm skin.

This simulator is also used to teach taking pulse rates. If you elect to use the Pulseless
Electrical Activity feature, you will not hear antecubital speaker sounds.

The Program
Open the iPod® box and follow set up instructions
If you do not have an iTunes® account set one up
Go to the App store
Search for Simulaids
Download and install the Simulaids BP App on the iPod®
Go to the iPod® settings to verify the iPod® and BP Simulator are linked
Connect the iPod® to the BP Simulator
Turn the BP Simulator on, and
Tap the BP star of life APP to initialize program
Opening screen display
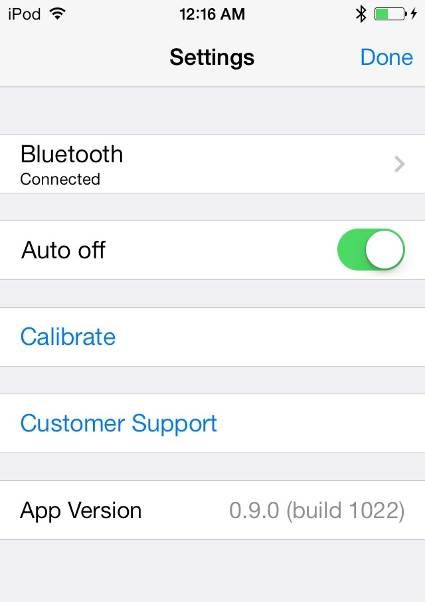
It is likely that the B/P cuff will need to be calibrated to the control box settings. To do so
tap settings, on the upper right corner, on the iPod® BP screen and a drop down list will
display. Pump the B/P cuff until the gauge reads 150 and wait until it stabilizes at 150
mmHg. At that time, tap “Calibrate” and the calibration is complete. Release the air in the
cuff and the trainer is ready for the next student. The calibration will set the gauge within 2
mm hg of the settings on the screen.

It may be necessary to reset the BP Simulator by turning it off and then on again after the
Auto Shut-Down. It also may be necessary to exit the BP Program on your iPod® and then
reenter the program after the Auto Shut-Down.

The Auto Off feature will allow you to set the unit to turn off to prolong the battery life of
the unit..

Notice the other drop down selections in this menu. The Ausculatory Gap simply toggles
from off to on. During the “ON” sequence, the gap occurs. Tap the choice again, and the
gap is off.

The other icon on the screen is the “Send” button. After changing the digit selections for
the B/P and the pulse rate, you must tap the send button in order for the change to take
place in the arm. You may use this feature to pre-load the trainer while the student is
working on the previous skill set. When you are ready to change, simply tap the button.

After the BP is calibrated, the Blood
Pressure, Heart Rate and Volume can be
changed.
Heart Rate: On the main screen click on
the blue arrow on the right side of the
screen next to the Heart Rate, this will
open up the Heart Rate Screen. Change
the values by tapping on the + and/or –
symbols.
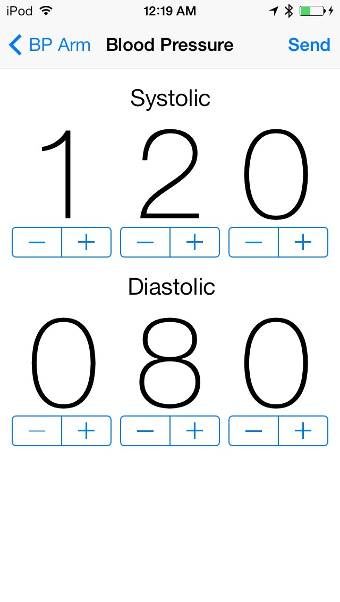
Blood pressure: On the main screen
click on the blue arrow on the right side
of the screen set between the systolic and
diastolic pressures, this will open up the
Blood Pressure Screen. The values can be
changed by tapping on the + and/or –
symbols.
Arm Volume: On the main screen click
on the blue arrow on the right side of the
screen next to the Arm Volume, this will
open up the Arm Volume Screen. Change
the values by tapping on the + and/or –
symbols.
WARRANTY: Simulaids warrants their products to be free from defects in materials and/or
workmanship for a period of one year from the date of purchase, as evidenced by the date on the invoice
of the product shipment to the end user. This warranty expressly does not cover abuse, accidental or
purposeful damage, or any form of modification to the product. This warranty does not cover moulage
products. Only products manufactured at the Simulaids plant in Saugerties, NY receive this limited
warranty status. All other products sold through Simulaids, but manufactured elsewhere, are subject to the
warranties supplied by the product manufacturer. These warranties may differ from the Simulaids’
warranty.
Simulaids reserves the right to either repair or replace affected parts or the entire unit, at their sole
discretion, after investigating and reviewing the actual product and the damage. In most instances, a
digital photo of the product in question showing the damage will help qualify a product for return to the
factory.

RETURN POLICY: At no time will any product be accepted without proper return authorization issued
by Simulaids. Please contact our Customer Service Department to arrange a return and obtain a RGA
number. Freight and Shipping charges are the sole responsibility of the end user. No product will be
received with shipping charges due. Serial number and invoice number from the agency through whom
the product was purchased must be provided for warranty repairs. No return authorization number will be
provided without this information.

An EXTENDED 2 YEAR WARRANTY is available for your Blood Pressure Simulator. The extended
warranty must be purchased within 2 months of the original purchase date established by the invoice date.
Contact your Simulaids representative and ask to purchase the extended warranty and they will quote you
the cost. The Extended Warranty simply extends the factory warranty (1 year) coverage to a total of three
(3) years. This is not available on products not manufactured by Simulaids, such as the iPod®.
Manufacturers of Training Manikins, Casualty Simulation
              Kits, Medical Training Devices
            PO BOX1289 16 Simulaids Drive
                   Saugerties NY 12477
                     (845)-679-2475
 Toll Free: (800)-431-4310 Fax: (845)-679-8996
                WWW.SIMULAIDS.COM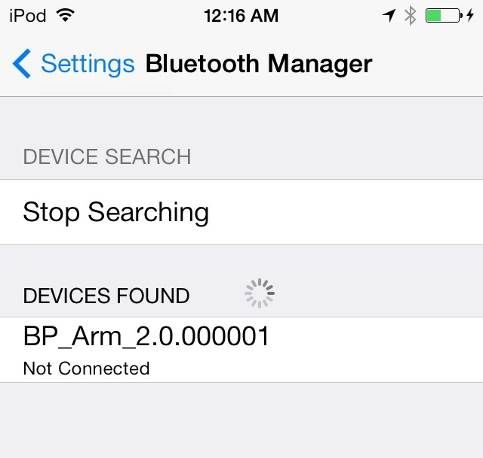
You can also read