Teaching Your Child to Ride a Bicycle - By Bob Oppliger, LCI & Connie Szabo Schmucker, LCI - City of North Liberty
←
→
Page content transcription
If your browser does not render page correctly, please read the page content below
Teaching Your Child
   to Ride a Bicycle

By Bob Oppliger, LCI & Connie Szabo Schmucker, LCI

Introduction
Riding a bike does more than just give children a fun
experience—it can serve as a first step toward independence. It
also provides exercise, not to mention a great way to go places!
Parents/caregivers can help children, as early as age 3, become
confident riders of two-wheeled bicycles. The following pages
show how to configure a bike for practice (by removing the
pedals and lowering the seat) so the child coasts before
learning to pedal. We discuss where to practice, and how to
help a child progress through balancing, pedaling, and stopping.
Each learning session should last about 30 minutes. Using the
strategies and tips that follow, a child can become a successful
bicyclist in as little as several days. Some children, however, will
need more time. Be patient.
Before beginning bike lessons, make sure your rider has a
properly fitted bike helmet: this means correct size and
tightness, sitting level on the head, and snugly clipped under
the chin. Wearing a properly fitted helmet to prevent head
injury cannot be stressed too much. To maintain that
protection, be sure to evaluate helmet fit periodically over time
to confirm that it still works to keep the rider safe. You’ll find a
helmet fitting guide at the end of this pamphlet.
Also, particularly for these first lessons, have your rider wear
rubber-soled, closed-toe shoes, and not flip-flops. (Closed-toe
shoes are always recommended when riding a bike.)

                                                                       2
Knowing When to Stop the Session
Look for early signs of frustration and give lots of praise. As new steps
are added, sometimes it’s two steps forward, one step back. Go back
and reinforce what the rider already knows. This helps build their
confidence back before moving on. Celebrate small victories and make
it fun!! Limit session to 30 minutes at a time (unless progressing really
well).

Setting Up the Bicycle
The bike should be the correct frame size or slightly smaller;
hand brakes are preferred but coaster brakes (which brake
by pedaling backward) are an option.
To begin, take off the pedals so they are out of the way. Pedals screw
off by twisting in the opposite direction from how they’re pushed while
biking. So, the left pedal screws off clockwise and the right pedal
counterclockwise. A generous squirt of lubricant helps twisting them
off.
If pedals can't be removed, put some padding (a sock or foam drink
cozy) to help cushion the pedal. It is a milestone when the pedals are
added back on the bike.
Lower the seat so the rider’s feet are flat on
the ground when the rider is seated, as
shown in the image. This image also shows
the pedals removed. With the pedals out of
the way, the rider can use feet flat on the
ground to push off.

                                                                            3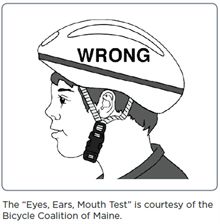
Location for Bike Riding Lessons
Give your budding rider plenty of room. Look for a large, paved
surface—for example, a quiet parking lot, school playground, or
basketball court, with slight downhill slope if possible. However,
in the absence of an open area, a flat or slightly sloped sidewalk
is suitable for these all-important initial steps.

Braking with a Hand Brake
Child-size bikes are configured with hand brakes or coaster
brakes. (Having a hand brake is preferred to be able to
separate braking from pedaling.) Youth bikes with 20"-wheel
size and above generally will have at least one hand brake.
The hand brake is typically only on the right hand and brakes
only the rear wheel. (If there is a left-hand brake, it stops the
front wheel and can be ignored until riding is mastered.)
Have your child walk with the bike, both hands on the
handlebars, body closer to the handlebars than the seat and
test the brake to see how it works. Walk 40’ or 50’ and say
“Brake” and the rider should use the right brake to stop the
bike. Do this a couple of times. If there’s a left-hand brake, do
not use it alone; it may cause the bike to “buck” and throw the
rider off the bike. The left-hand brake is not essential until
biking is mastered and offers only modest help.
If the bike has coaster brakes, we will discuss below how
to brake.

                                                                     4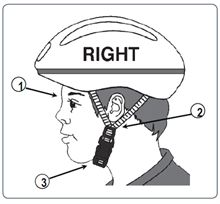
Getting on the Bike
To get on the bike (with the bike between the
rider’s legs): Stand close to the handlebars, both
hands on the handlebars, with the hand brake
on, if there is one, so the bike does not roll.
Swing the leg that is closest to the bike over the
back of the seat and rear tire and stand in front
of the seat. If needed, an adult hand at the
center of the handlebar can stabilize the bike on
the first couple of tries.
To get off the bike, make sure the bike is stable
and stand in front of the seat.
With the hand brake on, swing one leg over the
seat and rear wheel so that the rider ends up with both legs on
one side of the bike. Again, an adult hand at the center of the
handlebar can stabilize the bike on the first couple of tries. See
illustration.

Balancing and Coasting
Begin with the rider seated on the bike, with feet flat on the ground.
Before pushing off, your young rider should be looking up and ahead,
and the bike should aim straight ahead as well, with the front wheel in
alignment with the rest of the bike.

The rider should push off with both feet at the same time. The goal is to
see how far the rider can coast. At first, this may be only a few feet. To
stop, the rider should brake first and then put his or her feet down. If
the bike does not have hand brakes, the rider should stop by dragging
                                                                          5
their feet. Remind the rider that the seat is low so the rider can catch
themselves with their feet and keep from falling.
If pushing off with both feet is difficult, try the technique of walking the
bike to get momentum. Gaining confidence may take several days—or
sometimes weeks—and can depend on the rider’s age and motor skill
level. Be patient. Once again, to stop, the rider can drag their feet.
Longer Coasts
Work toward longer coasts. Give praise for small successes along the
way—say, coasting three feet, then coasting five feet, and so on. Keep
encouraging each longer coast—10 feet, 20 feet, and longer. With
those longer coasts, challenge the rider to steer (navigate) around small
obstacles and turn corners. To stop, encourage the rider to squeeze the
hand brake gently and then put their feet down after the bike has come
to a stop. Dragging the feet is still a good option.
6Restoring the Pedals
Once the rider has become comfortable with coasting about 30
feet, it’s time to restore the pedals. Although both pedals can
be added, initially, it’s recommended to start by installing the
pedal only for the dominant foot. Now have the rider practice
coasting with one foot resting on the pedal at 6 O’clock. Try
braking to stop. A guiding hand on the back of the seat may be
helpful here.
Now, place that pedal in a
position so it lines up even with
the downtube on the bike as
shown in the illustration at right
(2 O’clock for right pedal, or 10
O’clock for left pedal). To start,
have the rider push down with
the pedal foot and push off with
opposite foot. The pedal foot
should rest at about 6 O’clock.
Again, try using the brake to slow and stop.
Once the rider has mastered coasting with one pedal, add the
second pedal, repeat the start and coast as before, but rest the
opposite foot on the 2nd pedal which should be at 1-2 O’clock.
Encourage the rider to find foot placement without looking down. (A
guiding hand on the back of the seat may be helpful.) Use the hand
braking as above and put their foot down to stop. This same process
can be accomplished with both pedals added at once, but it requires
the rider to think about several new tasks at same time.
After the rider gets comfortable resting their feet on the
pedals, invite them to pedal. A guiding hand on the back of the
seat may be helpful here, too. It won’t take long to master this
7step. Encourage the rider to continuously pedal and rest with
their feet at 1-2 O’clock & 7-8 O’clock and not in a vertical
position, i.e., 6 O’clock & 12 O’clock positions because it’s
difficult to gain forward motion from the 12 O’clock position.
(Remember, pedaling backwards from a vertical position with
coaster brakes creates the stopping motion.)
If there are coaster brakes, introduce the idea of pedaling
“backwards” while putting their foot down to stop. The
forward pushing pedal can be referred to as the “go” pedal and
the backward pushing pedal as the “stop” pedal. (This may
take a couple tries, so dragging feet still works.)
8Stopping
Stopping has four steps:
• Stop pedaling,
• Place starting foot (from above) with the pedal straight down,
• After the bike slows down a bit, apply the right-hand brake,
• Once the bike has stopped, the rider should be getting ready to step
the non-starting foot off the pedal and forward onto the ground in
front of the pedal.
• -Note: If the bike has coaster brakes, coast with non-starting foot in
down position
Once the rider has learned starting/pedaling and stopping, he or she
also needs to learn how to start on flat surfaces and on uphill surfaces.
(Remember, these first practice runs have involved starting on a slight
downhill slope to gain more momentum when the rider starts out.)
Once the rider has learned starting, pedaling, and stopping, the next
step involves lots of practice to make starting/stopping second nature.
With the seat still low, the rider always can put one or both feet down
to maintain balance and brake. Once the rider starts pedaling, he or she
may not want to practice stopping, so make sure the rider masters
braking.
9Turning
Practice turning in a quiet parking lot or playground.
Once the rider has gained more speed, he or she will need to
slow down prior to making turns, coast through the turns, and
then pedal out of the turns (a new concept for riders who have
just learned how to ride).
Experienced bicyclists turn by leaning more than by turning the
handlebars. As a lead-up to full turn, use small obstacles (such as
cones or other safe objects) to create a slalom course, and then
introduce this leaning concept. The faster the speed, the wider
the turn. Practice riding in a parking lot doing all left turns, and
then practice doing all right turns.
10Raising the Seat
Once the rider has become more comfortable with riding and
braking, it’s time to start to move the seat to proper height.
When the seat is adjusted properly, the seated rider’s leg has a
slight bend when the pedal is in the lowest
position (see illustration).
Gradually raise the seat in three or four
stages. This allows the rider to use the
dragging-feet option to stop until the correct
seat height is reached.
Practice starting when off the seat, rather
than in a seated position. This is easier—it
uses body weight to push the pedal, allows
greater leg extension for more power in
pedal strokes, and the rider experiences less
wobbly pedaling, because the legs don’t have
to bend as much in the pedal stroke.
Stopping/ Starting
Not every start will be on a slight downhill slope. Once the rider has
learned starting and stopping, the rider will need to learn these skills on
flat surfaces and uphill slopes. Practice getting ready to start again after
stopping at an intersection, stop sign, or stop light and with slight
inclines.
11The Authors
Bob Oppliger has been a bike commuter and tour cyclist for
almost 40 years. For over a decade, he has been a League of
American Bicyclists League Cycling Instructor (LCI) and the
Education and Advocacy Coordinator for the Bicyclists of
Iowa City. He is a member of the League of American
Bicyclists Board of Directors.
Connie Szabo Schmucker is a League of American Bicyclists
League Cycling Instructor (LCI). As Advocacy Director for
Bicycle Garage Indy/ BGI Fitness, Indianapolis, IN, she works
on programs and projects to get more people on bikes.
Connie became a bike advocate 20+ years ago to help others
experience the joy of bicycling.
Acknowledgements
The authors appreciate the assistance of Master Teagan Jordan, Miss
Buffy Jordan and their mom, Angie Jordan, with the illustrations.
We appreciate the scholarly efforts of advanced Spanish & French
students at West High School in Iowa City, IA translating this pamphlet.
The editing skills of Elinor Levin, Kelcey Patrick-Ferree et al from the
South District Neighborhood Association, and Kurt Rogahn from the
Bicyclists of Iowa City were invaluable.
12Bike and Multi-Sport Helmets:
Quick Fit Check
Proper Helmet Fit
Use this easy, 3-point check to test for a proper helmet fit.
1. Eyes
Helmet sits level on your child’s head and rests low on the
forehead, 1 to 2 finger widths above the eyebrows. A helmet
pushed up too high will not protect the face or head well in a
fall or crash.
132. Ears
The straps are even, form a “Y” under each earlobe, and lay flat
against the head.
3. Mouth
The buckled chin strap is loose enough so that your child can
breathe. There should be enough room so you can insert a
finger between the buckle and chin. It should be tight enough
that if your child opens their mouth, you can see the helmet pull
down on top.
Why are helmets needed?
Helmets provide the best protection against head and brain
injury, whether your child is riding a bike, scooter, or
skateboard, or using skates. However, a helmet will only protect
when it fits well. Help your child get in the habit of wearing
a helmet by starting when they’re young. Be a good role model
and wear a helmet yourself.
How do I choose a helmet?
• Choose a helmet that meets safety standards. For biking, riding
a scooter, recreational roller skating and in-line skating, look for
a helmet with a CPSC (Consumer Product Safety Commission) or
Snell sticker inside.
• For skateboarding, or aggressive, trick, or extreme skating, look
for a helmet that has a sticker inside saying it meets ASTM
F1492. It is not enough for the helmet just to look like a skate
helmet.
• There are some helmets that meet both the CPSC and ASTM
F1492 standards. They are multi-sport helmets and can be used
for biking, skating, riding a scooter and skateboarding. Don’t be
14fooled into thinking that helmets that look “skate-style” are
always multi-sport. Look for the two safety standard labels to
be sure they are dual-certified.
• Helmet costs vary. Expensive helmets are not always better.
Choose one that fits properly, and that your child likes and will
wear.
• Helmet sizes vary between manufacturers. Always test for
proper fit.
• Check used or hand-me-down helmets with care, and never
wear a helmet that is cracked or broken. Used helmets may
have cracks you cannot see. Older helmets may not meet
current safety standards.
What are the pads for?
Helmets come with fit pads to help ensure a proper fit. Use the
pads where there is space at the front, back and/or sides of the
helmet to get a snug fit. Move pads around to touch your child’s
head evenly all the way around. Replace thick pads with thinner
ones as your child grows.
How do I check the fit?
If you can move the helmet from side to side, add thicker pads
on the sides or adjust the universal fit ring on the back if the
helmet has one.
When done, the helmet should feel level, fit solidly on your
child’s head and be comfortable. If it doesn’t fit, keep working
with the fit pads and straps or try another helmet.
Safety Tips
• Teach your child to take their helmet off before playing at the
playground or climbing on equipment or trees. The straps can
15get caught on poles or branches and prevent your child from
breathing.
• Leave hair loose or tie it back at the base of the neck.
• For skiing or snowboarding, you will need another type of
helmet.
When does a helmet need to be replaced?
• Bike helmets are good for only 1 crash. Replace the helmet after
a crash, and when the manufacturer suggests.
• Follow the instructions from the manufacturer to know when to
replace your multi-impact helmet.
• Replace the helmet if it does not have a CPSC, Snell or ASTM
sticker inside, it no longer fits, or your child doesn’t like it.
From Seattle Children’s Hospital
16You can also read