TOTAL HIP JOINT REPLACEMENT - Journey through your new HIP JOINT - BOPDHB
←
→
Page content transcription
If your browser does not render page correctly, please read the page content below
TOTAL
    HIP JOINT
  REPLACEMENT

Journey through your new

       HIP JOINT
CONTENTS...

 1     What is a Total Hip Joint Replacement (THJR)?

 2     What you can do to prepare for surgery?

 3     The operation and your stay in hospital

 6     During your stay in hospital

 6     Total Hip Joint Replacement precautions

 7     Looking after yourself when you get home

 11    What are the risks or complications of hip replacement
       surgery?

 12    Physiotherapy exercises

 The information in this booklet will help you, your family and
 support people prepare for your surgery. It will also explain your
 stay in hospital and tell you how to take care of yourself following
 your discharge.

 Please look after this booklet and bring it with you on admission,
 and to all of your hospital appointments regarding your hip.
WHAT IS A TOTAL HIP JOINT
REPLACEMENT?
This is an operation where your arthritic or damaged hip joint is
removed and replaced with an artificial joint (prosthesis). The
replacement is usually made of high grade metals, plastics and / or
ceramics. Total hip joint replacement involves replacing the hip socket
(acetabulum which resembles a cup-shaped bone in the pelvis) and the
head of the thigh bone (femur).
Following a total hip joint replacement, most people will experience
complete or nearly complets pain relief, allowing a return to many normal
day-to-day activities.
1WHAT YOU CAN DO TO PREPARE FOR SURGERY Look after your lungs Avoid getting chest infections (stay away from people with coughs and colds) and give up smoking at least two weeks before the operation date. Staff can issue you with a Quit Card so you can get subsidised nicotine patches, lozenges or gum to assist you. Alcohol If you drink alcohol cut down or stop before your surgery. Alcohol can add to the risk of developing confusion following an anaesthetic. Reduce sources of infection Surgery may be cancelled if you have any source of infection such as ulcers, tooth problems, sores or open wounds. Please see your GP or dentist if you have any of these. Regulate your weight If you are overweight a total hip joint replacement can be more difficult to perform due to there being more tissue around the hip. Recovery can be more difficult as you have more strain on your muscles and joints. It can be hard to lose weight, especially with reduced mobility but exercise and changes in diet even without weight loss can reduce your chance of complications after surgery. Before going into hospital Organise your home for your return two to five days after the operation. For example: • remove rugs and mats, loose cords and anything that can be a trip hazard • prepare extra meals and freeze them so that they only need to be re-heated when you need them • place items that you use daily at bench top height • if you live alone, it would be helpful if a friend or relative could stay with you for a week or two. 2
Plan your hospital stay
• Organise night clothes, easy to wear day clothes, shoes or slippers and
  toiletries.
• Bring something to occupy your spare time while in hospital.
• You may also bring your own pillow which will make your hospital stay
  more comfortable. Please make sure your pillowcase is not blue or white
  (these are hospital colours).

Organise transport
You will not be able to drive yourself for six weeks after surgery, so you will
need to organise a driver or alternative transport. Insurance companies will
not cover accidents caused by patients who have had total hip replacements
within the past six weeks.

THE OPERATION AND YOUR STAY IN
HOSPITAL
The night before surgery
Please have a shower using one of the tubes of antiseptic wash which was
given to you at preassessment clinic. You will also need to have a further
shower using the second tube of antiseptic wash in the morning before
admission to hospital.

Day of surgery
•   Unless otherwise stated, you will not be allowed any food for six hours
    before your anaesthetic (this includes milk, lollies and chewing gum). You
    can have water only, up to three hours before surgery.

•   Take morning medication as instructed by Pre-Assessment staff.

                                                                                  3
• A nurse will settle you into the unit and will discuss with you what to
expect.
• You will be checked to make sure you are not allergic to iodine and you
will be asked to dress in a ‘theatre gown’.
• At this time a nurse may supply you with white elastic compression
stockings, which you will need to wear for up to six weeks (unless told
otherwise) after surgery to reduce the risk of developing blood clots.
• Your surgeon will visit you in the unit to mark the operation site with a
marker pen.
• You will see your anaesthetist prior to surgery to answer any anaesthetic
questions you may have. You will also sign your anaesthetic consent
form if not previously completed at preassessment clinic.
• You may be given a tablet or injection about an hour before the operation
` to make you feel drowsy.
• You will be wheeled, or you may walk to theatre where you will be
handed over to the care of our theatre staff. Part of your preparation may
be a shave of the operative area in theatre.
After surgery
• You will wake up in a recovery room before going to the orthopaedic
ward.
• Nursing staff will take your blood pressure, pulse, temperature and check
your wound at regular intervals.
• Please let staff know if you are experiencing pain before it becomes
severe. Pain relief will be given to you as per your chosen pain
management option, as discussed with the anaesthetist at
preassessment.
• You will have an intravenous line (IV line) in your arm to make sure you
have sufficient fluid and you will also be able to drink small amounts of
fluid. You will be given antibiotics and possibly pain relief through this line
which will be removed when you are able to eat and drink normally.
4• Whilst you were in theatre you may have had a urinary catheter inserted.
This is a plastic tube that goes up into your bladder and drains your
urine. This stays in until you are up out of bed (usually the first day after
your operation).
• You may be given oxygen on the day of surgery and overnight, or for as
long as you require it.
• You may have a drain from your operation area; this is normally removed
after one or two days.
• You may have foot pumps attached to your feet. Every few seconds
these will squeeze your feet to assist circulation and help reduce your
chance of getting a blood clot. These can be uncomfortable and a bit
noisy but it is important to keep them on; they normally remain on until
you are up walking around.
• You will be helped to get out of bed and walk by the physiotherapist and/
or nurses with the aid of crutches or a walking frame. You will now be
able to go to the toilet and have a shower with assistance from your
nurse /health care assistant.
5DURING YOUR STAY IN HOSPITAL
• You may be seen daily by the pain team for the first two to three days following
surgery. They will ask how you are managing with your pain relief and make
changes as needed.
• The occupational therapist may visit you during your stay to review your
equipment needs and home environment.
• The social worker may visit you during your stay to review your care needs
and help coordinate your discharge. Please let a staff member know if you
wish to see a social worker.
• Maori Health Services, if you would like to talk with a kaupapa social worker
please let a staff member know.
• Most patients are able to be discharged two to five days after the operation.
• If you have clips, or sutures that are not dissolvable, they will be removed at
home by the district nurse.
• An appointment will be made at the outpatient clinic for you to see the
orthopaedic surgeon after discharge.
TOTAL HIP JOINT REPLACEMENT
PRECAUTIONS
To reduce the risk of dislocating your hip you must take the following precautions for
the first six to eight weeks after surgery
• Avoid bending your new hip joint further than 90 degrees. Do not sit on
anything low (armchair, toilet, bed) that will make your knees higher than
your hip.
6• Do not cross your legs at the knees
or ankles when sitting, lying or standing.
• Turning:
You must not twist on your leg.
When you turn, turn with your feet first to avoid twisting.
LOOKING AFTER YOURSELF
WHEN YOU GET HOME
After you leave hospital and go home you should stay active. The key is not to
overdo it! You should notice a gradual improvement over time.
The following information helps you to perform tasks in a way so that you are
keeping to the hip precautions.
These descriptions are not the only way to perform these tasks safely but they may
be helpful.
Dressing and undressing
• It is more practical to wear loose fitting lower body clothing.
• It is recommended that you sit in a chair or on the side of the bed.
• Dress operated leg first and undress operated leg last eg underwear and
trousers.
• Use the aids eg a reacher, long-handled shoe horn and /or sock aid.
• Discuss your needs with the
occupational therapist.
7Advice for showering /washing
• For safety, sit on the shower chair, stool or bathing equipment given to you
on short-term loan from the hospital. This should be adjusted to the correct
height for the hip precautions.
• Use a reacher with a sponge or flannel wrapped around to wash your legs.
Buy a long-handled body brush prior to surgery and bring it with you to the
hospital.
• Wrap a towel around a reacher to
dry your legs.
Sitting position
• Do not sit on a low surface and when sitting always keep your hips higher
than your knees.
• It’s advisable to sit in an armchair with a high back and firm seat. Do not sit
on a low soft chair or sofa, or use a deck chair, rocking chair or office/swivel
chair on wheels.
Tips:
If a chair is only knee height or lower when you stand beside it, it is too low!
Keep a blanket in your car, it can be folded and placed in a chair to raise the
height. Think about where you may be visiting in the community (doctor,
dentist, hairdresser and café) as their chairs may not be high enough.
Toilet:
Toilets are traditionally low, therefore use the appropriate toilet equipment
provided to you by the hospital.
Bed:
Should be high with a firm mattress; if you feel that your bed is not high
enough, discuss this with the occupational therapist.
8Shower:
You can stand to shower, however if your balance is an issue, a height
adjustable shower stool or shower chair will be provided by the
occupational therapist. When stepping into the shower your operated
leg goes in first.
Bathing:
Do not sit in the bottom of a bath tub. If you only have a bath discuss
your needs with the occupational therapist.
Household tasks /shopping
• Because you need to walk with two crutches (or a frame), you will not be
able to carry out any heavy housework, such as bed making, vacuum
cleaning and laundry. Have someone else do these chores.
• Use aids to help you, eg long-handled reacher to pick up
items from the floor (BBQ tongs work too!)
• If not already done before admission have
someone remove clutter, cords and scatter rugs
to prevent falls.
• Use a stool to avoid standing too long a period for ironing or meal
preparation. Your occupational therapist can assist you with this so that the
seat height is correct.
• Consider purchasing frozen meals or Meals on Wheels.
• Shop with family or friends who can carry shopping items.
Getting in /out of a car
Avoid very low and very small cars; do not get in the back of a 2-door car.
Getting into the passenger seat:
• Have the car parked away from the curb so your feet are on the road.
• Push the passenger seat back as far as possible for plenty of leg room and
recline the seat a little, so that you can lean back easily.
9• Back up to the car seat
• Put your operated leg forward and slowly lower
yourself down onto the seat.
• Move your bottom back as far as possible, a
nd then lift your legs in.
Handy Hint
Raise the passenger seat by placing a folded blanket
on it, and put a plastic bag on it to help you swivel round
and slide your hips in.
Getting out of the car is the reverse procedure.
Return to work
As a guideline; for light work expect to return after six to eight weeks. For more
physical type work, you can expect to resume work after eight to 12 weeks.
Discuss this with your Orthopaedic Surgeon.
Your GP or surgeon can provide you with a work medical certificate.
Intimacy
Intimacy and sexual relationships are a sensitive and private topic for many
people. If you would like some information on intimacy, please ask your health
professional prior to discharge from hospital.
Hobbies Exercise and Sport
You may return to many of your normal hobbies including exercise and sport
once you have recovered and rehabilitated from your surgery. This will usually
be around 3 months after surgery. Suitable activities could include walking,
swimming, golf, bowls, dancing, cycling on level surface, doubles tennis, lifting
weights, and gardening. Unsuitable activities include high impact or contact
sports such as running or jumping activities, soccer, rugby, hockey and netball.
Also avoid activities that involve over stretching of the joint. Talk to your surgeon
regarding other specific activities that you wish to partake in.
10WHAT ARE THE RISKS OR COMPLICATIONS
OF HIP REPLACEMENT SURGERY?
Infection:
An infection can occur in the wound or deep around the prosthesis. This could
happen while you are in hospital, after you go home and can even occur years
later, any infection in your body can spread to your joint replacement. Minor
infections are usually treated with antibiotics but major infections can sometimes
require surgery and removal of the prosthesis.
Dislocation:
Occasionally after a total hip joint replacement the head of the prosthesis can
become dislodged from the socket. In most cases the hip can be relocated
without surgery. The period that you are most at risk for dislocation is the first
six weeks following replacement, to minimise the risk you will need to follow the
precautions outlined in this booklet.
Blood clots, deep vein thrombosis (DVT):
A deep vein thrombosis is a blood clot that can form in a deep vein in the body.
This most commonly occurs in the legs and can partially or completely block the
flow of blood in a vein. For more detailed information please refer to the DVT
pamphlet in your information pack.
Nerve injury
It is unusual to damage any major nerves or blood vessels. However a nerve
palsy can develop if the nerve is stretched during surgery. Over time nerve
injuries often improve and may completely recover.
Wear
Hip replacements do wear and some will require revision surgery. The NZ Joint
Registry shows 93% of hip replacements are still in place 10 years after surgery.
They are likely to last considerably longer.
Leg length discrepancy:
It is not unusual for there to be up to 1cm leg length discrepancy following
a hip replacement, this is quite easily tolerated. The reason there may be a
discrepancy is to ensure that the hip joint is appropriately tensioned so that it does
not dislocate. Initially you may think that you have a longer leg but this is often
due to muscle contracture which over time may loosen up and your leg lengths
will even out.
If you think that you may be experiencing any of the above complications
following surgery, please discuss them with your GP. 11PHYSIOTHERAPY EXERCISES DAY OF OPERATION: It is important that you start with some simple exercises straight after your surgery. Deep breathing exercises: Lying or sitting down, take a deep breath in through your nose and feel your tummy rise. Then breathe out slowly through your mouth. Take four to five breaths like this. Repeat five to six times a day. Circulation exercises: With your knees straight, stretch your ankles up and down. This helps your circulation and will help to prevent a DVT (deep vein thrombosis). Do ths regularly (every hour). Static glutes: Lying on your back, squeeze your buttocks firmly together. Hold for three seconds, then relax. 12
DAY 1 AFTER YOUR OPERATION:
 These exercises are designed to increase the mobility of your new hip.
 All exercises should be done slowly and in a controlled manner.
 You should be amining to do all of these exercises about four to five times a
 day. As you get stronger you will be able to do more each time. To start with,
 aim to do 10 repetitions of each exercise and build to do 20.

1     Quadriceps exercise:
With your toes pulled towards you, tighten
your thigh muscles by pushing your knee
down into the bed.
Hold for five seconds and relax.

2     Knee extension:
Place a rolled towel under your knee. Keep
your thigh resting on the rolled towel and
lift your heel off the bed so that you full
straighten your knee,
Hold for five seconds and slowly lower.

3     Hip and knee flexion:
Lying on your back, slowly slide your heel up
the bed, bending your knee, then slowly
straighten again.

4     Hip abduction:
Lying on your back, keep your knee straight
and your toes facing the ceiling and slide
your leg out to the side. Slide it back to the
middle.
                                                                                  13
STANDING EXERCISES: Your physiotherapist will instruct you when you can start doing these exercises. Hold onto a bench or solid surface to do these exercises. All of these exercises can be done on both sides as this will help to strengthen your “new” hip. 1 Hip abduction: Stand straight holding onto a support. Lift your leg to the side, making sure that your toes face forward and that your trunk stays upright. 2 Hip extension: Stand straight holding onto a support. Bring your leg backward, making sure that you keep your knee straight and do not lean forward. 3 Knee extension: Sit on a chair, pull your toes up, tighten the front of your thigh muscle and straighten your knee slowly. Hold for five seconds, then slowly lower. 14
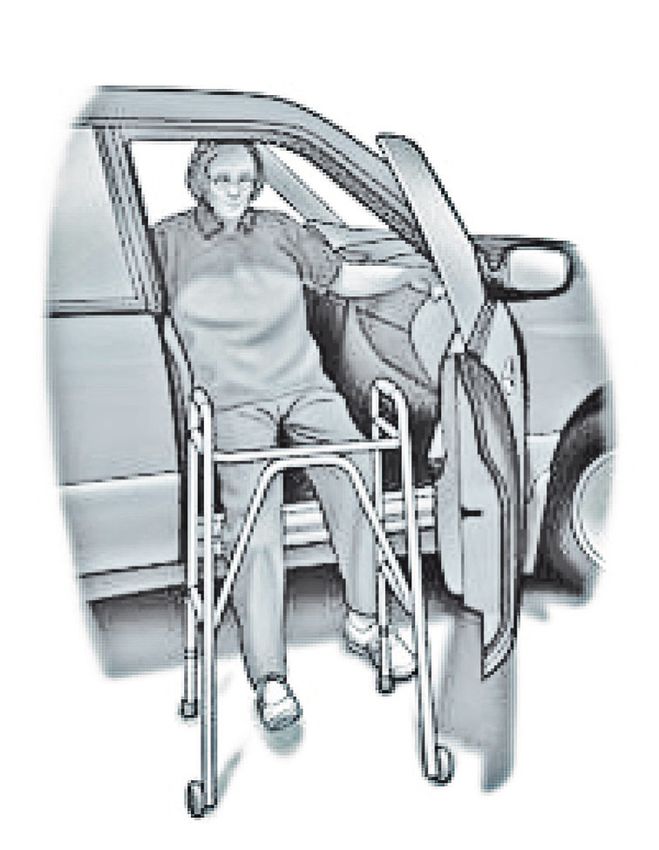
USING CRUTCHES OR
FRAMES:

Walking:
When you are using your
crutches or walking frame,
always remember...
• stand up straight and keep
  your head up

• to take a step - take both
  crutches forward first

• step forward with your
  affected leg and take the
  weight through your arms

• step forward with your good
  leg.

• walk with your feet pointing
  straight ahead - try not to let
  your affected leg turn out to
  the side.

                                    15
Getting up and down
from sitting:
• Use chair arms or bed to
push up into standing,
then put hands/arms into
crutches.
• (Do not put hands/
arms into crutches before
standing).
• Remove your hands/arms
from the crutches, then
use the chair arms/bed to
sit down.
Going up and down
stairs:
You may use two crutches or
one crutch and the handrail.
Going up
• Place good leg first
• Then affected leg up same
step
• Followed lastly by crutches
Going down
• Place crutches down a step
first
• Then affected leg on step
• Followed by good leg on
same step
16Day 0 After your surgery □ Eat and drink as tolerated □ Foot and ankle exercises – see booklet Day 1 □ You can eat and drink □ Urinary catheter may be removed □ Drain from your wound may be removed □ Oral pain relief and your drips disconnected □ You will get up out of bed take a few steps (with crutches or a frame) □ Spend some time sitting in a chair □ Bed wash or a shower □ Start doing physiotherapy exercises Day 2 □ Walk to the bathroom (with crutches or a frame) for a shower □ Get dressed in your own clothes □ Start day 2 physiotherapy exercises □ Start walking a little further □ Practice getting in and out of bed □ Work on exercises independently □ Have all meals sitting up in chair Day 3 □ Walk with crutches without supervision □ Get dressed in your own clothes □ Sit-up in a chair most of the day and for all meals □ Practice going up and down stairs □ You may be able to go home today Day 4 Go home today if you: □ Can get in and out of bed by yourself □ Walk by yourself with crutches/frame □ Know your physiotherapy exercises □ Can go up and down stairs
The Bay of Plenty District Health Board has an active commitment to the Treaty of Waitangi
                                                      and the improvement of Māori health.
                           Tauranga Hospital 07 579 8000, Whakatane Hospital 07 306 0999
                                                                   www.bopdhb.govt.nz
                                                      BOPDHB Design & Print Dept - October 2012
You can also read