TREE PROGRAMS FOR KID - HOW TALL IS THAT TREE? - Riverfront North Partnership
←
→
Page content transcription
If your browser does not render page correctly, please read the page content below
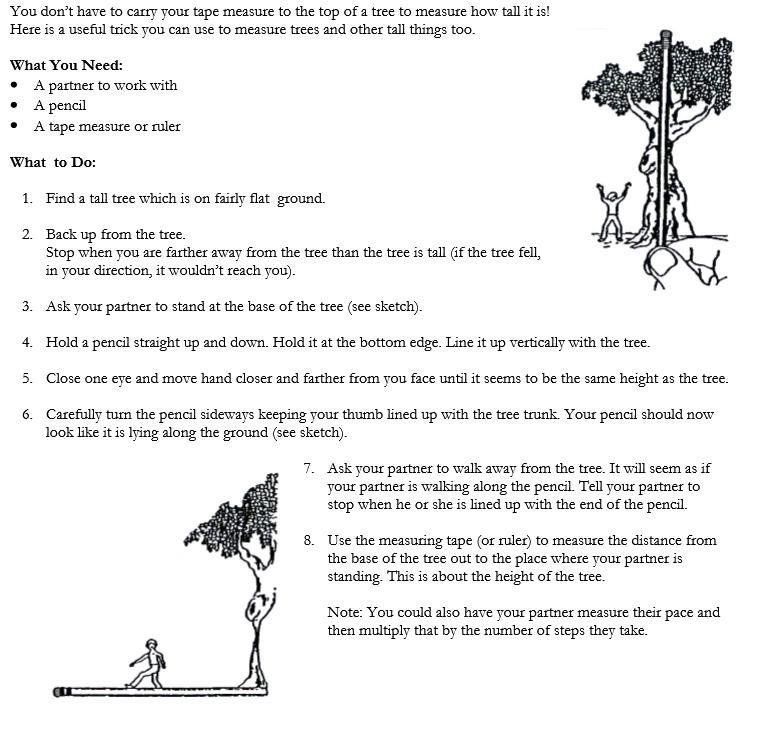
TREE
PROGRAMS FOR KID
HOW TALL IS THAT TREE?
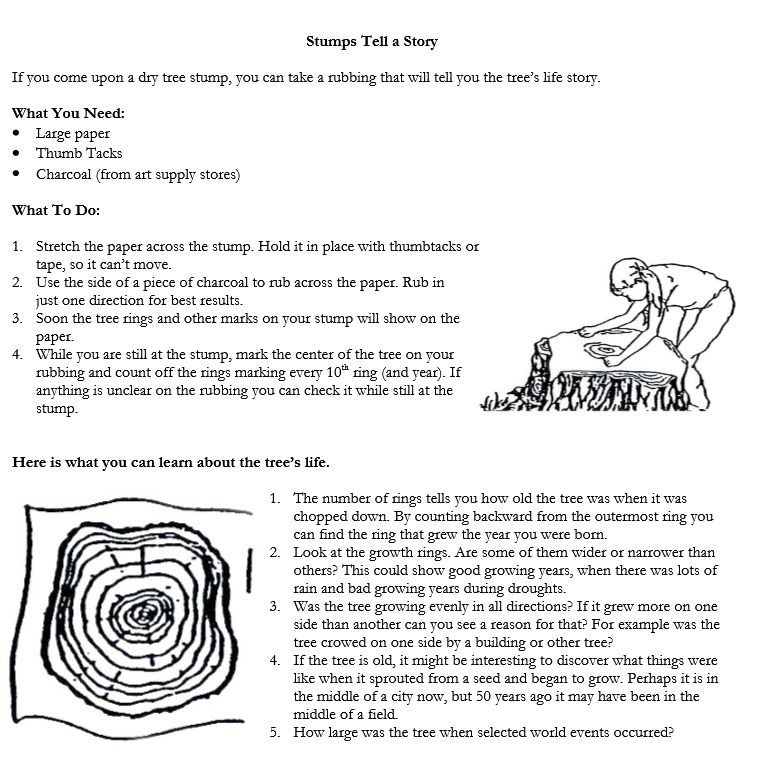
STUMPS TELL A STORY
Poet-Tree Corner
TREE STRESSES CHARADES

Props:

   •     Flashcards with various tree stresses written on one side and numbered on the other side
   •     A list of numbered tree stress cards
   •     Two branches for the tree
Optional Props:

Twine or string - spread out for roots

A blindfold (around the mouth because trees can not speak!)

Yellow baseball cap (represents the sun)

Plastic knife (represents damage)

Empty container of bleach (represents chemical spills)

Plastic bags filled with balled-up paper (represents trash)

To Play:

    1. Ask for a volunteer.
    2. Transform that person into a tree using the branches.
    3. Give out the flash cards to the players and request that they don't let anyone else see their
       flashcard.
    4. Call up each flashcard starting with number 1 and have that person act out the stress on the
       tree.
    5. The audience needs to guess which urban stress is being portrayed. For younger groups, provide
       a list of tree stresses to choose from.
    6. After it is guessed correctly, ask how that stress would affect the tree.

Optional: Divide the groups into teams to compete against each other with points.

Tree Stresses that can be used in this game:

•   Drought – an average large tree can release hundreds of gallons of water through transpiration.
•   Compacted soil – does not allow for water or air infiltration. A tree's roots can be smothered
    without access to oxygen.
•   Doggy doo (Dog litter) – can burn roots and can change the soil pH which can tie up some essential
    nutrients. (Note: the "doo" of non-vegetarian animals, such as dogs, is always unsuitable as a
    fertilizer.)
•   Chemical spills – toxic effect
•   Garbage – can compact soil and toxic materials can leak out; also implies a lack of respect for the
    tree.
•   Small pit (Limited rooting space) - tree will not be able to develop a strong root system; tree can
    eventually die, be blown over in a storm, etc.
•   Damage from cars – Car doors can damage the bark of the tree and the area right under the bark.
    The tree's ability to feed itself is compromised and damage to the bark can lead to diseases and
    insect infestation.
•   Damage from lawnmowers and weedwackers – similar to damage from cars.
•   Mulch Mountains – heaping mulch up against the trunk will cause rotting and encourage disease.
•   Reflected light – can cause droughty symptoms or burn the leaves.
• Bark carving – tree's ability to feed itself is compromised and damage can lead to disease and insect
infestation.
• Damage from vandalism – Carving letters into bark open the tree to disease and insects.
Note: There are other tree stresses. Those listed above lend themselves well to charades.
THE WORLD AS AN APPLEPINE CONE TREE and PINE CONE FEEDER
A. Pine Cone Tree
Time required: ½ hour
Materials:
• pine cones
• water
• small container
• soil
• seeds for sprouting
• bird decorations (optional)
Instructions:
• Remove stem of each cone so bottom is flat and cone will stand up.
• Soak each cone in water for a few minutes.
• Roll each cone in soil.
• Sprinkle more soil over top of cone.
• Sprinkle seeds evenly over each cone.
• Place in container filled with ½” of water. Put in a sunny spot and make sure the container always has
water.
• In a few days the seeds will sprout. Trim with scissors into a tree shape. Decorate with birds, if desired.
B. Pine Cone Feeder
Time required: ½ hour
Materials:
• pine cones
• thin wire
• wax paper
• plastic knives
• peanut butter in dishes or large trays
• aluminum pie pans filled with bird seed
• rubber gloves (optional)
Instructions:• Make hanger for each cone by twisting a length of wire around the scales at the top of the cone. If participants may find this difficult, do this step in advance. • Give each person a piece of wax paper to work on. • With the knives, spread the peanut butter onto all the scales of each pine cone. This can get messy, so use gloves if desired. • Roll each pine cone into the bird seed, completely covering peanut butter with the bird seed. • Place the finished cones onto trays to store until ready to hang outside for the birds. MAKING A RECYCLED BIRD FEEDER
MAKING RECYCLED PAPER
Materials needed: Newspaper Buckets or bowls Blender or hand mixer

Pieces of screen or felt Plastic wrap Rolling pin or a wood block

Instructions: (requires several days to complete)

Cut or tear the newspaper into small pieces (no larger than 1” x 1”, or 1½” x 2” strips) and place into the
bowl or bucket with water (1 part paper to 2 parts water) and let it soak overnight.

The next day, use the hand mixer or blender to “pulp” or break down the wet newspaper fibers.

Starch can be added for rigidity. Flower petals, leaves, cloth, fibers, dye or other materials can be added
for color and texture.

Place the wet pulp onto a screen or the piece of felt and place this between a folded piece of plastic
wrap.

Press down on plastic wrap and force the water out with a rolling pin or wood block, pushing the water
towards the outer edges. Keep pressing until most of the water is removed. Keep wiping away the water
to prevent it from being absorbed again. Let dry for a day or two.

Once dry, cut the paper into the proper size for cards or gift tags. Allow participants to decorate and
write on their newly made paper.

Use the paper for an art project or use it to write a letter to a neighbor or relative explaining how the
paper was made and the importance of recycling.

Note: If fibers are not used, paper may be very brittle. Use caution while decorating.

TREE FROM A SEED
What do acorns, avocado pits and walnuts have in common? They are all tree seeds.

Tree seeds, like all seeds, come in different colors, shapes and sizes. How many different tree seeds can
you think of?

Go on a tree seed hunt. Explore the area around several trees to find seeds.

Line the seeds up by size from largest to smallest.

Compare their shapes and colors.

What kind of trees will grow from each seed?

Examine each seed and notice its different parts.

• The SEED COAT covers the outside of the seed.

• Inside the seed coat is the EMBRYO.
• The two largest parts of the embryo are the COTYLEDONS (kot-i-lee-dons).

• The young trunk and root of the tree will grow between the cotyledons.

When a seed grows, we say it germinates. Find out how long it takes a fruit tree seed to germinate:

• Dry a seed from a fresh lemon, orange, avocado, or other fruit.

• Soak the seed in a glass of water for a day or two.

• Plant it in soil in a cup or pot with holes in the bottom for drainage. (keep a saucer under the planter
to catch water)

• Keep the soil moist.

• Before long – with sun, water and care – the seed will germinate and start to grow.

A special thanks for this activity to:

TreePeople School Education Program, 12601 Mulholland Drive, Beverly Hills, CA 90210

GROW-A-TREE RELAY
Materials needed:

16 empty plastic bottles

Representations of (or the actual items) to fill two bottles with each:

    •   Soil
    •   Water
    •   Air (empty or label as O2, oxygen)
    •   Sunlight (a cut-out of a sun)
    •   Seeds
    •   Room to Grow (a measuring tape or view of landscape )
    •   Mulch
    •   Trash (any kind of trash that fits in the plastic bottle)

Activity:

Two sets of the bottles are filled with each of the above items. They are set at the end of a running path.
The group is divided into two teams, lined up at the starting line. Each child takes a turn (1 at a time)
running down (relay style) to the pile of plastic bottles to grab one thing they need to grow a tree and
bring it back to the starting line. If anyone brings back something that you don’t want around your tree,
trash for instance, or if they collect two of the same thing, they must return it to the pile of bottles. The first group to get all 7 things a tree needs (without any trash)…GROWS A TREE and WINS! Results: This activity will teach students the elements needed for a tree to grow, while they engage in physical activity and learn about teamwork and cooperation! Race down to the pile of plastic water bottles, grab 1 bottle at a time and bring it back to begin building your tree. Once you have returned to the starting line, the next runner on your team can run down and grab another plastic water bottle. Keep running and collecting bottles until you have successfully built a tree by collecting ONE bottle with each of these elements: Soil Water Air Sunlight Seeds Place to Grow Mulch (Watch out for trash! Collecting trash will keep your tree from growing & must be returned to the pile, along with extra bottles you don’t need.) The first team to collect the 7 elements & Grow-A-Tree wins!
You can also read