UM1676 User manual Getting started with .NET Micro Framework on the STM32F429 Discovery kit
←
→
Page content transcription
If your browser does not render page correctly, please read the page content below
UM1676
User manual
Getting started with .NET Micro Framework on
the STM32F429 Discovery kit
Introduction
This document describes how to get started using the .NET Micro Framework (alias
NETMF) on the STM32F429 Discovery board (32F429IDISCOVERY). It presents the
software and hardware environment required to build a .NET Micro Framework application.
A set of C# example projects are provided within the STM32F429I_Discovery_NETMF_
Package (STSW-STM32141) allowing fast exploration of this environment.
NETMF is a developer platform for small embedded devices that gives C#, Visual Basic, or
Visual Studio programmers access to a subset of the NET framework programming
libraries. It is assumed the reader is already proficient in one of these programming
languages.
This document is structured as follows:
Chapter 1 presents the required software and hardware environment to get started with
.NET Micro Framework:
– Microsoft® Visual Studio®
– Microsoft .NET Micro Framework Software Development Kit
– STM32F429I_Discovery_NETMF_Package
– STM32 ST-LINK Utility
– STM32F429I_DISCOVERY NETMF USB driver
Chapter 2 describes how to build and deploy applications on the hardware.
Chapter 3 describes how to remove applications.
Chapter 4 contains links to useful web sites.
January 2014 DocID025302 Rev 1 1/13
www.st.com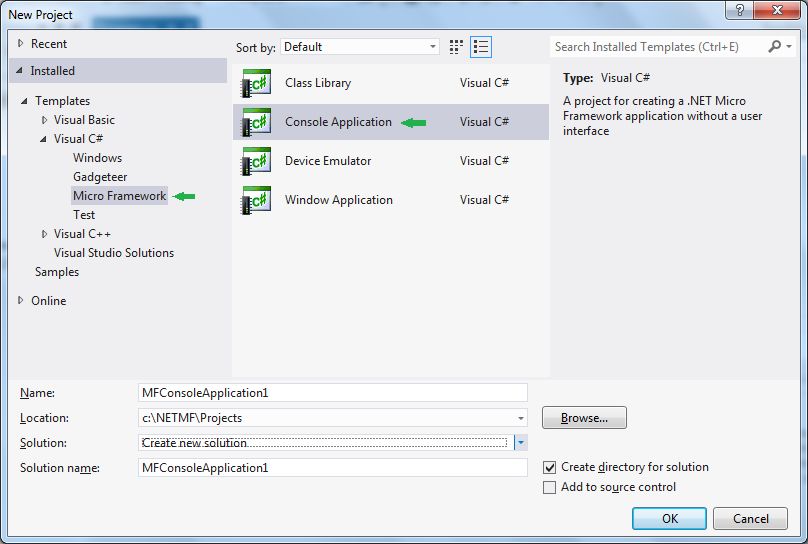
Contents                                                                                                     UM1676

Contents

1          Software environment . . . . . . . . . . . . . . . . . . . . . . . . . . . . . . . . . . . . . . . . 3

2          Create first NETMF application . . . . . . . . . . . . . . . . . . . . . . . . . . . . . . . . 5

3          Erase deployment section using MFDeploy . . . . . . . . . . . . . . . . . . . . . 10

4          Useful links . . . . . . . . . . . . . . . . . . . . . . . . . . . . . . . . . . . . . . . . . . . . . . . 11

5          Revision history . . . . . . . . . . . . . . . . . . . . . . . . . . . . . . . . . . . . . . . . . . . 12

2/13                                          DocID025302 Rev 1
UM1676 Software environment
1 Software environment
The following software is needed to develop a .NET Micro Framework (NETMF) application.
It should be installed if it is not already on your PC.
1. Microsoft Visual Studio 2012: You can use the Express edition, a time-limited free
evaluation version, downloadable from
http://www.microsoft.com/visualstudio/eng/products/visual-studio-express-products.
2. Microsoft .NET Micro Framework SDK version 4.3 downloadable from
http://netmf.codeplex.com/downloads/get/500745.
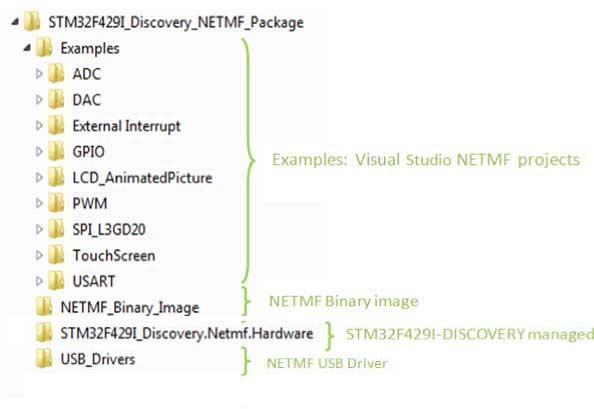
3. STM32F429I_Discovery_NETMF_Package: Contains binaries, NETMF USB driver,
libraries and examples required to develop and run a .NETMF application on the
STM32F429 Discovery board. It is available from www.st.com/stm32f4-discovery by
selecting the product 32F429IDISCOVERY.
Figure 1. STM32F429I_Discovery_NETMF_Package
Examples: Visual Studio NETMF projects (C#)
NETMF Binary image
STM32F429I-Discovery managed library
NETMF USB Driver
MS33234V2
4. STM32 ST-LINK Utility: You can use this utility to load the NETMF binary core into the
STM32F429 Discovery. It can be downloaded from www.st.com/stlinkv2.
ST-LINK Utility automatically installs the ST-LINK/V2 USB driver.
The STM32F429I_Discovery_NETMF_Package\NETMF_Binary_Image contains the
NETMF binary image which consists of three hex files that should be loaded using ST-
LINK Utility into the STM32F429 Discovery board.
DocID025302 Rev 1 3/13
13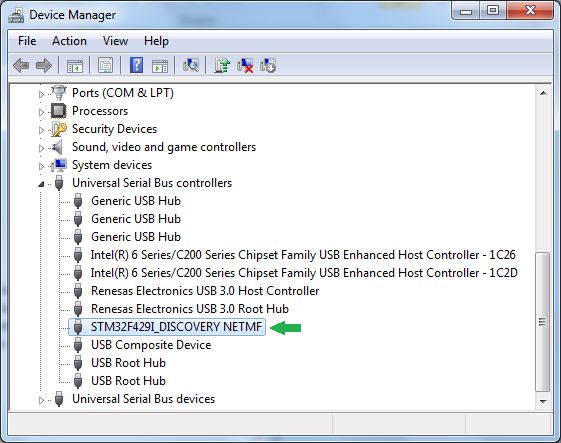
Software environment                                                                     UM1676

          5.   STM32F429I_DISCOVERY NETMF USB driver: USB USER (CN6) is used to deploy
               and debug a NETMF application on the STM32F429 Discovery. After loading the
               NETMF binary into the STM32F429 Discovery, install the NETMF USB driver.
               a)   Connect the STM32F429 Discovery to the computer using USB USER connector.
                    A device called "STM32F429 DISCOVERY" will be detected.
               b)   When windows asks for the driver, browse to the STM32F429I_DISCOVERY
                    NETMF driver in the STM32F429I_Discovery_NETMF_Package.
               c)   Once installation is done, an STM32F429I_DISCOVERY NETMF will be displayed
                    in the device manger as displayed in Figure 2.
          You are now ready to start your first NETMF application on the STM32F429 Discovery
          board.

                                   Figure 2. Windows Device manager

4/13                                  DocID025302 Rev 1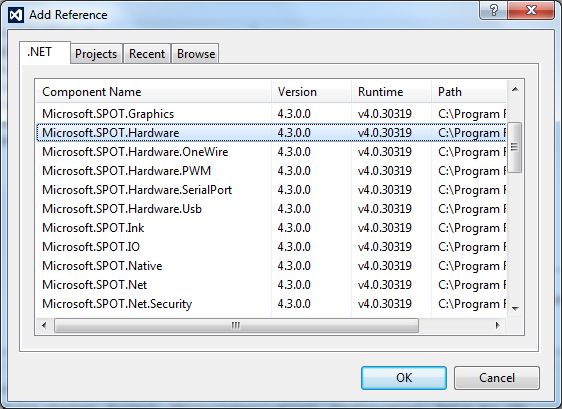
UM1676                                                             Create first NETMF application

2        Create first NETMF application

         A good way to get familiarized with the NETMF Development Environment is to create a
         simple LED toggle program to run on the STM32F429 Discovery board.
         1. Start Microsoft Visual Studio.
         2. From the main menu, select File > New Project…
         3. Click Visual C# > Micro Framework, select Console Application then click the OK button.

                                 Figure 3. New project window

         4. Our first NETMF project is created with only one C# source file named "Program.cs". This
         program displays a "Hello World!" message in the output window of Visual Studio.
         Program.cs contains only one class, Program, and one method, Main(), which is the first
         method called when the program is run.

                                        DocID025302 Rev 1                                       5/13
                                                                                                       13
Create first NETMF application UM1676
Figure 4. First NETMF project
6. To toggle an LED, the "Microsoft.SPOT.Hardware" component must be added to the
project:
a) Right click on the References in the solution explorer.
b) Select Add Reference.
c) Select Microsoft.SPOT.Hardware from the Add Reference window.
7. Add "STM32F429I_Discovery.Netmf.Hardware.cs" library to the project, it contains
necessary classes and methods to use features like LEDs:
a) Right click on the MFConsoleApplication1 in the solution explorer.
b) Select Add > Existing Item…
c) Browse to the "STM32F429I_Discovery.Netmf.Hardware" folder in the
STM32F429I_Discovery_NETMF_Package.
Note: You can Add As link to avoid copying the source file into the project folder.
6/13 DocID025302 Rev 1UM1676 Create first NETMF application
Figure 5. Add Reference window
8. Modify the generated Program.cs file (displayed in Figure 4) as shown in bold below:
using System;
using Microsoft.SPOT;
using STM32F429I_Discovery.Netmf.Hardware; // Needed for LED toggling
using System.Threading; // Needed for Sleep() function
namespace MFConsoleApplication1
{
public class Program
{
public static void Main()
{
LED.LEDInit(); //LED initialization
while (true)
{
LED.GreenLedToggle(); // Tooggle green led
Thread.Sleep(500); // wait 500 ms
}
}
}
}
DocID025302 Rev 1 7/13
13Create first NETMF application UM1676
In this code, you added "STM32F429I_Discovery.Netmf.Hardware" namespace which is
declared in the STM32F429I_Discovery.Netmf.Hardware.cs file to be able to use the LED
class.
LED.Init() configures the LEDs GPIO port and LED.GreenLedToggle() toggles the
green LED.
Note: Click on the method call and press F12 to go to its implementation.
9. Click on Build > Build Solution from the main menu (alternatively, click F7).
Figure 6. Build output window
10. Once the project is built successfully, the application must be loaded into the
STM32F429 Discovery booard. By default, a new project is configured to work with the
Emulator. It must be changed to use USB as deployment transport from the Properties
in the Solution Explorer (See Figure 7). The board should be connected to the
computer and "STM32F429I_DISCOVERY_a7e70ea2" should be displayed in the
Device name.
Figure 7. Properties window
11. Click on Debug > Start Debugging from main menu to load application and enter debug
session.
8/13 DocID025302 Rev 1UM1676 Create first NETMF application
Figure 8. Debugging in Visual Studio
The green LED on the STM32F429 Discovery board should now be toggling.
Visual Studio offers many debug features like breakpoints, watch, view memories and step
by step execution, that allow easy debug of your application and step by step execution.
To speed up NETMF development on the STM32F429 Discovery board, several C#
example programs are available in the STM32F429I_Discovery_NETMF_Package under
the "Examples" folder. For more information about the examples, a readme file is provided
with each example describing its behavior and hardware requirements.
DocID025302 Rev 1 9/13
13Erase deployment section using MFDeploy UM1676
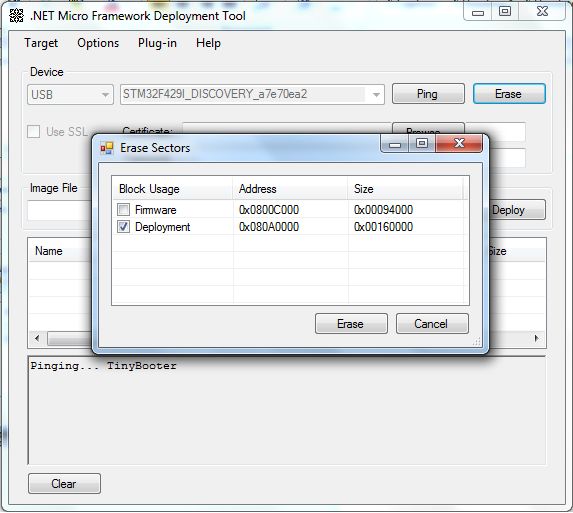
3 Erase deployment section using MFDeploy
The NETMF SDK has a useful tool called MFDeploy. it provides many helpful features such
as erasing the deployment sectors. A C# application in the deployment section alters the
debug communication and Visual Studio cannot override it.
To erase the deployment section:
1. Reset the board while pressing the USER button, to enter TinyBooter mode.
2. Open the MFDeploy from windows Start menu > Microsoft .NET Micro Framework 4.3.
3. Select USB as debug channel, "STM32F429I_DISCOVERY_a7e70ea2" should be
displayed in the Device name. Make sure that there's no ongoing Visual Studio debug
session.
4. Click on Erase button to open the erase window.
5. Select Deployment and click on Erase button.
Figure 9. Erasing deployment section using MFDeploy
After erasing the deployment section and resetting the board, you can launch a new debug
session using Visual Studio.
10/13 DocID025302 Rev 1UM1676 Useful links
4 Useful links
The following links provide inspiration and many more examples:
NETMF community development site: www.netmf.com
Codeplex STM32 NETMF project: netmf4stm32.codeplex.com
STM32 NETMF solutions by Mountaineer: http://www.mountaineer.org/netmf-for-stm32
DocID025302 Rev 1 11/13
13Revision history UM1676
5 Revision history
Table 1. Document revision history
Date Revision Changes
13-Jan-2014 1 Initial release.
12/13 DocID025302 Rev 1UM1676
Please Read Carefully:
Information in this document is provided solely in connection with ST products. STMicroelectronics NV and its subsidiaries (“ST”) reserve the
right to make changes, corrections, modifications or improvements, to this document, and the products and services described herein at any
time, without notice.
All ST products are sold pursuant to ST’s terms and conditions of sale.
Purchasers are solely responsible for the choice, selection and use of the ST products and services described herein, and ST assumes no
liability whatsoever relating to the choice, selection or use of the ST products and services described herein.
No license, express or implied, by estoppel or otherwise, to any intellectual property rights is granted under this document. If any part of this
document refers to any third party products or services it shall not be deemed a license grant by ST for the use of such third party products
or services, or any intellectual property contained therein or considered as a warranty covering the use in any manner whatsoever of such
third party products or services or any intellectual property contained therein.
UNLESS OTHERWISE SET FORTH IN ST’S TERMS AND CONDITIONS OF SALE ST DISCLAIMS ANY EXPRESS OR IMPLIED
WARRANTY WITH RESPECT TO THE USE AND/OR SALE OF ST PRODUCTS INCLUDING WITHOUT LIMITATION IMPLIED
WARRANTIES OF MERCHANTABILITY, FITNESS FOR A PARTICULAR PURPOSE (AND THEIR EQUIVALENTS UNDER THE LAWS
OF ANY JURISDICTION), OR INFRINGEMENT OF ANY PATENT, COPYRIGHT OR OTHER INTELLECTUAL PROPERTY RIGHT.
ST PRODUCTS ARE NOT DESIGNED OR AUTHORIZED FOR USE IN: (A) SAFETY CRITICAL APPLICATIONS SUCH AS LIFE
SUPPORTING, ACTIVE IMPLANTED DEVICES OR SYSTEMS WITH PRODUCT FUNCTIONAL SAFETY REQUIREMENTS; (B)
AERONAUTIC APPLICATIONS; (C) AUTOMOTIVE APPLICATIONS OR ENVIRONMENTS, AND/OR (D) AEROSPACE APPLICATIONS
OR ENVIRONMENTS. WHERE ST PRODUCTS ARE NOT DESIGNED FOR SUCH USE, THE PURCHASER SHALL USE PRODUCTS AT
PURCHASER’S SOLE RISK, EVEN IF ST HAS BEEN INFORMED IN WRITING OF SUCH USAGE, UNLESS A PRODUCT IS
EXPRESSLY DESIGNATED BY ST AS BEING INTENDED FOR “AUTOMOTIVE, AUTOMOTIVE SAFETY OR MEDICAL” INDUSTRY
DOMAINS ACCORDING TO ST PRODUCT DESIGN SPECIFICATIONS. PRODUCTS FORMALLY ESCC, QML OR JAN QUALIFIED ARE
DEEMED SUITABLE FOR USE IN AEROSPACE BY THE CORRESPONDING GOVERNMENTAL AGENCY.
Resale of ST products with provisions different from the statements and/or technical features set forth in this document shall immediately void
any warranty granted by ST for the ST product or service described herein and shall not create or extend in any manner whatsoever, any
liability of ST.
ST and the ST logo are trademarks or registered trademarks of ST in various countries.
Information in this document supersedes and replaces all information previously supplied.
The ST logo is a registered trademark of STMicroelectronics. All other names are the property of their respective owners.
© 2014 STMicroelectronics - All rights reserved
STMicroelectronics group of companies
Australia - Belgium - Brazil - Canada - China - Czech Republic - Finland - France - Germany - Hong Kong - India - Israel - Italy - Japan -
Malaysia - Malta - Morocco - Philippines - Singapore - Spain - Sweden - Switzerland - United Kingdom - United States of America
www.st.com
DocID025302 Rev 1 13/13
13You can also read