Users Guide & Installation Handbook - Stoves H2H HDCN601
←
→
Page content transcription
If your browser does not render page correctly, please read the page content below
Users Guide & Installation
                 Handbook

Stoves
H2H HDCN601              Part No 083714700 Date 28/02/2018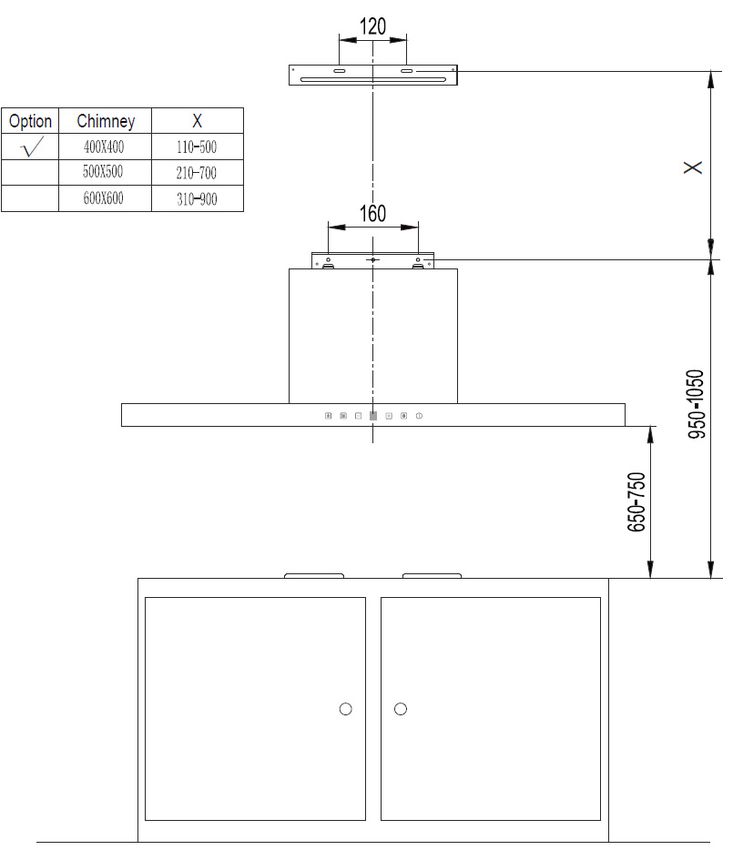
contents & INTRODUCTION

CONTENTS                                      Warranty
                                              Your new appliance comes with a manu-
•   SAFETY
                                              facturer’s guarantee, protecting you
•   USING THE product                         against electrical and mechanical break-
                                              down. To register, please complete the
•   CARE & cleaning
                                              registration form included, register online
•   INSTALLATION INSTRUCTIONS                 or by phone.
•   technical data                            For full terms & conditions of the manu-
•   CUSTOMER CARE                             facturer’s guarantee, refer to the website
                                              on the back of this book.

INTRODUCTION                                  European Directives
                                                        As a producer and a supplier of
Thank you for buying this high qual-                    cooking appliances we are com-
ity hood from Stoves.                                   mitted to the protection of the
                                                        environment and are in compli-
This guide book is designed to help you       ance with the WEEE directive. All our elec-
through each step of owning your new          tric products are labelled accordingly with
appliance, from installation to use. Please   the crossed out wheeled bin symbol. This
read it carefully before you start using      indicates, for disposal purposes at end of
your product, as we have endeavored to        life, that these products must be taken to
answer as many questions as possible,         recognised collection points, such as local
and provide you with as much support          authority sites/local recycling centres.
as we can.
                                              This appliance Complies with European
If, however, you should find something        Community Directives (CE) for household
missing, or not covered, please contact       and similar electrical appliances and Gas
our Customer Care team. Their number is       appliances where applicable.
located on the back page of this book.
                                              Hereby, Glen Dimplex Home Appliances
For customers outside the UK and North-       Ltd. declares that the radio equipment
ern Ireland, please contact your local        type ST H2H HDCN601 is in compliance
supplier.                                     with Directive 2014/53/EU. The full text of
                                              the EU declaration of conformity is avail-
When you dial this number you will hear       able at the following internet address, in
a recorded message and be given a num-        the online version of this handbook:
ber of options. This indicates that your      www.stoves.co.uk
call has been accepted and is being held
in a queue. Calls are answered in strict      This appliance conforms to European Di-
rotation as our Customer care representa-     rective 2009/125/EC regarding Eco design
tives become available.                       requirements for energy-related products.

Alternatively, general information, spares    Our policy is one of constant development
and service information is available from     and improvement, therefore we cannot
our website. The address is located on        guarantee the strict accuracy of all of our
the back page of this book.                   illustrations and specifications - changes
contents & INTRODUCTION

may have been made subsequent to
publishing.

WARRANTY EXCLUSIONS
Damage or calls resulting from transpor-
tation, improper use or relating to the
replacement of consumable parts.

Costs incurred for calls to put right an ap-
pliance which is improperly installed.
Appliances found to be in use within a
commercial environment, plus those which
are subject to rental agreements.
Before using the hood
Make sure that you have removed all
packaging, wrappings, stickers and films
from the hood surfaces.
See the customer care section for details
of how to obtain all the available cleaning
products.
Safety
WARNING
• Children less than 8 years of age shall be kept away unless
  continuously supervised. This appliance can be used by children
  aged from 8 years and above and persons with reduced
  physical sensory or mental capabilities or lack of experience and
  knowledge if they have been given supervision or instruction
  concerning the use of the appliance in a safe way and understand
  the hazards involved. Children shall not play with the appliance.
  Cleaning and user maintenance shall not be made by children
  without supervision.
• Means for disconnection must be incorporated in the fixed wiring
  in accordance with the wiring rules.
• It is necessary to allow disconnection of the appliance from the
  supply after installation. The disconnection may be achieved by
  having the plug accessible or by incorporating a switch in the fixed
  wiring in accordance with the wiring rules.
• This device must be connected to the supply network through
  either a plug fused 3 Amp or hardwired to a 1 phase spur
  protected by 3 Amp fuse.
• If the supply cord is damaged, it must be replaced by the
  manufacturer, its service agent or similarly qualified persons in
  order to avoid a hazard. The replacement power cord should be
  provided by the manufacturer.
• There shall be adequate ventilation of the room when the hood is
  used at the same time as appliances burning gas or other fuels
  (not appliacable to appliances that only discharge the air back into
  the room).
• The appliance should be cleaned every 2-3 months according to
  the “CARE & CLEANING” section of this handbook.
• There is a risk of fire if cleaning is not carried out in accordance
  with the instructions.
• Do not flambé under the cooker hood.
• The air must not be discharged into a flue that is used for
  exhausting fumes from appliances burning gas or other fuels (not
  applicable to appliances that only discharge the air back into the
room).
• All regulations concerning the discharge of air have to be fulfilled.

CAUTION
• Accessible parts may become hot when used with cooking
  appliances.
• Fire Safety Advice
If you do have a fire in the kitchen, don’t take any risks - get everyone out of your home and call the
Fire Brigade.

If you have an electrical fire in the kitchen:
• Pull the plug out, or switch off the power at the fuse box - this may be enough to stop the fire imme-
    diately.
• Smother the fire with a fire blanket, or use a dry powder or carbon dioxide extinguisher.
• Remember: never use water on an electrical or cooking oil fire.

•   Other Safety Advice
•   There is a risk of electric shock, so always make sure you have turned off and unplugged your
    appliance before starting to cleant it. Always allow the product to cool down before you change a
    bulb.
•   This appliance must be earthed.
•   The appliance must never be disconnected from the mains supply during use, as this will seriously
    affect the safety and performance, particularly in relation to surface temperatures becoming hot and
    gas operated parts not working efficiently.
•   GAS WARNING! - If you smell gas: Do not try to light any appliance, Do not touch any electrical
    switch. Contact the National Grid Gas Emergency Service, on 0800 111 999, immediately. Contact
    your local gas supplier.
USING THE HOod
7 6 5 4 3 2 1
1 ON/OFF KEY 4 POWER LEVEL DISPLAY 7 LIGHT KEY
2 BOOST KEY 5 MINUS KEY
3 PLUS KEY 6 WIRELESS CONNECTION KEY
Note: Generic illustration shown above your
appliance may visually differ.
Once the hood is powered on a beep will Power Boost
sound and the symbols will briefly flash To activate the boost function
for 1 second to indicate that the hood has
been powered on. 1) Touch the boost key.
The power level display will show a “b” as
long as the boost is active.
MANUAL CONTROLS
To deactivate the boost function
This range hood can be manually con-
trolled, if not connected to a compatible 1) Touch the minus button.
hob. The boost will deactive automatically after
8 minutes.
Central On/Off Switch
To switch on the hood Light
1) Touch the On/Off Key Touching the light key will switch the
lighting on or off independently of the
The power light will illuminate and the extractor fan.
hob will start to extract air on the lowest
setting. Plus
To switch off the hood Touch the plus key whilst the hood is
1) Touch the On/Off Key operating to increase the current set-
ting. The current extractor level will be
The hood will enter a 3 minute delayed displayed on the power level display.
shutdown state, during which it extracts
at a low rate to clean the air in the Minus
kitchen after cooking.
Touch the minus key whilst the hood is
If you prefer to switch off the hood im- operating to decrease the current setting.
mediately, then touch the On/Off Key one The current extractor level will be dis-
more time. played on the power level display.USING THE HOod
AUTOMATIC CONTROLS If pairing fails, the wireless indicator will
switch off after 60 seconds.
This range hood can be automatically
controlled, if connected to a compatible A hob and hood need to paired only 1
hob. See the hob manual for details. time. Once they are paired, the hood can
be connected and disconnected by touch-
Please contact Customer Care to find a
ing the wireless connector on the hood.
compatible hob.
Note: If the hob is being switched off, the
WIRELESS HOB CONNECTION connected cooker hood will shut down au-
tomatically after 3 minutes. During these
This hood can be wirelessly connected to 3 minutes the hood will extract at low rate
a compatible hob. to clean the air in the kitchen.
If the hob is connected to the hood, it will
automatically control the hood’s lighting
when the hob is switched on/off and the
power level of the hood.
The power level of the hood will be
adapted to the highest set power level
on the hob. See hood power levels in the
table below.
Highest cook-
Power level for
ing zone power
cooker hood
level on hob
Keep Warm 1
1, 2, 3 1
4, 5, 6 2
7, 8 3
9, Boost Boost
3 mins of
Pause/Off
air cleaning
To pair a hob wirelessly
1) Touch and hold the wireless connec-
tion key on the hob for at least 3 seconds
until the indicator LED starts flashing.
2) Touch and hold the wireless connection
key on the hood for at least 3 seconds
until the indicator LED starts flashing.
3) Once the hob and the cooker hood are
paired successfully, the wireless indicators
will be lit continuously on both appliances.CARE & CLEANING
COOKER HOOD The grease filters should be removed and
cleaned regularly - with normal use, this
Before cleaning the appliance, or carrying
should be every 2 months.
out any maintenance work, please switch
off the electricity supply. To clean use warm soapy water, or wash
in a dishwasher. Washing aluminium
Replacing the LED Lights
grease filters in a dishswasher can cause
If the appliance version is with LED the grease filters to discolour, however
lamps, the intervention of a specialised this does not affect their function or per-
technician is necessary to replace them. formance in any way.
Outer Casting Important: Frequent washing is essential
to prevent a build-up of grease in the
All external parts of the outer casing can
filters which could become a fire hazard.
be safely cleaned with a clean cloth wrung
out in hot soapy water. 1) Remove the filters according to Fig. 1.
Do not use caustic pastes, abrasive clean- 2) Carefully wash the grease filters in hot
ing powders, wire wool, hard implements, soapy water and dry with a clean towel.
or any products containing chlorides as
3) Refit the clean filters.
they will damage the surfaces.
Alternatively you can:
Stubborn marks can be removed using
a stainless steel cleaner. We recommend 1) Remove the filters according to Fig. 1.
that you clean the whole of the stainless
2) Put them into a dishwasher with
steel area to maintain a uniform finish.
detergent, set the temperature below 60
Sharp objects can mark the surface of °C. Only use detergent which has been
stainless steel, but marks will become less specificially designed for use in domestic
noticeable with time. dishwashers. Grease filters will need to be
placed into the dishwasher basket in the
To maintain the finish of the stainless
landscape (sideways) orientation to pre-
steel, or to remove any greasy marks,
vent the grease filters blocking the spray
wipe the stainless steel surface sparingly
arms from turning. Washing aluminium
with a minimum amount of Baby Oil and
grease filters in a dishswasher can cause
kitchen paper.
the grease filters to discolour, however
Do not use cooking oils, as these may this does not affect their function or per-
contain salt, which can damage the stain- formance in any way.
less steel surface.
3) Refit the clean filters.
Before cleaning the appliance, or carrying
out any maintenance work, please switch
off the electricity supply.
To avoid any fire risk, the following clean-
ing instructions must be followed:
Grease Filters
The grease filters absorb grease and dust
from cooking fumes, which would other-
Fig. 1 - Your model might differ slightly
wise damage the inside of the hood.CARE & CLEANING
Carbon Filters (Optional)
Carbon filters are only required if the
hood is being used in recirculation mode.
The carbon filters absorb cooking odours
and need replacing after about 2-3
months of normal use. Replacement
carbon filters can be obtained from our
Customer Care.
How often the carbon filters need to be
Fig. 2
replaced depends on how often the hood
is used, the type of cooking being car-
ried out and how often the grease filters
are cleaned. When the carbon filters are
no longer effective at removing cooking
odours, they should be replaced.
The carbon filters cannot be washed or
reused; replace them every 2-3 months.
The carbon filters are not supplied with
the appliance; they are available as an
optional extra.
To fit the carbon filters:
1) Remove the grease filters as shown in
Fig 1.
2) You will see cylindrical lugs on either
side of the motor assembly.
3) Place a circular carbon filter on each of
these cylindrical lugs and turn the filters
clockwise to lock them into position.
4) When the time comes to replace the
carbon filters, turn them anti-clockwise
to unlock them and remove the from the
lugs, so that new carbon filters can be
fitted.Installation General information Installation should only be carried out by a qualified installer or engineer. Please keep to the following points most carefully; Although every care has been taken to ensure this appliance has no burrs, or sharp edges, we recommend that you wear protective gloves when install- ing and moving this appliance. This will prevent injury. The minimum distances to other appli- ances and units are to be observed. Installations should be carried out in line with the National Regulations applicable with this product type. Built-in appliances may only be used after they have been built-in to suitable built-in units and surfaces that meet the required standards. Do Not Do not expose this product to contami- nation by dust, building debris, sawdust etc, it is recommended that this product is stored in a clean environment until you are ready to install it. Before installation any dust, building debris, sawdust etc should be vacuumed away to ensure no contamination will enter the unit. Failure to follow this advice can cause the product to fail or reduce the life of the product.
Installation

Right       Wrong      Fig. 3

            Fig. 4
Installation
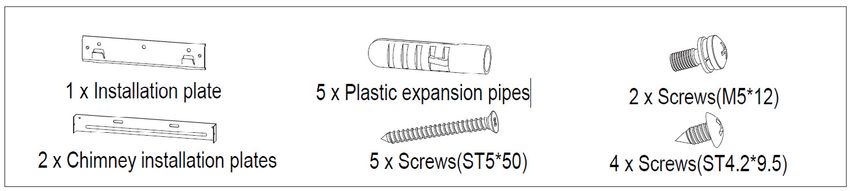
1 x fixing bracket for 5 x rawl plugs
the hood body
2 x fixing brackets for
the hood chimney
(Type and quantity of accessories is subject to actual demand.)
Mount the cooker hood on the wall
1) Using the dimensions shown on the
previous page, drill holes in the wall to
accept the five rawl plugs: two for the
upper chimney support bracket and 3 for
the hood body support bracket. Use the
5 x ST5*50 screws to secure the upper
chimney support bracket and the hood
body support bracket to the wall. Please
make sure that the support brackets are
level; this will prevent grease building
up on one side and will provide a better
cosmetic effect.
3) Use the 2 x M5*12 screws to secure
the body of the hood to the hood body
support bracket. Now attach the 150mm
diameter ducting pipe (which is not
included with the hood, but is available as
an optional extra) to the air outlet collar
on top of the motor and secure it with a
jubilee clip.
2) Locate the holes on the rear of the
hood body with the lugs on the hood body
support bracket to hang the hood body on
the wall.
4) Attach the lower chimney supportInstallation
bracket to the top rear part of the lower
chimney section, using the 2 x ST4.2*9.5
screws. This strengthens the chimney and
makes it more rigid.
Notes
The ducting pipework from the cooker
hood must not be connected to any exist-
5) Place the two piece chimney kit onto
ing ventilation or flue system that is being
the body of the hood.
used for any other purpose, and certainly
not connected to a flue system being used
by any fuel-burning appliance. This could
lead to an under-pressure, with harmful
gases being drawn back into the room.
If the hood is being installed in extrac-
tion mode in the same room as a fossil
fuel-burning appliance, then the fossil
fuel-burning appliance must be of the
room-sealed or balanced-flue type; that
is it must not take air from the room for
combustion and it must not exchange
air with the room. If there is a fossil-fuel
burning appliance in the same room as
6) Pull out the telescopic upper chimney the cooker hood, which uses an open flue/
section to the relevant height required to conventional flue, that is it does rely on air
reach the ceiling and to be aligned with from the room for combustion, there is a
the upper chimney support bracket. Use risk that a cooker hood in extraction mode
the 2 x ST4.2*9.5 screws to secure the could suck the dangerous gases and prod-
upper chimney section to the upper chim- ucts of combustion back into the room.
ney support bracket to secure it in place. Therefore, if there is a fossil fuel-burning
appliance with an open flue/conventional
flue in the same room as the cooker hood,
the cooker hood may only be used in
recirculation mode, and may not be used
in extraction mode.
All regulations concerning the discharge of
air have to be fulfilled.Installation
The bending of ventilation tube should be supply before connecting to the electricity
≥120°,parallel or above the start point/ supply.
should be connected to the external wall.
Warning: This appliance must be
Please make sure the installation plate is earthed.
placed horizontally to avoid grease collec-
tion at one end. See Fig. 3. Should the mains lead of the appliance
After installation, make sure that the plug ever require replacing, we recommend
can be pulled out if necessary. that this is carried out by a qualified
electrician who will replace it with a lead
The cooker hood should be placed 650- of the same size and temperature rating.
750 mm above the cooking surface for
safety and pleasing aesthetic effect. See Important: - ensure that you route all
Fig. 4. mains and electrical cables and flexible
During periods of intensive cooking, ad- tubing well clear of any adjacent heat
ditional ventilation may be required, for source.
example by opening a window.
Under no circumstances should the mains
Use the supplied ventilation duct for electric cable be allowed to come into
installing the appliance. contact with hot oven flues or similar
Connect to the electricity supply surfaces and keep well clear of any
moving parts that may be in the vicinity
Warning: Ensure that the power rating of the installation, such as cooling fans on
of the appliance is compatible with the adjacent appliances.
L N
Yellow / Green
Brown
BlueTECHNICAL DATA
Voltage 220-240V~50/60Hz
Rated Power 253W
Lighting Power 2 X 1.5W
Motor Power 250W
Diameter of air tube 150mm
Air flow at best efficiency point 423 m3/h
Air flow on Boost 800m3/h
Noise ≤ 66dB
Electrical Diagram
Electrical diagram please see the label on
the main part of the appliance.CUSTOMER CARE
Customer Care Web Shop range of Bake ware and Cookware essen-
tials including Roasting Pans, Cake Tins
Having purchased a superior cooker, hob and Non-Stick Cooking Liners.
or hood from us, you’ll naturally want to
keep it looking great. And who better to For all enquires, please visit our Web
help you care for it than the manufac- Shop at www.gdhaonline.co.uk or
turer? call the Spares Sales Team. For countries
outside the UK, please contact your local
We offer an extensive range of accesso- service agent.
ries, components and cleaning products
which, will instantly give your cooker a
good as new look.
In addition to the list of our most popular
products below, we also have an exciting
Product De-
Where used Purpose
scription
Enables easier cleaning of your ceramic hob.
All Ceramic glass
Ceramic Hob Prevents build up of mineral deposits. Best
hobs including
Cleaner used with Ceramic Hob Scraper Kit. 300ml
Induction
bottle.
All Ceramic glass Ideal for removing burnt-on marks from
Ceramic Hob
hobs including ceramic glass hobs. Best used with Ceramic
Scraper kit
Induction Hob Cleaner.
Sealed Hotplate All sealed/solid Restores the sleek matt black finish to solid
Conditioner plate hobs hotplates.
Multipurpose General kitchen Excellent multipurpose cleaner, for use
Kitchen Cleaner cleaner around the kitchen. 500ml bottle.
All cooking appli- Cuts through grease & burnt on grime. 500ml
Oven Cleaner
ances. bottle.
All cooking appli- Chemical free cleaning cloth. Ideal for clean-
Restor-A-Cloth
ances. ing & polishing glass & stainless steel.
Stainless Steel All stainless steel Oil based cleaner. Perfect for removing stub-
Cleaner parts born & greasy marks. 300ml bottle.
New filters, help to maintain efficient cooker
Rectangular car-
Cooker Hoods hood operation and keep your Kitchen odour
bon filters
free
New filters, help to maintain efficient cooker
Round Carbon
Cooker Hoods hood operation and keep your Kitchen odour
Filters
free
15.030Please keep this handbook for future reference, or for anyone else
who may use the appliance.Please keep this handbook for future reference, or for anyone else
who may use the appliance.Please keep this handbook for future reference, or for anyone else
who may use the appliance.CUSTOMER CARE
To contact Stoves about your appliance, please call
Warranty Registration
0800 952 1065
to register your appliance
Customer Care Helpline
0344 815 3740
in case of difficulty within the UK
Spares Sales Team
0344 815 3745
Alternatively general, spares and service information is available from our website at
www.stoves.co.uk
Please ensure that you have the product’s model no and serial no available when you
call. These can be found on the silver data label on your product which is located:
Ovens Open the door; adjacent to the oven cavity
High-level grill products Inside the base compartment
Hobs On the underside of the product
Hoods On the inside of the appliance and is visible when the grease
filters are removed
Enter appliance numbers here for future reference:
Model No
Serial No
Date RECORD
SERVICE of purchase Installed by Installation Date
Place of purchase:
Date Part(s) replaced Engineer’s name
For customers outside the UK and Northern Ireland, please contact your local supplier.
Glen Dimplex Home Appliances, Stoney Lane, Prescot, Merseyside, L35 2XWEU Declaration of Conformity
We Glen Dimplex Home Appliances
Of Stoney Lane, Prescot, Merseyside, L35 2XW, UK
In accordance with the following Directive(s):
2014/53/EU Radio Equipment Regulations
2014/35/EU The Low Voltage Directive
2014/30/EU The Electromagnetic Compatibility Directive
2011/65/EU Restriction of the use of certain Hazardous Substances in electrical and electronic equipment
Hereby declare that: ST H2H HDCN601
is in conformity with the applicable requirements of the following documents
Ref No. Title Edition/ date
EN 301 489-1 ElectroMagnetic Compatibility (EMC) standard for radio equipment and services; V2.1.1
Part 1: Common technical requirements; Harmonised Standard covering the essential requirements of article
3.1(b) of Directive 2014/53/EU and the essential requirements of article 6 of Directive 2014/30/EU
EN 301 489-17 ElectroMagnetic Compatibility (EMC) standard for radio equipment and services; V3.1.1
Part 17: Specific conditions for Broadband Data Transmission Systems; Harmonised Standard covering the
essential requirements of article 3.1(b) of Directive 2014/53/EU
EN 300 328 Wideband transmission systems; Data transmission equipment operating in the 2,4 GHz ISM band and using V2.1.1
wide band modulation techniques; Harmonised Standard covering the essential requirements of article 3.2 of
Directive 2014/53/EU
EN 62479 Assessment of the compliance of low power electronic and electrical equipment with the basic restrictions 2010
related to human exposure to electromagnetic fields (10 MHz to 300 GHz)
EN55014-1 Electromagnetic compatibility — Requirements for household appliances, electric tools and similar apparatus — 2017
Part 1: Emission
EN55014-2 Electromagnetic compatibility — Requirements for household appliances, electric tools and similar apparatus — 2015
Part 1: Immunity
EN 61000-3-2 Electromagnetic compatibility (EMC). Limits. Limits for harmonic current emissions (equipment input current ≤ 2014
16A per phase)
EN 61000-3-3 Electromagnetic compatibility (EMC). Limits. Limitation of voltage changes, voltage fluctuations and flicker in 2013
public low-voltage supply systems, for equipment with a rated current ≤ 16A per phase and not subject to
conditional connection
EN 60335-1 Household and similar electrical appliances. Safety. General requirements 2012
+A11:2014
EN 60335-2-31 Household and similar electrical appliances. Safety. Particular requirements for range hoods and other cooking 2014
fume extractors
EN 62233 Measurement methods for electromagnetic fields of household appliances and similar apparatus with regard to 2008
human exposure.
EN 50581 Technical documentation for the assessment of electrical and electronic products with respect to the restriction 2012
of hazardous substances
I hereby declare that the equipment named above has been designed to comply with the relevant sections of the above
referenced specifications. The unit complies with all applicable Essential Requirements of the Directives.
Signed:
Name: Paul Mulvenna
Position: Product Approval Manager
Location: Glen Dimplex Home Appliances, Prescot
Document Reference No.
On: 17th April 2018 Issue 1 RED HobsYou can also read