Induction Hob - Cofton Holidays
←
→
Page content transcription
If your browser does not render page correctly, please read the page content below
Induction Hob                                             LAM1801

Instructions and Installation

                 www.howdens.com/appliance-registration
See back page for product serial number
User manual LAM1801

Dear Customer,
Congratulations on your choice of hob.

The user manual will help you use your product quickly and safely.

•    Please read this user manual before installing and using the hob.
•    Always follow the safety instructions.
•    Keep this user manual within easy reach for future reference.
•    Please read any other documents supplied with the product.

Explanation of symbols
Throughout this user manual the following symbols are used:

Important information or useful tips about usage.

    Warning for possible hazards to health and property.

    Warning possibility of electric shock.

    Warning of risk of fire.

    Warning of hot surfaces.

Product information correct at the time of publication in January 2018.
The company has a policy of continuous product development and reserves the right to change any
products and specifications given in this manual.

Health / Implants

This induction hob complies with the applicable EMC and EMF standards. Therefore it should not interfere
with other electronic units. Persons fitted with a pacemaker or any other electrical SAFETY implant should
clarify with their doctor or the producer of the implant, whether there implant is adequate and fail-safe.
Please place pans centrally on the cooking zones. The British Heart Foundation provide additional advice
regarding using induction hobs when a pacemaker is fitted.

The appliance is marked according to the European Directive 2012/19/EU on waste Electrical and
Electronic Equipment (WEEE). By ensuring this product is disposed of correctly you will help prevent
potential negative consequences for the environment and human health. The symbol on this product
indicates that this product may not be treated as household waste. Instead it should be handed over
to the applicable collection point for recycling of electronic equipment. Disposal must be carried out
in accordance with local environmental regulations for waste disposal. For more detailed information
please contact your local council household waste site.
This product complies with EU RoHS Directive (2011/65/EU) It does not contain harmful and prohibited
materials specified in the Directive.

                                                                                                         03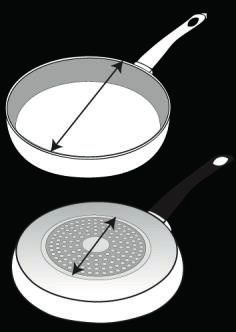
LAMONA Appliances

Index
Before using the hob                    05

Safety                                  05
General                                 05
Fire safety advice                      07
If a pan catches fire                   07
Deep fat frying                         07
If you have an electrical fire          07
Induction cooking                       07

Inductions hobs and pans                08
Size and material                       08

Using the hob                           09
Controls layout                         09
Turning on the hob                      09
Using the hob                           10
Booster                                 10
Turning off the hob                     10
Key lock                                10
Activating child lock                   10
Disabling the child lock                10
Timer functions                         11
Operation time limits                   11

Overheat protection                     12
Hints and tips                          12

Cleaning and maintenance                13
How to clean your hob                   13

Installation                            13
General information                     13
Clearances and dimension requirements   14

Before installation                     15
Self-adhesive seal                      16
Protecting the hob cut out              16
Fitting the hob                         16

Electrical connections UK               17

Electrical connections double           19
phase European Supply

Technical data                          19

Troubleshooting                         20

Guarantee                               21

04
User manual LAM1801

Before using the hob
•   Make sure that you have removed all packaging, wrappings, stickers and films from the hob surface.
•   It is recommended that you clean the hob surface before using for the first time (page 13).

SAFETY                                                CAUTION: Cooking process
   This appliance is for                              should be supervised continu-
domestic cooking purposes                             ously.
                                                            Servicing should be
only. It must not be used for                         carried out only by authorised
other purposes, for example                           personnel.
room heating.                                         • This appliance must be
General                                               installed so that it can be
                                                      electrically isolated by a
    WARNING: Accessible                               switch after installation.
parts will become hot during                          • Only use the connection
use. Care should be taken to                          cable supplied and as speci-
avoid touching heating                                fied if cable is damaged, it
elements.To avoid burns,                              should be replaced by a suita-
children less than 8 years of                         bly qualified person.
age should be kept away                               • Do not spray aerosols in
unless continuously super-                            the vicinity of this appliance
vised.This appliance can be                           while it is in operation.
used by children aged 8 years                         • Do not store or use flam-
and above, persons with                               mable liquids or items in the
reduced physical, sensory or                          vicinity of this appliance.
mental capabilities or lack of                        • Do not use steam clean-
experience and knowledge if                           ers to clean the appliance as
they have been given supervi-                         this may cause an electric
sion or instruction concerning                        shock.
use of the appliance in a safe                        • Always position pans over
                                                      the centre of the heat zone,
way and understand the                                and turn the handles to a safe
hazards involved. Children                            position so they cannot be
must not play with the appli-                         knocked over or grabbed by
ance. Cleaning and user                               children.
maintenance must not be                               • Never use pans smaller
made by children without                              than 100mm (4”) and larger
supervision.                                          than 250mm (10”).
                                                                                                         05
LAMONA Appliances
• Always match the size of hob. They could become hot if
pan to the heat zone – do not they are near a cooking area
use large pans on small zones which is in use.
or vice versa. • Never leave aluminium
• Always lift pans onto and foil on the hob top, it reflects
off the hob, rather than sliding heat back into the element
them across the surface to which leads to damage.
avoid marks and scratches. • Never heat up a sealed tin
• Never use double pans, of food on the hob, as it may
rim-based pans, old or mis- explode.
shapen pans, or any pan that • Never leave pans over-
is not stable on a flat surface. hanging the edge of the hob.
• Never use commercial • WARNING: Only use hob
simmering aids, or heat guards designed by the manu-
diffusers, as they create facturer of the appliance or as
excessive heat and can indicated in the instructions
damage the surface of the for use as suitable or hob
hob. guards incorporated in the
• Never use the hob for any appliance.The use of inappro-
other purpose than cooking priate guards can cause
food. accidents.
WARNING OF FIRE: • The appliance is not
• Never store items or leave intended to be operated by
plastic utensils close to, or on means of an external timer or
top of the hob. separate remote control
• Never leave any cook system.
zone on without a pan cover- • Do not modify this appli-
ing it. This causes potential a ance.
fire hazard. • WARNING: Never leave
• Never use the hob surface cooking fat, or oil,unattended.
as a chopping board or food • CAUTION: If the glass
preparation area, as this may
lead to it becoming damaged. surface is cracked or broken
• Never put metal cooking do not use the appliance. Risk
utensils, cutlery, knives or of electric shock.
other metal objects on the
06User manual LAM1801
Fire safety advice leave the pan to cool com-
• Most kitchen fires occur pletely.
when people are distracted or • Never fill a chip pan (or
leave things unattended, so other deep fat fryer) more
remember: than one-third full of oil.
• If you’re called away from • Do not use a fire extin-
the hob - by the phone or guisher on a pan of burning oil
someone at the door, either - the force of the extinguisher
take pans off the heat, or can spread the fire and create
switch off your hob. a fireball.
• Don’t let yourself be If you have an electrical fire in
distracted while cooking. DO the kitchen
NOT LEAVE UNATTENDED.
• If you do have a fire in the • Switch off the power at the
kitchen, don’t take any risks - fuse box - this may be enough
get everyone out of your home
and call the Fire Service. to stop the fire immediately
• Smother the fire with a fire
If a pan catches fire blanket, or use a dry powder
or carbon dioxide extinguisher
• Do not move it as it’s likely • Remember: never use
to be extremely hot. water on an electrical or cook-
• Turn off the heat if it’s ing oil fire.
safe to do so, but never lean
over a pan to reach the con- Induction cooking
trols.
• Metallic objects such as
• WARNING: Use fire
knives, forks, lids should not
blanket or a damp tea-towel to
be placed on the hob surface.
cover the pan.
• Ensure pan bases are dry
Deep-fat frying presents more as any water on the base may
dangers in your kitchen cause vapour pressure to build
up and may move the pan on
• If you have put the fire out, the hob during cooking.
07LAMONA Appliances
Induction hob & pans
Size and material
Induction hobs require the use of compatible, good In induction cooking, the iron content in the pan
quality pans. The pans must have a ferro-magnetic base is recognised by the system and this area is
base. (Generally speaking, the higher the iron heated by electromagnetic induction. Cooking stops
content, the better the pan will perform). The pan if the pan is lifted from the cooking zone as the
size should match the induction zone. electromagnetic force is no longer entering the pan
base.
Noises
Various noises may be heard when using pans on
induction hobs. Pans may ‘whistle’ or ‘fizz’ due to
their layered construction or if pan bases are wet
during cooking. (Always dry pan base as water
Min
vapour can form between the pan base and hob
during heating; creating pressure which may cause
the pan to move / jump).
Max
Pan Sizes *Note
Induction zones heat pans very quickly.
Use high power levels (8 / 9 & Boost) sparingly at
Modern pans are often made using alloys of the beginning until you get used to the high speed
different materials such as aluminium or copper of cooking.
(Non-ferromagnetic) but use a steel disc in their
base to make them compatible with induction hobs. Do not use high power with Teflon (Non-stick)
The diameter of this disc may be smaller than the pans and low amounts of cooking oil / spray.
actual pan base and it may also be quite thin. These
factors can lead to reduced performance or Zone Size
problems of pan detection.
Small zone (145mm) ideal for sauces, slower
cooking.
Pan is not compatible if symbol is shown when
pan is placed on a cooking zone.
Recommendations
Medium zone (180mm) normal for every day use.
Only use pans with flat bases.
They are more stable, will not
damage the hob and ensure
more even heat transfer.
* Do not use aluminium pans.
They can damage the glass
surface.
Large zone (210mm) high power for larger dishes.
08User manual LAM1801
Using the hob
Do not use the ceramic hob if the glass surface is cracked, as electrical parts are directly beneath.
Switch off the appliance at the supply to prevent electric shock and contact your supplier.
The appliance is not intended to be operated by means of an external timer or separate control
system.
The hob surface remains hot after use. DO NOT TOUCH.
Controls layout Turning on the hob
Touch the key on control panel for 2-3 seconds.
Cooking zone displays illuminate dimly.
The hob is ready for use now.
If no operation is performed within 10 seconds,
the hob will automatically return to Standby
mode.
Residual Heat Indicators
Main Key - On/0ff CAUTION HOT SURFACE:
Keylock Although the heating elements do not get hot, the
hob surface will be heated by the pan and contents
Power / Timer Set and will get hot.
H is displayed when the surface temperature of a
Cooking zone display
cooking zone is sensed to be above 60°C.
When residual heat falls below 60°C, h appears on
Cooking zone selection controls The display.
Timer Selection * If mains power is cut the residual heat indicators
will not be displayed.
Timer Display
NOTE: DO NOT PLACE HOT PANS ON CONTROL
PAD AREA
* Always keep the control panel clean and dry.
Damp or soiled surface may cause error codes
to be displayed or functions to be effected.
* If the control panel is exposed to intense
vapour or liquid this may also cause error codes
to be displayed or functions to be effected.
09LAMONA Appliances
Using the hob
Turning off the zone / hob
Select cooking zone.
Touch to set power level to
or
Touch for 3 seconds .
Keylock
1.Turn on the hob.
Turn on the hob.
2.Select cooking zone.
Touch the and keys together for longer
3.Touch or keys to set the power level * than 2 seconds to lock / unlock the touch controls.
Confirmed with an audible signal. (An LED light will
(If you touch these keys for longer, the power appear to show all cooking zones are locked).
level will continuously increase or decrease).
(If no operation is performed within 10 seconds, the Activating child lock
hob will automatically return to Standby mode).
1.Touch power key to turn on the hob.
Once power level has been selected and is in use
the display will dim. 2.Touch and keys simultaneously for at
least two seconds until it beeps twice.
To alter the power level again
3.Then, touch key once again. (beeps twice)
Select cooking zone being used. Child Lock function is activated and L appears on
all cooking zone displays.
Touch or keys to set the power level
Disabling the Child Lock:
Booster (P)
1.Turn on the hob.
This function assists faster heating. When Booster
is activated, the zone will operate at an increased 2.Touch and keys simultaneously for at
maximum power (hob will manage availability of least two seconds, until it beeps twice.
zone to be boosted depending on other zone use).
3.Then, touch key once again (beeps twice).
Using the Booster function:
L will disappear from cooking zone displays when
1.Turn on the hob. the lock is deactivated successfully. (All zone displays
will be off).
2.Select the desired cooking zone.
3.Touch keys to set the power level 9.*
4.Touch again and P is displayed.
Once pan has heated sufficiently:
* Symbol will display if no pan is present
5. Select the cooking zone. on the selected zone or if there is an issue with
the pan material / size.
Touch key to set the desired power level
to complete the cooking.
10User manual LAM1801
Timer function
Cooking zone timer (To turn a cooking zone off Operation time limits
after a period of timed use, 1 - 99 minutes)
The hob control is equipped with an operation time
The timer function provides the following options: limit. When one or more cooking zones are left on
A maximum of 4 cooking zone timers. the cooking zone will automatically be deactivated
after a certain period of time.(see Table below).
(The cooking zone timers can only be set for the
Operation time limit depends on the selected power
cooking zones that are activated).
level.
1. Turn on the hob.
If there is a timer assigned to the cooking zone the
timer display will also turn off later.
2. Select the desired cooking zone.
Operation time limit depends on the selected power
3. Select power level between 1 and 9.
level. Maximum operation time is applied at this
power level.
4. Enable the cooking zone timer by touching.
The cooking zone may be restarted by the user if
5. Set the desired time value by touching
it is turned off automatically.
An LED illuminates to show the zone selected
that is being timed. Temperature Level Operation Time Limit
0 0
To set additional timers:
1 6
Repeat steps above, selecting a different zone.
2 6
To see remaining time 5
3
Touch relevant cooking zone selector. 4 5
5 4
Touch
6 1.5
Remaining time is displayed. 7 1.5
To alter / amend the time remaining use 8 1.5
to adjust. 9 20 Minutes
P (Booster) 5 Minutes (*)
Once cooking time has elapsed the zone will turn
off, an audible alert will sound, the LED and zone *The hob will drop to level 9 after 5 minutes
display will flash.
Touch any key to silence / continue.
To cancel timer
1.Turn off the hob.
or
Touch relevant cooking zone selector.
Use to set power level to
(LED light turns off)
11LAMONA Appliances
Overheat protection Hints and tips
The hob is equipped with sensors ensuring • Before frying foods, always dry them well and
protection against overheating. gently place into the hot oil. Ensure complete
The following may be observed in the case of thawing of frozen foods before frying.
overheating:
• Do not cover the pan when heating oil.
• Active cooking zone may be turned off.
• Selected level may drop (however, this condition • Place the pans in a manner so that their handles
cannot be seen on the indicator). are not over the zones to prevent heating of the
handles. Do not place unbalanced and easily
Overflow safety system tilted pans on the hob.
The hob is equipped with an overflow safety system. • Do not place empty pans on cooking zones when
If there is any overflow that spills onto the control they are switched on. They may be damaged.
panel, the system will cut the power control
immediately and turn off the hob. "F" warning • Operating a cooking zone without a pan on it may
symbol appears on the display during this period. cause damage to the product. Turn off the cooking
zones after the cooking is complete.
Precise power setting
• As the surface of the product may become hot, do
Induction hobs react to the commands immediately not put plastic items etc on it.(Clean any such
as a feature of their operating principles. It changes melted materials from the surface immediately).
the power settings very quickly. Thus, you can
prevent a cooking pot (containing milk etc.) from • Use flat bottomed pans only.
overflowing.
• Put the appropriate amount of food into pans.
Operating noises This will prevent pans from overflowing
Some noises may arise from the induction hob. • Do not put lids of pans on cooking zones.
These sounds are normal and part of induction
cooking. • Place the pans in a manner so that they are
centred on the cooking zone.
• Noise increases with high power levels.
• When you want to move the pan onto another
• Alloy construction of the pans can cause noise. cooking zone, lift and place it onto the cooking
zone you want instead of sliding it.
• At lower power levels, a regular on/off clicking
sound will be heard. • Never place items wrapped aluminium foil onto a
cooking zone.
• Noise can be heard if an empty saucepan is
heated. When you put water or food in it, this • Do not use the hob as a chopping board.
sound will disappear.
• The noise of the cooling fan system may be heard.
12User manual LAM1801
Cleaning and maintenance
How to clean your hob
• The ceramic hob top can be cleaned using a • Regular cleaning will prevent any salts or
clean, damp cloth or kitchen paper. Do not minerals from accumulating on your hob and
use a used dishcloth or sponge as they can discolouring the glass.
leave a film of detergent on the surface which
can lead to discolouration. Please ensure that • Wipe any spillage as soon as possible.
the elements are cooled fully to avoid steam
burns. • Clean the hob top as regularly as possible, this
will prevent any build up of grease which may
• You can use a specialist ceramic cleaner to be a fire hazard.
restore the surface, but use sparingly to avoid
coating the hob top too thickly. Too much • Foods with high sugar content (toffee, fruit
cream cleaner will lead to discolouration. Use juice, jam, etc.) that boil over while cooking, or
a dry, clean cloth to polish the surface. spattered sugar stains must be immediately
removed using a scraper even if hot.
• For stubborn marks, a specialist hob scraper
can be used. • Do not use abrasive products, bleach, hob
cleaner spray or pan scourers.
• Do not use steam cleaners or high pressure
cleaning equipment. • The hob may sound an audible warning if to
much liquid is placed on the hob surface.
Installation
General information
Installations should be carried out in line with the
Installation should be carried out by a National Regulations applicable with this product
registered competent person. type.
Installations MUST be carried out in line with
the National Regulations applicable with this product
type.
Please Note:
Although every care has been taken to ensure
this appliance has no burrs, or sharp edges, We
recommend that you wear protective gloves when
installing and moving this appliance. This will
prevent injury.
The hob should not be fitted above a washing
machine, a fridge or a freezer. Wall surfaces above
the work surface and in the immediate vicinity of
the cooking hob must be heat resistant.
Laminated surfaces and the adhesive used for
fixing them must be heat resistant in order to avoid
any damage.
13LAMONA Appliances
Installation
Clearances and dimension requirements
Minimum distance
between cabinets
* must be equal to
400mm min the width of the hob
55mm min
560mm +2 50mm min between hob and rear wall
(>60mm to cut out aperture)
490mm +2
50mm Min
*Minimum height to extractor
as recommend in extractor
instruction manual
No shelf or overhang of combustible material should be closer than 650mm directly above the hob.
There must be a minimum clearance of 50mm between the rear edge of the hob and the rear wall. This
clearance must be maintained up to 650mm above the worktop (unless otherwise stated in your extractor
manual).
The rear wall is any vertical surface behind the hob. If any tiles, backboards, splashbacks or upstands
.
are fitted the distance is taken from the front face of these items.
Apply the self adhesive seal around the perimeter of the worktop cut-out. For best results, the seal should
be adhered along each side in turn, as close to the edge as possible, and trimmed at each corner, taking
care to ensure a neat join.
14User manual LAM1801
Before installation
The product should only be installed by a registered Installation above a cupboard/drawers
qualified person. If the installation is not above an oven and the
underside of the hob can be touched, a wooden
The product must be installed in accordance shield is required to be installed at least 15mm
with all local regulations. below the underside of the hob unit.
Prior to installation, visually check the product
for any damage/defects. Do not install if any issues
are found.
15 min.
Damaged products may cause risks to your own
safety.
The appliance is intended for installation in
Howdens kitchen cabinets. If the board is below:
It is required to leave a ventilation opening of
• Surfaces, synthetic laminates and adhesives minimum 180 cm2 at the rear section of the
used must be heat resistant. furniture as illustrated in the following figure
• Kitchen cabinets must be set level and fixed.
• If there is a drawer beneath the oven, a shelf
must be installed between oven and drawer.
• The following installation drawings are
representational and may not match exactly
with your appliance.
Installation above an oven
If the appliance is installed with an oven
underneath, please leave at least 15mm of
ventilation, unless otherwise stated in your oven
installation guidelines.
Worktop Hob
15mm
Oven
5mm
15LAMONA Appliances
Self-adhesive seal Fitting the hob
Turn the hob underside down, place it on a
flat protected surface.
Apply the self adhesive seal to the
underside edges of the hob glass. For best
results, the seal should be adhered along
each side in turn, as close to the edge as
possible, and trimmed at each corner, taking
care to ensure a neat join.
DO NOT fit silicone sealant under the
glass hob instead of the self-adhesive seal.
Once the seal is on the glass the hob can be fitted
into the cut out:
Position rear side of the hob into the cutout,
lowering the front edge, gently pressing the hob
into position.
To remove hob:
Protecting the hob cut-out Push hob up from below by placing hands at front
of hob
The types of chipboard used for work surfaces swell Or
relatively quickly in contact with humidity. Use fingers under the edge of the glass (never
use a screwdriver etc) to lift the hob
Apply a special varnish or adhesive to the cut edge
to protect and seal it from moisture ingress.
16User manual LAM1801
Electrical connections UK
The appliance may be connected to the mains supply only by a competent person.
IMPORTANT: Ensure that the electricity supply is switched off before connecting. Your hob is
intended for permanent installation.
Your appliance must be connected to fixed wiring via the use of a double pole switched outlet
with at least 3mm contact separation. The isolation switch must be accessible after installation (see
technical data for fuse rating). We recommend the use of an RCD device as additional protection.
Installation of the appliance MUST only be carried out by a registered competent person.
Installation MUST be carried out in accordance with the National and local regulations applicable with this
product type .
The terminology DOUBLE POLE -/+ means that both the live and neutral supplies are switched and
disconnected at the same time.
The terminations labelled SUPPLY are connections for the internal house wiring and the terminations
labelled LOAD are for connection to the appliance.
IMPORTANT: The wires in the mains lead are coloured in accordance with the following code:-
Blue-Grey........ Neutral
Brown-Black......Live
Green and Yellow.....Earth
Blue-Grey Brown-Black
(Neutral) (Live)
L
LOAD
L Green / Yellow.
N SUPPLY
LOAD (Earth)
DP 250V~
N SUPPLY
As the colours of the wires in the mains lead of this appliance may not correspond with the coloured
markings identifying the terminals in your box, proceed as follows;
The wires which are coloured blue&grey must be connected to the terminal which is marked with the letter ‘4’ or .
coloured ‘BLACK’.The wires which are coloured brown&black must be connected to the terminal which is marked with
the letter ‘2’ or coloured ‘RED’ . The green and yellow earth ‘E’ should be connected to the terminal marked
with the following symbol ‘ ’.
17LAMONA Appliances
The appliance may be connected to the mains supply only by a registered competent person.
The mains lead must not be clamped, bent, trapped, or come into contact with hot parts of the appliance.
If the mains lead is damaged, it must be replaced by a qualified person (mains cable must not be
longer than 2m for safety reasons). It should be routed away from the appliance and not trapped between
the appliance and the wall.
For single-phase 220v - 240v UK
connect the wires as
identified below:
• Brown/Black cables = L (Live)
• Blue/Grey cables = N (Neutral)
• Green/Yellow cables = (E) (Earth)
N L
18LAMONA Appliances
Electrical connections double phase European Supply
The appliance may be connected to the mains supply only by a registered competent person.
The mains lead must not be clamped, bent, trapped, or come into contact with hot parts of the appliance.
If the mains lead is damaged, it must be replaced by a qualified person (mains cable must not be
longer than 2m for safety reasons). It should be routed away from the appliance and not trapped between
the appliance and the wall.
The appliance may be connected to the mains supply only by a competent person.
IMPORTANT: Ensure that the electricity supply is switched off before connecting. Your hob is
intended for permanent installation.
For double-phase European Supply
connect the wires as NOTE: FOR DOUBLE Phase Supply, Remove
identified below: FERRULE FROM L1 and L2 + Seperate
accordingly.
• Brown cable = L1 (Phase 1)
• Black cable = L2 (Phase 2)
• Blue/Grey cable = N (Neutral)
• Green/yellow cable = (E) (Ground)
N L1 L2
Technical data
Outer Dimensions
Width 580mm
Depth 510mm
Height 55mm
Cutout Dimensions
Width 560mm (+2)
Depth 490mm (+2)
Cook Zones
Rear Left Ø180-2000/2300w
Front Left Ø180-2000/2300w
Front Right Ø145-1600/1800w
Rear Right Ø210-2000/2300w
Voltage/Frequency
Total Electric Power 7200w
Supply Voltage 1N ~220-240 V 50 Hz
Cable Type H05V2V2 1.5mm ², 5 core (Max 2m) or eqv.
19User manual LAM1801 Troubleshooting Product emits metal noises while heating and cooling. • When the metal parts are heated, they may expand and cause noise. >>> This is not a fault. Product does not operate. • The mains fuse is defective or has tripped. >>> Check fuses in the fuse box. If necessary, replace or reset them. • Product is not plugged into the (grounded) socket. >>> Check the connection. • If the display does not light up when you switch the hob on again. >>> Disconnect the appliance at the circuit breaker. Wait 20 seconds and then reconnect it. • Overheat protection is active. >>> Allow your hob to cool down. • The cooking pot is not suitable. >>> Check your pot. " " symbol appears on the cooking zone display. • You have not placed the pot on the active cooking zone. >>> Check if there is a pot on the cooking zone. • Your pot is not compatible with induction cooking. >>> Check if your cooking pot is compatible with induction hob. • The cooking pot is not centered properly or the bottom surface of the pot is not wide enough for the cooking zone. >>> Choose a pot wide enough and center the pot on the cooking zone properly. • Cooking pot or cooking zone is overheated. >>> Allow them to cool down. Selected cooking zone suddenly turns off during operation. • Cooking time for the selected cooking zone may be over. >>> You may set a new cooking time or finish cooking. • Overheat protection is active. >>> Allow your hob to cool down. • An object may be covering the touch control panel. >>> Remove the object on the panel. The pot does not get warm even if the cooking zone is on. • Your pot is not compatible with induction cooking. >>> Check if your cooking pot is compatible with induction hob. • The cooking pot is not centered properly or the bottom surface of the pot is not wide enough for the cooking zone. >>> Choose a pot wide enough and center the pot on the cooking zone properly. 20
LAMONA Appliances
Your guarantee
Product Guarantee Details (UK only)
Your appliance has the benefi t of a comprehensive manufacturer’s guarantee which covers the cost of
breakdown repairs. (Details of which are shown on your Proof of Purchase Document).
• Any claim during the period of the guarantee (MUST BE ACCOMPANIED BY THE PROOF OF PURCHASE)
• The product must be correctly installed and operated in accordance with the manufacturer’s
instructions and used for normal domestic purposes.
• This guarantee does not cover accidental damage, misuse or alternations which are likely to affect the
product.
• The guarantee is invalid if the product is tampered with, or repaired by any unauthorised person.
(The guarantee in no way affects your statutory or legal rights)
What to do if you need to report a problem-
Please ensure you have ready:
• The product’s model and serial numbers
• Howdens Proof of Purchase document
• Your full contact details
Call the Depot number on your Proof of Purchase Document supplied
with the product / kitchen.
Or
Call the LAMONA Service Line on 0344 460 0006
* Product installed within a domestic kitchen or non-domestic kitchen where 8 or fewer people are
using the appliance.
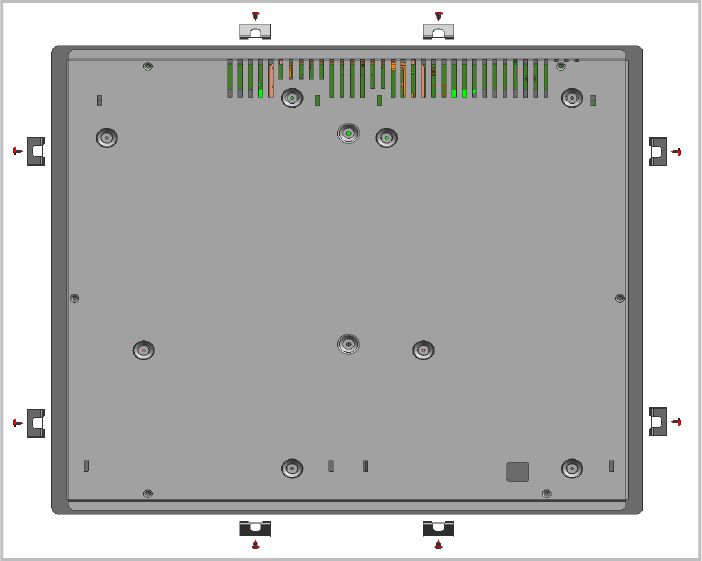
Where to find the model
and serial number on On the base of the hob
your machine.
21Product serial number
(Place sticker here)
Issue v4 010620
185.2619.68/R.AD/01/06/2020You can also read