Pre-delivery Guide - Spa and Swim Spa (Australia) 2020
←
→
Page content transcription
If your browser does not render page correctly, please read the page content below

Pre-delivery Guide - Spa and Swim Spa
(Australia) 2020
Congratulations on the purchase of your new spa.

This guide is designed to provide all the information CRITICAL for a smooth delivery
and installation of your spa.

Not reading this guide can lead to your disappointment and added cost to you.

Please read it carefully and chat with our customer care team if you require any
further clarification.

   •    Safety
   •   Pre-delivery
          o What to consider before delivery
          o Positioning your spa or swim spa
          o Service access
          o Drainage
          o Foundation or base
          o Electrical
          o Spas Requiring 10-15 amps
          o Spas Requiring 32+ amps
   •   Delivery
          o Balance of payment
          o Taking delivery of your spa
          o Depot pickups
          o What’s next?
          o Standard Delivery
          o Delivery access requirements
          o Delivery Requiring a Crane
   •   External Heat Pump (Optional)
          o Heat Pump Installation Timing
          o Locating Your Heat Pump
          o Heat Pump Installed In a Pit
          o General Heat Pump Connection
          o Parts supplied
          o Tools and parts required
          o SV Mini Heat Pump Connection
   •   Portable spa specific information
   •   IKON specific information
   •   Hotspring specific Information
   •   Swim Spa specific information
          o Power
          o Fencing Requirements
          o Concrete Pad
          o Fast-lane specific pre-delivery information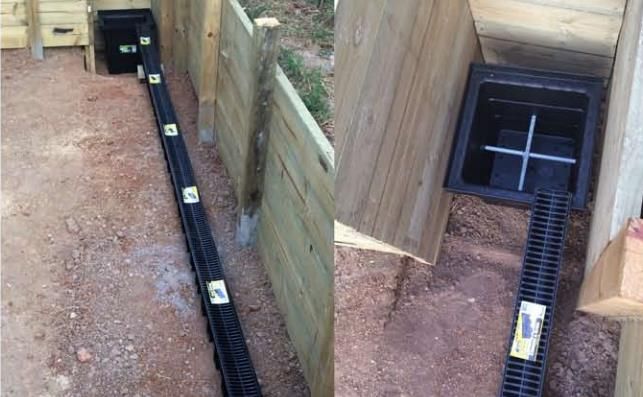
•   Gas Heating
   •   Running Costs
   •   Heating Time
   •   Sinking your spa or swim spa into the ground
   •   Reference Information
   •   Manuals

Safety
Please read this guide and all attached material carefully.

   •   Never position a spa, swim spa, or any other type of pool near overhead
       cables or power lines.
   •   All electrical work needs to be carried out by a licensed electrician and must
       conform to all national, state and local electrical codes in effect at the time of
       installation.
   •   The appliance must be connected to a suitably rated and weather protected
       power supply.
   •   The supply line should be a dedicated power circuit and means for
       disconnection must be incorporated in the fixed wiring in accordance with your
       local wiring regulations.
   •   Means for disconnection from the supply mains should have a contact
       separation in all poles that provide full disconnection under overvoltage
       category III conditions.
   •   The appliance should be supplied through a residual current device (RCD)
       having a rated residual operating current not exceeding 30mA.
   •   If the supply cord is damaged, it must be replaced by the manufacturer, its
       service agent or similarly qualified persons in order to avoid a hazard.
   •   The appliance is not intended for use by young children or infirm persons
       unless they have been adequately supervised by a responsible person to
       ensure they can use the appliance safely.
   •   Young children should be supervised to ensure they do not play with the
       appliance.
   •   In order to avoid the possibility of hypothermia (heat stress) occurring it is
       recommended that the average temperature of the spa pool water should not
       exceed 40oC.
   •   The control box, heater, pumps and other electrical items should only be
       serviced by a qualified spa service technician.
   •   Do not operate electrical appliances within 1.5 m of the spa.
   •   To meet the requirements of AS3000 an electrical socket adjacent to an
       above ground spa less than 5000 litres must be IPX5 rated, must be greater
       than 1.25m from the inside edge of the spa, and greater than 450mm off the
       ground, it must be on its own circuit and must be RCD protected

Note: It is the owner’s responsibility to display all required safety notices within view
of the spa.
What to consider before delivery

Positioning your spa or swim spa

Your spa needs a solid, flat, level foundation with adequate drainage. lt must be
positioned to allow for adequate service access on all sides.

Proper planning will enhance the enjoyment of your spa experience and protect your
privacy.
Do you need quick and easy access? If so, placing spas close to the house or
changing room is ideal.

Perhaps you want extra privacy by adding a gazebo?
Do you have a view to admire from the spa?

If so, consider how the spa can be best rotated so the seating faces the view without
obstructing the service panel.

Service access

Decking can create a stunning visual effect and by stepping down into your spa or
swim spa, you benefit from added privacy and ease of access.

However, if you are building a deck around your spa, sinking it slightly or placing it
against a wall, you must ensure easy access to the service panel is provided. This is
almost always located on the same side of the spa as the touch-pad.

You must ensure that it Is possible to drain the spa and move it to gain access to the
other three sides, if next to a wall or other object.

We recommend you allow at least 600 mm clearance on all four sides for spas and
for swim spas.

If you are decking around the spa or swim spa we strongly advise that you do this
after the item has been delivered. Swim spas cannot be moved without a crane so it
is important that they are spaced at least 600 mm from any buildings, fences or
retaining walls to ensure sufficient access to all panels.

When checking around your new pool we advise that you place upright supports at
regular intervals around the spa set back 600 mm the cantilever the joist so that the
deck is self-supporting around the spa so that technicians can access any service
panels if required.
Spa World recommends that you position your spa to sit 300 mm above the deck
height. This allows for safe entry and exit into the spa and most importantly allows
for the cover safety clips to be attached to the spa's cabinet. If your spa shell is level
with the deck you will need to install these clips onto the deck and they become a toe
and trip hazard, typically ending with either a broken toe or broken clip.

Drainage

Make sure that if the spa or swim spa is to be positioned near a slope, dip or below
ground level, that there is adequate drainage for any ground water to run off. In this
instance, we recommend a land drain around the four sides of the spa. Damage
caused by flooding Is not covered under warranty.

Foundation or base

If the foundation is inadequate, it may shift or settle after the spa is in place causing
stress to the shell and cabinet which will void the warranty.

   •   Dry weight (unfilled) Portable Spa will weigh between 120 kg and 1,000 kg
       (1.0 Tonne)
   •   Dry weight (unfilled) Swim Spa will weigh between 800 kg and 1,600 kg (1.6
       Tonne)

We recommend the following surfaces:

   •   100 mm thick reinforced concrete pad for portable spas
   •   150 mm thick reinforced concrete pad for swim spas
   •   A deck built lo Australian building standards and certified by a qualified
       engineer that it can carry the full weight.

Electrical

All electrical work must be carried out by a licensed electrician only.

   •   You are responsible for the cost and organizing an electrician if required.
   •   Electrical connections for your spa are typically found under the touchpad of
       your spa.

In the comment sections of your order, your salesperson should have noted the
power requirement in amps that your spa requires to operate. This information can
also be found at the back of this guide in the reference section or you can contact
your salesperson. If you require an electrician, you will need to supply the power
requirement information to your electrician for them to quote correctly.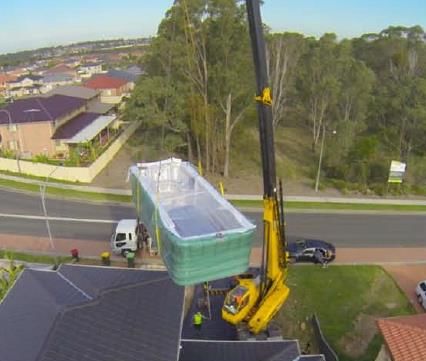
To meet the requirements of AS3000 an electrical socket adjacent to an above
ground spa less than 5000 litres must be IPX5 rated, must be greater than
1.25m from the inside edge of the spa, and greater than 450mm off the ground,
it must be on its own circuit and must be RCD protected.

Spa Requiring 10-15 amps

Spas that are listed as 10 or 15 amps will require an outdoor waterproof powerpoint
with an earth leakage protection device (unless there is one already fitted to your
power board). Some, but not all brands of spas that are 10-15 amps come with a
power lead that is approximately 5 meters long and located under the touch-pad. For
the cord to reach the powerpoint you need to position the touchpad side of your spa
to within 2 Meters of the powerpoint.

Consult your electrician but in most cases, due to safety reasons, you cannot have
the powerpoint closer than 1 meter to the spa.

If your spa is located further than the power cord length, your spa must then
be hardwired by an electrician.

Note: All Connections over 15 amps will require Hard wiring from a qualified electrician.

Wire placement for 10 and 15 amp spas

To provide maximum flexibility, the spa cabinet is not pre-drilled to allow for the
power cord to be run out of the cabinet. Therefore, a 60 mm hole should be drilled in
the appropriate position. On some models, but not all, a special transition cap is
provided to tidy the hole and this will be found with the spas instruction manual.

Spas Requiring 32+ amps

If your spa is 32 amps or more, it will need to be hard wired by an electrician. This
typically means that your electrician is required to make two trips; the first to do the
initial circuit and connection work and the second to connect the wires after delivery
and before the handover.

We recommend that you arrange for the electrician’s second trip to your site be after
the spa delivery date in case of delays with the delivery.

If your spa has a SpaNet controller it can be used with single, two or three-phase
power. The controller is configurable with the change of jumpers.

         Model           Maximum RequirementMinimum Requirement Total Required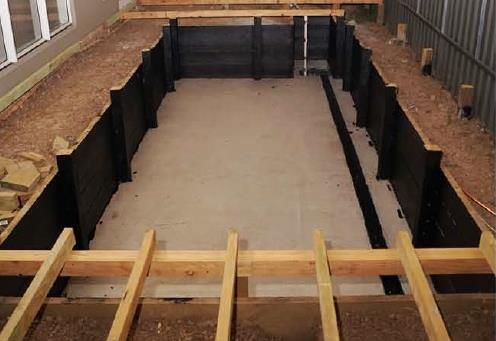
Single Zone Plunge
                                 15 amps                 15 amps              15 amps
Models
Single Zone Pro Models           32 amps                 32 amps              32 amps
Single Zone Extreme
                                 45 amps                 45 amps              45 amps
Models
                                32 amps +               32 amps +
Hydrozone Pro Models                                                          45 amps
                                 15 amps                 15 amps
                                45 amps +               45 amps +
Hydrozone Extreme
                                                                              60 amps
models
                                 15 amps                 15 amps

NOTE: The above assumes that an optional heat pump is fitted. All Dual Zone swim
spas have 2 separate controllers and require individual electrical connections.

Wire placement for 32+ amp spas

When hard-wiring the spa, the electrician will typically drill a hole in the cabinet and
run
conduit to connect the spa electrics. Please discuss where you would like this hole
drilled
with your electrician.

Alternatively, if you are preparing a new base for your spa or installing onto a deck
and would like to conceal the power, please follow these instructions:

See the reference section of this guide for the link to download the correct tech pack
for your spa that shows where the power should enter the spa base.

Mark out where your spa will sit on the base with the correct dimensions specified in
the tech pack.

You can have your electrician run conduit before the base is prepared so that when
the spa is delivered the power will come from underneath the spa and be concealed.

Single zone Swim spas require 1 connection
Dual Zone Spas require 2 separate connections as each zone is operated by
individual controllers. Eg. 15amps to the spa zone + 32amps to the Swim
zone. Each zone must be on a separate circuit. It is not legal to split the power
cable from 1 circuit to the 2 zones.

When the delivery driver arrives you will need to advise them of the power location
and that they will need to prepare a hole in the base of the spa to accommodate the
cable.
As every spa is different we cannot guarantee that every spa will accept this method
of installation and you must refer to the tech pack for your spa.

If you have questions, please contact your sales person or start a live chat with our
friendly support agents

Delivery

Balance of payment

It can take one or two weeks after receiving the balance of your payment before we
can schedule your delivery.

As soon as your product is ordered and arrives in our warehouse, full payment and
acceptance of possession is required.

If you are not ready for delivery, we will hold your spa for up to 4 weeks. After the 4
weeks, you will be charged a storage fee of $75 per week for portable spas or a
$300 per week for swim spas.

If possession of the spa will not be accepted within 8 weeks of its arrival Spa World
reserves the right to re-sell the Spa and order a replacement for your order once
given 8 weeks notice. If the product is already in our warehouse or a showroom floor
model, payment in full must be made before delivery.
Payments can be made via credit card by visiting your local store or by contacting
us. If you wish to pay over the phone by credit card, we charge a 1.1%
surcharge.

Direct Deposits must be made in advance of the delivery to ensure funds have
cleared.
Our Bank Account details are as follows:

Spa World Australia Pty Ltd
Commonwealth Bank
BSB: 062-827
Account Number: 1025 1814

Please quote your surname or invoice number as your reference should you choose
this option.

Taking delivery of your spa

When your spa arrives, our delivery team will be notified and they will contact you to
arrange a suitable delivery date and time. The delivery teams duty is to deliver the
spa as outlined previously in this guide, be sure to give clear instructions of where
the spa is to be located.
Our delivery team will make one drop off. If they are required to come back to
reposition the spa for any reason other than through fault of their own, an additional
delivery fee will be charged.
Once the spa is in position, please sign to verify that you have received your spa.

Note: Upon delivery of your spa you should unwrap it immediately to avoid excessive heat build-up,
even if you are not installing it straight away. Any damage caused by overheating is not covered by
your warranty.

Note: Please keep the cover on at all times including while empty, especially if in direct sunlight.
While empty and during extreme heat it is suggested to periodically vent spa in the evening by
opening part of the cover to release built up heat.

Depot pickups

If you have chosen to collect your spa from our nearest depot, or you have assigned
a courier to collect it, you will be responsible for it as soon as it has left our
warehouse. It is recommended that, even if you assign a courier to pick up the
product, you are also present to inspect the goods at our warehouse to avoid any
issues.

CAUTION: If you have to position the spa for some time before filling it, be sure to
avoid direct sunlight on the shell by securely fitting and locking the hardcover in
position. If you have instructed a courier to transport your goods, be sure to advise
them to store the spa pool out of direct sunlight. Direct sunlight and excessive heat
can damage the product, and this will not be covered by our warranty.

What’s next?

IMPORTANT: Before filling your spa, please read the instructions carefully. Most
importantly,
please ensure that all barrel unions on either side of all pumps and your heater are
securely tightened.

Once your electrician has hooked up the power for your spa and you are ready to fill
it. Fill the spa to a level that is referred to in your user manual. In the unlikely event
you notice any water coming from the spa, please stop filling it and contact us
immediately.

For a complete set of operating instructions, please refer to the information pack that
will
arrive with the spa or find the link at the back of this guide to download the manual
for your spa model.

Standard Delivery

Any local delivery charge that has been included in the sale is for Spa World’s
standard delivery with two people and a trolley. If the spa can be put into place with
two people using only a trolley then there will be no extra charges.

If the delivery team arrives, and the spa cannot be put into place as described
above, the delivery team will discuss options with you that may incur extra charges.

Deliveries to areas outside of the metropolitan areas may be charged an additional
fee and be completed by general carriers who will only deliver your spa to the kerb. If
this is the case with your delivery, you will be responsible for arranging to have the
spa moved into position.

Note: To avoid disappointment at the time of delivery, please read the following
delivery access requirements carefully.

Delivery access requirements
Your salesperson should have discussed access requirements with you when you
purchased your spa. In addition to the dimensions of the spa, you need to allow 300
mm of height for the trolley.

For example, if your spa is 2350 X 2350 X 930 mm and is to go on its side to the
place where you want it, you must allow 2650 mm in height and at least 1-1.2 meters
in width when measuring. If it needs to turn corners there must be an allowance for
the width and also length.

Please contact your salesperson if you have any questions or concerns regarding
delivery.
Delivery Requiring a Crane

Unless otherwise noted on your sales order you are responsible for the hiring,
organizing and cost of the crane.

If access is difficult, a crane may be required. If you have ordered a swim spa, a
crane will be required. The size of the crane required is dependent on your access
and position of the spa.

Cranes are not as expensive as some would think and it is important to use the right
crane for the job to avoid unnecessary costs. If you have not already discussed
delivery access with your salesperson please do so as soon as possible.

Depending on the access you have, you may be able to crane the spa into position
using a truck-mounted hiab. This type of crane delivery can be the most cost-
efficient, however, it requires the truck to be able to drive within an appropriate
distance to the intended location of the spa. (Typically 5 metres).

Stand alone, truck-mounted cranes will have a much larger reach. However, these
cranes are often very wide, very heavy and may not be able to drive on a domestic
driveway. It is very unlikely that a crane of this type will be able to operate from grass
or 'off-road', but some all-terrain cranes are available.

In all cases please consult with your salesperson so that they can point you in the
right direction. It is best to have everything arranged well before delivery to avoid
delays.

Note: It is virtually impossible to move a swim spa by hand. Once in position, it is
there to stay and so it is vital that it is placed in its final position whilst the
crane or hi-ab truck is on-site.

Forms of Delivery

Depending on your access and size of your spa there are a number of ways your
spa can be delivered.

Metro Portable Delivery - Product up to 2.3 Square:

Delivery includes 2 people and a trolley. A clear pathway from your driveway is
required. It is important to note that once on its side the spa becomes 1 metre wide,
2.3 metres long and up to 3 metres high including the trolley. You need to walk
through your property from the driveway to the spa's final position with these
measurements and any corner maneuvering in mind.

NOTE: If in the event your delivery is non-standard, additional charges may apply.
Please contact our delivery team if you wish to discuss this further on 1300 895 902
or email delivery@spaworld.com.au .

Metro Swim Spa Delivery: Product larger than 2.3 Square & Swim Spa Product:
Delivery is included to your property, the product needs to be put into position with
either a Hiab or Crane lift (Crane not Included unless specified on your Sales Order
Confirmation). To trolley a Swim Spa or Large Spa into position is Non-Standard and
needs to be quoted prior to delivery.

Out of Area Delivery:

Delivery outside Metropolitan areas may be completed by general carriers and will
only deliver the product to the roadside kerb, you will need to have the product
moved into position.

Non-Standard Delivery:

Non-Standard conditions include but are not limited to; steep surface gradient of
property, steps, retainer walls, tight spaces, powerlines, narrow gate widths, low
eaves or any delivery that involves inserting into decking. If the product cannot get
into position because the access is not barrier-free and the product has to go back to
the depot and be delivered at another date, a service fee, storage fee and an
additional delivery fee will be charged. To prevent disappointment & unnecessary
costs please contact your sales representative or delivery team prior to your delivery.
Please email any photos & measurements to delivery@spaworld.com.au if you are
unsure of your site access.

We recommend that your chosen crane company visit your property to assess the
potential access, any potential access challenges and to ensure that the intended
site is within safe reach.

While spas can often be lifted without spreader bars, this is at the discretion of the
crane company and we insist that they are used for lifting swim spas.

It is the sole responsibility of the crane company to ensure that the spa is moved
without damage and it is your responsibility to ensure that they are suitably insured
for damage occurring to either your spa or your property. We cannot and will not be
held responsible for any damage to person or property while the product is in the air
or while the crane is operating.

External Heat Pump
Heat Pumps are optional and not compatible with all spas.

If you choose the optional heat pump:

   •   A heat pump can save up to 70% of the heating cost over an electric heater.
   •   Heat pumps can heat and cool.
   •   Heat pumps are optional and sold separately and are optional.
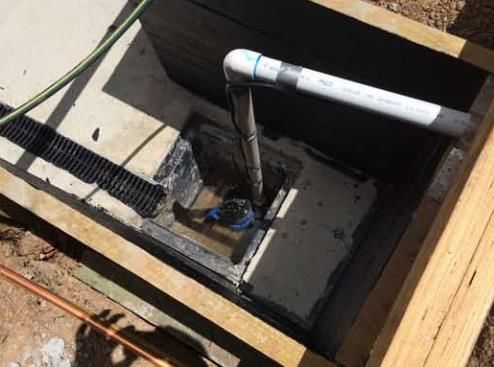
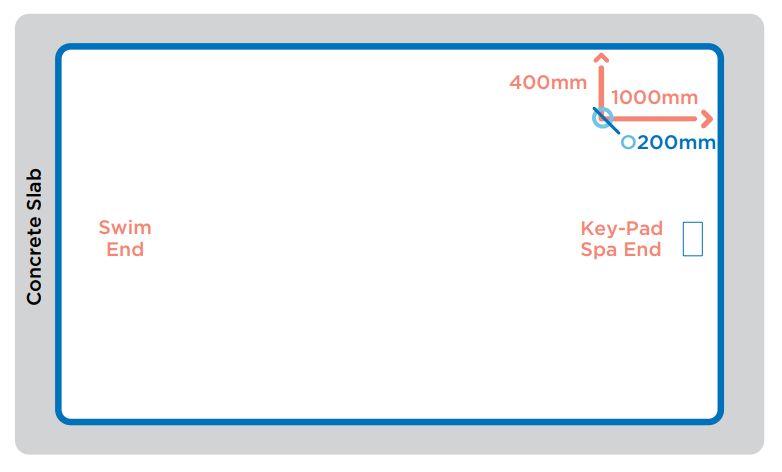
Heat Pump Installation Timing

Your spa must be filled and powered up before a technician can install the heat
pump. The technician will be in contact with you to schedule the installation within
two weeks of delivery. If your spa is not ready they will schedule your delivery at a
later date. You can use the onboard heater of your spa to heat it prior to the
installation of your heat pump.

Note: Out of Area Spa Deliveries DO NOT include heat pump installation, this will need
to be arranged and paid through your local plumber or electrician. Western Australia
customers the heat pump is installed at the time of delivery.

Location of your Heat Pump

Please download the manual for your specific heat pump by clicking the link on the
manual page at the end of this guide.

The heat pump must be installed at least 1 metre from the spa pool but not more
than 2.5 meters from the circulation pump which is typically located under the
touchpad end of the spa.

The heat pump must sit on either a concrete base or well-laid concrete paving
stones. The most common solution is to pour a pad extension for the heat pump
when the main pad is poured.

The heat pump moves a lot of air and so both the back and front of the heat pump
must be completely unobstructed. The manufacturer recommends 300 mm at the
back, 500 mm each side and 2.5 m to the front of the unit.
The heat pump is very quiet (49dB), but you should avoid placing your heat pump
outside the bedroom window for example.

If you wish to avoid fencing your spa, the heat pumps plumbing should be fitted low
to the ground so as not to be used as a step. Heat pumps should be secured to the
concrete pad using dyna-bolts or similar.

Diagram of heat pump layout including measurements coming soon...

Heat Pump Installed In a Pit
The heat pump must be at least 1.2 metres from the edge of the swim
spa but no more than 3 metres away. The heat pump should be installed at the
same level as the base of the swim spa. If your swim spa is being sunk into a pit,
then the heat pump should be installed in the pit with its backside 300 mm off the
edge of the pit, and the front side facing across the front side of the swim spa to
ensure it has adequate airflow.

Add heat pump pit diagram coming soon...
General Heat Pump Connection

   1. Turn off the spa and close the shut off valves to the circulation pump and
       controller. (Marked 1 on
       the diagram)
   2. Consult the Spa Net installation guide to connect power and control wire.
   3. Remove existing plumbing between circulation pump and S.V controller.
       (Marked 2
       on the diagram)
   4. Fit the new 40 mm circulation pump union supplied and point it in the direction
       where
       the heat pump will be located.
   5. Cut holes into the cabinet where the pipe will run into the heat pump, be sure
       to cut the
       holes at a height that allows the pipes to remain even and supported on the
       cabinet.
   6. Run 40 mm pipe from the circulation pump to the inlet of the heat pump.
   7. From the outlet of the heat pump, run 40 mm pipe to the inlet of the S.V
       controller using the
       supplied union to make the new connection.
       NOTE: You must use PVC hard pipe on the outside of the spa, the flexible
       pipe may only be used internally.
   8. Open the shut-off valves. (Marked 1 on the diagram)
   9. Undo the top outlet on the heat pump to bleed air out of the system.
   10. Close it once the water comes out and then switch on the spa.
   11. Make sure the circulation pump is flowing and is free of any airlocks.
   12. Depending on the installation, pure-zone filters may create a flow error, we
       suggest replacing this filter with a standard paper version

Parts supplied

   •   1 x circulation pump barrel union.
   •   1 x 40 mm 90 Degree Street elbow.
   •   1 x S.V barrel union.

Tools and parts required

   •   40 mm or larger hole saw
   •   PVC Pipe Glue
   •   Hacksaw
   •   40 mm hard pipe (The amount of pipe or fittings required will depend on your
       installation)
(Depending on the installation of your heat pump, your pure zone filter may need to be replaced with a paper filter, if you receive a flow error, shut down the spa and replace the pure zone with a paper filter before re-starting if the problem persists please ring the service number) SV Mini Heat Pump Connection Add SV Mini Diagram coming soon Gas Heating Most spas are gas heat compatible. Gas heaters are installed by a third-party technician. Please talk to your salesperson for details. Running Costs Running costs for spas are impossible to predict accurately! There are a considerable amount of factors that will affect the cost of running your spa, such as: • Volume of water • Set temperature • Ambient temperature (The temperature where your spa is placed) • Location of the spa (sheltered or exposed to the elements) • Amount of pumps • Usage of spa • Insulation of spa • Filtration settings • Local electricity rates • Spa usage during peak or off-peak electricity rates The list goes on, and as you can see it is a complicated subject. There are ways to manage the running costs of your spa, so please do not hesitate to contact our customer service line for advice. Heating Time The heating time of your spa is also impossible to predict. Just like running costs there are many variables to consider, such as: • Volume of water • Heater element size
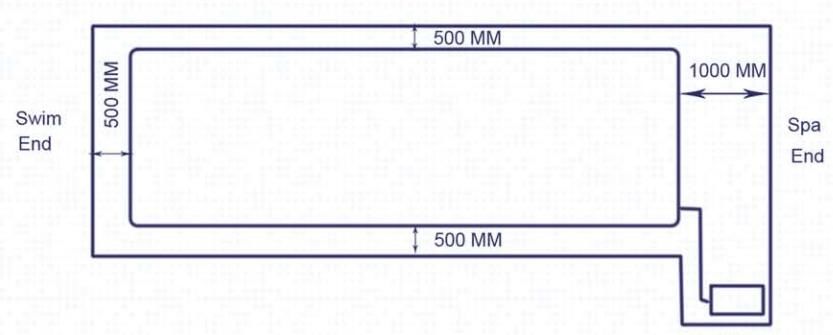
•   Pool and ambient temperature

As a guideline, we can estimate that a standard spa pool of 1500 litres with a 3kw
heater element, will increase in temperature between 1-2 degrees per hour (cover
on).

If you have a larger heater element such as 6kw, you could obtain between 2-4
degrees per hour.
Heat pumps can significantly decrease the heating time and reduce power
consumption, however, your heat time will always be relevant to the volume of water
and power available to heat the water.

Sinking your spa or swim spa into the ground
If you are planning to sink your spa into the ground, we strongly advise that you read
on.
If this is not done properly it can be the equivalent of welding your car bonnet shut!

When excavating your hole, ensure that you allow an extra 500 mm from each side
of the swim spa and an extra 1000 mm at the spa end for access to the equipment
bay.

If a heat pump or pit drain is being installed below ground level, sufficient room must
also be allowed for these items.

As such, a swim spa measuring 4 m x 2.3 m would require a hole that is 3.3 m x 5.5
m

The walls then have to be retained this can be done with timber, bricks or
concrete. (Optional) Using a liquid filler, fill all the gaps in between the timber and
then paint using a black seal waterproof paint. This will stop any seepage from the
dirt into the pit.
Drainage of the pit needs to be fitted. A full-length drain should be used that either
gravity drains to the outside of the pit, or drains into a sump with an automatic
submersible pump fitted.

The base needs to be a concrete pad 150 mm thick. Make sure of your heights
and what height you want the swim spa to finish so as to sit flush in relation to any
decking.

Adequate ventilation is required if also installing an external heat pump. Please
consult your third party contractor on local requirements before works start.
Once the swim spa is in position, you can complete the decking up to the spa.

Note: It is important that access is available to all sides and most importantly,
the equipment bay of your swim spa. This can be achieved using removable decking panels.
Failure to take this into account could lead to significant costs if your swim spa needs to be
serviced in the future.

Note: Spa World does not recommend running any water-filled PVC plumbing under the slab
or through the slab. If leaks occur access or damage to equipment is not covered under
warranty.

Portable spa specific information

IKON specific information

IKON spas must be moved using a crane or hiab. Unlike most portable spas, it
cannot be moved on its side so special consideration is required with regards to
access and placement.

Ace Installation

The ACE and Freshwater® System are optional upgrades specific to Hot Springs
spas and must be installed after the spa is filled and commissioned. This work will be
carried out by one of our technicians who will call to schedule the work.

Stereo installation
The Hot Springs Stereo System is an optional upgrade and must be installed after
the spa is filled and commissioned. This work will be carried out by one of our
technicians who will call to schedule the work.

Swim Spa specific information

Swim Spa Power

For most, the reason for buying a swim spa is to be able to swim in it! As such, swim
spas have 2 or more larger pumps, that drive the swim stream. When not in use,
swim spas use surprisingly little power, however with the swim pumps on, this power
draw increases and therefore adequate power supply is crucial to get the most from
your swim spa.

Please see the reference section for your specific model to find the power
requirements.
Please note that if you do not have the maximum power requirement available, the
swim spa
will be set up so that the heater will turn down when one or more of the swim pumps
are activated.

Within Australia and New Zealand, these will be single-phase power supplies,
however, the swim spa can be configured to use either 2 or 3 phases if required.

Swim Spa Fencing Requirements

Whilst there is some variation from councils regarding fencing requirements for spas,
you should assume that if you are installing your swim spa in ground or adding
decking, the council will require a fence of 1.2 metres surrounding the spa.

This can often be avoided if the swim spa is installed above ground, as swim spas
are generally more than 1.2 metres high. However, when installed above ground the
council require that the steps are removable and there are no other items around the
spa that can be used as a step. This includes heat pumps.

If you wish to avoid fencing your swim spa by leaving it completely above ground,
the heat pump will need to be installed at least 1.2 m away from the side of the swim
spa.
(this is a guideline only; please consult directly with your local council on your legal
obligations regarding the installation of the swim spa)
Swim Spa Concrete Pad

When a swim spa is full and depending on the model it can often weigh in excess of
9 tonnes. As such, it needs a very firm base. We recommend 150 mm thick
reinforced concrete.

Fastlane specific pre-delivery information

Coming Soon

Reference Information
Coming Soon

Manuals
SpaNet SV Series User Guide

New Spa Owners Set up Guide

Chemical Quick Start Up Guide
You can also read