User guide. AIR FRYER OVEN - Nutricook
←
→
Page content transcription
If your browser does not render page correctly, please read the page content below

AIR FRYER OVEN

User guide.
Please make sure to read this User Guide prior to using your unit.


Find delicious recipes online at:
    nutricookworld.com        nutricookworld
4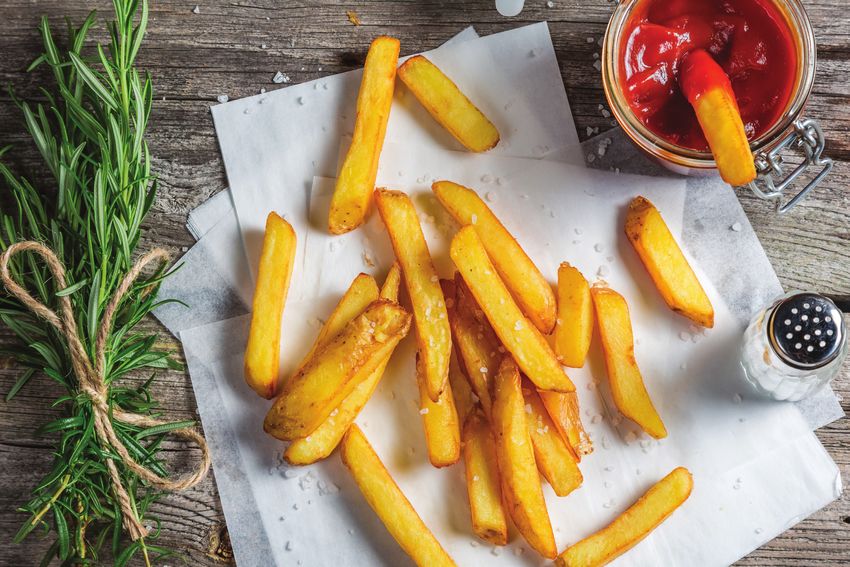
Contents.
05        Welcome.
07        Before you begin.
09        Important safeguards &
          cautionary information.
14        What's included.
16                Air fryer oven parts overview.
19        Getting started.
20                Control panel details.
23                Control panel setting.
25                How to use.
32                Cooking chart.

34        Care & maintenance.

36        Troubleshooting.

37        Warranty.

Thank you for purchasing the NutriCook.

                                                   5
Find delicious recipes online at:
    nutricookworld.com        nutricookworld
6
Welcome to team
NutriCook             ™

Life is complicated. Eating
healthy doesn’t have to be.

There’s really no easier way to
streamline your healthy lifestyle
than with this mighty appliance.

We are constantly working to
create recipes that are
EASY. DELICIOUS. NUTRITIOUS.

You can find these recipes online at
nutricookworld.com

We can’t wait to see how you make
NutriCook part of your everyday.
          ™

Get social with us.
     nutricookworld

                                       7
Find delicious recipes online at:
    nutricookworld.com        nutricookworld
8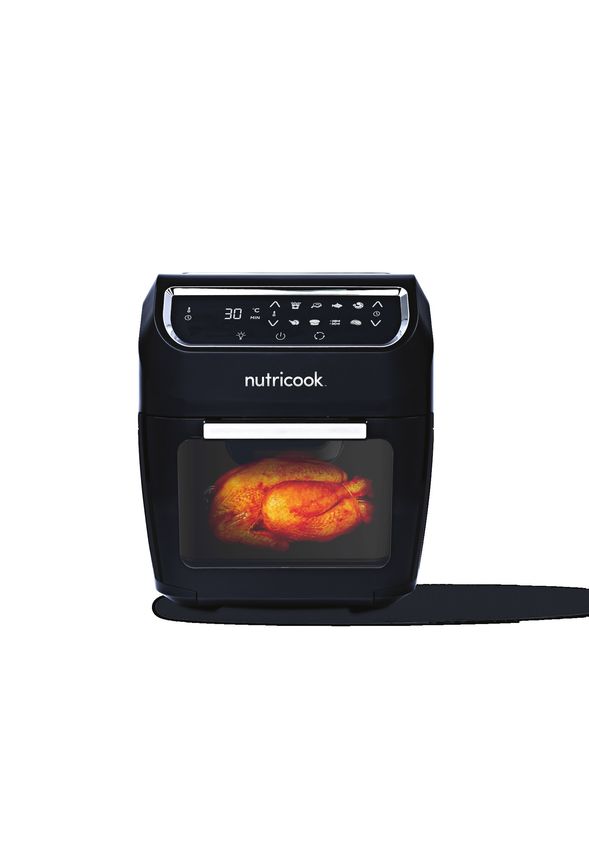
Before you begin.

• Remove all packaging materials from in
  and around the air fryer oven and verify
  that all parts are accounted for.

• Place the air fryer oven on a stable, level
  surface, away from external heat sources.

• Read all Important safeguards and
  cautionary information in this User guide.
  Failure to do so may result in property
  damage and/or personal injury.

• Follow Care & maintenance instructions in
  this User guide to clean the air fryer oven
  before cooking.

• Do not remove safety warning stickers or
  rating label.

    *CAUTION: NEVER use the air fryer oven on a stovetop. Do not place
    appliance on or in close proximity to a hot gas or electric burner, or a
    heated oven; heat from an external source will damage appliance.           9
Building a smoothie.
Find delicious recipes online at:
nutricookworld.com nutricookworld
10Important safeguards &
cautionary information.
Warning! This appliance generates heat and escaping steam
during use. To avoid the risk of serious injury, carefully read all
instructions before operating this appliance.
When using any electrical appliance, basic safety precautions should
always be observed, including the following critical information.
GENERAL SAFETY
• Do not touch hot surfaces. Use handle, oven mitts or pot holders.
• CAUTION! To protect against electrical shock, do not immerse
cord, plugs, or the unit in water or other liquid.
• CAUTION! Extreme caution must be used when moving unit
containing hot oil or other hot liquids.
• Close supervision is necessary when any unit is used by or near
children.
• This appliance is not a toy, and children should not play with it.
• Children should be supervised to ensure that they do not play with
the appliance.
• This appliance is not intended for use by persons (including
children) with reduced physical, sensory or mental capabilities, or
lack of experience and knowledge, unless they have been given
supervision or instruction concerning use of the appliance by a
person responsible for their safety.
• Unplug from outlet when not in use, during assembly, during
disassembly, and before cleaning. Allow to cool before putting on
or taking off parts.
*WARNING: Read this User guide carefully and completely, and retain for future
reference. Failure to adhere to safety instructions may result in serious injury.
11• Do not use appliance other than its intended use. For household
use only.
• Do not place on or near a hot gas, electric burner and or in a
heated oven.
• Never put the appliance against the wall or other appliances.
There should be at least 3 inches of free space for the back side,
left/right sides and the upper side of the appliance. Do not place
anything on top of appliance.
• To disconnect, press and hold the POWER ( )button, then remove
plug from the wall outlet.
• CAUTION! During air frying, hot steam is released from the air
outlet opening. Keep your hands and face distance from the steam
and from the air outlet opening. Be careful of hot steam and air
when you open appliance.
• CAUTION! Do not touch the accessories during and immediately
after cooking. Always wear oven mitts or use pot holders when
handling potentially hot accessories. Allow everything to cool
completely before cleaning.
• Make sure the ingredients prepared in this appliance come out
golden yellow instead of dark or brown. Remove burnt remnants.
• CAUTION! HOT SURFACE: This appliance generates heat
and escaping steam during use. Proper precautions must be
observed to prevent the risk of burns, fires or other injury to persons
or damage to property.
• CAUTION! This appliance is hot during operation and retains
heat for some time after turning OFF. Do not place anything on top
of the appliance while it is operating or while it is hot.
• Do not place the unit close to flammable materials, heating units
or wet environments.
• Do not overload accessories with food.
• Do not replace with other parts that are not designed specifically
for this unit.
• WARNING! If a lot of smoke is escaping from the air vent during
operation, unplug the unit immediately and contact customer
service.
• During first use, it is normal for some smoke to escape from the
unit when heating.
12• Do not move the unit while in operation. Only after the unit has
completely cooled down should you attempt to move it. Always
wait for the unit to cool down prior to handling it.
• Never use a towel to block the vent. Do not cover the air inlet and
outlet opening while the appliance is operating.
• If any troubles arise during operation, any necessary service must
be authorized by the manufacturer for repairs.
• Do not disassemble the unit on your own or replace any parts.
• Do not cook overly greasy food in this appliance.
• If the power cord is damaged, do not attempt to operate the unit.
• Keep the unit out of reach of children when the unit is operating or
cooling down.
• Keep hands and face away from the vent outlet or where heat or
steam is being released.
• Make sure the unit is always clean prior to cooking.
• WARNING! Do not operate this appliance if the glass door is
broken or damaged.
• CAUTION! Do not position power cord near air vents while
appliance is in operation.
• WARNING! Do not pour oil into the appliance as this may create
a fire hazard.
• Do not leave the appliance unattended while in use.
• Never touch the inside of the appliance while it is operating.
• This appliance is not intended to be operated by means of an
external timer or separate remote-control system.
DO NOT USE UNIT FOR OTHER
THAN INTENDED USE
Note: Put the appliance on a surface that is horizontal, even and stable.
This appliance is intended for normal household use. It is not intended
to be used in environments such as staff kitchen of shops, offices, farms
or other work environments. Nor is it intended to be used by clients in
motels, bed and breakfast and other residential environments.
13ELECTRICAL SAFETY
CAUTION: To avoid risk of electric shock, never immerse the cord,
plug, or power base of this unit in water or other liquids.
• DO NOT use this product in locations with different electrical
specifications or plug types. Do not operate with any type of plug
adapter or voltage converter device, as these may cause electrical
shorting, fire, electric shock, personal injury or product damage.
• DO NOT modify the plug in any way, as doing so will void the
warranty.
• DO NOT pull, twist or mistreat the power cord.
• The use of attachments or parts not recommended and sold by
the manufacturer may cause fire, electric shock, personal injury,
or product damage and will void the warranty.
• If the supply cord is damaged, it must be replaced by its service
agent or similarly qualified persons in order to avoid a hazard.
• Always POWER OFF and UNPLUG the appliance when it is not in
use or BEFORE cleaning.
• DO NOT allow the cord to hang over the edge of the table or
counter. Do not pull, twist, or damage the power cord. Do not
allow cord to touch hot surfaces, including the stove.
• DO NOT let cord hang over edge of table or counter, or touch
hot surfaces. The cord can get tangled or cause the appliance to
fall. Bring it to a qualified technician for examination, repair or
electrical and mechanical adjustment.
• DO NOT operate this appliance with a damaged cord or plug or
if the appliance malfunctions, or is dropped or damaged in any
manner.
• Use of adapters and converters is considered an unauthorized
modification of the product and as such voids the warranty. Use of
this product in locations with different electrical specifications may
result in damage to the product.
14ELECTRICAL INFORMATION:
For safety reasons, the cord length of this appliance was selected to
reduce Safety Hazards that may occur with a long cord. Extension
cords are available and may be used if care is exercised in their use.
If an extension cord is used: (1) the marked electrical rating of the
extension cord should be at least as great as the electrical rating of the
appliance, and (2) the longer cord should be arranged so that it does
not drape over the counter or table top where it could be accidentally
pulled off the counter or table or tripped over.
Save these instructions!
FOR HOUSEHOLD USE ONLY
15What's included.
• 1800 WATT AIR FRYER OVEN
• ROTATING BASKET
• ROTISSERIE SHAFT
• 2 ROTISSERIE FORKS
• 10 SKEWERS
• 2 SKEWER RACKS
• 3 WIRE RACKS
• DRIP TRAY
• FETCH TOOL
• PROTECTIVE COVER
Product Specification:
MODEL CAPACITY POWER VOLTAGE WEIGHT DIMENSION
AIR FRYER OVEN 220-240 V
12 L 1800 watts 8.5 kg 32.4x31.1x36.8 cm
AF9204S 50/60 Hz
1617
Air fryer oven parts
       overview.

                                 air outlet
                     (located at the back of air fryer oven)

                                               air inlet

        control panel

           rotating
          connector
                                                                              upper/
                                                                              middle/
                                                                              lower rack

                         removable
                           glass

     *NOTE: Images are for visual representations only. Always refer to actual product.

18
rotating basket 3 pcs wire racks
1 set skewer racks (L/R) drip tray
10 pcs skewers fetch tool
1 set rotisserie forks rotisserie shaft
*NOTE: Images are for visual representations only. Always refer to actual product.
19Find delicious recipes online at:
nutricookworld.com nutricookworld
20Getting
started.
21Control panel details.
temperature digital adjustable cooking adjustable
control button display temperature control preset s time control
timer control internal light power/start rotation cooking
button button button button indicator lights
Power/Start button ( ).
1. Once unit is plugged in, the POWER ( ) button will light up.
2. Press the POWER ( ) button. The whole control panel
illuminates and default TEMP: 185°C and TIME: 15 minutes will
alternate on the digital display.
3. Press the POWER ( ) button again to begin the cooking process
at the default temperature and time.
4. Press and hold the POWER ( ) button at any time to turn the
Air Fryer Oven OFF. Once the Air Fryer Oven is turned OFF, the
cooking indicator lights will continuously run in sequence for 20
seconds. Ten (10) audible beeps will sound as the Air Fryer Oven
automatically turns OFF.
Note: Digital display shows OFF
22Timer control button ( ).
Selecting the timer control button, increase or decrease the cooking
time using ( ) or ( ). This enables you to increase or decrease the
cooking time in 1 minute interval except for Dehydrate ( ). Keeping
the ( ) or ( ) buttons held down will rapidly change the time.
Note: All cooking functions except Dehydrate ( ) have a time range of 1-60
minutes. The time range for Dehydrate ( ) is 2 hours-24 hours adjustable
by 30 minutes.
Temperature control button ( ).
Selecting the temperature control button, increase or decrease
cooking temperature using ( ) or ( ). This enables you to increase
or decrease the cooking temperature in 5°C interval. Keeping the( )
or ( ) buttons held down will rapidly change the temperature.
Note: All cooking functions except Dehydrate ( ) have a temperature
range of 65°C-200°C. The temperature range for Dehydrate ( ) is from
30°C-80°C.
Cooking presets.
8 presets to choose from: Fries, Meat, Fish, Shrimp, Chicken, Bake,
Rotisserie and Dehydrate.
Digital display.
This display will keep track of the temperature and remaining cooking
time.
Cooking indicator lights.
These lights will run in sequence while cooking is in progress and
continue running for 20 seconds once Air Fryer Oven is turned OFF.
23Rotation button ( ).
Press this button when using the Rotisserie ( ) function. The icon
will blink while in use.
Internal light ( ).
Selecting this button will help you check and view cooking progress.
Note: Opening the door during the cooking process will pause cooking. Internal
light ( ) button will blink in the control panel when the door is opened.
Adjustable control (TEMPERATURE AND TIME).
The ( ) or ( ) buttons enable you to increase or decrease cooking
temperature and time manually.
24Control panel setting.
Menu food. Temp. Air fry Time.
Fries 200°C 15 min
Meat 185°C 25 min
Fish 200°C 15 min
Shrimp 160°C 12 min
Chicken 185°C 40 min
Bake 175°C 30 min
Rotisserie 200°C 30 min
Dehydrate 30°C 4h
Note: Times and temperatures listed are pre-programmed. You can
manually adjust the cooking time and temperature using ( ) or ( )
according to your recipe.
IMPORTANT!
Note: Depending on the thickness and/or density of foods, it may be
necessary to use meat thermometer to check cooking progress after preset
TIME is completed.
25Find delicious recipes online at:
nutricookworld.com nutricookworld
26How to use.
Accessories.
Wire racks.
Note: Use wire racks to make dried
vegetables or jerky, cook fried snacks, or
reheat small food items such as pizza.
Slide up to 3 wire racks into the air
fryer oven.
Drip tray.
Note: Use to catch oil and food debris.
Place on the bottom part of the air LEFT RIGHT
fryer oven
Skewers/skewer racks.
Note: Use with skewers/rotisserie shaft to
cook kababs, meat, or vegetables.
• Attach two skewer racks (L/R) to
the rotisserie shaft.
• Slide food into the skewers.
Warning: The end-point of the skewer
racks are sharp. Extreme caution must
be exercised when inserting food to
avoid injury. LEFT SIDE
• Insert one end of a skewer into
a hole, then squeeze the other
end to lock it in the skewer rack.
Repeat until all skewers are
attached to the skewer racks
• Within the air fryer oven, insert
the left side of the rotisserie
shaft into the designated hole.
Hook the right side of the shaft
into the slot. RIGHT SIDE
27How to use.
Rotisserie shaft and
forks.
Note: Use with rotisserie shaft to cook
roasts or whole chicken.
Slide the rotisserie shaft through the
meat. Secure the meat with
two rotisserie forks, one on each side.
Rotating basket.
Note: Use to cook fries or small snacks.
Open and place ingredients into the
basket. Insert the basket into the
designated slots in the air fryer oven
(see skewers/skewer racks section
of this user guide).
Fetch tool.
Note: Use fetch tool to remove rotisserie
shaft or rotating basket.
Use the fetch tool to lift the rotating
basket or rotisserie shaft. Tug
the fetch tool right to release the
accessory and pull it out.
28Protective cover.
Note: : Use protective cover to protect
food and avoid touching the heating coil.
Insert and slide protective cover into
top of the unit.
Glass door.
• Note: : The glass door is an essential
part of product safety. Check for
any damage before inserting in the
main door of the Air Fryer Oven.
Always ensure that the glass door is
properly installed before operating
your appliance.
• Be careful when opening the main
door as the glass door can slide
causing it to fall and break
Warning: Do not operate this
appliance if the glass door is broken
or damaged. Contact
Customer Service.
Install: Align the hinge so the joints
fall into the slots.
Remove: Pull door at 45° angle to
remove.
29How to use.
Preparing.
1. Read all important safeguards and cautionary information in this
user guide including warning stickers/labels on the product.
2. Remove all packing materials, labels and stickers. Check that
there is no packaging underneath and around the unit.
3. Place appliance on a flat, heat-resistant, stable and level surface
and plug it into a wall outlet. An audible beep will sound and the
POWER ( ) button will appear on the control panel.
CAUTION:
• Leave at least 3 inches
of clearance around the
appliance during operation.
• Make sure power cord has
enough length to reach the
socket. Do not pull, twist or
mistreat the power cord.
WARNING:
• DO NOT put anything on top of the appliance.
• DO NOT cover the air vents on the top and at the back of the appliance.
• DO NOT fill any cooking vessel with oil or liquid of any kind. This
appliance cooks with hot air only.
• NEVER wash or submerge the unit in water.
NOTE:
• Clean accessories with hot water, dish soap, and a non-abrasive sponge
before first use. Wipe inside and outside of appliance with a clean, dry
cloth. Make sure all stickers and packing labels are removed.
• During first use, the Air Fryer Oven may emit slight odor. This is normal
and will not affect the flavor of the food.
30How to use.
Cooking.
1. Place ingredients in the desired accessory according to your recipe.
CAUTION: Do not overload the
accessories with food to ensure
proper cooking and air circulation.
CAUTION: Use oven mitts/pot
holders to insert the accessory into
the air fryer oven. Close the door
securely.
2. Press the POWER ( ) button. The control panel illuminates and
the default time and temperature 185°C and 15 minutes will alternate
in the display.
Note:
• If no buttons are pressed, the Air Fryer Oven will remain in standby mode.
• The Air Fryer Oven will not start if the door is not locked properly.
3. Press any of the 8 preset programs according to your recipe.
Note: You can manually adjust cooking temperature and time using ( ) or (
) buttons according to your recipe.
31How to use.
Cooking.
4. When the desired cooking temperature and time has been set
and appear on the digital display, press POWER ( ) button to
begin cooking. The cooking indicator lights will run in sequence
while Air Fryer Oven is in operation. The preset time will begin to
countdown. The temperature and remaining time will alternate on
the display.
5. For certain foods, you can do one of the following to cook food evenly:
• Press the rotation button ( ) to rotate food when using the
ROTISSERIE function.
• Shake the wire racks or flip food.
• WARNING: Always use oven mitts/pot holders to pull wire racks
out of the appliance to shake/flip the food. Extreme caution must
be exercised when opening the door as escaping steam can cause
serious physical injury.
• Insert the wire racks back into the appliance to continue cooking.
326. When the remaining TIME
reaches 00:00, the Air Fryer
Oven automatically turns OFF.
The cooking indicator light will
continue to run in sequence within
20 seconds and unit will sound 10
audible beeps.
Note: If needed, open the door to pause
cooking, or press and hold the power
button to turn appliance OFF.
CAUTION:
Always turn the appliance OFF and unplug when not in use. Do not move or
store the appliance until it has completely cooled down.
Always use the Fetch Tool when taking out the Rotating Basket or Skewers
from the unit and remove food.
During cooking process, the Rotating
Basket and other accessories will become
very hot.
NEVER place the Rotating Basket directly
on a counter top or table.
ALWAYS make sure you have a trivet or
a heat resistant surface nearby to set it
down on.
Make sure to place any used accessory
on a stable surface away from any
combustible items.
33Cooking chart.
Note:
• Cooking times and temperatures are estimated and based on average
sizes and weight. ALWAYS use a meat thermometer to ensure that the
meat, poultry and fish are cooked thoroughly before serving.
• Frying smaller batches will result in shorter cooking times and higher food
quality. Adjust the air frying times and temperatures as necessary to suit
your taste.
Food Item Min-Max Time Temperature Comments
Potatoes and fries.
Thin frozen fries 2 - 3 cups 15-16 min. 200°C
Thick frozen fries 2 - 3 cups 15-20 min. 200°C
Homemade fries 2 - 3 cups 10-16 min. 200°C Add 1/2 tbsp.oil
Homemade
2 - 3 cups 18-22 min. 180°C Add 1/2 tbsp.oil
potato wedges
Homemade
2 - 3 cups 12-18 min. 180°C Add 1/2 tbsp.oil
potato cubes
Hash browns 1 cup 15-18 min. 180°C
Potato gratin 2 cups 15-18 min. 200°C
34Food Item Min-Max Time Temperature Comments
Meat and poultry.
Steak 0.50 kg 8-12 min. 180°C
Hamburger 0.50 kg 7-14 min. 180°C
Sausage roll 0.50 kg 13-15 min. 200°C
Chicken
0.50 kg 18-22 min. 180°C
drumsticks
Chicken breast 0.50 kg 10-15 min. 180°C
Snacks.
Spring rolls 0.75 kg 15-20 min. 200°C Use oven-ready
Frozen chicken
0.50 kg 10-15 min. 200°C Use oven-ready
nuggets
Frozen fish sticks 0.50 kg . 6-10 min. 200°C Use oven-ready
Frozen mozzarella
0.50 kg 8-10 min. 180°C Use oven-ready
sticks
Frozen onion rings 0.50 kg 15 min. 200°C Use oven-ready
Stuffed
0.50 kg 10 min. 160°C Use oven-ready
vegetables
Dessert
Cake 3 cups 20-25 min. 160°C Use baking pan
Quiche 5 cups 20-22 min. 180°C Use baking pan
Muffins 3 cups 15-18 min. 200°C Use baking pan
35Care & maintenance.
WARNING: To avoid electric shock or damage to your air fryer oven, always
unplug the power cord from the power supply outlet before cleaning. Make
sure that all parts of your air fryer oven have cooled down completely
CAUTION: Do not immerse the power cord or your air fryer oven in water or
any other liquids.
• Do not use abrasive cleaners, steel wool, or scouring pads.
• Dry all parts thoroughly after cleaning, before using, or before storing your
air fryer.
• Make sure that all parts and surfaces are completely dry before connecting
your air fryer oven to a power outlet. Wet parts can cause electric shock.
WARNING: DO NOT immerse air fryer oven base in water.
36Cleaning Methods
Part Cleaning Tip
Dishwasher Hand Wash Wipe Clean
Safe (submerged) (damp cloth)
• Wipe the outer part of the body
with soft and barely damp cloth.
• To clean the oven door, remove
it by lifting it to a 45°angle while
gently pulling upward. Clean both
sides with warm soapy water
using a soft and damp cloth.
• Do not soak or submerge the
door in water or wash in the
dishwasher.
Air Fryer
• Clean the inner part of the unit
Oven Base, with hot water and mild detergent
Door and using soft, barely damp cloth
including the heating coil to
Plug Cord.
remove dried food debris
WARNING: Always ensure the
heating coil is dry before using the
air fryer oven.
• If necessary, remove unwanted
food residue from the upper
screen with a cleaning brush.
• Wipe the plug cord with dry cloth."
• WARNING: These accessories
become very hot while in use.
Make sure these parts have
completely cooled off before
cleaning.
Accessories. • These accessories are dishwasher
• Wire racks. safe. We recommend using a dish
• Rotating basket. brush to remove stubborn food
• Skewers. debris and grease before putting
• Skewer racks. in the dishwasher.
• Rotisserie shaft • Never use abrasive cleaning
(including forks materials or utensils on these
and screws). accessories.
• Fetch tool. • Caked on food should be soaked
for easy removal in warm soapy
• Protective cover.
water.
• Drip tray.
• To clean the drip tray, drain oil
and remove food residue before
cleaning. Wash in mild soapy
water.
37Troubleshooting.
Possible
Problem Solution
Cause
The unit is not Plug in air fryer oven. Check and verify that
plugged in. there is no damage on the plug and cord.
After setting the desired time and
Air fryer oven does not The POWER ( )
temperature, press the POWER ( ) button
work. button is not pressed.
to begin cooking.
Door is not locked
Close and lock the door securely.
securely.
The accessories are
Place smaller batches of food.
overloaded.
Food not cooked. The cooking time is too
short and temperature Increase cooking time and temperature.
is too low.
Food is not fried The accessories are Place small batches of food.
evenly overloaded. Shake or flip food to ensure even frying.
Use a clean kitchen towel to wrap and dry
Raw fries have too potato sticks thoroughly.
Fries are not crispy
much water. Cut potato sticks smaller.
Shake and use spray oil.
When cooking overly greasy food, drain the
drip tray from oil frequently.
WARNING: Extreme caution must be
Food is overly greasy.
exercised when pulling the drip tray from the
White smoke comes unit. Contents are hot and can cause serious
out of the unit. physical injury.
The drip tray contains
grease and food ALWAYS ensure that all accessories are clean
residue from previous after every use.
use.
As the door is slightly open (about 1
inch/2.5cm from the closed position), align the
hinge so the joints fall into the slots, then close
the door.
Glass door came off Door came off hinge. Note: By design, the glass door is removable
for easy cleaning.
CAUTION: Be careful when opening the
door of the unit as the glass door can slide
causing it to fall and break.
38Warranty.
LIMITED WARRANTY FOR NUTRICOOK
Nutricook’s limited warranty obligations are confined to the terms set
forth below:
Nutricook warrants this product against defects in materials and
workmanship for a period of two years from the date of original
retail purchase. This limited warranty is valid only in the country in
which the product is purchased and comes with the product at no
extra charge, however shipping and processing fees will be incurred
for returns, replacements and or refunds.
OBTAINING WARRANTY SERVICE
For limited warranty service, simply visit www.nutricookworld.com
for Customer Service details of your respective territory or contact
our customer service department at info@nutricookworld.com
and we will be glad to help you. When you contact our customer
service department you will be asked for your name, address,
telephone number and to provide proof of the original purchase
(receipt) containing a description of the product(s), purchase date,
and the appropriate Nutricook bar code(s). Before you send your
product for limited warranty service please make sure to keep a
copy of all relevant documents for your files (receipt, etc.). It is always
recommended to purchase product insurance and tracking services
when sending your product for service. Remember, shipping and
processing fees will be incurred and are not covered by the two-year
limited warranty.
EXCLUSIONS AND LIMITATIONS
This Nutricook Two-Year Limited Warranty applies only to Nutricook
products distributed by or for Nutricook that can be identified by the
“Nutricook” trademark, trade name, logo and bar code. Nutricook’s
Two-Year Limited Warranty does not apply to any other products
that may appear to be authentic, but were not distributed/sold by
Nutricook.
39Warranty.
Normal wear and tear is not covered by this limited warranty.
This limited warranty applies to consumer use only, and is void when
the product is used in a commercial or institutional setting.
This limited warranty extends only to the original consumer purchaser
and is not transferable. In addition, proof of purchase must be
demonstrated.
Repair or replacement of the product (or, if repair or replacement is
not feasible, a refund of the purchase price) is the exclusive remedy
of the consumer under this limited warranty. Nutricook shall not be
liable for any incidental or consequential damages for breach of this
limited warranty or any implied warranty on this product.
This limited warranty does not apply: (a) to damage caused by
accident, abuse, misuse, or misapplication; (b) to damage caused
by improper maintenance (including unauthorized parts service); (c)
to a product or a part that has been modified in any way; (d) if any
Nutricook bar code or trademark has been removed or defaced; and
or (e) if the product has been used with an adapter/converter.
THIS LIMITED WARRANTY AND THE REMEDIES SET FORTH ABOVE
ARE EXCLUSIVE AND IN LIEU OF ALL OTHER WARRANTIES, REMEDIES
AND CONDITIONS, WHETHER ORAL OR WRITTEN, EXPRESS OR
IMPLIED. NUTRICOOK SPECIFICALLY DISCLAIMS ANY
AND ALL IMPLIED WARRANTIES, INCLUDING, WITHOUT
LIMITATION, WARRANTIES OF MERCHANTABILITY AND FITNESS
FOR A PARTICULAR PURPOSE. IF NUTRICOOK CANNOT
LAWFULLY DISCLAIM IMPLIED WARRANTIES UNDER THIS LIMITED
WARRANTY, ALL SUCH WARRANTIES, INCLUDING WARRANTIES OF
MERCHANTABILITY AND FITNESS FOR A PARTICULAR PURPOSE
ARE LIMITED IN DURATION TO THE DURATION OF THIS LIMITED
WARRANTY. No Nutricook reseller, agent, or employee is authorized
to make any modification to this warranty.
40NUTRICOOK IS NOT RESPONSIBLE FOR DIRECT, SPECIAL, INCIDENTAL
OR CONSEQUENTIAL DAMAGES RESULTING FROM ANY BREACH OF
WARRANTY OR CONDITION, OR UNDER ANY OTHER LEGAL THEORY,
INCLUDING BUT NOT LIMITED TO LOST PROFITS, DOWNTIME,
GOODWILL, DAMAGE TO OR REPLACEMENT OF EQUIPMENT AND
PROPERTY. NUTRICOOK SPECIFICALLY DOES NOT REPRESENT THAT
IT WILL BE ABLE TO REPAIR ANY PRODUCT UNDER THIS LIMITED
WARRANTY.
41NutriCook | www.nutricookworld.com | All rights reserved. Illustrations may differ from the actual product. We are constantly striving to improve our products, therefore the specifications contained herein are subject to change without notice.
You can also read


