How to Build a Walk-In
Cooler for Your Small Farm
←
→
Page content transcription
If your browser does not render page correctly, please read the page content below

How to Build a Walk-In Cooler for Your Small Farm

Introduction
For small farms, cold storage can mean the difference between
profitability and not making ends meet. Produce starts to deteriorate as
soon as it’s picked, and, especially in warm temperatures, that
deterioration can happen very quickly. This can lead to costly post-
harvest loss.

Cold storage enables you to harvest your crops at the most advantageous time and
keep them fresh until you’re ready to take them to market, package them for CSA
pickup, or distribute them through another channel.

This guide teaches you everything you need to know to build your own walk-in
cooler from scratch using a CoolBot temperature controller and an air conditioner.

Here’s what you’ll learn:

   What it costs to build your own CoolBot-powered walk-in cooler
   Where on your property to put your cooler
   How to insulate a room
   How to seal your cooler
   How to hook up electricity and lighting
   How to select the right air conditioner
   How to install your air conditioner
   How to install your CoolBot
   Ideal temperatures for storing common fruits and vegetables
How Much You’ll Save with a
CoolBot-Powered Walk-In
Cooler
The CoolBot makes cold storage accessible for farms of all sizes.
Depending on the size, a traditional walk-in cooler can cost between
$6,000 and $10,000. In addition to this upfront cost, you also need to
consider the operating costs (energy) and service, which usually
requires a specially trained technician.

In contrast, the CoolBot provides a solution that’s not only more
affordable upfront, but also saves you money over the long run.

Our customers on average spend about $3,000 in total building their walk-in
coolers.

That $3,000 includes all equipment and insulation. For additional savings, many
farmers repurpose lumber and insulation, which allows them to build their cooler
for less than $1,000.

And the savings don’t stop there. Since it uses roughly 40% less energy than a
traditional cooler, the CoolBot continues to save you money every month. And
you’ll never need to call a maintenance technician. Our customer support team is
available to help you by phone and email to solve any problems that might arise.
The chart below shows the economic advantages of a CoolBot over a traditional
system.

                 CoolBot + 18K BTU A/C        Traditional Walk-in Cooler        Savings
                                              Refrigeration System

 Refrigeration   CoolBot $329                 Top-mount self-contained          $2,252
 Unit Upfront                                 refrigeration unit (1.5 HP)       (72%)
 Cost¹           18K BTU window A/C
                 $559                         $3,140

                 Total: $888

 Installation²   Designed for easy            Requires expensive                $1,500
                 installation by end users    professional installation

 Operating       Uses up to 42% less                                            Potentially
 Costs³          energy compared to a                                           $100s per
                 traditional walk-in cooler                                     year
                 refrigeration system

 Service         Customer support team        At least $150 to have a           Potentially
                 available by phone and       refrigeration technician take a   $100s per
                 email                        look; potentially more            year
                                              expensive to resolve any issues

Notes:
1. 18K BTU LG air conditioner available on Store It Cold website
2. Quote in Denver, Colorado for a standard walk-in cooler refrigeration system
   installation [quote received on 5/17/2016]
3. 41.7% energy savings when comparing a CoolBot-driven system versus a
   conventional refrigeration system for a simulated cooler. The simulated cooler
   was 250 square feet, located in Albany, and set at 41 degrees Fahrenheit. See
   page 13 of the NYSERDA report: Evaluation of the CoolBot Low-Cost Walk-In
   Cooler Concept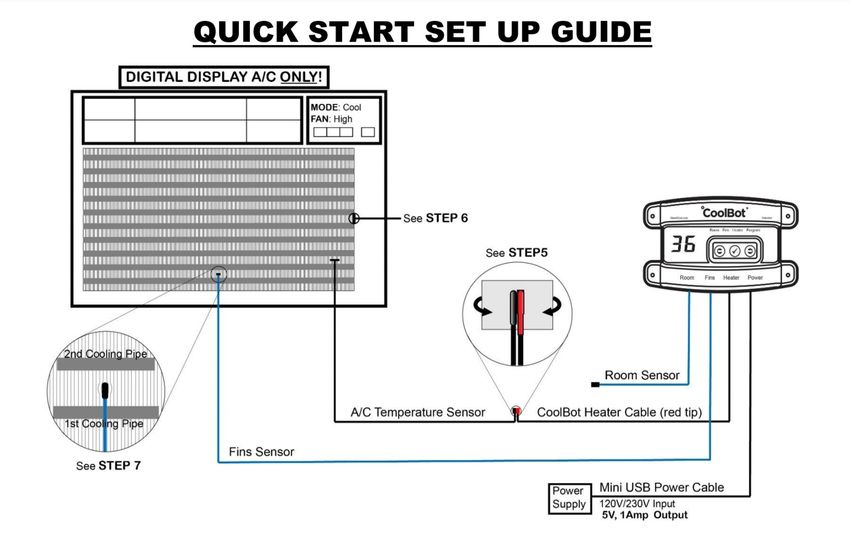
You need three things to build your walk-in cooler:

   A well-insulated room
   An air conditioner
   A CoolBot

The rest of this guide provides details about these three key components.
Where Should You Put Your
Walk-In Cooler?

If you’re building a standing cooler, as opposed to a mobile one, choosing the
location is one of the most important decisions you will make. This is especially
true if you live in a hot climate.

Just like you’re more comfortable in the shade during the middle of summer, your
cooler is much happier out of direct sunlight. This is critical for energy savings.
Coolers in direct sunlight require approximately 70% more electricity than coolers
in the shade.

For the most efficient performance, place your cooler in a protected area:

   Inside an existing building
   Under a tree
   On the north side of a barn
   Under an overhang on an existing structure

If you build an overhang for your cooler, be sure to build an openly vented roof
that keeps the sun off the insulated ceiling of the cooler.

Flat roofs on a small cooler may still be structurally sound in wind, rain, and snow
loads, but they don’t protect from sun exposure. Building a standard peaked roof
with ventilation over the insulated cooler ceiling will shade the cooler and provide
passive ventilation that will keep air circulating over your cooler and help you save
money on cooling costs.

**Note: Heat rises, which is why in a house we put twice as much insulation on the
roof as the walls. Cold air sinks, so if you keep your cooler roof out of direct
sunlight, you can put the same insulation in the roof as you did in the walls. This
will save you money in both upfront construction and long-term operating costs.

Insulation

Insulation helps you keep both your cooler temperature and your electricity bill
down. Insulation is measured by its R-value, which tells you the capacity of the
insulation to resist heat. The higher the value, the more effective the insulation.

The industry standard for walk-in coolers is R25. Going up to R30 will save you
even more money, especially if you are keeping your cooler at 40°F or below.

Recommended insulation: Rigid foam
There are several types of insulation you can use in your walk-in cooler. We
recommend using rigid foam whenever possible -- polyisocyanurate on the walls
and ceiling and extruded polystyrene on the floor.

 Polyisocyanurate                          Grey or yellow
                                           R-value of ~6.8 per inch (can vary among brands)
 Best choice for walls and                 After 5-10 years: R-value of 5.5 per inch (where it
 ceiling                                   stays)
                                           Comes in 4′ x 8′ sheets
                                           Available at Lowe’s and Home Depot

 **Use at least 4 inches. If it has foil backing, be sure it faces the outside. This product can
 be irritating to skin, so be sure to wear long sleeves when working with it.**

 Extruded Polystyrene (XPS)           Pink or blue
                                      After 5-10 years: R-value of ~6 per inch (where it stays)
 Best choice for floor                Comes in 4’ x 8’ sheets
                                      Available at Lowe’s and Home Depot

 **Use at least 4 inches in the walls.**
This guide tells you how to work with our recommended rigid foam insulation. Visit our website for information about using alternative insulation solutions, including spray-in-place foam, roxul mineral wool, and cellulose. WARNING: Do not use fiberglass batt insulation! Even with a vapor barrier, moisture seeps into the fiberglass insulation. This will create a moldy nightmare and also allow cold air to leak out, resulting in higher electricity bills. How to insulate a room This section provides tips for insulating and sealing your room. Select insulation of at least R25 When purchasing insulation, remember that the higher your R-value, the lower your electricity bill. You only purchase insulation once, while electricity is an ongoing expense. Spending a little more money upfront will save you a lot more down the road. Also keep in mind that the R-value of insulation is additive. So, depending on the insulation you use, you may need multiple layers. For example, you could use two layers of R10 plus one layer of R5 to achieve R25. Make sure your cooler is airtight Before you insulate, you’ll want to make sure your cooler is airtight. This will allow it to cool down faster and to lower temperatures, while also keep your electricity bill down by preventing the cold air from escaping. Use several bottles of spray foam and caulk to seal the following: Cracks Seams between insulation sheets Under the door (use a door sweep as well for extra seal) Every corner
Sealing around the air conditioner

 This is a common place for hot air to sneak in. For this area, we recommend using pipe
 insulation instead of spray foam. This way, if you ever need to pull the A/C unit out, you
 don’t have to carve away the spray foam.

 Pipe insulation is available at the hardware store. It’s soft and pliable, but still has a “closed
 cell” structure, so water can’t get in and air can’t pass through. Look for pipe insulation in
 6’ strips that you can cut to the size you need before stuffing it into the gap between the
 wall and the air conditioner.

Attach insulation over the studs, not in between

Tack the rigid foam up on the outside of the studs, not in between them. Cutting
up your insulation to go in between studs will not only leave gaps and holes, but no
matter how careful you are, polyisocyanurate and polyurethane will shrink a bit
over time, exposing your cooler even more.

Overlap the seams on multiple layers of insulation

If you’re using multiple layers of insulation (e.g., 2″ x 2″ layers) to achieve your
target R-value, stagger the seam locations and overlap the insulation. This will
create a more effective barrier compared with having all the seams lined up on top
of one another.

Prepare and insulate the floor

Since cold air falls, insulating the floor of your cooler traps the cold air. This keeps
your electricity bill lower and reduces the load on your A/C.

For perched floors:

Coolers built on a deck need at least as much (preferably more) insulation in the
floor as in the walls. If you build on a deck instead of a slab, you need to insulate
the floor to at least R25 (and R30 would be even better).
If you have an untreated wood floor under your cooler, you will need to put in a
vapor barrier. Here’s a method we’ve found successful:

1. Put three layers of carpenter plastic between the styrofoam and the top layer of
   plywood. As an alternative, you can use a single pond liner.
2. Stretch the plastic out into a “bathtub floor” that goes up the walls a couple
   inches.
3. Screw roof edge about 3” above the floor all the way around the wall like a
   metal baseboard, and gather the plastic under it.
4. Caulk the entire top of the roof edge so the water dripping off of the walls
   won’t slip between the plastic and the wall, pooling up under the floor.

For concrete slab and dirt floors:

Whether or not it makes sense to insulate a concrete or dirt floor depends on your
targeted cooler temperature. On average, adding a floor will increase the efficiency
of your cooler by about 15%.

 Above 45°F     Insulating the floor isn’t worth the investment.
 / 7.2°C

 Down to        If you live in a hotter region, you might want to insulate the floor, but
 38°F / 3.3°C   typically you can still reach 38°F / 3.3°C without it.

 Below 38°F     Floor insulation is required. Even just 2” of insulation makes a big
 / 3.3°C        difference.

If the concrete pad extends beyond the cooler, the pad can absorb radiant heat. In
this case, you’ll need to insulate the floor.
How to insulate the floor

Whether you’re building up on an existing trailer deck, above a basement, or on a
slab, you don’t need to frame out a floor. Simply follow this two-step process:

1. Place rigid foam directly on the floor.
2. Lay ¾” plywood painted with porch paint (or any exterior paint) directly on top
   of the rigid foam.

The plywood spreads the load out enough over the rigid foam. Even after 10 years,
your insulation will still be holding strong.

In fact, if you were to stud out your floor, you would risk decreasing the
effectiveness of the insulation, because the studs can create thermal bridges where
the cool air flows out through the less-insulated studs, between small gaps in your
insulation.

Do you need drainage?

For a cooler that will just be used for produce, you shouldn’t need to install a drain.
There likely won’t be enough water accumulating, and putting one in would just
compromise the integrity of the cooler. The only thing the drain will really let out is
the cold air!

Instead, we recommend you tilt the floor toward the door so that any water that
gathers due to condensation or dripping veggies can drain out.

It’s also important that you site your structure so the water has someplace to go
once it leaves the door. If you’re building on a trailer or a deck-type floor, this is
easy to do. If you’re pouring a new slab, build it a little bit above grade and put your
formwork a barely noticeable “off-level” toward the door.

Sheathing
Finally, you may want to install sheathing to protect the insulation. The safest
option is to put both interior and exterior sheathing on your cooler. However, if
you’re careful (and don’t have employees carrying boxes in and out and banging
them on the walls), you should be fine with just the exposed solid styrofoam
insulation.
Inner sheathing

An easy and inexpensive option for inner sheathing is oriented strand board (OSB),
which is similar to particle board. If you use this material (or untreated plywood), be
sure to seal it before installation.

Another option for inner sheathing is fiberglass reinforced plastic (FRP), which is
durable, sanitary, and easy to clean.

Outer sheathing

If you built your cooler inside an existing structure, you don’t need to sheath it. If
it’s outside, the sheathing will help protect the insulation from the sun. An
affordable way to do this is by splitting sheets of CDX plywood into 1’x8’-foot
strips to make your own overlap siding.
How to Seal Your Cooler

Proper sealing is essential for your cooler to function efficiently. This includes
sealing joints between the walls, floor, and ceiling. You should also regularly check
the gaskets on your door.

For sealing insulation, we recommend using spray foam, like Great Stuff. You can
also use weather stripping or a rubber gasket if your door doesn’t have a nice tight
seal. Other options include caulking, pool toy floaties, and the same soft foam pipe
insulation you used to insulate between the air conditioner cabinet and the walls.

The sealing step must be completed before you turn on your cooler for the first
time.

**Note: It’s important to take your time sealing the room. Even the smallest hole
can have a large impact on your cooler’s energy efficiency.
Your cooler door
The door is another essential tool for keeping the cold air in. We recommend you
use a pre-hung insulated exterior door without windows. This type of door seals up
tight.

Here are a few tips for getting the most out of your door:

   Make sure your door opens to the outside of the cooler. As you build your
   cooler, ensure that it’s slightly above the surrounding ground level so the door
   can swing freely.
   Glue another layer of 2″ rigid foam to the inside of the door, as most doors are
   only about R18.
   If you plan on hosing down your cooler, remove the bottom metal piece of the
   pre-hung door so it doesn’t create a dam for the water inside your cooler. You’ll
   also have to cut the sides of the door down so the bottom stays flush against
   the floor.
   You can add a door sweep to help seal out any drafts that may be sneaking in at
   the bottom of the door. This M-D Building Products door bottom with drip cap
   is inexpensive and effective.
   To limit cold air loss when the door opens, use plastic curtains and automatic
   door closers.
Electricity & Lighting

Because a cooler can be a moist environment, we recommend using outdoor rated
light sockets and outlets.

This is less about the fixture than about the perforations that wires make when
they come into the cooler. A vacuum effect can be caused by the warm outside air
being sucked in through the back of the outlet box by the cold cooler air. This can
result in moisture gathering, which could cause the circuit to trip.

Here’s the solution:

1. Take the cover off the outlet.
2. Find where the wire enters the back of the outlet box.
3. If there are any gaps where the wires enter the box, seal them so no air can
   move through using silicone caulk, clay, or feldspar.
4. Replace the cover.
How to Select the Right Air
Conditioner

Important: A/Cs must have digital controls to work with the CoolBot.

The CoolBot works with most standard air conditioners. The right one for you
depends on three elements:

   A/C size in BTUs
   Unit type – window unit or mini split
   A/C brand

This section of the guide will walk you through these three elements.
A/C sizing
Air conditioner size is measured in BTUs, which is a unit of heat. The chart below
shows our recommendations for A/C size based on cooler size, using a desired
temperature range for produce of 38°F / 3°C.

**Note: These A/C sizing suggestions are based on an airtight cooler with an 8’
ceiling, insulated to at least R25 and opened no more than six times per hour.

 Cooler Dimensions                                      A/C Size

 4’ x 4’                                                8,000 BTU

 6’ x 6’                                                8,000 BTU

 6’ x 8’                                                10,000 BTU

 8’ x 8’                                                12,000 BTU

 8’ x 10’                                               15,000 BTU

 8’ x 12’                                               18,000 BTU

 10’ x 14’                                              24,000 BTU

 Larger coolers may require multiple A/C units and CoolBots. Please call us for more
 information: 888-871-5723.
A/C unit type
Important: For your CoolBot to function your A/C must have a digital display.

There are several different types of air conditioners. Here’s how the different A/Cs
work with the CoolBot.

Window A/C - Highly recommended

The window unit is our preferred type of A/C because it’s durable and efficient.
Whether you’re building a standing cooler on your property or a mobile cooler to
take to market, a window unit will deliver the best performance.

Readily available in the United States, window units are also affordable and will
work even if you’re installing the A/C in an 11” thick wall.

Mini-split A/C - Recommended

If you lack the space for a window unit, or live in a country where window A/Cs are
hard to find or expensive, a mini-split will work in a pinch. In the United States,
mini-splits can cost twice as much as a window unit, but they’re also more efficient
and can confer higher energy savings.

Through-the-wall A/C - Recommended with reservations

Through-the-wall units tend to be twice the price of window A/Cs. They also seem
to have (slightly) more electrical problems -- not serious or unworkable problems,
just unnecessary annoyances. If you already have a through-wall unit, don’t
hesitate to use it. But if you’re purchasing a new A/C, you’d be better off with a
window unit or a mini-split.

Portable A/C - Not recommended

Portable A/C units bring too much warm air to the cooler, and they can only get
down to 50°F / 10°C. They’re also more expensive and consume more electricity
than our recommended units.
A/C brand
We, and our customers, have tested the CoolBot with many different brands of air
conditioners. Here are our assessments of the most common brands of A/Cs.

LG - Highly recommended

LG is our favorite brand because it’s easy to install and provides consistent
performance. Thousands of our customers use LG air conditioners. Some of them
are still running strong from 2006!

You can buy our preferred LG A/C units through Amazon via the product links
below:

   LG 6,000 BTU 115 Volt Window Air Conditioner
   LG 8,000 BTU 115 Volt Window Air Conditioner
   LG 10,000 BTU 115 Volt Window Air Conditioner
   LG 12,000 BTU 115 Volt Window Air Conditioner
   LG 15,000 BTU 115 Volt Window Air Conditioner
   LG 18,000 BTU 230 Volt Window Air Conditioner
   LG 24,500 BTU 230 Volt Window Air Conditioner

Danby - Recommended

Danby (manufactured by Whirlpool) offers great air conditioners. Any Danby model
made after 2011 will work with the CoolBot, as long as it has a digital display.
Avoid pre-2011 models due to electrical problems.

Haier - Recommended

Many of our customers have had success with Haier units. They can also be less
expensive than LG or Danby. One thing to note is that in 2010, Haier added
wording to their instructions saying that the units don’t work if outside
temperatures fall below 60°F. In our experience, this isn’t true -- these units work
great even through Canadian winters. We do recommend you avoid models
beginning with HWE.
Frigidaire - Recommended
We’ve had great experiences with most 2015 and 2016 Frigidaire models, except
the 12,000 BTU units. If you use Frigidaire, avoid pre-2015 models as well as
12,000 BTU models, and be sure to select one with automatic restart.
General Electric - Recommended (certain models only)
GE units are widely available and work well in winter, but only some are
compatible with the CoolBot. Some models have a second sensor that requires
extra steps during installation. Note that since 2013, GE units restart automatically
after a power failure.
CoolBot-compatible GE Models GE Models to Avoid
12,000 BTU Pre-2010 models
AEL12AS
AEM12AS Difficult sensors to install
AEZ12AS AEZ12AT
AEM10AT
18,000 BTU AEL24DS
AEE18DT AHH10AS
AEW18DS AEL24DQ
AEH12AT
24,000 BTU: All AHL##AS
AEE24DT All AEL##DV
AEM25DP All AEM##DT
AEW24DS
AEH24DT Too small
AEM24DQ AEW12AS
AEL12AR
AEL18DQ
Don’t see your air conditioner on this list? Visit the A/C Selection Guide on our
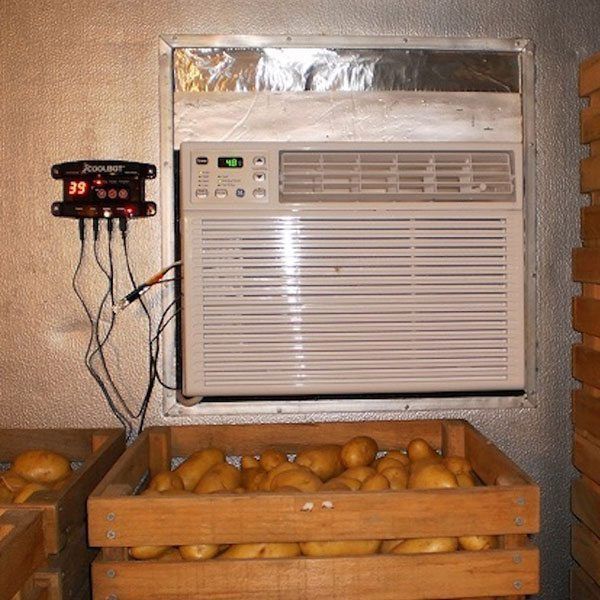
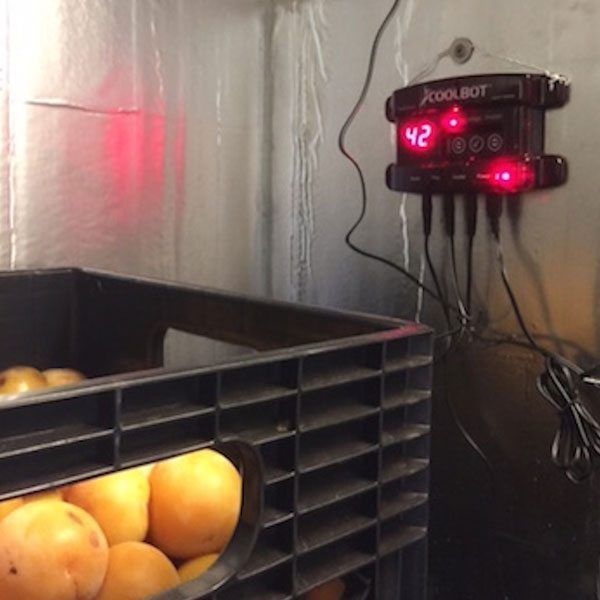
website for notes about many other brands.How to Install Your Air Conditioner Follow these three basic steps to install your air conditioner: 1. Cut an appropriate-sized hole in the wall of your walk-in cooler. 2. Put the A/C unit into the hole. 3. Use some type of insulation so that you can easily remove the A/C instead of having to carve it out in case you switch units in the future. (See the Insulation section of this guide for more information.) A/C and CoolBot placement Here are a few tips for where to place your A/C and CoolBot in your cooler. Mount it at eye level The A/C will perform at its best when it’s installed so that the bottom of the unit is at eye level. Cold air sinks, so the higher the A/C the better. This also makes maintenance a lot easier. Make sure the A/C blows down the length of the cooler If your space is rectangular, then the A/C should be mounted on one of the shorter walls so that it blows down the length of the room. For example, in a 5’ x 10’ room, mount the A/C on one of the 5’ walls. Mount the CoolBot and the A/C side by side The CoolBot should be mounted inside the cooler next to the A/C unit. For troubleshooting purposes, mount them right next to each other.
Install the A/C at a slight tilt

Install your A/C so that the back of the unit (outside the cooler) is about an inch
lower than the front of the unit (inside the cooler). This is so the condensation that
the A/C pulls out of the air can drip out the back rather than freezing inside the
unit.

Most air conditioners will keep some water at the back of the pan to help cool the
compressor and extend its life. The tilt is important so that the water doesn’t get
too far forward, where it can freeze.

**Note: Air conditioners must be level left-to-right because they’re designed with a
trough for water inside.

Allow your A/C to breathe

Air conditioners need at least 2’ of clearance overhead on the back side to vent
properly. If there’s not enough room, your unit will overheat and fail prematurely.
Check the specifications of your particular A/C to determine the exact setback
required for your model.
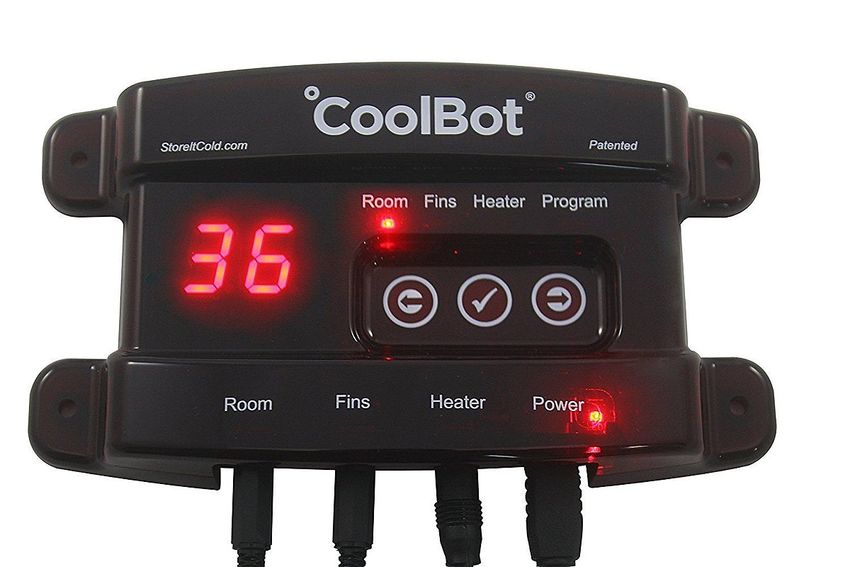
How to Install Your CoolBot

After installing the air conditioner, your final step is to install the CoolBot.

Anyone can install a CoolBot in just a few minutes! You will receive a detailed
Installation Manual with your CoolBot, and you can visit our website to watch a
short video on how to do it.

Here are step-by-step instructions for installing a CoolBot with a window A/C:

1. Plug the CoolBot into a standard outlet. The CoolBot uses no more electricity
   than a cell-phone charger, so no special electrical connections are needed.
2. Locate the three labeled wires coming out of the CoolBot:
      The wire labeled “Room” measures the temperature of the room. Let it hang
      free, but make sure it’s not making contact with any metal and is not in the
      direct pathway of the cold air coming from the A/C.
      Place the wire labeled “FIN Sensor” into the front cooling fins of the A/C
      unit. Gently place the sensor as low as possible, but ABOVE the first
      horizontal cooling tube. Use a pen or pencil to widen a space 1-2” up from
      the bottom and put the fin sensor ⅓” in so that it’s not touching the coolant
      pipes behind them. It should stay there on its own, without tape or screws.
      You may need to gently pinch the fins closed around the sensor, but be
      careful not to damage the sensor.
      Attach the wire labeled “Heater” to the A/C’s temperature sensor. The
      temperature sensor comes out of the A/C. On a new unit, the temperature
      sensor will be mounted on small plastic brackets in front of the fins. Wrap
      the CoolBot Heater wire up with the temperature sensor using a small ½” x
      1” piece of aluminum foil (included) to ensure a good thermal connection.
      Allow this foil pack to hang freely away from any metal and out of the direct
      pathway of cold air.

Program your CoolBot. The CoolBot comes pre-programmed to cool your room
down to 42°F (5.6°C). However, you can set it to whatever temperature you want.
Click here to watch a video on how to program your CoolBot.
**If your A/C has a secondary sensor or a mini-split A/C, see our website for installation instructions.
Ideal Temperatures for
Storing Common Fruits &
Vegetables

          Storage Conditions for Select Vegetables and Fruits from ATTRA

Product                            Temperature            Storage Life In Days

Apples                             30–40°F / 1–4°C        90–240

Asparagus                          32–35°F / 0–2°C        14–21

Beans, fresh                       40–45°F / 4–7°C        10–14

Beets                              32°F / 0°C             90–150

Blueberries                        31–32°F / -1–0°C       10–18

Broccoli, Cauliflower, Cabbage     32°F / 0°C             10–14

Cantaloupe                         36–41°F / 2–5°C        10–14

Carrots, topped                    32°F / 0°C             28–180

Cherries, sweet                    30–31°F / -1°C         14–21

Corn, sweet                        32°F / 0°C             4–6

Cucumbers                          50–55°F / 10–13°C      10–14

Eggplant                           46–54°F / 8–12°C       10–14
Grapes 32°F / 0°C 56–180 Lettuce 32°F / 0°C 14–21 Okra 45–50°F / 7–10°C 7–14 Onions, bulb 32°F / 0°C 30–180 Onions, green 32°F / 0°C 7–10 Peaches 31–32°F / -1–0°C 14–28 Peas, fresh snap 32°F / 0°C 7–10 Peppers 40–55°F / 4–13°C 12–18 Potatoes 40–50°F / 4–10°C 56–140 Pumpkins 50–60°F / 10–15°C 84–160 Raspberries 32°F / 0°C 2–3 Spinach 32°F / 0°C 10–14 Squash, summer 41–50°F / 5–10°C 7–14 Squash, winter 50–55°F / 10–13°C 84–150 Strawberries 32°F / 0°C 5–10 Sweet potatoes 55–60°F / 13–15°C 120–210 Tomatoes 62–68°F / 16–20°C 7–28 Turnips, Rutabagas 32°F / 0°C 120–150 Watermelon 50–60°F / 10–15°C 14–21
Are you ready to get started
with your walk-in cooler?
Buy a CoolBotYou can also read