User Manual T9 Franklin Mobile Hotspot
←
→
Page content transcription
If your browser does not render page correctly, please read the page content below
T9 Franklin Mobile Hotspot

User Manual
Contents
 Getting Started ....................................................................................................................................................................1
     Overview ................................................................................................................................................................................................ 2
       System Requirements ................................................................................................................................................................ 2
     Components .......................................................................................................................................................................................... 3
     Device Display ..................................................................................................................................................................................... 5
     Battery Management ........................................................................................................................................................................ 6

 Using Your T9 ......................................................................................................................................................................7
     Accessing the Network ..................................................................................................................................................................... 8
     Using Your T9 for the First Time .................................................................................................................................................. 8
       System Requirements ................................................................................................................................................................ 8
       Installing the LTE Nano SIM Card......................................................................................................................................... 8
       Charging the Battery .................................................................................................................................................................. 9
     Connecting to Your T9 ................................................................................................................................................................... 10
       Wi-Fi Name (SSID) and Password ......................................................................................................................................10
       Connecting to the Internet .....................................................................................................................................................11
     Using Your T9 after Setup is Complete .................................................................................................................................... 11
       Mobile Hotspot to share connections ...............................................................................................................................11
       Wi-Fi and Mobile Hotspot (http://mobile.hotspot) Security ................................................................................11
     Updating Your T9 software .......................................................................................................................................................... 12

 T9 Settings......................................................................................................................................................................... 13
     Managing Your Mobile Hotspot ................................................................................................................................................. 14
       Access the T9 Mobile Hotspot home page ......................................................................................................................14
     Home ..................................................................................................................................................................................................... 15
     Messages .............................................................................................................................................................................................. 16
       On the T9 device display ........................................................................................................................................................16
       On the T9 Mobile Hotspot Home page .............................................................................................................................16
     Settings ................................................................................................................................................................................................. 17
       Wi-Fi ................................................................................................................................................................................................18
       Mobile Network ..........................................................................................................................................................................22
       Device ..............................................................................................................................................................................................26
       Advanced Router .......................................................................................................................................................................29
     About ..................................................................................................................................................................................................... 34
     Support ................................................................................................................................................................................................. 35

 Troubleshooting ............................................................................................................................................................. 36
     Overview .............................................................................................................................................................................................. 37
     First Steps ............................................................................................................................................................................................ 37
     Common Problems and Solutions .............................................................................................................................................. 37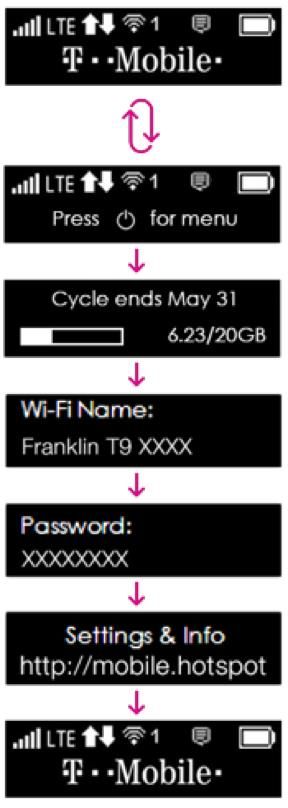
Regulatory Information ............................................................................................................................................... 39
    Regulatory Statements .................................................................................................................................................................. 40
      FCC Equipment Authorization ID: XHG-R717 ...............................................................................................................40
      Body-Worn Operation .............................................................................................................................................................40
    Safety Hazards .................................................................................................................................................................................. 41
    Trademark .......................................................................................................................................................................................... 43

Glossary .............................................................................................................................................................................. 44
    Glossary ................................................................................................................................................................................................ 45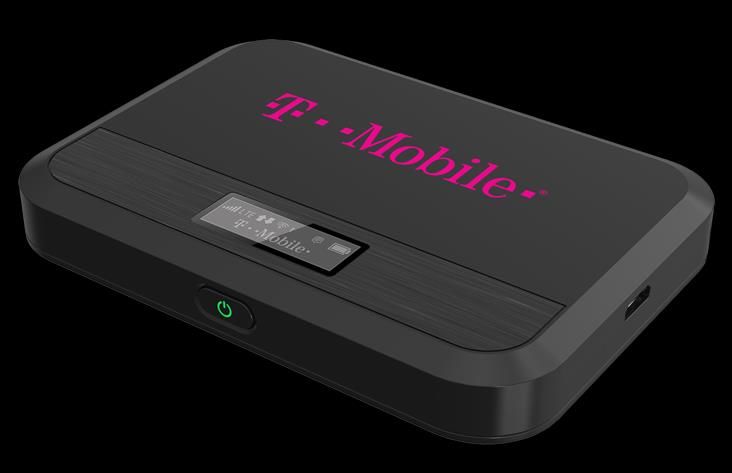
1
        Getting Started
                    Overview
                 Components
               Device Display
         Battery Management

    1
Overview
Thank you for choosing T9, LTE Mobile Hotspot!
Having the T9 at your fingertips will allow you to access LTE network for fast uploads and
downloads. You can also connect up to eight Wi-Fi capable devices to the Internet at once -
laptops, tablets, eReaders, Smartphones and more.
System Requirements
Compatible with all IEEE802.11b/g/n/ac Wi-Fi enabled devices.
Works with the latest versions of most browsers*.
* It is recommended to use the latest versions of Internet browsers. Outdated versions may not be
compatible with the T9 Web Admin User Interface, http://mobile.hotspot or http://192.168.0.1
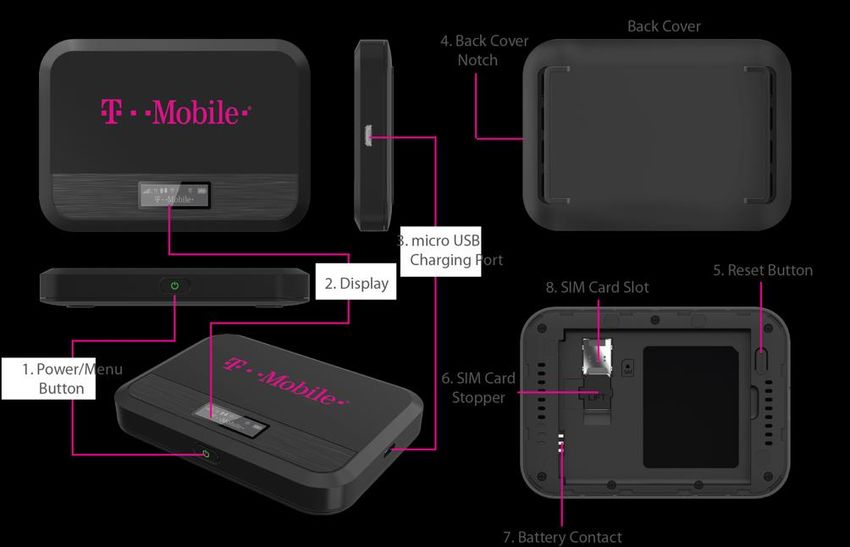
2Components
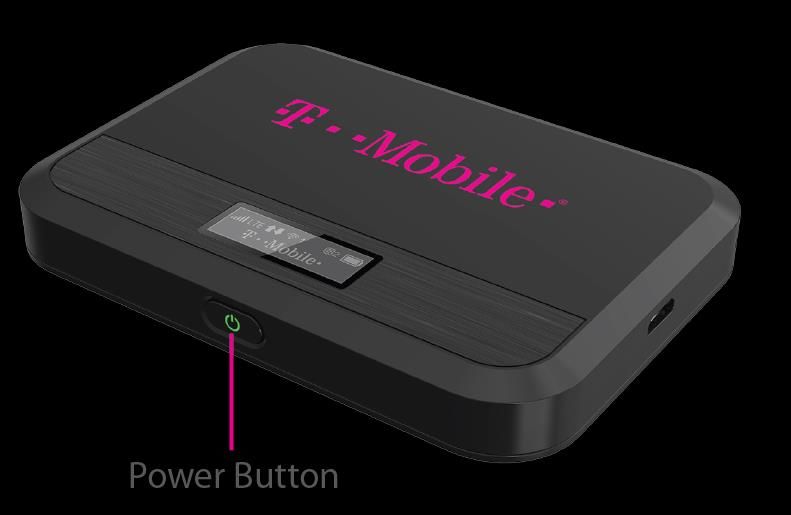
31. Power/Menu Button – Turn on/off T9. Shows device menu and information
Button Operation
Operations Actions
Turn On Press and hold the button for 3 seconds.
Press and hold the button until “Goodbye” message
Turn Off
appears.
Display When the display is off (sleep mode), the first quick press
Wake-Up of the button wakes up the display.
When the display is on, press the button quickly to go
Info Display
through the device menu and information.
LED Indicator
Colors Charging Status
Off Power off.
Solid Power off and connected to a charger.
Blinking Power on/Operating normally
2. Display – Provides device status information such as battery, service signal strength, the
number of users connected with Wi-Fi etc.
3. Charger Port – The USB charger connects here.
4. Back Cover Notch – Lift the notch to open the back cover.
5. Reset Button – To perform reset of your device, gently press and hold the button for 3
seconds, then release.
6. SIM Card Stopper – Lift the stopper to insert or replace the Nano SIM card.
7. Battery contact – Insert the battery to align with the battery contacts.
8. SIM Card Slot – The SIM card installation slot.
4Device Display
5Battery Management
Your T9 is equipped with a replaceable and rechargeable battery. It works from its charged
battery alone, or when the device is plugged into a power source.
Note: Please do not attempt to open or disassemble your hotspot and the battery pack. Doing
so may cause damage that voids your warranty.
Charge the battery with the charger provided together with your hotspot. While the battery is
charging, the battery charging icon displays.
IMPORTANT! Please use only an approved charger to charge your hotspot. Improper handling
of the charging port, as well as the use of an incompatible charger, may cause damage to your
device and void the warranty.
62
Using Your T9
Accessing the Network
Using Your T9 for the First Time
Connecting to Your T9
Using Your T9 After Setup is Complete
7Accessing the Network
Work effectively outside the home or office with the reliable broadband speed that the LTE
service provides. You can connect to the internet at speeds fast enough to keep up-to-date on
all your email correspondence, download attachments, and access your corporate intranet.
Using Your T9 for the First Time
System Requirements
Your computer, tablet, or other wireless devices need Wi-Fi capability and Internet browser
software only. Your T9 is compatible with most major operating systems and the latest versions
of browsers.
Installing the LTE Nano SIM Card
Your SIM (Subscriber Identity Module) card is a small rectangular plastic card that stores
important information about your wireless service.
If not already inserted, follow the instructions below to install your LTE Nano SIM card.
1. Remove the back cover of your device and take the battery out.
2. Lift the “LIFT” tab and slide your Nano SIM card in the SIM card slot with Wireless Carrier
logo facing up. After installation, secure the “LIFT” tab back into place.
3. Properly install the battery and put the back cover on.
IMPORTANT! Do not bend or scratch your Nano SIM card. Avoid exposing your Nano SIM card
to static electricity, water, or dirt. Whenever you insert or remove the SIM card, ensure your T9
is powered off and is not connected to any power source. Never use tools, knives, keys, or any
type of object to force the door open or to remove the Nano SIM card.
8Charging the Battery
Before using your mobile hotspot, ensure that the battery is fully charged. Be sure to use the
charger that came with your device.
NOTE: Your T9 is equipped with a replaceable rechargeable battery. When handling the battery
or SIM card, please make sure the device is not connected to any power sources. Do not use any
tools, sharp objects or any utensils when dealing with the battery. Doing so may cause damage
that voids your warranty.
It normally takes 3~5 hours, depending your power sources and device status to fully
charge the battery.
The battery discharges faster as additional devices connect to your hotspot.
Battery life depends on the network, signal strength, temperature, features, and active
connection time.
When charging, keep your device near room temperature.
Never leave the T9 in an unattended vehicle due to uncontrolled temperatures that may be
outside the desired temperatures for your device.
It is normal for batteries to gradually wear down and require longer charging time.
9Connecting to Your T9
Wi-Fi Name (SSID) and Password
You can find your Wi-Fi Name and Password any time you need. Just press the power/menu
button ( ) shortly when the display is on.
Press quickly Home screen, Device menu guide
(Switching every 3 seconds)
Press quickly Data usage display
Press quickly Wi-Fi Name display
Press quickly Password display
Press quickly Web Admin URL Guide display
Press quickly Back to Home screen
10Connecting to the Internet
1 Open the Wi-Fi application or controls on your laptop or Wi-Fi capable device that you want
to connect to your T9. Then find your T9’s Wi-Fi name.
2 Click Connect and enter the Password when prompted.
NOTE: The last four characters of your Wi-Fi Name is unique for your T9. You can change the
Wi-Fi Name of your own. See “Settings”.
Using Your T9 after Setup is Complete
Mobile Hotspot to share connections
You can use your T9 as a wireless mobile hotspot to connect to a total of eight Wi-Fi capable
devices to the mobile broadband network.
Wi-Fi and Mobile Hotspot (http://mobile.hotspot) Security
The T9 comes from the factory with security turned on. By default, Mobile Hotspot password is
‘admin’. Your Mobile Hotspot password is always the same as ‘admin’ unless you change it in
the Mobile Hotspot home page.
You can create your own Mobile Hotspot password by signing into the Mobile Hotspot home
page. After you change your own Mobile Hotspot home password, you will be required to use
the new password to sign in to the Mobile Hotspot home page.
To change your Mobile Hotspot home password:
1 Connect your Wi-Fi capable device to your T9.
2 Open a web browser and enter http://mobile.hotspot or http://192.168.0.1.
3 From the Web UI, click Settings > Device > Web Interface.
11Updating Your T9 software
New software is updated automatically in the following scenarios.
1) Every power up the device will check for a new SW update.
2) If a new update is available it will be downloaded in the background and wait to be
applied on the next power off.
3) The device must have at least 40% battery or 20% on charger to apply an update.
4) If the device is on AC power all the time and an update is available the device will
download and wait to apply the update in 48 hours between the hours of 2-4am. It also
will be updated when the device turns off.
5) If there is traffic or data activity for at least 1 minute at the 2-4am window the device will
wait until next day 2-4am window (24 hours later) to apply the update.
Update starts
Updating
Update successfully Update failed
123
T9 Settings
Managing Your Mobile Hotspot
Home
Messages
Settings
About
Support
13Managing Your Mobile Hotspot
Access the T9 Mobile Hotspot home page
You can access your Mobile Hotspot device information using an internet browse.
Access T9 Mobile Hotspot using a browser
1 Connect your Wi-Fi capable device to the T9.
2 Open a web browser on your connected device and open your home page by entering
either http://mobile.hotspot or http://192.168.0.1.
3 Enter the password and Click Login. If you entered the correct password, the Web User
Interface screen appears.
NOTE: The default password is 'admin'. On your first login, you will be directed to 'Change
password'
14Home
The T9 Mobile Hotspot home page allows you to quickly access all menu options for your T9.
Messages
Settings
About
Support
Check status of network connection and data usage on the Home page.
Disconnect: Click Disconnect to disconnect the Internet.
Reset: Reset data usage.
15Messages
Messages page displays SMS messages sent to you by Wireless Carrier.
On the T9 device display
The number of unread messages displays to the right of the message icon.
When a new message arrives, the message icon appears. A maximum of 20 messages can be
stored.
On the T9 Mobile Hotspot Home page
You can see the message contents by pressing the Messages menu on your Mobile Hotspot
home page. To delete a selected message, click the trash bin icon to the right of the message
date and timeline. To delete all messages, click Delete All Messages button.
The Message page allows you to view the message contents by pressing the Device
Messages menu on your T9 Mobile Hotspot Admin home page. To delete a selected
message, click the trash bin icon to the right of the message date and timeline. To delete all
messages, click Delete All button.
16Settings
The Settings page has the following menu options.
Wi-Fi
Mobile Network
Device
Advanced Router
17Wi-Fi
The Wi-Fi menu contains the following options:
- Basic : the basic wireless network parameters
18- Multi SSID: Select ON if you like to set up a separate guest Wi-Fi network. Your T9
will broadcast two Wi-Fi Names.
- Guest Wi-Fi: If ON is selected for Multi SSID, Guest Wi-Fi menu will appear. You can
change Guest Wi-Fi settings.
- Multi SSID Isolation: If On is selected, it prevents your devices from communicating
across the Main and Guest Wi-Fi access points.
- Allow Guest Wi-Fi users to access the Web interface: If the box is checked, users on
the Guest Wi-Fi also can access the Web User Interface.
- Wi-Fi Name: Service Set Identifier (SSID). To change it, enter a string less than 32
characters as the name for your wireless local area network (WLAN).
- Wi-Fi Password: To change, enter the new Wi-Fi password. The password needs to
be at least 8 characters long. l Privacy Separator: If ON is selected, your devices on
the same Wi-Fi Name can't make Local Area Network communication.
- Wi-Fi Band: It supports both the 2.4- and 5GHz bands of wi-fi spectrum for top
throughput. You can choose Wi-Fi Band depends on your preference.
NOTE: if you connect WLAN printer to your T9, Privacy Separator should be OFF to send
file from your PC to the printer
- SSID Stealth: If ON is selected, the Wi-Fi name won't be found by other devices
around it. You need to manually enter the Wi-Fi name and connect.
- Authentication Method: The authentication methods are described below.
Mode Description
Apply both the WPA-PSK and WPA2-PSK scheme.
WPA-PSK/WPA2-PSK
WPA-PSK is the securer version of WPA with
WPA2-PSK implementation of the 802.11i standard.
Authentication via Shared Key protocol.
SHARED
Authentication and encryption won't be performed.
There are risks that private info will be intercepted or
OPEN
network will be used by unauthorized individuals.
- Encryption Method: Select an encryption method from the drop-down list.
- Maximum Connections: Choose the maximum number of the devices which connect
to your device simultaneously. You can also click the right or left arrow to distribute
the maximum number of the connected devices between the Main Wi-Fi and the
Guest Wi-Fi.
19- Display Wi-Fi Name: If ON is selected, the Wi-Fi Name will be displayed on your
R850 device display menu.
- Display Wi-Fi Password: If ON is selected, the Wi-Fi password will be displayed on
your T9 device display menu.
- Wi-Fi Settings Reset: Click the Reset button to reset all Wi-Fi settings to the default.
- Advanced
These advanced settings should only be changed for specific circumstances. Changes to
the advanced settings could result in loss of Wi-Fi connection with your devices. Consult
your devices’ manuals for Wi-Fi specifications.
1. From the Web UI, click Settings > Wi-Fi > Advanced to view the wireless network
advanced parameters (2.4GHz, 5GHz)and the WPS settings shown in the following
figure.
- 802.11 Mode: Select an 802.11 mode from the drop-down list.
- Wi-Fi Channel: Select a Wi-Fi channel from the drop-down list.
2. Click Save Changes to save your settings.
NOTE: Default Inactive Time is 10 minutes. If the T9 is inactive for more than 10 minutes, it
is required to press the power button to connect to Wi-Fi.
20- Connected Devices
The Connected Devices menu contains the following options:
- Main Wi-Fi Devices – Normally this is the hostname of the connected device as set
on the connected device. You can use the pencil tool to change the name of any
connected device.
- MAC Address – The MAC address is a unique network identifier for this connected
device.
To Edit a Connected Device:
1. Click on the Edit. A page opens, allowing you to edit the name of the device.
2. Update the name of the device and click OK.
21Mobile Network
Manage your mobile network settings.
- Mobile Settings
1. From the Web UI, click Settings > Mobile Network > Mobile Settings. The Mobile
Settings page is shown in the following figure.
- Manage Connection Mode You Prefer: Auto Connect on or off.
- Roaming: Turn Data Roaming on or off. Turn it ON to require confirmation
before connecting to the roaming network.
CAUTION! Allowing roaming could result in additional service charges.
2. Click Save Changes to save your settings.
22- APN
From the Web UI, click Settings > Mobile Network > APN. The default APN parameters
are shown in the following figure. You can use the default APN to connect to the Internet.
You can also add new APNs.
To add a new APN, follow the steps below:
1. Click Add to access the following page.
233. Enter the related parameters as described in the following table.
Parameters Description
Type the profile name.
Name
User name is used to obtain authentication from the ISP when
User name
the connection is established.
Password is used to obtain authentication from the ISP when
Password
the connection is established.
Password Authentication Protocol (PAP) provides a simple
Auth
method without encryption for the peer to establish its identity
(Authentication)
using a 2-way handshake. Challenge-Handshake Authentication
Protocol (CHAP) is used to periodically verify the identity of the
peer using a 3-way handshake.
4. Click Save Changes to add the new APN.
Additional APN Options
- To activate the new APN, check the circle in front of it and then click Save Changes.
- To edit the new APN, click Edit, change the settings, and then click Save.
To delete the new APN, click Delete.
NOTE: The default APN cannot be edited or deleted.
- SIM
1. From the Web UI, click Settings > Mobile Network > SIM. The SIM PIN lock is disabled
by default. You can enable it by entering SIM PIN.
2. Enter the SIM PIN and press Save Changes to save your settings. The SIM Status will
be changed to Enabled. Once the SIM PIN Lock is enabled, you need to enter SIM PIN
24to connect to the mobile broadband network each time you power on your T9.
NOTE: If you enter the wrong SIM PIN three times, your SIM will be disabled
permanently until you enter the PUK code from your service provider.
- Advanced
Advanced Mobile Network Settings should only be used as directed by T-Mobile Customer
Service personnel. Certain advanced options will reset your device's connections and
programming and will require reactivation.
1. From the Web UI, click Settings > Mobile Network > Advanced to set the mobile
network advanced settings on this interface.
- Factory Reset: Click Factory Reset to reset the modem to the factory default value.
25Device
- Preferences
1. From the Web UI, click Settings > Device > Preferences.
- Device Display Timeout: Select a timeout time from the drop-down list. Your T9 display
turns off after this timeout period if there is no menu button action.
- LED Enable: If ON is selected, the LED indicator next to Your T9 display will blink when
the device is on. This LED is a power indicator that shows the device is on when the
device display is off.
2. Click Save Changes to save your settings.
- Data Usage
1. From the Web UI, click Settings > Device > Data Usage.
2. Choose Day of Month, Usage Limit and Click Save Changes to save your settings.
26- Web Interface
1. From the Web UI, click Settings > Device > Web Interface.
- Display Password: If ON is selected, the Web Interface admin password is displayed on
your T9 device display menu.
- Change Password:
- Current Password: Enter the current password.
- New Password: Enter the new password.
- Confirm New Password: Enter the new password again.
2. Click Save Changes to save your settings.
27- Backup and Restore
1. From the Web UI, click Settings > Device > Backup and Restore to access menus to
back up your device settings to your computer, restore from the backup and restore your
device to its factory default settings.
To back up your device settings to your computer, follow the steps below:
a. Click Back Up Now.
b. Click Save on the pop-up window.
c. Choose a location on your computer to save the backup file.
d. Click Save.
To restore from the backup, follow the steps below:
a. Click Choose File to select the backup file in your computer.
b. Click Restore now.
To restore your device to its factory default settings, follow the steps below:
a. Click Restore Factory Defaults.
b. Click OK to confirm the command.
28Advanced Router
Configure LAN, Firewall, and Customization settings.
- LAN
1. From the Web UI, click Settings > Advanced Router > LAN Settings to display the router
information shown in the following figure.
- IP Address: IP address for Web User Interface.
- Subnet Mask: Subnet mask for the IP address.
- VPN Pass-through: VPN pass-through must be enabled if you want to allow VPN tunnels
to pass through your device’s firewall.
- DHCP Server: Enable or disable DHCP Server function.
- DHCP IP Range: Allocate begin and end IP address for IP Range.
- DHCP Lease Time: Define how long the leased IP address will be. The new IP address
will be relocated after the IP address is expired.
- DNS Manual Mode: Turn DNS manual mode on or off.
- UPnP: Turn UPnP (Universal Plug n Play) mode on or off.
- NAT Timeout: Set TCP NAT time.
2. Click Save changes to save your settings.
29- Firewall
From the Web UI, click Settings > Advanced Router > Firewall. You may set up firewall
rules to protect your network from virus and malicious activity on the Internet.
IP Address Filtering
To set IP Address Filtering rules, follow the steps below:
1. Turn on the Firewall Switch.
2. Turn on the IP Address Filtering.
303. Click Add.
4. Enter the related parameters as described in the following table.
Parameters Description
Enter the LAN IP address
LAN IP Address
Set the LAN port
LAN Port
Enter the WAN IP address
WAN IP Address
Set the WAN port
WAN Port
Set which protocol will be used for filtering
Protocol
Set how to handle the packet if it matches with the rule
Status
5. Click Save Changes to save your settings.
31Port Mapping
To set port mapping rules, follow the steps below.
1. Turn on the Firewall Switch.
2. Turn on Port mapping.
3. Click Add.
Description
Parameters
Enter a name for the rule
Name
32Set the WAN port
WAN Port
Enter the LAN IP address
LAN IP Address
Set the LAN port
LAN Port
Set which protocol will be used for filtering
Protocol
Set how to handle the packet if it matches with the rule
Status
5. Click Save Change to save your settings.
33About
View your device's connection information, firmware information, WWAN information, Wi-Fi
details and device information.
From the Web UI main screen, click the About tab to view the available information.
34Support
Obtain support information from the Web UI Support Tab.
From the Web UI main screen, click the Support tab to view the available options.
354
Troubleshooting
Overview
First Steps
Common Problems and Solutions
36Overview
The following tips can help solve many common problems encountered while using the T9.
First Steps
1 Make sure you are using your T9 in the correct geographic region (within coverage).
2 Ensure that your wireless coverage extends to your current location by using the interactive
Wireless Carrier’s coverage map tool.
3 Ensure that you have an active service plan.
4 Restarting your computer and your T9 can resolve many issues.
IMPORTANT! Before contacting customer care, be sure to restart both your T9 and any device
that is currently connected.
Common Problems and Solutions
T9 just powered off without pressing the Power/Menu button. Why?
This may occur under Battery depletion.
To restore power, manually press and hold the Power/Menu button to turn on your T9. If the
battery is depleted, charge the battery with the AC charger provided.
IMPORTANT! If the power button will not start your T9, please try Power Reset (see How do I
perform a Power Reset on T9? below).
How do I perform a Power Reset on T9?
Using the power button: Press and hold the power button for 10 seconds until the T9 restarts.
By replacing the battery: If pressing and holding the power button for 10 seconds does not
restart the T9, open the battery cover, take out the battery and re-install the battery after 5
seconds. Put the battery cover back and turn on the T9 by pressing the power button.
37How do I perform a Reset?
Using the reset button: Remove the back cover. Make sure the battery is installed and your T9
is on. Press down the reset button for 3 seconds and release. Then, your T9 will perform the
reset and restart automatically.
How do I perform a Factory Reset?
Using Mobile Hotspot Homepage: Connect to your T9 and then open Mobile Hotspot home
page (http://mobile.hotspot, or, http://192.168.0.1). Select Settings > Mobile Network >
Advanced and Click Factory Reset.
I cannot connect to Wi-Fi after changing Wi-Fi password.
Your Wi-Fi devices save the previously used Wi-Fi names associated with the passwords used
to access the Wi-Fi name. When you change the Wi-Fi password only for your T9 and keep the
same Wi-Fi Name, the devices try to connect to your T9 using the Wi-Fi name and previous Wi-
Fi password saved, causing Wi-Fi authentication error.
I cannot access the http://mobile.hotspot.
Ensure that Wi-Fi connection is enabled on your device and that you have selected the correct
Wi-Fi name (SSID) for your T9 connection. Also, make certain that you are entering the correct
full URL address as http://mobile.hotspot. If this URL address does not work, try the IP address
http://192.168.0.1.
I cannot log into http://mobile.hotspot.
Ensure that you are entering the correct Mobile Hotspot password to sign in. The default
Mobile Hotspot login password is “admin” unless you have previously changed. If you have
forgotten your password, reset your device by pressing the Reset button next to the battery
slot.
385
Regulatory Information
Regulatory Statements
Safety Hazards
Trademark
39Regulatory Statements
FCC Equipment Authorization ID: XHG-R717
This device complies with Part 15 of the FCC Rules. Operation is subject to the following two
conditions: (1) this device may not cause harmful interference, and (2) this device must accept
any interference received, including interference that may cause undesired operation.
SAR Information
The exposure standard for your device uses a unit of measurement called the Specific
Absorption Rate (“SAR”).
SAR is the unit of measurement for the amount of RF energy absorbed by the body when using
a mobile device. Although the SAR is determined at the highest certified power level, the actual
SAR value of the device while in operation can be well below the level reported to the FCC.
This is due to a variety of factors including its proximity to a base station, the design of the
device and other factors. What is important to remember is that each device meets strict
Federal Government guidelines. Variations in SARs do not represent a variation in safety. All
devices must meet the federal standard, which incorporates a substantial margin of safety. SAR
values at or below the federal standard of 1.6 watts/kg (W/kg) are considered safe for use by
the public. This product meets current FCC Radio Frequency Exposure Guidelines. The
reported SAR value of the device is 1.58 W/kg.
Additional details at FCC website:
www.fcc.gov/oet/ea
Body-Worn Operation
Please note this important safety information regarding radio frequency (RF) radiation exposure
and near-body operation. To ensure compliance with RF exposure guidelines, the device must
be used at least 5 mm from your body. Failure to observe this warning could result in RF
exposure exceeding the applicable guideline limits.
This equipment has been tested and found to comply with the limits for a Class B digital device,
pursuant to part 15 of the FCC Rules. These limits are designed to provide reasonable protection
against harmful interference in a residential installation.
This equipment generates, uses and can radiate radio frequency energy and, if not installed and
used in accordance with the instructions, may cause harmful interference to radio
communications. However, there is no guarantee that interference will not occur in a particular
installation. If this equipment does cause harmful interference to radio or television reception,
which can be determined by turning the equipment off and on, the user is encouraged to try to
40correct the interference by one or more of the following measures:
- Reorient or relocate the receiving antenna.
- Increase the separation between the equipment and receiver.
- Connect the equipment into an outlet on a circuit different from that to which the receiver is
connected.
- Consult the dealer or an experienced radio/TV technician for help.
FCC CAUTION: Any changes or modification not expressly approved by the party responsible for
compliance could void the user's authority to operate this equipment.
NOTE: The Radio Frequency (RF) emitter installed in your modem must not be located or
operated in conjunction with any other antenna or transmitter, unless specifically authorized by
Franklin Wireless.
Safety Hazards
Follow Safety Guidelines
Always follow the applicable rules and regulations in the area in which you are using your
device. Turn your device off in areas where its use is not allowed or when its use may cause
interference or other problems.
Electronic Devices
Most modern electronic equipment is shielded from radio frequency (RF) signals. However,
inadequately shielded electronic equipment may be affected by the RF signals generated by
your device.
Medical and Life Support Equipment
Do not use your device in healthcare facilities or where medical life support equipment is
located as such equipment could be affected by your device’s external RF signals.
Pacemakers
The Health Industry Manufacturers Association recommends that a minimum separation
of six inches must be maintained between a device and a pacemaker in order to avoid
potential interference with the pacemaker. These recommendations are consistent with
the independent research by and recommendations of Wireless Technology Research.
Persons with pacemakers should always follow these guidelines:
Always keep the device at least six inches away from a pacemaker when the device is
turned on.
Place your device on the opposite side of your body where your pacemaker is implanted
in order to add extra distance between the pacemaker and your device.
Avoid placing a device that is on next to a pacemaker (e.g., do not carry your device in a
shirt or jacket pocket that is located directly over the pacemaker).
If you are concerned or suspect for any reason that interference is taking place with
your pacemaker, turn your device OFF immediately.
Hearing Devices
41When some wireless devices are used with certain hearing devices (including hearing aids and
cochlear implants) users may detect a noise which may interfere with the effectiveness of the
hearing device.
Use of Your Device while Operating a Vehicle
Please consult the manufacturer of any electronic equipment that has been installed in your
vehicle as RF signals may affect electronic systems in motor vehicles.
Please do not operate your device while driving a vehicle. This may cause a severe distraction
and in some areas, it is against the law.
Use of Your Device on an Aircraft
Using your device during flight may violate FCC regulations. Because your device may interfere
with onboard electronic equipment, always follow the instructions of the airline personnel and
turn your device OFF when instructed to do so.
Blasting Areas
In order to avoid interfering with blasting operations, your device should be turned OFF when in
a blasting area or in an area with posted signs indicating that people in the area must turn off
two-way radios. Please obey all signs and instructions when you are in and around a blasting
area.
Proper Battery & Adapter Use and Disposal
Do not disassemble or open crush, bend or deform, puncture or shred.
Do not modify or remanufacture, attempt to insert foreign objects into the battery,
immerse or expose to water or other liquids, expose to fire, explosion or another
hazard.
Only use the battery for the system for which it is specified.
Only use the battery with a charging system that has been qualified with the system per
CTIA Certification Requirements for Battery System Compliance to IEEE 1725. Use of
an unqualified battery or charger may present a risk of fire, explosion, leakage, or
another hazard.
Do not short circuit a battery or allow metallic conductive objects to contact battery
terminals.
Replace the battery only with another battery that has been qualified with the system
per this standard, IEEE-Std-1725. Use of an unqualified battery may present a risk of
fire, explosion, leakage or other hazard. Only authorized service providers shall replace
the battery.
Promptly dispose of used batteries in accordance with local regulations.
Battery usage by children should be supervised.
Avoid dropping the battery. If the battery is dropped, especially on a hard surface, and
the user suspects damage, take it to a service center for inspection.
Improper battery use may result in a fire, explosion or another hazard.
The host device shall only be connected to CTIA certified adapters, products that bear
the USB-IF logo or products that have completed the USB-IF compliance program.
42Trademark
© 2019 Franklin Wireless, Inc. All rights reserved. The information contained in this document
should not be construed as a commitment by Franklin Wireless and is subject to change without
notice by Franklin Wireless.
Trademarks and Service Marks
Franklin Wireless is a trademark of Franklin Wireless, Inc., and all other trademarks, logos, and
service marks used in this user manual are the property of Franklin Wireless or their respective
owners. Nothing contained in this user guide should be construed as granting by implication, or
otherwise, a license or right of use of Franklin Wireless or any other Trademark displayed in this
user manual without the written permission of Franklin Wireless or its respective owners.
The names of actual companies and products mentioned in this user manual may be the
trademarks of their respective owners.
Document Revision History
Revision: Rev.2.1
Date: Aug 12, 2019
436
Glossary
44Glossary
Term Definition
LTE Long-Term Evolution
802.11(b/g/n/ac) A set of WLAN communication standards in the 2.4GHz frequency band.
Bps Bits per second
Broadband High capacity, high-speed transmission channel with a wider bandwidth
than conventional modem lines.
DHCP Dynamic Host Configuration Protocol
DHCP Server A server or service with a server that assigns IP addresses.
DNS Domain Name System
Firmware A computer program embedded in electronic devices. Firmware usually
contains operating code for the device.
GB Gigabyte
Hotspot A Wi-Fi (802.11b/g/n/ac) access point or the area covered by an access
point.
HTTP Hyper Text Transfer Protocol
IMEI International Mobile Equipment Identity
IMSI International Mobile Subscriber Identity
IP Internet Protocol
IP Type The type of service provided over a network.
IP Address The address of a device attached to an IP network.
ISP Internet Service Provider
Kbps Kilobits per second
LAN Local Area Network
MAC Address Media Access Control address
Mbps Megabits per second
MSID Mobile Station Identifier
Network Operator The vendor who provides your wireless access.
Port A virtual data connection used by a program to exchange data.
Port Forwarding A process that allows remote devices to connect to a specific computer
within a private LAN.
Port Number A 16-bit number used by the TCP and UDP protocols to direct traffic.
PRL Preferred Roaming List
Protocol A standard that allows connection, communication, and data transfer
between computing endpoints.
Proxy A firewall mechanism that replaces the IP address of a host on the
internal (protected) network with its own IP address.
Router A device that directs traffic from one network to another.
SIM Subscriber Identification Module
SSID Service Set Identifier
TCP/IP Transmission Control Protocol/Internet Protocol
USB Universal Serial Bus
VPN Virtual Private Network
WLAN Wireless Local Area Network
WWAN Wireless Wide Area Network
45You can also read