SerialMagic Professional for Windows Mobile (& Power Upgrade)
←
→
Page content transcription
If your browser does not render page correctly, please read the page content below
Doc Rev 08252009-DL

 SerialMagic Professional for Windows Mobile (& Power Upgrade)
                        SerialMagic Professional Edition - Version 6.6.9.8
                      Windows Mobile / Pocket PC / Windows CE / .NET
 (SerialMagic is also available on Palm OS, BlackBerry, Symbian, Windows Mobile Smartphone, OS X, Windows,
                                               Linux X11, Zaurus)

Introduction
SerialMagic Professional will take serial data from a Bluetooth
port, or the built-in RS232 serial port of a Windows Mobile
device and enter it directly into virtually any Windows Mobile
application that can accept Key input.
This document describes how to use SerialMagic Professional
(Power Upgrade) on Windows Mobile 2005 Pocket PC.

Installation
Install SerialMagic Professional using the Windows computer that
ActiveSync software is running on, connected to the Windows
Mobile device. Then continue the installation of SerialMagic Pro
from the Windows Mobile device. When initially running
SerialMagic, you may be prompted with a message (as figure left shows.) Simply choose YES
to continue. Throughout this document we will be using a Dell Axim X51v as our example
device.
Launching SerialMagic
The first time SerialMagic is started use the Start >> Programs dialog. After this, the
SerialMagic icon may be available directly from the Start menu (depending on what other
program have been recently run). When SerialMagic is first started you should see the
SerialMagic Professional registration dialog. Please refer to
“Installation and Registration” portion of this document before
continuing.

Registration
There are two ways of Registering SerialMagic;
you can register manually by entering a license key, or
automatically via the Internet from your Windows Mobile device.

SerialMagicTM Pro for Windows Mobile                      ©2005-2009 SerialIO.com, all rights reserved.
                                                   1/39
Doc Rev 08252009-DL
Registering SerialMagic Manually
To register your software, start SerialMagic on the Windows Mobile device, and you will be
prompted with the registration screen. If the SerialMagic software was purchased directly from
Serialio.com, the registration code can be created from the Serialio.com store by logging into the
account that was used to purchase the SerialMagic software. You will need the Hardware ID
displayed in SerialMagic Registration screen to generate your license key.
Registering SerialMagic Via Web
If you purchased SerialMagic along with a barcode scanner from Serialio.com, then you can use
the “Register via Web” feature. Simply connect SerialMagic to a barcode scanner, and choose
the “Register via Web” option during the delay dialog. (You can also access the “Register via
Web” option from Menu > Registration.)

If SerialMagic detects a problem with automatic registration, you will see one of these errors:

                                                                            If you cannot resolve these issues,
                                                                            try registering the software
                                                                            manually.
                                                                            Note: SerialMagic can be run
                                                                            without the license key, by using
                                                                            Cancel option. While using the
                                                                            software in this fashion, it will
                                                                            frequently display "Unlicensed
                                                                            SerialMagic".
                                                                            Note: Choose the “Register…”
                                                                            option from the menu to open the
                                                                            Registration screen.

SerialMagicTM Pro for Windows Mobile                  ©2005-2009 SerialIO.com, all rights reserved.
                                               2/39
Doc Rev 08252009-DL

Connecting to a LaserChamp Bluetooth scanner
When you are ready to start SerialMagic, tap the Start button from the SerialMagic main dialog.
SerialMagic will then perform a Bluetooth discovery to find nearby Bluetooth devices.
Depending on the version of Windows Mobile being used, this may take several seconds.
Note: Make sure the LaserChamp is flashing/discoverable by clicking the scan button.
After discovering Bluetooth devices, tap the desired device to connect. To re-search for
Bluetooth devices, choose Menu > Discover. Shortly after your selection, you will be asked if
you want to add the LaserChamp to your device list, tap Yes.

Next, the "Passkey:" prompt should appear. Enter the
Bluetooth Passkey for the device and tap "Next" at the
bottom right of the Windows Mobile device.
LaserChamp Note: The default Passkey for the
LaserChamp and Flic barcode scanners is 0000.

SerialMagicTM Pro for Windows Mobile                 ©2005-2009 SerialIO.com, all rights reserved.
                                              3/39
Doc Rev 08252009-DL

After the Bluetooth Passkey is entered, Windows Mobile
will search for Bluetooth services supported by the Bluetooth
device. In the case of most Bluetooth barcode scanners such as
the LaserChamp, this will be the Serial port profile or Spp.
Check the "Serial Port" setting (below center) then tap
"FINISH" in the lower right of the Windows Mobile device.
SerialMagic will now be active and ready to process scans
from the LaserChamp Bluetooth laser barcode scanner.

Using LaserChamp Bluetooth Scanner To Put Data Into Pocket Excel
Once SerialMagic Pro is active on the Windows Mobile PDA or phone, and connected to the
LaserChamp Bluetooth barcode scanner, start the desired application to scan data into. In this
example Excel Mobile is used and 3 Book barcodes are scanned with the ISBN Conversion
feature of SerialMagic Pro enabled. This converts the EAN-13 Bookland codes to ISBN-10
numbers and enters them into Excel (below left). When SerialMagic is active the SerialMagic
icon at the top of the Windows Mobile display can be tapped to switch to the SerialMagic
application (below center). The SerialMagic icon in the Windows Mobile system tray can also be
used to switch to SerialMagic Pro (below right).

SerialMagicTM Pro for Windows Mobile                 ©2005-2009 SerialIO.com, all rights reserved.
                                              4/39
Doc Rev 08252009-DL

Main Dialog

From this screen you have the option to START the program
running, QUIT the application, MINIMIZE which will hide
SerialMagic (without quitting) and Grid-In-Hand (this will
bring up a grid used to input data).
Before STARTing SerialMagic for the first time, you will
need to verify that the settings are correct for your scanner as
well as for the behavior you are looking for when
SerialMagic receives a scan. Refer to “Device Setup” in the
following pages.
Status Display/Device
The main screen of SerialMagic also displays the status,
(Connecting/Reconnecting/Connected/Disconnected) and
also the name of the current or last device connected.

Menu
There are the following options from “Menu”:
Minimize
Select this option to hide SerialMagic and leave it running,
without quitting.
Register
Select this option to view the Registration screen of
SerialMagic.
Upload to iScanList
This option will upload the current list to iScanList.com
Show Registered Apps
This option is used to Show Registered Apps for the
SerialMagic API (Application Programmer Interface).
You can enable the API by turning on “Direct Data”
under Setup > Actions.
Restore Software Defaults
Selecting this option will restore all SerialMagic settings to default.
Setup Remote BlueSnap
Used to configure Serialio.com BlueSnap devices wirelessly, via Bluetooth (see Appendix).

SerialMagicTM Pro for Windows Mobile                    ©2005-2009 SerialIO.com, all rights reserved.
                                                 5/39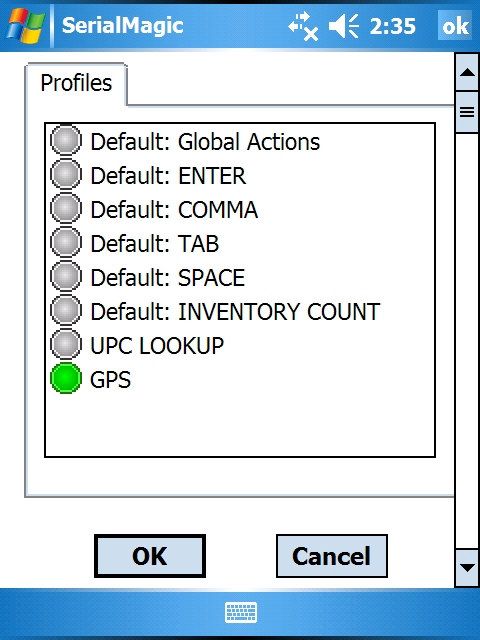
Doc Rev 08252009-DL
Setup Pneu-Logic Probe
Select this option to configure your BT probe. BT probe must be connected and SerialMagic
must be started to select menu feature. Use Tread Calibration and Pressure Calibration to
configure the default settings for the BT probe.
Terminal Lite
Use Terminal Lite to send and receive data to/from devices like a Terminal (see Appendix).
Grid-In-Hand
Brings up a customizable grid used to collect data. See
Appendix for usage.
About
Select this menu option to view software version and
copyright information.
Power Upgrade
Select this option to enter your license key for SerialMagic
Power Upgrade. The Power Upgrade can be purchased from
Serialio.com to unlock extra-powerful features in
SerialMagic. Features available to the Power Upgrade
version will be discussed throughout this document,
and denoted as such.
SerialMagic will notify you of a valid upgrade by the “Power Upgrade is successful” message.

SerialMagicTM Pro for Windows Mobile                  ©2005-2009 SerialIO.com, all rights reserved.
                                               6/39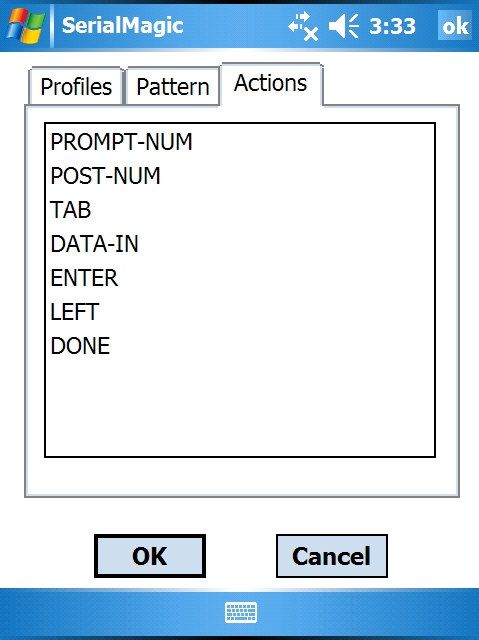
Doc Rev 08252009-DL

Setup > Device
*Always select the Device Type prior to “Starting” SerialMagic.*
Choose the SETUP menu located on the bottom left of the screen and first choose “Device…”
From this option you can pick the device type from the Device dialog.
Options include LaserChamp BT (Bluetooth), LaserChamp Tethered (Cabled), CHS7,
MS9535 (VoyagerBT), MS1633 (FocusBT), SF51, IDChamp, Pneu-Logic Probe, KDC200,
and Other. (All of these scanners are available for purchase from SerialIO.com)
Please choose the correct Device Type to ensure proper operation.
If your device is not listed, the select “Other.”

Batch Mode - *Power Upgrade Only*
Select this option to use the LaserChamp Bluetooth scanner in “Batch Mode.” This mode is used
to collect a “batch” (up to 2500) of scans in the scanner, and then download them all at once;
so DO NOT use this feature for real-time scanning. This mode is used in conjunction with the
“Batch” options located in Setup > Other Settings > Batch. SerialMagic must be “Started” and
Connected in order for the scanner to be properly setup for this option.

Notify Scans Deleted -*Power Upgrade Only*
This is purely optional. The scanner will notify by beeping once all scans downloaded/cleared.

Setup LC II batch scanner - *Power Upgrade Only*
Before you can setup the LaserChamp II Bluetooth scanner for Batch mode, SerialMagic must be
Connected to the scanner. Next, go into the Setup > Device screen, select “Batch Mode” and
“Notify scans deleted” (if desired) then hit the “Setup” button. Once the scanner has been
successfully configured for Batch Mode, you will see “Bluetooth scanner configured.”

SerialMagicTM Pro for Windows Mobile                 ©2005-2009 SerialIO.com, all rights reserved.
                                              7/39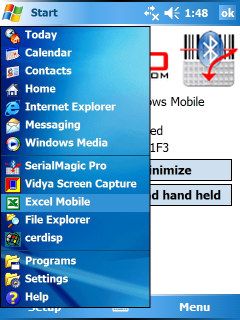
Doc Rev 08252009-DL

                                      Setup CHS 7 Scanner
                                      In order to setup a Socket CHS7 scanner with SerialMagic,
                                      first “Start” SerialMagic and get Connected. Then go to Setup
                                      > Device, and choose “Setup” as seen to the left.
                                      Stealth Mode
                                      Check this option before choosing “Setup” if you want to set
                                      the scanner in “Stealth Mode.” In Stealth Mode, the scanner
                                      operates silently.

                                      Setup KDC200 Scanner
                                      In order to setup a KDC200 scanner, first Start SerialMagic and
                                      get Connected. Then choose Setup > Device,
                                      then choose selected options. Once done choose “Setup” and
                                      scanner will be configured with selected options. When connected
                                      a battery icon will appear and show the percentage of battery life
                                      for the scanner.

Batch Mode
This mode is used to collect a “batch” (up to 2500) of scans in the scanner, and then download them all
at once; so DO NOT use this feature for real-time scanning

Ask to erase
When this option is chosen the scanner will prompt the user before easing the scans from memory
Stealth Mode
Check this option before choosing “Setup” if you want to set the scanner in “Stealth Mode.” In Stealth
Mode, the scanner operates silently.
Post Stored
When this option is chosen when data is posted it will not be automatically deleted from the scanner.
Travel Lock
Travel Lock is a feature for the KDC200 that saves battery power. (Must be Connected to enable)
    SerialMagicTM Pro for Windows Mobile                    ©2005-2009 SerialIO.com, all rights reserved.
                                                     8/39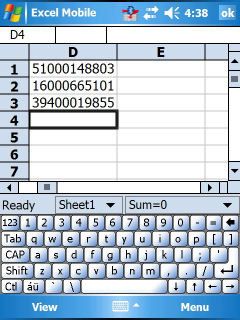
Doc Rev 08252009-DL

Setup > Connection
The connection settings option is essential for proper
working operation of SerialMagic with your scanner or
serial device.
Port
Port
This is the communications port connected to the scanner.
The built-in serial port on a Windows Mobile device (e.g.
on the bottom of the Axim X51v) should normally be
COM1.
BitRate, DataBits, StopBits, Parity, Flow Ctrl
When using an RS-232 device, it is essential to choose the
proper port parameters. These settings are only available
when using a built-in COM port or a Compact Flash (CF) based COM port.
Note: LaserChamp II tethered scanner uses these parameters 4800, 8, 1, None, None.
You can manually configure the baud-rate of the LaserChamp II by printing out and scanning the following:
http://serialio.com/download/LaserChamp_II_Control_Codes.pdf
BT Auto-on
This setting will turn on Bluetooth communication on your handheld when SerialMagic is
launched.
DTR
Data Terminal Ready is used with legacy cables and supported Bluetooth hardware connections
such as SerialIO.com's BlueSnap device.
RTS
Request to Send is used with legacy cables and supported Bluetooth hardware connections such
as SerialIO.com's BlueSnap device.
Choose new device
When using a Bluetooth device this option allows a new Bluetooth device to be selected when
SerialMagic Start button is selected. If unchecked SerialMagic will attempt to connect to the last
Bluetooth device to which it was connected.

SerialMagicTM Pro for Windows Mobile                         ©2005-2009 SerialIO.com, all rights reserved.
                                                      9/39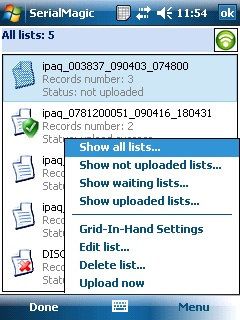
Doc Rev 08252009-DL
EnduraScan
EnduraScan options help to extend the battery life of the
handheld. Using these options extends battery life of the
handheld by controlling Bluetooth activity. (When the
Bluetooth radio is active it uses a considerable amount of
battery power).
LaserChamp Off
Choose this setting to cause the LaserChamp to fall asleep
after a certain period of time. (Must be less than Suspend
Handheld time, unless set to Never).
Suspend Handheld
Choose this setting to cause the handheld to suspend after
a certain period of time.
Auto-start on resume
This setting causes SerialMagic to auto-start after the handheld has come back from suspend.
Timed Auto-Stop
If Timed Auto-Stop is set, SerialMagic will automatically disable the Bluetooth radio of the PDA
after a certain length of inactivity. Choices are 30 sec., 1, 3, 5, 7, 10, 15, and 30 minutes.
Scanner BT off
When enabled, SerialMagic will also turn off the scanner currently connected Bluetooth radio as
well.
Active With Screen (AWS)
When Active With Screen is enabled, SerialMagic will wake-up the Bluetooth radio of the
handheld when the screen becomes active (from a button push, screen tap, phone call, etc.).
Only with Endurascan App
When selected, enables the Active With
Screen feature only when the selected
EnduraScan Application is in the foreground.
Endurascan Application
Enable this option to select an application that will activate
SerialMagic any time the application is in focus. When the
option is enabled, a list off all current applications will
appear. Select the application you would like to associate
with SerialMagic and click OK.

SerialMagicTM Pro for Windows Mobile                    ©2005-2009 SerialIO.com, all rights reserved.
                                                10/39
Doc Rev 08252009-DL
Setup > Actions
Action Settings contain configuration settings for how to
process received data. Do not alter these settings unless you
fully understand them. This screen is available from the
SETUP menu of the main screen.
Start Flag
This option is only available when a DEVICE TYPE of
“Other” has been selected. There are two selections for this
setting, STX and None. This option tells SerialMagic what
character determines the start of the data packet.
Action Byte
This option tells SerialMagic what end character to look for,
designating the END of the packet. Thus providing an
indication to SerialMagic to begin any “Actions” on the data.
Byte mode
SerialMagic is very powerful, and can be used with virtually any kind of device that outputs
ASCII data. Use this mode when the device being used does not have ‘packet markers’. For
example it just sends data without special flags showing the start and end of the ‘packet’ of data.
Packet mode
This mode should be used with virtually any device that provides ‘packet markers’ (device sends
data with special flags showing the start and end of the ‘packet’ of data). Packet mode will be
automatically enabled when using LaserChamp scanners, Socket CHS7, Metrologic MS9535,
MS1633, Intermec SF51, IDChamp, Pneu-Logic Probe, and the Koamtac KDC200 scanner.
(All of these scanners are available for purchase from SerialIO.com)
Delay on Start
When connecting to a LaserChamp scanner that already has scans in memory, this option will
provide a delay after connecting to the device in order to allow time to switch to a target
application before scan downloading begins.
Sheet Columns
This option can be used to arrange barcodes in columns in a spreadsheet. Thus a selection of the
number “3” would deliver scans to a spreadsheet (i.e. Pocket Excel) in three columns before
beginning a new row of data. Note: This option is unavailable when using Action Profiles.
ISBN Conversion
Use this option when scanning EAN-13 Bookland codes in order to have SerialMagic
Professional provide the 10 digit ISBN number to the target program.
SerialMagicTM Pro for Windows Mobile ©2005-2009 SerialIO.com, all rights reserved.
11/39Doc Rev 08252009-DL
Note that when “ISBN Conversion” option is selected the scanner must be properly configured
to support this mode. For LaserChamp & Flic scanners scan the configuration codes “AIM
IDENTIFIERS ENABLE” and “DISABLE SUPPLIMENTAL CODES.” These codes are
available at Serialio.com from the support page. When using a Socket CHS 7 series scanner, use
the Config “Configure CHS 7 scanner” option under “Setup >> Select Device…”
Direct Data
This option configures SerialMagic to send data via API (Application Programmer Interface)
when a scan occurs, instead of sending data to the keyboard cursor. For more information see
SerialMagic API page at http://www.serialio.com/support/SerialMagic/indexAPI.php
Use Action Profile & Show Hint Options
Action Profiles are a feature of SerialMagic Professional that allows you to script behaviors
(actions) that occur when scan data is received. The Action Profile Manager allows you to create
and maintain multiple Action Profiles that can be edited, changed, and made active at any time
whether SerialMagic is running or not. When you click the “Action Profile Settings” button, you
will be taken to the SerialMagic Action Profiles (SMA) manager. “Show Hint” enables tips
while creating a new profile.
Profiles
Profiles contain a list of available action profiles. There
are a number of default profiles provided when
SerialMagic is installed. These default profiles cover the
majority of basic actions that you would need to do when a
scan is received.
If a profile is selected (like Default: ENTER), a new tab is placed on the manager screen called
ACTIONS. Switch to this tab to review the actions to be performed by this profile. In the case
of “Default: ENTER”, the actions are simply to deliver the scan, “Data-In,” and then hit the
“ENTER” key. The other defaults are similar in nature, but with a different ending action
corresponding to the title. (eg. Data-In then TAB for Default: TAB, etc…) The SMAP “Default:
Prompt Length 12” will be discussed further when Patterns are discussed. Please refer to
Appendix for more information on the different actions that
are available.
In Profiles you have the option to Add, Remove, Edit, View,
Copy the profile. In each, you have the opportunity to name
the profile, provide a brief description of its purpose and also
set it to active. By setting a profile to active, you are
designating that profile as the one to run when scan data is
received. There can be only one ACTIVE profile at any one
time.
SerialMagicTM Pro for Windows Mobile ©2005-2009 SerialIO.com, all rights reserved.
12/39Doc Rev 08252009-DL
Setup > Other Settings
The Other Settings screen provides a whole host of additional
SerialMagic Professional. These options are broken down
into four areas, Common, Audio, GPS, and Batch.
Common
Log Enable / Clear
This option stores diagnostic information from SerialMagic
while running. This option should normally be set to OFF
and enabled on if requested by software supplier. Choose
“Clear” to clear the log file contents.
Maximum Size
This sets the size of the log file, 0 = never clear.
Connection Notify (Bluetooth Only)
This option allows you to configure SerialMagic to notify the user whether your scanner
connects and disconnects from your PDA. (This option is available only for Bluetooth enabled
communications.) For typical PDAs, the option of Off and Audio are only available. If your
PDA/Smartphone device supports it, there is an option to notify by vibrating the device as well.
If Vibrate is selected (or Vibrate + Audio), when connect / disconnect occurs, the device will
vibrate momentarily providing tactile feedback that the scanner has changed connection status.
Feel The Scan
This option, when checked, provides tactile feedback (PDA vibration) when a scan is received
and processed by SerialMagic. The setting allows you to choose the duration of the vibration,
up to 1 second. This option is only available on devices that can support vibration.
Start On Device Reset
This option determines whether SerialMagic automatically restarts after your PDA device has
been reset. To optionally restart, choose “Prompt” and you will be prompted whether to restart
SerialMagic Pro on a device reset.
Password Protection
This preserves SerialMagic settings, and prevents the program from being opened until the
password is entered. This feature can be used by I.T. Departments to ensure the user doesn’t
alter the software settings.
Show In Taskbar
When enabled, Show In Taskbar displays an icon in the taskbar whenever SerialMagic has been
loaded. This allows you to click the icon, and choose to Show Application to go back to
SerialMagic. When disabled, there is no visible indication that SerialMagic is running.
Disable Keys when posting
This option is enabled by default. It disables the keypad while SerialMagic is posting data and
performing actions in an action profile.
SerialMagicTM Pro for Windows Mobile ©2005-2009 SerialIO.com, all rights reserved.
13/39Doc Rev 08252009-DL
Audio
Audio on Connect / Audio on Disconnect
By default when SerialMagic is first installed, two audio files
(BTConnect and BTDisconnect) are stored in your PDA’s
(My Documents) folder. These audio files are tones that are
used by default to designate connection / disconnection of the
scanner. You can select other audio files with these options
as well (not recommended).
Audio on Scan
This option, when checked, provides additional audio
confirmation of scan data being received and processed by
playing the tone designated.
SerialMagicTM Pro for Windows Mobile ©2005-2009 SerialIO.com, all rights reserved.
14/39Doc Rev 08252009-DL
GPS
The GPS feature allows SerialMagic to post GPS LAT-LON readings and even measured
distances to any application that can receive keystroke data.
If you are using a cabled GPS device, usually COM1 is the correct port to choose. When setting
up a Bluetooth GPS device to use with SerialMagic, pick “Bluetooth” as GPS port, then tap
“Choose new GPS.” Pick your Bluetooth GPS from the list, in this example “iBT-GPS”. After
the GPS is selected, SerialMagic will remember it. When you want to use the GPS functionality
of SerialMagic tap “Start GPS Listener” or “Start listener at startup” can be used to start the GPS
Listener whenever SerialMagic starts. “Clear Last GPS Read on Start” does just that, clearing
the last GPS reading upon Start.
Note: The GPS Listener is named this way as it listens to the GPS to collect coordinate
information (normally at least one reading per second). The GPS Listener only listens to the data
coming in, in order for the data to be posted to your application; you must have a SerialMagic
Action Profile (SMAP) that uses GPS Actions. See Appendix: Example of GPS Action Set.
SerialMagicTM Pro for Windows Mobile ©2005-2009 SerialIO.com, all rights reserved.
15/39Doc Rev 08252009-DL
Batch - *Power Upgrade Only*
In order to use of the options under Setup > Other Settings > Batch, you must have a supported
Batch scanner. Supported scanners include the LaserChamp II Bluetooth, and KDC-200.
Make sure that your scanner is properly configured for Batch mode first. (See Setup > Device)
Auto-clear scans
Scans will be removed from scanner once downloaded.
Set scanner clock
Scanner’s internal clock will be set to PDA System Time.
Put timestamp
Time/Date stamp will be captured along with barcode scan.
Scanner BT off
Scanner Bluetooth will automatically turn off after download.
Write CSV files
SerialMagic will store downloaded data in CSV format.
Days to keep CSV files
SerialMagic will delete stored CSV files that are over “7 days” old (for example).
iScanList.com - *Power Upgrade Only* / iScanList.com Account required
iScanList is a new service from Serialio.com! Download scans from a Batch scanner and have
them automatically emailed to the email address of your choice! Ask sales@serialio.com
Send Column Header – The CSV file emailed to iScanList email account will contain column headers.
See an example of iScanList.com in action: iScanList in Action - Attendance and Security
SerialMagicTM Pro for Windows Mobile ©2005-2009 SerialIO.com, all rights reserved.
16/39Doc Rev 08252009-DL
DB
Allows for CSV files and SQL databases to be opened and viewed. Allows option to upload list
to email, or FTP server via the iScanList.com interface.
Open CSV
Will bring up a file browser of your device to choose what file
to open with SerialMagic.
Back, Next, Go To
These options allow for navigation between the rows of your
CSV file or SQL database. Go To option works by filling in
the number of the row to the right of the button and then
selecting Go To.
Load SQL
Will bring up a file browser for your device to choose what
SQL database to open with SerialMagic.
Load Last used
Option will upload the last CSV file or SQL database used (if able to be found).
Send only modified
Option will send upload only modified records.
Auto-Width
Adjusts the width of the columns to fit appropriately with in viewing screen.
Setup > Run Wizard
Wizard allows for a simple set up with SerialMagic and your scanning device. Follow the
screens will guide you through a set up process according for your use of SerialMagic.
SerialMagicTM Pro for Windows Mobile ©2005-2009 SerialIO.com, all rights reserved.
17/39Doc Rev 08252009-DL
Appendix
Setup Remote BlueSnap
SerialMagic provides the capability for configuring of a BlueSnap Bluetooth RS-232 module via
a Bluetooth connection. This is great for configuring a BlueSnap module, for use with legacy and
other RS-232 devices, when a computer with RS-232 serial port and null-modem cable are not
available, or inconvenient to use.
The following gives a step-by-step example of how to Setup Remote BlueSnap.
Start the BlueSnap configuration from the main SerialMagic Pro dialog by choosing
Menu > Setup Remote BlueSnap. Be sure the remote BlueSnap is in Slave mode
(the default mode), has power enabled, and is NOT Bluetooth connected (blinking).
SerialMagicTM Pro for Windows Mobile ©2005-2009 SerialIO.com, all rights reserved.
18/39Doc Rev 08252009-DL
Once discovered, select the BlueSnap device you would like to configure, then cycle the power.
(Turn it OFF and then turn it back ON).
SerialMagic will then display the current configuration of the remote BlueSnap device.
To change one of the settings, select the parameter you would like to change, and select the
desired value from the drop-down menu, or input the value in the field.
Settings that have been changed will be displayed in red.
When you are done configuring the device, click OK to save the changes.
SerialMagicTM Pro for Windows Mobile ©2005-2009 SerialIO.com, all rights reserved.
19/39Doc Rev 08252009-DL
Terminal Lite
The Terminal Lite feature can be used to communicate with devices by sending and receiving
data. (See the example on the following page using Terminal Lite to communicate with a scale.)
The interface here is very similar to a terminal application. If SerialMagic is not connected to a
device, you will see the “Start” button. Click Start to initiate the connection. SerialMagic will
begin to look for a connection based on the parameters set under Setup > Connection.
Terminal Lite - Control View
There are options for creating and sending command data, and a window for received data.
There are a few built-in commands; “Hello” sends the data “Hello!” followed by a CR.
Name - To add new commands to the list, type a Name for the
command, then define the data to be sent in the Data field. Then
click Save (Save button not pictured).
Data – This will be the data sent to the connected device.
HEX - To send commands as Hexadecimal data (HEX).
CR - To send the command followed by CR (carriage return).
Start / Send – Choose the Start button to initiate the connection. Once connected, the button will
change to Send. Choose Send to send the specified command to the connected device.
On Select – Choose the On Select option to have the command sent automatically after choosing
it from the list, without having to hit the “Send” button.
Params – Select “Params” option for a command, if the command has a standard command
portion, and an additional parameter that may change. Example: “SM,1” SM,2” SM,3” etc.
SerialMagicTM Pro for Windows Mobile ©2005-2009 SerialIO.com, all rights reserved.
20/39Doc Rev 08252009-DL
Assign
Once a command has been defined, you can use "Assign" to attach the command to a button.
(So that when you hit the button, (example: “Down arrow”) SerialMagic will send the specified
command. Select the command you wish to assign to a button on the handheld, and choose
"Assign" to open the button assignment screen. Click "New" to add a new assignment.
Next, select the command from the list, and hit the button on the handheld that you want to
assign the command to.
Once the command has been assigned to a button, tap OK, then Done.
Now from this point on, anytime the button in pushed, SerialMagic will send the command.
This is especially handy because you do not need to be in the “Terminal Lite” window for this to
work! Just leave the Terminal Lite window by launching another application, such as Excel.
Once connected to a device that is transmitting data,
received data will appear in the text box at the bottom.
Save – Select this option to Save a newly created command to
the command list, or to save changes made to an existing one.
Remove - To remove a command, select the command from
the list and select Remove.
Clear – Clears the Command fields (Name, Data, etc.)
HEX - To print received data in Hexadecimal format, select
the HEX button at the bottom-right.
SerialMagicTM Pro for Windows Mobile ©2005-2009 SerialIO.com, all rights reserved.
21/39Doc Rev 08252009-DL
Control View Menu Options
(Change to) Full View – Select this option to switch from
“Control View” to Full View, which has a larger window for
incoming data.
Data Clear – Clears the incoming data window.
File list – Terminal Lite can send entire files if desired.
Select this option to add files to the “Send File list.”
Send file – Select this option to see a specific file. Note: you
must have a command Name defined first, to send a file.
Terminal Lite Full View
“Full View” has a larger window for incoming data, and a simple
drop-down menu full of commands. This view would be used after
all commands have been defined.
(Change to) Control View – Select this option to change back to
Control View.
HEX – To receive incoming data in Hexadecimal format.
Command Clear – Clears the command menu.
File list – Terminal Lite can send entire files if desired.
Select this option to add files to the “Send File list.”
Clear – To clear the incoming data window.
Send file – Select this option to see a specific file.
Note: you must have a command Name defined first, to send a file.
SerialMagicTM Pro for Windows Mobile ©2005-2009 SerialIO.com, all rights reserved.
22/39Doc Rev 08252009-DL
Terminal Lite Example
This example outlines how to use SerialMagic Professional, along with a BlueSnap RS232
Adapter, to capture readings from an RS232 scale directly to an Excel spreadsheet on Windows
Mobile 5. This is just one example of the power of SerialMagic; there is a multitude of
applications possible.
Here are the main components of this setup:
1) A Scale measuring weight, using an RS232 output for the data.
2) BlueSnap RS232 adapter to take the RS232 data and transmit it is as a Bluetooth signal.
3) A Dell Axim X51v device with Bluetooth, running SerialMagic Professional software.
4) "Terminal Lite" configured to send the "Read" command to the scale by the push of a button!
5) The Excel spreadsheet, which is open on the Dell Axim X51v, to capture the incoming data.
First, you will need to configure the BlueSnap RS232 Adapter to have the same Baud settings of
your RS232 scale. The easiest way to configure the BlueSnap is remotely, via Bluetooth, using
SerialMagic's Setup Remote BlueSnap (available from Menu).
Next, determine what key command is necessary to get a reading from the scale.
Example, when you send the "W" key, the scale replies with the weight "04.810" etc.
Now, launch SerialMagic Professional on your PDA/Phone.
(In this example we are using a Dell Axim X51v).
Go to Menu > Terminal Lite.
If SerialMagic is not yet connected to the BlueSnap, you will be notified.
SerialMagicTM Pro for Windows Mobile ©2005-2009 SerialIO.com, all rights reserved.
23/39Doc Rev 08252009-DL
Now, define the command to send to the scale. In this example, when we send the scale "W"
it replies with the weight. Enter "Get Weight" for the command Name, and enter "W" for
the Data. Also select "CR" to send a at the end of the data (this is common), then Save.
Now that the command has been defined, "Assign" the command to a button on the Axim X51v.
Click on "Assign" to open the button assignment screen. Click "New" to add a new assignment.
Next, select the "get weight" command from the list, and hit the button on the Axim X51v that
you wish to assign the command to.
Once the command has been assigned to a button, tap OK, then Done.
Now test the new Command/Assignment. Tap "Start" to start SerialMagic and connect to the
BlueSnap. Once Connected, hit the assigned button. You should see the weight reading returned
in the text box below. Place another item on the scale and hit the assigned button again to receive
the next reading.
SerialMagicTM Pro for Windows Mobile ©2005-2009 SerialIO.com, all rights reserved.
24/39Doc Rev 08252009-DL
Now that you have verified that SerialMagic is properly configured to get readings from the
scale, click the OK button. Launch Excel (Start > Excel Mobile). Open a new spreadsheet, place
your cursor where you want the scale data to go, and hit the assigned button!
The weight reading goes directly into Excel! Now place another item on the scale...
This is just one example of using SerialMagic Professional's "Terminal Lite" feature.
You can apply this to a number of different devices, capturing data to virtually any application!
SerialMagicTM Pro for Windows Mobile ©2005-2009 SerialIO.com, all rights reserved.
25/39Doc Rev 08252009-DL
Grid-In-Hand
Grid-In-Hand is a customizable grid for use with SerialMagic data input. This application has the
ability to run in the background on the handheld while the user scans data. The user then also has
the ability to choose to upload them to to email or FTP server via the iScanList.com interface.
Grid-In-Hand is customizable to the users specifications and needs. Click on the GIH Menu in
the right hand corner and see all the options of GIH. To customize the grid choose “Grid-In-
Hand Settings”. The new screen presents you with different options for the grid you wish to
create.
Auto-Width
When selected the grid will automatically expand to fit the
size of the largest entry in the column.
Show grid on SM start
When selected this option brings Grid-In-Hand to focus
when SerialMagic started.
Show grid when SM in focus
When selected this option brings Grid-In-Hand to focus
when SerialMagic is maximized or leaves another open
application.
Show post notification when GIH is hidden
When selected SerialMagic will display a pop up notification
of the scans being placed within the grid.
SerialMagicTM Pro for Windows Mobile ©2005-2009 SerialIO.com, all rights reserved.
26/39Doc Rev 08252009-DL
Auto-save
This option will automatically save you list after the given time period.
Edit columns
Choose this option to add, delete, name, and order the columns in the grid.
Below shows the column editing screen. Using the menu, all the column options are listed. All
but the 'Add column' option need a column to be selected(highlighted) before a option may be
chosen. The pictures below take you through adding an additional column to the grid.
Once you have to chosen to add an additional column form the Edit columns menu, you enter a
name for the column you wish to add. By default it will be named column and the current
number of columns there are. Once entered the new column will be displayed in the Edit column
screen and then in the main Grid-In-Hand screen as well.
SerialMagicTM Pro for Windows Mobile ©2005-2009 SerialIO.com, all rights reserved.
27/39Doc Rev 08252009-DL
Then once you are done scanning you can choose to save the list and/or upload to iScanlist.com.
By choosing the upload option it will directly upload.
Grid-In-Hand Menu
Add row
will add an additional row to the grid.
Remove row
Will removed the selected row from the grid.
Save list
Will save the current list for future use. Use Grid-In-Hand
manager to locate the list.
SM view
Will take you back to the SerialMagic main dialog.
Hide
Will minimize Grid-In-Hand.
Quit
Will exit the Grid-In-Hand application.
Grid-In-Hand manager
Using the menu options you can choose which lists you would like to select from. Then with
each individual list you have the options to edit, delete or upload to iScanList. To choose one of
these options you must first highlight the list and then choose the corresponding menu option.
The “Done” menu option will return you to the main Grid-In-Hand screen.
SerialMagicTM Pro for Windows Mobile ©2005-2009 SerialIO.com, all rights reserved.
28/39Doc Rev 08252009-DL
SerialMagic Action Profiles (SMAPs)
"SerialMagic Actions Profiles" are optional actions that can be performed based on the data
received. For example after scanning in data, SerialMagic Actions can be defined to
automatically add an ENTER after scan, perform a lookup on the data in a spreadsheet or some
other processing function.
For Actions to work the input data must have a Carriage Return (CR) 'marker' to signify the end
of the data packet. Virtually all barcode scanners (e.g. LaserChamp and Flic scanners) and scales
that output ASCII data are designed with such a feature. Note: with some SerialMagic OEM
developer options data packet end markers other than CR may be available.
In the Actions editor, you can tap-and-hold anywhere on the actions screens to choose to Add an
Action, Add a Pattern, Edit an existing action or Delete an action entirely. When adding, the
selected action will be added at the end of a list of actions. If you wish to insert an action
between existing actions, tap-and-hold the line you wish to insert, AFTER, and the selected
action will be added after this line.
There are numerous profiles provided by default in SerialMagic. These default profiles provide
basic functionality (such as hitting after a barcode is entered). These default profiles
can be reviewed and selected but not edited or removed. If you wish to extend the functionality
of a default profile (or any created profile for that matter), you can simply COPY the profile to
another name, and can modify this profile to fit your needs.
Another special default profile that is available is Default: Global Actions. This default profile
has the unique characteristic that if enabled (turned on), will always run and before any other
ACTIVE profile. Tap-and-hold on Global and select ON to enable Global Actions.
If enabled, the radio button next to the option will be colored BLUE.
Actions
DATA-IN
This action posts the scanned barcode into the application.
KEY
Send an individual key. With this action you can send compound
keys such as , , etc…
TEXT
Allows for entry of specified text. When inserting this action,
you will have the option of sending a string of text.
DELAY
Insert a timed delay or pause. When choosing this option, there
will be an option to select the number of seconds for the delay.
Range is 0.10s to 10secs.
SerialMagicTM Pro for Windows Mobile ©2005-2009 SerialIO.com, all rights reserved.
29/39Doc Rev 08252009-DL
CLIP
This option allows you to clip a number of characters at the beginning, end, or both beginning
and end of barcode.
POST-DATA
This action will send the data to your application. If a CLIP action was issued prior to POST-
DATA, the resulting barcode is sent. (Data-In always sends the original unmodified barcode.)
DATE-TIME
This action will post the System Date or Time to your application. If you wish to post both the
Date and Time, simply add two DATE-TIME actions, one for Date and one for Time.
FOCUS
This action will direct SerialMagic to bring the chosen application to the foreground. This
allows a scan to be sent to a specific application rather than simply where the cursor is.
PROMPT-NUM
This action pauses your action profile with a dialog box requesting input of some number. This
would typically be used (in concert with POST-NUM) to register a count along with a scan, and
is primarily to be used for inventory where a scan could prompt for “Quantity of Item”. There
are two buttons available at the prompt: The PAUSE button will pause the prompt for 15 sec and
then return. This will allow the time to switch to another application (if needed) before posting
data. Discard will simply discard the data and not run any additional actions until more data (the
next scan) is received.
COUNT-BY-SCAN
This action is useful for inventory counting. Each time a barcode is scanned, SerialMagic will
display the COUNT-BY-SCAN window. It includes a message specified by the user (such as
“Item Number”), the barcode scanned, as well as a counter. The counter will increment each
time the same item is scanned. So if you scanned item number “12345” seven times in a row,
the window would display “Item Number” “12345” and “7.” To post the barcode and quantity
data to the application in the background (such as Excel), use “DATA-IN” to post the barcode,
and “POST-NUM” to post the quantity (and generally a “KEY: TAB” action to separate them.)
POST-NUM
This action will post the result of a PROMPT-NUM request. Note if no entry is made into a
PROMPT-NUM, then the default number posted is “1”.
PROMPT-READ-SCAN
This action gives the user the ability to scan a barcode right into a Prompt, and have that data
saved for posting later. You can describe the kind of data it is (Serial Number, Model Number,
etc.) by “Identifying” it. Then, later on, the user can have the data posted using the
“POST-SCAN” action and instructing SerialMagic to post a specific “Identified” data type.
POST-SCAN
Use this action to post data stored from the PROMPT-READ-SCAN action.
SerialMagicTM Pro for Windows Mobile ©2005-2009 SerialIO.com, all rights reserved.
30/39Doc Rev 08252009-DL
PROMPT-TEXT
This action causes a Prompt to appear each time a barcode is scanned, with a specified message,
and a field for entering text by the user. For example, scan an item and use PROMPT-TEXT to
prompt for “Condition of Item” then the user can enter the condition as “Good” “Bad” or “Fair”
using the keypad. The text entered by the user can then be posted to the target application
(Excel, etc.) using the “POST-TEXT” action.
POST-TEXT
Use this action to post the data entered by the user during the PROMPT-TEXT.
SET-DATA / GET-DATA / REMOVE-DATA
These three actions work as a data storage mechanism. If for example, you wanted to capture a
Part Number of an item, and save it to be posted at another time, use the “SET-DATA” action to
“Save” the data, with “Marker” set to “Part Number.” To retrieve the data from memory, simply
use the “GET-DATA” “Part Number” action, and then to post the data, use the “POST-DATA”
action. To remove the stored value for “Part Number” use “REMOVE-DATA”: “Part Number”.
POST-DATA-SMS
Action will send a SMS message to the entered recipient. Option to prompt for text to be entered
before and after the scan that will also be sent with the scan in the SMS message.
WEB-IE
This action is used to launch the Pocket Internet Explorer browser on your Window Mobile
device. This action allows you to select a URL to navigate Pocket IE to, and then will append
the scanned data after the URL. The “After Scan” prompt allows you to enter a string of text
after the barcode. Example: URL: http://www.lookatme.net&id=?lookup=yes. In
this case the URL would be “http://www.lookatme.net&id=” data would be “ and
After Scan would be “&lookup=yes”
DONE
This action immediately stops your action profile from executing any more instructions. This
action is useful when multiple Pattern Actions are evaluated, and you wish to stop checking for
other patterns. Option for DONE is: “DONE unless ___ sec since last post”. This allows
SerialMagic to process duplicates if they occur some value of time after the previous data post.
SET-ACTIVE-SMAP
This action allows an action profile to select another action profile to set active. This can be
useful in changing what actions are to be run under different conditions WITHOUT having to
change which profile is ACTIVE manually. This is used in the Default: Global Settings profile
to allow the user to scan a barcode to choose an active profile, without having to go into
SerialMagic to change the active profile.
HIDE-SOFT-KEYPAD
This action will tell your PDA’s soft keypad (usually displayed at the bottom of the PDA screen)
to hide.
SerialMagicTM Pro for Windows Mobile ©2005-2009 SerialIO.com, all rights reserved.
31/39Doc Rev 08252009-DL
GPS-READ-LOCATION
This action tells SerialMagic to take a GPS reading from a GPS receiver connected to the PDA.
GPS-POST-LOCATION
This action will post the last GPS reading that was taken by SerialMagic.
Posting format can be GPS (34d 26.104' N, 119d 50.226' W)
or decimal (34.436122 -119.839461).
GPS-CALC-DISTANCE / GPS-POST-DISTANCE
These actions will calculate the distance between the last two GPS readings, then post the result.
CLIPBOARD-COPY
This action will copy the text in the selected field to the system clipboard.
CLIPBOARD-MOVE-RELATIVE
This will move the keyboard cursor a specified number of cells based on the Clipboard data.
Example, if Clipboard data is “R1L4U2D3” cursor will move Right 1, Left 4, Up 2, Down 3.
DEVICE-ID-POST
This action will post the Device ID of the connected device. You can choose to have
SerialMagic post the Bluetooth Address or Friendly Name.
TAP-AT
Use this action to have SerialMagic “Tap” a specific location on the screen. You must enter the
X,Y coordinates of the specific location on the screen. The coordinates can be found by taking a
screenshot of the screen and using an image tool on the PC for mapping.
EXIT
Stops processing of the current action list. If an EXIT is encountered in a secondary SMA list,
(such as in a Pattern action) SerialMagic will return to the primary list and continue executing
the SMAP. If Exit occurs in the main action list, EXIT stops SMA processing immediately.
MARK
Used to select data. Has following options
Select current word – self-explanatory
Mark start location – starts the selection
Select range – selects text in the current field using the specified range
Select all – selects all text in the current field.
AUDIO
Play the specified audio file.
SerialMagicTM Pro for Windows Mobile ©2005-2009 SerialIO.com, all rights reserved.
32/39Doc Rev 08252009-DL
DB-POST-MATCH*
SerialMagic will search the specified Lookup Field in the selected Database Table, for the data
that was scanned. If the data is found, then SerialMagic will post the record that corresponds to
that data, from another field in the table.
DB-PROMPT-CHECKIN
When using SerialMagic for a ticket check-in system, this action will prompt the user with the
ticket information when the ticket has already been scanned and input into the check-in system.
DB-IMPORT-CSV
SerialMagic will import a CSV file to the database located in Other Settings > DB.
SEND-DATA
In devices requiring a handshake before data transmittal, this action has SerialMagic send a
corresponding signal to the given application to initiate the handshake process.
GIH-GOTO-CELL
SerialMagic will post data into Grid-In-Hand given by the cell indicated.
GIH-SET-COLUMNS
When posting into Grid-In-Hand this profile will name the columns in the grid by what is given
in the profile.
Patterns
Adding a pattern (Pattern Action) will instruct SerialMagic to look at the incoming data for the
pattern designated. When you add a pattern, notice that the ACTIONS tab will change to
PATTERN and a new ACTIONS tab will be added to the right of PATTERN. This allows you
to dictate a separate list of actions associated with scans that “fit” the pattern defined.
LENGTH
This pattern action will look at the length of the data scanned and match it to your selection
criteria. If it matches this criterion, all Actions for that Pattern will be executed. See example to
follow.
MATCH
This pattern action will inspect the received data at a specified position and compare it to the
characters that you entered. If the characters match, then the actions associated with this pattern
will be run. For example, if a barcode for a packing slip barcode starts with a “PK”, then you
could configure a pattern to look for “PK” at the beginning of a code and perform different set of
actions based on your requirements for packing slip processing.
DISTANCE
The Distance Pattern is used in conjunction with the GPS-READ-LOCATION Action.
SerialMagic will calculate the distance between the current location and the last GPS reading,
and if the distance meets specified parameters (e.g. > 10 meters) then the corresponding actions
will be executed.
SerialMagicTM Pro for Windows Mobile ©2005-2009 SerialIO.com, all rights reserved.
33/39Doc Rev 08252009-DL
DEVICE ID
The Device ID Pattern examines the Device ID of the source of incoming data. If the Device ID
of the source matches the Device ID specified by the user, then SerialMagic will execute the
corresponding actions.
CLIPBOARD-MATCH
The Clipboard-Match Pattern compares the incoming data to the current item in the clipboard. If
the two items match, SerialMagic will then execute the subsequent actions.
FILTER-DUPLICATE
Will occur when the scan data is the same as the previous scan data. Can be used e.g. to allow
posting of only new data from RFID reader (that provides multiple streams) when tag is in view.
LAST-ACTION-TIME
This pattern examines whether a specific SMA has occurred within the specified time. If so,
then SerialMagic will execute those actions attached to the pattern.
ACTION-OCCURRED
This pattern examines whether a specific SMA has occurred at all within the session. If so, then
SerialMagic will execute those actions attached to the pattern.
DB-LOOKUP*
Search the specified Database Table for the scanned data. If found, specified actions will occur.
GIH-FIND-FIRST
This pattern will search within the the Grid-In-Hand spreadsheet for the first occurrence of the
data pattern and preform the specified action.
SerialMagicTM Pro for Windows Mobile ©2005-2009 SerialIO.com, all rights reserved.
34/39Doc Rev 08252009-DL
Example of Length Pattern Action
The following example outlines the behavior in the default profile, “Default: Prompt Length 12”.
As may have been surmised by the title, this action profile is expected to prompt for some
information based on data received (barcode) that are 12 characters in length.
In this profile, SerialMagic will look to evaluate data received
and look for data that is exactly 12 characters in length. If a
barcode IS NOT 12 characters in length, then the rest of the
actions will be run. In this case, the rest of the actions are simply
to enter the data into your application and hit the ENTER key.
This default profile is intended to function with a spreadsheet
such as Excel Mobile. The actions applied will work for any
application.
In the case where the data is exactly 12 characters, the “Prompt-Num” action prompts for
quantity, followed by “Post-Num” which posts the result of “Prompt-Num.”
Here are the results of scanning a barcode that is 12 characters long, such as “123456789012.”
SerialMagicTM Pro for Windows Mobile ©2005-2009 SerialIO.com, all rights reserved.
35/39Doc Rev 08252009-DL
Example of Filter-Duplicate Pattern Action
The following is a simple example of using the Filter-Duplicate pattern. In this example,
SerialMagic first looks for a Duplicate scan (2 of the same exact barcode scans in a row). If
SerialMagic recognizes the scan as a duplicate, it simply says “Done” (and does nothing) unless
it has been at least 60 seconds since the last time it posted data. If it has been at least 60 seconds
since the last scan was posted, then it will complete the action profile, which is DATA-IN, then
ENTER. In the case that the scan is NOT a duplicate, SerialMagic will skip the Filter-Duplicate
Pattern, and just performs DATA-IN, ENTER.
SerialMagicTM Pro for Windows Mobile ©2005-2009 SerialIO.com, all rights reserved.
36/39Doc Rev 08252009-DL
Example of GPS Action Set
SerialMagic has the capability of reading scans from a Bluetooth barcode or RFID scanner and
also reading GPS coordinates from a cabled GPS receiver simultaneously. Using SerialMagic
Actions, you can post the GPS location where a barcode was scanned; calculate the distance
between scans, as well as control the posting of scanned data based on the distance between
scans (among many other applications).
Here we will show how to setup a SerialMagic Action Profile using the GPS Action Set, to post
the GPS location of where the barcode was scanned, post the barcode data itself, and post the
distance between the last scan. We will also use the Device-ID-Post Action to post the Device ID
of the scanner in another column.
-First, create a New Action Profile and name it “GPS.”
-Next, build the Profile by adding the actions below.
-Set the “GPS-Read-Location” parameters to match the GPS Receiver attached to the PDA.
-Set the GPS-Post-Distance action to post the desired format.
-Set the profile to Active, Start SerialMagic.
-Launch Excel, and start scanning…
SerialMagicTM Pro for Windows Mobile ©2005-2009 SerialIO.com, all rights reserved.
37/39Doc Rev 08252009-DL
Here is the resulting spreadsheet after several scans…
SerialMagicTM Pro for Windows Mobile ©2005-2009 SerialIO.com, all rights reserved.
38/39Doc Rev 08252009-DL
Import / Export Action Profiles
SerialMagic Professional has the ability to Import/Export
selected profiles to enable the exchange of completed
SerialMagic Action Profiles (SMAPs). To export a profile, you
must first select the profile for export. Do this by selecting a
profile to VIEW and selecting “Export Profile”. Yellow radio
buttons indicate profiles that have been selected for Export.
Once you’ve selected your profiles to export, you can Tap-and-
Hold on the Profiles tab, and the Import/Export menu will
appear. Choose Export and then you’ll be prompted to continue.
At this point, you can select the name and location of the export
file (default: Export). Once
saved, all profiles selected
for export will be
unselected. At this point,
this exported SMAP file can be sent to another SerialMagic
Pro user to be imported. You can choose to “Email” an
SMAP (if your device/service has been setup properly) by
choosing the “Email” box. Select an account and email
address to send the SMAP, and you will be prompted to save the SMAP. When complete, an
email will be created to the address specified and the exported SMAP will be attached.
To import an SMAP, tap-and-hold “Profiles” and choose Import. You will have the option of
selecting the SMAP file you want to import (there can be multiple files.) After you select OK,
each profile will be imported immediately. After import is complete, the SMAP file will
automatically be deleted from the Device and reside within SerialMagic.
SerialMagicTM Pro for Windows Mobile ©2005-2009 SerialIO.com, all rights reserved.
39/39You can also read