User Manual Luxeo 6i Stereo Zoom Microscopy
←
→
Page content transcription
If your browser does not render page correctly, please read the page content below
Luxeo 6i
Stereo Zoom Microscopy

User Manual

To ensure proper use of this instrument as well as to avoid injury while operating   Part No.:4147100-795
Instrument, understanding this manual completely before use is highly recommended.   Issue 1.0
                                                                                     Printed on Jan.,2021
Luxeo 6i
CONGRATULATIONS
Congratulations on purchasing a LABOMED Luxeo 6i- an excellent choice!
The outstanding features of this stereo microscope are its high performance Modular design, its
ease of use with extensive range of accessories and Absolutely maintenance-free performance.
Sturdy and reliable, it is exceptionally well suited to Industrial, Hospital and Laboratory applications.
In developing the LABOMED Luxeo 6i, we have placed great emphasis on simple, self-explanatory
operation. However, please take the time to read the user manual and the notes on operating safety to
learn about all the features and capabilities to use them to your best advantages.
Should you have any questions, please consult your local Labomed representative. We are gladly to be
at your service!
4147100-795 Luxeo 6i Issue 1.0
Printed on Jan.,2021Luxeo 6i
TABLE OF CONTENTS
1. INTRODUCTION 1
2. SAFETY INFORMATION 2-6
2.1 Symbols 2-3
2.2 Important notes 4
2.3 Care & Maintenance instructions 5-6
3. INITIAL SETUP 7
3.1 Unpacking your microscope 7
4. Luxeo 6i BINOCULAR MICROSCOPE 8
5. DARK FIELD/BRIGHT FIELD (DF/BF) BASE (IF SUPPLIED) 9
6. MIRROR BASE Luxeo 6i BINOCULAR MICROSCOPE 10
7. INSTALLATION 11
7.1 Microscope setup 11
7.3 Setting up the Dark field/Bright field attachment (if supplied) 11
8. OBSERVATION & USE OF MICROSCOPE 12-15
8.1 Power on the microscope 12
8.2 Diopter setting of eyepiece 12
8.3 IPD adjustment 13
8.4 Focusing of microscope 13
8.5 Focusing torque adjustment 14
8.6 Use of crank mechanism to observe extra high objects 14
8.7 Use of common main objectives 15
9. OBSERVING EXTRA HEIGHT SPECIMEN 16
9.1 PL stand 16
9.2 Assembly PL stand Luxeo 6i 16
10. CALCULATING THE TOTAL MAGNIFICATION AND FIELD OF VIEW DIAMETER 17
11. MAGNIFICATION CHART 18
12. SPECIFICATIONS 19
13. ELECTRICALS 20
14. SYSTEM DIAGRAM 21
15. SYSTEM OF OBSERVATION PROCEDURE 22
16. TROUBLESHOOTING GUIDE 23
4147100-795 Luxeo 6i Issue 1.0
Printed on Jan.,2021Luxeo 6i
1. INTRODUCTION
The Luxeo 6i high quality stero microscope designed on a telescope Principle and equipped with an Infin-
ity corrected 6:1 parallel optics zoom system. Making it suitable for digital photoghaphy by using DSLR
and Smart phones. Typical area of use are Industrial, hospital and laboratory applications.
Luxeo 6i is a modern, high performance stero microscope with a modular design. An extensive range of
accessories is available through Labomed. It can easily be converted from continunes zoom to step mag-
nichanger by using tab on the magnichanger knob. Labomed stereo Luxeo 6i microscope have two paral-
lel beam path and one common main objective; LED coaxial illumination with a life span of 50,000 hours.
Designed for professionals. this microscopes offers many features and functions for its diverse applica-
tions.
Extra clarity and contrast is provided through an option of Binocular body inclined at 45° and 0-210°
tiltable binocular.
The pressure die cast stand consists of Ball bearing ‘friction less’ sideways focusing to avoid any loss in
motion.
The sturdy new stylish design provides comfort as well as stability.
The lateral magnification changer allows comfortable and friction less movement for zoom magni-
fication.
Special crank mechanism for extra excursion range provides opportunity to inspect larger & high
objects.
It has large distance for extra high objective.
The Luxeo is used with direct input power supply of 110V - 240V AC 50Hz/60Hz.
This ensures continuous operation even under fluctuating voltages.
1
4147100-795 Luxeo 6i Issue 1.0
Printed on Jan.,2021Luxeo 6i
2. SAFETY INFORMATION
2.1 SYMBOLS
Warning / Caution Symbols Used in this Manual
Though Labomed Products are designed to provide you with the utmost safety during use,
incorrect usage or disregard of the instructions may cause personal injury or property damage.
For your own safety, read the instruction manual carefully and thoroughly before using the product.
Do not discard this manual. Always keep it near the product for easy reference. Inside this instruction
manual, safety instructions are indicated with the symbols shown below. Be sure to follow the
Instructions marked with these symbols for your safety.
WARNING Disregarding instructions marked with this symbol may lead
to death or serious injury.
CAUTION Disregarding instructions marked with this symbol may lead
to injury or instrument damage.
WARNING
1. Intended use of this product
This product is intended only for microscopy. Do not use it for any other purpose.
2. Do not disassemble
Disassembly may result on damage to the instrument. Never disassemble any part except as
described in this operation manual. Contact your LABOMED representative if you notice any
Malfunction of this instrument.
3. Check the input voltage
When using an illumination, check that the input voltage displayed on the power supply (supplied)
matches the operating voltage. Contact your LABOMED representative voltage. Use of an
improperly matched illuminator may result in damage to equipment.
4. Power Cord
Always turn the power switch off and unplug the power cord for any kind of repair work as failure to
do so may result in electric shock or equipment damage.
2
4147100-795 Luxeo 6i Issue 1.0
Printed on Jan.,2021Luxeo 6i
SAFETY INFORMATION (CONTINUED)
CAUTION
1. Place of use
Use the stereo microscope in closed, dust free rooms at +10°C to +40°C. Protect it from oil,
Chemicals and extreme humidity. Install electrical devices at least 10cm from the wall and
away from flammable substances.
In warm and warm-damp climate zones, the individual components require special care in
order to prevent the built-up of fungus.
2. Transport
If at all possible ,use the original packaging for shipping or transporting individual modules.
In order to prevent damage from vibrations, the customer should disassemble all moving parts
according to the user manual and pack them separately.
3. Integration in third-party products
When installing Labomed products into third-party products, the manufacturer of the complete
system or its dealer is responsible for following all applicable safety instructions, laws and
guidelines.
4. Disposal
Disposal must comply with locally applicable laws and regulations.
If the warning label is stained or peeled off, contact your LABOMED distributor.
3
4147100-795 Luxeo 6i Issue 1.0
Printed on Jan.,2021Luxeo 6i
SAFETY INFORMATION (CONTINUED)
2.2 IMPORTANT NOTES
Before installing, operating or using the instrument, it is mandatory to read this user manual. In
particular, please observe all safety instructions.
User Manual
This User manual includes important instructions related to operating safety, maintenance and
Accessories.
• It is prohibited to reproduce or transmit this manual in part or whole without Labomed’s
expressed permission.
• The content of this manual are subject to change without notice.
• Although every effort had been made to ensure the accuracy of this manual, if you note any points
that are unclear or incorrect, contact your nearest Labomed representative.
• Some of the products described in this manual may not be included in the set you have purchased.
• If the equipment is used in a manner not specified by the manufacturer, the protection provided
by the equipment may be impaired.
Legal Requirements
Adhere to general and local regulations relating to accident prevention and environmental
protection.
EC Declaration of Conformity
Electrically operated accessories are constructed based on the state of the art of technology and
are provided with an EC Declaration of Conformity.
4
4147100-795 Luxeo 6i Issue 1.0
Printed on Jan.,2021Luxeo 6i
SAFETY INFORMATION (CONTINUED)
2.3 CARE & MAINTENANCE INSTRUCTIONS
1. General Instructions
• Protect the stereo microscope from moisture, fumes and acids and from alkaline, caustic and
corrosive materials.
• Protect the stereo microscope from oil and grease. Never grease or oil mechanical parts or sliding
surfaces.
• Follow the instructions of the disinfectant manufacturer.
• We recommend concluding a service contract with Labomed.
2. Cleaning the lenses
To clean the lens surfaces, remove dust using a soft brush or gauze (compressed air dust cans are
ideal). For removing finger marks or grease, soft cotton cloth/ lens tissue or gauze lightly moistened
with cleaning solution ( 85% petroleum ether and 15% isopeopanol) should be used. For cleaning the
optics, use xylene. Observe sufficient caution in handling xylene.
Cleaning procedure
Place the eyepieces on the dust-free surface (e.g. fresh aluminum foil). All other optical components
to be cleaned should be as accessible as possible.
a. Blow all loose dust particles away with a dust blower.
b. Remove all water-soluble dirt with distilled water. If this is unsuccessful repeat using a solution of
diluted hand soap liquid. Remove any remaining residue with a dry cotton swab.
c. To remove oil, use a solution of diluted hand-soap liquid initially. If this does not produce a satisfac-
tory result, repeat the cleaning using a solvent (Optical Cleaning Solution 85% petroleum ether and
15% isopropanol).
d. Grease must always be removed using a solvent.
e. Cleaning is achieved by using a spiral motion from the center to the rim. Never wipe using zig-zag
movements as this will only spread the dirt. With larger optical surfaces (e.g. tube lenses) the spiral
motion starts initially at the rim before to the middle and is only then followed by a center to rim
cleaning motion. Normally several spiral wipes are recommended. We recommend pure, volatile
petroleum ether or Optical Cleaning Solution as explained in point 3 above.
Zig-Zag motion Spiral motion
Wipe using a spiral movement. Do not use a zig-zag motion!
3. Cleaning of painted surfaces
Avoid the use of any organic solvent (e.g. thinner, xylene, ether, alcohol etc.) for cleaning of painted
surfaces of the instrument. Painted surfaces can be cleaned with a very lightly moistened micro fiber
cloth. Loose dust and dirt can be removed using a brush of soft hair used exclusively for this purpose.
5
4147100-795 Luxeo 6i Issue 1.0
Printed on Jan.,2021Luxeo 6i
SAFETY INFORMATION (CONTINUED)
4. Cleaning coated parts and plastic parts
• Dust and dirt particles should be removed with a soft brush or lint-free cotton cloth.
• Remove coarse debris with a moistened disposable cloth.
• Acetone, xylene or intro-containing thinners must not be used.
• Never use chemicals to clean colored surfaces or accessories with rubberized parts. This could
damage the surfaces, and specimens could be contaminated by abraded particles.
Caution
Do not use aggressive organic solvent such as acetone for cleaning painted surfaces and plastic
parts of the microscope.
5. Accessories, maintenance and repair
Accessories
• Use accessories only described in ‘SYSTEM DIAGRAM’ of this user manual.
Maintenance, Repair & Servicing
• The labomed Luxeo 6i stereo microscope is basically maintenance-free. To ensure that it always
operates safety and reliably, we recommend periodic inspections or, if appropriate, conclude a
maintenance contract with LABOMED.
• We recommend concluding a service contract with Labomed.
• For maintenance and repair, only OEM spare parts may be used.
Repairs and service work
• Only original Labomed spare parts may be used.
• Before opening the instruments, switch off the power and unplug the power cable.
• Touching the live circuit can cause injury.
6. Never attempt to dismantle
Never attempt to dismantle the instrument so as to avoid the possibility of impairing its operational
efficiency and accuracy.
7. Disinfection
1. Normal household bleach (Sodium hypochlorite 5%)- strength 5000 ppm(10 parts water 1 part bleach).
OR
2. 70% Isopropyl alcohol.
Disinfection Procedure:
• Take a muslin cloth.
• Moist it to feel wet
• Disinfect/clean the surface gently.
Note – 1. Use mask and Gloves while performing cleaning and disinfection.
2. While cleaning, muslin cloth should not be dripped wet to prevent seepage and rusting to running/bare parts.
3. Alcohol is flammable,its use as a surface disinfectant should be in well-ventilated spaces only.
6
4147100-795 Luxeo 6i Issue 1.0
Printed on Jan.,2021Luxeo 6i
3. INITIAL SETUP
3.1 UNPACKING YOUR MICROSCOPE
LIST OF PARTS
1. Power Adapter (SD 165-24V-P5)
1
2. Power Cable
2
3. Luxeo 6i Microscope
4. DF Base Compensator
5. DF Base (if ordered) (4146100-820)
6. Specimen Plate (Black & White) (4147000-851)
7. Specimen Plate DF Base (if DF base
provided (4146000-827)
8. User manual (4147100-795)
9. Dust Cover (PKG-104) with yellow duster. 3
5
4
7
6
8
9
7
4147100-795 Luxeo 6i Issue 1.0
Printed on Jan.,2021Luxeo 6i
4. Luxeo 6i BINOCULAR MICROSCOPE
Part No. - 4147100- 800
Eyepieces Observation Head
Magnification changer
Membrane switch for
Zoom to step change over Goose Neck LED
tab illumination control
Magnichanger
Coarse adjustment
Knob
Membrane switch for
Coaxial light
Crank lifting knob
CMO
Crank locking knob
Goose neck
Goose Neck LED
Black & White Plate
Mains ON/OFF
switch
DF base ON/OFF
Base
DF/BF Lever
8
4147100-795 Luxeo 6i Issue 1.0
Printed on Jan.,2021Luxeo 6i
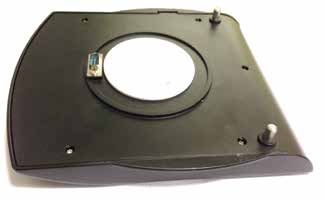
5. DARK FIELD/BRIGHT FIELD (DF/BF) BASE
Part No. 4147100-826
Note: DF/BF base is not a standard configuration part of Luxeo 6i. It is supplied on order.
For use of DF/BF base refer page no. 14.
Specimen Plate Dark Field Base
DF / BF Base
On / Off Switch
Align Pins
Dark Field / Bright-field Lever
9 Pin Connector
9
4147100-795 Luxeo 6i Issue 1.0
Printed on Jan.,2021Luxeo 6i
6. MIRROR BASE Luxeo 6i BINOCULAR MICROSCOPE
PRE-CONFIGURED MIRROR BASE FOR DARK FIELD ILLUMINATION (4147300)
Dark field observation in Luxeo 6i is provided through a specialized stand controlling reflection mirror &
light shielding plate to direct on inverted hollow cone of illumination towards specimen at oblique
angles. It has the same function as DF / BF base but advantage is that it is factory configured dedicated
to DF application only.
Observation Head
Magnification changer
Eyepieces
Membrane switch for
Zoom to step change over Goose Neck LED
tab illumination control
Magnichanger
Coarse adjustment
Knob
Membrane switch for
Coaxial light
Crank lifting knob
CMO
Crank locking knob
Goose neck
Black & White Plate
Mains ON/OFF
switch
Base DF/BF Lever
10
4147100-795 Luxeo 6i Issue 1.0
Printed on Jan.,2021Luxeo 6i
7. INSTALLATION
7.1 MICROSCOPE SETUP
1. Open Card board box from top.
2. Take out User manual.
3. Take out EPE foam sheet out of card box and take out the
microscope, Power Cord and Power adapter.
4. Raise up the bracket of microscope using Coaxial Knobs.
5. Remove front support packing.
6. Remove dummy foam block if DF/BF base not provided.
7. Place the microscope on a sturdy table. Luxeo 6i is placed in
ready to use condition. No spread installation instructions are
required except power up of the microscope through Power
adapter provided. The ocular tubes are equipped with eyepieces
Fig.1 installed. Ocular tab prevents the eyepieces from falling,
rotating freely or easily pulled out.
7.2 SETTING UP THE DARK FIELD ATTACHMENT (IF SUPPLIED)
L
F
k
Fig.2
1. Remove Black & White specimen plate from base pressing
the plate as shown in fig. 2.
2. Place the Dark Field Base gently on to the Luxeo 6i base by
matching the Guide pins of Dark Field base (K) with the Guide
holes (L). Refer fig.2.
3. The 9 pin male connector below dark field base will auto-
matically connect to the female 9 pin inlet (F) while lifting
up the disc gently on the Luxeo 6i base.Refer fig. 2 & 3.
4. For illumination press On/Off button (N) on Dark field base.
P Refer figure 3.
5. Place the transparent specimen plate (P) on DF/BF base.
Refer fig. 3.
N 6. Achieve Dark Field Illumination by push back the Lever (O).
O Pull the same lever (O) to front to achieve Bright field
Fig.3 Illumination.
11
4147100-795 Luxeo 6i Issue 1.0
Printed on Jan.,2021Luxeo 6i
8. OBSERVATION & USE OF MICROSCOPE
8.1 POWER ON THE MICROSCOPE
Plug in the output of power adapter and connect the power adapter
to the AC socket (A). Refer fig-4.
Press the power on switch (B) Refer fig-4.
The incident Coaxial illumination is controlled by the switch(G)
Refer Fig-5.
Intensity control
Press button (F) and (H) to increase or decrease the Coaxial
illumination intensity in six steps.
B A
Fig.4 The incident illumination (Goose Neck LED ) is controlled by the
switch (D) to glow both sided Goose Neck LED’s. Press the button
C in the following sequence to illuminate the Goose Neck LED.
DE
• Press button (D) to illuminate both Goose Neck LED.
• Second press of button (D) to switch off Goose Neck LED.
Intensity control
F Press button (C) and (E) to increase or decrease the Goose Neck
G LED intensity in six steps.
H
Fig.5
8.2 DIOPTER SETTING OF EYEPIECES
This adjustment should be performed every time the observer is
changed since the eyesight differs between individuals.
1. Turn the diopter rings on both eyepieces to set them at the 0
position match the 0 line with the index line.
2. Turn the zooming knob to the highest magnification. Focus on
the sample using the focus knob.
5 4 3 2 1 1 2 3 4 5 3. Turn the zooming knob to the lowest magnification. Peering
through the left eyepiece with the left eye, focus on the sample
using the diopter ring on the left eyepiece. Then, peer through
the right eyepiece with your right eye and focus on the sample
using the diopter ring on the right eyepiece.
4. Repeat steps 2 and 3 until the image is kept focused even though
the zooming magnification is changed. This adjustment ensures
Fig.6 sharp image throughout the zooming range.
12
4147100-795 Luxeo 6i Issue 1.0
Printed on Jan.,2021Luxeo 6i
OBSERVATION & USE OF MICROSCOPE (CONTINUED)
8.3 IPD ADJUSTMENT
This adjustment should be performed every time the observer
is changed since the interpupillary distance differs between
Individuals. Adjust the interpupillary distance so that the view
field for each eye is merged into one. Move while holding each
sleeve with both hands.
The interpupillary distance is correctly set if you see a single
circular image field when looking at a specimen.
If you are still a novice microscope user, you may need a short
time to become accustomed to this. Not to worry – after a little
while, it will become automatic.
Adjusting the interpupillary distance
1. Look into the eyepieces.
2. Hold the eyepieces with both hands. Push the eyepieces
Fig.7
together or separate them until you see a circular image.
3. Slowly approach the eyepieces with your eyes until you can see
the complete image field without corner cutting.
8.4 FOCUSING OF MICROSCOPE
1. Switch on the desired illumination as per specimen selected.
I
2. Adjust both eye pieces at 0 diopter reading.
3. Adjust IPD to user convenience.
4. Place any specimen on Black & White plate or on DF/BF base
J as per configuration provided.
5. Setup the magnification factor at highest magnification of
zoom pod using knob (I).
6. Looking through the eyepieces, adjust the focusing of micros-
cope head using coarse knob (J) to focus the specimen.
7. Bring the image nito critical focus.
8. Change magnification factor from highest to lowest.
9. At this stage image should remain in focus. This setting is
called as par-focal of microscope.
Fig.8 10. Microscope is ready to use.
Focusing raises or lowers the stereomicroscope using the focus-
SCALE 0.500 ing drive. The specimen detail is brought into sharp focus as soon
as it is in the focal point of the objective.
•The focusing drive can be operated either left- or right-handed.
• The focussing arrangment can carry a load of up to 20 kg.
13
4147100-795 Luxeo 6i Issue 1.0
Printed on Jan.,2021Luxeo 6i
OBSERVATION & USE OF MICROSCOPE (CONTINUED)
8.5 FOCUSING TORQUE ADJUSTMENT
Luxeo 6i Microscope’s focusing torque is pre-adjusted
to maximum limit to withstand a max. force of 20kg with
standard Binocular.
Torque of focusing mechanism can be loosened it required
as per following procedure per user’s convenience:
H 1. Hold firmly the right knob shown as (K). Refer Fig.9.
L 2. Rotate left knob (L) to clockwise to loosen torque of the
K
focusing mechanism of microscope.
3. As explained above, torque cannot be tightened further,
but it can be loosened to user’s convenience if required.
Changing the Magnification (Zoom)
Luxeo 6i have an integrated 6:1 zoom.
Zooming
1. Look into the eyepieces.
Fig.9 2. Focus on the specimen.
3. Rotate the magnification changer until the desired magnifica-
tion is configured.
Zoom to step magnichanger
1. Refer fig 9, Red tab ‘H’ is always disengaged from factory for
continues zoom observation.
2. Push in the red tab ‘H’ to engage the step magnichanger
observation.
8.6 USE OF CRANK MECHANISM TO OBSERVE EXTRA HIGH OBJECTS
Refer Figure: 10
• Knob A is used to lift the complete coaxial system of micro-
scope upto a height of 65mm.
• Knob B is used to lock this mechanism at any desired position
during the complete range of 65mm.
• This unique feature is used to accomodate extra height
specimen for observation.
B A
Fig.10
14
4147100-795 Luxeo 6i Issue 1.0
Printed on Jan.,2021Luxeo 6i
OBSERVATION & USE OF MICROSCOPE (CONTINUED)
8.7 USE OF COMMON MAIN OBJECTIVES
1. Remove the protective cap from the optics carrier ‘A’ by
turning it.
Hold the objective ‘A’ firmly during assembly and disassembly
so that it does not fall onto the stage plate. This applies particu-
larly to the 1x or 1.25x planapochromatic objective,which is very
A heavy. Remove all specimens from the stage plate first.
2. Screw in the objective clockwise completly into the optics
carrier.
Fig.11 THE DIFFERENT TYPES OF OBJECTIVES
To meet the various requirements regarding imaging properties,
there is a choice of highquality interchangeable planachromatic
and planapochromatic objectives and also lowerpriced inter-
changeable achromatic objectives.
• Achromatic objectives are particularly suited for specimens
with high-contrast structures.
• Flat-field (planachromatic) objectives are particularly well
suited for studying flat objects such as wafers and thin
sections.
Fig.12
• With planapochromatic objectives, the finest structures are
visible with high contrast. The sophisticated apochromatic
correction allows these objectives to attain the highest color
brilliance and fidelity.
Achromatic objectives
The 0.32×, 0.5×, 0.63×, 0.8×, 1× achromatic objectives offer countless variants for selecting
the object field diameter, magnification ranges and working distances.
Planachromatic objective 1.25×
For the highest requirements for overall image quality, we recommend equipping the microscope
with the 1.25× plan (flat-field) objective, which returns sharp, contrast-rich object fields.
15
4147100-795 Luxeo 6i Issue 1.0
Printed on Jan.,2021Luxeo 6i
9. OBSERVING EXTRA HEIGHT SPECIMEN
9.1 PL STAND (4147400)
PL Stand application is useful in:
1. Observation of extra height objects.
2. Any objective between 0.3x to 0.5x magnification.
9.2 ASSEMBLING PL STAND Luxeo 6i
Place the Stand on the level surface.
Fit the zoom pod with bracket to the pillar as shown and
tighten it with clamping knob provided on the bracket.
Refer figure 14 & 15.
Connect Power Supply output (B) to the Inlet socket (A)
Fig.13 on the top of Zoom bracket. Refer figure 16.
Connect Power Supply to the microscope (C). Refer figure 16.
Follow procedure and refer steps as mentioned on page no.
11 to 15 to setup the microscope.
Fig.14
A
B
C
Fig.15 Fig.16
16
4147100-795 Luxeo 6i Issue 1.0
Printed on Jan.,2021Luxeo 6i
10. CALCULATING THE TOTAL MAGNIFICATION AND FIELD OF VIEW DIAMETER
PARAMETER
MO Magnification of objective eg. 1x
ME Magnification of eyepiece eg. 10x
f Magnification changer position eg. 2.5
a Binocular Tube factor = 1.6
Field number Field number of the eyepiece. Field numbers are printed on the
(FN) eyepieces along with magnification factor.
Eyepiece eg. 10x/22 here 22 is the field number
Magnification(M) Calculation example
M = MO × ME × f × a
or
1 × 10 × 2.5 × 1.6 = 40×
Calculation example: Field of view diameter in the specimen
øFOV: FN
MO × f × a
22
= 5.5
1 × 2.5 × 1.6
17
4147100-795 Luxeo 6i Issue 1.0
Printed on Jan.,2021Luxeo 6i
11. MAGNIFICATION CHART
Luxeo 6i Specification Table
Objectives Achr.0.32x Achr. 0.50x Achr.0.63x Achr.0.80x Achr 1.0x/Plan Apo 1x Achr. 1.25x
working Distance 300 185 145 114 90 / 106 82
Mag. Total Obj. Field Total Obj. Field Total Obj. Field Total Obj. Field Total Obj. Field
Eyepiece Position Mag. X Φ Mag. X Φ Mag. X Φ Mag. X Φ Total Mag. X Obj. Field Φ Mag. X Φ
0.4 2.0 110.0 3.2 68.8 4 55.0 5.13 42.9 6.4 34.4 8 27.5
0.5 2.5 88.0 4.0 55.0 5 44.0 6.41 34.3 8 27.5 10 22.0
0.7 3.5 62.9 5.6 39.3 7 31.4 8.97 24.5 11.2 19.6 14 15.7
0.9 4.5 48.9 7.2 30.6 9 24.4 11.54 19.1 14.4 15.3 18 12.2
10x/22
1.0 5.0 44.0 8.0 27.5 10 22.0 12.82 17.2 16 13.8 20 11.0
1.5 7.5 29.3 12.0 18.3 15 14.7 19.23 11.4 24 9.2 30 7.3
2.0 10.0 22.0 16.0 13.8 20 11.0 25.64 8.6 32 6.9 40 5.5
2.5 12.5 17.6 20.0 11.0 25 8.8 32.05 6.9 40 5.5 50 4.4
0.4 2.5 90.0 4.0 56.3 5 45.0 6.41 35.1 8 28.1 10 22.5
0.5 3.1 72.0 5.0 45.0 6.25 36.0 8.01 28.1 10 22.5 12.5 18.0
0.7 4.4 51.4 7.0 32.1 8.75 25.7 11.22 20.1 14 16.1 17.5 12.9
0.9 5.6 40.0 9.0 25.0 11.25 20.0 14.42 15.6 18 12.5 22.5 10.0
12.5x/18
1.0 6.3 36.0 10.0 22.5 12.5 18.0 16.03 14.0 20 11.3 25 9.0
1.5 9.4 24.0 15.0 15.0 18.75 12.0 24.04 9.4 30 7.5 37.5 6.0
2.0 12.5 18.0 20.0 11.3 25 9.0 32.05 7.0 40 5.6 50 4.5
2.5 15.6 14.4 25.0 9.0 31.25 7.2 40.06 5.6 50 4.5 62.5 3.6
0.4 3.2 80.0 5.12 50.0 6.4 40.0 8.21 31.2 10.24 25.0 12.8 20.0
0.5 4 64.0 6.4 40.0 8 32.0 10.26 25.0 12.8 20.0 16 16.0
0.7 5.6 45.7 8.96 28.6 11.2 22.9 14.36 17.8 17.92 14.3 22.4 11.4
0.9 7.2 35.6 11.52 22.2 14.4 17.8 18.46 13.9 23.04 11.1 28.8 8.9
16x/16
1.0 8 32.0 12.8 20.0 16 16.0 20.51 12.5 25.6 10.0 32 8.0
1.5 12 21.3 19.2 13.3 24 10.7 30.77 8.3 38.4 6.7 48 5.3
2.0 16 16.0 25.6 10.0 32 8.0 41.03 6.2 51.2 5.0 64 4.0
2.5 20 12.8 32 8.0 40 6.4 51.28 5.0 64 4.0 80 3.2
0.4 4 60.0 6.4 37.5 8 30.0 10.26 23.4 12.8 18.8 16 15.0
0.5 5 48.0 8 30.0 10 24.0 12.82 18.7 16 15.0 20 12.0
0.7 7 34.3 11.2 21.4 14 17.1 17.95 13.4 22.4 10.7 28 8.6
0.9 9 26.7 14.4 16.7 18 13.3 23.08 10.4 28.8 8.3 36 6.7
20x/12
1.0 10 24.0 16 15.0 20 12.0 25.64 9.4 32 7.5 40 6.0
1.5 15 16.0 24 10.0 30 8.0 38.46 6.2 48 5.0 60 4.0
2.0 20 12.0 32 7.5 40 6.0 51.28 4.7 64 3.8 80 3.0
2.5 25 9.6 40 6.0 50 4.8 64.10 3.7 80 3.0 100 2.4
18
4147100-795 Luxeo 6i Issue 1.0
Printed on Jan.,2021Luxeo 6i
12. SPECIFICATIONS
Optical System Galiean
Magnification Zoom 6:1
Eyepieces WF 10x/22mm
Diopter Correction ±5D
IPD 50 - 75 mm
Viewing Angle Binocular, 45° or tiltable ergo head 0-210° with
standard 1x objectives
Working Distance 106mm
Magnification range 6.4 to 40x
Object field diameter 5.5 to 34.4 mm
Eyegaurds Foldable
Illumination control Incident coaxial Illumination with intensity control
Goose neck for extra illumination
Transmitted Light: DF/BF (Dark field/ Bright field)
base with On Off control
19
4147100-795 Luxeo 6i Issue 1.0
Printed on Jan.,2021Luxeo 6i
13. ELECTRICALS
Input rating 100V - 240V / 50 - 60Hz
Output rating 24V - 2.7A
Fuse rating 250V / 1.4A
Voltage fluctuation +/- 10% (Fluctuation more than +/- 10% may damage to the
instrument. In high voltage fluctuating regions voltage stabilizing
provisions are recommended for longer life of the instrument.
Internal fuse 1.4A / 250V
Fuse rating 250V / 1.4A
Operational Altitude 2000m max.
Environment Temperature 0° - 40°C
(indoor use only)
Relative humidity 85% max.
(no condensation)
Pollution level Degree 2
Installation C
Storage Temperature 20° to 60°C
environment Relative humidity 90% max.
(no condensation)
Protection Class Class 1
Power cord Use only the recommended power supply cord. Using the wrong
power cord could result in danger or fire. The protection
class1equipment should be connected to PE (protective earth)
terminal.
20
4147100-795 Luxeo 6i Issue 1.0
Printed on Jan.,2021MICROMETER
10MM=100 PARTS
4147100-795
10x EYEPIECE 12.5x EYEPIECE 16x EYEPIECE 20x EYEPIECE
20° INCLINED HEAD TILTABLE ERGO HEAD (0-210°)
I-PHONE 7 (6134172-7i)
FLEX BRACKET 6i
14. SYSTEM DIAGRAM
(4147000-803)
I-PHONE-7PLUS (6134172-7P)
DOUBLE IRIS
I-PHONE-8 (6134172-8i)
Luxeo 6i
(6214051)
SWING ARM SWING ARM
MEDIUM DUTY HEAVY DUTY
2.7600
(4140300-800) WITH CRANK ADJUSTMENT
I-PHONE-8PLUS (6134172-8P) (4140400-800)
DBS I-PHONE-X (6134172-Xi)
(6134150)
MAIRROR BASE STAND LUXEO 6i STAND LUXEO 6i POWER SUPPLY
(4147000-802) (4147000-801) (4140500-800)
I-PHONE-S MAX (6134172-XSM )
I-PHONE-11i (6134172-11i)
DF BASE
(4146100-820)
I-PHONE-11PRO (6134172-11P)
CCD CAMERA DSLR CAMERA I-PHONE ADAPTER
ADAPTER ADAPTER 6134172
(6134110) (6134131) I-PHONE-12i (6134172-12i)
ACHR. 0.32x ACHR. 0.50x ACHR. 0.63x ACHR. 0.80x ACHR. 1.0x PLAN APO. 1.0x PLAN APO. 1.25x
(4147050) (4147051) (4147052) (4147053) (4147054) (4147055) (4147056)
I-PHONE-12PRO (6134172-12P)
Issue 1.0
I-PHONE-12PRO MAX (6134172-12PM)
I-PHONE-12MINI (6134172-12MN)
Printed on Jan.,2021
Luxeo 6i
21Luxeo 6i
15. SUMMARY OF OBSERVATION PROCEDURE
Flip the main switch to “ON”
Switch on the incident and/or transmitted illumi-
nation as required. The illumination for incident
light can be controlled through the membrane Membrane
switches provided on the observation head. Switches for
Incident
illumination
Place the specimen on the stage
AC Inlet
Main Switch
Bring the specimen in focus
Adjust the observation tube and eyepieces
Adjust the interpupillary distance
Adjust the diopter setting
Adjust the brightness for incident light
Observe Specimen
22
4147100-795 Luxeo 6i Issue 1.0
Printed on Jan.,2021Luxeo 6i
16. TROUBLESHOOTING GUIDE
Under certain conditions, performance of the unit may be adversely affected by factors other than defects.
If problems occur, please review the following list and take remedial action as needed. If you cannot solve
the problem after checking the entire list, please contact Labomed for assistance.
OBSERVATION CAUSE REMEDY
Uneven brightness in The incident illumination is low. Increase the incident illumination
observation field The transmitted illumination is Place an opaque specimen or move
blocked by the specimen. the specimen. Use incident light.
The Light does not glow at all. The power cord id not attached. Check the power cord. Attach is
The microscope is not switched Precisely.
on. Switch on the microscope.
The power button is not switched Switch indicator will glow
on. when the power is on.
The fuse is blown. Check the fuse. If blown, replace
with a live fuse. Adhere caution!!
The specimen does not focus The specimen is not focused Focus the specimen first on the
properly. lowest magnification. Achieve best
The specimen is too small. focus using the coarse adjustment
The specimen is too big. knob.
The specimen is too small. Slide
with micro dissection are not
visible on stereo microscopes. The
Specimen is too big to focus. Use
smaller specimen.
23
4147100-795 Luxeo 6i Issue 1.0
Printed on Jan.,2021Labo America Inc.
920 Auburn Court
Fremont, CA
94538
U.S.A.
Phone: 510-445-1257
Fax: 510-991-9862
Email: sales@laboamerica.com
www.laboamerica.com
EU REP.
Labomed Europe b.v.
Essebaan 50
2908 LK Capelle aan den IJssel
The Netherlands
Phone: +31-10-458-4222,
Fax: +31-10-450-8251
E-mail: info@labomedeurope.com
A28240 ISO 9001
LABOMEDYou can also read