2021 ICE MACHINE ELECTION DAY GUIDE - (North Greenbush ONLY) RENSSELAER COUNTY BOARD OF ELECTIONS - Rensselaer ...
←
→
Page content transcription
If your browser does not render page correctly, please read the page content below
2021 ICE MACHINE
           ELECTION DAY GUIDE
          (North Greenbush ONLY)

  RENSSELAER COUNTY BOARD OF ELECTIONS

   Election Day
 Contact Numbers

518-270-2990

                   RENSSELAER COUNTY BOARD OF ELECTIONS
                           1600 7th Ave, Troy, NY 12180

                   Edward McDonough     Jason Schofield
                    Commissioner         Commissioner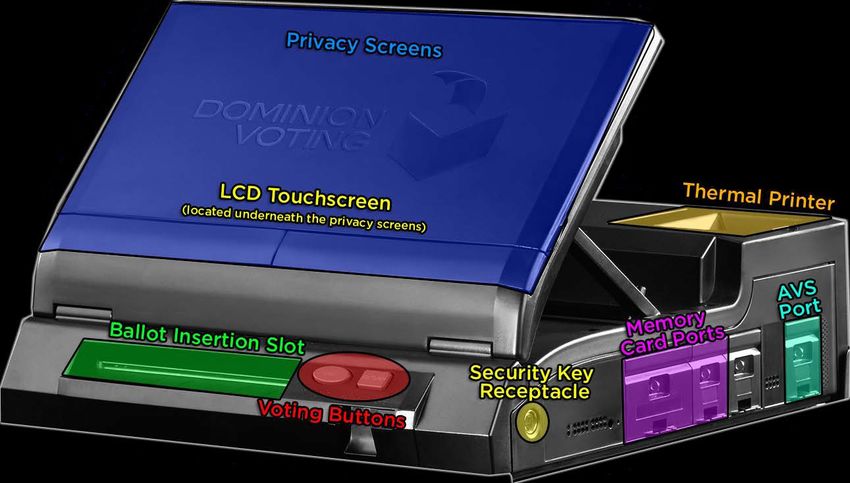
ELECTION DAY
The Chairperson(s):
• Check that your machine is the proper one for your polling site.
• Verify that you have the correct sealed supply bag for your town/district(s).
• Make sure you have all the supplies you need for the election.
• The keys to the ICE machine are in the Election Day Speedy Bag.
OPENING POLLS
Chairperson to assign the following tasks
Make sure an American Flag is displayed
Open supply bag
Set up poll booths per diagram in your binder
Place all signs
100’ Distance marker
Polling Place Sign
Sample Ballot
How to Vote
Voter’s Bill of Rights
Finish setting up poll site.
-Make sure there is adequate space between the greeting table,
inspector table, poll booths and voting machine(s) for voter privacy.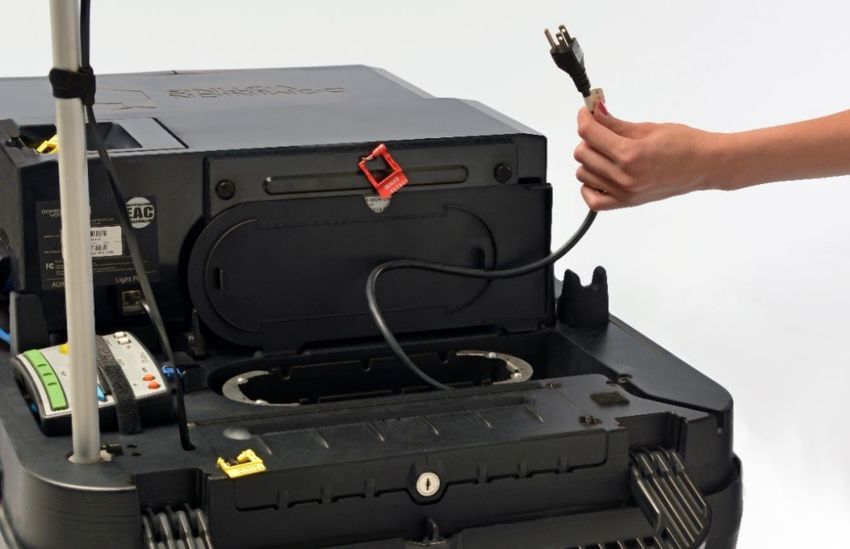
HARDWARE OVERVIEW

   A. TABULATOR
The diagrams and explanations below describe the features and operating functions
of the ImageCast® Evolution tabulator.

   •   Privacy Screens – The privacy screens protect the touchscreen when the
       unit is shut down. When the unit is set up, the privacy screens can be opened
       so the touchscreen is accessible. In this image the screens are closed.
   •   LCD Touchscreen – This display is the primary interface between the
       machine and the user. It displays messages, directions, election status, and
       other important information.
   •   Ballot Insertion Slot – Ballots are fed into the unit through this slot.
   •   Voting Buttons – The CAST button illuminates green and RETURN button
       illuminates red when are available for use. Depending on the button pressed,
       the system then casts (drops into ballot box) or returns the ballot.
   •   Security Key Receptacle – The security key must make contact with the
       security keypad to access administrative functions.
   •   Memory Card Ports – Results for each election period are stored on two
       compact flash memory cards - one located in each access compartment.
   •   AVS Port – Also called the Assistive Device port, the ATI is connected to the
       unit using this port.
   •   Thermal Printer – In the top right and rear of the unit is the results printer
       compartment, which can be sealed for security. It uses thermal paper and is
       therefore          very         quiet         when           it          prints.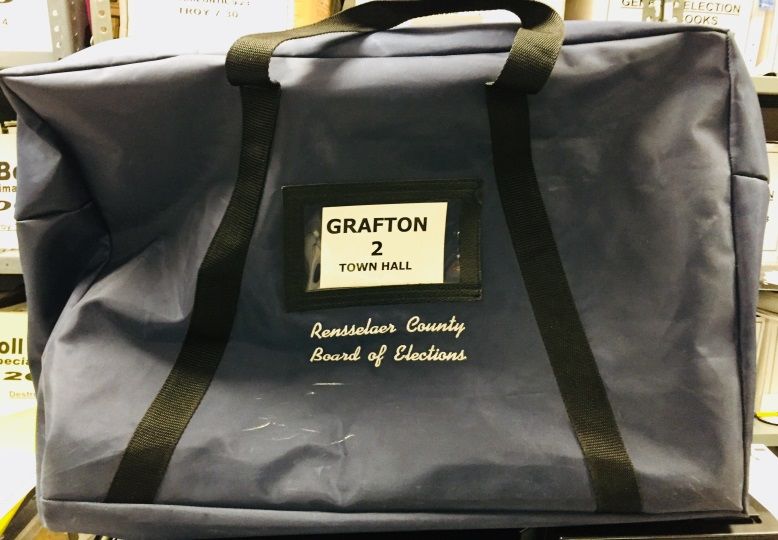
A. BALLOT BOX

 The plastic ballot box is a made of a molded plastic base/lid/cover (i.e. a
stackable ballot box on wheels)

DESCRIPTION

Lockable wheels on the bottom of the ballot box allow it to be moved and positioned.

The size of the plastic stacking box with the cover installed is 24” (W) by 38” (L) by
43.5” (H). Its weight is 95 pounds.

COMPARTMENTS

The primary compartment, which can store approximately 1500 ballots, is in the
middle. The secondary compartment, which can store approximately 200 ballots, is
at the front. There is also an auxiliary compartment at the rear that can store
approximately 150 ballots.

The auxiliary compartment is used in cases where the tabulator is inoperative. A slot
can be opened on the rear of the ballot box that allows the ballots to be inserted
from the top. When the auxiliary compartment is no longer in use, it can be closed
and secured. To remove ballots, a secured door in the panel can be opened

B. RESULTS STORAGE – MEMORY CARDS
Two memory cards with election files are necessary to operate the unit. They are
inserted into the Primary and Backup card slots. Both slots are located underneath
the first and second door on the right side of the ICE.

NOTE: Both Primary and Backup memory cards can be programmed as Primary
memory cards (meaning that they contain all election files for the tabulator) so that
the slots become interchangeable.

The Backup slot typically remains sealed for the entire election process. It is only
used if the primary memory card fails, or to confirm that the primary card has not
been tampered with.

The ICE monitors the amount of free space available on the memory cards. Once the
card reaches 2% free space available, ballots can no longer be scanned although an
administrator can still navigate to the Poll Worker Menu.

If the compact memory cards reach 1% free space available, the unit will consider
the cards full and only allow shutdown procedures to be performed.

C. OPERATOR INTERFACE

1) LCD TOUCHSCREEN

The Integrated Liquid Crystal Display (LCD) Touchscreen is the primary interface
between the unit and the user. It is used for displaying messages, allowing users to
input Security passcodes to gain access to either Election Mode or Technician Mode
operation, and send requests for the performance of various functions within the
two operation modes.

Furthermore, the LCD Touchscreen performs the POWERING ON FUNCTION when
staraised from its resting/storage position.

     2) IBUTTON SECURITY KEY MODULE

The iButton Security Key module, as seen in the image below, is equipped with an
electronic iButton reader which works in conjunction with an iButton security key. It
is encrypted with a username and password to provide system-level access as well
as a variety of verification functions to authorized officials.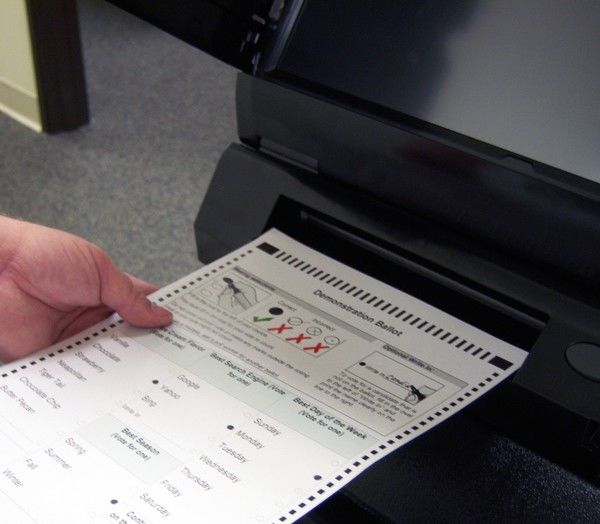
3) VOTING BUTTONS

       The Voting Button module is comprised of two push buttons: one labeled CAST
       (oval) and the other labeled RETURN (rectangular). When available to be pressed, a
       green backlight illuminates the CAST button and a red backlight illuminates the
       RETURN button. Depending on the push button pressed, the system then casts
       (drops into ballot box) or returns the ballot to the user.

       During voting CAST and RETURN can be used when displayed on the touchscreen.

ELECTION BAGS

   Black Inspector Supply Bag – Election Day Binder and Poll Site supplies
   needed for the day.
Red Speedy Bag – Poll Worker CF Cards and Closing Polls tape, are put in red
    speedy bag and placed in the blue voted ballot bag (pictured below), to be picked
     up by town clerk or returned to the board of elections. (seal not needed.)

Blue Voted Ballot Return Bag – ALL VOTED BALLOTS and the speed bag are to be returned
                           to Board of Elections on Elections.
4) ACCESSIBLE VOTING INTERFACES

AUDIO TACTILE INTERFACE (ATI)

The ICE is equipped to assist visually or physically impaired voters. An Accessible
Voting Session uses a hand-held controller called an ATI.

The ATI is a handheld device that is used by a voter to navigate and make selections
to a ballot. The ATI:

    •    Has raised keys that are identifiable tactilely without activation
    •    Can be operated with one hand
    •    Includes a 3.5 mm headphone jack
    •    Has a T4 rating for interference
    •    Uses light pressure switches
    •    Can be equipped with paddles or a pneumatic switch (Sip and Puff)

An audio ballot is initiated for the voter through the Poll Worker Menu. Once the
voter has completed their Accessible Voting Session, the system records the
vote selections made by the voter.

The ATI is tethered to the ImageCast® Evolution and can extend up to 10 feet from
the unit.

NOTE: An Accessible Voting Session cannot begin if the ATI is not connected to the
ImageCast® Evolution.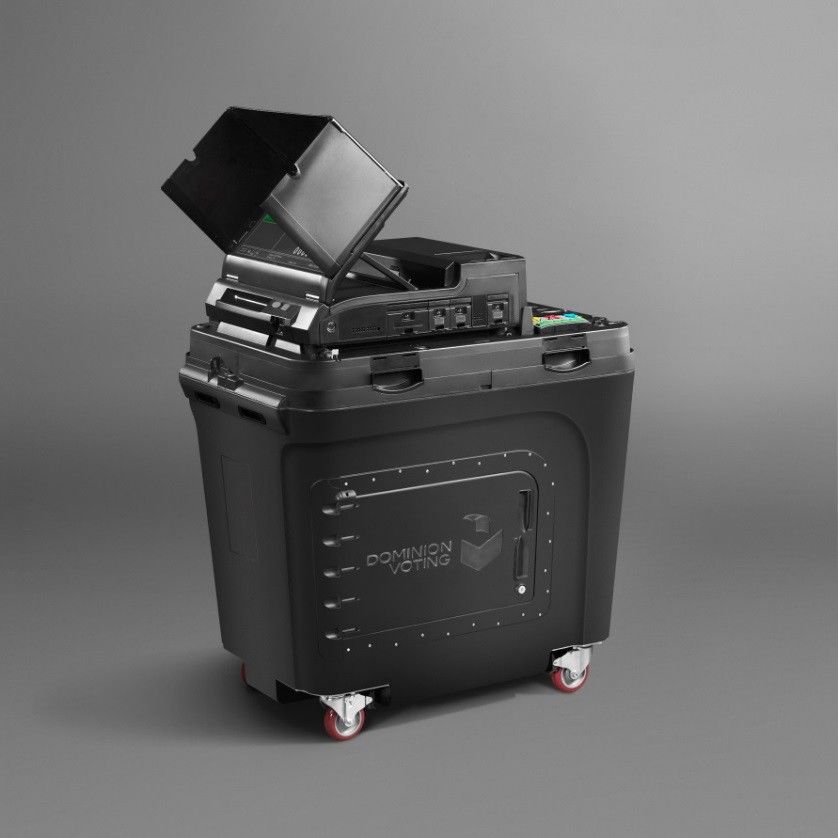
The ATI connects to the ICE via the network port located on the right side of the
unit. The headphones connect to the audio port on the bottom of the ATI.
SIP / PUFF SWITCH

Similar to the paddles, the Sip / Puff switch is connected to the ATI via the same
port. Only one of the devices can be used at a time since they both occupy the same
port.

A voter navigates through the ballot by inhaling (“sip”) and blowing out (“puff”)
through the straw connected to the switch.
D. BATTERY LIFE
A battery is provided in the event that the main electric supply is disrupted. The
battery can power the ICE a period of two hours under normal operating conditions
(100 voters per hour and two ADA voters per hour).

The system will shut down and preserve the integrity of votes cast prior to the power
failure, and it resumes functionality when power is restored.

In the event of a power failure, the equipment will continue to operate and indicate
the battery life on the LCD monitor. The recessed push button labeled “PRESS FOR
BATTERY LEVEL” located on the side panel can also be pressed to provide indication
of remaining battery life via the Battery Level LED lights.

Item          Attribute               Power Source            Battery Status

1             Completely filed        Battery power           Battery 100% full

2             75% filled              Battery power           Battery 75% full

3             50% filled              Battery power           Battery 50% full

4             25% filled              Battery power           Battery 25% full

5             0% filled               Battery power           Battery low

6             AC Plug                 AC/DC power             System on AC/DC Power
I.        STARTUP
     1.   For the cover. Unlock cover and remove.

          Unlock ballot door, cut yellow seal, and retrieve the blue supply bag and
          other supplies. And relock the door.

     2. Position the ballot box near an outlet. An extension cord may be used if
        necessary. Lock Wheels.
     3. Insert the plug of the ballot box power supply cord into the outlet.
4. Lift the monitor into the upright position by grasping the right and left side and lifting firmly, this will automatically trigger an ON/OFF switch and begin your session. 5. Lower the monitor support stand and fix to desired position. 6. Lift monitor cover open flaps to reveal screen. 7. Attach flaps to top cover.
8. After powering on, the system boots up, and it will prompt you with a
   beep for the Security Key (or the iButton) to be applied to the Security
   Key Pad.

9. When prompted, press the security key to the I Button receptacle
   on the right side of the ICE machine.
10. If you do not press the security key correctly to the receptacle, an error
screen will be displayed. Press the key firmly to the receptacle, and hold until
the login screen appears.
11. On the Authorization screen, enter the Username Admin (1) and
Password 12345678 (2) specific for the project and press the OK (3)
button. In case the incorrect username and/or password are entered, the
screen will clear the text and provide a new opportunity to enter the
correct username and password.
12. If correct, screen will read-“Valid security detected” and start loading files.
13. A screen will appear that states-“an unexpected condition occurred dual
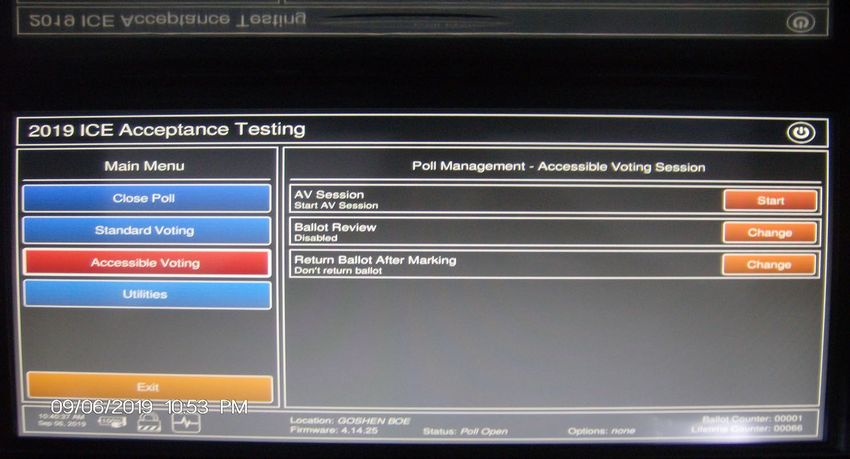
monitor feature is not licensed to be used on this device”. Press Ok.A. OPENING THE POLLS
The Poll Worker Menu provides functions for poll management (open and close polls),
activation of various voting options (AVS session, ballot review), report management
(transmit results, print results report), and system information review.
1. Select Open Poll. The “Poll Management” screen appears with three options:
• Poll Status,
• Print Zero Tape,
• Number of Copies to Print
2. The options on Print Zero Tape and Number of Copies to Print are
preset. Don’t push the Change button.3. On the “Poll Management - Open Poll” screen press the Open button next to the “Poll Status” option. The “Confirmation required” screen appears. Press the OK button. 4. The Zero Tape will begin printing and the printing in progress screen will appear. Pressing the Cancel button will stop the printing of the tape. 5. Tear tape by pulling toward seal against metal bar. Check Tape against sample ballot, and 2 from each party sign. 6. Using Tape, fill out Opening Polls Statement of Canvass.
7. Once the zero tape is printed, the “Printing completed” screen will appear.
   Do you want to print more copies of the zero tape? Press No.

8. The “Poll Worker Menu” screen will appear with the poll open and ready for
   operation.
9. Press the Standard Voting option
B. VOTING

1) STANDARD VOTING
   1. The “Poll Management - Standard Voting” screen appears.
   2. “Ballot Review” can be Enabled, Disabled, or Enabled Once by pressing the
      Change button next to it. Leave Disabled.

   3. Click on the Start button next to “Standard Voting Session.” The confirmation
      screen will appear.
   4. Press OK to continue.
5. The “Standard Voting” screen will appear and the unit is now ready to scan the ballots. Total Voters should be 0. 6. A voter can now insert a voted ballot.
Poll Book Procedures

Two inspectors, one from each political party, must jointly supervise the poll book procedures.
   1. Greet the voter.
   2. Ask for the voter’s name and address. You should loudly and distinctly repeat the person’s name and
       address.
   3. Find the voter’s registration record in the poll book.
   4. Always double-check the spelling of the voter’s name. Turn a few pages forward or back to look for the
       name; also, check hyphenated names.
   5. Note spelling corrections.

                    Voters who voted by Absentee Ballots – Poll Books
                   • The letters AB are placed by the voter’s signature in the
                      Poll Book which will identify anyone who voted by
                      Absentee Ballot.
                   • If the individual who voted Absentee comes to the poll
                      site and wishes vote in person, have that individual sign
                      by their name in the Poll Book.
                   • On the AB Voter List, in your Poll Book, mark, “voted in
                      person” on the line next to their name.
                                        Early Voter
                   • The orange letters EV on the voter’s signature means
                      that they voted early and cannot vote at their poll site.
   6. Cover the voter’s signature and make sure the voter signs next to their name.
   7. Compare the signature to the original pre-printed signature. Do not allow the voter to view the pre-printed
      signature before signing. Any inspector who believes the signatures do not match can challenge the voter.
   8. If the signature line in the Poll Book states, “ID REQUIRED”, the individual needs to present ID.

                 Acceptable forms of ID must be either a current and valid photo ID
                 or one of the following:
                 Driver’s License, Passport, Non-Driver’s ID, Student Photo ID, Pistol
                 or Firearm Permit, Pilot’s License, Military ID, Government ID;
                  Current Utility Bill, Government Check/Pay Check, Hunting License,
                 Bank Statement, Tuition Statement

   9. Once the voter has provided the required identification, the inspector will enter the type of ID and
      the ID number in the space provided. While covering the pre-printed signature, have the voter
      sign over the words “ID Required”, and then two inspectors, one from each party, initial in the
      space provided.

If a voter is required to show ID and they cannot provide it, they MAY NOT sign the Poll Book. Present the voter
with the NOTICE TO VOTERS statement.
The voter will then have the right to vote by affidavit ballot.

   10. If the voter’s name is not in your Poll Book, check the inactive list. If more than one district votes in the
      same polling place, please check with the other election district to be sure the voter votes in the correct
      district. Check the street guide, map or other tools provided in your Election Day Binder. If you are
      unable to find any information on that voter, call the Board of Elections.
11. A voter may never sign for someone else.
12. Power of Attorney and pre-printed stamps may not be used.
13. Never make any stray marks in the Poll Book.
14. Never add any voters to the Poll Book.
15. Note deceased voters in Poll Book. Only information from the immediate family may be noted. Note the
relationship (mother, father, brother, sister, etc.)
16. Note voters who have moved in the Poll Book. Only information from the immediate family may be noted.
Note the relationship (mother, father, brother, sister, etc.)
17. Note any corrections to birth date.
18. If the voter claims to be physically unable to sign, enter the words, “Unable to Sign” next to the signature.
Have the voter mark with an “X”. Two inspectors, one from each party, should then initial in the space
provided. Note this on the Voter Challenge Report.
VOTER ASSISTANCE
ALL VOTERS MUST BE ASKED: “Do you require assistance in marking your ballot?”
If a voter requests assistance from the election inspectors, take the following steps:
Whenever possible, instruct the voter on how to use the system before the individual begins to vote.
Use the sample ballot to help explain.
Remember that voters who request assistance must be treated with politeness and respect.
The needed assistance should be provided in a way that guards the voter’s privacy, but does not influence
the vote. The person or persons that are providing the assistance should not observe how the individual
voted. If you happen to notice how the individual voted, tell no one.
Locate “Assistance Provided Report” in the “Voters Challenge Reports.” Assist the voter in completing the
Assistance Provided Report.
If the voter has no one to help her/him, one inspector from each political party will help that voter. If the
voter requests help from someone other than the inspectors, administer the required oath, and complete the
rest of the “Assistance Provided Report.”
Have the voter sign the Poll Book, and indicate in a space provided for use, that the person received
assistance.SPOILED BALLOT PROCEDURE
• VERIFY BALLOT SPOILED. DO NOT
a. Ask the voter to find problem.
b. If none, have voter retry, insert upside down. LOOK AT
c. If still won’t accept, follow procedures below.
VOTED
BALLOT
• SPOILED BALLOT VERIFIED.
a. Instruct voter to fold ballot in half and write “spoiled” or “void” on backside of ballot.
b. Place ballot in Spoiled Ballot Envelope.
c. Close envelope, and store in secure place.
GIVE VOTER NEW BALLOT.
- Make sure the voter understands how to properly mark the ballot.
EACH VOTER IS ONLY ALLOWED 3 BALLOTS.
-If the 3rd ballot does not work, place in an affidavit ballot envelope,
write”3rd ballot or 3rd try” on the envelope, hash check report sheet, (do not fill out
personal information) and place in magenta affidavit bag.
-Board of Elections officials will record acceptable votes.
Ballot Review
1. To enable ballot Review, place Security Key on the receptacle.
2. Select Standard Voting – Go to ballot review on right and select Change.
3. Ballot review will change to Enable Once.
4. Select Start on the Standard Voting Session. Confirmation will appear select OK.
5. Machine will beep while reviewing ballot. Cast and Return will light up.
6. To go to next page “push next page at bottom of screen”.
7. Push Cast to enter vote, or Return to finish voting ballot or spoil ballot and start over.8. If ballot review is Disabled and the ballot is valid, it is scanned, deposited
into the ballot box, and the ballots counter increases by one.
9. If ballot review is Enabled and the ballot is valid, a review screen appears
with both Return and Cast buttons enabled.10. SCANNING BALLOTS Once a ballot is scanned, the screen displays Valid Ballot and then Casting Ballot Please Wait messages. Once the ballot has been cast successfully, there will be audible ping sound, the System Ready screen appears and the Ballot Counter will increase by (1).
If a blank ballot or an overvoted ballot is scanned, the tabulator will display
            instructions on how to proceed. The voter can choose to return the ballot by
            selecting the Return (1) button and have it marked or can choose to cast the
            ballot by selecting the Cast (2) button.

            The following table describes other tabulator warning messages.

             NOTE: Undervote Warnings have been disable for NY State usage.

EMERGENCY BALLOT PROCEDURE
  • First call Board of Elections.
  • Only use if machine is not working!
  • Ballots are the same. The only difference is where you insert them.
  • Emergency Ballot Slot is at rear of machine.
  • Cut seal and unlock door using machine key.
  • Open door and open slot by sliding up.
  • Close and re- lock.
  • Voter should not fold ballot, just insert in slot.
• Machine will look like picture below
• When polls close and the machine is working, insert the emergency ballots in scanner.
• If machine is still not working at the close of polls, use Un-Scanned Emergency Ballot Statement of
Canvass to record votes, and place ballots and canvass sheet in blue voted ballot bag to be returned to
the Board of Elections.
ACCESSIBLE VOTING SESSION (AVS) NOTE: An Accessible
Voting Session cannot commence if the ATI is not connected to
the ICE machine.
1. The poll worker needs to initiate an accessible voting session for the voter.
First press and hold the Security key onto the receptacle on the right side
of the unit.2. The poll worker then selects the Accessible Voting option.
3. NOTE (The Accessible Voting session will not start until
the ATI is plugged in the ATI port)
4. The Ballot Review is disabled as the Accessible voter will get the chance to
review their selections before the ballot is marked. Press Start next to “AV
Session” to initiate the accessible voting session.
5. On the confirmation screen, press OK to continue.6. The “Accessible Voting” screen is displayed, prompting the user to insert an unvoted blank ballot. 7. Insert the unvoted blank ballot to initiate an AV session.
8. Select the correct language by making the correct selection on the ATI.

9. The voter has the option to also select the type of assistive device to be used
   in the voting session. To use the ATI press the yellow right arrow. (1)
10. To see the voting session on the screen press the red X-shaped button (1).
    To hide the screen press the blue down arrow (2).

11. To hear the audio for voting over headphones press the X-shaped button (1).
    To continue without audio press the blue down arrow (2).
12. A welcome screen is presented. Pressing the blue down arrow will continue
the Accessible Voting session.
13. After navigation instructions are presented the voter will have options to
control the ballot zoom and contrast.14. To begin marking selections on the ballot, press the blue down arrow (2). To
return to the previous screen, press the blue up arrow (1).
15. The ballot is displayed on the screen while the voter continues making
selections for the ballot.16. The voter then completes an AVS ballot by making selections using the ATI.
Once the voter accepts the selections, the ballot is marked and then scanned
by the ICE.
17. At this point, the voter can Cast or Return the ballot.
• If the voter presses the CAST button, the ballot is dropped into the main
chamber of the ballot box, the “Standard Voting” screen is displayed, and
the counter is incremented by one.
• If the voter selects the RETURN button, a message for the poll worker to
remove the ballot is displayed, and the votes are not counted towards
the results (the counter is not incremented).
• The Voter then decides to manually cast the ballot or spoil the ballot.
11. CANCELLING AN ACCESSIBLE VOTING SESSION (AVS)
A voter may choose to cancel an AVS ballot. This is done during the session and
before the ballot has been cast.
a. The inspector will press the security key firmly to the receptacle and
hold until the cancellation screen appears.
b. The options are given to continue with the AVS ballot or proceed with
cancelling the session. If cancelling, select OK. The ballot will then be
ejected and the screen message will prompt the inspector to remove
the blank ballot.
c. After removal, the screen will display the “Poll Worker Menu”
again. The inspector can then choose the function Standard
Voting to continue normal voting.C. CLOSE POLL 1. The poll worker will press the security key firmly to the receptacle and hold until the poll worker menu appears. 2. If you press the Close Poll option, the “Poll Management - Close Poll” screen will appear.
3. Under the “Poll Status” option press the Close button.
4. Number of Copies to Print is preset for 2. Do not Change.

5. The “Authorization” screen will appear depending on the election
   configuration. Enter the Username and Password and then press OK.
6. The “Confirmation” screen will appear. If the Cancel option is chosen, the
   user is returned to the “Poll Worker Menu.” Press OK to confirm.

7. A prompt will appear requiring the Auxiliary/ Emergency Ballot Bin to
   be checked for any additional ballots.
8. The result tape is printed and the “Confirmation” screen will appear asking if
   another copy of the result tape is required. If 2 are printed Press No. If 1 is
   printed Press Yes.

9. The “Administration Menu” screen looks different when the poll is closed as
   shown in the image below.
POWER DOWN
10. Press the power button icon in the top right corner of the screen.

11. On the “Power Down” screen select the Shut Down button.

12. The LCD will go blank and a single shut down beep will emanate from the
    machine indicating the tabulator is powered down.
13. Once the LCD screen is blank, lower the privacy shields. 14. Raise the monitor stand and lift monitor support stand back to set position.
15. Lower the monitor back to its storage position.

16. Disconnect the ballot box power supply cord from the wall outlet or extension
    cord.

17. Wrap and secure power supply cord.
D. MEMORY CARD REMOVAL Both memory cards are to be removed and transported back to the election office. Break the security seals on each of the memory card doors. Once the seals on the CF 1 and CF 2 doors have been removed, open both doors press the black release button beside each card and remove both cards from the tabulator. Make sure both memory cards are returned to the election office in the Red Speed Bag.
E. BALLOT REMOVAL
To remove the ballots from the ballot box first open the retrieval door.

Unlock and open the ballot retrieval door and remove all of the ballots from the
bin and put in Blue Ballot Bag making sure to also remove any ballots from
the write in compartment as well.

Write In ballots are in a special compartment with a white door cover.

Do Not yank on the white cover door, lift door gently and open to access
write-in ballots.

Remove all write in ballots and put in write in manila envelope and place in
Blue Ballot Bag With voted Ballots.

Place unused ballots and privacy sleeves in ballot bin in machine.

Lock and reseal door.

Fill out Closing Polls Statement of Canvass Report.
FINAL CHECKLIST FOR CHAIRMAN
• Make sure all proper bags with voted ballots are
  Returned to Board of Elections or Town Clerk.
• All documents are filled out correctly:
  - Returns of Canvass
  - Seal Tag Report
  - Ballot Accountability
  - Voter Challenge Reports
  - Emergency Ballot Statement of Canvass–only
     if necessary.
  - Vouchers
• Check for signatures on all documents, two from
  each party.
• Place notes written throughout the day concerning
  Election Day events in supply bag.
• Return sealed supply bag back to the Board of Elections
  before noon the following day.

              CHECK & DOUBLE CHECK!
II. TROUBLESHOOTING AND MAINTENANCE
A. PAPER JAMS
PAPER JAM IN SCANNER PATH
If the ballot is visible from either the front Ballot Entry slot or any of the two diverter
slots on the bottom, perform the following steps:
1. Gently pull the ballot out. Ensure the ballot is not ripped in the process.
2. Be sure to properly account for the jammed ballot, placing it in the ballot bin
if it has already been cast (this is unlikely) or placing it in the ballot entry slot
so that it can be tabulated.
3. To determine if the vote has been cast, read the error message on the
screen.
4. If the jam keeps repeating itself immediately, call Board of Elections and
start Emergency ballot procedure.
If the ballot is stuck within the machine and is not visible from the accessible slots:
1. Place the IButton Security Key on the Security Keypad and enter
the appropriate credentials.
2. The machine will automatically run the unjam procedure to clear the ballot.
You will hear a variety of clicks from the machine as it completes this process.
3. If the jam is still not cleared, refer to the previous section to see if any ballot or foreign
materials are present.
4. If this does not resolve the issue, call Board of Elections and
start Emergency ballot procedure.
POWER FAILURES
The ICE is designed that in the event of an AC Power Failure, the internal battery
automatically kicks in to supply power to the machine. A battery or AC Power icon on
the bottom left corner of the LCD screen helps identify whether the machine is
running on battery or AC Power Supply.
FAULTY MAIN POWER SOURCE
To identify whether the wall outlet is functional, plug in any other electrical product
into the outlet and check if it powers up. If the other electrical product fails to
power up, plug the ICE unit into a different wall outlet and confirm power up.
FAULTY OR DISCONNECTED POWER ADAPTOR
5. Once it is confirmed that the wall outlet is functional, but
the ICE unit still does not power up, call Board of Election
Official, and start Emergency ballot procedure.MISCELLANEOUS
DOCUMENTATION
1. Tips for Interacting with Voters
with Disabilities
2. Poll Watchers
TIPS FOR INTERACTING WITH VOTERS WITH DISABILITIES
The right to vote is one of the most basic and fundamental rights that we as American
citizens enjoy. Participating in elections can be a very simple task for many of us.
However, for individuals with disabilities, physical and attitudinal barriers can make
voting a very difficult and discouraging event. It is up to you, as the election Inspector, to
make this a smooth and carefree process for everyone!
The following tips will help you to effectively interact and assist a voter with a disability.
Remember, the most important rule is to communicate and to just ask the individual the
type of assistance or accommodation they may need.
Individuals with Mobility Impairment/Wheelchair Users
• Never push an individual in a wheelchair without asking that individual first.
• Never lean on or use the individual’s wheelchair as a footrest or armrest.
• Offer the individual assistance as you would anyone else. The individual will
appreciate the offer.
• Familiarize yourself with the poll site. Identify, if any, the accessible entrances,
restrooms, and other access related features throughout the building.
Individuals who are Blind or Visually Impaired
• Identify yourself to the individual.
• Offer the individual assistance and guide the person by letting them take your
arm. Remember, to state directions clearly (for example, “Please take my left
arm”, “The voting machine is on your right”.) If the individual declines your offer of
assistance, then simply instruct where they should go to vote. REMEMBER; do
not act unless the offer of assistance has been accepted.
• Be clear when giving verbal directions. Pointing and nodding is of no help. Do not
use phrases such as “Over here” and “Over there.”
• If the individual has a service animal, allow the animal to accompany the person;
DO NOT touch, pet, play or feed the animal. This animal is on duty and must
concentrate to assist its owner.
• DO not shout or talk loud. When you walk away from the individual, let the
individual know.• Remember to communicate and ask questions. Speak directly to the individual
and not to their companion.
Individuals who are Deaf or Hard of Hearing
• Have paper and pen available to communicate.
• If someone accompanies the individual, speak to the person that is deaf, not the
individual who is accommodating the person.
• DO NOT shout or talk loud.
• Look directly at the person when speaking.
• Do not exaggerate your lip movements.
Other Helpful Tips
• Provide simple and easy to follow instructions. Do not assume the individual
needs assistance.
• Offer he individual assistance as you would anyone else. If the individual
declines, do not force assistance upon that individual.
• Be patient and allow the individual to take someone of his or her choice into the
voting booth. If the individual does not bring someone along to assist in the
voting booth and they ask for help, one election inspector from each party may
assist the individual.
• If the individual has speech impairment, this does not mean that they cannot
comprehend or understand you. Do not finish sentences for him/her.
Proper Language and Terms to Use
Correct Use Incorrect Use
Person with a disability Handicapped, physically challenged
Uses a wheelchair Wheel-chair bound, cripple
Developmental Disability Retarded
Deaf or hard of hearing/unable to speak Deaf & Dumb/mute
Remember:
Always put the person first. NOT the individual’s disability!
POLL WATCHERS
Overview
To ensure fair and honest elections, New York State law provides for appointing poll
watchers to observe voting at the polls. Poll watchers are designated by candidates,
political parties, independent organizations and/or political committees which have
candidates on the ballot.The Role of the Poll Watcher
The role of the poll watcher is to observe elections at the polling sites on behalf of a
particular candidate, political party or organization, and where they observe
irregularities, report these observations to either the election inspector and/or the Board
of Elections.
Poll Watcher Qualifications
Poll watchers must be qualified voters in Rensselaer County. Poll watchers must be
certified in writing by a candidate, a chairperson of a political committee, or independent
body and must present a certificate for each election district to the election inspector for
that election district.
Number of Poll Watchers
New York State Law allows three poll watchers per election district for each party
committee, or independent body.
Poll Watcher Rights
The Poll Watcher may:
• Arrive 15 minutes before opening to observe the opening of the polls.
• Compare the sample ballot for errors.
• Observe the closing of the polls and final canvasses.
• Challenge individual voters on the following basis:
Signature authenticity
Residence
Multiple voting
Qualification to vote
Electioneering
Poll Watcher Limitations
The Poll Watcher may not:
• Greet Voters
• Electioneer in any manner:
o Electioneering includes soliciting votes or distributing, wearing or carrying
political literature, posters, banners or buttons, or displaying refreshments
showing a candidate or party’s name.
• Tamper with election materials.
• Interfere with the election process.
• Protest a vote ruling.
• Accompany a voter into the booth.
If you see a violation
Poll watchers are not law enforcement officers. However they may attempt to enforce
their candidate’s rights by reporting a violation to any of the following:
• Election Inspectors
• The Rensselaer County Board of Elections
• The Rensselaer County Sheriff’s DepartmentRensselaer County Board of Elections
The Board of Elections wishes to help bring about greater understanding and
participation in the election process. For more information election laws and procedures,
please write or call the Board of Elections.
Poll Watcher Certificate
To the Rensselaer County Board of Elections:
Pursuant to the provisions of 8-500 of the Election Law of the State of New York, the
undersigned here appoints:
___________________________________________________
Name of Individual
(Print)
To act as a Watcher on their behalf, at the Primary or General
Election to be held on __________________________
in the Town of _____________________________
Election District __________, County of Rensselaer, New York.
___________________________________________________
Signature of Candidate or Chairperson of Political Committee or
Independent Body
___________________________________________________
Name of Candidate (Print)
Chairperson of Political Committee or Independent BodyYou can also read