What causes tight hips? - Outspoken Chiropractic
←
→
Page content transcription
If your browser does not render page correctly, please read the page content below
What causes tight hips?

Your body is an efficiency machine. It adapts to what you do most often and,
unfortunately, not to what you do that is best for your long-term physical health. What
this means is that as you get older, you lose the ability to get into positions and
perform movements that, over time, you have neglected.

                     Here are 5 ways this can affect your hips:

1. Chronic contraction. We sit for an average of 10 hours day—at work, on the
bike, when we’re travelling, eating and relaxing in front of the TV. Sitting shortens the
hip flexors, the muscles that connect the lower spine and pelvis to the tops of the
thighs.
2. Limited range of motion. What you do most of the time—walking, running and
riding your bike—requires very limited range of motion, especially at the hips.
3. Overuse. You repeat that limited range of motion, over and over.
4. Weak glutes. As the hip flexors tighten from contraction and overuse, the
opposing muscles—the glutes—respond by relaxing and deactivating. This process,
known as reciprocal inhibition, is designed to protect the hip flexors from tearing.
5. Pain. Muscular imbalances lead to compensation patterns. These dysfunctional
patterns when repeated over and over, stress synergistic muscles, eventually
causing chronic pain.

These 5 factors create the perfect storm for tight and inflexible hips. You, therefore,
need to counterbalance your lifestyle habits and physical training with targeted
flexibility and mobility work. When you have access to full range of motion at your
hips you will be able to:
                      o generate maximum power and speed on the bike
             o transfer your weight smoothly and efficiently to optimise control and
                                         reduce fatigue

Loose hips will also reduce your risk of injury and help to relieve associated lower
back and knee pain.

                                3 types of yoga poses

One of the main reasons that yoga is so effective at loosening up tight hips is that,
unlike conventional stretching, in yoga we stretch the hips from multiple different
angles.

There are 3 different types of hip openers—hip flexor, groin and outer hip
stretches—and you should aim to incorporate all of them into your mobility training.
When you start to tune in, you will probably find that you are flexible in some ranges
of motion and less in others, so focus on the areas that need most attention.

If you struggle to get into any of these poses, try one of the alternatives until you
have sufficient flexibility and mobility to move up to the next level. This is going to
look different for all of you. For example, some of you drop easily into Pigeon but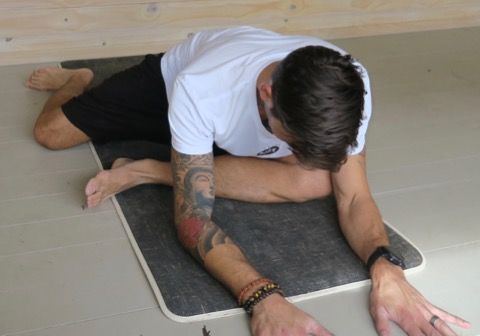
struggle with Dead Pigeon, which for many is an easier pose. Just see what works
for you and, of course, feel free to ask me any questions.

                                    Low Back

                              Downward Facing Dog

Instructions
• From a table top position (on all fours with wrists below shoulders and knees
   below hips), tuck the toes under, press into the hands and begin to lift the hips
   toward the ceiling.
• Spread the fingers wide with the middle finger facing forward. Press out through
   the fingers and edges of the hand
• Using straight (but not locked) arms, press the hips up and back reaching the
   chest towards the thigs. Lift up through the tailbone to keep the spine straight
   and long
• Have feet hips width apart with toes facing forward. You do not have to have
   your heels touching the floor. Keep a slight bend in the knees to encourage the
   spine to stay straight.
• Let the head and neck hang freely from the shoulders or look up at your belly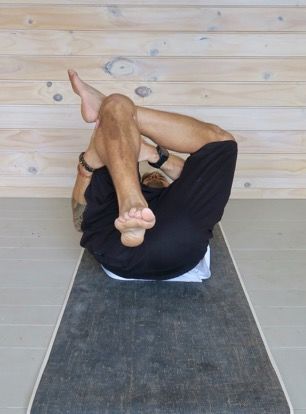
Legs Up the Wall

Instructions
   • Sit right up close to a wall
   • Swing your legs up to vertical and come down onto your back
   • Bring your arms out by your sides
   • Relax fully into the pose

                               Reclining Hand to Toe

Instructions
   • This is a hamstring and calf stretch.
   • Lie flat on your back.
   • Bring your left knee into your chest, loop a strap, belt or towel around the arch
      of your foot and then straighten your leg as much as is possible up to the sky.
   • Keep your left foot flexed and press through your heel.
   • If you find yourself straining in the pose, you can bend your bottom leg and
      bring the sole of your right foot flat to the mat.
   • Relax. Use the weight of your arms and gravity to increase the intensity of the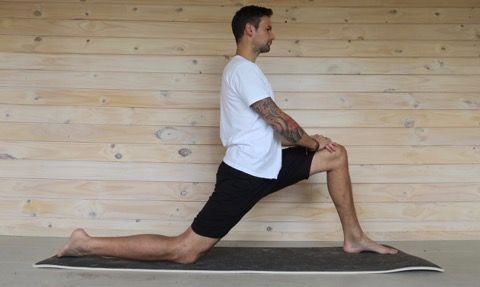
stretch.
   •   When you're ready, release the pose and switch sides.

                            1.Hip flexor stretches

                              Wind-Relieving Pose

Instructions
   • Lie on your back and hug your right knee into your chest.
   • Press your lower back into the mat and move your right knee in any way that
      releases tension or tightness in your right hip.
   • Hold for 5-10 breaths, in and out through your nose.
   • Release the pose and switch sides.

                                   Low Lunge

Instructions
   • From Downward Dog, step your right foot in between your hands, drop your
      left knee and release your back foot.
   • Come up and rest both hands on your front thigh. Check that your right knee
      is directly above your ankle.
   • You should feel the stretch in the front of your left thigh and hip.
   • Stay in the pose for 5-10 deep breaths, in and out through your nose.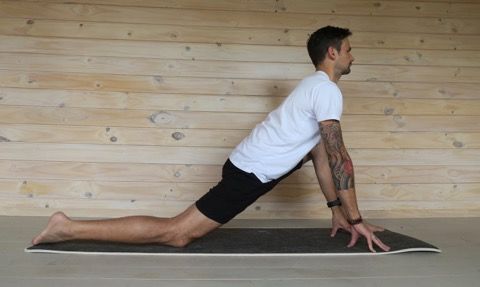
• Take a deep breath in. Exhale, bring your hands to the mat, tuck your back
toes and step back to Downward Dog for the other side.
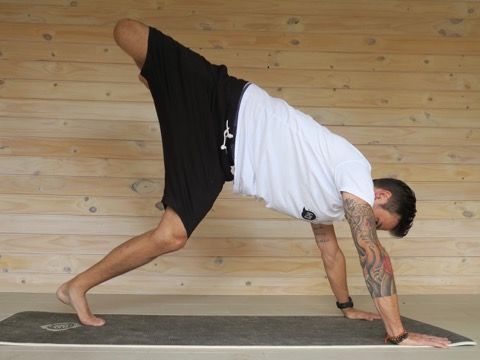
Lizard
Instructions
• From Downward Dog, take a deep breath in.
• Exhale, step your right foot in between your hands. Drop your left knee,
release your back foot and slide it back.
• Bring your right hand inside your right foot and walk your right foot out to the
edge of the mat. Sink into the stretch.
• To go deeper, come down onto your forearms and interlace your fingers. You
can rest your elbows on blocks until you can come all the way down to the
mat.
• Hold for 5-10 deep breaths, in and out through your nose.
• Take a deep breath in. Exhale, tuck your back toes and step back to
Downward Dog for the other side.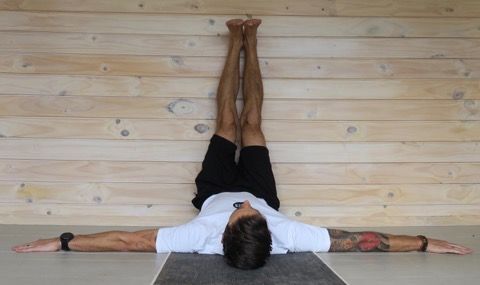
2.Groin (adductor) and hamstring stretches

                               Downward Dog Split

Instructions
   • From Downward Dog, step your big toes together.
   • Inhale, sweep your left leg up to the sky. Exhale, relax into the pose. You can
      bend your supporting leg as much as you need to.
   • To deepen the intensity of the pose, bend your left knee and let your foot drop
      back behind you.
   • Stay here for 5 deep breaths, feeling the stretch in your left hip.
   • To come out of the pose, take a deep breath in. Exhale, bring your left foot
      down to the mat for the other side.

                                Reclining Butterfly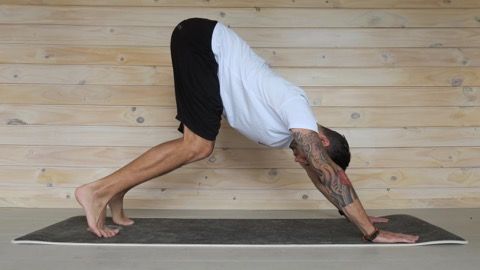
Instructions
   • Lie on your back, bring the soles of your feet together and let your knees fall
      open in the shape of a diamond.
   • Bring your arms up overhead and take hold of opposite elbows.
   • If your hips are tight, you can put cushions under your knees for support.
   • Completely relax into the pose, allowing gravity to open up your hips.
   • Hold for 5-10 breaths, in and out through your nose.
   • To come out of the pose, bring your hands to your knees and gently lift them
      back up to centre.

               3.Outer hip (glute and piriformis) stretches

                                    Dead Pigeon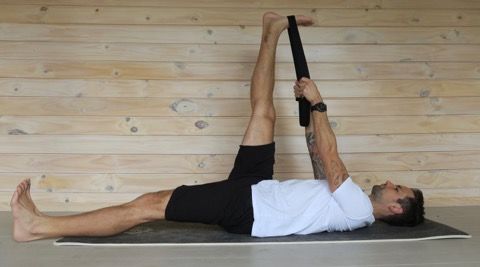
Instructions
   • Lie on your back with your knees bent, feet flat on the mat.
   • Rest your right ankle on your left knee.
   • Thread your hand through the triangle between your legs and hold the back of
      your left thigh with both hands. Gently pull your leg in towards you.
   • Relax your neck and shoulders.
   • Press your left elbow against your inner thigh to increase the stretch in your
      outer hip.
   • Hold the pose for 5-10 deep breaths, in and out through your nose.
   • Release the pose and switch sides.

                                     Pigeon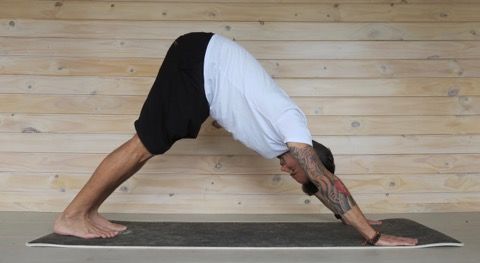
Instructions
   • From Downward Dog, step your big toes together.
   • Inhale, sweep your right leg up to the sky. Exhale, bring your right knee
      forward, place it on the mat behind your right wrist and position your right foot
      underneath your left hip.
   • Release your back foot and slide it back. Look behind you to check that your
      left leg is straight.
   • If your hips are not level, you can support your right hip on a cushion.
   • Inhale, press into your fingertips to lengthen your spine. Exhale, walk your
      hands forward, and come down onto your forearms.
   • Stay in the pose for 5-10 deep breaths, in and out through your nose.
   • To come out of the pose, bring your hands to the mat, tuck your back toes, lift
      your hips up and step back to Downward Dog for the other side.
   • Pictures 3 & 4 show an easier variation with back leg bent and to the side.
   • Allow front lower leg in either variation to project back at any comfortable
      angle. You do not want to stress the knee joint.

                               Reclining Spinal Twist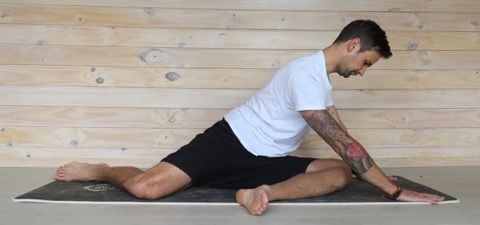
Instructions
   • Lie on your back and hug your knees into your chest.
   • Lower your left leg to the mat and squeeze your right knee into your chest.
   • Bring both arms out in a T, palms facing down.
   • Hook your right foot behind your left inner thigh and gently guide your right
      knee across your body, down towards the mat, as far as is comfortable.
   • Look to the right and try to keep both shoulders flat to the mat.
   • Stay in the pose for 5-10 deep breaths, in and out through your nose.
   • Take a deep breath in. Exhale, come back to centre and switch sides.

                              Corpse Pose (Shavasana)

Instructions
   • Lying on your back, let the arms and legs drop open, with the arms about 45
      degrees from the side of your body.
   • Close your eyes and take deep breaths through the nose. Allow your whole
      body to become soft and heavy, letting it relax into the floor.
   • Stay here for 5-15 minutes.
   • To release wriggle your toes and fingers first before sitting up.

                                    Further tips

1. Be patient and consistent. Loosening up tight hips may take time. Depending on
your level of flexibility, you can work on improving your hip mobility for 15 minutes, 3-
5 times a week.
2. Force is a substitution for intelligence always. (Moshe Feldenkrais) Focus on
feeling and easing your way into the poses, rather than on trying to force your hips to
open.
3. Use your breath. Slow down your breath and use it as a guide for how deep you
should go into each of the stretches. Breathe and release. Catch yourself anytime you find yourself holding your breath and holding onto tightness. 4. Pay attention to your alignment. Practice in front of a mirror if you can and pay close attention to alignment cues. 5. Be mindful. Notice how your body feels in the stretches. Notice where your asymmetries are and which areas you need to work on.
PHASE 2: Strengthen weak muscles

When you feel that you’re out of the danger zone, you can introduce some
strengthening exercises. Try to do them every day or as often as you can, ideally in
the morning when your energy and motivation levels are high. These exercises
strengthen the lower back (erector spinae), abs, hips, glutes and obliques which are
typically weak if you sit for much of the day. These muscles work together to support
your lumbar spine, allowing you to generate maximum power through your arms and
legs.

Hold them for 5-10 breaths, in and out through your nose, or as long as you can
without compromising your form. It's crucial that you contract your core muscles and
don't just hang out in the poses. The objective is to strengthen all the muscles that
work together to support your lower back.

                                        Plank

Instructions
   • From all fours, walk your hands forward, tuck your toes and come up into
      Plank.
   • Spread your fingers wide and press your hands evenly into the mat. Check
      that your shoulders are directly over your wrists and your feet are hip-width
      apart.
   • Try to create a straight line all the way from your heels, to your hips, to the
      back of your head. Engage your core and press back through your heels to
      straighten your legs.
   • Look down at the mat to complete the alignment.

                                       Locust
Instructions
• Lie face down on the mat with your feet hip-width apart and your arms resting
by your sides, palms facing up.
• Inhale, lift your chest, hands, arms and feet off the mat. Exhale, draw your
shoulders back and push through the balls of your feet, looking straight down
at the mat so you don't compress your neck.
• When you're ready, take a deep breath in. Exhale, come down onto the mat.
• Rest your left cheek on the mat and rock your hips from side to side to release
your lower back.
• Push back to Child's pose for a few breaths.
Bridge
Instructions
• Lie on your back with your knees bent and your feet flat on the mat, hip-width
apart. Check that your toes point straight ahead.
• Rest your arms by your sides, palms facing down. Walk your feet back until
your fingertips graze your heels.
• Screw your feet into the mat and lift your hips all the way up. Check that your
knees point straight ahead and do not fall out to the sides or in towards each
other.
• Roll your shoulder blades underneath you and come up to your edge.
• Contract your glutes to stabilise your hips.
• When you're ready to come down, take a deep breath in. Exhale, lower slowly
down onto the mat.
• Bring one hand to your belly and one hand to your chest. Walk your feet to the
edges of the mat and drop both knees slowly to the right, and to the left.
Windscreen wiping your knees a few times to release your lower back.You can also read