Push-Ups, Squats and Sit-Ups
←
→
Page content transcription
If your browser does not render page correctly, please read the page content below
Push-Ups, Squats and Sit-Ups
With all the “new” exercises, dance classes and workout videos available, it is
important to remember that those things can be good, but there are a few tried-
and-true exercises that have been around for a long time and can still provide an
easy and effective workout that you can do anywhere. Allow me to re-introduce
the old-fashioned Push-Up, Squat and Sit Up.

Warm Up: Walk for 5-8 minutes, gradually increasing speed
Workout: 2 sets of 8-12 repetitions of each of the three exercises (rest 60-90
seconds in between each set). You can rotate through the exercises. (i.e. Do 1
set of push-ups, then 1 set of squats, then 1 set of sit-ups, then repeat)
Cool Down: Walk for 3-5 minutes, then stretch all the major muscle groups
Progression: When any of these exercises becomes easier, keep challenging
yourself! You can add repetitions, add another set, or add weight. (i.e. Push-Ups:
don’t use your knees, Squats: hold dumbbells or some other weighted object in
your hands, Sit-Ups: hold a light weight in your hands above your head)

Bent Knee Push Up

Step 1
Starting Position: Come to a hands and knees position (quadruped) on the mat
with your hands directly under your shoulders; fingers facing forward and knees
under your hips. Engage the abdominals and pull the shoulder blades down your
back.
Step 2
Reposition your knees as needed to create a straight line in your body from the
knees, through the torso and out through the head. There should be no bend at
the hips. Keep the abdominals braced.
Step 3
Downward Phase: Keeping the torso rigid and head aligned with your spine,
slowly bend your elbows and lower your body toward the floor. Do not allow your
low back to sag or your hips to hike upward. Continue to lower yourself until your
chest or chin touch the mat or floor. Your elbows should remain close to the
sides of your body or flare outwards slightly.
Step 4
Upward Phase: Maintaining a rigid torso and head aligned with your spine, press
upward through your arms. Do not allow your low back to sag or your hips to hike
upward. Continue pressing until the elbows are straight.
*Push-ups place stress upon the wrist joints. To alleviate some of this stress you
may opt to use dumbbells and grip the handles rather than place your hands on
the floor. If your are pressing from an elevation such as a dumbbell, you do not
need to lower your chest or chin to the floor, but rather lower yourself until your
chest or chin are level with the dumbbell handles
*This is a modified version of the Push Up. When you build up enough strength,
you can do Push Ups without using your knees! Find more information
ACEfitness.org
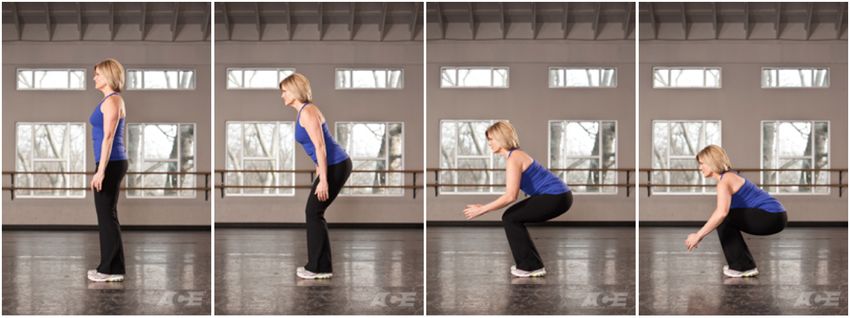
Bodyweight Squat
Step 1
Starting Position: Begin standing with your feet slightly wider than hip-width and
your toes turned out slightly. Your hands are by your sides with your palms facing
inward. Pull the shoulders down your back toward your hips.
Step 2
Engage your abdominal/core muscles to stabilize your spine ("bracing"). Keep
your chest lifted and your chin parallel to the floor. Shift your weight back into
your heels as your hips begin to push toward the wall behind you.
Step 3
Downward Phase: Begin this phase by hinging at the hips, shifting them back
and down. Your hips and knees bend simultaneously. As you lower your hips the
knees bend and will start to shift forward slowly. Try to prevent your knees from
traveling too far forward past the toes. Keep the abdominals/core muscles
engaged and try to keep your back flat (do not tuck the tail or arch the low back).
Step 4
Continue to lower yourself until your thighs are parallel or almost parallel to the
floor. If your heels begin to lift off the floor or your torso begins to round, return to
start position. Be aware of any movement that may occur at your feet, ankles and
knees. Work to ensure that the feet do not move, the ankles do not collapse in or
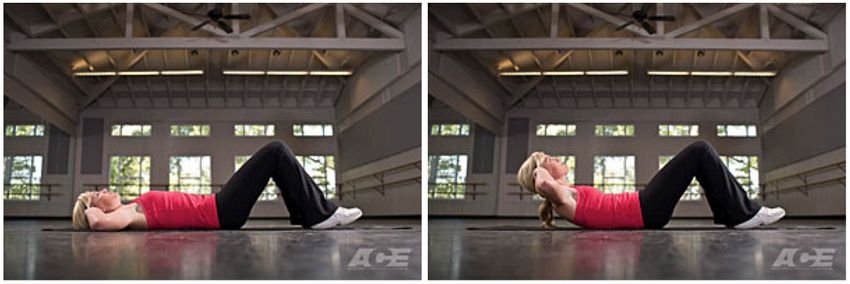
out and the knees remain lined up with the second toe.Step 5 From the Lowered Position: Keep the knees aligned with the second toe and body weight evenly distributed between the balls and heels of both feet. If you can view this from the side, your shinbone should be parallel with your torso and the low back should appear flat or may be showing the beginning of some rounding. Step 6 Upward Phase: While maintaining the position of your back, chest and head and with the abdominals engaged, exhale and return to start position by pushing your feet into the floor through your heels. The hips and torso should rise together. Keep the heels flat on the floor and knees aligned with the second toe. Bent-Knee Sit-Up / Crunch Step 1 Starting Position: Lie on your back on a mat with your knees bent, feet flat on the floor and heels a comfortable distance (12-18") away from your seat. Step 2 Place your hands behind your head. Pull your shoulder blades together and your elbows back without arching your low back or causing your ribs to splay out. This elbow position should be maintained throughout the exercise. Your head should be aligned with your spine.
Step 3
Upward Phase: Exhale. Engage your abdominal and core muscles. Nod your
chin slightly as you slowly curl your head and shoulders off the mat. Pull your rib
cage together and toward your pelvis. Keep the neck relaxed. Your feet, tailbone
and lower back should remain in contact with the mat at all times. Continue
curling up until your upper back is lifted off the mat. Hold this position briefly.
Step 4
Downward Phase: Gently inhale and lower your torso back toward the mat slowly
and with control. Keep your feet, tailbone and low back in contact with the mat.

*Proper form is important for this exercise to prevent excessive stress on your
low back. Individuals typically perform this movement too rapidly and recruit the
hip flexors to assist with the upward phase. Doing this should be avoided as it
causes the pelvis to tilt anteriorly, increasing the stress on the low back. The
abdominals connect the rib cage to the pelvis so the movement should focus on
bringing these two body parts closer together while keeping the neck and
shoulders relaxed.
You can also read