OPTIMIZE YOUR STRIDE - PODIUMRUNNER
←
→
Page content transcription
If your browser does not render page correctly, please read the page content below
Optimize Your Stride
Jay Dicharry teaches you how to maximize your stability and durability for more efficient, less
stressful miles ahead.
Exercises and Workouts
This course is made up of three sections. Here’s what to expect and how to plan these workouts into your training schedule.

  Run Cues                                             Level 1                                  Level 2
  Strategies for ongoing                               “Balance your Imbalance”                 Performance workouts: Progresses from
  awareness of your position                           Exercises: 4-6 weeks to improve          Level 1, you’ll start to see strength changes
  and movements.                                       neuromuscular control                    after 6-8 weeks, and can keep the rotation in
  You’ll learn a few key strategies                    Level 1 work is designed to help you     your training program for the long term.
  all runners can use to improve                       find and feel specific muscles - the     Once you get a feel for the proper way to load
  their run. Optimal running should                    ones that help you stabilize and steer   your body joint by joint, we’ll introduce you to 4
  be efficient and elastic, and as                     your body as you run. In Level 1 your    performance workouts that will integrate skill and
  low stress as possible. You’ll                       muscles may not get a workout, but       load your body for more resilience. You can rotate
  learn eight cues to feel proper                      your brain will. As you master the       through the workouts for the long term. They’ll hit
  position, discover where you need                    exercises, you’ll feel differences in    all the bases to ensure you stay primed to run at
  to develop postural endurance                        your movement. You are building a        your peak. And we’ve also got a calming mobility
  on the run, and begin to develop                     critical foundation for a more durable   routine as well to ensure your body moves
  effective habits.                                    and efficient stride.                    smoothly as you recover.

RUN CUES
Posture Checks – Let’s start your run with better alignment.
We want the body to be aligned in neutral – not pitched forward, and not
overly arched back either. Slightly drop your chest forward to put even
weight over your forefoot and rear foot. Then let your hands fall alongside
you so that palms are facing forward and shoulder blades slide back and
down along your ribs. Now stand on one leg and imprint this position into
your muscle memory. I suggest stopping and repeating the sequence every
¼ to ½ mile of your runs as needed to ensure your core muscles integrate
the posture into your runs.

Fingertip Posture Drill
Use your hands to ensure you are able to keep your torso over your pelvis as
you drive forward. Start by placing your pinky over the front corner of your pel-
vis, and your thumbs up somewhere on the front of your ribs. Then drop your
rib cage down in front slightly to ensure you are in correct alignment. Use your
fingers to “LOCK” this position in place. Now lift one leg up in front to step for-
ward, and use the contact from your hands to help ensure you keep your spine
as one unit (not allowing the back to arch) as you move forward. Continue this
pattern for 10-20 steps throughout the day to reinforce better alignment.

Elbows Behind Hips
Instead of swinging the arms out in front, focus on pushing your elbows
back behind your body and hips. This will improve your posture and
shoulder blade position, and discourage you from over-striding.

Heel Lift Drill
Using the muscles on the back of your legs to lift your feet (instead of
using the hip flexors to lift on the front side) is the secret to getting your
leg to swing equally behind you and in front of you. If you feel a “scuff”
sensation at first, you are landing correctly.
Optimize Your Stride, with Jay Dicharry

RUN CUES
Shopping Cart
Imagine trying to push a 300 lb shopping cart in front of you while
running. You can’t lift your leg forward (or you’ll bump into the cart), but
rather need to push the cart by driving your leg behind you. Practice the
movement, then continue to imagine pushing a cart down the road as
you run, to help you drive over and past your foot for a better push off.

Flashlight
To keep your hips tracking straight, imagine your knee caps as flash-
lights, one yellow, one blue. Yellow and Blue should not make green –
don’t let them drift together but shine them forward as you run.
Optimize Your Stride, with Jay Dicharry

LEVEL 1 : Balance Your Imbalance
Level 1 features 5 different neuromuscular workouts designed not to make your body sweat, but your brain sweat. Progress through them until you’ve done all 5
workouts 5 times to build new muscle memory.
             • You can do them daily, or you can do more than one of these per day.
             • While you may “feel” some new muscles, nothing in this series will be significant to affect your run workouts.
             • Once you’ve done all of them 5x through, you can progress to Level 2. All the skills you learn in Level 1 will directly transfer into Level 2.
             • Note: If you’ve got any “niggles,” Run Cues is a great way to help correct some of the irritation you’ve been dealing with. If these exercises help,
                you can continue doing them as a warm up before every run, or before speed workouts.
             • Y ou’ll need a few small pieces of equipment: resistance band (ideally a medium-strength one about 4-5 feet long, and maybe a smaller loop band
                — or you can tie the longer one), a 55-65 cm Swiss Ball, a foam roller, a medicine ball, 10-25lb kettlebell (or other weight you can hold in your hand
                such as a gallon jug), and, if desired, a MOBO Board (www.moboboard.com)

CORE

Inkpad Press Out
Lie on your back with your hips and knees bent up at 90 degrees. Next
wrap a resistance band around your feet so that it pulls into the middle
and hold both ends firmly in your arms. Imagine that you are on a giant
ink pad with a lot of pressure in your midback and pelvis and less pres-
sure in your low back. The goal is to maintain this position as you press
your feet into the band and away from you. Do this continually for 2 min.

Roller Dogs
Get onto the floor with your knees on the foam roller and your hands on
the ground. Your spine should be neutral and arms and thighs should be
vertical, feet hovering off the floor. While keeping a stable spine, extend
one leg behind you so that it is horizontal, then extend the opposite arm
out until horizontal. Now lower your knee back to the roller and hand
back to the ground. Do 2 min total alternating sides each rep.

Swiss Ball Band Twist
Wrap one end of a band around something solid like a squat rack or
door knob. Now hold a stability ball in front of you as your face perpen-
dicular to the attachment point of the band, and hold the other end of
the band in the hand farthest away, such that it passes over the stability
ball. We do this to increase the leverage of the resistance in order to
target your core. Spread your legs just wider than shoulder width, and
keep your hips stable while you twist your upper body (and the ball)
right and left for 25 reps. Turn around and repeat the other direction.

Seated Spine Twist
Anchor the resistance band on something solid like a door knob, and set
your seat so that your hip opposite the anchor is on the seat and the hip
close to the resistance band is floating (if band is coming from the left, then
right hip is on the chair). Hold the band and put tension on it so that you’re
holding it right in front of your belly button. Then follow this sequence: Level
your hips, rotate your SHOULDERS away, rotate SHOULDERS towards, drop
the floating hip down. Repeat for 25 reps in each direction.

Dowel Hip Hinge
Anchor the resistance band on something solid like a door knob. Step inside
your resistance band loop with one leg so that you face away from the attach-
ment point and the band sits at your upper groin/hip crease. Hold a dowel so
that it has contact on the back of your head, your mid back, and your tailbone
and never pull away from any of these points during this drill. Now step away
from the anchor point until you feel a pull of the band trying to fold you into a
proper hip hinge, then push your hips back into the band to push your torso
back upright — 100% of this motion comes from the hips and ZERO comes
from the low back at the top of the movement. Do 10–20 reps each leg.
Optimize Your Stride, with Jay Dicharry LEVEL 1 : Balance Your Imbalance UPPER BODY Tspine Foam Roller Lie on a foam roller so that it is perpendicular to your spine. While supporting your head with your hands, roll up and down along the spine and ribs finding spots that feel stiff. While resting on the tight spots, rotate your body slightly to right or left, and breathe deeply, allowing your breathing to do the work of mobilizing your ribs. Stay in the zone from the base of your neck to the bottom of your rib cage – not the lower back. Do this for 1-2 min at one level along your spine, and then roll above or below to hit a different level as needed. Pec Minor Stretch To stretch the right side, lie on your stomach with your right arm out to the side straight out, perpendicular to the body. Next, gently bend the right elbow about 90 degrees. Then place your left hand under the left shoulder, and push so that the left side of the body lifts off of the ground, and bring the knees and hips up to 90/90 and relax. You should feel the stretch in the front of the right shoulder. Hold for 2.5 min. Wall Slides Place a light resistance band around your wrists and face a wall such that your wrists are stacked over your elbows, in line with shoulders, and with the outside edge of your hands resting on the wall. Now slide your hands up the wall, maintaining wrist and elbow alignment as you reach overhead and back down. Do not let wrists twist inward of elbows. Do 3 sets of 10 reps. Shoulder Pack/Arm Circle Grab a theraband in both hands in a “palms forward” position, then widen your grip out to place some tension on the band and stand on one leg. While keeping your elbows locked straight, reach overhead with the band and then behind your body. Return overhead to the front. Do 10 reps on each leg. Next, raise your arms until just below your shoulders. Now pull the band apart so that your arms spread wide on either side of you, and then back to the front. Do 10 reps on each leg. 90/90 Band Rows Sling your resistance band around a doorknob or other solid achor. Grab the end of your elastic bands with elbows fully extended. Next draw your hands in towards your chin keeping the elbows HIGH. Flip your forearms up. Lower forearms back down, and extend arms straight again. Do 3 sets of 10 reps. HIPS Pigeon Get into the pigeon stretch position, with your back leg straight behind you such that your toes are on the ground and your knee is resting on the floor. Without moving your pelvis or toes, tighten your glutes to raise your knee off the floor so that you move into extension at the hip (your thigh moves behind your torso). Keeping glutes tight, lower your knee back to the floor under control. Do 25 reps on each side.
Optimize Your Stride, with Jay Dicharry

LEVEL 1 : Balance Your Imbalance
HIPS
Core Bridge
Lie on your back with knees bent. Place hands on the sides of your belly
and push outward at 30% core engagement. Then engage the glutes
and bridge up so that your body is straight from knees to shoulders.
Keep the glutes and core engaged as you lower back down, then
release your glutes while keeping the core engaged. This is one rep –
continue to 25 total.

Glute Rainbow
Start on all 4’s. Imagine you’ve got a plumb bob hanging down from your
chest that shouldn’t sway at all. Next lift one hip straight behind you so that
your leg is horizontal and parallel with your torso. Bend the knee up to 90
degrees. While keeping your knee at the same height, twist your hip so that
the foot scribes a rainbow to the inside, and then use the glute to twist out
to the other side of the rainbow. Use as large an arc of motion as you can
without allowing any collapse in your spine. Inward and outward is one rep:
do 25 reps on each side.

Hip Band Twist
Anchor a band in front of you. To work the right leg, wrap the band
around your left side so that it sits below your waist and hold it with your
right hand at the side of your right hip. Adjust tension by stepping closer
or further to the attachment point. Lift your left leg so you are balancing
on your right. Now, twist your pelvis inward and outward while maintain-
ing level hips. Do 25 reps on each side.

Standing Clam
Step inside a resistance band so that it is around your knees. Step just
far enough from a wall so that when you lift one leg and place your foot
behind you on the wall, your thighs are parallel. Place your hands on
your hips and maintain them level while driving your foot into the wall
and pushing the bent knee out from midline and back. Do 25 reps each
leg.

BONUS: Hip stretch: Drop into a half kneeling position with one
knee on the ground. Making sure to keep the thigh of the leg you are
kneeling on vertical, tuck your pelvis under, rotating the top back-
wards (posterior pelvic tilt). Hold for 3 min. To increase the stretch,
rotate your foot out.

KNEE
Banded Knee Extension
Step one leg inside of an anchored band, and step back until a moderate
amount of tension is felt when the leg is held straight. Now bend the
knee to approximately 30 degrees, and then straighten your knee full
out. Repeat for 50 reps on each side.
Optimize Your Stride, with Jay Dicharry

LEVEL 1 : Balance Your Imbalance
KNEE
MOBO Step Down
Place your heel on a 2 in block, or on a MOBO (with fins in BACK slots).
Keep hands on level hips, extend your free foot out in front of you and
bend your stance knee enough that your other foot touches the ground,
then come back up. do 20 reps each leg.

Hip Hikes
Stand on one leg with good posture (drop ribs down slightly to keep
weight over midfoot). While keeping a straight, but soft, knee, drop your
opposite hip, then raise it back up again using the glutes. Do 20 reps on
each side.

90/90 Shin Twist
Sit on a chair, with the leg you want to work in front of you. Elevate your
toes slightly off the ground. If it’s your right leg, take your left hand and
place it on the inside of the knee above the kneecap, to ensure that your
thigh stays straight. Now place your finger on your tibial tubercle — the
bump on the shin below the knee cap — and use it as a visual to ensure
your shin rotates as you screw your lower leg in and out beneath your
finger. Do 20 reps on each side.

Skiers
Stand on the edges of the MOBO so that the fins (placed in even or odd
slots) are between your feet and the board can rock side to side. Drop
down into a squat and, while keeping the upper body quiet, drive one
knee down while the opposite goes up, then reverse. Make sure that the
knee tracks up/down and not in/out. Keep driving down alternating legs
for 3 sets of 30 seconds.

FEET
Toe Yoga
Improve your foot coordination by learning to separate your big toe and
little toes. Actively raise the big toe while leaving the little toes down on
the ground, Then drive the big toe straight down (without curling it) and
elevate your little toes (without cheating your ankle position and lifting
your whole foot). Do this often throughout the day until you learn the
pattern. When ready, progress to doing these while standing on one leg.

Pass Back
Stand on one leg — on the floor or on the MOBO with fins in even slots —
with a weight in the opposite hand of the foot you are balancing on. You
can also use a water bottle or milk jug. Properly align your posture, then
drive your big toe down and build a “tripod” from the inside ball of foot,
to the outside ball of foot, to the end of the big toe. Now pass the weight
back and forth from one hand to the opposite hand. Continue back and
forth for 40 full passes.

Foot Band Twist
Single leg band rotations – while standing in correct posture on one
strong foot or a MOBO, hold the resistance band out in front of you so that
you are pulling from the big toe side over to the little toe side – you only
need to pivot about 20 degrees each direction. Do 25 reps on each foot.
Optimize Your Stride, with Jay Dicharry

LEVEL 1 : Balance Your Imbalance
FEET
Foot Rocks
Set the MOBO up in the odd slots and step onto it with your right foot. While
standing with good posture, gently tap the toe side of the board down to the
ground, then the heel side. This is 1 rep. Repeat for 20 reps. Switch the fins
to the even slots and, still standing with your right foot, do another 20 reps.
Repeat this series with the other foot with both fin positions.

Twisted Airplane
Stand on one leg and hinge at the hip, keeping hips level as you bend for-
ward. Steer your trunk to the right, then to the left, and then back to center.
Now twist the hips in and out, and then level and back up again. This is one
rep. Make sure to keep your weight centered over the midfoot with the big
toe grounded as you move – do 2 full minutes on each side.
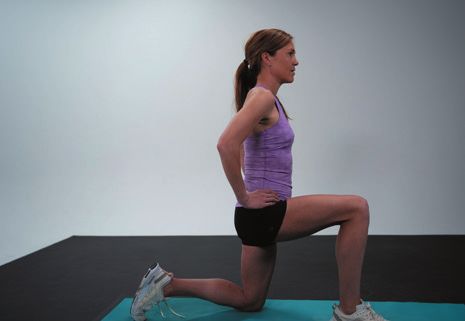
Optimize Your Stride, with Jay Dicharry

LEVEL 2 : Performance Workouts
Level 2 introduces 4 workouts designed to improve your durability, strength, and power. We’ve got regression and progression options to help ensure you are
constantly challenged just enough for success, but not too little to produce gains.

How Often: Rotate through workouts 1-4, doing 1-2 of the workouts per week for the long term. Only complete one performance workout a day. Doing 1 of these
workouts per week will maintain your fitness, 2x per week will produce more noticeable gains. If time is crunched: You’ll benefit more by adding these into your
program and slightly shortening your run volume for the day than ignoring these workouts and putting in more run volume. Quality always wins.

When in the day: It’s always best to do these PRE-run if possible, or on a non-run day.

When in the week: Feel free to integrate these workouts in as you have time — with one caveat. If you are doing speed work, that’s the most critical workout of
the week, and we don’t want you going in overly sore. Your body is under the most stress 48 hrs AFTER a hard workout. So the worst time to do strength training
would be 48 hrs prior to your speedwork session. Doing a performance workout the day prior to your speedwork session is much better than 2 days prior.

When to progress: When things get easy, you’ll need to place the tissue under more load. Can you add weight? Can you slow down the movement? Can you
add rotation? We explain recommendations for progression for each exercise. Pay attention to our progression cues and at some point, when you are ready,
you’ll need to get creative and add load by sticking some books in a backpack, or using something heavy in the garage. The load should always be hard enough
to be challenging, but not so heavy that you are moving super slow at the end of your set.

When to Chill: Performance workout #5 is focused on active recovery. This workout will keep your neuromuscular ability primed for performance. It’s a great
way to get some natural movement in after some hard sessions. It can be done anytime and will not result in soreness to impact the rest of our training.

WORKOUT#1 : HIP DRIVE

Half Kneeling Chop
Anchor your band to your side a few inches off the ground. Drop into
a half kneeling position on your right knee facing perpendicular to the
band on your right side. Grab the band with both hands. Now twist,
moving from down and to the right to up and to the left, then return
and repeat for 25 reps each side. The key here is to ensure that you are
twisting and not arching your back.

Butt Scoots
Sit on the floor with your legs stretched out in front of you. Imagine
that you are sitting at a true 90 degree angle so that your low back and
pelvis are straight and not rounded. Clasp your hands and reach out in
front of you. While keeping your upper body as still as possible, hike up
one hip and twist it forward so that your foot extends forward past your
opposite leg. You can imagine that you are trying to lengthen your legs
by twisting from the hips and “walking” on your sit bones. Do this 10
times moving forward, and then 10 times backwards. Repeat for 3 sets.

Single Leg Deadlift
Standing on one leg with a weight in the opposite hand, bend forward
from the hips, keeping your hips level as you drop your torso. Then push
the pelvis forward to come up, using the glutes. You can stand on a
MOBO to further integrate your feet and your hips. Do 3 sets of 10 reps.

KB Swing
Grab a kettlebell with both hands and set your feet slightly wider
than shoulder width. Hinge backward from the hips so that your torso
becomes more horizontal than vertical, allowing the kettlebell to drop
down between your legs. Then using your HIPS (not your upper body)
drive your pelvis forward quickly such that the weight swings upward
to shoulder height. As the weight falls back down, make sure to hinge
backwards again at the hips. You should feel everything in the glutes
and hamstrings, and nothing in the low back. To increase difficulty,
have a friend slam the weight down each rep. Do 3 sets of 10-15 reps.
Optimize Your Stride, with Jay Dicharry

LEVEL 2 : Performance Workouts
WORKOUT#1 : HIP DRIVE

Airplane Split Squat
Stand in front of a bench or chair facing away. Lift one foot back behind
you so that the top of the foot rests on the bench to get into a staggered
stance. Now drop the back knee down to the ground into a single leg
squat. Aim to keep the trunk leaning forward and to keep shoulders
packed down and along your ribs. As you descend, your shin stays
vertical and your torso will move backward to your heel to unload your
knees and load your hips. Remember to be an airplane (gliding) not a
helicopter (vertical descent). Do 3 sets of 10 reps for each leg.

Hip Jack
Place a band around both ankles. Stand on one leg, making sure to drive
the big toe down solid on the floor. Ensure posture is in neutral (weight
on the balls of the feet). Imagine you’ve got a full glass of water on each
shoulder to avoid tipping or moving from the spine or pelvis (hands on
your hips can help visualize any tipping in the pelvis). While maintaining
stability on one leg, move the other leg up and back, 45 degrees out
away from your body. Only move as far as you can control. As you get
more stable and stronger, aim to move the leg further. To increase dif-
ficulty, you can stand on a MOBO. Aim for 3 sets of 30 seconds on each
leg, with 10 jumping jacks in between each set.

WORKOUT#2 : KNEE DRIVE
Swiss Lateral Walk
Place your knees or feet up on a swiss ball facing downward and your
hands flat on the floor into a plank position. Walk your body sideways
left and right for 30 seconds continually. Take a 30 sec break, and re-
peat for 3-5 times. Avoid the tendency to shrug the shoulders, ensuring
that your shoulder blades slide back and down along the ribcage.

Super Swiss Side Plank
Lie on your side, with a swiss ball between your feet. Come up onto your
elbow and draw the shoulder blade back and down along your ribcage
for support. Now push your hips up so that your upper body is parallel
to the ground. The challenge here is moving in the lateral plane while
trying not to twist down to the floor. Hit 2 sets of 10 reps on each side.

Helicopter Split Squat
Drop into a high lunge to start. During this entire movement, keep
your trunk 100% upright as if you are a hovering helicopter. Now lunge
forward as far as your knee will allow — past your foot. Once you are as
low as you can go, push your lead foot away from you to use your quads
to drive you back up. Do 3 sets of 10 reps on each leg.

MOBO Star Squat
Stand on one leg, on the floor or on a MOBO with fins in even slots. Lower
into a single leg squat while you move your free leg forward, then rise up.
Lower and move the free leg laterally as you squat, then up. Then move the
free leg backwards as you squat. These three make 1 rep. Do 5 reps total (15
individual squats) Feel free to use a mirror to watch your knee to ensure it is
tracking straight and not diving inward. Perform 2 sets on each leg.
Optimize Your Stride, with Jay Dicharry

LEVEL 2 : Performance Workouts
WORKOUT#2 : KNEE DRIVE

Split Box Jumps
Find a box or bench just below knee height. Place one leg up on the box
and your hands on your hips. Drive your body up explosively and switch
your leg position in mid air. When you touch back on the ground, aim to
explode off again at contact. Double bouncing is not allowed! Do 3 sets
of 12 jumps (6 for each leg)

Lateral Hurdle Hop
Hop sideways from right foot to left foot over a center line. These can be
done on the ground by hopping over a foam roller or other small object
like your shoes. The key is to keep your hips level at all times so that you
don’t collapse in, and to keep time on ground as short as possible. Aim
for 10–20 jumps per leg, taking breaks to keep it explosive.

WORKOUT #3 : POSTURAL CONTROL
Scap Bridge
Sit down on the floor with your arms propped up along either side of you,
your elbows on chairs or benches. When first doing the exercise, keep the
chairs tight to your torso; later, move them further out to make the effort
more challenging. Press your shoulder blades down and back driving the
elbows into the chairs to spread your chest in front as your hips move up
into a bridge. The key is to maintain your shoulder blades flat along your
back while driving with your hips, maintaining a quiet low back. If you
feel the effort in your low back, drop your ribs until it goes away. Hold for
20-30 seconds, or march, lifting alternating legs, continually for 20-30
seconds. Do 3 sets.

Reach Out
Start kneeling on a foam roller with arms on a swiss ball in front of you.
Lean forward into the ball, keeping your shoulder blades along your
back and opening up your hips as you reach out and then back. Feet
should stay off the floor! Do 3 sets of 10 reps.

Bridge Series
Part 1: ECCENTRIC: With your shoulders lying on a bench and a band
around the top of your knees, lift your hips to form a straight line from shoul-
ders to knees bent at 90 degrees so feet are flat on floor. Lift your left leg
straight out so you are supporting only with your right, and then lower your
hips slowly, taking 5 seconds to get back to the ground. Then bridge back
up with both legs for one rep. Do 10 eccentric bridges on each leg.

Part 2: SINGLE LEG: With shoulders on the bench, lift your left foot up
so you form a bridge using only your right leg, holding a straight line from
foot to knee, keeping your hips level. Lower your hips to the ground using
only your right leg. Do 10 full range single leg bridges on each side. Work
up to repeating both parts again 2x more, for a total of 3 sets.

Dips
Place your hands on a bench behind you facing upwards. Dip your hips
low, and drive your shoulder blades away from your ears as you push
back up. Do 3 sets of 10 reps.
Optimize Your Stride, with Jay Dicharry

LEVEL 2 : Performance Workouts
WORKOUT #3 : POSTURAL CONTROL

Nordic Hamstring Curls
Set yourself up in a kneeling position so that your feet are anchored
under a sofa or something solid in the gym. Place a swiss ball in front of
you, with both hands on top. Now lean forward from the knee (not the
waist) as you roll your hands out on the swiss ball for support. When you
are as far out as you can go, bend the hips and roll back into a starting
position. Do 3 sets of 5–8 working up to 10 reps.

Calf Raises
Stand on one foot on a MOBO with fins in slots 1+4, or with your forefoot
on a 1-2 inch-high book, facing a wall for balance. Keep the knee bent
10-15 degrees as you raise your heel off the ground as high as you can.
Each rep should take 3–5 seconds for 25 reps on each side.

WORKOUT #4 : BALANCED STABILITY
Thread the Needle Plank
Attach a resistance band a few inches off the floor. Drop into a plank
position with your feet spread wide, perpendicular to the band
attached on your right. Use your right arm to support your upper body,
and reach your left hand through, beneath your chest, to grab the
band. Now ‘un-twist’ your spine, pulling the band through. Suck your
left shoulder blade back along your ribs, and extend the shoulder out
until straight, and then re-coil back towards the band attachment. Do
2 sets of 10 reps, and then switch sides.

Swiss Tuck Twist
Kneel on a swiss ball with your hips flexed up to 90 degrees, and hands
on the ground in a push-up position (like you are sitting in a chair facing
down). Now twist your spine so that your legs roll to the right as far as you
can go, then back to the left, in a controlled movement, keeping your hips
at 90 degrees. Do continuously for 30 seconds. Repeat 3 times.

Hip ADD/ABD
Lie on the ground on your side with arms extended straight out from
you at 90 degrees and your lower leg on top of a chair, bench or sling
(the upper leg stacked on top). Press down into the support so that
you raise up into a side bridge, with a straight line from shoulder to
foot. Do 10 reps. Then place your upper leg on top of the chair with
the other leg below it with a bent knee. Again raise the body up to
straight for 10 reps. Repeat for 3 sets of 10 reps in each position, then
switch legs and repeat the series.

Rotisserie Chicken
Lie on the ground on your side with arms extended straight out from you
at 90 degrees and your upper leg on top of a chair, bench or sling and
raise your opposite leg up so your hips are level. Now rotate your pelvis
around an imaginary axis, as if you were on a BBQ spit, rotating down
and then up above horizontal. Do 3 sets of 10 reps for each leg.
Optimize Your Stride, with Jay Dicharry

LEVEL 2 : Performance Workouts
WORKOUT #4 : BALANCED STABILITY

Swiss Curls
Place a swiss ball under your heels and bridge up to a straight line from
heels to shoulders. Keeping the spine straight at the hips, bend your
knees and roll the ball toward you so that your heels come toward your
butt while your hips rise up. Do 3 sets of 10 reps. When able, gradually
progress to single leg, adding one single leg per day.

Reverse Nordic Curl
Kneel down and grab a band or strap anchored in front of you. Hold
it with as much tension as needed for support. Keeping your hips and
trunk 100% straight, lean back from the knees as far as you feel comfort-
able, and then use your quads to push you back up. Do 3 sets of 10 reps.

WORKOUT #5 : ACTIVE RECOVERY
Loaded Twist
Lie on your back with your legs up towards the ceiling, and a 5-15 lb
medicine ball or other weight in your hands. Keeping your lower body
relatively still, rotate both the ball and your entire torso over to the side.
Continue back and forth for 40 reps (20 to each side). Ensure that you
keep your head relaxed.

Standing Y/T/L
Anchor a resistance band about chest high. Grab each end with one
hand. Standing on one foot in good posture alignment with your weight
over your midfoot, pull your arms up overhead to make a Y, relax, then
pull perpendicular to make a T, then down along your sides to make an
L. This is one rep. Do 20 reps on each leg.

Long Arm Band Squat
Attach a resistance band to a point about chest to waist height and
face 90 degrees to the band. Set your feet up just wider than hip
width, and with the band in both hands, extend your arms out in
front so there is tension on the band trying to twist you inward. Aim
to maintain your upper and lower body in the same plane as you
squat up and down. You can step closer to the anchor to ease the
load, and further away to increase the load. Do 20 reps each side.

Statue of Liberty
Grab a weight in your right hand and reach overhead with your elbow
fully straight above your shoulder. Left hand starts on the outer left
thigh, and wraps down and to the inside of the left thigh as you fold for-
ward (keeping the knees straight!). As you fold, turn your head and torso
to look up at the weight overhead. To move back up again, initiate the
push from the hips. The elbow should stay straight above the shoulder
the entire movement. Do 3 sets of 10 reps on each side.
Optimize Your Stride, with Jay Dicharry

LEVEL 2 : Performance Workouts
WORKOUT #5 : ACTIVE RECOVERY

Push-Ups
Place hands on the floor with thumbs facing forward and fingers facing
out to help screw the shoulder blades flat along the back. Form a
straight plank from heels to shoulders supported on your hands and
toes. Lower your shoulders, keeping the hips flat. As you drop down,
make sure you don’t allow the elbows to move past the torso. This will
keep your shoulders healthy. To make this easier, raise your hand sup-
port position to a bench, desk or table. Do 3 sets of 10–12 reps.

Twisted Warrior
Drop into a high lunge, then lower your torso so that both hands are
grounded inside your foot with the back leg extended straight behind you.
Now twist your upper body and reach up to the ceiling with one hand, first
to the right and then the left. As you twist, pretend your eyes are on your
chest to ensure that you twist your trunk, and not just your arm and head.
Do 10 times (5 on each side), then switch legs, and repeat.
You can also read