INSTRUCTIONS FOR USE - Light-Curing Flowable Composite for Crowns & Bridges, Inlays and Veneers - SHOFU Dental GmbH
←
→
Page content transcription
If your browser does not render page correctly, please read the page content below
Light-Curing Flowable Composite for
Crowns & Bridges, Inlays and Veneers

     INSTRUCTIONS FOR USE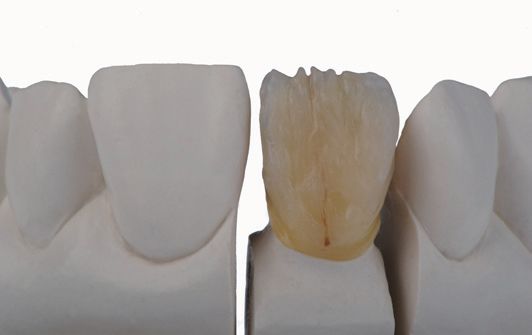
As a manufacturer of direct and indirect filling as well as crown & bridge composites, SHOFU sets new stan-
    dards for light-curing hybrid composites, which fulfill the clinical demands of dentists, dental technicians and
    patients in physical and aesthetic respect with optimal satisfaction.

    The acquired knowledge and many years of experience led to the development of new materials, which
    combine the advantages of ceramic and composite – CERAMAGE UP.

    Presented in a dispenser, the new flowable light-curing hybrid composite enables a free layering application
    for high-quality aesthetic veneerings on metal frameworks and non metal restorations. CERAMAGE UP has
    outstanding physical properties, allowing accurate shade reproduction, even where space is limited.

    Due to its thixotropic properties, CERAMAGE UP flows bubble-free when applied from the dispenser and
    features excellent build-up and modeling characteristics. While providing substantial material savings the
    flowable composite can be processed quickly and accurately.

    Moreover, CERAMAGE UP has a high abrasion resistance and elasticity, a tooth-like reflection index, translu-
    cency and opalescence.

    CERAMAGE UP is indicated for a wide range of clinical applications, including aesthetic anterior and molar
    telescopic and implant superstructures that require long term durability.

    Note:
    Please read these instructions carefully before use to attain maximum benefits of the CERAMAGE UP system. Keep
    this manual at hand for your future reference!

2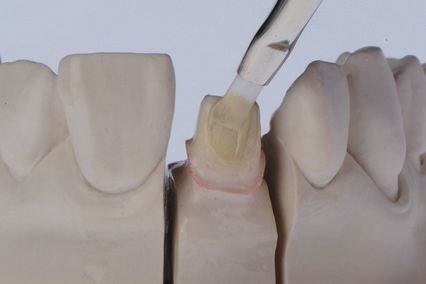
Contents
1. Notes on Use
  1-1. Precautions…………………………………………………………………………………………                        4
  1-2. Hazard warnings……………………………………………………………………………………                      4
  1-3. Notes on use………………………………………………………………………………………                        5
  1-4. Cleaning Information………………………………………………………………………………                   6
2. System components
  2-1. Indications………………………………………………………………………………………… 7
  2-2. Characteristics……………………………………………………………………………………… 7
  2-3. Components and shades………………………………………………………………………… 7
  2-4. Components / Accessories……………………………………………………………………… 8
  2-5. Shade charts………………………………………………………………………………………10
  2-6. LITE ART Stains……………………………………………………………………………………10
3. Application
  3-1. Layering diagram…………………………………………………………………………………… 11
  3-2. Layering technique for metal-supported restorations…………………………………………13
  3-3. Layering technique for metal free crowns………………………………………………………17
  3-4. Layering technique for inlays and onlays………………………………………………………20
4. Special applications
  4-1. Application of Opaque Dentin……………………………………………………………………22
  4-2. Application of UNIVERSAL OXY-BARRIER Gel………………………………………………22
  4-3. Additions after curing CERAMAGE UP…………………………………………………………23
  4-4. Additions after curing CERAMAGE………………………………………………………………23
5. Contouring, finishing and polishing
  5-1. Contouring…………………………………………………………………………………………24
  5-2. Contouring of fissures………………………………………………………………………………24
  5-3. Finishing and polishing……………………………………………………………………………24
  5-4. Pre-polishing and high-gloss polishing…………………………………………………………25
  5-5. Case examples ……………………………………………………………………………………25
  5-6. Preparing for cementation of metal free restorations…………………………………………25
6. Technical data
  6-1. Light-curing chart……………………………………………………………………………………26
  6-2. Depth of cure (based on SHOFU test method)…………………………………………………27
  6-3. Physical data………………………………………………………………………………………27
  6-4. Bond strength to metal (semi-precious alloy) (MPa)……………………………………………27

                                                                                3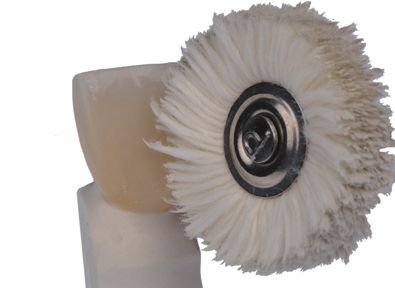
1. Notes on Use

    1-1. Precautions
    • Do not use this product on patients with known allergies to this material and/or methacrylate monomer.
    • Operators with known allergies to this material and/or methacrylate monomer must not use this product.
    • If any inflammation or other allergic reactions occur on either the patient or operator, immediately discon-
      tinue use and seek medical advice.
    • Do not use this product on patients with malocclusion and bruxism (clenching, grinding and tapping).
    • Do not handle unpolymerized material with bare hands. Use protective plastic gloves and glasses to avoid
      sensitization to this product. Avoid contact of this material with skin and eyes. In case of accidental contact
      with skin, immediately blot with alcohol moistened cotton ball and rinse with plenty of water. In case of
      contact with eyes, immediately flush the eyes with plenty of water and seek medical advice.
    • Use local dust extractor, dust protective mask, etc. while grinding this product to avoid harmful influence of
      the dust on the human body.
    • Give the patient proper instructions for daily cleaning to avoid getting stained or plaque adhesion.
    • This product is intended for use by dental professionals only.
    1-2. Hazard warnings
    • Pre-Opaque (UNIVERSAL OPAQUE), Opaque (UNIVERSAL OPAQUE) contains UDMA
    • CERAMAGE UP flowable composite contains UDMA
    • M.L. Primer contains acetone
    • CERAMAGE SEP contains ethanol
    • CERAMAGE SPACER contains natural rubber latex

4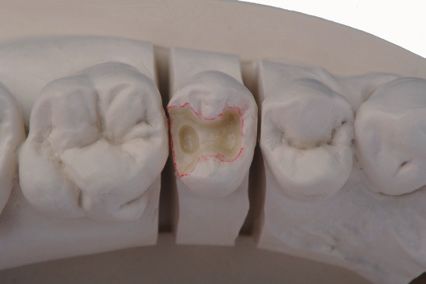
1-3. Notes on use
• Store in a dark place at room temperature (1-25°C / 34-77°F). Avoid high humidity and keep away from
  direct sunlight and any source of ignition.
• Use separate brushes for Pre-Opaque (UNIVERSAL OPAQUE) and Opaque (UNIVERSAL OPAQUE). After
  application, clean the brush with alcohol or ethanol.
• Don’t apply surface lustering or glazing agents to the surface of the CERAMAGE UP restoration.
• When using CERAMAGE UP for intraoral repair, dispense adequate amount of the material onto a paper
  pad and apply with a suitable instrument.
• Average light-curing time for intraoral repair with CERAMAGE UP
         Dental light-curing unit               Halogen light-curing unit           LED light-curing unit
         Light-curing time                             40 sec.                            20 sec.

• When using a hand-held light-curing unit, operators must use protective glasses or light shielding plate to
  avoid looking directly at the curing light. Operators must also protect patients' eyes from direct exposure to
  the curing light.
• After using intraorally, disinfect the hand-held light-curing unit with alcohol to avoid cross-contamination.
• Follow the instructions for use of each dental material, instrument or equipment to be used in conjunction
  with this product.
• Tightly close the cap immediately after each use.
• The paste dispensed onto the dish or paper pad should be shielded from ambient light by light-shielding
  cover to avoid unintended polymerization of the material.
• Do not mix CERAMAGE UP with other materials including CERAMAGE to avoid degradation of the perfor-
  mance of this material and entrapping air bubbles.
• Do not use this product in places with intense light such as close to a window or under the work light to
  avoid unintended polymerization of the paste.
• Do not use this product for any purposes other than specifically outlined in the Indications in these instruc-
  tions for use.
• Use this product within the expiration date indicated on the package and container.
  (Example         YYYY-XX→Shelf life: at the end of XX month, YYYY year)

                                                                                                                   5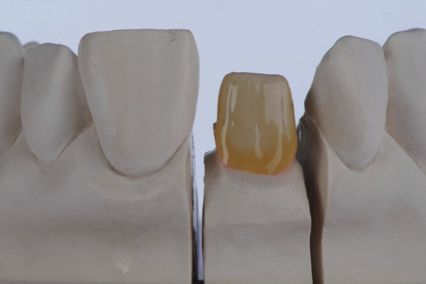
1. Notes on Use

    1-4. Cleaning Information
    • Avoid cleaning with ultrasonic cleaning liquid, because they are highly aggressive. The composite surface
      may begin to dissolve if the liquid is used inappropriately. Therefore, alkaline cleaning agents with a pH
      higher than 8 should not be used.

6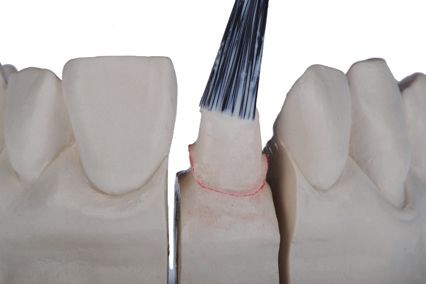
2. System components

2-1. Indications
• Veneering of metal-supported crown and bridgeworks
• Veneering of telescopic combination dentures
• Veneering of fixed and removable implant superstructures
• Veneering of gingival areas of fixed and removable implant superstructures
• Veneering of CAD/ CAM fabricated metal and hybrid ceramic frameworks
• Anterior and posterior metal free crowns
• Inlays, onlays and veneers
• Indirect and direct repairs of crown restorations and defects in prosthetic restorations
2-2. Characteristics
• CERAMAGE UP is an easy to apply flowable hybrid composite in a dispenser
• Free layering technique for material and time saving application
• Accurate reproduction of the natural tooth shade, even where space is limited
• Wide color range of translucent and opalescent flowable composites, effect and gingival masses
• Its abrasion resistance ensures molars are protected from the opposing dentition
• In combination with M.L. Primer and UNIVERSAL OPAQUE a strong bond to any type of metal including
  precious alloys is produced

2-3. Components and shades
 Pre-Opaque (SHOFU UNIVERSAL OPAQUE) (1 shade, 2 mL)
 Opaque (SHOFU UNIVERSAL OPAQUE) (28 shades, 2 mL)
                                        WO, W2O, W3O, A1O, A2O, A3O, A3.5O, A4O, B1O, B2O,
                                        B3O, B4O, C1O, C2O, C3O, C4O, D2O, D3O, D4O, rootAO,
                                        MO, BGO, GO, InO, VpO, VrO, PO, GUM-O
 CERAMAGE UP flowable composites for Crowns and Bridges (74 shades, 5 g)
 Cervical (8 shades)                    AC1, AC2, BC1, BC2, CC1, CC2, DC1, DC2
 Opaque Dentin (17 shades)              ODA1, ODA2, ODA3, ODA3.5, ODA4, ODrootA, ODB1,
                                        ODB2, ODB3, ODB4, ODC1, ODC2, ODC3, ODC4, ODD2,
                                        ODD3, ODD4
 Body (21 shades)                       W0B, W1B, W2B, W3B, A1B, A2B, A3B, A3.5B, A4B, rootAB,
                                        B1B, B2B, B3B, B4B, C1B, C2B, C3B, C4B, D2B, D3B, D4B
 Incisal (5 shades)                     56, 57, 58, 59, 60
 Translucent (8 shades)                 T, HVT, LVT, T-Glass, BG, GT, CT-A, CT-B
 Concentrate (5 shades)                 MY, WE, OC, AM-Y, W
 GUM (10 shades)                        GUM-L, GUM-D, GUM-Or, GUM-Br, GUM-V, GUM-R,
                                         GUM-DP, GUM-LP, GUM-P, GUM-T

                                                                                                      7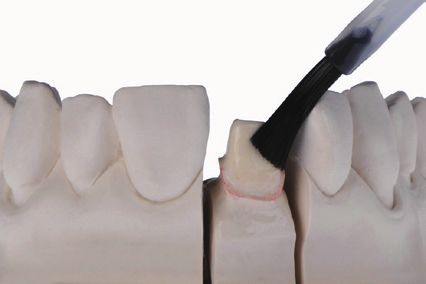
2. System components

    2-4. Components / Accessories                            • GUM-O (Gum Opaque, dark pink)
                                                               For coloring and preparing the framework for GUM
    M.L. Primer ( 1 bottle / 5 mL)                             colors
      -- Metal Primer for stronger bond between the
         metal frameworks and UNIVERSAL OPAQUE               • PO (Pink Opaque, light pink)
                                                               For coloring and preparing the framework for GUM
      -- Improved bond when applied to the surface             colors
         of precious alloys, semi precious alloys and
         non-precious alloys                                 CERAMAGE UP Flowable Composite
    PRE-OPAQUE (SHOFU UNIVERSAL OPAQUE)                      •CERVICAL (8 shades / 5g)
    (1 shade / 2 mL)                                           For reproducing cervical shades
      -- Paste Opaque for the first layer when veneering
         on metal frameworks
                                                             • OPAQUE DENTIN (17 Shades / 5g)
                                                               -- Highly opacious dentine shade
      -- Highly flowable, flows easily even into small         -- For reproducing the dentin shade at thin layered
         areas of retainers. Higher depth of cure ensures         dentine areas
         full light curing and a strong bond to the alloy.
    OPAQUE(SHOFU UNIVERSAL OPAQUE) (28
                                                             • BODY (21 shades / 5g)
                                                               For reproducing dentine shades
    shades / 2 mL)
    Paste Opaque for masking the metal framework and
                                                             • INCISAL(5 shades / 5g)
                                                               For reproducing enamel shades
    abutment teeth of jacket crowns. In addition to basic
    shades following special colors are available:           • TRANSLUCENT (8 shades / 5g)
                                                               • T (Translucent)
    • MO (Margin Opaque)                                        For reproducing translucent shades
      Applied after Pre-Opaque in widths of 1mm                • HVT (High-Value Translucent)
      around the cervical margins for masking unwanted           For reproducing bluish translucent shades with
      shadows of the alloy                                       higher brightess
    • BGO (Blue-Gray Opaque, Incisal Opaque)                   • LVT (Low-Value Translucent)
      For blue-gray characterization by mixing with              For reproducing grayish translucent shades with
      UNIVERSAL OPAQUE                                           lower brightness
    • GO (Gray Opaque)                                       The translucent level is LVT > T > HVT
      For transparent areas and for adjusting the bright-      • T-Glass
      ness of the UNIVERSAL OPAQUE                              For reproducing glass clear translucent shades
    • InO (Incisal Opaque)                                      (maximum translucency)
      For gray characterization by mixing with
      UNIVERSAL OPAQUE                                         • BG (Blue Glass)
                                                                Light blue T-Glass
    • VrO (Value Reduce Opaque)                                • GT (Gray Trans)
      For reducing the value (brightness) of the                Gray translucent effect shade
      UNIVERSAL OPAQUES                                        • CT (Cervical Trans)
    • VpO (Value Plus Opaque)                                   Translucent effect shade for cervical areas
      For increasing the value (brightness) of the              --CT-A
      UNIVERSAL OPAQUES                                           For A-shade range (orange tone)
    • WO (White Opaque)                                         --CT-B
                                                                  For B-shade range (yellow tone)
      For adjusting the brightness of the UNIVERSAL
      OPAQUES

8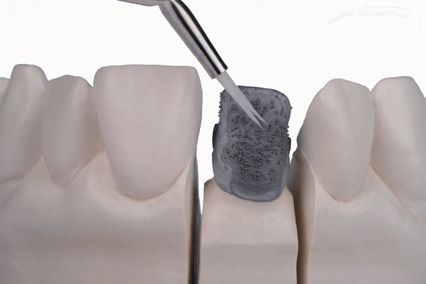
• CONCENTRATE (5 shades / 5 g)                            • ACCESSORIES
 • WE (White Enamel)                                       • UNIVERSAL OXY-BARRIER (1 jar / 10 g)
   Slightly whitish translucent enamel effect shade for     Creates an air barrier to guarantee a complete
   occlusal ridges and proximal areas of anterior teeth     polymerization of the composite and avoid an
                                                            inhibition layer.
 • OC (Occlusal)
   Slightly less translucent enamel shade for
   occlusal surfaces on molars or proximal areas           • PRO-PAD (2 x 30 sheets)
   (anterior / posterior)                                   Two colored paper pad for the optional use of
                                                            composites and light curing stains on a black or
The opacity level is WE > OC                                white area. The black area creates more contrast
                                                            and extends the working time of the composites.
 • AM-Y (Amber Yellow)
   For reproduction of translucent amber enamel effects    • CERAMAGE UP TIPS + Caps (50 pcs.)
                                                            Tips for using with special CERAMAGE UP
 • MY (Mamelon Yellow)                                      dispenser.
   For reproduction of yellowish mamelon effects
   by mixing with Body shades                              • CERAMAGE SEP (1 bottle / 7 mL)
                                                            Separating Liquid for isolation between plaster
 • W (White)                                                and CERAMAGE UP. Used when fabricating
   For reproduction of whitish effects by mixing with
                                                            metal free crowns, inlays, onlays and veneers.
   Body or lncisal shades
 • GUM (10 shades / 5 g)                                   • CERAMAGE SPACER (1 bottle / 7 mL)
   For reproduction of gingival shades                      Spacer for plaster models to form a silicone-like
                                                            layer and ensure space for cement between
   --GUM-L                                                  metal free restorations, such as metal free
     Gum Light (light color)                                crowns, inlays / onlays and veneers to the
   --GUM-D                                                  prepared tooth.
     Gum Dark (dark color)                                 • Ceramage Finishing & Polishing Kit (1 set)
   --GUM-Or                                                 Well matched instrument kit for systematically
     Gum Orange (orange color)                              contouring and finishing of CERAMAGE UP and
                                                            other micro filled hybrid composites.
   --GUM-Br
     Gum Brown                                             • DURA-POLISH (1 jar / 20 g)
                                                            Aluminum oxide impregnated (73% by weight)
   --GUM-V
     Gum Violet                                             polishing paste for pre-polishing of CERAMAGE
                                                            UP and other micro filled hybrid composites.
   --GUM-R
     Gum Red                                               • DURA-POLISH DIA (1 jar / 5 g)
                                                            Diamond impregnated (67% by weight) polishing
   --GUM-DP                                                 paste for high gloss polishing of CERAMAGE
     Gum Dark Pink                                          UP and other micro filled hybrid composites after
   --GUM-LP                                                 using DURA-POLISH
     Gum Light Pink
                                                           • UNI BRUSH No.4
   --GUM-P
     Gum Pink                                              • UNI BRUSH No.5
   --GUM-T
     Gum Translucent

                                                                                                                9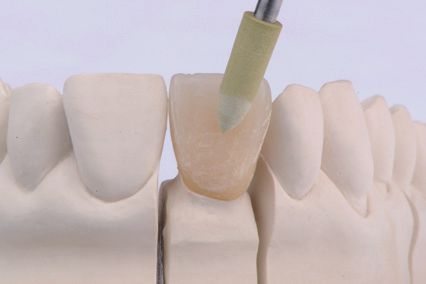
2. System components

     2-5. Shade charts
      1. Basic Shade Composition
      Shade             A1      A2      A3    A3.5     A4 root A B1                           B2       B3       B4
      Opaque           A1O     A2O     A3O A3.5O A4O rootAO B1O                              B2O      B3O      B4O
      Cervical           -         AC1             AC2       -    -                              BC1           BC2
      Opaque Dentin ODA1 ODA2 ODA3 ODA3.5 ODA4 ODrootA ODB1                                 ODB2 ODB3          ODB4
      Body             A1B     A2B     A3B A3.5B A4B rootAB B1B                              B2B     B3B        B4B
      Incisal              58              59          60   60   57                           58      59         60

      Shade                C1         C2        C3     C4        D2        D3      D4
      Opaque              C1O        C2O       C3O    C4O       D2O       D3O     D4O
      Cervical               -           CC1           CC2          DC1           DC2
      Opaque Dentin       ODC1      ODC2 ODC3         ODC4     ODD2 ODD3          ODD4
      Body                 C1B       C2B     C3B       C4B      D2B     D3B        D4B
      Incisal               58            59            60       59      60         59

      2. Whitening Shade Composition
      Shade            W0     W1     W2               W3
      Opaque               WO        W2O              W3O
      Body             W0B    W1B    W2B              W3B
      Incisal                  56                      57

     The supplementing four Whitening colors and root-A color form a meaningful extension of the “classical” color
     range.
     Root A (intensive A) has higher chroma than the color A4.

     2-6. LITE ART Stains
     For individual characterization of the CERAMAGE UP restorations the ready to use LITE ART stains are
     recommended. LITE ART light curing stains are designed to recreate the color and shade characteristics
     easily. In a very simple way the reproduction of every natural tooth characteristic can be created with a vital
     appearance during the build-up of CERAMAGE UP.

     Natural individualization with LITE ART light
     curing stains during the build-up

10
3. Application
3-1. Layering diagram
Guidelines for the minimum thickness of the abutment tooth
Anterior
Metal free Crown Faced Crown
Cervical > 0.8 mm > 0.8 mm
Labial Surface > 1.2 mm > 1.2 mm
Lingual Surface > 1.2 mm -
Incisal Edge Height 1.5 - 2.5 mm 1.5 - 2.5 mm
Others The margins should be contoured The metal thickness should be
with a round or deep chamfer. > 0.3 mm. The labial margin
should be contoured with a
shoulder or rounded shoulder. The
proximal and lingual area should
be contoured with a deep chamfer.
1.5 - 2.5 mm
●
●
● ●
●
●
●
●
●
●
● ●
> 1.2 mm
● ●
● ●
● ●
> 1.2 mm
● ● ● ● ● ● ● ● ● ●
> 0.8 mm > 0.8 mm
Anterior jacket crown Anterior faced crown
113. Application
Posterior
Metal free Crown Faced Crown Inlay / Onlay
Cervical > 0.8 mm > 0.8 mm > 0.8 mm
Pits & Fissures > 1.2 mm > 1.2 mm > 1.0 mm
Tooth Cusp Premolar > 1.2 mm Premolar > 1.2 mm Premolar > 1.2 mm
Molar > 1.5 mm Molar > 1.5 mm Molar > 1.5 mm
Width of occlusal surface - - > 2 mm
Bevel - - -
Others The margins should be The margins should be The margins should be
contoured with a round or contoured with a shoulder contoured with a deep
deep chamfer. or round shoulder. chamfer. The cavity
margin should not be
The metal thickness bevelled.
should be > 0.3 mm. A box preparation should
be used for the cavity.
The edges of the cavity
should be rounded.
The cavity margins
should be prepared away
from the contact areas of
the opposing dentition.
Premolar > 1.2 mm Premolar > 1.2 mm
Molar > 1.5 mm Molar > 1.5 mm
> 1.2 mm > 1.2 mm
> 0.8 mm
Posterior jacket crown Faced crown
> 2.0 mm
Premolar > 1.2 mm
Molar > 1.5 mm
> 1.0 mm
Inlay / Onlay
> 0.8 mm
123-2. Layering technique for metal-supported restorations
Translucent
Incisal
Body
Translucent Incisal
Opaque
Body
Opaque
Cervical
Cervical
1. Pre-Treatments
• The design of the wax framework is made according to the generally accepted guidelines. In order to obtain
the correct shade with sufficient stability, the thickness of the veneer should be at least 1.0 mm. Then, apply
retention beads of 150 µm.
• After casting adjust the metal framework and create a tapered chamfer design at the cervical area and
polish the parts which are not veneered.
• The surface of the veneer area requires a blasting with aluminum oxide Al O (50-100 µm) with a pressure
2 3
of 2-3 bar.
• After sandblasting clean with steam cleaner or ultrasonic cleaner.
2. Conditioning of the framework with M.L. Primer
Dispense 1-2 drops of M.L. Primer on a dish and apply a thin layer M.L. Primer with UNI BRUSH No.5 on the
surface where Opaque (UNIVERSAL OPAQUE) is to be applied. Dry for 10 seconds and apply the first layer of
Pre-Opaque (UNIVERSAL OPAQUE).
Framework after cleaning and drying Application of M.L Primer with UNI
BRUSH No.5
Note: M.L. Primer contains solvents, close the cap tightly immediately after use. Dispensed liquid
should be used immediately.
After applying M.L. Primer, clean the brush with alcohol. The brush should not be cleaned
with self curing resin liquid.
133. Application
3. Application and light-curing of Universal Pre-Opaque
The special polymerization characteristics and viscosity of Pre-Opaque (UNIVERSAL OPAQUE) enables it to
cure completely even in undercuts and ensure secure bonding. Apply Pre-Opaque (UNIVERSAL OPAQUE) in
the undercuts of the retentions beads using a UNI BRUSH No. 4 and light-cure for 1 minute with the Solidilite
V light-curing unit. Ensure that Universal Pre-Opaque flows completely into these areas.
Apply Universal Pre-Opaque 10 Cover the framework evenly in a Cure for 1 minute with Solidilite V
seconds after M.L. Primer thin layer
4. Application and light-curing of Universal Opaque
The first thin masking layer of Opaque (UNIVERSAL OPAQUE) creates a good masking effect. Apply the first
Opaque layer uniformly with a brush and light-cure for 3 minutes with Solidilite V. After the application of the
second layer the framework is uniformly masked in the desired shade. Light-cure the second Opaque again for
3 minutes with Solidilite V.
First application of first Universal With the second Opaque layer the
Opaque framework is uniformly masked
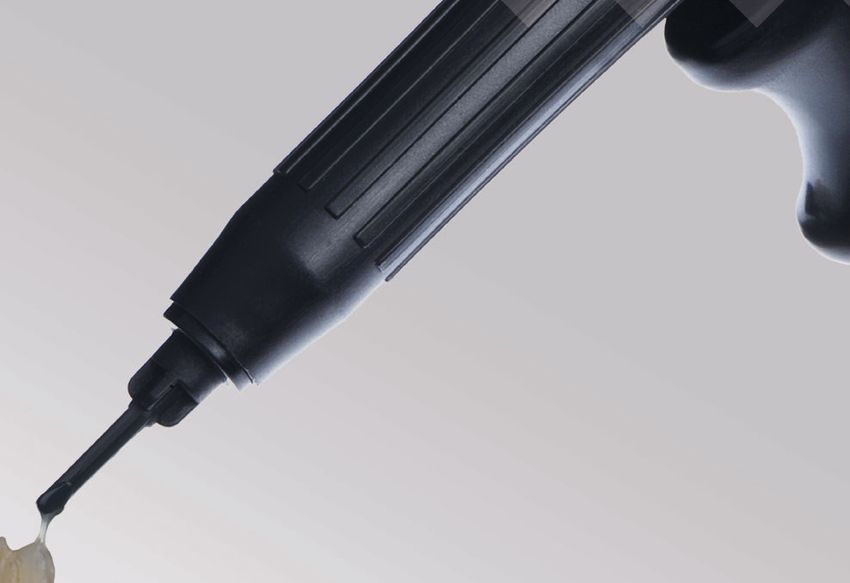
145. Mounting of handle and tips on the dispenser
CERAMAGE UP is supplied in a ready to use dispenser with a tip. The system also contains handles which
make a free layering technique possible.
Attach Nozzle Tip securely After dispansing, cap with
the Nozzle Cap securely
Note: Due to the viscosity of CERAMAGE UP, it’s possible to apply the single composite in a free
build up technique directly out of the dispenser. The layering technique is carried out in
accordance with porcelain restorations, building up in the order of Cervical, Body Translucent
and Incisal. It’s recommended to build up the veneer segment by segment (tooth by tooth)
and to separate them during the build-up.
6. Application and light-curing of Cervical
Cervical composites are highly chromatic and reproduce cervical shade even in thin layers. The maximum
thickness of each individual layer should not exceed 1 mm. Dispense Cervical composite by turning the
dispenser sleeve clockwise to apply from the marginal area of the restoration towards to the centre in a half
moon shape and intermediate cure (fixation) for 5-20 seconds with Sublite V. Continue towards the proximal
area and pre-cure for 1 minute with Solidilite V.
Apply Cervical composite directly from Continue proximal and / or The composite can be smoothed
the dispenser to the cervical area palatal area with a brush before pre-curing
153. Application
7. Application and light-curing of Body
Build up Body composite step by step with the dispenser corresponding to the anatomical body shape of the
natural tooth. Fix the buildup for 5-20 seconds with Sublite V. Design the dentin in a way that mamelon shape
remains outlined.
Make sure to provide adequate space for the subsequent application of translucent and incisal materials and
cure for 1 minute with Solidilite V.
Apply Body composite and fix the Continue step by step directly with Design the dentin anatomically
build up the dispendser or brush
8. Application and light-curing of Translucent and Incisal
Apply translucent composite e.g. HVT for standard layering as intermediate layer to the incisal / interproximal
area and fix for 5-20 seconds with Sublite V. Then, complete the build up with incisal composite and fix for 5-20
seconds with Sublite V. After the layering procedure has been completed, apply UNIVERSAL OXY-BARRIER
gel on the entire veneering surface and light-cure for 3 minutes with Solidilite V.
Apply translucent composite HVT to Complete the build up with incisal Final build up before final curing
incisal and interproximal areas composite
163-3. Layering technique for metal free crowns
Translucent
Incisal
Body
Translucent Incisal
Opaque
Opaque Body
Cervical
Cervical
1. Pre-Treatments
• Fabricate the model with removable segments in a usual manner.
• Expose and mark the preparation margins.
• Ensure that the restoration can be removed after polymerization process without damaging the die.
2. Application of CERAMAGE SPACER and SEP
Apply CERAMAGE SPACER to mask the die. Avoid applying to marginal areas and dry for 1-2 minutes.
After drying, CERAMAGE SPACER becomes transparent. Then apply CERAMAGE SEP to the die and to
the proximal model surfaces that may come into contact with CERAMAGE UP. Remove excess material with
oil-free compressed air.
Avoid applying CERAMAGE After drying CERAMAGE Apply CERAMAGE SEP to the die
SPACER to marginal area SPACER becomes transparent and the proximal surfaces
Note: Shake the bottle well until the sediment disappears before applying CERAMAGE SEP. Since
the SPACER contains solvents, close the cap immediately after use. The contents may solid-
ify if the cap is not closed securely.
173. Application
3. Application and light-curing of UNIVERSAL OPAQUE
Apply the first thin masking layer of Pre-Opaque (UNIVERSAL OPAQUE) uniformly with a Uni Brush No. 4
and cure for 1 minute with Solidilite V. Avoid applying to marginal areas. After the application of the second
Opaque layer with UNIVERSAL OPAQUE, the die should be uniformly masked in the desired shade. Cure
the second layer again for 3 minutes with Solidilite V.
First application Uniformly mask with
UNIVERSAL OPAQUE
Note: After applying UNIVERSAL OPAQUE, clean the Uni Brush No 4 with alcohol. The brush should
not be cleaned with self- curing resin liquid.
4. Application and light-curing of Cervical
Cervical composites are highly chromatic and reproduce cervical shade even in thin layers. Maximum
thickness of each individual layer should not exceed 1 mm. Dispense Cervical composite by turning the
dispenser sleeve clockwise to apply from the marginal area of the restoration towards to the centre in a
half moon shape and intermediate cure (fixation) for 5-20 seconds with Sublite V. Continue toward to the
proximal area and pre-cure for 1 minute with Solidilite V.
Apply Cervical composite directly from Continue to proximal and / or
the dispenser to the cervical area palatal areas and light-cure for 1
minute
185. Application and light-curing of Body
Build up Body composite step by step with the dispenser corresponding to the anatomical body shape of
the natural tooth. Fix the build-up in between for 5-20 seconds with Sublite V. Design the dentin in a way
that mamelon shape remains outlined.
Make sure to provide adequate space for the subsequent application of translucent and incisal materials
and light-cure for 1 minute with Solidilite V.
Apply Body composite and fix the Continue step by step directly with
free build-up the dispenser or brush to design
the dentin anatomically
6. Application and light-curing of Translucent and Incisal
Apply translucent composite e.g. HVT for standard layering as intermediate layer to the incisal / interprox-
imal area and fix for 5-20 seconds with Sublite V. Then complete the build up with incisal composite and
fix for 5-20 second with Sublite V. After the layering procedure has been completed, apply UNIVERSAL
OXY-BARRIER gel on the entire veneering surface and light-cure for 3 minutes with Solidilite V.
Apply translucent composite e.g. Complete the build-up with Incisal Apply UNIVERSAL OXY-BARRIER
HVT at the incisal and interproximal composite completely on the entire veneering
areal surface before final curing
193. Application
3-4. Layering technique for inlays and onlays
> 1.2 mm
Premolar >1.2 mm
Molar >1.5 mm
>1.0 mm >1.2 mm
>0.8 mm
1. Pre-Treatments
• Fabricate the model with removable segments in a usual manner.
• Expose and mark the preparation margins.
• Block out undercuts with blocking wax or blocking out resin and ensure that the restoration can be removed
after polymerization process without damaging the die.
2. Application of CERAMAGE SPACER and SEP
Apply CERAMAGE SPACER to the cavity floor corners. Avoid applying to marginal areas and dry for 1-2
minutes. After drying, CERAMAGE SPACER becomes transparent. Then, apply CERAMAGE SEP in the
cavity and the margins. Remove excess material with oil-free compressed air.
Block out undercuts with wax After drying CERAMAGE Apply CERAMAGE SEP in the
or resin before application of SPACER becomes transparent cavity and the margins
CERAMAGE SPACER
Note: Shake the bottle well until the sediment disappears before applying CERAMAGE SEP. Since
the SPACER contains solvents, close the cap immediately after use. The contents may solid-
ify if the cap is not closed securely.
203. Application and light-curing of Cervical, Body, Incisal / Occlusal
Apply the first layer of Cervical or Body composite to the cavity. Maximum thickness of each individual
layer should not exceed 1 mm. Then, pre-cure for 1 minute with Solidilite V. Make sure to provide space for
subsequent application of Incisal and Incisal Effect materials. Complete the restoration by using Incisal and
Incisal Effect materials (e.g. Occlusal). After the layering procedure has been completed, apply UNIVERSAL
OXYBARRIER gel on the entire inlay or onlay and cure for 3 minutes with Solidilite V. After removing the
UNIVERSAL OXYBARRIER gel, finish the restoration as described in the chapter “5. Contouring, finishing,
and polishing”.
Apply Cervical or Body compos- Cusps and ridges may be Finished restoration after
ite to the cavity. Ensure enough supplemented by Incisal or Incisal contouring and polishing
space for the subsequent applica- effect
tions
214. Special applications
4-1. Application of Opaque Dentin
CERAMAGE UP Opaque Dentin shades are identical with Body shades, but slightly more opacious. They are
recommended for thin layers to achieve a labial or lingual harmonious and correct dentin shade. They also can
be used for characterizations e.g. application on Mamelons.
Opaque
Dentin
Opaque
Dentin
4-2. Application of UNIVERSAL OXY-BARRIER Gel
UNIVERSAL OXY-BARRIER is a masking gel that inhibits oxygen. It’s applied to the restoration before final
polymerization to minimize the formation of an inhibition layer on the surface of the veneering composite.
Consequently the gel ensures complete curing of CERAMAGE UP.
Application on the entire veneer- Application to the occlusal areas
ing surface ensures a sufficient of posterior restorations assists
curing of CERAMAGE UP subsequent contouring and
polishing
Note: After completing the final polymerization procedure, remove UNIVERSAL OXY-BARRIER gel
completely from the restoration using running water and / or steam cleaner.
224-3. Additions after curing CERAMAGE UP
Polymerized and / or polished CERAMAGE UP surfaces must be roughened mechanically with diamond
burs, Dura-Green stones or blasting with aluminum oxide Al2O3 (50-100 µm) with a pressure of 1-2 bar before
further masses are applied. Scrub off any dust with a brush or blast it off with oil-free compressed air. Then,
apply CERAMAGE UP masses supplementaly on the dry surface without using any modelling or bonding
liquids.
Clean the roughed surface with Apply the supplement material
compressed air without using modelling liquid or
any other bonding liquid
Note: Cleaning with water or steam cleaner must be avoided in order to get sufficient bonding of
the supplement CERAMAGE UP layer. Don’t use modelling liquid or any other bonding liquid
before application of the supplement masses.
4-4. Additions after curing CERAMAGE
Polymerized and / or polished CERAMAGE surfaces must be roughened mechanically with diamond burs,
Dura-Green stones by blasting with aluminum oxide Al2O3 (50-100 µm) with a pressure of 1-2 bar before
further masses are applied. Scrub off any dust with a brush or blast it off with oil-free compressed air. Then
apply one layer of Cera Resin Bond (CRB) I on the entire surface with a brush. Leave it undisturbed for 10
sec. Then, apply one layer of CRB Bond II on the entire surface and light-cure for 1 min. with Solidilite V. Apply
CERAMAGE UP masses supplementaly on the dry surface.
235. Contouring, finishing and polishing
5-1. Contouring
Due to its high ultrafine ceramic filler content, CERAMAGE UP composite is extremely wear resistant and
exhibits outstanding physical properties, just by light curing. Therefore, polymerized composite surfaces must
be trimmed with suitable rotary instruments. It is not recommended to use carbide cutters or coarse diamond
burs. The well suitable rotary instruments of the Ceramage Finishing & Polishing Kit allows you to contour,
finish and pre-polish ceramic reinforced micro hybrid composites systematically.
First use Dura-Green abrasives, available in various shapes to contour composites and to structure the
surface details with a rotation speed of approx. 10,000-15,000 rpm.
Contour the composite surface and structure
anatomical details with Dura-Green abrasives
Note: Don’t use carbide cutters or coarse diamond burs for contouring CERAMAGE UP.
5-2. Contouring of fissures
Fissure details of posterior restorations can be gently adjusted and smoothed in one step with the triangular
shaped Robot Carbide Fissure Bur. The shape is particularly suitable for post contouring of pits and fissure
with only minimal heat generation.
Contour with Robot Carbide Fissure Bur
5-3. Finishing and polishing
After contouring it’s essential to pre-polish and smooth the surface and anatomical details with diamond
impregnated silicone polishers e.g. CompoMaster coarse. These polishers contour and smooth rough compos-
ite surfaces in one working step, depending on the contact pressure. A speed of app. 10.000-15.000 rpm is
recommended. Then, perform final pre-polishing and high gloss polishing by using DURA-POLISH and DURA-
POLISH DIA polishing pastes.
Finish with CompoMaster Coarse
245-4. Pre-polishing and high-gloss polishing
For pre-polishing, use the aluminum oxide impregnated polishing paste DURA-POLISH with a brush. With a
low pressure and a rotation speed of approx. 10,000 rpm it creates perfectly homogeneous surfaces even in
difficult to reach areas (occlusal /interproximal area).
For final high-gloss polishing use the micro fine diamond particle impregnated polishing paste DURA-POLISH
DIA at first with a brush with a low pressure and a rotation speed of app. 10.000 rpm. The particle size of
DURA- POLISH DIA is matched to the ceramic filler of CERAMAGE UP. The subsequent polishing with a felt
wheel or wool mop achieves long lasting high gloss and durable composite surfaces in a very short time.
The efficient two steps polishing Pre-polish with DURA-POLISH on DURA-POLISH DIA on a wool mop
system with DURA-POLISH and a brush with low pressure and a achieves long lasting high gloss
DURA-POLISH DIA polishing pastes rotation speed of app.10,000 rpm
5-5. Case examples
Anterior metal free crown Anterior metal supported crown
Inlay Posterior metal supported crown
5-6. Preparing for cementation of metal free restorations
In order to achieve an excellent bond between CERAMAGE UP composite, the cementation side of the resto-
ration has to be carefully blasted with Al2O3 (50-100 µm) at 1-2 bar pressure. Following the try-in in the dental
office and subsequent cleaning, the cementation side is again roughened with 50-100 µm diamond directly
prior the adhesive cementation. The surfaces need to be silanized to enable a chemical bond.
256. Technical data
6-1. Light-curing chart
Procedure Solidilite V Solidilite EX
Curing of Pre-Opaque 1 min 1 min
Curing of Opaque 3 min 3 min
Preliminary curing 1 min 1 min
Curing of Pontic 3 min 3 min
Final light-curing 3 min 5 min
XS / UNI-XS
Procedure Eclipse Junior
HiLite Power
Curing of Pre-Opaque 1.5 min 1.5 min
Curing of Opaque 3 min 3 min
Preliminary curing 1.5 min 1 min
Curing of Pontic 3 min 3 min
Final light-curing 3 min 5 min
Note: CERAMAGE UP composites can be light-cured in all light-curing units recommended by
SHOFU. The types of the unit and light-curing times are displayed in the Light-curing chart.
In order to guarantee a sufficient light-curing of CERAMAGE UP materials, make sure that the
restoration is placed at optimal position for sufficient curing. Please refer to the manufactur-
er’s instructions of curing units you use.
266-2. Depth of cure (based on SHOFU test method)
Material Shade Curing time Solidilite V (min.) Depth of cure (mm)
Pre-Opaque - 60 0.7
Opaque A1O 180 0.24
A3O 180 0.23
A4O 180 0.21
Cervical AC1 60-180 1.3-1.8
AC2 60-180 1.0-1.4
Opaque Dentin ODA1 60-180 1.8-2.5
ODA3 60-180 1.5-2.1
ODA4 60-180 1.2-1.6
Body A1B 60-180 2.5-3.4
A3B 60-180 1.8-2.6
A4B 60-180 1.8-2.5
Incisal 56 60-180 4.2-6.8
59 60-180 4.0-5.8
Translucent T 60-180 5.5-8.6
T-Glass 60-180 6.2-9.6
Concentrate MI 60-180 2.4-3.4
OC 60-180 3.7-6.3
AM-Y 60-180 3.2-4.6
MY 60-180 1.6-2.4
GUM-D 60-180 1.4-2.0
6-3. Physical data
CERAMAGE UP Test Method
Vickers hardness (HV) 40
Flexural strength (MPa) 140
Flexural modulus (GPa) 6.4
Based on SHOFU test method
Compressive strength (MPa) 300
Water absorbtion (µg/mm3) 24
Toothbrush abrasion (%) 0.69
6-4. Bond strength to metal (semi-precious alloy)
CERAMAGE UP Test Method
28.0 MPa Based on SHOFU test method
27You can also read