F F e - 2019 Registration Guide - UC ANR
←
→
Page content transcription
If your browser does not render page correctly, please read the page content below
Food Fiesta

       2019
Registration Guide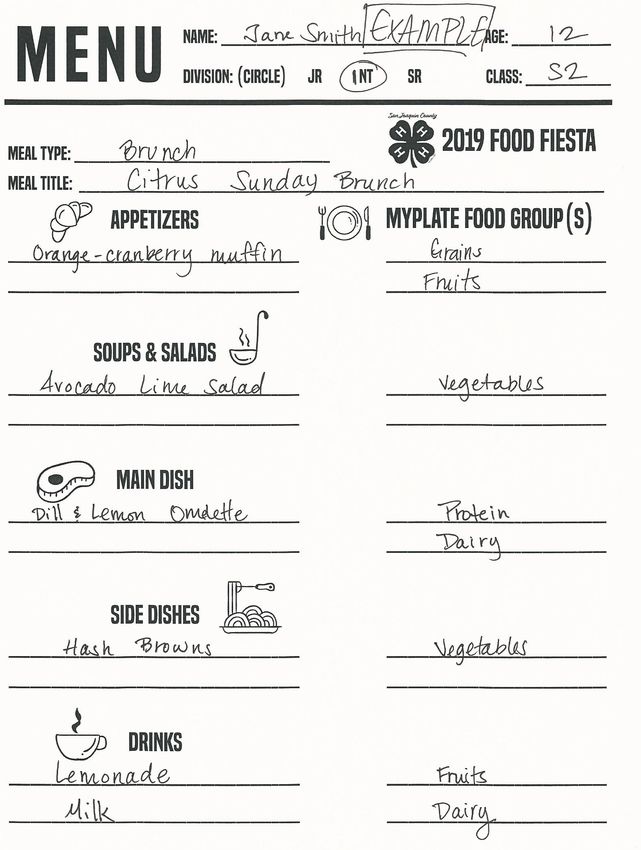
Adapted from University of Nebraska - Lincoln Extension, 4-H
Foods Judging Guide and Washington State University -
Extension, publications: C1097E, C1098E, C1099E.

1/20/2019
Who is Eligible?
All 4-H members are welcome, especially those enrolled in Foods/Nutrition, Cake Decorating, Breads, and
Beginning 4-H projects to the Annual San Joaquin County 4-H Food Fiesta.
Clover members (ages 5-8) are welcome to attend the event, but may not enter any of the competitive
activities, including group classes. However, Clover-friendly group activities will be available throughout the
day.
Classes and Divisions List
Exhibitors will be divided into divisions by their ages and classes by the type of dish/display they are entering.
Each exhibitor may enter only once in each type of class (showmanship, exhibit, recipe contest, or
table setting). Changes cannot be made to an exhibitor’s class/division once registration closes.
Age Divisions
Please use the exhibitor’s 4-H age when determining their division. For example, a youth who turns 11 on
December 31st would have a 4-H age of 11 and register as Intermediate, but a youth who turns 11 on January
1st would have 4-H age of 10 and register as a Junior.
Age Divisions
Junior Ages 9-10
Intermediate Ages 11-13
Senior Ages 14-19
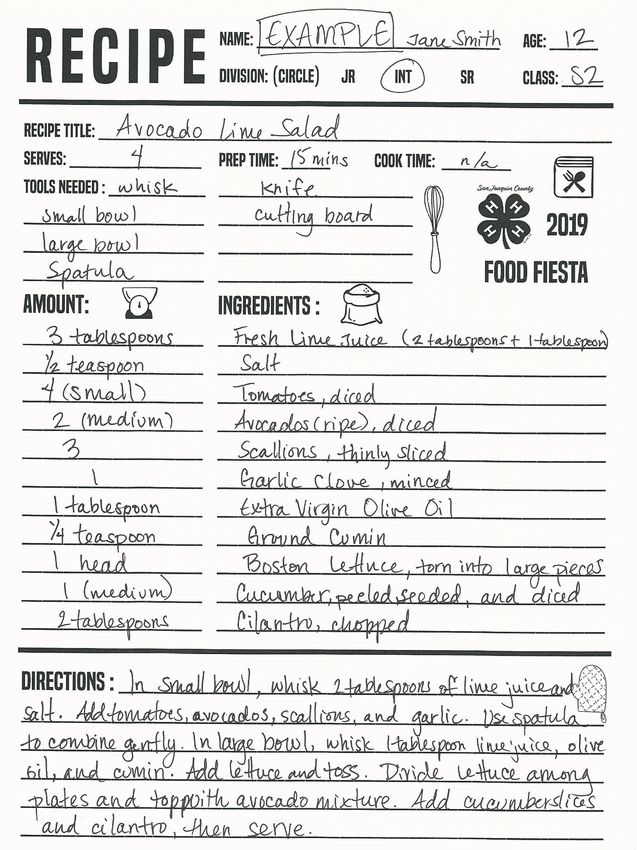
Individual Showmanship Classes
Participants create a balanced menu and choose one dish from the menu to prepare* and present to a panel of
judges. Each entry consists of:
• Dish prepared by participant*
• Place setting*
• Recipe Card form
• Menu form
(*)The Pantry Panic class does not require these items since it is a non-cooking option.
Participants in the showmanship classes will be judged on the presentation of their menus and recipes.
Participants may prepare their dish in advance, but they will also have access to a kitchen for any preparation
needs one hour before the event. Participants will set up a place setting (see page 4), present their dish to a
panel of judges who usually taste it, and undergo a short interview. A completed recipe card and menu form
(see pages 6-10) must be provided and safe food handling practices must be followed at all times.
Participants in the Pantry Panic class will be presented with a stocked pantry and will have to create a
balanced menu from the items available in that pantry. They will have one hour and access to a collection of
recipe books to create their menu and a recipe card for one item from their menu. At the end of the hour,
participants will present their menu and recipe card to the judges and undergo a short interview.
2|P a g e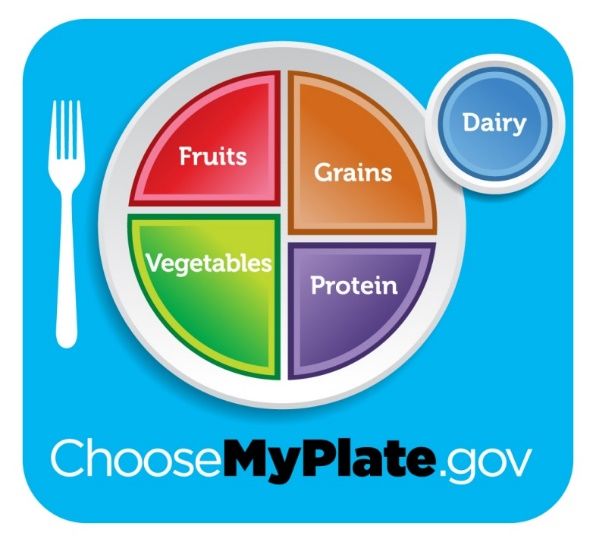
Class     Exhibit Type
    S1       Appetizer
     S2      Soup or Salad
     S3      Side Dish
     S4      Main Dish
     S5      Pantry Panic (non-cooking option)

Individual Project Exhibit Only

The exhibitor prepares a dish in advance that can be safely left at room temperature for several hours. The
dish must be checked in and displayed between 9:00-10:00am. No place setting is required, but a recipe card
must be provided (see pages 6-10). There is no interview component, and the exhibitor does not need to be
present at the event once their entry is checked in and displayed. The projects are judged on taste alone
(*decorated items are judged on visual presentation and only tasted if exhibitor chooses).

   Class                      Exhibit Type
    P1       Cookies
     P2      Yeast Breads
     P3      Quick Breads
     P4      Pies
     P5      Cakes
     P6      Candy
     P7      Preserves
     P8      Decorated Item* (Cakes, cupcakes, etc)

Recipe Contest

The Recipe Contest is for teams of two youth. Teams will be given a simple baking recipe on the day of the
competition and access to ingredients and equipment. Teams will have two hours to prepare their baked
goods and are encouraged to experiment and improve the recipe with the items on hand. The final product will
be tasted by the audience, who will select the winners by a paper ballot vote.

   Class     Exhibit Type
     R1      Recipe Contest

Group Table Settings

The maximum size of each group is 8 youth and 2 adults. The group will decorate a table to fit one of three (3)
classes and the table setting theme to include tablecloths or placemats (or both), place cards, napkins,
centerpieces, and utensil place setting.

   Class     Exhibit Type
     T1      Banquet/Party (8 settings, exhibitor must use 72” circular table provided at venue)
     T2      Dinner for Two (2 settings, exhibitor must bring small table)
     T3      Picnic/Camping (4 settings, exhibitor must bring table/blanket)

3|P a g e
Place Setting Guidelines
The following guide is a basic set of rules for setting the table. It can be used in formal as well as informal
situations.
An attractive table adds to the enjoyment of a meal. To set the table, the 4-H’er needs a “place setting” for
each person. A table setting should include the following items:
• Dinnerware (plates, cups, saucers, and bowls)
• Glassware (glasses of all shapes and sizes)
• Flatware (forks, spoons, and knives)
• Napkins
• Centerpiece (group setting)
• Placemats
• Place cards
The following rules for setting a table correspond to the
numbers seen in the table setting illustration.
1. The flatware, plate, and napkin should be one
inch from the edge of the table.
2. The plate is always in the center of the place
setting.
3. The dinner fork is placed at the left of the plate.
4. If a salad fork is used, it is placed to the left of
the dinner fork.
5. The napkin is placed to the left of the fork, with
the fold on the left. It can also go under a fork,
or on top of the plate.
6. The knife is placed to the right of the plate with
the sharp blade facing in towards the plate.
7. The teaspoon is placed to the right of the knife.
8. If a soup spoon is needed, it is placed to the right of the teaspoon.
9. The soup bowl may be placed to the right of the teaspoon.
10. The drinking glass is placed at the tip of the knife.
11. If a salad plate is used, place it just above the tip of the fork.
12. The cup or mug is placed to the top right of the spoons.
Tips for your place setting for individual classes:
Placemats can be used for special occasions.
Dinnerware and flatware should be chosen as appropriate for the occasion and that complement each
other. Matching or blended colors or textures in the dishes or contrast something different make a table
setting look attractive.
Table setting items should be appropriate for the meal served. Snacks on paper plates are appropriate
while a home-cooked dinner should be served on attractive dishes to help show it off.
Only the utensils needed are placed on the table.
All entries will be limited to about 22 inches x 15 inches.
Please do not include such things as candles, flowers, or a centerpiece in your place setting.
Tips for group table setting classes:
The centerpiece should be attractive. Simple ones, such as fresh flowers, a plant, or fruit can be used.
If candles are used, they should be of the length so that if they were lit, they would be above eye level.
The centerpiece should be low enough so that the people at the table can see over it; it should be
colorful and blend with the tablecloth and the dishes; and be fresh and clean looking.
4|P a g eNutrition Content
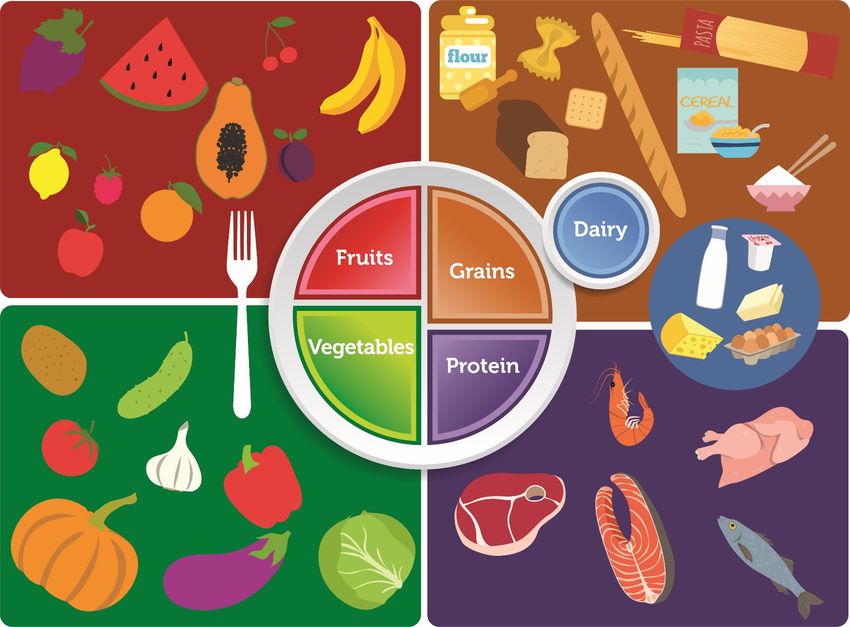
All entries should meet the standards of MyPlate. An appropriately written menu should follow the Dietary
Guidelines for America and MyPlate to assure nutritional adequacy. Good menus have choices from every
food group and get the most nutrition out of the calories provided. As a general guideline, a meal should have
at least three different food groups to help balance out what the body needs every day to get all the nutrients
needed.
Sample Menus: Be sure to use capital letters for all words except
prepositions and conjunctions. List foods in order they will be served.
Breakfast Lunch Dinner
Grapefruit Peanut Butter and Jelly Sandwich Salad
Cereal with Milk Carrots with Ranch Dressing Steak
Eggs and Bacon Banana Baked Potato
Orange Juice Milk Green Beans
Bread
Milk or Water
Ice Cream
5|P a g e6|P a g e
7|P a g e
8|P a g e
9|P a g e
10 | P a g e
You can also read