A Curriculum for Digital Media Creation - Sixteen Lessons, from Storyboarding to Producing a Documentary
←
→
Page content transcription
If your browser does not render page correctly, please read the page content below
A Curriculum for
Digital Media Creation
Sixteen Lessons, from Storyboarding
to Producing a Documentary

By Marco Antonio Torres and Ross Kallen
Sponsored by Apple Inc.
Introduction
Every day digital media becomes more important as a means for receiving,
producing, sharing, and broadcasting information. Tools and resources that were
once the exclusive property of a few are now available to many more people.
Tomorrow’s publishers, marketing people, and community leaders will need to know
how to use digital media to persuade others and tell new and effective stories.
Knowledge of the rules and grammar of movie production, broadcasting, and media
presentation is a new powerful literacy.

Today’s educators and students will find it particularly valuable to be skilled in the
use of digital media tools such as Final Cut Studio. To help, Apple has created the
Apple Authorized Training Center for Education program, designed for schools that
use Apple’s professional software solutions in their curriculum. In addition to using
the curriculum that the program offers, students have the opportunity to receive
Apple’s Pro Certification in Final Cut Studio. This certification communicates to
the world that these students are ready to do professional work on video editing
projects.

This curriculum guide is designed as a supplemental resource to the Final Cut
Studio Certification materials. The 16 lessons included here are linked to either
content area standards or skill set competencies and are meant to be taught during
a traditional 18-week semester. This guide also provides the resources to align a
moviemaking/editing class to a Regional Occupational Program (ROP) or Perkins-
funded school-to-career program.

The authors of this curriculum are Apple Distinguished Educators with extensive
experience in media production (see “Author Biographies,” next). These are not
untested projects—they are lessons that the authors use in their classrooms to
prepare students for leadership in the digital media production and broadcasting
fields. Each project includes a list of tools, estimated time required, tips, evaluation
suggestions, additional resources, and more. The “Real-World Connection” section
in each lesson explains how the skills learned in that lesson will be valuable in the
students’ professional lives.

The 16 projects are the following:
• Lesson 1: Developing Movie Ideas
• Lesson 2: From Script to Storyboard
• Lesson 3: Shoot It! The Production Process
• Lesson 4: Lighting a Scene and a Person
• Lesson 5: Working with Audio
• Lesson 6: Composing Camera Frames
• Lesson 7: Documentary Movies 101—A Roll and B Roll

© 2008 Marco Antonio Torres and Ross Kallen. All rights reserved.
A Curriculum for Digital Media Creation                                            3
Sixteen Lessons, from Storyboarding to Producing a Documentary

• Lesson 8: Fix It in Post!
• Lesson 9: Producing a Music Video
• Lesson 10: Producing a Documentary
• Lesson 11: Producing a 30-Second Super Bowl TV Ad
• Lesson 12: Creating a Cross-Curricular Project
• Lesson 13: Film • Fiction
• Lesson 14: Budgeting
• Lesson 15: Filming a Professional-Looking Product
• Lesson 16: The Show!

Author Biographies
Marco Antonio Torres, Teacher, Media Coach, San Fernando High School, Los
Angeles Unified School District, CA

Marco Torres is an internationally recognized Social Studies teacher in an urban
high school in Los Angeles. He is also a professional filmmaker, photographer,
designer, keynote speaker, and digital media professional trainer. Torres is an Apple
Distinguished Educator and serves on the George Lucas Educational Foundation
Board. The California legislature has recognized him as a California Teacher of the
Year. Learning creatively is his passion. In his teaching, Torres combines media
technology, content area focus, community building, and student empowerment.
He believes in making learning more relevant, meaningful, and applicable with the
assistance of today’s new teaching, learning, networking, and creative environments
and resources. His specialty is documentary-style production and how to plan,
manage, execute, and showcase student movie projects.

Ross Kallen, Teacher, Digital Media Production, Rancho Bernardo High School,
Poway Unified School District, Poway, CA

A digital media specialist for over 10 years, Ross Kallen created the Rancho Bernardo
High School Digital Media Arts Program and was recently honored by the National
Academy of Television Arts and Sciences with five National Student Television
Excellence Awards. He has led professional training seminars in the areas of live
production, post-production, and studio design at state and national technology
conferences and seminars. Kallen is an Apple Distinguished Educator and has
presented workshops and seminars at national and international events ranging from
the National Association of Broadcasters (NAB) convention to the Digital Olympic
Forum for the Beijing 2008 Olympiad. Many of his graduates have won awards at the
local, regional, and international level and have been showcased on Apple’s website.
Kallen’s media program has also been recognized in Government Video Magazine,
and the California legislature selected him as a “High Tech Teacher” in 2000.

Setting Up the Classroom Studios
When George Lucas made his first epic Star Wars movie in 1977, he had to invent
or purchase equipment that was custom-made for his movies. He was then the only
one who had access to those tools. After a break, Lucas revisited his space saga
and made Episodes I, II, and III with a new set of tools. The digital revolution had
restructured how he would make these movies. Moreover, the tools his team used

© 2008 Marco Antonio Torres and Ross Kallen. All rights reserved.
A Curriculum for Digital Media Creation                                                4
Sixteen Lessons, from Storyboarding to Producing a Documentary

for the new movies could now be purchased over the counter, giving moviemakers
everywhere access to the same tools as Industrial Light and Magic. This new
democratic access to tools and resources once exclusively available to professional
filmmakers and university film professors has changed how stories are produced
and how we, as teachers, teach the art of digital storytelling. This section provides
information about setting up your classroom studio. It includes information about
software and equipment students will use in the projects as well as suggestions for
additional post-production equipment that will come in handy.

Setting up a studio in your classroom is very similar to setting up a professional
studio. Thanks to the flexibility of Final Cut Studio, it is not mandatory to purchase
additional post-production equipment. However, workflow is key in a classroom
setting, and learning how to organize, manage, and distribute movie projects does
require additional items to help facilitate the process of production. This chapter offers
suggestions for supportive gear based on what can work for your classroom space
and budget. Three options are presented for you to choose from:

The Ideal Setup: When money is not much of an issue and additional space is
available

The Great Setup: Excellent for schools that eventually will grow into a more ideal
situation, but that need to work up to that point

A Good Setup: Not the ideal, but a good way to begin a production studio and get
the classroom ready for the Apple Certification curriculum

Technology Hardware
The following chart provides detailed recommendations for the Ideal Setup, the Great
Setup, and the Good Setup. All of these options can evolve and expand as budgets
grow and expand. If students have a camera with microphone inputs, a mic, a good
sense of light (knowing how to use what is natural and available), Final Cut Pro, and
a plan—they can create a great movie. The recommendations for additional items can
help add production value to the movie projects.

© 2008 Marco Antonio Torres and Ross Kallen. All rights reserved.
A Curriculum for Digital Media Creation                                                                  5
                                             Sixteen Lessons, from Storyboarding to Producing a Documentary

                                            Make sure all of the gear is labeled and inventoried. You can develop a checkout
                                            form to track all equipment being used by students. It works well to have one or two
                                            students who are responsible for checking out all equipment, with the requested gear
                                            requiring your approval as the teacher (you have the role of the executive producer—
                                            the ultimate money decider). The requested items need to be reflected in the movie
                                            being shot. In other words, if a movie is shot in the middle of the day, there is no need
                                            for an on camera light. Fill lights can be added via Lightdisks.

           The Ideal Setup                                The Great Setup                                    The Good Setup

Computer   Mac Pro, MacBook Pro, or iMac with as          Mac Pro, MacBook Pro, or iMac with as              Mac Pro, MacBook Pro, or iMac with
           much storage as possible                       much storage as possible                           as much storage as possible

 Camera    HD Pro Camcorders                              3 CCD High-End Camcorders                          3 CCD Camcorders
 & video   •   Panasonic AG-HVX200                        • Panasonic AG-DVX100B                             Make sure the cameras you
 support
           •   JVC GY-HD11 DU                             • Canon GL-2                                       order have both a mic port and a
           •   Canon XL-H1                                • SONY DCR-VX2100                                  headphones jack. Most of today’s
                                                                                                             consumer cameras don’t have these
           •   Sony HVR Z1U                               • Video deck                                       essential ports. Also, cameras that
           • Video deck                                   If you cannot afford a video deck, use             have a shoe mount make it easier to
           High-end cameras are not designed              another camera for the deck. Just use              mount an additional mic, light, and so
           to be used as playback machines. We            it for that purpose alone. You can find            on.
           recommend getting a Sony DSR-11, a             decent and compact cameras for under
                                                          $600 that can be dedicated video decks.            Video Reference Monitor
           dedicated and durable playback machine
           that can fit on a desktop. Depending on        See the discussion about the merits of a           We have found portable DVD
           the size of your program, you may want to      dedicated video deck in “Ideal Setup.”             players that have RCA/Composite
           buy one for every capturing station.                                                              In connections. Connect the camera
                                                          Video Reference Monitor                            or the video deck directly into it and
           Note: Not all computers will be used to        You can use any monitor that accepts an            you have a portable video reference
           capture video. Some will only be used to       S-Video In connection from the camera              monitor. You may want to get a DVD
           edit. Also, it’s more expensive to maintain    or video deck. Ideally, you would want             player that has a 16:9 and 4:3 aspect
           a camera if it’s used as a player and          the S-Video connection for better picture          ratio switch. This may come in handy
           recorder as well. Try and use it for one       quality; however, if you only have RCA/            depending on how you shoot: wide
           function—videotaping. The DSR-11 can           Composite In connections, it will work             anamorphic or 16:9 or the more TV
           do the player portion.                         (but will look “fuzzier” or softer).               standard of 4:3 (more square looking).
           Video Reference Monitor
           Another essential broadcast tool is an
           NTSC color reference monitor. These
           monitors help you see what the project will
           look like on TV. Colors from the monitor,
           titles, and graphics look different on TV
           than on a computer screen. A computer
           screen looks at images via pixels, or dots;
           a TV uses lines to display an image. This
           difference leads to different results. A
           video reference monitor helps you view
           a more accurate color representation.
           Sony and JVC make the best reference
           monitors but range in price between $600
           to $1000. HD reference monitors are
           available as well, but be prepared to pay.

                                             © 2008 Marco Antonio Torres and Ross Kallen. All rights reserved.
A Curriculum for Digital Media Creation                                                                  6
                                           Sixteen Lessons, from Storyboarding to Producing a Documentary

           The Ideal Setup                              The Great Setup                                    The Good Setup

  Sound Shotgun/boom stereo mic and a wireless          Shotgun/boom stereo microphone and                 Shotgun/boom stereo microphone and
        UHF lavaliere microphone system                 a wireless UHF lavaliere microphone                a wireless UHF lavaliere microphone
                                                        system                                             system
           There are several mics here to choose
           from. Reputable companies for these are      There are several mics here to choose              Entry-level mics are available. The
           Sennheiser, Audio Technica, and Azden        from. Reputable companies for these are            sound may not be as “warm” and
           (with a price range of $400 to $1000).       Sennheiser, Audio Technica, and Azden.             clear, but it is still way better than what
           When buying a camera, make sure you          (Range: $400 to $1000)                             comes with the camera. Plus, learning
           have a microphone port and a headphone                                                          what mics to use is a key lesson in
           port as well. Buy good headphones                                                               itself.
           with good bass. We recommend
           any headphones over $40. If you’re
           interviewing and working the camera,
           we recommend ear buds, which are less
           obvious than the bulky earmuffs. Sure,
           Ultimate Ear, and V-Moda all make decent
           ear bud headphones.

           You may want to purchase a boom pole
           with a shock mount to connect the pole to
           the camera. The shock mount suspends
           the microphone to avoid the recording
           of microphone movement. Poles can
           be purchased for around $100 to $300
           (better, carbon fiber ones are more
           expensive). Shock mounts usually have
           to be purchased separately for $50 to
           $150. Find one that fits your microphone
           properly.

           Another helpful item is a windscreen for
           the sensitive microphones. They eliminate
           the annoying blowing sound that appears
           in most family outdoor excursion videos.

Speakers   M-Audio Studiophiles BX8                     M-Audio Studiophiles BX5                           An affordable pair of speakers from
                                                                                                           your local electronics store
           M-Audio has education pricing. There are     M-Audio has education pricing. There
           many options here, but M-Audio has been      are many options here, but M-Audio
           very reliable and its education department   has been very reliable and its education
           can facilitate the dialogue between what     department can facilitate the dialogue
           you want to do and what is best for your     between what you want to do and what is
           budget.                                      best for your budget.

                                           © 2008 Marco Antonio Torres and Ross Kallen. All rights reserved.
A Curriculum for Digital Media Creation                                                                  7
                                              Sixteen Lessons, from Storyboarding to Producing a Documentary

           The Ideal Setup                                 The Great Setup                                    The Good Setup

Tripod & Carbon fiber tripod legs and a fluid tripod       Tripod legs and a fluid tripod head                Tripod legs and a fluid tripod head
    head head
                                                           For this option, we recommend the same             A tripod is essential. We recommend
           The carbon fiber is a light material. These     things as with the Ideal Setup; however,           the same options here as for the
           tripods will last a long time and are not       the carbon fiber is optional. You can find         Great Setup. There are less expensive
           heavy. We recommend Bogen, Manfrotto,           less expensive aluminum tripods. We                tripods, but in a classroom, the wear
           and Gitzo. The fluid tripod heads are very      still recommend the same fluid head.               and tear of daily use takes its toll on
           important. We recommend Bogen. Like             Bogen makes a really good one for the              a tripod. Also, remember what can
           the name says, they move fluidly and            recommended cameras.                               happen to the camera if the legs give
           are ideal for shooting scenes where the                                                            out.
                                                           Stability is key.
           action moves and the cameraperson has
           to follow. The heads are basically priced
           according to how much weight they can
           hold. For your purposes, you can use the
           heads that range in price from $200 to
           $400.

           Optional: Some tripod/fluid head combos
           come with remote zoom and focus
           buttons. This is your call.

           Stability is key.

  Lights/ Studio Lights                                    Studio Lights                                      Studio Lights
Light Kit The Photoflex Starlite Medium DLX                The Photoflex Starlite Medium DLX                  The Photoflex Starlite Medium
          Location Kit 2 includes two complete             Location Kit 2 includes two complete               Location Kit 1 comes with a Starlite
          light setups with a multi-kit case. This         light setups with a multi-kit case. This           QL light head, Starlite Connector,
          company has great pricing for schools            company has great pricing for schools              two 1000 watt lamps, a medium
          and replacement parts are available.             and replacement parts are available.               SilverDome soft box, and a light stand.
                                                                                                              This company has great pricing for
           Mobile Lights                                   Mobile Lights                                      schools and replacement parts are
           LED Lights by LitePanels are no-heat            LED Lights by LitePanels are no-heat               available.
           producing lights that light beautifully for     producing lights that light beautifully
                                                                                                              Mobile Lights
           near-broadcast quality. They are compact,       for near-broadcast quality. They are
           flat, and durable. They cost about $1000        compact, flat, and durable. They cost              Sony’s HVL-20DW2 double-decker
           with the color filters, a hot shoe for an on-   about $1000 with the color filters, a hot          camcorder light shines either 10 or
           camera solution, a battery, and a charger.      shoe for an on-camera solution, a battery,         20 watts of light on the scene to help
                                                           and a charger.                                     you capture footage in nearly any
           Frezzi MF-4X                                                                                       condition.
                                                           The UL2-20 Ultralight-2
           This lighthead is a workhorse. It’s bright
                                                                                                              Lightdisks
           enough to fill in the darker areas during       This inexpensive, compact camera-
           interviews. This is an industry standard.       mounted light is one of the most widely            A 4 in 1 lightdisk set from Photoflex
                                                           used lights for from-the-field news                can also help diffuse or enhance any
           Lightdisks                                      reporting. The UL2-20 can easily mount             filming situation.
           A 4 in 1 lightdisk set from Photoflex can       to all professional cameras/camcorders.
           also help diffuse or enhance any filming
                                                           Lightdisks
           situation.
                                                           A 4 in 1 lightdisk set from Photoflex can
           Accessories                                     also help diffuse or enhance any filming
           If you purchase a Sony camera, we               situation.
           recommend a Coco battery converter
           by Bebob, which allows you to use your
           camera batteries to power the on-camera
           light. This makes the mobile kit more
           compact.

                                              © 2008 Marco Antonio Torres and Ross Kallen. All rights reserved.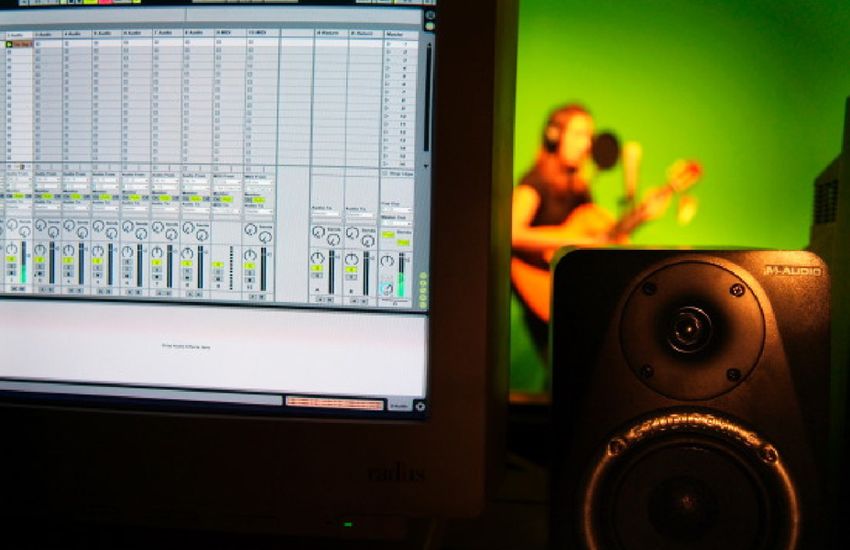
A Curriculum for Digital Media Creation                                                               8
                                        Sixteen Lessons, from Storyboarding to Producing a Documentary

        The Ideal Setup                              The Great Setup                                    The Good Setup

Tapes Purchase the highest-grade tapes and        Purchase tapes from the same company                  The recommendation for tapes is the
      do not reuse them. You should create a      as your camera. For example, buy                      same as with The Great Setup.
      naming structure and do not veer from it.   Panasonic tapes for your Panasonic
      For example, write the name of the project  camera. Some tapes are dry and others
      on the tape (usually in an abbreviated      are wet. Mixing the media may result in
      way, such as “CHA” for China, followed by   dirty playheads later. Do not reuse tapes.
      a number, such as “CHA1”). This will help   You should create a naming structure and
      you locate files later.                     do not veer from it. For example, write the
                                                  name of the project on the tape (usually
        Refer to the documentation that came with in an abbreviated way, such as “CHA”
        your camera for tape recommendations.     for China, followed by a number, such as
                                                  “CHA1”). This will help you locate files
                                                  from later.

                                                     Refer to the documentation that
                                                     came with your camera for tape
                                                     recommendations.

                                       Software
                                       Final Cut Studio is a full and comprehensive production tool that is an end-to-end
                                       solution for most filmmakers. The following are some of the functions offered by this
                                       software collection:
                                       • Final Cut Pro: Logging and capturing
                                       • Final Cut Pro: Editing clips
                                       • Final Cut Pro: Multiclip editing
                                       • Motion: Compositing and animating graphics
                                       • Color: Color correction, grading, and finishing
                                       • Soundtrack Pro: Correcting, enhancing, and adding audio components
                                       • Compressor: Compressing the final projects for web or DVD
                                       • DVD Studio Pro: Creating interactive DVDs
                                       Other software titles for you to consider are:
                                       • Apple Aperture: Photography integration and correction
                                       • Apple Shake: Advanced motion graphic compositing and integration
                                       • Adobe Creative Suite: For image manipulation and integration

                                       See “Tools Used in the Lessons,” next, for other applications students use in the
                                       activities in this guide.

                                        © 2008 Marco Antonio Torres and Ross Kallen. All rights reserved.
A Curriculum for Digital Media Creation                                              9
Sixteen Lessons, from Storyboarding to Producing a Documentary

Tools Used in the Lessons
In addition to Final Cut Studio, you’ll want to have on hand some additional software
titles. Some are required to complete all of the activities in a project; others are
optional. These applications include the following:
• Graphic organizer software, such as Inspiration or NovaMind (see Lesson 1 for
  discussion)
• iMovie
• Storyboarding software (see Lesson 2 for recommendations)
• Scripting software
• Keynote

Students will use the classroom production equipment, such as microphones and
cameras, to create the films in many of the projects. In addition, you will want to have
a projector available so the whole class can view the completed projects. An iPod with
a voice recorder like a Belkin TuneTalk recorder or a solid-state portable recorder like
an M-Audio MicroTrack is optional for Lesson 5.

Setting Up Your Equipment
Here is a typical and ideal setup for the classroom computers and connected
equipment:

Throughout the year, both you and your students will find helpful to stay connected
with other digital filmmakers. In many cities, technical groups exist for sharing ideas
in person. Los Angeles, for example, has the Final Cut Pro User Group (LAFCPUG),
which meets monthly and offers a wealth of information. Many groups like the
LAFCPUG are available online. Search in the Technorati website at
http://technorati.com for blogs dedicated to this area of production.

Additional Resources
The lessons suggest resources specific to that lesson. You and your students can
also take advantage of the many blogs, podcasts, and other online resources that
are available to learn more about the production process. One we like in particular
is Ripplecast, a podcast by Steve Martin and Brian Gary (available from the iTunes
Store) where you can learn specifics via video, our favorite way of learning. Ken
Stone’s Final Cut Pro site (www.kenstone.net) provides a good collection of resources
for producers, editors, and other filmmakers interested in tips from the masters.

© 2008 Marco Antonio Torres and Ross Kallen. All rights reserved.
A Curriculum for Digital Media Creation                                        10
Sixteen Lessons, from Storyboarding to Producing a Documentary

Many books focus on the post-production side of the process. Also, some great
reference books exist for documentary moviemaking classes. We recommend two of
them, both of which look at the whole picture of documentary moviemaking:
• Directing the Documentary, Fourth Edition (Paperback) by Michael Rabiger
• Documentary Storytelling for Video and Filmmakers by Sheila Curran Bernard

© 2008 Marco Antonio Torres and Ross Kallen. All rights reserved.
A Curriculum for Digital Media Creation                                                 11
Sixteen Lessons, from Storyboarding to Producing a Documentary

lesson 1

Developing Movie Ideas
Coming up with ideas and mapping them are the most important components
of moviemaking. In this lesson, students brainstorm movie ideas using a visual
thinking software tool such as Inspiration. Each student comes up with three
movie ideas. Students then work in groups to choose three of those movies. They
develop a detailed plan for each that includes timelines, roles and responsibilities,
and production needs. Students peer review each other’s plans. To help students
understand the importance of having a plan, they then make a one-minute movie
about an object. This also gives them practice in visual storytelling.

Preparation
Download and install software for the students to map out their ideas. By using this
type of application, students can organize their ideas visually and share them with
others for additional input. We like the no-frills Inspiration for this purpose. It is both a
linear and a nonlinear thinking tool that can also work very quickly. If you don’t already
have Inspiration in your classroom, you can download a free 30-day trial version from
the company website. The website also offers a quick tour and many great examples
of Inspiration documents. (See “Resources.”) NovaMind is also an effective and good
program for mapping out ideas.

Project Steps
Activity 1: Growing Movie Ideas
1. To introduce the lesson, explain to the class that they will learn how to come up
   with new ideas for movies and nurture them into projects. Point out that there
   are no bad ideas during this part of the process. This is where a movie is born.
   First, they will brainstorm ideas as a group and then develop their own ideas.
   They will also learn how to peer assess along the way to provide feedback to
   their classmates. Emphasize that all movies require a focus and a plan. Knowing
   where a project is heading and who is doing what also helps during the editing
   process. Tell students that it’s okay to vary from one’s original plan, but having a
   structure and a path can help direct the project, people, stories, and the technical
   preparations like the lights, camera, and sound.

2. When coming up with ideas, students need to consider some essential questions.
   You can present these questions to the class as they begin to think of movie ideas,
   structures, and strategies for completion.
   • What are some cool ideas people will want to know more about?
   • Who is the target audience?
   • How long does the project need to be? Note: By doing small projects of less
     than 10 minutes long, students can produce more in a short period of time. Also,
     it’s better to create movies that make people think and have more questions
     than answers about the subject being discussed.
   • What are your initial goals?
   • Is it clichéd? Have others done it? Is it anything new?

© 2008 Marco Antonio Torres and Ross Kallen. All rights reserved.
A Curriculum for Digital Media Creation 12
Sixteen Lessons, from Storyboarding to Producing a Documentary
• How do you plan to shoot it?
• Who would be great to interview?
• Where would it be ideal to shoot?
• Do you need to get any permissions before or during the shoot?
• What equipment do you think you will need?
• What are your other needs: music, other media assets (pictures, additional
footage, graphics)?
3. Demonstrate the use of Inspiration or other visual organizing software to the
students.
4. Practice making maps for movies with the class. Pick a subject, any subject, and
grow it with Inspiration. Pick an easy movie idea and use the list of questions in
Step 2.
5. After practicing as a group, ask each student to come up with three movie ideas
and discuss them in a small group of five to six students. Each group should
then decide on the three best ideas to develop further. The brainstorming part of
the process is where we, as teachers, act as coaches. Students often get stuck
and think they can’t come up with anything. Too often they over-think their ideas.
Remind students that the first rule in brainstorming is that there are no bad ideas
at the beginning. They should get a bunch of ideas on paper even if they are just
keywords. Hopefully, this will get the ideas going.
6. After the groups have agreed on three ideas, they should map out each idea,
addressing each one’s “what,” “why,” and “how to.” When students are finished,
they should have a list of schedules, production needs, and team responsibilities
for each movie.
7. Have students peer review each other’s ideas before submitting them to you for
approval. Let students know that they will turn the ideas they developed into a
production in a later lesson.
Activity 2: A Day in the Life of “X”
1. Explain to students that they will now plan, shoot, and edit a one-minute movie
with 25 shots about any object, such as a water bottle, a rock, or a late pass, but
not a person. The goal of this activity is for the audience to empathize with the
main character, “x,” and to think visually. The assignment parameters are: final
piece = 1 minute, exactly 25 shots used, cannot show people (extreme close-ups
are OK), no audio (they can add music later), with varying angles and points of
view. In our experience, this activity creates a great buzz around the first project
and gets the students thinking outside the box.
2. Have students develop their ideas for their “A Day in the Life of X” movie and
plan their shot list. Give them 90 minutes to shoot their footage, using entry-level
camcorders.
3. Give students two to three hours to import their footage and edit their movie in
iMovie. Go over the basics of iMovie with them before they import the footage and
start editing, including how to crop and split clips. Next, students should add any
music and other audio, titles, and so on to complete their movies.
4. Using a projector, have students share their productions with the rest of the class
and complete evaluations of each other’s movies.
© 2008 Marco Antonio Torres and Ross Kallen. All rights reserved.A Curriculum for Digital Media Creation 13 Sixteen Lessons, from Storyboarding to Producing a Documentary Project Duration 3 to 4 days Competencies, Standards Descriptions Students will learn how to generate ideas, brainstorm ideas, and create a map of how the project will progress. This is a fundamental part of the moviemaking process because it acts as the project’s business plan. Student will learn to create a planning structure, make and adhere to timelines, define responsibilities, and establish a set of checks and balances between the people and the project’s goals. In the moviemaking part of the lesson, students will learn to use an entry-level camcorder, use multiple angles and composition techniques, and gain a basic understanding of how to do story editing in iMovie. Tools and Resources Tools • Graphic organizer software, such as Inspiration or NovaMind • iMovie • Entry-level camcorder • Tripod (optional) • Projector • Student Guide: Javier: Boy Pilot—An Example of a Movie Plan Resources • Information about iMovie www.apple.com/imovie www.apple.com/education/imovie • Inspiration Software, Inc. www.inspiration.com • NovaMind www.nova-mind.com • Moleskine notebook information www.moleskine.com Evaluation Ideas Students each generate three new movie project ideas. Each student group then develops three of these ideas into a plan that includes a detailed description of the movie’s production needs, schedule, and responsibilities. Three students review and approve these plans before you finally approve them. In the second activity, students produce a one-minute video. Students are given a prompt to complete their shooting in ninety minutes and then capture their footage into iMovie and make a basic edit of their story in two to three hours. Students showcase their work in class and their work is reviewed by peers for constructive feedback (positive and negative). © 2008 Marco Antonio Torres and Ross Kallen. All rights reserved.
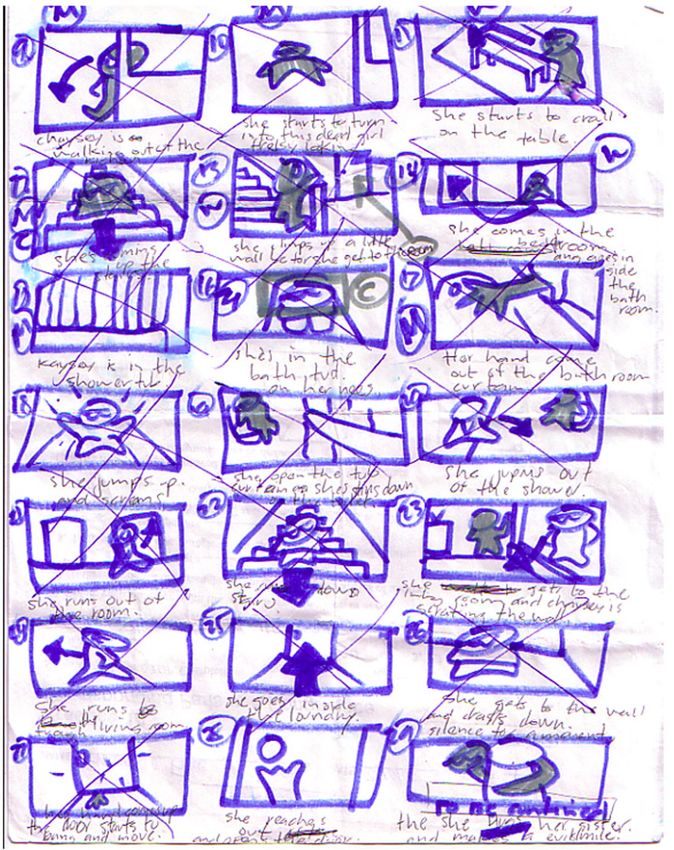
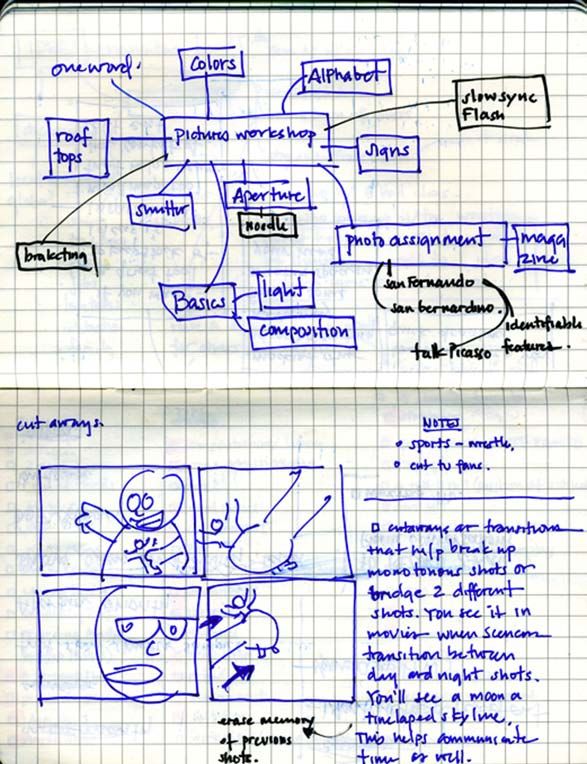
A Curriculum for Digital Media Creation                                                   14
Sixteen Lessons, from Storyboarding to Producing a Documentary

Tips
• From an academic perspective, mapping a movie is a great way to showcase how
  students think, organize thoughts, and plan. It’s a paper trail to nonbelievers of
  our profession and passion. Projects should always start with students working
  in a group to define the scope of the projects and the specifics of the production.
  Working in teams from the beginning helps with communication between students
  and helps the projects stay focused and moving forward. Make this the norm for
  how students begin projects as well as produce, edit, and assess them.
• The moviemaking exercise in this lesson is about the students jumping in and
  getting creative. It is intentionally restrictive in nature by limiting shots and angles. It
  is important to let the students tell their story. This motivates students to work later
  to edit their stories and learn to use editing tools.
• You can point out to students that movie ideas may come to them when they least
  expect it, so they might want to always carry an idea book with them. This is just
  a notepad they can toss in a pocket, a daypack, or a purse. We recommend the
  Moleskine pocketbooks. They are more expensive than many others, but they
  have a hard cover so they can take a beating and a pocket for saving additional
  drawings. Here is an example of a hand-drawn map of a movie that later was put
  into an Inspiration document:

© 2008 Marco Antonio Torres and Ross Kallen. All rights reserved.
A Curriculum for Digital Media Creation                                           15
Sixteen Lessons, from Storyboarding to Producing a Documentary

Real-World Connection
Good planning is key to everything. We love this quote from the architect Frank
Lloyd Wright: “You can either take an eraser to the blueprint or take a pickaxe to the
foundation.” Try traveling without a map or direction. As students make their short
movies, they’ll see the importance of having a detailed a plan when shooting a film.
One of the biggest problems with student movie products is not paying sufficient
attention to details, usually due to poor planning with actors, key interviews, or lack
of familiarity with the equipment. The planning process not only helps your class be
better students, it can help them later in life. In the business world, what they have
developed in this lesson are the fundamental components of a business plan. This will
help them in all professions.

© 2008 Marco Antonio Torres and Ross Kallen. All rights reserved.
A Curriculum for Digital Media Creation                                                  16
Sixteen Lessons, from Storyboarding to Producing a Documentary

Student Guide

Javier: Boy Pilot—An Example
of a Movie Plan
You may find it helpful to use Inspiration software to plan your movies. You can
get started in Inspiration with just the name of the project or the working title. The
example here shows a plan for a movie to be called “Javier: Boy Pilot.”

Next, you create two boxes for the main parts of moviemaking: the product (the What
and Why) and the process (the How).

Under What/Why, you add the essential product-related question and information:
• What are your goals as a moviemaker?
• What is the project timeline?
• Who will monitor the timeline and make sure it’s being followed?
• What is the main idea?
• Who is the target audience?
These are the fundamental What and Why questions.

© 2008 Marco Antonio Torres and Ross Kallen. All rights reserved.
A Curriculum for Digital Media Creation                                            17
Sixteen Lessons, from Storyboarding to Producing a Documentary

After mapping the product, you address the process—the how-to’s of the project, as
shown in the example from Javier: Boy Pilot.

With Inspiration, you can see your idea map as a standard text outline with the click
of a button. Being able to quickly look at your plan in this way helps the project’s
flow and direction. Like a thesis statement, it helps to keep the team focused on
the project’s goals and deadlines. It also allows for communication among the team
members because each person on the team will know what the others are doing. As
the movie project advances and evolves, the person responsible for the project plan
can keep and print updated copies for everyone, including your teacher.

© 2008 Marco Antonio Torres and Ross Kallen. All rights reserved.
A Curriculum for Digital Media Creation                                              18
Sixteen Lessons, from Storyboarding to Producing a Documentary

Here is the outline of the same movie project shown in Inspiration outline form:

Movie Javier: Boy Pilot
I.    What / Why
      A     Idea—The Catch, The Angle we’re focusing on:
		          1.   Javier Luzo is too young to drive, but old enough to fly a plane.
      B     Goals
		          1.   Show who Javier is.
		          2.   Where he flies
		          3.   How he learned?
		          4.   Have him explain the plane to us.
      C.    Target Audience
		          1.   General Audience.
      D.    Timeline
		          1.   Due April 16, 2007
			              a.    to air on our school network in two weeks.
			              b.    Post online the day after.
II.   How
      A.    Style: Documentary: Not a news report.
		          1.   A roll
			              a.    Interview with Javier
			              b.    Interview with his teacher
			              c.    Interview with another pilot at Whiteman Airport, Pacoima.
		          2.   B roll
			              a.    Fly with him.
			              b.    Footage of his plane from another plane.
			              c.    Coverage shots around the airport:
				                   (1) Tower
				                   (2) runway
				                   (3) planes landing and taking off
				                   (4) taxiing.
			              d.    AT home, school.
      B.    Crew:
		          1.   1 Camera
		          2.   1 mic
		          3.   1 assistant to camera: Lights.
		          4.   Producer/Interviewee.
		          5.   1 Editor
      C.    Music: Guitar. Old country rock style.
		          1.   Antonio Sol can play it.

© 2008 Marco Antonio Torres and Ross Kallen. All rights reserved.
A Curriculum for Digital Media Creation 19 Sixteen Lessons, from Storyboarding to Producing a Documentary LESSON 2 From Script to Storyboard Another facet of the planning process is the storyboard, the map that provides instructions to the actors, cameraperson, editor, and support team. The usual storyboard resembles a set of comic book drawings. Like comic books, storyboards communicate as much information as possible with a combination of artwork and text. Most movies are still created this way so storyboarding is a great skill to have. In this lesson, students first create storyboards from existing scripts for plays or movies. They then develop storyboards from original ideas for a commercial that they film in Lesson 3. Preparation Gather some scripts for students to use to create storyboards. You could use collections of one-act plays, plays that students may have already read in English class, such as those by Shakespeare, or scripts from movies that have been made. Students will need just one or two scenes to storyboard. Project Steps Activity 1: Creating a Storyboard from an Existing Script 1. To introduce the lesson, show the class a Pixar film on DVD. Pixar does a great job at showing how they transition from one step of the moviemaking process to the next. Make sure to show students the additional footage on the Pixar DVD in which the artists discuss the storyboarding process. Students can see the movie being born here. The storyboard artist goes through the scenes animating every shot to the team. It’s magical. 2. Explain to students that the storyboard is the most important piece of information for the movie editor as well as the rest of the production crew. Storyboards are produced in different ways. The traditional storyboard is a document with boxes with action drawings that look like those in comic books. In a narrative movie, the drawings communicate the camera and action instructions to the crew. This helps the director instruct the actors on what they need to do. The drawings also show the cameraperson and lighting team how to light and frame a shot. Point out that with documentaries, the storyboard serves a different purpose. Unlike narrative movies, acting in documentaries is minimal so there is little need to draw all of the actions that will take place. A simple list of what should be shot and what questions need to be asked may be sufficient. Show the class some examples of storyboards, scripts, and shot lists. 3. Have students work in groups of two to four to create a storyboard based on an existing script. The storyboard should include where the camera needs to be and instructions for the actors. Students should draw the storyboards by hand, but point out that storyboarding software is available. (See “Resources.”) If students © 2008 Marco Antonio Torres and Ross Kallen. All rights reserved.
A Curriculum for Digital Media Creation                                              20
Sixteen Lessons, from Storyboarding to Producing a Documentary

   are working with a documentary script, have them create more of a shot list,
   a list of who will be interviewed, the questions that will be asked, and camera
   instructions.

4. Have students share their completed storyboards or shot lists with the class.

Activity 2: Developing a Storyboard for a Commercial
When students finish the first activity, they often wish they had had more time to plan.
This second activity helps students understand the importance of the storyboard.
In this activity, the students come up with a great idea for a commercial, plan it, and
present it (pitch it) to the class. The best idea is storyboarded. In Lesson 3, students
film it as a class project.

1. Divide students into small groups and have each group come up with about 15
   keywords to get them started with developing movie ideas for a class commercial.
   From there, they should come up with a short outline or treatment of three ideas.
   This process usually takes about one hour.

2. The next class period, have students pitch all of their ideas to the class. Write the
   ideas on the board while students present them. Assure the class that there are
   always a lot of great ideas that don’t get selected and that these ideas might be
   used for great projects later in the course.

3. Once all of the ideas are discussed, have the class vote to narrow the choice down
   to the top three ideas.

4. Divide students into three groups and have each group storyboard one of the ideas
   that was chosen (stick figures are fine). Encourage students to utilize different
   shots to help illustrate the key points. Make sure they understand the different
   types of shots: wide, medium, close up, and extreme close up. (See Lesson 5 for
   more information.) Also, point out to students that a 30-second commercial should
   have at least 15 storyboard frames. You can also introduce the ideas of pacing and
   editing by using the beats from music included in a piece. Rhythm is key in editing.
   Sometimes the beat of the music can help the editor indicate where to make the
   edit or transition.

5. Once the groups finish the storyboards, have the students pitch the ideas again.
   Advise them that if they like their idea, they need to sell it to everyone else. Some
   groups may want to act out the pitch, while others draw on the board. Either way, it
   is up to them to get the message across. Once the storyboard pitches are finished,
   have the class select one as the basis for a commercial.

6. Next, have the class work together to recreate the story on the whiteboard to
   produce a more detailed storyboard for the commercial. The more artistic students
   could be asked to create the drawings on the whiteboard.

In the next lesson, students develop the schedule and shoot their production.

Project Duration
5 to 7 days

© 2008 Marco Antonio Torres and Ross Kallen. All rights reserved.
A Curriculum for Digital Media Creation                                              21
Sixteen Lessons, from Storyboarding to Producing a Documentary

Competencies, Standards Descriptions
Students will demonstrate the ability to create a storyboard. Students will work
collaboratively to develop a treatment and present it to an audience.

Tools and Resources
Tools
• Drawing materials
• Inspiration software (optional)
• Student Guide: Storyboards, Screenplays, and Shot Lists
• DVD of a Pixar movie
• Projector

Resources
Books
• The Art of the Storyboard: Storyboarding for Film, TV, and Animation by John Hart
• Film Directing Shot by Shot: Visualizing from Concept to Screen by Steven D. Katz

Websites

Students can use several different software programs for storyboarding. You can find
out about some of these programs at the following websites:

High end
• Toonboomstudio Storyboard by Toonboom
  www.toonboomstudio.com/products/storyboard
• StoryBoard Artist by PowerProduction Software
  www.storyboardartist.com

Entry level
• StoryBoardPro by Atomic Learning
  www.atomiclearning.com/storyboardpro
• Comic Life by plasq
  http://plasq.com

Evaluation Ideas
For Activity 1:
• Students create a storyboard for an already existing script. Actor direction and
  camera instructions need to be included.
• Alternatively, students create a storyboard/shot list for a documentary-style movie
  project. A list of who will be interviewed as well as what they will be asked is
  included in the notes. Camera instructions need to be included as well.

© 2008 Marco Antonio Torres and Ross Kallen. All rights reserved.
A Curriculum for Digital Media Creation                                               22
Sixteen Lessons, from Storyboarding to Producing a Documentary

For Activity 2:
• Students share and rate storyboards of other groups.
• Students pitch their ideas to the class.
• The class vote to narrow down the top three ideas.
• The class develop three storyboards (by groups).
• The class choose one storyboard to be developed on the board.

Tips
• We recommend that students use a good old-fashioned Moleskine notebook for
  their storyboarding. Some even come with storyboard template drawn right in.
• You will find students who will love the storyboarding process. This step provides
  them a great opportunity to meet and discuss the visualization of the story with the
  writer, director, and cameraperson. Find the “doodlers” in your class. They will do
  just fine. Stick figures and lines communicate a lot.
• For the second activity, help the students with their ideas. Give them guidelines of
  what topics are appropriate for the target audience, in this case, the school, district,
  and students’ families.

Conclusion: Real-World Connection
Pre-visualization is not only a great skill to have as a moviemaker, it is a great skill
as a leader. Storyboards, shot lists, and screenplays are three parts of the planning
process that help communicate to the production and post-production team the goals
for the project. Although they are not always essential for every project, aspects of the
three always appear in a well-developed movie project.

© 2008 Marco Antonio Torres and Ross Kallen. All rights reserved.
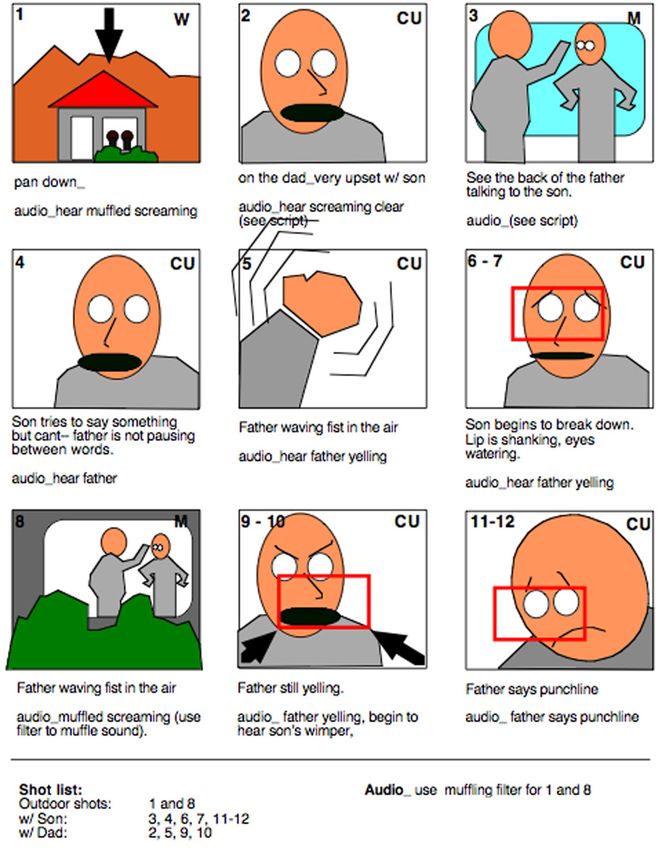
A Curriculum for Digital Media Creation                                             23
Sixteen Lessons, from Storyboarding to Producing a Documentary

Student Guide

Storyboards, Screenplays,
and Shot Lists
Knowing how to create storyboards, screenplays, and shot lists will help you plan
your movie projects.

Storyboards
Here are several examples of portions of storyboards for movie projects:

Hand-drawn sample

© 2008 Marco Antonio Torres and Ross Kallen. All rights reserved.
A Curriculum for Digital Media Creation                             24
Sixteen Lessons, from Storyboarding to Producing a Documentary

Hand-drawn sample

© 2008 Marco Antonio Torres and Ross Kallen. All rights reserved.
A Curriculum for Digital Media Creation                             25
Sixteen Lessons, from Storyboarding to Producing a Documentary

Sample drawn with AppleWorks

© 2008 Marco Antonio Torres and Ross Kallen. All rights reserved.
A Curriculum for Digital Media Creation                             26
Sixteen Lessons, from Storyboarding to Producing a Documentary

Sample drawn with StoryBoard Artist

© 2008 Marco Antonio Torres and Ross Kallen. All rights reserved.
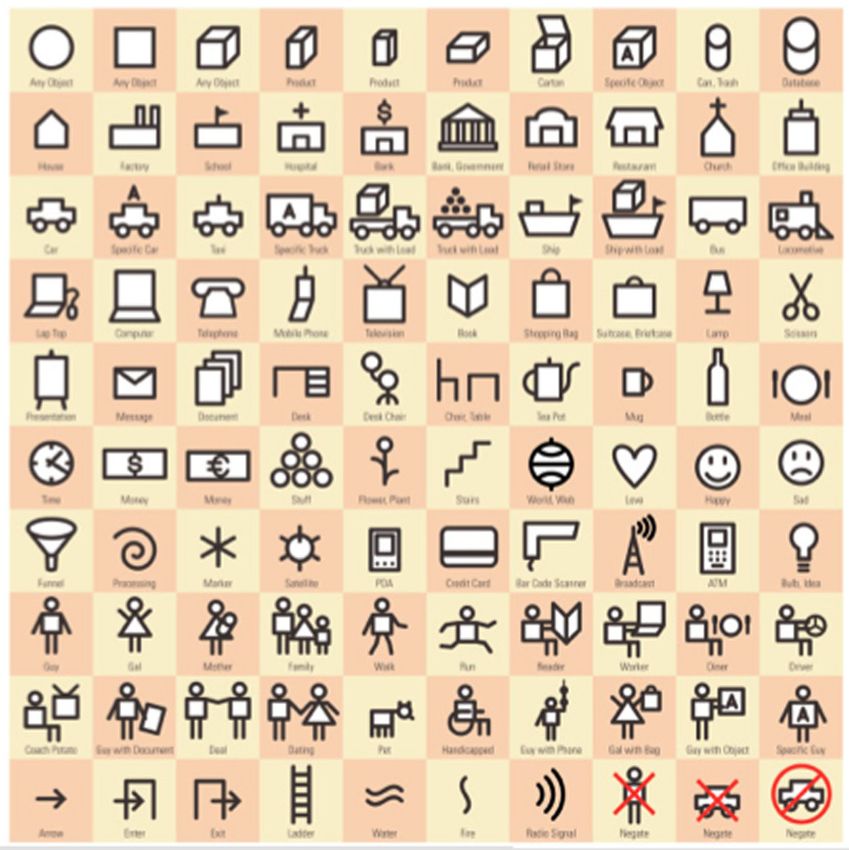
A Curriculum for Digital Media Creation                                               27
Sixteen Lessons, from Storyboarding to Producing a Documentary

Icons for Storyboards
The following diagram shows icons you can use in your storyboards:

The Screenplay
A screenplay can be an original work or a rewrite of a short story or a novel. It differs
from a script in that the screenplay includes more detailed descriptions of the action
and visuals. If a screenplay is not an original work, the process of rewriting is called
the adaptation of the story or novel. The screenplay is the step between the orignal
story and the storyboard. (See the example below.)

The screenplay may be written by more than one person. It can often take a team to
coordinate and write. In the screenplay, the subtext, interpretations, and subtleties
are defined and visualized for the screen. With adaptations, this is the time many
fans of the original text may be disappointed with what they see as opposed to what
they imagined while reading the same story. The screenplay is an interpretation and a
decision to move the imagination of the narrative onto a more literal story that can be
produced.

© 2008 Marco Antonio Torres and Ross Kallen. All rights reserved.
A Curriculum for Digital Media Creation                                               28
Sixteen Lessons, from Storyboarding to Producing a Documentary

[EXAMPLE}
• SCRIPT: OUTSIDE. COLD. WINDY. The boy sits alone and is feeling down.
• SCREENPLAY: WIDE SHOT> boy sitting on bench. Tree to his left. Leaves blowing
  off. SOUND> Hear the wind. Violins playing an A minor chord vibrato. The boy
  is sitting on the edge of the bench. COLOR PALETTE> Blue and Grays. CUT
  TO A MID SHOT> Sad Body Language. SOUND> Cont from shot one. CUT TO
  CLOSEUP> of face and then hands. A leaf barely hanging on a branch (reflective of
  him).
• STORYBOARD: The storyboard helps visualize what the screenplay direction is
  communicating. Again, it’s a literal interpretation of the short original script.

The Shot List
The shot list is a checklist of shots that are needed to complete the filming of a
project. It acts as a guide for the director of photography (the DP) as to what needs
to be shot and when. A shot list groups, combines, and organizes what needs to be
shot when as opposed to the order that the shots will appear in the movie as shown
in a storyboard. This makes a movie more efficient. For example, a shot list might
combine all of the night shots to be filmed at the same time. Or, if an actor has a
limited schedule, the director would instruct the director of photography to create a
shot list with all of the scenes that include that actor. The editor then consults the
storyboard to reconnect the footage for the movie in the order that was intended.

Practice
You can see how this works by creating a shot list from a storyboard and shooting it
in a different order. Make sure the beginning of every shot is introduced with a slate
(clapper) that includes the scene, shot, and take information. If you don’t have a slate,
you can use paper or a dry erase board.

© 2008 Marco Antonio Torres and Ross Kallen. All rights reserved.
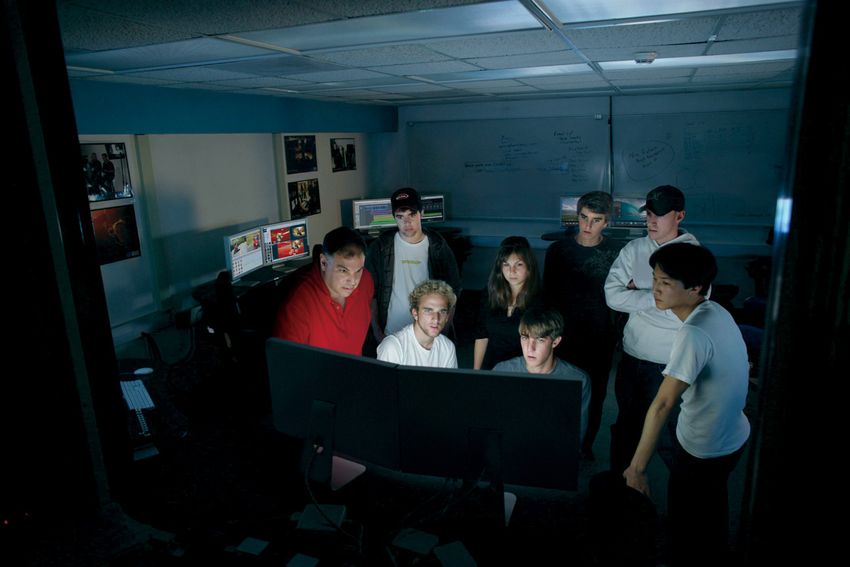
A Curriculum for Digital Media Creation                                               29
Sixteen Lessons, from Storyboarding to Producing a Documentary

Lesson 3

Shoot It! The Production
Process
This lesson focuses on shooting a commercial using the storyboard developed in
the second activity in Lesson 2. A key way this production workflow differs from a
professional production is that every student will have an opportunity to work in every
position. Along the way, the students start mentoring each other on how each position
works and the relevant equipment. This lesson is a great way to help teach the
students about how crews work together as well as about shot composition, directing,
and performance.

Project Steps
1. Explain to students that now that the storyboard (from Lesson 2, Activity 2) is
   finalized, they need to schedule the production. It is important to identify the cast
   members, props and wardrobe, and the locations. This information dictates the
   order in which students shoot their footage.
   Note to Teacher: When creating the schedule, remember that the shooting may go
   slowly at the beginning because of the students’ lack of experience. We have found
   that once we get four or five shots filmed, the students have a better understanding
   of what to expect and start jumping in where needed. When scheduling, we group
   shots together based on location, cast availability (if they’re not from our class),
   equipment availability, and so on.

2. Once the schedule is complete, set up a crew matrix in which every student signs
   up for each position. They will switch roles with each scene. (They can use the
   Crew Assignment Matrix PDF included with the course.) The positions are: director,
   director of photography, gaffer (lighting technician), grip, audio engineer, and
   production assistant. Having a student facilitate the crew assignments is one way
   students can take on more responsibility for the production. A main goal is to get
   the students working together as soon as possible. Post on the board a workflow
   and the crew’s responsibilities. Each student should be in a group and have one
   of the roles described. For example, the gaffer is responsible for all of the lighting
   equipment while the camera department is responsible for the camera, tripod, video
   assist, and other necessary items. This helps students see how films are shot with
   a crew. If a student finishes his or her assigned responsibility, the student can help
   someone else or have others assess what the student worked on.

3. When the crew list and the schedule are complete, have the students start shooting.
   As they rotate their roles through each shot, have the students teach each other
   what they have learned in the prior shot. This process usually takes a good two
   weeks to shoot. Students can use the Shot List to keep track of their shots.

© 2008 Marco Antonio Torres and Ross Kallen. All rights reserved.
A Curriculum for Digital Media Creation 30 Sixteen Lessons, from Storyboarding to Producing a Documentary Project Duration 1 week Competencies, Standards Descriptions Students will learn to work in the following production crew positions: • Director • Director of photography • Gaffer (lighting technician) • Grip • Audio engineer • Production assistant Students will work as part of a collaborative team to accomplish tasks. Students will learn to schedule a production. Tools and Resources Tools • Crew Assignment Matrix • Shot List—Shooting Day Schedule Evaluation Ideas Students will demonstrate ability in each of the crew positions. Students will work collaboratively and teach each other the crew positions that they have already experienced. Tips • Plan on a slow start. Encourage students to jump in and help crew members. • The video assist monitor is a great way to teach everyone composition techniques. Eventually, the students have fun watching their friends act. There will also be many funny outtakes that the students can work into a blooper reel. Conclusion: Real-World Connection This lesson replicates a real-world experience as much as possible. Every step is taken to follow the workflow of a real production, even down to the slate and the director calling “action.” © 2008 Marco Antonio Torres and Ross Kallen. All rights reserved.
A Curriculum for Digital Media Creation                             31
Sixteen Lessons, from Storyboarding to Producing a Documentary

© 2008 Marco Antonio Torres and Ross Kallen. All rights reserved.
A Curriculum for Digital Media Creation                             32
Sixteen Lessons, from Storyboarding to Producing a Documentary

© 2008 Marco Antonio Torres and Ross Kallen. All rights reserved.
A Curriculum for Digital Media Creation                                               33
Sixteen Lessons, from Storyboarding to Producing a Documentary

Lesson 4

Lighting a Scene and
a Person
Photography in Latin means “the writing of light.” Without light, one cannot write with
it, so no photography can exist. Making sure the students are shooting in good light
should be the first step in the process of shooting a movie. In this lesson, students
learn about different lights and their purposes. They learn how to find good natural
light, become familiar with the ideal situations and times of day to shoot, and find out
tips for better lighting. The lesson also covers studio lighting, camera lighting options,
and functions.

Project Steps
1. Go over the basics of lighting with the class, including the use of natural light,
   three-point lighting setups, how lighting affects the mood of the scene, and the use
   of color gels, diffusers, and other filters. Have students read the Student Guide:
   Working with Light and explore lighting using the suggestions in that document.

2. Show the class some interviews and have them guess the locations of all of the
   lights. For each interview, have students create a diagram and mark on the paper
   where they think the lights are placed. After students have performed this exercise
   a couple of times with interviews, ask them to do it with TV shows and movies.

3. Have students practice lighting objects on a desk with three different light sources.
   They should take pictures of the objects and compare how the different lighting
   options affect the mood and feel of the scene.

4. Have students make a lighting plan and then shoot an interview and light it
   naturally using window or outdoor lighting. They should also diffuse light and
   reflect natural light on the subject and experiment with color gels, diffusers, and
   other filters.

5. Using online examples from www.flickschool.com, go over some cases when
   mobile lighting (light from the camera) is required or preferred. Then explain
   how mobile lighitng is ideal in documentaries and situations when you don’t
   have control of an environment; for example, in a walking or action scene. Have
   students shoot an action scene using mobile lighting.

Project Duration
3 days

Competencies, Standards Descriptions
Students will learn the function of light in a shoot. They will learn how to use the
different lights to create different moods and feels for the director. They will learn how
to be creative and find alternative ways to light scenes. They will learn how to pre-
visualize a lighting situation and diagram light placements.

© 2008 Marco Antonio Torres and Ross Kallen. All rights reserved.
You can also read