A New Zealand First Aid Reference Guide - Triple One Care
←
→
Page content transcription
If your browser does not render page correctly, please read the page content below
First Aid Book: January 2021
A New Zealand First Aid
   Reference Guide

                               231220V7.1KB
Triple One Care First Aid Book: Contents

    Pages                                       Subject
       3        Introduction
     3-5        Exposure to biological hazards
    5 - 14      The Primary Survey
    14 - 16     Automate External Defibrillation (AED)
    17 - 18     Stable Side Position
    18 - 19     Bag / Valve / Mask (BVM) Resuscitation
      19        Cardiac Arrest & The Chain of Survival
    20 - 22     Foreign Body Obstructed Airway
    22 - 24     The Secondary Survey
    24 - 25     Fractures
    25 - 26     Soft Tissue Injury
    26 - 28     Bleeding
    28-29       Shock
      29        Concussion
    30-31       Head Injury
    31-32       Spinal Injury
    32-33       Sucking Chest Wound
    33-34       Burns
    34-36       Diabetes
    36-37       Heart Attack
    38-39       Angina
    39-40       Stroke
    40-41       Seizures
      42        Asthma
      43        Hyperventilation
    43-44       Anaphylaxis (Severe Allergic Reaction)
    44-46       Environmental Conditions
      47        Emergency Childbirth
    47-50       Poisoning
    51-52       Patient Report Form

                           Contacting Triple One Care:
                          0800 4 TRIPLE / 0800 487 475
         Email: info@tripleonecare.nz    Website: www.tripleonecare.nz

                        Primary New Zealand References

•    ANZCOR Guidelines for First Aid (November 2016)
•    New Zealand Red Cross - Essential Emergency Care for First Aiders (2014)
•    NZ Mountain Safety Council - NZ Outdoor First Aid (3rd Edition 2012)

                                                                          P a g e 2 | 52
Introduction                                        Definition & Philosophy

The primary focus of first aid training is to provide you with the skills and knowledge necessary, to
minimise the effects of accidents or illnesses. First aiders provide a primary response to emergencies
within the community and may sometimes be first and only person on the scene, resulting in the need to
remain calm and be able to make the right decisions in a situation dominated by emotional stress and
anxiety.

Definition of First Aid:

First Aid is the emergency care and treatment of a sick or injured person before more advanced medical
assistance, in the form of the emergency medical services (EMS) arrives.

Responsibilities of a first aider:

    •    Preserve life and provide initial emergency care and treatment to sick or injured people
    •    Protect the unconscious
    •    Prevent a casualty’s condition from becoming worse
    •    Promote the recovery of the casualty.

Philosophy of First Aid:
In the pre-hospital setting, the key contributors to survival and recovery from illness and injury are
prompt and effective maintenance of the body’s primary functions:
    •    Response
    •    Airway
    •    Breathing
    •    Circulation
    •    Bleeding control (life threatening)
Medical research data suggests that effective support of these basic functions provides the most
significant contribution to positive outcomes for casualties in the pre-hospital setting.

                   Exposure to Biological Hazards                                    Health & Safety

First aiders may be exposed to biological substances such as blood-borne pathogens and
communicable diseases, whilst dealing with a first aid incident.

These may result from dealing with:

    •   Trauma related injuries
    •   Resuscitation

There are many different blood-borne pathogens that can be transmitted from a penetrating injury or
mucous exposure, in particular, Hepatitis B Virus, Hepatitis C Virus and Human Immune deficiency
Virus (HIV). Other diseases not found in human blood may be carried in fluids such as Saliva (e.g.
Hepatitis A and the organism that causes meningitis) or animal blood and fluid.

                                                                                            P a g e 3 | 52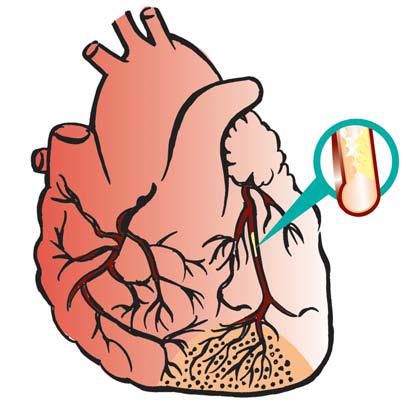
Universal Precautions:

First aiders should equip themselves with and use, personal protection equipment. This equipment is
used to minimise infection from disease.

Exposure sources:

The following are common sources of exposure:
   • All human body fluids and secretions, especially any fluid with visible blood
   • Any other human material.

Exposure routes:

The following are typical means of exposure:
   • Punctures or cuts from sharp objects contaminated with blood / fluid
   • A spill of blood / fluid onto mucous membranes of the eyes, mouth and/or nose
   • A spill of blood / fluid onto skin that may or may not be intact
   • A laceration and contamination with blood/fluid from a bite.

The expression ‘universal precautions’ refers to the risk management strategy used to prevent the
transmission of communicable disease, by reducing contact with blood and other body substances.

        Disposable Gloves                   CPR Face Shield                     CPR Pocket Mask

Universal precautions include:
    •    Wearing appropriate protective equipment for the task
    •    Treating all persons as if infectious
    •    Washing following completion of task
    •    Appropriate disposal of disposable protective items and/or equipment
    •    Maintaining good hygiene practices before, during and after tasks involving contamination risk.

Note: Universal Precautions are the most effective approach to protecting emergency first aiders in a
biological substance exposure situation. If these guidelines are followed, the risk of infection can be
significantly minimised.

Immediate action at scene following exposure to poison/corrosive substance:

For an open wound
    •    Encourage the wound to bleed, thoroughly wash with water for 15 minutes and dress
    •    Do not attempt to use a caustic solution to clean the wound
    •    Seek medical advice as soon as possible.

                                                                                          P a g e 4 | 52
For a splash to a mucous membrane

    •    Flush splashes to nose, mouth or eyes thoroughly with water for 15 minutes
    •    If the splash is in the mouth, spit out and thoroughly rinse out with water for 15 minutes
    •    If the splash is in the eyes, irrigate with the eyes open for 15 minutes
    •    Seek medical advice as soon as possible.

For a splash to the skin

     •    At the scene, wash thoroughly with soap and water
     •    Seek medical advice as soon as possible if the exposure is medium / high risk.

                         The Primary Survey                                      Casualty Assessment

The primary assessment is a systematic checklist designed to maximise safety and identify / treat
immediate life-threatening problems.

The steps to be followed for an adult, child and infant casualty are remembered by the letters

DRSABCD:

  D - Danger
  R - Response
  S - Send for help

 A-      Airway
 B-      Breathing
 C-      CPR (Cardiopulmonary Resuscitation) + Control Major Bleeding
 D-      Defibrillation

Note: CPR is continued until responsiveness or normal breathing returns or EMS instruct you to stop,
      or the first aider can no longer continue due to exhaustion.

Why do you need to know this?

It is very important that you understand the correct procedure to follow in order to offer effective primary
care. At the same time, it is necessary to protect yourself from any harm. The initial steps of
resuscitation are:

D - Danger!
Before approaching any situation, you must assess the scene for any threat to:
    • You and anyone else assisting with the situation
    • Bystanders near the scene
    • The casualty or casualties

                                                                                            P a g e 5 | 52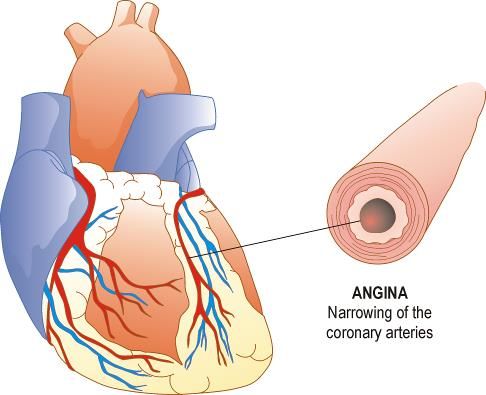
By rushing into the situation without properly assessing what has occurred, you are compromising your
safety. If you are injured while attempting to assist the casualty, you will be unable to help them. If the
scene is not safe, remove the threat from the casualty (or the casualty from the threat). If this cannot be
achieved, go to a safe place and wait for further assistance.

Safety Note:
Always remember to reassess the safety while treating the casualty. Bystanders should be warned
about any dangers and kept at a safe distance to ensure they do not become casualties. Once the
scene is considered safe, bystanders can be asked to assist if needed.

Remember to ELIMINATE or MINIMISE hazards!

Moving a casualty?

A rescuer should only move a collapsed or injured patient........
    • To ensure the safety of both rescuer and the patient
    • Where extreme weather conditions or difficult terrain indicate that movement of the patient is
        essential
    • To make possible the care of airway, breathing, and circulation (e.g. turning the unconscious/
        breathing patient onto their side to maintain their airway. An unresponsive not breathing
        normally patient onto their back to perform cardiopulmonary resuscitation effectively)
    • To make possible the control of severe bleeding.

All unconscious persons who are breathing normally must remain on their side (injuries permitting). It is
reasonable to roll a face-down unresponsive patient into the supine (back) position to assess airway
and breathing and initiate resuscitation. Concern for protecting the neck should not hinder the
evaluation process or lifesaving procedures.

When ready to move the patient:
   • Avoid bending or twisting the patient's neck and back: remember, spinal injury can be
       aggravated by rough handling
   • Try to have three or more people to assist in the support of the head and neck, the chest, the
       pelvis and limbs
   • A single rescuer may need to drag the patient (either an ankle drag or arm-shoulder drag is
       acceptable)
   • Make prompt arrangements for transport by ambulance to hospital

        REMEMBER: We move Patients when it is life threatening.
R – Response:
Overview:
Unresponsiveness is where the patient cannot be roused, is unaware of their surroundings and no
purposeful response can be obtained.

When checking a person’s response, you are assessing how well their brain is functioning. The brain
requires a constant supply of oxygenated blood and glucose to function. Interruption of this supply will
cause loss of consciousness and will result in permanent brain damage in minutes. When the casualty’s
brain is not functioning normally, they may not be able to look after their own airway. Their protective
reflexes of coughing, swallowing, or gagging may not be working very well.

                                                                                           P a g e 6 | 52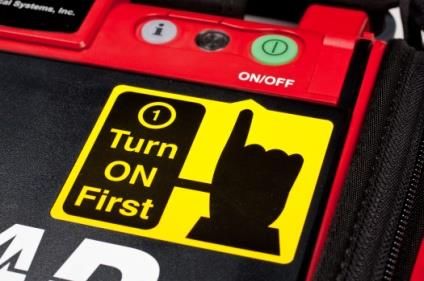
Causes of unconsciousness:
The causes of unconsciousness can be classified into four broad groups:
• Blood oxygenation problems (heart attack)
• Blood circulation problems (trauma, blood loss)
• Metabolic problems (e.g. diabetes, overdose, alcohol)
• Central nervous system problems (e.g. head injury, stroke, tumour, epilepsy, spinal injury)
How to check for responsiveness:
Assess the collapsed victim's response to verbal and tactile stimuli (‘talk and touch’), ensuring that this
does not cause or aggravate any injury. Give a simple command such as, “open your eyes, squeeze my
hand, let it go”. Then grasp and squeeze the patients shoulder firmly to elicit a response.
Checking for a response
The four levels of responsiveness are:
A - Alert: The casualty is alert and responsive. You can have a logical conversation with them.
V - Voice: Even if drowsy, the casualty is able to reply when you talk to them.
P - Pain: The casualty is responsive to pain when applied.
U - Unresponsive: The casualty is unresponsive to all stimuli.
If the casualty is breathing normally but is unresponsive, place them in a stable side position, to
maintain their airway
Note: When possible, always approach the casualty from the direction of the head (for safety).
S - Send for help: Activating the Emergency Medical Services (EMS)
'Activating EMS' means choosing an Emergency Medical Service response appropriate to the severity
of the injury or illness and the situation encountered.
Summoning help may be by using 1-1-1, or other means e.g. radio, beacon etc.
P a g e 7 | 52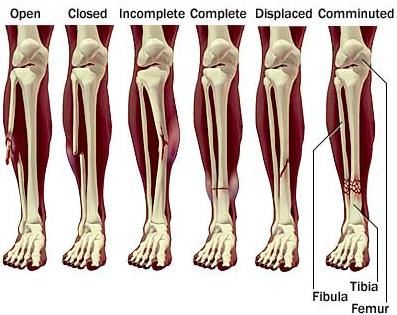
However, in addition to the 'normal' emergency services, secluded / remote locations may have local
networks for emergency response. Researching the availability of these responders, is an important
part of pre-planning for outdoor activities.
The level of help selected needs to be considered on an individual basis. It may for instance, be
appropriate to contact a local general practitioner (GP), Nursing Services, Healthline, A&E Clinics, the
NZ National Poisons Centre or utilize the skills of a group member that has medical experience.
If you are in doubt as to which level of help is required, activate the Emergency Medical Services
(Ambulance) as a safeguard!
Useful Phone Numbers:
• Emergency Medical Services: 111 (emergency)
• Healthline: 0800 611 116 (non-emergency health issues)
• NZ National Poisons Centre: 0800 764 766 (0800POISON) (information)
A - Airway:
Overview
When a Patient is unconscious, all muscles are relaxed. If the patient is left lying on the back, the
tongue, which is attached to the back of the jaw, falls against the back wall of the throat and blocks air
from entering the lungs. Other soft tissues of the airway may worsen this obstruction. The mouth falls
open, but this tends to block, rather than open, the airway. The unconscious patient is further at risk
because of being unable to swallow or cough out foreign material in the airway. This may cause airway
obstruction, or laryngeal irritation and foreign material may enter the lungs. For this reason, the rescuer
should not give an unconscious victim anything by mouth and should not attempt to induce vomiting.
Key point:
In an unconscious Patient, care of the airway takes precedence over any injury, including the possibility
of spinal injury. Airway management is high priority. It is important to check the airway before the
breathing. If air cannot enter the lungs due to some sort of blockage, the casualty will not survive for
long.
Airway management is required to provide an open airway when the patient:
• Has a lower level of response;
• Has an obstructed airway;
• Needs rescue breathing.
Airway obstruction:
If during resuscitation the airway becomes compromised, the patient should be promptly rolled onto their
side to clear the airway. The patient should then be reassessed for responsiveness and normal
breathing. Most airway problems are caused by the tongue and/or vomit. These can often be resolved
by simple airway management.
Tongue:
The muscle tone of the upper airway is directly related to the level of responsiveness: when sleeping,
for example, minor degrees of reduced muscle tone may lead to sufficient obstruction to cause snoring.
When unresponsive, however, this obstruction can become complete and fatal.
P a g e 8 | 52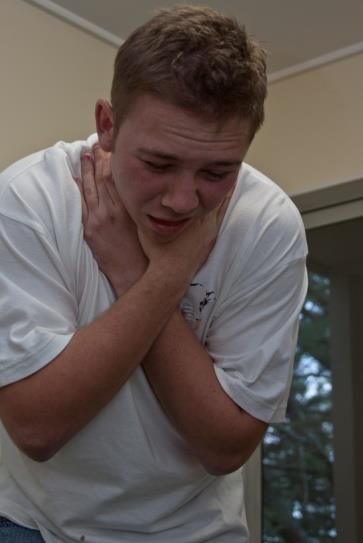
Vomit:
Food remains in our stomach for hours, so most patients will have food in their stomachs, and it is
possible for this food to regurgitate up from the stomach into the lungs. This is called aspiration. The
acidity of the stomach contents and the particle size can block and damage the airway. Regurgitation is
a passive process caused by a rise in stomach pressure overcoming the sphincter. It is usually caused
by a full gut, obesity (weight on the stomach), or air.

How to check an Airway:
Ensuring an airway is clear and open -
   • Open the mouth and look for foreign objects
   • Finger sweep (only if an object can be seen and can be removed with a sweep of a gloved
        finger)
   • Perform a Chin-lift’ and head tilt`

Chin-lift and Head-tilt:
Adults and Children (A child is defined as one year to eight years of age).

One hand is placed on the forehead or the top of the head. The other hand is used to provide Chin Lift.
The head is tilted backwards without placing your hand under the neck. It is important to avoid
excessive force, especially where neck injury is suspected. Wherever possible make sure that you are
wearing barrier gloves.

Chin lift is commonly used in conjunction with Backward Head Tilt. The chin is held up by the rescuer’s
thumb and fingers in order to open the mouth and pull the tongue and soft tissues away from the back
of the throat. One technique involves placing the thumb over the chin below the lip and supporting the
tip of the jaw with the middle finger and the index finger lying along the jaw line. Care is required to
prevent the ring finger from compressing the soft tissues of the neck. The jaw is held open slightly and
pulled away from the chest.

                                            Head tilt / Chin lift

Finger sweep:

The finger sweep is used to clear the mouth of fluid and debris in the unresponsive patient. It should
only be performed if you can see something to remove. It should always be performed with a gloved
hand with the patient positioned on their side in a stable side position. Sweep with your gloved finger the
patient’s mouth, perform a single sweeping motion to the opposite side, flicking out vomit, blood, and
debris. Most of which will fall out just by placing the patient on their side.

                                                                                          P a g e 9 | 52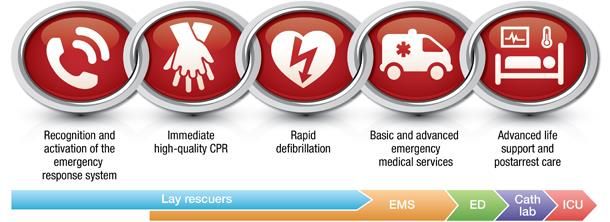
Infants:
An infant is defined as younger than one year.
The upper airway in infants is easily obstructed because of the narrow nasal passages, the entrance to
the windpipe (vocal cords) and the trachea (windpipe). The trachea is soft and pliable and may be
distorted by excessive backward head tilt.

Therefore, in infants the head should be kept neutral and maximum head tilt should not be used. The
lower jaw should be supported at the point of the chin with the mouth maintained open. There must be
no pressure on the soft tissues of the neck. If these manoeuvres do not provide a clear airway, the head
may be tilted backwards very slightly with a gentle movement.

                               Neutral Alignment: Infant Airway Position

Breathing:
Normal breathing is essential to maintaining life. Patients who are gasping or breathing abnormally and
are unresponsive require resuscitation.

Causes of absent or ineffective breathing:
   • Direct depression of/or damage to the breathing control centre of the brain
   • Upper airway obstruction
   • Paralysis or impairment of the nerves and/or muscles of breathing
   • Problems affecting the lungs
   • Drowning
   • Suffocation

Signs of ineffective breathing may include:
    • Little or unusual chest movement
    • Weak or abnormal breath sounds (wheezing, fluid sounds when breathing etc)
    • Occasional gasps
    • Reduced responsiveness
    • Anxiety
    • Unusual skin colour (pallor)
    • Rapid or slow breathing
    • Unusual posture.

                                                                                       P a g e 10 | 52
How to check for breathing:
The rescuer should -
• LOOK for movement of the upper abdomen or lower chest
• LISTEN for the escape of air from nose and mouth
• FEEL for breath on the side of your face / movement of the chest and upper abdomen.
• This should take you no longer than 10 seconds.
Checking for breathing
If the unconscious patient is unresponsive and not breathing normally after the airway has been cleared
and opened with chin lift- head tilt, the rescuer must immediately commence chest compressions and
then rescue breathing (CPR). Give 30 compressions and then two breaths allowing about one second
for each inspiration.
Note: If unwilling or unable to perform ventilations, rescuers should continue compression only CPR!
Rescue breaths:
Kneel beside the patient’s head. Maintain an open airway. Use resuscitation barrier devise. Take a
breath, open your mouth as wide as possible and place it over the patients slightly open mouth. Whilst
maintaining an open airway pinch the nostrils and blow to inflate the victim’s lungs.
Because the hand supporting the head comes forward some head tilt may be lost, and the airway may
be obstructed. Pulling upwards (with the hand on the chin) helps to reduce this problem. For mouth to
mouth ventilation, it is reasonable to give each breath in a short time (one second) with a volume to
achieve chest rise regardless of the cause of collapse. Care should be taken not to over-inflate the
chest
Look for rise of the patient’s chest whilst inflating. If the chest does not rise, possible causes are:
• Obstruction in the airway (inadequate head tilt, chin lift, tongue or foreign body);
• Insufficient air being blown into the lungs;
• Inadequate air seal around mouth and or nose.
If the chest does not rise, ensure correct head tilt, adequate air seal and ventilation. Following inflation
of the lungs, lift your mouth from the victim's mouth, turn your head towards the patient’s chest and
listen and feel for air being exhaled from the mouth and nose.
P a g e 11 | 52Rescue breathing using universal precautions
Mouth to nose:
The mouth to nose method may be used where the rescuer chooses to, the patient’s jaws are tightly
clenched, or when resuscitating infants and small children. The technique for mouth to nose is the same
as for mouth to mouth except for sealing the airway. Close the patient's mouth with the hand supporting
the jaw and push the lips together with the thumb. Use a resuscitation barrier devise.
Take a breath and place your widely opened mouth over the patient's nose (or mouth and nose in
infants) and blow to inflate the patient's lungs. Lift your mouth from the patient's nose and look for the
fall of the chest; listen and feel for the escape of air from the nose and mouth. If the chest does not
move, there is an obstruction, an ineffective seal, or insufficient air being blown into the lungs.
In mouth to nose resuscitation, a leak may occur if the rescuer’s mouth is not open sufficiently, or if the
patient’s mouth is not sealed adequately. If this problem persists, use mouth to mouth resuscitation. It
may be found that blockage of the nose prevents adequate inflation. If this occurs, mouth to mouth
resuscitation should be used
C – Cardiopulmonary Resuscitation (CPR)
Effective CPR - 30 compressions followed by 2 Breathes
CPR is a repetitive cycle of:
1. Airway opening.
2. Chest compressions
3. Rescue breathing
External chest compression is the most effective way of artificially circulating blood. Chest compressions
are accompanied by rescue breathing which provides oxygen that the blood delivers around the body to
its vital organs. This is the only way to keep the heart and brain oxygenated until a defibrillator arrives.
Recognition of the need for chest compressions:
First aiders should use unresponsiveness and absence of normal breathing to identify the need for
resuscitation. Feeling for a pulse is unreliable and should not be performed to confirm the need for
resuscitation.
When should CPR be performed?
CPR should be performed on patients who are not breathing or unresponsive and breathing
inadequately. Sometimes a casualty suffering a cardiac arrest may occasionally gasp, but this does not
constitute breathing.
P a g e 12 | 52When not to perform CPR:
You should not perform CPR:
• When it is too dangerous to rescuers
• When there are obvious signs of death, for example rigor mortis
Complications:
Broken ribs are not uncommon during CPR. If this occurs, check your hand position and continue. You
can reduce the chance of breaking ribs by placing your hands in the correct position.
Broken ribs will decrease the effectiveness of chest compressions in generating blood flow, but this
cannot always be avoided.
Reassessment:
Pauses in CPR are associated with reduced survival. Reassess when you see any signs of life
(coughing, breathing, or movement). This should take no longer than 10 seconds. If the patient begins
to show signs of life during CPR, reassess the breathing using ABC`s. If the patient is breathing, place
them on to their side and monitor airways continuously.
When to stop CPR:
You must perform CPR uninterruptedly until one or more of the following happens:
• The casualty recovers responsiveness and is able to breathe on their own
• You are placed at significant risk
• You cannot continue due to exhaustion
• Advanced help arrives and takes over the care of the casualty.
Compression only CPR:
If Rescuers are unwilling or unable to do rescue breathing, they should do chest compressions only (the
survival outcome is reduced). If chest compressions only are given, they should be continuous at a rate
of approximately 100-120 per minute uninterrupted.
Locating the site for chest compressions:
There is insufficient evidence for or against a specific hand position for chest compressions during CPR.
For a patient receiving chest compressions, Rescuers should place the heel of their hand in the centre
of the chest with the other hand on top. (armpit line in adults, middle of the nipple line for children and
infants).
Compression applied too high are ineffective and, if applied too low may cause regurgitation and/or
damage to internal organs.
Method of compression:
Children and Adults
• Two hand technique is used for performing chest compressions in adults
• One hand (or two hand technique depending on the size and strength of the person performing
CPR and the size of the patient) in the centre of the chest is used to perform chest
compressions on children under 8 years old.
• Chest should be compressed 1/3 the depth of whoever you are performing compressions on
(be it an adult/child/infant).
P a g e 13 | 52(Adult) 2 Handed CPR
Infants
In infants the two-finger technique should be used to deliver compressions. Having obtained the
compression point in the centre of the chest between the nipple line, the rescuer places two fingers on
this point and compresses the chest. The rescuer must avoid either rocking backwards and forwards or
using thumps or quick jabs. Rescuers should allow complete recoil of the chest after each compression.
Depth of compression:
• Push down approximately one third of the depth of the chest with each compression and allow
the recoil.
Rate of chest compressions:
Rescuers should perform chest compressions for all ages at a rate of approximately 100-120
compressions per minute (Push hard and fast).
CPR quality:
When performing compressions, if feasible, change rescuers at least every two minutes, to prevent
rescuer fatigue and deterioration in chest compression quality (particularly depth). Changing rescuers
performing chest compressions should be done with minimal interruptions to the compressions.
Automated External Defibrillator (AED) The Primary Survey
Defibrillation:
Attach an Automated External Defibrillator (AED) if it's available and follow the instructions given by
AED.
There are several brands of AED's available in NZ. They are all effective, but there are differences in
their design and operation. If you have regular access to an AED, it is important that you familiarise
yourself with its operation.
P a g e 14 | 52The heart is a muscle that pumps blood around the body. This function is achieved through a
mechanical contraction of the heart initiated by a coordinated electrical stimulation from within the heart.
When the rhythmic electrical activation of the heart becomes abnormal, the heart muscle contraction
can become less effective. Ventricular fibrillation (VF) is a catastrophic rhythm disturbance where
electrical activation becomes uncoordinated. As a result, small parts of the heart muscle contract rapidly
and the heart stops effectively pumping blood to the brain, leading to a cardiac arrest.
Ventricular fibrillation is most commonly caused by a heart attack (a blocked artery within the heart) and
is the leading cause of sudden death: people in VF lose responsiveness within 5-10 seconds, and
without appropriate treatment this condition is fatal. CPR will keep some blood flowing to the brain, but it
will not correct the ventricular fibrillation.
The only thing that will reliably stop VF and allow restoration of the normal coordinated electrical
stimulation is a large electric shock. This procedure is called defibrillation. The chance that defibrillation
will work is governed by time. For every minute of delay in receiving a defibrillating shock, a person’s
chance of surviving the event decreases by about 10%.
An AED is a device that has been designed in a way that a person with little or no training can use it
effectively and safely, to defibrillate a patient within 60 seconds.
To operate an AED:
1. Turn the device on (there will be a clearly marked On/Off button).
2. Once the device is turned on, the device will start charging and provide audible prompts.
3. Follow all the instructions given by the AED.
Safety considerations:
Always keep in mind the following safety considerations:
• Do not touch patient when shocking, make sure everyone is clear
• Do not use the AED in flammable environments
• Do not use the AED on casualties who are lying in water
• Do not use the AED on casualties who are lying on metal surfaces.
P a g e 15 | 52Indications for use:
The AED should be used on all unresponsive casualties who are not breathing normally breathing or not
breathing.
Placement of pads:
Follow the manufacturer’s directions for specific placement of pads on the patient’s body.
1. Using a razor (if provided), quickly remove excess hair to assist with adhesion of the pads.
2. Dry the chest of excessive moisture to assist with adhesion.
Pad placement on an adult
Using an AED on children and infants:
There are specific child pads designed to reduce the size of the shock delivered to children aged 1 to 8,
and they should always be used if available. If the AED does not have a paediatric mode or paediatric
pads, then the standard adult AED and pads are to be used. Ensure the pads do not touch each other
on the child’s chest. This may require the one pad to be placed on the centre of the chest and the other
one on their back, slightly to one side.
Child Pad Placement
Safety Note: AEDs are to be used on an infant with adult pads if infant pads are not available.
Listen carefully to the AED prompts.
P a g e 16 | 52Recovery - Stable Side Position Casualty Positioning
Positioning an unconscious, breathing victim:
With an unconscious victim, care of the airway takes precedence over any injury. If a casualty is to be
left unattended or is vomiting – protection of the airway is more important than protecting a neutral
spine. In this case, turn them over, use the finger sweep if necessary and put them in the stable side
position. All unconscious victims must be handled gently, and every effort made to avoid any twisting or
forward movement of the head and spine.
A stable side position is the single most effective method of providing and maintaining a clear
airway in the unresponsive, breathing casualty.
The stable side position:
• Allows the tongue to fall away from the back of the throat, enabling the patient to maintain a
clear airway.
• Facilitates drainage and reduces the risk of inhaling foreign material.
• Is suitable for any unresponsive, breathing casualty, who must be left alone for any reason.
Many versions of the stable side position exist. When considering the specific position to be used, the
following principles should be observed:
• The patient should be placed on their side with the head tilted, to allow free drainage of fluid
• The position should be stable
• Any pressure on the chest that impairs breathing should be avoided
• It should be possible to turn the patient onto the side and return to the back easily and safely,
having regard to the possibility of cervical spine injury
• Good observation of and access to the airway should be possible
• The position itself should not give rise to any injury to the patient
• Rescuers should continuously assess for and manage deterioration.
Procedure:
1. Kneel beside the patient and check the patient’s pocket s for anything that could injure them
during the procedure.
2. Roll the patient toward you, pulling from the patient’s hip and shoulder.
3. Once the patient is on their side, tilt their head back to ensure an open airway.
4. Move the patient’s uppermost knee to a position approximately 90° from their torso.
5. Move the patient’s uppermost arm to a position approximately 90° from their torso.
Adult / Child Stable Side Position Infant Stable Side Position
P a g e 17 | 52Once in a stable side position, you need to continually monitor breathing and make sure that the airway
is still clear and open. If a casualty is to be left unattended or is vomiting – protection of the airway is
more important than protecting a neutral spine. In this case, turn them over, use the finger sweep if
necessary and put them in a stable side position is maintaining the airway.
Bag Valve Mask (BVM) Resuscitator Ventilation
A Bag Valve Mask (BVM) Resuscitator is a manually operated air/oxygen delivery device, suited to
casualties who are not breathing normally or not breathing. It has a reservoir bag attached that
increases the delivery of oxygen (if fitted). Some organisations have a BVM Resuscitator as part of their
first aid equipment.
Bag / Valve / Mask Device
Technique:
• Ensure that the BVM is assembled correctly.
• Make sure the casualty is positioned on their back.
• If the casualty is responsive, explain what you are doing and reassure them.
• Manually open the airway and maintain it open at all times.
• Assess breathing, look, listen and feel.
• Position yourself at head of the casualty, supporting their head with your thighs with the airway
open
• Place the facemask over the mouth and nose.
• Press downward on the mask with your thumb positioned above where the bag meets the
mask and your forefinger below. Make sure the air does not leak out around the facemask –
‘C grip’.
• Position the remaining three fingers under the chin, so that you can lift the chin (chin-lift). Make
sure the airway remains open.
• Slowly compress the bag while applying downward pressure on the mask, forming a tight seal
over the casualty’s face.
• Check that the casualty’s chest rises and falls adequately.
• If there is no chest movement, recheck the airway and mask application, and ensure that the
airway is open.
• Continue with ventilations and attach oxygen if available. Ventilations should be given at the
rate 2 ventilations after 30 chest compressions.
P a g e 18 | 52Complications:
Care must be taken to ensure that the airway is opened, and that air does not escape around the edge
of the mask. If the chest fails to rise, recheck the equipment, reposition the airway using head-tilt / chin-
lift and then consider the two-person technique. Excessive pressure may cause stomach distension
(ballooning) possibly causing the casualty to vomit. If vomit occurs, roll the casualty onto their side and
clear the airway.
Cardiac Arrest & The Chain of Survival Interventions n
Cardiac arrest occurs when the heart is no longer able to effectively pump blood around the body. If not
treated, this will cause death within minutes. One of the consequences of cardiac arrest is the disruption
of the electrical activation of the heart. When this happens, the heart muscle can rapidly contract in an
uncoordinated fashion. This rhythm is called ventricular fibrillation (VF). While a heart attack is the
most common cause of cardiac arrest, it is not the only cause and the majority of people who suffer a
heart attack do not have cardiac arrest.
Adult chain of survival:
The key steps to surviving a cardiac arrest in adults are described as the adult chain of survival. There
are five links in this chain and each one needs to occur promptly to ensure survival.
1. Early recognition and 111 activation for Emergency Medical Services (EMS).
2. Early CPR to maintain artificial ventilation and circulation until the EMS arrives.
3. Early defibrillation to deal with the heart’s electrical problems.
4. Early advanced medical care by the EMS.
5. Early advanced life support and post arrest care.
Chain of Survival
The survival rate for cardiac arrest is very low in most countries, including New Zealand. It is time-
critical, with the chances of survival decreasing by approximately 10% for every minute you have to
wait for a defibrillator. Checkout the free App “AED Locations” that will identity the closest AED to you
when activated.
P a g e 19 | 52Foreign Body Airway Obstruction (Choking) Interventions n
Overview
Airway obstruction may be partial or complete and may be present in the conscious or the unconscious
patient. Some typical causes of airway obstruction may include, but are not limited to:
• Relaxation of the airway muscles due to unconsciousness;
• Inhaled foreign body;
• Trauma to the airway;
• Anaphylactic reaction leading to swelling of the airway.
The symptoms and signs of obstruction will depend on the cause and severity of the condition. Airway
obstruction may be gradual or sudden in onset and may lead to complete obstruction within a few
seconds. Consequently, the patient should be observed continually.
In the conscious victim who has inhaled a foreign body, there may be extreme anxiety, agitation,
gasping sounds, coughing or loss of voice. This may progress to the universal choking sign (clutching
the neck with the thumb and fingers).
Universal Choking Sign
Airway obstruction:
There are two types of airway obstruction:
Partial:
• Breathing is laboured;
• Breathing may be noisy;
• Some escape of air can be heard or felt from the mouth.
Complete:
• There may be efforts at breathing;
• There is no sound of breathing;
• There is no escape of air from nose and/or mouth.
Airway obstruction may not be apparent in the non-breathing unresponsive patient until rescue
breathing is attempted.
Signs and symptoms:
The indications that someone may be struggling with an obstruction are:
• Panic
• Grasping the throat
• Inability to speak
• Inability to breathe
• Colour of face (pallor)
• Inability to cough.
P a g e 20 | 52Treatment for choking adults and children
Effective Cough (Partial Airway Obstruction)
• A patient with an effective cough should be given reassurance and encouragement to keep
coughing to expel the foreign material.
• If the obstruction is not relieved the rescuer should call an ambulance.
Ineffective Cough (Severe Airway Obstruction):
Conscious Patient
• If the patient is conscious, call an ambulance
• Perform up to five sharp, back blows with the heel of one hand in the middle of the back
between the shoulder blades. Check between each back blow to see if it has relieved the
airway obstruction. The aim is to relieve the obstruction with each blow rather than to give all
five blows.
Supporting the patient / Delivering back blows
• If back blows are unsuccessful the rescuer should perform up to five chest thrusts. Check
between each thrust to see if the chest thrust has relieved the airway obstruction. The aim is to
relieve the obstruction with each chest thrust rather than to give all five chest thrusts.
• To perform chest thrusts, identify the same compression point as for CPR (centre of the chest)
and give up to five chest thrusts. These are similar to chest compressions but sharper and
delivered at a slower rate. Children and adults may be treated in the sitting or standing
position. If the obstruction is still not relieved, continue alternating five back blows with five
chest thrusts.
Unconscious Patient
The finger sweep can be used in the unconscious victim with an obstructed airway if solid material is
visible in the airway. Commence CPR immediately!
Treatment for choking infants (less than 1 year):
The following procedure is for a choking infant:
• Check to see if the obstruction can be cleared using the finger sweep.
• Lay the infant in a lying face down position over your forearm, supporting the baby’s face and
body with your arm. The infant’s body should be inclined downwards to utilise the effects of
gravity.
• Deliver up to five blows between the infant’s shoulder blades, check after each back blow.
P a g e 21 | 52• If the obstruction is still present, turn the infant onto their back, again with the body inclined.
• Deliver up to five chest thrusts in the centre of the chest between the infant’s nipples (same
location as CPR) using two fingers, check after each chest thrust.
• Repeat this process until the obstruction is cleared or the infant becomes unresponsive.
• Commence CPR if the infant becomes unresponsive.
The Secondary Survey Casualty Assessment
The secondary assessment/survey is a systematic and thorough head-to-toe check (down front and
back) of the injured or ill casualty. It is performed after the primary assessment to identify any
significant injuries. In an injured casualty, this is achieved through a body sweep, in an attempt to
identify any obvious injuries such as fractures or bleeding.
The secondary assessment is also useful to obtain information for more advanced medical assistance.
Questioning techniques such as SAMPLE and PQRST and the recording of vital signs can provide
further information that may assist in the treatment of the casualty.
The secondary assessment is also useful to obtain information for more advanced medical personal
when they arrive. The assessment should not take any longer than 1–2 minutes. If the casualty is
responsive, you need to talk to them and explain what you are doing. It should be undertaken only when
the primary assessment has been completed and any issues resolved. You need to record your
findings and pass them on to ambulance crew during the handover.
Secondary assessment procedure
The procedure for the secondary assessment is as follows:
• Always wear gloves. Systematically checking for blood / fluids on gloves as you progress
through the secondary survey.
• Central nervous system: Talk to the casualty and assess their level of responsiveness.
• Starting at the casualty’s head: Look and feel for any deformity and tenderness. Check for fluid
leaking from ears and nose
• Neck: Look and feel for any deformity and tenderness. Consider Mechanism of Injury (MOI) for
any neck or spinal injury
• Chest: Look and feel for any deformity and tenderness. Look for equal rise and fall of the chest,
and for any obvious bruising.
• Back: Look and feel for any deformity and tenderness.
• Abdomen and pelvis: Look and feel for any deformity and tenderness.
• Extremities (arms and legs): Look and feel for any deformities. Check for strength by asking the
casualty to squeeze your hands or push your hands with their feet.
• Checking and recording of any vital signs
Information gathering:
As part of the secondary assessment in medical related incident, this will involve questioning and the
recording of vital signs. Good questioning enables you to gather information that may be useful for EMS
staff.
Note: This may be the last opportunity to obtain this information (if the casualty becomes unresponsive).
P a g e 22 | 52Managing a responsive casualty:
• Undertake the primary assessment
• Call for assistance (make sure ambulance is in route)
• Position the casualty in the most comfortable position for them, or stable side position if
unresponsive and breathing normally
• Undertake the secondary assessment – PQRST and SAMPLE questioning.
• Encourage/ assist the casualty to administer their medicines (if required).
• Rest and reassure
Questioning:
Types of questioning:
There are two key questioning methods: PQRST and SAMPLE. It is good practice to write notes so that
the information can be relayed to ambulance staff.
P Promotes or alleviates-does anything make the pain better or worse?
Q Quality-can you describe what the pain feels like e.g. dull, sharp, crushing or throbbing?
R Region/radiates-where is the pain? Does it go anywhere else?
S Severity-on a scale of 1-10, how would you rate the pain?
T Time-how long have you had the pain?
S Signs and symptoms
A Allergies-are you allergic to anything?
M Medications-are you on any medication, when and how long ago did you take it?
P Past history- do you have any medical conditions, has this happened before?
L Last meal-when did you last eat or drink?
E Events prior to incident. What happened, what were you doing?
Vital signs:
It is very important to have a clear understanding of the casualty’s vital signs and to know what they
mean, and what the possible consequence are to any change to these vital signs. First aiders should
check and record:
• Respirations - how many times per minute the patient breathes, laboured or normal.
• Pulse - how many times the heart beats per minute, weak or strong, regular or irregular.
• Temperature -what is the temperature of the casualty?
• Pupils - the pupils can tell a lot about how the brain is functioning. Both pupils should be
roughly equal in size and reactive to light.
When a light is directed into the pupil, a normal functioning pupil should instantly constrict, and dilate
again once the light is removed. Consider medical reasons for abnormal constriction and dilation or
unequal pupil size.
A normal pupil in a fit and healthy person range from 3.0mm to 6.5mm
Any abnormal change in pupil size can occur as a result of:
• Medications
• Drugs
• Toxins (poisons)
• Head trauma
• Stroke
P a g e 23 | 52Vital signs – Ranges:
Respirations Pulse Temperature Blood pressure
Adult 12-20 rpm 60-80 bpm 37C 120/80 mmhg
Child 20-30 rpm 60-100 bpm 37C 100/65 mmhg
Infant 30-40 rpm 100-160 bpm 37C 95/65 mmhg
Extended care in the outdoors - WRAPT
Insulate the casualty, remove wet clothing, protect from the elements
W Warmth
This, along with concern / empathy can help the casualty cope and have
R Rest
a positive effect on vital signs
Monitoring, recording and evaluating vital signs will help you to tell if the
A Assess again
condition of the casualty is getting worse
Lying flat? Semi-sitting? Legs raised? Stable side position?
P Positioning
You can begin this when you know what the illness / injury is. Arranging
T Treatment
evacuation will have to be considered
Always check to see if the casualty is carrying medical ID or wearing medical alert jewellery e.g.
www.medicalert.co.nz or if they are carrying medications on them
Trauma Management
Fractures Trauma Management
Overview:
Fractures in a pre-hospital environment rarely need splinting. The most important focus in fracture
management is to effectively treat any associated external bleeding and to perform the primary survey.
Significant blood loss can occur from fractures and bleeding can be internal.
Types of fractures:
Common Types of Fracture
P a g e 24 | 52Open fractures These are fractures that have punctured the skin. The bone end may have returned
and not be visible, but this is still an open fracture.
Closed fractures These are fractures where the surrounding skin remains intact.
Complicated fractures These are fractures that have caused damage to internal structures, such as a
punctured lung, or a fracture that involves significant bleeding.
Signs and symptoms
A casualty experiencing a fracture may experience one or more of the following signs and symptoms:
• Pain at the injury site
• Bleeding (internal or external)
• Open wounds with or without exposed bone ends
• Deformity
• Shortening or rotation of the limb
• Inability to move or stand
• The casualty reports hearing the bone break
• Tenderness
• Swelling or irregularity
• Shock like signs and symptoms
• Crepitus (the sound of bones grinding)
• Discolouration
• Shortening of the limb
Management
The steps for the management of fractures are:
• Carry out primary assessment, DRS ABCD
• Seek medical attention (make sure EMS are en route).
• Control any external bleeding using direct pressure. If a bone is exposed apply indirect pressure
around the bone to stop bleeding.
• For a closed fracture, ice packs may be used to assist with pain relief and swelling.
• Minimise any unnecessary movement unless there are safety concerns.
• If the injured limb needs to be immobilised, make use of whatever you have got at hand to do
so e.g. pillows, magazines, or dressings to support the limb.
• Check the circulation below the fracture site.
• Carry out secondary assessment
• Rest and reassure
Soft Tissue Injury Trauma Management
Overview
Ligaments and tendons are soft tissues that connect muscle and bones together. They can be damaged
as a result of forceful joint movements and/or external pressure on the body. Sprains and strains can
limit movement by causing pain and swelling in the area of injury. More serious underlying injuries can
be present, for example fractures or tendon ruptures.
Treatment - RICED:
ACC has specific guidelines on how to deal with sprains and strains. This is simplified with the acronym
RICED.
P a g e 25 | 52R Rest: Stop the activity
I Ice: For up to 20 min (do not over cool)
C Compression: To reduce the swelling
E Elevation
D Diagnose: Soft tissue injuries may be referred to a doctor in order to identify any potential fracture/s
Signs and symptoms:
A casualty experiencing a soft tissue injury may display one or more of the following signs and
symptoms:
• Pain in the area of injury
• Lack of, or limited movement
• Inability to bear weight
• Swelling
• Tenderness
• Bruising
Management:
The steps for the management of soft tissue injuries are:
• Carry out primary assessment, DRS ABCD
• Seek medical attention.
• Remove constrictive clothing or jewellery.
• Apply the RICED technique.
Bleeding Trauma Management n
Overview
Bleeding is one of the most rectifiable causes of death following trauma, therefore controlling external
bleeding is a main priority when administering care in a pre-hospital environment.
There are three main types of blood vessel:
• Arteries
• Veins
• Capillaries
P a g e 26 | 52Types of bleeding:
Arterial bleeding will be profuse and rapid because it is under pressure. It will be spurting as the heart
beats, which will make it difficult to control and difficult for clots to form. This bleeding will be bright red
as arterial blood is comprised of highly oxygenated red blood cells. Arterial bleeding is a significant and
life-threatening blood loss.
Venous bleeding is easier to control because the blood in the veins is under less pressure, which
assists with clotting. Because it carries less oxygen, venous blood is a much darker red. Dangerous
levels of blood loss can occur from venous bleeding.
Capillary bleeding is the most common and easiest to control, as capillaries are closest to the surface
of the skin. Blood tends to ooze rather than flow or spurt as the pressure in the capillaries is very low.
Management:
• Carry out primary assessment, DRS ABCD
• Seek medical attention (make sure EMS are en route)
• Make sure there isn't a foreign body in the wound before applying direct pressure
• Apply direct pressure (dressing and bandage)
• Elevation provides minimal assistance but may be used if the wound position allows
• If unresponsive and breathing is adequate, place the casualty in the recovery position
• Carry out secondary survey
• Severe bleeding may lead to unconsciousness and may require life support (CPR)
• Rest and reassure
Direct pressure:
Direct pressure is the main treatment used to manage bleeding:
1. After checking for any foreign objects in the wound, apply firm pressure, directly onto and if required,
into the wound using large sterile trauma dressings.
2. If blood soaks through the initial dressing, apply further dressings as required.
Application of direct pressure
Indirect Pressure
When a foreign object or bone protrudes from a wound, place packing around the object and pressure
with bandages to control bleeding. Do not remove the object as it acts as a plug to stem bleeding.
P a g e 27 | 52Tourniquet:
For severe bleeding from a limb where direct pressure is ineffective, a tourniquet (or improvised
tourniquet) can be used as last resort. Apply approximately 5cm above the wound (between the wound
and the heart) ensuring the tourniquet stops the bleeding. Do not tourniquet over a joint, and once in
place Do not remove. Inform EMS of the tourniquet and time it was applied.
Example of an Improvised Tourniquet
Shock Trauma Management
Overview:
Shock is a medical emergency in which the organs and tissues of the body are not receiving an
adequate flow of blood. This deprives the organs and tissues of oxygen (carried in the blood) and allows
the build-up of waste products. The most common cause of shock you may encounter is caused by
severe blood loss (Hypovolaemic shock). Shock can easily lead to death if the cause is not treated
urgently.
Five main types of shock:
• Cardiogenic shock (problems associated with the heart's functioning)
• Hypovolaemic shock (the total volume of blood available to circulate is low)
• Anaphylactic shock (caused by a severe allergic reaction)
• Septic shock (caused by overwhelming infection, usually by bacteria)
• Neurogenic shock (caused by damage to the nervous system from a spinal cord injury or
neurological disorder.
Typical Causes of shock include:
Loss of circulating blood volume, which can result from:
• Severe bleeding
• Major or multiple fractures
• Major trauma
• Severe burns or scalds
• Severe diarrhoea and vomiting
• Severe sweating and dehydration (heat stroke).
• Heart disorders
• Anaphylactic reaction
• Severe brain/spinal cord injury
Signs and symptoms of shock:
There are several indicators that a casualty is going into shock:
• The body's nonessential organs slow down
• Rapid weak pulse
• Pallor, cold, clammy, sweaty skin
• Nausea or vomiting
• Thirst
• Altered level of responsiveness
P a g e 28 | 52Shock management:
• Carry out primary assessment, DRS ABCD
• Seek medical attention (make sure EMS are en route).
• Minimise any movement to casualty
• If bleeding is present attempt to manage by applying direct pressure and elevation.
• Where possible have the patient lying down with their legs and feet raised (shock position) or if
unresponsive and breathing is adequate, place the casualty in the recovery position
• Keep the casualty warm but do not overheat
• Undertake a secondary assessment.
• Rest and reassure.
Concussion Trauma Management
Concussion
This is a temporary loss or altered level of consciousness occurring after a head injury or impact to the
skull area. Casualty’s who subsequently show a decline in conscious level may be suffering from a more
serious brain injury, requiring urgent medical attention.
Mild concussion may involve no loss of consciousness (feeling "dazed") or a very brief loss of
consciousness (being "knocked out").
Severe concussion may involve prolonged loss of consciousness with a delayed return to normality.
Causes:
Concussion can be caused by any significant blunt force trauma or jolt to the head e.g. falls, car
accidents, or being struck on the head with an object
The signs and symptoms of concussion are:
• Loss of consciousness after any trauma to the head
• Temporary confusion
• Confusion that lasts several minutes
• Nausea
• Inability to recall the incident
• Blurred vision
Management:
• Carry out primary assessment, DRS ABCD
• Seek medical attention (make sure EMS are en route).
• If unresponsive and breathing is adequate, place the casualty in a stable side position
• When you move the casualty, immobilise the casualty by supporting the head and neck with
both hands. This will minimise head, neck and spinal movement.
• Carry out a secondary assessment, taking into consideration any neck or spinal injury
• Rest and reassure
P a g e 29 | 52Head Injury Trauma Management
Head Injury is damage to living brain tissue caused by an external mechanical force. It is usually
characterised by a period of unconsciousness lasting minutes, months or indefinitely. The resulting
damage to the brain tissue impairs the individual's abilities both physically and mentally. Other causes
of head injuries are chemical exposure and alcohol related damage.
There are some groups in the community who are more susceptible to head injury than others:
• Young male adults aged 17-25 make up 50% of known head injury victims, usually as the result
of car accidents.
• Pre-schoolers are the next most vulnerable with falls from play equipment, windows and
downstairs.
• The Elderly are also vulnerable to head injury mainly from falls in the home.
Causes:
About 170 New Zealanders are hospitalised with head injuries every week and many more are
concussed or have mild head injuries. These can be caused by:
• Motor vehicle accidents
• Assaults through blunt force trauma
• Sporting accidents
• Accidents at home
• Industrial accident
• Exposure to solvents
• Exposure to drugs and alcohol
Signs and symptoms of head injuries are:
• Skull deformity
• Obvious signs of a head wound
• Bleeding or straw-coloured fluid discharge from ears, nose or mouth.
• Slurred speech
• Bruising around the edges of the eyes (raccoon eyes) and behind the ears
• Unconsciousness, drowsiness or vagueness
• Loss of memory
• Agitation or irritability
• Lack of coordination
• Bleeding into the eyes
• Changes in size or shape of pupils
• Seizures.
Management:
• Carry out primary assessment, DRS ABCD
• Seek medical attention (make sure EMS are en route).
• If unresponsive and breathing is adequate, place the casualty in a stable side position
• When you move the casualty, immobilise the casualty by supporting the head and neck with
both hands. This will minimise head, neck and spinal movement.
• Control any external bleeding.
P a g e 30 | 52You can also read