A pre-coding game for 4-6 year olds - LESSON PLANS - 2021 CodeMonkey Studios Ltd.
←
→
Page content transcription
If your browser does not render page correctly, please read the page content below
LESSON PLANS

A pre-coding game for 4-6 year olds

                               © 2021 CodeMonkey Studios Ltd.   1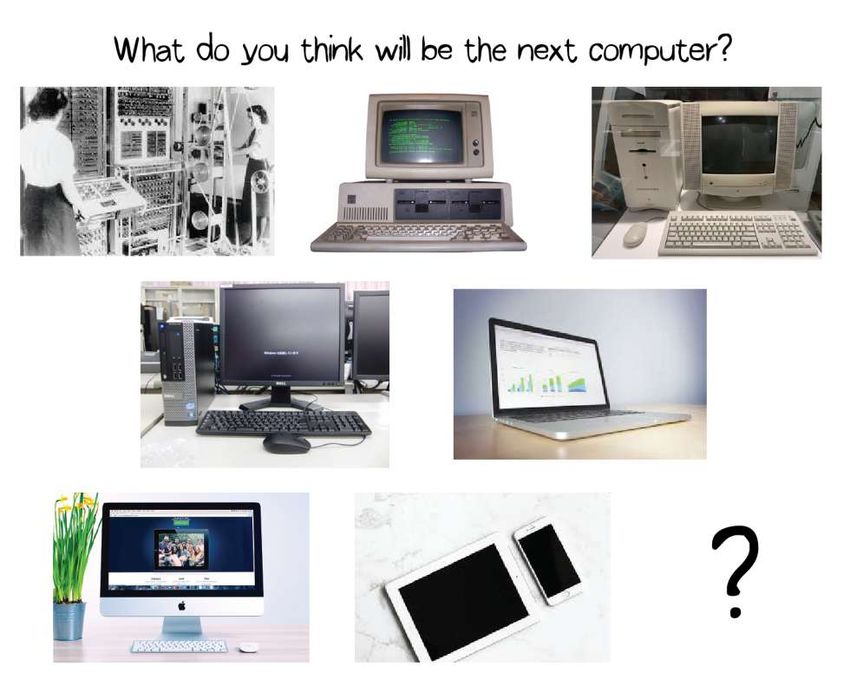
LESSON PLANS

Copyright © 2021 by CodeMonkey Studios Ltd.
All rights reserved. This book or any portion thereof
may not be reproduced or used in any manner whatsoever
without the expressed written permission of the publisher.

2345 Yale St., 1st floor
Palo Alto, CA 94306
info@cm-studios.com
www.codemonkey.com

                                       © 2021 CodeMonkey Studios Ltd.   2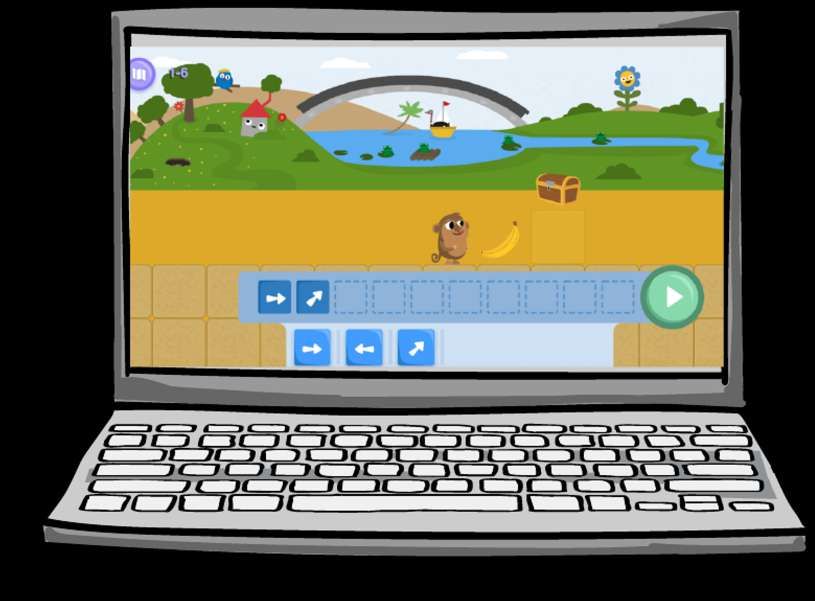
Introduction
LESSON PLANS

        Thank you for choosing                to introduce your preschoolers to the basics of computational thinking and coding principles
        through gaming. This course is recommended for 4-6 year-olds. The following 10 lessons will cover all 4 chapters in             , which
        include a total of 30 levels. These levels will introduce students to fundamental concepts and terms from the world of computers and
        programming.

        Each lesson is set to be 35 minutes long and is made up of 3 parts: an Introduction, Playtime and Debriefing. If you think you need more
        time to complete a lesson, feel free to split it into 2 sessions. Not all of the lessons are based upon playing the game itself as some are
        more theoretical and teach new concepts. All of the lessons are playful and designed for younger students. Not all lessons require a
        computer or tablet and active Internet.

        Before you get into the lesson plans, we recommend reading CodeMonkey Jr.’s Teacher Guide. At the end of this file, you will find a
        Glossary that summarizes each coding concept. Please refer to it throughout the course. Feel free to email us with any questions or
        comments.

        Good Luck!
        The CodeMonkey Team

                                                        © 2021 CodeMonkey Studios Ltd.                                                            3
LESSON PLANS

                                 some notes on teaching codemonkey jr.
         ●     ALL Beginners are welcome!
                 ○ We will provide you with everything you need in order learn the basics of coding and enjoy teaching the game. You do not
                     need any background in Computer Science!
         ●     A love of learning is a plus
                 ○ A love of learning is key for learning new topics like programming, which may seem intimidating at first. Don’t worry
                     though, we will provide you all the information you need to successfully teach your students coding.
         ●     A love for playing is also a plus!
                 ○ We believe learning through playing is a joyful and engaging way to introduce concepts to your students. CodeMonkey Jr.
                     will open up a new world for your students so give them time to replay the game if they want. Afterall, we want students to
                     have fun.
         ●     Mistakes are OK!
                 ○ Mistakes are the best way to learn so use them to challenge and engage your class. You can even encourage students to
                     play with wrong sequences to see where the monkey will go.

                                                                                                                                               4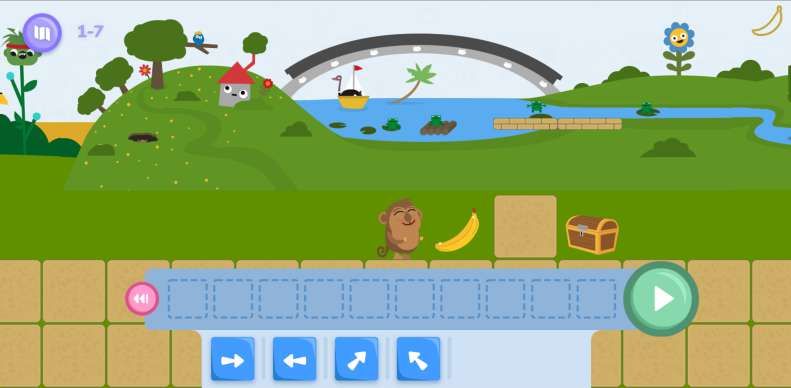
LESSON PLANS

                                                                  Guidelines
         ●     We recommend going over the Teacher Guide and the entire lesson plans before starting the course
         ●     The following lesson plans are only suggestions so feel free to change, edit and adjust them to your class. At the end of the day,
               only you know what is best for your students!

                                                                                                                                                    5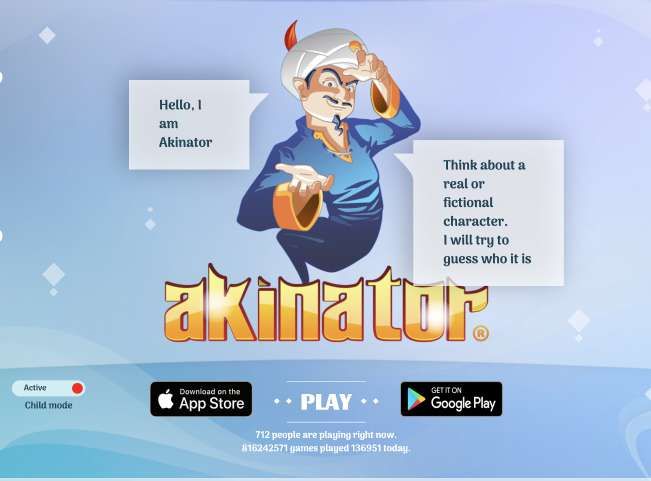
LESSON PLANS

                                                     Technical Requirements
         ●     You will need tablets or desktops for students. You can use 1 device per 2 students.
         ●     It is best if your computer is connected to a projector or screen so that you can present levels
         ●     An Internet connection is recommended in order to save student progress

                                                                                                                  6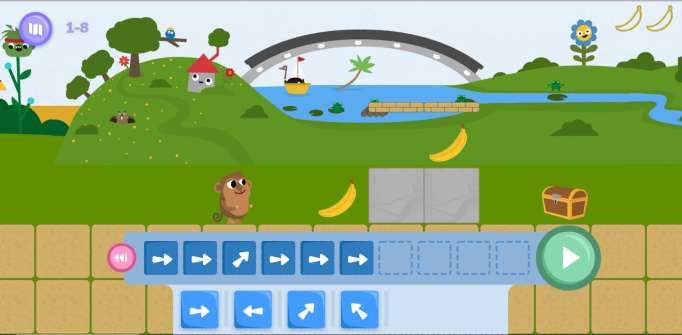
LESSON PLANS
                                                         Table of Contents
    Lesson                                                                                              Type           Chapter     Slide

    Lesson 1 – Intro to Computers                                                                       Theoretical        -               8

    Lesson 2 - Intro to Coding                                                                          Theoretical        -            13

    Lesson 3 – Meet the Monkey                                                                          Practical          1            18

    Lesson 4 – Finding Treasure                                                                         Practical          1            23

    Lesson 5 – Back and Forth                                                                           Theoretical        -            27

    Lesson 6 – Practice Makes Perfect                                                                   Practical          2            32

    Lesson 7 – On Repeat                                                                                Theoretical        -            36

    Lessons 8 & 9 – Loops                                                                               Practical          3            40

    Lesson 10 - Not Just Loops + Summary                                                                Practical          4            45

    Glossary                                                                                                               --           49

    NOTE: The type of lesson can be either theoretical or practical. Theoretical signifies lessons that take place without playing CodeMonkey Jr..
    They serve to introduce concepts to your students and help them understand them through offline activities. Practical lessons take place
    online, using the CodeMonkey Jr. platform. In these lessons students will solve levels on CodeMonkey Jr..
    Looking at the type of lesson in advance can help you know when you need to reserve devices for your class.
                                                            © 2021 CodeMonkey Studios Ltd.                                                           7
LESSON PLANS - theoretical

                                        Lesson 1 – Intro to Computers
                             Through this lesson, students will understand what a computer is and how almost
                             everything in our world is digitized or computerized.

                                                       © 2021 CodeMonkey Studios Ltd.                          8   TOP
PREPARE IN ADVANCE:
LESSON 1: Intro to Computers
                                                                                                                         For this activity, please prepare Images of

                                                                     Part 1: 15 Minutes                                  different computers over time (from the
                                                                                                                         first computer to the ones we use today).

                                                                   Introduction
                                                                                                                         See next slide for examples.

                    Discussion                                                   15 mins.
                    Your class’ understanding of computers and technology may differ from student to student. The following discussion will
                    help you understand their level. If you see that most of your students lack understanding on what a computer is or what it
                    does, consider splitting this lesson into two parts.
                    Lead a discussion with your class about the computers in their lives by asking the following:
                          1.  What is a computer? Let students define a computer in their own words and terms. You can guide them with a
                              leading question such as: “Imagine that a kid from the Stone Age is coming to class and you need to explain to
                              him or her what a computer is. What would you say?”
                                  •   Your students will probably start with answers related to what you use computers for.
                                  •   Try to lead with questions that will focus them on defining what computers are. Provide them with an
                                      example such as is a computer an object or person? Is it mechanical or digital? Is it durable or fragile?
                          2. Ask students what types of devices they have at home.
                                  •   Present different computer images - desktops, tablets, smartphones, etc. (see next slide)
                          3. Discuss the fact that computers today go beyond the standard devices we all know. For example, autonomous
                              cars, smart TVs, robots, etc. are all computers.
                          4. Ask students what they do with computers at home.
                                  •   What do other family members do?
                                  •   Examples could be playing games, searching the web, watching videos, working, etc.
                          5. Ask them what is connected to their computer. Examples could be a keyboard, mouse, screen, camera, etc.
                                  •   This is a good point to speak about the difference between software and hardware - explain that we
                                      develop the software and without software, computers are just a machines (or hardware) that cannot do
                                      anything.                      © 2021 CodeMonkey Studios Ltd.                                                       9   TOP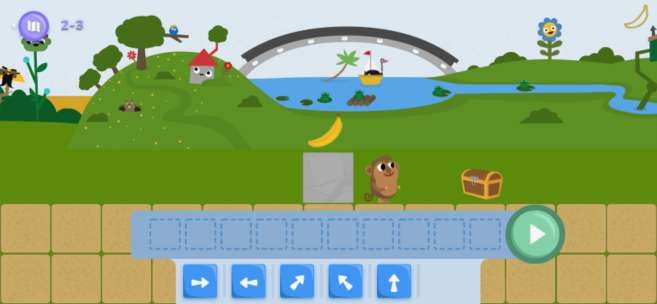
LESSON 1: Intro to Computers
                                                                         Good to Know in Advance:

                               Computer evolution                   ●    The first computer was invented more
                                                                         than 70 years ago, it was the size of a
                                                                         room
                                                                    ●    The evolution of computers started from
                                                                         very large computers to small devices
                                                                         like the tablets we use today. They
                                                                         became smaller and more efficient over
                                                                         time

                                                                  Useful links:
                                                                  Computer facts for kids
                                                                  Next steps in computers evolution

                                 © 2021 CodeMonkey Studios Ltd.                                       10   TOP
PREPARE IN ADVANCE:
LESSON 1: Intro to Computers
Download Akinator for free on the
Part 2: 15 Minutes App or Google Play Store or use the
web link
Playtime Make sure to Turn ON “Child Mode”!
Present 15 mins.
This part of the lesson will be based on a 6-minute video and the Genie Guessing Game
○ Start with this awesome introductory YouTube video on what computers are for
kids.
○ After the video, play the Genie Guessing Game on Akinator with your class
○ Ask students to think about a real or fictional character. The genie will try to
guess who it is.
○ After the game, ask students:
• Does the genie know everything? Yes
• Is there a genie in the computer? No, it is software that was developed
by programmers
How is this game connected to computer programming?
When kids play the game, they get the impression that computers can read their
thoughts, but that is not the case. Somebody programmed this game to be smart
enough to have enough information to be able to “read their thoughts”, ask the right
questions and ultimately guess the character that they are thinking of.
© 2021 CodeMonkey Studios Ltd. 11 TOPLESSON 1: Intro to Computers
Part 3: 5 Minutes
Debriefing
Discussion 5 mins.
Ask your class to name something that they learned today.
Remind them of the following:
1. Computers - desktops, laptops, tablets
2. Keyboard, Mouse, Screen
3. Software - games, videos, emails
Ask students about what new computers or software ideas they would like to invent.
© 2021 CodeMonkey Studios Ltd. 12 TOPLESSON PLANS - theoretical
Lesson 2 – Intro to coding
After this lesson students, will know that what it means to make a computer perform a
task. They will also practice basic algorithms.
The lesson covers the following:
-Logic
-Algorithms
-Sequencing
-Direction/orientation
-Counting
© 2021 CodeMonkey Studios Ltd. 13 TOPLESSON 2: Intro to Coding
Part 1: 15 Minutes
Playtime
Play 10 mins.
Game #1 - Instruction-based drawing
1. Print or draw a shape like the bullseye on the right (simplify it as you see fit)
2. Ask for a volunteer
3. Give the volunteer the drawing
4. Handout paper and pens to all of your students
5. Ask the volunteer to guide the class to draw the bullseye, without showing the paper to them
Discuss 5 mins.
Ask students to present their drawings and have the volunteer show the bullseye.
● How many drawings look like the original? How come?
● What was difficult about the game? Ask both the volunteer and the class.
© 2021 CodeMonkey Studios Ltd. 14 TOPPREPARE IN ADVANCE:
LESSON 2: Intro to Coding ● An 8 x 8 inch grid with two objects placed on
Part 2: 15 Minutes the grid
○ The grid can be a chessboard or chalk
Playtime
grid that you drew
● Index cards with the following Instructions:
○ turn left, turn right, move one tile
forward (see next slide)
Playtime 10 mins.
Game #2 - Software Vs. Computer
In this game, students will learn how computers and software work through visual
Y
representation. Choose two volunteers - Student 1 and Student 2. Student 1 will be the
programmer. He or she will be in charge of building up a set of instructions (the program)
given to the computer (Student 2).
In this case, the program will be responsible for getting the object from point X to the object on
point Y.
Student 2 will act as the computer. He or she will move the objects based on the exact
instructions given by the Student 1 ( the programmer).
X
Discussion 5 mins.
After this game, students will understand the importance of the following:
● Defining clear steps and giving accurate instructions for students to follow
● Counting from one space to the next
● Actively following instructions
● Analyzing wrong instructions
● Giving accurate instructions at a pace that the student can follow
© 2021 CodeMonkey Studios Ltd. 15 TOPLESSON 2: Intro to Coding
Instructional cards
Instruction Meaning
turn right
turn left
Move one tile forward
Tip:
● Let students choose their own two objects (i.e. toys) that will be placed on the board
● Students may have difficulties in differentiating between left and right so you may print
cards in different colors
● Start the game with a simple sequence where the instructions are only move forward.
● After one or two rounds, make the path more complex.
16 TOPLESSON 2: Intro to Coding
Part 3: 5 Minutes
Debriefing
Discussion 5 mins.
Explain how the game mimicked what it is like to be a programmer in real life
● What was the main challenge in both games?
○ Defining clear instructions
● Why is it important to provide clear instructions?
○ When instructions are not precise, the student 2 could interpret a different meaning that what student 1 meant. This would
lead to the game reaching a different outcome.
● Have you ever been given unclear instructions and ended up doing the wrong thing? When?
○ For example, what happens if your parents tell you to put on your shoes but then you forget to put on your socks first
© 2021 CodeMonkey Studios Ltd. 17 TOPLESSON PLANS - Practical
Lesson 3 – Meet the Monkey
After this lesson, students will understand the objectives of the game and learn how to
play CodeMonkey Jr.. By end of this lesson, students will complete levels 1-4.
Students will also learn about the move-left and move-right blocks.
Please note that the
minimum class time required
for this lesson is 35 minutes. If
you are rushed for time,
please skip to Part 2. © 2021 CodeMonkey Studios Ltd. 18 TOPPREPARE IN ADVANCE:
LESSON 3: Meet the Monkey ● Install CodeMonkey Jr. on your device
Part 1: 10 Minutes ● Make sure you have Internet
Present
Introduction 10 mins.
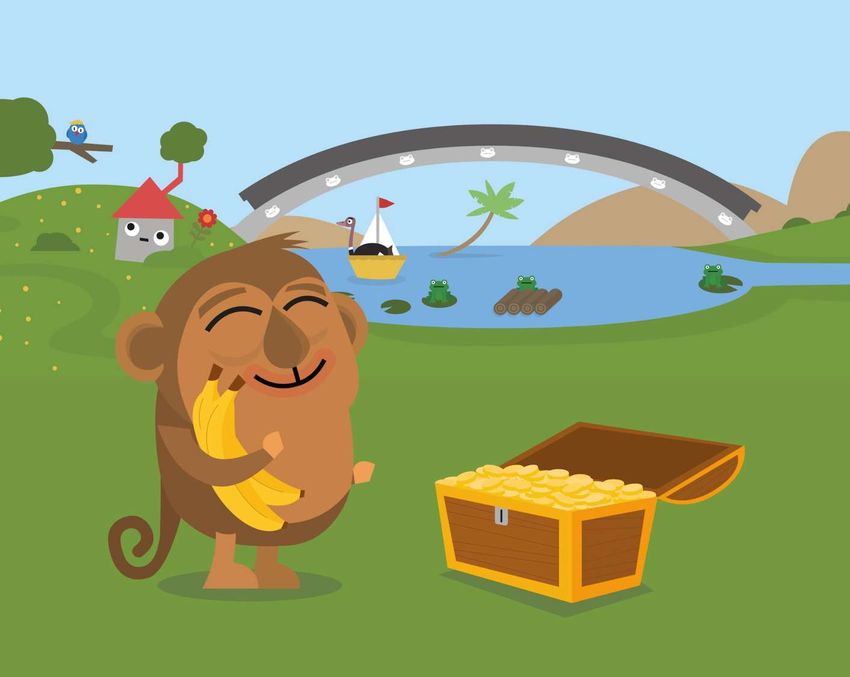
Introduce CodeMonkey Jr. to your students. The game takes place in a world filled with captivating creatures and bright colors, where
students need to help a monkey collect bananas and unlock a treasure chest. In order for the monkey to get to the treasure chest,
students need to code the path. The coding instructions are carried out through graphical blocks. In the scope of this version, the game
consists of four consecutive chapters that either increase in difficulty or introduce a new concept.
1. Open the game and present the homescreen.
2. Enter the first chapter (Sequencing) and go to the first level. This level has an animated tutorial.
3. Instructions can be either tapped or dragged to the code line.
4. Once the code is complete, tap play to see where the monkey goes.
© 2021 CodeMonkey Studios Ltd. 19 TOPLESSON 3: Meet the Monkey
User Interface
Home screen with 4 chapters First level with an animated tutorial
Move left/right instructions
20 TOPLESSON 3: Meet the Monkey
Part 2: 20 Minutes
Playtime
Playtime Flow 20 mins.
In the following lesson, we will play levels 1-4.
After presenting Level 1, emphasize the following:
1. Counting: Each tile is a single step. Make sure all students can count to 10.
2. Directions: Go over the difference between left and right
Playtime can take up to 20 minutes. Students will get to Level 4 or higher. If they understand the game fast, consider
combining lessons 3 & 4.
Level Scope Tips & Tricks -
Before the end of the lesson, walk between
1 Introduction/tutorial students to see which level are they at and if
they need help.
2 1 step left
3 2 steps right + catch Learning from errors - Make sure you spend
banana time presenting to students wrong solutions.
This is very important in developing the ability
4 3 steps left + catch to analyze the cause of the error and how to
banana correct it.
© 2021 CodeMonkey Studios Ltd. 21 TOPLESSON 3: Meet the Monkey
Part 3: 5-10 Minutes
Debriefing
Discussion 5 mins.
The students are now real programmers.
● Before the end of the lesson, have students complete the level they are at.
● Compliment students on their first programming/coding experience.
● Lead a discussion with the students:
○ What does it mean to be a programmer?
■ Speak about solving problems
○ Ask students when they need to solve problems in their daily lives
○ What challenge is the monkey facing?
■ Speak about two matters - getting to the treasure chest and collecting bananas
○ What did you do to help the monkey?
■ Designed the right code to help it get to the treasure and bananas
○ Is there only one right way to solve a problem?
■ There are levels where you can solve them in more than one way and still get 3 stars. There are also levels where you can
get to the chest without 3 stars using different code.
○ Programming as a language - discuss the fact that they have learned a new language
○ What signs/words do we have in our coding language?
■ So far we learned 2 words - move right and move left. In the next lessons, we will learn new words.
© 2021 CodeMonkey Studios Ltd. 22 TOPLESSON PLANS - Practical
Lesson 4 – Finding Treasure
In this lesson, students will continue their progress by playing levels 5-8. Your class will
learn the jump blocks (jump right, jump left and jump up.) This lesson will also focus on
advanced planning and solving subproblems in order to solve the bigger problem.
Please note that the
minimum class time required
for this lesson is 35 minutes. If
you are rushed for time,
please skip to Part 2. © 2021 CodeMonkey Studios Ltd. 23 TOPLESSON 4: Finding Treasure
Part 1: 5 Minutes
Present
Discussion 5 mins.
This lesson is dedicated to playing CodeMonkey Jr.. Students will learn 3 new blocks and will deal with more complex pathways.
Explain the following:
● The monkey may need to jump or go over tiles - he can jump up in both directions.
● Going down is done with the go left/right blocks
● Jumping up moves the monkey up one tile and back down again.
© 2021 CodeMonkey Studios Ltd. 24 TOPLESSON 4: Finding Treasure
Part 2: 25 Minutes
Playtime
Introduction 5 mins.
How a programmer works:
● Plans in advance
● Defines the problem - cuts it into small chunks
● Builds the sequence for each chunk
Playtime 20 mins.
Have students solve levels 5-8 (see table below)
Level Scope
5 2 steps with jump up
6 3 steps with jump up
7 3 steps with jump up and walk down
8 6 steps with jump up and walk down
© 2021 CodeMonkey Studios Ltd. 25 TOPLESSON 4: Finding Treasure
Part 3: 5 Minutes
Debriefing
Discussion 5 mins.
Explain that when a level is long and includes several instructions, there is a distinct need to plan in advance.
It helps to define goals/sub-sequences, build the sequence and then define the next goal until you complete the sequence. Make sure you
count the steps and walk in the right direction.
In the solution for Level 8 (see below), you can see the 3 parts:
● 2 steps right
● Jump right
● 3 steps right
Building the solution based on the sub problems makes it easier
© 2021 CodeMonkey Studios Ltd. 26 TOPLESSON PLANS - Theoretical
Lesson 5 – Back & Forth
This lesson is based on improving the counting capabilities required for moving back
and forth. It will also practice adding and subtracting.
© 2021 CodeMonkey Studios Ltd. 27 TOPLESSON 5: Back & Forth
Part 1: 10 Minutes
Present
Discussion 10 mins.
Start the lesson by telling a story that represents a challenge you faced. The level of complexity of the challenge can vary depending on
your class.
The story could be:
“At my house, there is a basement downstairs, a living room and kitchen are on the first floor and bedrooms on the second. Ask students
how many floors you have.
● 3
Tell your class that that between each floor are 5 stairs. Ask them how many stairs you have.
● 10 (two flights of stairs in a 3-story house)
Tell them that yesterday, you were in the kitchen when your younger son called you from the basement to fix something and your older
son asked for help with homework from upstairs. Tell them that you would like to do both.
Ask them how many stairs you need to climb in order to be able to help both of them?
● 3
Ask students what they would do.
● Have they ever been in such a conflict?
● Speak about order of actions/activities. What should you do first? Is there any advantage for choosing one path over the other?
● Mention that sometimes one path will be more efficient, this should be analyzed when defining the solution
© 2021 CodeMonkey Studios Ltd. 28 TOPPREPARE IN ADVANCE:
LESSON 5: Back & Forth ● Take 2 cards and write a different symbol on
Part 2: 20 Minutes each (i.e. heart and flower)
Playtime #1
Instructions 10 mins.
This lesson is about practicing counting, adding and subtracting.
Preparation:
1. Seat students in a row, circle or semicircle depending on class size
2. Choose a student to be Student A (make sure Student A is not on either end)
3. Hand the two cards that you have prepared to the two students seated on either side of Student A
a. During the first round, be sure to choose students seated close to Student A
b. Increase the distance between the two students and Student A with each round
4. Choose a volunteer to count the steps of each game round
Game:
1. Ask Student A to collect both cards and return to his/her spot
2. Have the volunteer count and write on the board the steps taken (1 step = 1 student)
3. Be sure to then play the game several times with the following alterations:
a. Play a few rounds where Student A does not return to their spot
b. Play a few times with various growing distances between Student A and the two students on either side
Discussion:
● How many steps did the student take? How many students did the student cross on his /herpath?
● Which students did the student go through once and which twice?
● Is there a difference in the number of steps taken depending on which direction you chose to go first?
● Is there a difference in the amount of steps when Student A returns and does not return to their place and does it affect which
direction to start with?
© 2021 CodeMonkey Studios Ltd. 29 TOPLESSON 5: Back & Forth
Part 2: 20 Minutes
Playtime #2
Instructions 10 mins.
The following are ideas for questions to ask the class. Use this structure to build similar questions. Try to make the questions visual with
objects or drawings.
1. I have 3 apples, I gave my friend 1 apple - how many I have now?
a. my mom gave me additional 4 apples - how many apples I have?
2. There are 3 kangaroos, 1 hops away. How many kangaroos are left?
a. 2 kangaroos
3. The kangaroos came back with a friend, how many kangaroos are there?
a. 3 kangaroos
4. I have 3 friends and 2 snacks, how many snacks are missing?
a. 1 snack
5. I gave one of the friends a snack, how many snack are missing now?
a. 2 snacks
6. Now, 1 new friend has joined, how many snacks are missing?
a. 3 snacks
7. I’m standing on the 2nd level of a ladder. I need to go down to pick up my tools and go up to the 4th level. How many steps do I
need to take?
a. 6 steps
© 2021 CodeMonkey Studios Ltd. 30 TOPLESSON 5: Back & Forth
Part 3: 5 Minutes
Debriefing
Discussion 5 mins.
Discuss the following with your class:
● This lesson was in preparation for our next class, where we will help the monkey step back and forth (as you remember until now he
only stepped forward)
● Before we complete the lesson, I’d like you to think about our first discussion. Remember when I told you about the conflict I was
having at home with my sons? Do you remember the game we played at the beginning where [insert student name] had to choose
how to collect the cards?
○ Summarize the common theme where both scenarios required counting and planning
○ Counting the steps required planning and solving two different problems:
1. Going from the Point A to Point B
2. From Point B to Point C
○ It is important to understand that the total number of steps will be a sum of both.
© 2021 CodeMonkey Studios Ltd. 31 TOPLESSON PLANS - Practical
Lesson 6 – Practice makes Perfect
In this lesson, students will complete the 2nd chapter of CodeMonkey Jr., which focuses
on advanced sequencing. In the scope of this game, Advanced Sequencing is when
students use advanced counting abilities for going back and forth and combining both
directions in a single line of code.
Please note that the minimum
class time required for this
lesson is 35 minutes. If you are
rushed for time, please skip to
Part 2. © 2021 CodeMonkey Studios Ltd. 32 TOPLESSON 6: PRACTICE MAKES PERFECT
Part 1: 5 Minutes
Present
Discussion 5 mins.
What happens when the banana is on your left but the treasure chest is on your right?
How can you solve this problem?
1. Go directly to the treasure chest → but you will not get the highest score
2. Go the the treasure chest first and then go to the banana → the level ends up when you reach the treasure chest, hence this is
impossible
3. Go to pick up the bananas first and then go to the treasure chest
© 2021 CodeMonkey Studios Ltd. 33 TOPLESSON 6: PRACTICE MAKES PERFECT
Part 2: 25 Minutes
Instructions TIME: 25 min Playtime
Remember to count the steps to and from the banana and
not from the point the monkey is at in the beginning.
Level Scope
1 Pick up banana on the left and go to the treasure chest on the right (1 step left, 2 steps right)
2 The banana is on the right and treasure chest is on the left. (2 steps right, 3 steps left)
3 Jump left and then walk right
4 Go to the tile and then go back all the way. Jump right on the way to the banana and jump left on
the way back
5 Long path - make sure to plan the full path based on the 2 sub-paths
© 2021 CodeMonkey Studios Ltd. 34 TOPLESSON 6: PRACTICE MAKES PERFECT
Part 3: 5 Minutes
Debriefing
Discussion 5 mins.
There are many ways to solve a problem. Each way may differ in quality, effort and outcome.
In this chapter, we saw that you can code different paths to the treasure chest, but not all will collect the bananas. This indicates that you
can complete a level successfully, however you will not receive the highest score.
Attaining the highest score requires planning as well as a different type of counting method since you need to plan two paths, one to the
banana and then going from the banana to the treasure chest.
© 2021 CodeMonkey Studios Ltd. 35 TOPLESSON PLANS -
Theoretical & Practical
Lesson 7 – On Repeat
In this lesson, the students will learn the concept of a loop.
There are several types of loops in programming. In our scope, students will learn how
to use a preset conditional loop.
Loop - repeat an action until asked to stop
Please note that the minimum
class time required for this
lesson is 35 minutes. If you are
rushed for time, please skip to
Part 2. © 2021 CodeMonkey Studios Ltd. 36 TOPLESSON 7: On Repeat
Part 1: 5 Minutes
Present
Discussion 5 mins.
What happens when you need to perform the same action many times?
For example, what would the code look like if the monkey needs to walk 7 tiles to the right?
● MR-MR-MR-MR-MR-MR-MR
Is there a shorter way?
What about the following ways?
● Move right 7 times
● Move right until you reach the goal
© 2021 CodeMonkey Studios Ltd. 37 TOPPREPARE IN ADVANCE:
LESSON 7: On Repeat ● Dice for the class - each pair of students will
Part 2: 20 Minutes need 2 die
Playtime
Instructions - The Dice Game 15 mins.
Split the class into couples and give each pair a set of dice.
The game is simple - the first one who gets a double wins the round.
Ask students to document the game by writing how many throws they needed each round to get a double.
Going back to the game 5 mins.
After 3-4 rounds (depending on the students), ask students to open Chapter 3 and play levels 1 & 2.
These levels are simple sequences which means that a single instruction is repeated several times.
For example, Level 1 requires 7 MR (move-right).
© 2021 CodeMonkey Studios Ltd. 38 TOPLESSON 7: On Repeat
Part 3: 5 Minutes
Debriefing
Discussion 5 mins.
Ask students for feedback about Chapter 3, Levels 1-2.
Do they have an idea for doing it in a different way?
Lead students to understand that sometimes, repeating instructions can be combined together.
This is a loop!
© 2021 CodeMonkey Studios Ltd. 39 TOPLESSON PLANS - Practical
Lessons 8 & 9 – Loops
In this lesson, students will play CodeMonkey Jr. and complete the 3rd chapter which
focuses on loops. Since Chapter 3 is longer than the others, we recommend planning a
longer class or completing it in two consecutive classes.
© 2021 CodeMonkey Studios Ltd. 40 TOPLESSONs 8 & 9: Loops
Part 1: 5 Minutes
Present
Discussion 5 mins.
● In the previous lesson we introduced the concept of loops. Start this lesson by asking the students the following:
○ Do you remember our previous lesson? We learned a new concept, do you remember what it was?
○ If students don't remember loops, use leading questions such as “what happens when we need to perform the same action
many times?” or “In real life, is there a limit to the number of times we need to repeat an action?”
○ If students do remember loops, you can solidify what they already know by going over loops again and explaining why they
are so important (for example, loops are helpful in executing one or more statements a certain number of times).
● Define:
○ A loop is a way to instruct computers to repeat a set of actions or in other words, doing the same action multiple times.
○ Until Loop - Until loops are a way to instruct computers to repeat a set of actions until a certain event occurs. For example,
keep walking until you reach the end, keep working until you finish your homework or keep playing until your team scores 10
points.
○ Loops are a fundamental part of programming - it is an essential part of any programming language and as becoming a
programmer you will master the concept of controlled repetition
© 2021 CodeMonkey Studios Ltd. 41 TOPPREPARE IN ADVANCE:
LESSONs 8 & 9: Loops ● This chapter is a bit longer than the other ones
Part 2: 25 Minutes so if possible, we recommend teaching it in
either two consecutive hours or two classes in
Playtime-1
a row. This will help your students better grasp
the lesson.
● If the lessons are couple of days apart, be sure
to review the first lesson at the beginning of
the second one.
Instructions 5 mins.
1. Start by presenting the loop tutorial in level 3-3
2. Present the level and ask students what would be the solution - Level Scope
[ML,ML,ML,ML,ML,ML,ML]
3. What is unique about this problem/solution? The same instruction 1-2 A long repeated sequence which is part of previous
repeats until the monkey gets to the treasure chest lesson
4. Follow the tutorial
a. Present the new LOOP instruction and drag it to the coding 3 A loop tutorial on how to use the loop symbol
area
b. Show students how to tap the instruction that will be within
the loop (ML) and then drag it into the loop
c. Play
5. Explain that the instructions within the loop are performed in order
of appearance and repeated in the same order until the condition is
met
Pay attention to the following:
● Tap/drag to add a loop
● Tap to add an instruction after the loop
● Drag to place it within the loop or change the order
© 2021 CodeMonkey Studios Ltd. 42 TOPLESSONs 8 & 9: Loops
Part 2: 25 Minutes
Playtime-2
Instructions 20 mins. Level Scope
4 Loop[JR]
Pay attention to the following:
● Tap/drag to add a loop 5 Loop[ML,JU]
● Tap to add an instruction after the loop
● Drag to place it within the loop or change the order 6 Loop[MR,JU] *there are other solutions, let the students
find the right solution for them
7 Loop[MR,JU,MR]
8 Loop[JL,JU,ML]
9 Loop{JL,JL,MR,MR]
© 2021 CodeMonkey Studios Ltd. 43 TOPLESSONs 8 & 9: Loops
Part 3: 5 Minutes
Debriefing
Discussion 5 mins.
● Ask your students what loops are useful for, why we use them and when.
● Explain the fact that we use loops in cases where we don’t know how many times we need to repeat an action or when we need to
repeat an action many times.
● Loops are one of the most important computing structures.
● The main challenge in this chapter is identifying what the repeated section within the loop is and how to build the code accordingly.
● It is important to understand that the entire code within the loop is performed at each loop repetition. The order of the instructions
within the loop doesn’t change.
● In this chapter, we will see that some levels can be solved in multiple ways so check with your class to see what creative solutions
they came up with.
© 2021 CodeMonkey Studios Ltd. 44 TOPLESSON PLANS - Practical
Lesson 10 – Not just loops
In this lesson, students will play CodeMonkey Jr. and complete the 4th chapter. This
chapter summarizes all the concepts that were taught throughout the course.
© 2021 CodeMonkey Studios Ltd. 45 TOPLESSON 10: Not Just Loops
Part 1: 5 Minutes
Present
Discussion 5 mins.
● The previous lessons focused on paths that were built using a single loop with no instructions outside of the loop.
● Ask your students if we could add the code before or after the loop?
○ What happens if we add code before the loop?
○ Does it make sense to add the code after the loop? Will the monkey perform it?
■ The code needs to go before the loop since the loop will end once the monkey reaches the treasure chest. This means that the
monkey will not get to perform the code after the loop. Important - there are other loop structures that will have code performed
after the loop is completed, these are not covered in the scope of this course.
For example - describe how to make a smoothie
● Do we use a loop when preparing a smoothie? YES, while blending.
● What is the order of instructions? Do we need to have instructions before and after the loop? YES, we do!
○ Slice fruits
○ Put in blender
○ Add ice
○ Blend until smooth ← Until loop
○ Pour into glass
○ Enjoy!
● Can you think of other daily activities where you have a loop with actions before and after?
○ For example - brushing your teeth, taking a bath, cleaning your room.
● For these additional activities, define the following with your class:
○ What is a loop responsible for? For the repeated section. For example, Loop [brush your teeth until you have cleaned all your teeth]
After loop [wash your mouth until all toothpaste is washed]
○ Where is the loop within the entire process? Are there instructions before or after the loop? [the loop is in the middle of the process,
actually we have 2 loops, the first for brushing the teeth, which takes place after a sequence of instructions, then the loop for washing
© 2021 CodeMonkey Studios Ltd. 46 TOP
the mouth[LESSON 10: Not Just Loops
Part 2: 25 Minutes
Playtime
Instructions 25 mins.
Pay attention - The loop is always the last section of the code. Do you know why?
The loop is an Until loop, for example “until you reach the treasure chest." In CodeMonkey Jr., the loop signifies
the end of the level.
In real life, the loop is not always the last block.
Level Scope
1 ML, Loop[JL,JU,ML,JU,ML]
2 JU, ML, Loop[JL, JL, ML, ML]
3 JR,JR, MR, MR, JL,JL,Loop[ML]
4 JU,MR,MR,JU,Loop[MR]
5 MR, JL, JL, Loop[ML]
© 2021 CodeMonkey Studios Ltd. 47 TOPLESSON 10: Not Just Loops
Part 3: 5 Minutes
Debriefing
Discussion 5 mins.
That’s it, you have completed the first milestone in your journey to becoming a programmer! Let your students know that they are also real
thinkers and problem solvers.
Ask the following:
● What have you learned in the past ten lessons?
○ Let students express and reflect on their experiences.
● Would you like to continue learning to program?
● What would you like to program?
● Did you find this game fun?
● Did you find it challenging? If so, what about it?
Discuss what programming is all about:
● Solving problems
● Analyzing needs and designing a solution
● Checking if the solution works and improving it if needed
© 2021 CodeMonkey Studios Ltd. 48 TOPLESSON PLANS
Glossary
Term Definition
Computer A computer is a machine that is able to take information (input), do some work on or make changes to the information, to make
new information (output).
Modern computers are very different from early computers. They are now very powerful machines that are able to do billions of
calculations every second. Most people have used a personal computer in their home or at work. Computers are useful for many
different jobs where automatic tasks are useful. Some examples are controlling traffic lights, vehicle computers, security systems,
Washing machines and Digital Televisions.
(source: https://wiki.kidzsearch.com/wiki/Computer)
Software Computer software (often called just software) is made of one or more computer programs. Sometimes it means one specific
program, or it can mean all the software on a computer, including the applications and the operating system. Applications are
programs that do a specific thing, such as a game or a word processor.
(source: https://wiki.kidzsearch.com/wiki/Computer_software)
Hardware Hardware (computer hardware) includes the physical parts of a computer, such as the cabinet, motherboard, central processing
unit, storage, and more. Peripheral hardware include - monitor, keyboard, speakers, mouse and more.
In some computers the peripheral devices are built-in (like laptop or tablet)
Until loop Until loops are a way to repeat a set of actions until a certain condition is satisfied
49 TOPLESSON PLANS Great Job!
You have Completed
© 2021 CodeMonkey Studios Ltd. 50 TOPYou can also read