AARRPPMMIINNEERR INSTALLATION & CONFIGURATION GUIDE VERSION 3.4 - KAPLANSOFT
←
→
Page content transcription
If your browser does not render page correctly, please read the page content below

ARPMiner
Installation & Configuration Guide
                       Version 3.4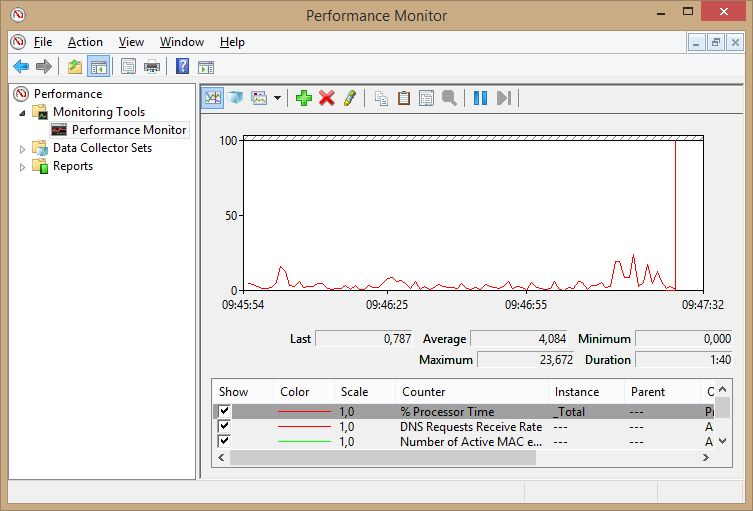
ARPMiner Version 3.4 - Installation & Configuration Guide

Document Revision 3.0

https://www.kaplansoft.com/

ARPMiner is built by Yasin KAPLAN

Read “Readme.txt” for last minute changes and updates which can be found under
application directory.

Copyright © 2013-2023 KaplanSoft. All Rights Reserved. This document is supplied by KaplanSoft.
No part of this document may be reproduced, republished or retransmitted in any form or by any
means whatsoever, whether electronically or mechanically, including, but not limited to, by way of
photocopying, recording, information recording or through retrieval systems, without the written
permission of KaplanSoft. If you would like permission to use any of this material, please contact
KaplanSoft.

KaplanSoft reserves the right to revise this document and make changes at any time without prior
notice. Specifications contained in this document are subject to change without notice. Please send
your comments by email to info@kaplansoft.com.

KaplanSoft is registered trademark of Kaplan Bilisim Teknolojileri Yazılım ve Ticaret Ltd.

Microsoft, Win32, Windows 2000, Windows, Windows NT and Windows Vista are either registered
trademarks or trademarks of Microsoft Corporation in the United States and/or other countries.

© 2013-2023 KaplanSoft - https://www.kaplansoft.com/                                                 2
ARPMiner Version 3.4 - Installation & Configuration Guide

Table of Contents

  Table of Contents ............................................................................................................................. 3
  Introduction ...................................................................................................................................... 4
  System Requirements ....................................................................................................................... 4
  Installation ........................................................................................................................................ 5
  Configuration ................................................................................................................................... 5
     Settings Section ............................................................................................................................ 5
     Operating Mode Section .............................................................................................................. 6
     Authentication Section ................................................................................................................. 9
     Accounting Section .................................................................................................................... 10
     SMTP Section ............................................................................................................................ 10
     DHCP Section ............................................................................................................................ 11
     DHCP Server Monitoring .......................................................................................................... 12
     Counters ..................................................................................................................................... 12
  Users............................................................................................................................................... 13
  Application Log ............................................................................................................................. 14
  User Defined Login Interface ........................................................................................................ 14
  Sponsored Authorization................................................................................................................ 15
  Supported RADIUS Attributes ...................................................................................................... 16
  Starting ARPMiner Service (TekSpot) .......................................................................................... 17
  RFC 8908 and RFC 8910 Support ................................................................................................. 18
  Troubleshooting ............................................................................................................................. 18
     TekSpot Messages in TekSpot logs ........................................................................................... 18
  Index............................................................................................................................................... 20

© 2013-2023 KaplanSoft - https://www.kaplansoft.com/                                                                                                3
ARPMiner Version 3.4 - Installation & Configuration Guide
Introduction
ARPMiner is a multi-purpose access control software runs under Windows (Vista/7/810/11, 2008-
2022 Server). Major features;
• Simple design and easy to use user interface.
• Simple interface for user definitions.
• Real time monitoring of connected users.
• NAT and bridge operation modes for HotSpot Captive Portal.
• PPPoE Server with MPPE (40/128 bits) Encryption.
• PAP, CHAP, MS-CHAP-v1 and MS-CHAP-v2 authentication methods.
• Built-in HTTP server with enhanced SSL and CGI/1.1 support, built-in DHCP server and
DNS proxy.
• RADIUS AAA support (Commercial editions only). ARPMiner accepts Packet of
Disconnect (PoD) from RADIUS servers.
• Sponsored authorization (Commercial editions only).
• RADIUS MAC authentication.
• DNS redirection.
• Client Id (Ethernet MAC address) in DNS requests (Experimental).
• WISPr authentication and partial RADIUS dictionary support.
• Customizable HTTP interface
• Performance monitoring through Windows Performance Monitor.
• RFC 8908 Captive Portal API and RFC 8910 Captive-Portal Identification in DHCP and
Router Advertisements (RAs) support.
ARPMiner consists of a GUI and a service application called TekSpot. TekSpot has its own built-in
PPPoE, HTTP, DHCP server and a proxy DNS server. TekSpot uses its built-in NAT engine.
RADIUS AAA and PPP encryption are supported in only SP edition.
System Requirements
• A Windows system (Vista, 7, 8, 10, 2008-2022 Server) with at least 4 GB of RAM.
• Microsoft.NET Framework 4.8.
• 8 MB of disk space for installation.
• One Ethernet interface for Private (Hotspot) zone and another for the Internet (Public)
connection.
• Administrative privileges.
• You must have installed a packet driver prior to install ARPMiner. Such as;
o https://nmap.org/npcap/ 1
o https://www.winpcap.org/
o http://www.win10pcap.org/
1
Npcap must be installed in Winpcap API compatible mode.
© 2013-2023 KaplanSoft - https://www.kaplansoft.com/ 4ARPMiner Version 3.4 - Installation & Configuration Guide
Installation
Unzip “ARPMiner.zip” and click “Setup.exe” comes with the distribution. Follow the instructions
of setup wizard. Setup will install ARPMiner and TekSpot Service, add a shortcut for ARPMiner to
desktop and the start menu.
Configuration
Run ARPMiner from Start Menu / Program Files / ARPMiner. ARPMiner automatically configures
itself at first run.
Settings Section
Click the Settings Tab to start configuration. The Settings tab has four sub sections. Enter following
information:
Figure - 1. ARPMiner Settings tab / Service section
• Startup / Logging: Set TekSpot service startup mode, Manual or Automatic. You can also
disable service startup. Select logging level of TekSpot. Select “None” if you do not want
logging, select “Errors” to log errors and select “Sessions” to log session information and
errors. Log files are located under \Logs directory.
• Server Certificate: Select server certificate for TLS.
• Log Directory: Log files are stored under the \Logs directory by
default.
• Auto Clear: ARPMiner can delete log files older than specified days. Set 0 to disable this
feature.
• Enterprise IP Address: This is detected user configured IP address of the public interface.
• Enable TLS: You can use HTTPS for HotSpot login form when you enable TLS. You must
select a server certificate after enabling TLS.
© 2013-2023 KaplanSoft - https://www.kaplansoft.com/ 5ARPMiner Version 3.4 - Installation & Configuration Guide
• Root Directory: You can set the directory where alternative login, info and error message
html file resides. Please see User Defined Login Interface section of this manual.
• Idle Timeout: Set idle timeout in seconds. Users will be assumed offline after this amount
of time if no network activity occurs.
• WISPr Enable: You can enable WISPr authentication by setting this option. ARPMiner
will add WISPr-Location-ID and WISPr-Location-Name to RADIUS accounting requests.
• WISPr Location Name: Enter a descriptive name for HotSpot location.
• WISPr Location: Enter a description for HotSpot location.
Operating Mode Section
Click Address Translation Tab to configure Internet connection and Private Network (Wireless e.g.)
connection interface. ARPMiner supports three modes of operation for access control; Network
Address Translation (NAT), bridge mode and PPPoE server mode.
Network Address Translation, NAT (Routed) Operation Mode
Private Network Interface
192.168.137.1/24
DHCP Start IP Address - Count
192.168.137.100 - 100
Internet Router
192.168.88.1/24
Internet
ARPMiner
Public Network Interface
192.168.88.3/24
Auxiliary IP Address
192.168.88.2/24
DHCP Assigned IP Parameters
IP Address, 192.168.137.100/24
Gateway, DNS Address, 192.168.137.1
DNS Address, 192.168.137.1
Figure - 2. Sample NAT (Routed) Configuration
ARPMiner will translate source IP address and port number (Port translation is performed when
it’s needed, ARPMiner performs symmetric NAT by default) while forwarding a packet from Private
Network to the Internet. ARPMiner will stop Windows Internet Connection Sharing (ICS) at startup
if it is enabled. Please also make sure that IP routing is disabled on ARPMiner installed machine.
ARPMiner uses an Auxiliary IP address (192.168.88.2/24 in the example above) for IP address
translation on the Public Network side. Windows machines would reject return packets from the
Internet if the translation was performed using public interface IP address (192.168.88.3/24 in the
example above).
© 2013-2023 KaplanSoft - https://www.kaplansoft.com/ 6ARPMiner Version 3.4 - Installation & Configuration Guide
An auxiliary IP address is chosen automatically but you can also set it manually. You must set it to
an IP address which is not used in the public network when you set it manually for proper
operation.
Built-in DHCP server deployment is optional. Built-in DHCP server will assign an IP address from
its IP pool to the client on the private network (Either wireless or wired). Assigned IP subnet mask
will be the same as the Private Interface of the ARPMiner installed machine. DNS server and
gateway IP address will be assigned as the Private Network IP address of the ARPMiner running
machine.
You must set gateway IP address as the Private Network IP address of the ARPMiner running
machine and set a DHCP IP pool range with same subnet of the IP address as the Private Network
IP address when you choose to use an external DHCP server on the private network. ARPMiner
will automatically set private interface IP address and subnet mask. DHCP IP pool address and
address count will be updated when you set private interface IP address and subnet mask.
ARPMiner allows you to set private interface IP address and subnet mask directly from the
management interface. IP address and subnet mask of interface will be changed at operating system
level when you save the settings changes in ARPMiner.
You can enable Sponsored Authorization allow HotSpot users to request access from a corporate
employee via e-mail. ARPMiner sends a request for access on behalf of the user to user specified
sponsor e-mail address. Please see Sponsored Authorization section for more details. You need also
configure an SMTP account in SMTP tab for this feature. Local or RADIUS authentication will not
be used when this feature is enabled. This feature can be used only with NAT and Bridge operating
modes.
Bridge Operation Mode
Private Network Interface
No IP Address
Internet Router
192.168.88.1/24
Internet
ARPMiner
Public Network Interface
192.168.88.3/24
DHCP Start IP Address - Count
192.168.88.100 - 100
DHCP Assigned IP Parameters
IP Address, 192.168.88.100/24
Gateway, DNS Address, 192.168.88.1
DNS Address, 192.168.88.3
Figure - 3. Bridge Mode Configuration
© 2013-2023 KaplanSoft - https://www.kaplansoft.com/ 7ARPMiner Version 3.4 - Installation & Configuration Guide
ARPMiner acts as a bridge in bridge operation mode. ARPMiner transparently performs packet
forwarding between public and private networks and maintains its own MAC address table for the
private network.
This operation mode enables you to perform access control for the private network without any
topology change in your network. NAT should be performed by the Internet router if it’s needed.
You do not need to assign an IP address to the private network interface of ARPMiner installed
machine and ARPMiner will reset private interface IP address to an IP address in 169.254.0.0/16
subnet automatically when this operation mode is set.
Built-in DHCP server deployment is also optional in this operation mode. Built-in DHCP server
will assign an IP address from its IP pool to the client on the private network (Either wireless or
wired). The assigned IP subnet mask will be the same with the Public Interface of the ARPMiner
installed machine. DNS server as the Public Network IP address of the ARPMiner running machine
and Gateway as the default gateway of the ARPMiner running machine will be assigned to the
DHCP clients.
Figure - 4. ARPMiner Settings tab / Operating Mode section
ARPMiner will stop Windows Internet Connection Sharing (ICS) at startup if it is enabled. Please
also make sure that IP routing is disabled on ARPMiner installed machine.
You can redirect all DNS requests from clients to a specific DNS server. Leave Proxy DNS set to
0.0.0.0 if you do not use this option. ARPMiner can add client Ethernet MAC address as client id to
DNS requests from clients. This feature is experimental, and its usage is not recommended
currently.
PPPoE Server Operation Mode
ARPMiner does not perform Network or MAC address translation in PPPoE Server Operation
Mode. TekRADIUS authenticates user sessions using PAP, CHAP, MS-CHAP-v1 or MS-CHAP-v2
authentication methods based on client preference. MS-CHAP-v1 or MS-CHAP-v2 must be set as
authentication method in client settings for MPPE encryption. Encryption level (40/128 bits) is also
© 2013-2023 KaplanSoft - https://www.kaplansoft.com/ 8ARPMiner Version 3.4 - Installation & Configuration Guide
determined by either client settings or MS-MPPE-Encryption-Types attribute received in RADIUS
authorization response. PPP encryption will be used based on client preference.
Authentication Section
Authentication is enabled by default and ARPMiner uses built database to keep user accounts. SP
license of ARPMiner provides RADIUS authentication. Please also see supported RADIUS
attributes section.
Figure - 5. ARPMiner Settings tab / Authentication section
• Encrypt Passwords: Set this option to keep the endpoint passwords in encrypted form in
SQLite database TekSpot.db3 under ARPMiner application directory.
• Blacklist IP Endpoints: If selected, ARPMiner monitors failed login attempts from
suspicious endpoints and blacklists them.
• Cache Session Information: ARPMiner can cache user credentials for a specified period.
ARPMiner will auto provide login if client browser submits a valid HTTP cookie.
• Sponsored Authorization: Please see Sponsored Authorization section.
• Use RADIUS Protocol: If you prefer to direct authentication requests to a RADIUS Server,
check this option. If you do not check this option, TekSpot will use the local user’s database
to authenticate the login attempts.
• RADIUS Server: Enter a valid IPv4 address for the RADIUS server.
• RADIUS Port: Enter the UDP port number of the RADIUS server. The default is UDP port
1813.
• RADIUS Secret: Enter the RADIUS secret key for the RADIUS Server.
• RADIUS Timeout / Retry: You can set an amount of time which TekSpot waits for a reply
for the RADIUS accounting packets from the RADIUS Server. You can also specify how
many attempts will be made by TekSpot to deliver RADIUS accounting packets to the
RADIUS server.
© 2013-2023 KaplanSoft - https://www.kaplansoft.com/ 9ARPMiner Version 3.4 - Installation & Configuration Guide
• MAC Authentication: ARPMiner can bypass portal login for specific MAC addresses. You
need to have user profiles in your RADIUS server for these MAC addresses without a
password. Please make sure that you have anti-spoofing measures deployed on your network
prior to enabling this option.
Accounting Section
Accounting is available in only SP editions of ARPMiner. Please also see supported RADIUS
attributes section
• Accounting Enabled: RADIUS accounting is disabled by default. Click “Accounting
Enabled” to enable RADIUS accounting.
• Stop Only: If you prefer to send only RADIUS Accounting stop messages to the RADIUS
server, select this option.
• RADIUS Server: Enter a valid IPv4 address for the RADIUS server.
• RADIUS Port: Enter the UDP port number of the RADIUS server. The default is UDP port
1813.
• RADIUS Secret: Enter the RADIUS secret key for the RADIUS Server.
• RADIUS Timeout / Retry: You can set an amount of time which TekSpot waits for a reply
for the RADIUS accounting packets from the RADIUS Server. You can also specify how
many attempts will be made by TekSpot to deliver RADIUS accounting packets to the
RADIUS server.
Figure - 6. ARPMiner Settings tab / Accounting section
SMTP Section
SMTP settings are required for Sponsored Authorization. It is recommended to create a special
SMTP account for ARPMiner authorization messages. ARPMiner sends authorization messages
© 2013-2023 KaplanSoft - https://www.kaplansoft.com/ 10ARPMiner Version 3.4 - Installation & Configuration Guide
using the account specified in Mail From parameter. You can test SMTP settings prior to saving
settings.
Figure 7. - ARPMiner Settings tab / STMP section
DHCP Section
You can enable and configure DHCP server settings at Settings tab / DHCP section.
Figure 8. - ARPMiner Settings / DHCP Server tab
ARPMiner built-in DHCP server to assign IP addresses to the wired or wireless devices on the
private network, and accessed via the DHCP Server tab. Within this tab, it is possible to define a
DHCP IP address pool, and monitor IP address usage and active DHCP assignments.
© 2013-2023 KaplanSoft - https://www.kaplansoft.com/ 11ARPMiner Version 3.4 - Installation & Configuration Guide
DHCP Server Monitoring
You can monitor active DHCP IP address assignments, Lease history (if enabled) and configure
static IP address assignments based on client MAC address at DHCP Server tab..
The DHCP tab is only available if the DHCP server has been enabled in the Settings tab /
DHCP section.
Figure 9. - ARPMiner DHCP Server tab
Counters
ARPMiner provides numerous counters to monitor activity performed.
Figure 9. - ARPMiner Settings / Counters tab
© 2013-2023 KaplanSoft - https://www.kaplansoft.com/ 12ARPMiner Version 3.4 - Installation & Configuration Guide
ARPMiner provides numerous counters:
• Number of Active MAC entries
• Number of Active Sessions
• Used Memory
• Number of DNS Requests Received
• DNS Requests Receive Rate
• Number of Endpoints in Quarantine
• Number of RADIUS Authentication Requests Sent
• Number of RADIUS Authentication Replies Received
• Number of RADIUS Authentication Timeouts
• Number of RADIUS Accounting Requests Sent
• Number of RADIUS Accounting Requests Received
• Number of RADIUS Accounting Timeouts
• DHCP requests received
• Number of Active Leases
• DHCP requests receive rate
• DHCP errors
• DHCP errors rate
These counters can also be monitored through ARPMiner within the Counters tab.
Users
You can define users in “Users” tab. Enter a username in the bottom leftmost textbox, enter the
password to the textbox at the right of the username entry and a session duration in seconds. The
idle timeout is 5 minutes, and it cannot be changed.
Figure - 10. Users Tab
© 2013-2023 KaplanSoft - https://www.kaplansoft.com/ 13ARPMiner Version 3.4 - Installation & Configuration Guide
Application Log
You can monitor system events in the Application Log tab. You can manually refresh log entries
and clear log entries. Click Enable Auto Refresh option to refresh log list every second.
Figure – 11. Application Log Tab
User Defined Login Interface
You can use your own defined login, info and error pages. ARPMiner uses built in html resources
for these pages. ARPMiner looks for alternative login.html, info.html and error.html files in the
Root Directory specified in Settings / Service Parameters. If any of them are found, ARPMiner
uses user defined html file. Login.html must have following form and form objects;
You can display user’s connection date and remained credit by adding %connected% and
%remained% variables to info.html. You can optionally add %url% variable if you would like to
provide an option user to continue web browsing. TekSpot will replace last tried URL with %url%
variable in info.html. TekSpot will replace real values of these variables prior to send html
response.
You can display TekSpot generated error message in error.html file using %message% variable.
Here is a sample login.html;
HotSpot LoginARPMiner Version 3.4 - Installation & Configuration Guide
background-color: lightgray; border-color: lightgray; border-collapse: collapse;">
HotSpot Login%message%
Username :
ARPMiner Version 3.4 - Installation & Configuration Guide

Sponsor clicks in the e-mail message and an authorization form is displayed;

Sponsor can deny by simply clicking Submit button without setting Authorized option. Sponsor
can select authorized amount of session duration up to 24 hours in hourly steps.

You can use your own defined login, info and sponsor pages. ARPMiner uses built in html
resources for these pages. ARPMiner looks for alternative sponsored-login.html, sponsored-
info.html and sponsored-authorize.html files in the Root Directory specified in Settings / Service
Parameters. You can download sample html resources from;

http://www.kaplansoft.com/arpminer/html-samples.zip

Supported RADIUS Attributes
ARPMiner RADIUS authentication request packet contains following RADIUS attributes;
   •   User-Name
   •   User-Password or CHAP-Password
   •   NAS-IP-Address
   •   Called-Station-Id
   •   Calling-Station-Id (User Ethernet MAC address)
ARPMiner expects following RADIUS attributes in an Access-Accept reply;
   •   Session-Timeout
   •   Idle-Timeout
ARPMiner RADIUS accounting start packets contains following RADIUS attributes;
   •   Acct-Status-Type = Start
   •   Calling-Station-Id
   •   Called-Station-Id
   •   Framed-IP-Address
   •   NAS-IP-Address
   •   Acct-Session-Id

© 2013-2023 KaplanSoft - https://www.kaplansoft.com/                                                 16
ARPMiner Version 3.4 - Installation & Configuration Guide

   •   User-Name
   •   Connect-Info (Added only when sponsored authorization is enabled. It reports sponsor e-
       mail address)

ARPMiner recognizes following RADIUS attributes in PPPoE Server Operation Mode;

   •   MS-MPPE-Encryption-Types
   •   MS-CHAP2-Success
   •   MS-CHAP-MPPE-Keys
   •   MS-MPPE-Send-Key
   •   MS-MPPE-Recv-Key
   •   MS-Primary-DNS-Server
   •   MS-Secondary-DNS-Server
   •   MS-Primary-NBNS-Server
   •   MS-Secondary-NBNS-Server
ARPMiner RADIUS accounting stop packets contains following RADIUS attributes;
   •   Acct-Status-Type = Stop
   •   Acct-Terminate-Cause
   •   Acct-Session-Time
   •   Calling-Station-Id
   •   Called-Station-Id
   •   Framed-IP-Address
   •   NAS-IP-Address
   •   Acct-Input-Octets
   •   Acct-Output-Octets
   •   Acct-Session-Id
   •   User-Name
   •   Connect-Info (Added only when sponsored authorization is enabled. It reports sponsor e-
       mail address)

Starting ARPMiner Service (TekSpot)
Click “Service” menu and select “Start” to run ARPMiner Service after making necessary
configuration and saving configuration. If service starts successfully you will see “TekSpot is
started” message at bottom left message section of ARPMiner. Optionally you can start/stop
TekSpot using the button on Settings tab. When you make any change(s) in configuration, TekSpot
will be restarted when you save the settings.
If TekSpot cannot start, please examine Application Log tab as well as TekSpot log file under
\Logs if you were enabled logging in Settings tab.

© 2013-2023 KaplanSoft - https://www.kaplansoft.com/                                                 17
ARPMiner Version 3.4 - Installation & Configuration Guide
Figure - 12. TekSpot on Windows Performance Monitor
RFC 8908 and RFC 8910 Support
ARPMiner can respond to RFC 8908 Captive Portal API request when TLS transport is enabled.
TLS transport is mandatory for Captive Portal API calls. Built in DHCP server adds DHCP option
114 for the Captive Portal API URI. Hostname is derived from the Subject name of the certificate
set for TLS transport. It is not necessary to point DNS A record for the hostname to one of IP
addresses on the ARPMiner installed server. ARPMiner will intercept DNS A address record
queries for this host name and return the private IP address of the ARPMiner installed server to the
clients.
ARPMiner will automatically add exceptions for the servers that can be used by the clients to
validate the server certificate.
Troubleshooting
TekSpot provides many messages when problems occur. You can see error messages on ARPMiner
Status bar or in the log file of TekSpot service. You can enable logging in Settings Tab. There are
three levels of logging; None, Errors, Sessions. If you select Errors, TekSpot logs just error
messages. If you select Sessions both Session and Error messages will be logged. You have to save
or apply settings changes if you change the logging level setting. Log files are located under
\Logs directory.
TekSpot Messages in TekSpot logs
ARPMiner Service x.y.0.0 (Revision 0) is being started ().
This message notifies that TekSpot is being started.
Registration Key is valid; running in commercial mode.
© 2013-2023 KaplanSoft - https://www.kaplansoft.com/ 18ARPMiner Version 3.4 - Installation & Configuration Guide You see this message when a valid Registration.key file exists under ARPMiner application directory. User defined login form read into memory You see this message when a valid user defined login form html file exists under Root Directory. Cannot obtain an auxiliary external IP address ARPMiner requires an auxiliary IP address for the NAT operation mode. ARPMiner service cannot start if it cannot obtain a suitable address. © 2013-2023 KaplanSoft - https://www.kaplansoft.com/ 19
ARPMiner Version 3.4 - Installation & Configuration Guide

Index

Accounting, 10, 13                                     MAC, 8, 13, 16
Authentication, 9, 13                                  MPPE, 4, 8, 17
Blacklist, 9                                           MS-CHAP-v1, 4, 8
bridge, 4, 6, 8                                        MS-CHAP-v2, 4, 8
Certificate, 5                                         NAT, 4, 6, 8, 19
CGI, 4                                                 Network Address Translation, 6
CHAP, 4, 8, 16, 17                                     PAP, 4, 8
Counters, 12, 13                                       PPPoE, 4, 6, 8, 17
DHCP, 4, 7, 8, 11, 12, 13                              proxy, 4
DNS, 4, 7, 8, 13                                       Quarantine, 13
Encrypt, 9                                             RADIUS, 4, 6, 9, 10, 13, 16, 17
Ethernet, 4, 16                                        Routed, 6
GUI, 4                                                 routing, 6, 8
Hotspot, 4                                             TekSpot, 4, 5, 9, 10, 14, 17, 18
HTTP, 4, 9                                             TLS, 5
ICS, 6, 8                                              Windows Performance Monitor, 4, 18
Login, 6, 14, 15                                       WISPr, 4, 6

© 2013-2023 KaplanSoft - https://www.kaplansoft.com/                                                 20
You can also read