Advice Guide
Admonter wooden floors
←
→
Page content transcription
If your browser does not render page correctly, please read the page content below

Advice Guide Admonter wooden floors
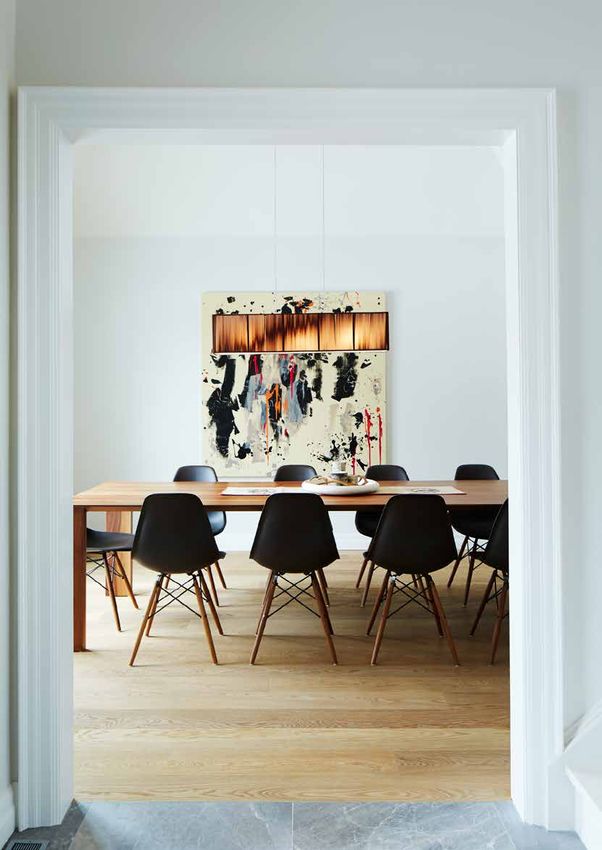
CLASSIC                                                                                                 CLASSIC
    GRADING                                                                                                 GRADING
    OAK                                                                                                     SOFTWOOD /
                                                                                                            OTHER HARDWOOD

                                   Oak NOBLESSE                                                                                                  Spruce BASIC

                                   Oak ELEGANCE                                                                                             Larch NATURELLE

                                         Oak BASIC                                                                              American Walnut ELEGANCE

                                  Oak NATURELLE                                                                                      American Walnut RUSTIC

                                       Oak RUSTIC

    The way an installed floor looks depends on         For each Floor Grade, you can expect a distant      Attention: Please note that the colour of floor sam-       Current dimensions and grading descriptions are
    which Grade you choose for your floor. Each         look. These examples show the grading crite-        ples can change over time with exposure to UV light.       shown in our brochures and catalogues and on our
    Admonter Grade has distinct tree growth charac-     ria of Admonter Natural Floors. As our name         This is a completely natural phenomenon.                   website www.admonter.at/en/downloads
    teristics including the size and number of knots.   implies, each floor is made from naturally grown    Prior to installation, it is absolutely necessary to lay
    In order to achieve a consistent appearance, we     wood so slight deviations in structure and colour   the floor boards out and pre-sort them.
    sort and classify the natural wood boards into      are possible.                                       Due to the printing process, variations in colour may
    Grades.                                                                                                 occur.

2                                                                                                                                                                                                                         3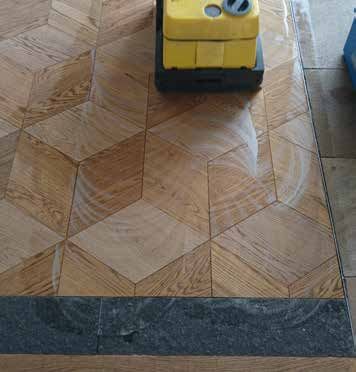
TEXTURES &
                                                                                                                    THE DIFFERENCES
         SURFACES
                                                                                                                    OF SURFACES

     SANDED                                 BRUSHED / RELIEF**                    SCRAPED

                                                                                                                                              • Ready-to-use natural oiled surface / already
                                                                                                                          NATURAL OILED          treated
     CROSS                                  ALPIN                                 ANTICO *                                                    • Durable / low maintenance
                                                                                                                          EASY CARE
                                                                                                                          ADVANTAGES | NOTE   • Very wide range of colours, textures,
                                                                                                                                                dimensions, product structure, installation
                                                                                                                                                systems, accessories, etc.
                                                                                                                                              • Ongoing routine care is necessary

     USED *                                 AUTHENTIC *                           CHARACTER **                            NATURAL OILED       • Initial Oil treatment is necessary
                                                                                                                          PRO CARE            • Durable / low maintenance
                                                                                                                                              • Very wide range of colours, textures, dimen-
                                                                                                                          ADVANTAGES | NOTE
                                                                                                                                                sions, product structure, installation systems,
                                                                                                                                                accessories, etc.
                                                                                                                                              • Ongoing routine care is necessary

    NATURAL OILED                           NATURAL OILED                         HACKED **
                                                                                                                                              •   Wood pores are sealed and gives the floor a
    EASY CARE                               PRO CARE                                               * only FLOORs
                                                                                                                          MATT LACQUER
                                                                                                                                                muted matt appearance
                                                                                                 ** only ELEMENTs                             • Easy care
                                            Natural Oiled Pro Care floors require a                                       ADVANTAGES | NOTE
    Our EASY CARE products are de-                                                                                                            • Durable
                                            post-installation oil before they can be used.
    livered PREFFINISHED.                                                                                                                     • A variant with very little wood-typical haptic
    This means that the floor does not                                                                                                          perception.
    have to be oiled after installation,
    and can be used and walked on
    immediately after installation!
    The new natural oiled easy care
                                            MATT
    finish provides a rich, durable sur-    LACQUERED
    face, and also has the desired
                                            The application of matt lacquer will entirely
    look from the beginning, as other-
                                            seal the pores of the wood. The matt lac-
    wise only floors with an additional
                                            quered finish is very durable and absolutely
    oil coating offer. Without any effort
                                            uncomplicated in care & main-tenance.
    – just easy.

4                                                                                                                                                                                                 5
SKIRTING                                            STAIR NOSING
                                                      2-Layer-Stair nosing, Tongue & groove 10 mm - (TK)             2-Layer-Stair nosing, lock-it 10 mm - (TK)

        Skirting TYPE 1

     Solid skirting
     (Length depends on availability)
     40 x 16 x 2000/2400 mm (Oak and Larch)             Object-Stair nosing, lock-it 15 mm - (TK-Object)    Object-Stair nosing, Tongue & g. 15 mm - (TK-Object)
     50 x 18 x 2000 mm (Am. Walnut and Spruce)

        Skirting TYPE 2

     Solid skirting (made from floorboards)
     50 x 18 x 1980 mm
                                                          Object - classic - lock-it 13 mm - (TK-Object)            Object - small, lock-it 13 mm - (TK-Object)

        Skirting TYPE 3

     Veneered skirting with spruce base material
     40 x 16 x 2500 mm (Oak and Larch)

     Type 3 white
     for all products                                     3-Layer-Stair nosing, Tongue & g. 15 mm - (TK)             3-Layer-Stair nosing, lock-it 15 mm - (TK)

        Flush-mount skirting                                       175                                                      175

     Consisting of basic profile, screed height

                                                                                       40

                                                                                                                                                40
     gauge and skirting
                                                                                  20                                                      20

     • Length: 2375 mm
     • Height: app. 60 mm
       (visible)                                     3-Layer-Stair nosing, ONDO Tongue & g 13 mm - (TK)         3-Layer-Stair nosing, ONDO lock-it 13 mm - (TK)

                                                                   175
                                                                                                                           175

                                                                                       40

                                                                                                                                               40
                                                                                 20
                                                                                                                                         20

                                                   Border Loose                                            Note (15mm):

                                                   3 x 40 x 960 mm with structure and surface              This variant of stair nosing is not possible with the types of wood Amerci-
                                                                                                           an Cherry and Pine.
                                                   for installation on site (TK-ANLEIMER-40)
                                                                                                           The local building regulations regarding permissible opening sizes in stairs
                                                                                                           must be observed.
                                                   For the final treatment on site, the necessary
                                                   supplementary oil can be ordered.

                                                   Lengths
                                                   stair nosing:

                                                   1180 mm small
                                                   1980 mm classic
6                                                  2380 mm classic                                                                                                                        7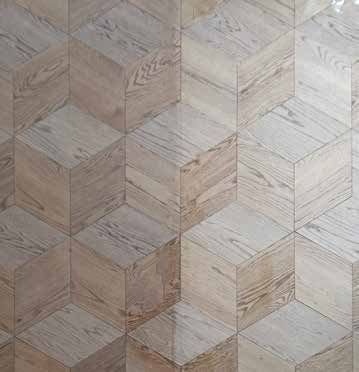
STAIRs STRUCTURALLY
FLOATING TESTED
TREAD DESIGN SELF-SUPPORTING
STAIR ELEMENTS
Dimension 1
• Tread depth - 330 mm
CONSTRUCTION / INSTALLATION: GENERAL:
• Tread height - 105 mm
• Tread length - variable up to max. 1200 mm Top layer Edge-banded in 3.6mm thick solid wood layer • Available in Floors from Admonter Natural Wood
Wood species
• For sub-construction e.g. 60 x 60 mm Flooring Classic range with 3.6mm top layer
Multi-layer construction. Approx 47 – 50mm
Thickness (s)
square tube (Depending on structure and type of wood) • noblesse / elegance / basic
• Other grades on request
• Min. 307 mm Grading • Only one type of wood per order or flight of stairs
Tread depth (t) • Max. 390mm – larger dimensions on request
with the same grade on all visible surfaces
(parallel only – no spiral staircases)
Dimension 2 Tread width (b) 1000 - 1500 mm, larger dimension on request • Tread and underside: brushed, cross
Structures or alpin
• Support / bracket width 50 mm • 4-sided edge band: sanded or brushed
• Tread depth - 330 mm • Support / bracket depth at least 80% of the tread
element depth • natural oiled, stone, white
• Tread height - 85 mm • Strength of the bracket / stringer as per steel cons- Finishes • Special finishes on request (Smoked floors cannot
• Tread length - variabel up to max. 1200 mm truction requirements be used).
• The local regulations for the maximum permissible
• For sub-construction e.g. 40 x 40 mm Fastening • clear step spacing must be complied with
square tube • The staircase element must be fastened by screws
(staircase element and bracket) because of the risk of
„slipping“.
• For structural reasons, deviating fastening methods
are not permitted.
3 STANDARD SYSTEMS
(at least 307 mm | max 390 mm
At least 80% of the tread depth
2 DIMENSIONS PER SYSTEM
Tread depth „t“ 330 mm
Tread thickness „s“
Tread width „b“ (1000-1500 mm)
app. 47-50 mm
Available in Oak and Larch
(brushed, natural oiled) Support width at least 50 mm
SYSTEM 1 -
BOX CONSTRUCTION FROM 1
COMPONENT. WALL FACING END LANDINGS: FALL PROTECTION:
OPEN.
Possible on request – on-site structural analysis We recommend installing fall protection (shield
is a prerequisite! panel or similar) when the distance between the
upper edge of the step and the lower edge of
SYSTEM 2 - the step is or exceeds 120 mm or comply with
BOX CONSTRUCTION FROM 2 local building regulations.
COMPONENTS. WALL FACING
END OPEN. BOX LID ON MORE INFORMATION: • Anti-slip class R10, as per DIN 51130 (not when
UNDERSIDE LEFT OPEN FOR sanded and painted)
• Because of the structural analysis, an end-face • Fire behaviour – classified as D-s2 d0 in
GLUING ON SITE.
milled slot is not permitted! Milling out the bottom accordance with CWFT (Table 1 of EC 2003/43/
of the staircase element for a bracket is an option EC, as corrected by Corrigendum (OJEU L33 of
(on site by the user, up to the maximum thickness 08.02.2003) and supplemented by the decision of
of the top layer). EC 2008/348/EC)
• Direct contact with uncoated metals must be avoi- • An example of the assignment of typical usage
SYSTEM 3 - (TYP TK / TK-OBJECT)
ded at all costs (possible tannic acid reaction). categories for Austria and Germany is contained
BOX CONSTRUCTION FROM 2
• The correct indoor climate (see Admonter com- in the Admonter STAIRs data sheet.
COMPONENTS. BOTH ENDS OF fort chart) and proper cleaning and care, as with • The local building regulations permissible opening
BOX OPEN Admonter natural floors, are important for the sizes in stairs must be observed.
durability of the stairs.
LOCAL CONCRETE see page 30-31
8 9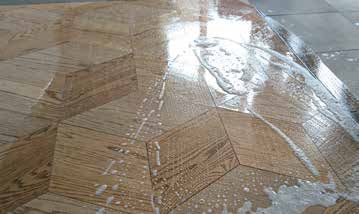
NATURAL                                                OAK               before   after
                                                                                               THE PERFECT
     COLOR CHANGE                                                                              INDOOR CLIMATE

                                                                                               The optimum room humidity range for Admonter
     All Admonter floors are a natural product and will     LARCH             before   after   floors is between 30% and 65%. In inter, indoor
     over time change colour.                                                                  humidity levels often fall below this ideal range
     Depending on the amount of exposure your floor                                            due to usage of central heating systems which
     has to sunlight, lighter timber will turn darker and                                      dry out the air. Being a natural material, wood
     darker timber will become lighter. This change is                                         assists in regulating indoor humidity by absor-
     most pronounced in the first 3-6 months.                                                  bing and releasing moisture helping to keep our
                                                                                               indoor climate at an optimum level for healthy
     Regular cleaning and care with Admonter care                                              living.
     products provides the floor with additional pro-
     tection against colour changes and stains.             SPRUCE            before   after   Tips for achieving an optimal climate zone:
                                                                                               • Humidifiers, proper ventilation (thorough ai-
                                                                                                 ring), green plants or even small fountains help
                                                                                                 to keep the indoor climate at an ideal level.
                                                                                                 Use a hygrometer to regularly check this.
                                                                                               • Install a moisture recovery unit in ventilation
                                                                                                 systems.

                                                            for example OAK   before   after
                                                            IGNIS/LAPIS

                                                                                               INDOOR
                                                                                               CLIMATE CHART
     VARIATION OF
     TEXTURE AND                                            for example OAK   before   after
     COLOUR                                                 AURUM

     Admonter’s brochures and catalogues show
     many images of our floors. Due to the nature of
     natural wooden floors, these images should be
     viewed as a guide only as each floorboard differs
     in texture and colour.
                                                            for example OAK   before   after
     Why? Because every individual Admonter                 FUMO
     board is naturally unique.

                                                            AM. WALNUT        before   after

10                                                                                                                                                  11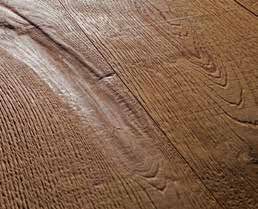
INSTALLATION OPTIONS

        FLOATING INSTALLATION:                                                                                                     INSTALLATION ON A SUBFLOOR:
     When using the Floating Installation method, the entire floor expands and contracts as one entire surface area. The       Installation on bearers and joists was mostly used to compensate for uneven surfaces. Nowadays, self-levelling compounds and
     boards are secured together by either gluing just the tongue & groove into place or with the Lock-it system.              dry-screed boards are replacing this outdated building method in many countries.

                          • Short installation time                                                                                                  • No installation glue required
                          • Comfortable to walk on due to its natural flex                                                         ADVANTAGES:       • Firmly fixed to the floor
                          • Reduced impact sound                                                                                                     • Comfortably to walk on thanks to its natural flex
         ADVANTAGES:      • The symmetrical structure also makes it suitable for                                                                     • Height of the construction
                            laying on underfloor heating.                                                                       DISADVANTAGES:
                                                                                                                                                     • Creaking noises cannot be avoided completely
                          • A better method to use if the sub-floor is not level or
                            needs work.
                          If you maintain an expansion gap of 10 – 15 mm from the
      DISADVANTAGES:      wall so that the floor can expand, there are no disadvan-                                            Please note: The CE marking, as well as DOP, is only valid when laid on a continuous, subfloor and not on beams and
                          tages with the floating method.
                                                                                                                               joists.
                          Installers should take into consideration permanent move-
                 NOTE:
                          ment joints in the main structure.
                                                                                                                               Screwing onto the subfloor:
                                                                                                                               The screw (3 x 30 mm for 15 mm thick floor and 3 x 40 mm for 21 mm thick floor) is held at an angle of 45 ° to the tongue
                                                                                                                               and then screwed to the subfloor.

        FULL-SURFACE GLUING:
     With this installation option, the boards are glued directly to the subfloor. Both the Tongue & Groove and Lock-it sys-       ADMONTER FLOORS ON UNDERFLOOR HEATING:
     tems are perfect for this method. ATTENTION : Make sure to use flexible glue. Admonter recommends the Full-Surface        In addition to a Floating Installation, full-surface gluing with Admonter Elastic Adhesive has proven itself as an ideal installa-
     Gluing method particularly for projects with special requirements such as installation over large surface areas, rooms    tion system due to improved heat transfer and low-gap formation.
     with reduced sound requirements such as in Museums or Restaurants but also in private homes.

                          • Continuous installation of larger surfaces
                          • Little formation of gaps
                          • Perfectly adequate for under-floor heating systems
         ADVANTAGES:
                            (better heat conduction)
                          • Low expansion of the total surface which enables the use
                            of silicone joints instead of skirting boards
                          • Higher sub-floor preparation requirements                                                          Warm water, low temperature underfloor heating systems are recommended
                          • Subfloor must be level for continuous bonding along the                                            for use with Admonter Floors. A surface temperature of 29 Celsius must not be
      DISADVANTAGES:                                                                                                           exceeded.
                            board
                          • Long installation times
                          Installers should take into consideration permanent move-
                 NOTE:
                          ment joints in the main structure.

                                                                                                                               The same applies to electric surface heating with gentle heat-up and cool-
     “H” Gluing of Tongue & Groove joints with Full-Stick down bonding for Underfloor Heating.                                 down characteristics. ATTENTION : Heat build-up under large floor objects
     Full-surface bonding reduces impact noise or foot-fall sound and makes underfloor heating systems more efficient. Use     such as rugs, couches, futon beds etc, should be avoided.
     a permanently elastic adhesive for gluing. When gluing a 3-layer floorboard over underfloor heating, “H” Gluing of Ton-
     gue & Groove joints, as illustrated, is stipulated by the manufacturer.
     The “H” gluing is not required for other installation systems.

                                                                                                                               In the case of underfloor cooling, it must be ensured that no dew point conditions occur at any time in the area
                                                                                                                               of the floor surface.
                                                                                                                               More information can be found on our data sheet: „Admonter FLOORs on underfloor heating and cooling“.

12                                                                                                                                                                                                                                                                  13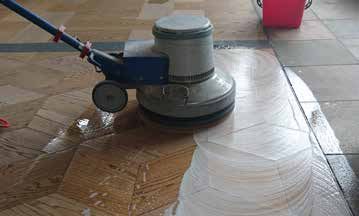
BEFORE INSTALLATION: PRE-SORTING

     With an Admonter Natural Wood Floor, you have chosen for outstanding quality and a genuine, natural product.                       MERGING COLOUR    DELIBERATELY MIXING COLOUR
     Before laying, the floor should be room acclimatized however the individual packages are only to be opened imme-
     diately before laying. Prior to installation, it is particularly important to sort the individual planks by colour. You will see
     that each floorboard will vary in its colour – just as it does in nature. By pre-sorting, it’s possible to deliberately influen-
     ce the overall appearance of the room, depending on how the boards are sorted…….

     PLEASE NOTE: Calm or vivid sorting of boards will provide a different appearance.

        English pattern: In this case the boards are laid in individual rows, but always offset by half of the parquet board.
        This lets the English pattern appear much more tranquil than ship deck style flooring.

        Random pattern: The floorboards are always laid in individual rows. The boards are slightly offset in every row.
        The offset distance is random although the face joints must have the minimum required distances (Small – 30cm /
        Classic – 50cm) as per the installation and care instructions.

                                                                                                                                        ENGLISH PATTERN   RANDOM PATTERN

14                                                                                                                                                                                     15
CARE & MAINTENANCE
FOR NATURAL OILED, PRO CARE & EASY CARE FINISHES MATT LACQUER FINISH (WE RECOMMEND)
After installation add approx. 100 ml of Admonter Clean & Care to 10
litres warm water and wipe the floor in the direction of the grain, using
a damp mop. Allow the floor to dry.
After the floor has dried the floor can be polished by hand or using a
polishing machine.
REGULAR CARE & MAINTENANCE
* different colour pads may be used depending on 3M products.
Washing : We recommend using two buckets for cleaning your floor – one for the care product and the other for clean water to rinse
the mop. To one bucket add approximately 100ml of Admonter Clean & Care to 10 litres of warm water and mop in the direction of
the grain using a damp mop. Over time when the colour of the floor has faded or looks dull, add 1,000ml of cleaning product to water
and clean as normal.
Please note: Admonter Clean & Care contains both cleaning and care ingredients however, with natural oiled surfaces, this cleaning SPOT REPAIRS
alone is not enough. Periodic re-oiling is required. Please do not use microfibre cloths or mops on the floor as they are abrasive.
Renovations and repairs must be carried out by a specialist company!
Repair instructions or detailed information must be requested
SURFACES - CARE separately for each product!
GENERAL INFORMATION:
GENERAL REQUIREMENTS:
Sweep or vacuum all dust and dirt off the floor before undertaking any care or maintenance procedures. If the floor is still On the damaged area use the grey sanding pad* and remove dust.
dirty, use Admonter Clean & Care to wash the floor and let dry.
Thinly apply Admonter maintenance oil (for white oiled surfaces
use the white maintenance oil - shake well before use!) with a cotton
cloth. Allow the oil to soak in & then polish. Allow the repaired area to
dry for some hours, repeat this application several times. Protect the
MAINTENANCE (RE-OILING) - NATURAL-OIL-SURFACE
repaired area for at least one week. Avoid exposure to moisture.
Admonter Maintenance Oil should be shaken well before use and
should be used sparingly (1 litre is sufficient for approx. 70 – 100 m²).
Please note: After use oil-saturated cloths must be soaked with water
Distribute the oil evenly with the use of an oil-sponge, soft cloth or
(self-ignition hazard).
spray can. The quantity of maintenance oil natural clear applied may
vary due to the different absorption of the wood. Polish the floor using
* different colour pads may be used depending on 3M products.
a polishing machine and a white pad (different colour pads may be
used depending on 3M products).
Repair oil
Do not apply the oil thickly. Ensure an even distribution of the oil in
order to avoid differences in the overall shine once the floor has dried.
Should this occur, the appearance will even-out as the floor is used.
Allow the floor to dry for approx. 24 hours, taking extra care during
this period to prevent any contact with moisture.
Depending on the polishing, the room temperature and the moisture
level the drying of the floor can take 2 - 7 days. Please allow air to
flow into the room and combine with underfloor heating to help dry
the floor faster. During this period you can walk on with clean slippers,
avoid any dirt!
REPAIR OF SURFACES:
Once re-oiled, cover high-traffic areas like hallways and entrances
• NATURAL OILED PRO CARE:
with cardboard. After use, oil-saturated cloths must be soaked in
Local repair is possible
warm water and then hung out to dry (Caution: could be flammable).
• NATURAL OILED EASY CARE:
Local repair is possible under certain conditions
• MATT LAQUER SURFACES:
Local repair not possible
16 17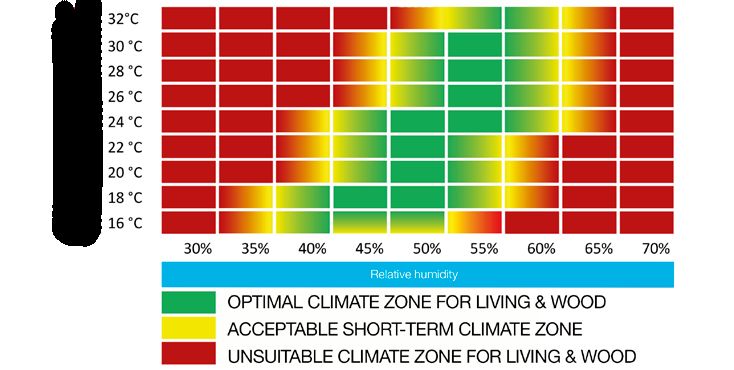
MAINTENANCE OIL FOR COMMERCIAL PROJECTS - INSTRUCTIONS                                                                            DEEP CLEAN & RE-OILING – INSTRUCTIONS

        FOR NATURAL OILED PRO-CARE FINISH                                                                                                 FOR NATURAL OILED PRO CARE FINISH

     Wide plank floors installed in high traffic areas and commercial projects must be highly durable and easy to maintain.            With regular care & maintenance, natural oiled surfaces will provide a long-lasting and durable finish. Through wear and
     Therefore we recommend having the surface treated with Admonter Oil for High-Traffic areas and Commercial Projects                tear of everyday use however, the surface may lose its original factory finish, turn grey or become heavily soiled. In this
     by a flooring expert (industrial polishing machine required). In this way, your natural oiled floor will be given an additional   case we recommend a quick and simple reconditioning treatment of deep cleaning and re-oiling to be carried out by a
     wear layer and will ensure regular care and maintenance is easier.                                                                flooring expert – (industrial polishing machine required).

                                                                                                                                         STEP 1
       STEP 1                                                                                                                          Mix Admonter Hydro-cleaner at a ratio of 1:2 to 1:10 (depending on how dirty the floor is) with water and use it to mop
     To a bucket with 5 litres of warm water add 100ml of Admonter Clean & Care and mix. Using this mixture, the floor                 the floor in the direction of the grain. Use the polishing machine with a red pad to work the cleaner into the floor. After
     should be washed with a damp mop in the direction of the grain. Allow the floor to dry well.                                      this, mop again with clear water (if necessary 2-3 times). Beware not to soak the floor with water. Allow at least 24 hours
                                                                                                                                       for the floor to dry before undertaking Step 2. It is recommended to cross ventilate the room during this time.
       STEP 2
     Thinly apply Admonter Oil for High-Traffic areas and Commercial Projects. 1 litre is sufficient for approximately 40-60m2           STEP 2
     (depending on the wood species).                                                                                                  Thinly apply Admonter maintenance oil (shake well before use) or Admonter high traffic oil and evenly distribute it using a
                                                                                                                                       sponge or a soft cloth (1 litre is sufficient for approx. 60 - 100 m2). For white natural oiled surfaces use the white main-
     NOTE: 53.         Apply the Commercial Oil with a spray bottle for optimal distribution. Polish the oil evenly and intensely      tenance oil. After 15 – 20 minutes polish the Admonter maintenance oil in using a polishing machine and a beige pad
     using a polishing machine and a soft pad. When using 3M products, please use the beige pad. Do not apply the oil too              (colours of the pad according to 3M products). Small areas can also be treated by hand using a white polishing pad or a
     thickly, taking care to spread it uniformly over the area to avoid differences in sheen after the floor has dried. Corners        soft cloth. Polish the oil in thoroughly. Do not apply too thick in places and spread the material regularly in order to avoid
     should be finished by hand and blended into the middle section of the room with the polishing machine. Following the              differences of the sheen after the floor has dried!
     treatment, do not walk on the floor and protect it from moisture for at least 24 hours. For the next week, treat the floor
     carefully and protect it from dirt and moisture.                                                                                    STEP 3
                                                                                                                                       Following the treatment, do not walk on the floor and protect it from moisture for at least 24 hours. For the next week,
     This will allow the surface to completely harden, providing your floor with a very durable and resistant finish.                  treat the floor carefully and protect it from dirt and moisture. This will allow the surface to completely harden, providing
                                                                                                                                       your floor with a very durable and resistant finish.

18                                                                                                                                                                                                                                                                      19
DEEP CLEAN - INSTRUCTIONS
FOR NATURAL OILED EASY CARE FINISH
The easy care surface is already factory finished with an additional coat of oil, therefore no final coat of oil is required after Immediately after the surface has been rubbed off, use the wet and dry vacuum cleaner to rework the surface (also in
the area towards the edges – the formation of water puddles must always be avoided – see Fig. 4).
installation.
It is recommended that 2 people work together on larger areas greater than 16m2 so that the dirty water does not dry
Continuous maintenance care still needs to be carried out to ensure lasting resilience. However, if the surface becomes out on the floor surface. If necessary shade floors from sunlight to hinder any drying action the heat may cause. it is
unsightly due to overuse or because of problems with its maintenance and care (extreme contamination, greying, etc.), recommended to allow the floor to dry completely at least overnight and then still check the wood moisture content the
renovation is only possible by a specialist. next day (7 +/- 2% equilibrium moisture content).
Repair and supplementary oils are available on request.
Fig. 4 Sucking up the dirty water Fig. 5 Comparison: Before – after
Renovation of the easy care surface should always be carried out by a specialist. Sweep up or vacuum any loose dust
and dirt on the floor before carrying out any care activities. In addition, masking the skirting boards, furniture and the
walls close to the floor to protect them against the resulting dirty water is recommended. Then the Admonter Remover
can be used to dissolve the firmly adhering dirt.
AREA BEFORE CLEANING:
Shake the container (Admonter Remover) well before use and mix at a ratio of about 100 ml of detergent to 5 litres
of water. If this mixture does not achieve the desired cleaning effect, the amount of detergent can be increased to up
to 250 ml in 5 litres of water.
The floor is then wiped wet (see Fig. 2) and evenly cleaned with a commercially available polishing machine (see Fig. 3).
A beige pad (colours based on 3M products) is used for this purpose.
If the soiling is more severe, a red pad (3M) may be used. When working with soft woods, make sure that no sanding
marks are left in the wood. Depending on the intensity, it may not be possible to completely remove deep-set dirt in
pores.
Fig. 2 Wiping the dirty area Fig. 3 Rubbing with a polishing machine Fig. 5 shows a comparison of before and after cleaning with Admonter Remover. Check the surface after when it has
dried or re-oil if necessary.
20 21GENERAL INFORMATION UNDERFLOOR HEATING AND COOLING
INFORMATION FOR YOU
FOR THE PERFECT PROTECTION - ADMONTER FLOORLINER -
Appropriate and effective protection for covering the floor after installation.
Admonter floors are ideally suited for use on underfloor heating systems, designed in accordance with DIN EN 1264 (se-
If this is not possible, we recommend to use Admonter Floor-liner in order to ries) “Surface-embedded heating and cooling systems with water flow –- Part 3: Design”. Except wood types susceptible
avoid damage or soiling of the floor prior to handover. to movement such as beech.
If the floor has been recently oiled, wait for 72 hours or when the floor is com-
pletely dry before installing the Floor-liner over the floor. In addition to floating installation, glue-down with Admonter Elastic has proven itself as an ideal installation system due to
improved heat transfer and low gap formation.
IN ADDITION: Dirt-trapping zones Prevent dirt and moisture from being
When flooring is laid over unheated floors and in rooms without cellar space underneath, the installation of durable water-
carried inside with the use of foot mats at all entrances. This will protect floors from dirt and damage from stones, proofing and an active vapour barrier to prevent any damage due to rising moisture from the subsoil are important factors
moisture and dirt. to take into consideration.
* different colour pads may be used depending on 3M products. Both professionally produced wet and dry screed systems can be used. The screed has to be cured according to the ma-
nufacturer‘s instructions. The residual moisture as per the CM method at the time of installation may not exceed 1,8%
for cement screeds and 0,3% for anhydrite. When other screed systems or chemical additives such as accelerators are
used, the manufacturer‘s instructions must be followed. The corresponding relative humidity of the screed must be below
60% rH in any case. A corresponding relative humidity is considered the measured value in the state of equilibrium under a
sufficiently large, sealed test surface on the surface of the screed.
Warm water, low temperature underfloor heating systems are recommended for use with Admonter Floors. A surface tem-
perature of 29 Celsius must not be exceeded. This is according to DIN EN 1264 (series) and ONORM B 2242 which also
stipulates areas around room edges must not exceed 29 Celsius. The same applies to electric surface heating with gentle
heat-up and cool-down characteristics. ATTENTION : Heat build-up under large floor objects such as rugs, couches, futon
beds etc, should be avoided.
Please refer to the technical information table at www.admonter.at for the respective heat transfer resistances of Admonter
floors.
If no other specifications are given, screed and room temperature between 18 and 23 °C and relative humidity of a maxi-
mum of 65% at installation must be adhered to.
EN 15251:2012 “Indoor environmental input parameters for design and assessment of energy performance of buildings
addressing indoor air quality, thermal environment, lighting and acoustics” recommends a seasonal relative humidity of
about 30% to about 65% for a healthy indoor climate. Natural manifestations typical to wood such as gaps and cracks
or warping occur to a moderate degree at this humidity range. Longer-term deviations can be the cause of adverse health
effects. Wooden floors then are prone to excessive changes in appearance, such as large deformations, and gap or crack
formation. To keep the relative humidity at 30 – 65% throughout the year may require the use of mechanical humidifiers or
a moisture recovery system in ventilation systems while heating takes place.
Please also refer to the Admonter comfort diagram at www.admonter.at. In this regard, attention is drawn to the use of
the Fidbox®, which provides a multi-year climate record and which is user-friendly to read.
Underfloor cooling - In terms of building physics, the installation of a room cooling system at floor level is not ideal,
preferably it should be installed in the wall and ceiling area. Basically, Admonter Floors are suitable for laying over under-
floor cooling systems if it can be regulated and detected so that a daily average of 65% relative humidity directly on the
parquet floor is not exceeded and that the dew point is never even close to being reached. Although only to a moderate
degree, the natural phenomena typical to wood such as gaps, cracks or warping as during heating should then also to be
expected. A single dew point measurement on the inflow pipe is in any case not sufficient! Full-surface bonding with
Admonter elastic adhesive is required.
Delamination tests as per Test Method HFA AA B 214 or IHD factory standard 482 “Testing the adhesion of multi-layer
parquet” are suitable to examine the product quality of the adhesion of multi-layer parquet (condition as delivered).
22 23ECOLOGY AND ECOLOGICAL
OUR PRODUCTS CAN BE SAFELY USED
SUSTAINABILITY INDOORS FOOTPRINT
WHY CHOOSE ADMONTER AUSTRIAN ECOLABEL
In addition to in-house quality control, the Ad- The Austrian Ecolabel provides consumers with
monter products are also regularly checked by an information base for environmentally friend-
accredited institutions. Apart from all the structu- ly purchasing decisions. It is a state-awarded
ral standards, they also meet the highest envi- eco-label that draws the public‘s attention to
ronmental and health requirements. the environmentally harmful production, use and
disposal of consumer goods, and in turn, labels
Our commitment to nature begins at home: environmentally friendly products and services.
• Admonter sits amid the forests of the Gesause Products labelled with the eco-label for indoor
National Park use produce little or no pollution and therefore
• Our wood is sourced from sustainably mana- make an important contribution to the quality of
ged forests indoor air.
• We manually inspect the quality of our work
• Formaldehyde-free glues are only the start of Admonter is the first Austrian wood flooring
our commitment to producing healthy pro- manufacturer to be awarded with the Austri-
ducts for indoor use. an EcoLabel.
SUBSTAINABILTY WE WALK THE TALK
The independent control of our entire produc- WHY EPD
tion chain – from the forest to the final product,
guarantees the seamless traceability of the flow An Environmental Product Declaration (EPD) is
of wood along the entire journey, taking into aimed at assisting builders, architects and pro-
account the economic, ecological and social cessors to compare the environmental impact of
aspects of production. different products with each other.
WITH A GOOD CONSCIENCE
Choosing Admonter is a choice for nature. In An EPD is a neutral tool for communicating the
every respect. environmental properties of products – inde- The “Life Cycle Assessment” LCA is the compilation
SUSTAINABLE USE OF THE MATERIAL pendently audited according to standardised and assessment of the input and output flows and the poten-
The abundant forests that surround Admont and rules. tial environmental impact of a product in the course of its
many parts of Austria means our raw materials Apart from the origin of the raw material from sustainably life. Factors such as resource consumption, global warming
have a short delivery route to production at managed forests, the sustainable use of the material plays The conducting of an LCA study regulate the ISO potential or energy content are represented by key figures.
Admonter. an equally important role at Admonter. The use of a raw 14040 and ISO 14 044 series of standards. The sum of the required resources and emissions (“LCI”) is
material over several stages is known as the cascading or In an LCA the environmental relevance of the converted into indicators of a comprehensive impact assess-
multiple use. various life stages of the product or process are ment.
It starts with a product that has the highest added value, examined. The LEED sustainability standard is an internationally com-
ecologically creates the greatest benefit and does not parable quality label for energy-efficient and environmentally
exclude multiple use. responsible buildings, interiors and management concepts.
Many Admonter products are rated by the Sentinel House
Institute and approved for use in „healthier buildings“. In
Building directory healthier buildings
doing so, emphasis is placed on the lowest possible indoor For more information
air emissions. visit us at www.admonter.at
24 25WARRANTY / NOTE
HEALTHY
INTERIOR AIR
30 YEARS WARRANTY
Honestly, who will still have their invoice at hand
after 20, 25 years? Admonter Holzindustrie the-
refore offers customers a very special service. If NATURAL CARE
you send the warranty certificate with a stamp of
your dealer to Admonter, your data will be cent- The best warranty for a beautiful floor finish is you! With
rally stored and can be easily retrieved for up to an Admonter Natural Floor, you have purchased a genuine
30 years if required. natural product of living material that will literally live with
you. The way in which you handle your floor, the way you
use it and care for it will determine its appearance over the
years and decades to come.
TUV PROFICIENT PRODUCT FOR INTERIORS
Admonter products fulfil the award criteria V1.0
of the TUV-Proficient Product Interior Certification
and which has been awarded in the PREMIUM
class.
Overview of formaldehyde limit values
Emission class Test method Limit value
according to
This simultaneously complies with the following EN 717-1 0,1ppm (0,124mg/
m³)
emission limits. E1
EN 717-2 3,5mg/m²h
E0 AS/NZS 4266.16 0,5mg/l
AgBB
F**** JIS A 1460 0,3mg/l
Sauna suitability EN 717-2
according (tested at 90°C)
0,4mg/m²h
to ÖNORM M
Belgian VOC regulation 6219-1 2010
Steady state
LEED v4 (outside North America) concentration of 0,01 ppm
raw wood
BREEAM Exemplary Level
Admonter solid
Finnish M1 classicifation wood multilayer 0,01 ppm
products
RAL-UZ 176 (Blauer Engel)
Our detailed folder about sustainability can be
downloaded at www.admonter.eu/de/downloads/
26 27Customer:
CONSULTING CONSULTING
Editor:
GUIDE GUIDE
Sub customer:
ORDER SHEET ORDER SHEET
Editor:
ACCESSORIES
Order-No.:
AMOUNT (pcs.):
End customer:
PRODUCT: 1 litre 6 pcs. pack. 2,5 litre 4 pcs. / pack.
Deliv. address: Admonter
Clean & Care:
BVH:
Admonter 1 litre 6 pcs. pack. 2,5 litre 4 pcs. / pack.
Date of delivery: Clean & Care
SIZE: white:
Date: Admonter 1 litre 6 pcs. pack. 2,5 litre 4 pcs. / pack.
maintenance oil
natural:
noblesse elegance basic naturelle rustic Admonter 1 litre 6 pcs. pack. 2,5 litre 4 pcs. / pack.
Grading: maintenance oil
white:
sanded brushed cross alpin scraped antico 1 litre
Admonter
Surface:
supplementary oil:
ng1 easy care ng1 pro care matt laquer soaped (1 natural oiled) 30 ml
Admonter
Finish:
repair-oil:
Type 1 Type 2 Type 3 flush-mount skirting 2,5 litre 2,5 litre
Natural wood floor Natural wood floor
Skirting:
soap natural: soap white:
TK (A/B/F/D/G) TK-Objekt (C, H, E) Object-oil 750 ml
Stair nosing (for pro-care
finishes)
STAIRs Dimension 1 Dimension 2 System 1 System 2 System 3 17 kg / bucket
Admonter
Floating tread
elastic adhesive
design:
STAIRs Yes No 12 rolls à 30 m2 12 rolls à 10 m2
Admonter
self-supporting
natural underlay
element:
floating installation full suface gluing tongue & groove lock-it 66 lm. rolls à
Admonter
Installation:
Adhesive tape
Merging color Deliberately 50 m2 rolls à
mixing colour Admonter
Pre-sorting:
Floorliner
engl. pattern random pat. 750 g
Installation pattern: Joint filling putty
FLOORs Skirting Stair nosing
Note:
AMOUNT (m2): AMOUNT (m2): AMOUNT (m2):
28 29ORDER SHEET: STAIRCASE ELEMENTS ORDER FORM: STAIR ELEMENTS
FOR CLADDING CONCRETE STEPS FOR COVERING CONCRETE STEPS
Client: Building project: Dimension approx. (mm)
Product Article-Nr. / Piece / More
(Thickn. / Width /Length)
Editor: Date of delivery: Riser with edge 15 mm laterally on one side STAIR NOSING-RISER-
for on-site trim adjustment STANDARD-15
Order-Nr.: Date: Piece
192mm
1180 x 192 x 15 mm
FLOORs More
Structure: 1180
mm
product:
15m
m
Grading: Surface:
Thickn. / Width /
Riser with border 40 mm laterally on one side STAIR NOSING-RISER-
Profile: for on-site trim adjustment STANDARD-40
Length:
Piece
192mm
Piece Piece
Profile
1180 x 192 x 15 mm
15m
last kick:
m
More
mm
1180
40m
m
Dimension approx. (mm)
Product Article-Nr. / Piece / More
(Thickn. / Width / Length) Tread cladding for coiled without edge band STAIR NOSING-RISER-
for on-site trim adjustment STANDARD-COILED
Tread cladding straight - without edging
STAIR NOSING-STANDARD-KICK Piece
for on-site trim adjustment 640m
m
450mm
Piece
1180 mm
mm
15
1800 x 640 x 15 mm
Rest More
mm m
1180 m
1800
ca. 192 mm More
15mm
mm
1180
ca. 130 mm
Border loose with structure & surface
STAIR NOSING-BORDER-40
for on-site assembly
Tread cladding straight - with attachment 40 x 3 mm left
STAIR NOSING-STANDARD-KICK-L Piece
for on-site trim adjustment
450mm Piece 3 x 40 x 960 mm
1180 mm
Rest
ca. 192 mm More
40mm
15mm
mm
1180
ca. 130 mm Requirement: Full-surface bonding on a level surface!
Tread cladding straight - with attachment 40 x 3 mm right STAIR NOSING-
for on-site trim adjustment STANDARD-KICK-R
More
Piece
450mm
information:
1180 mm
Rest
40mm
ca. 192 mm More
15mm
1180
mm
ca. 130 mm
30 31ENGLISH
03.2019
More information, as well as our binding
Maintenance & Installation Instructions
can be found at:
www.admonter.en
Stamp field
Admonter Holzindustrie AG
8911 Admont - Austria
Phone: +43/3613/3350-0; Fax: +43/3613/3350-117
info@admonter.at - www.admonter.at
Building directory healthier buildings
Origin of wood: EUROPA
Exception: American Walnut, American Cherry, Siberian Larch)You can also read


