Alice Cooper's Nightmare Castle Service Manual - Cover Page - Spooky ...
←
→
Page content transcription
If your browser does not render page correctly, please read the page content below
Alice Cooper’s Nightmare Castle
                     Service Manual

Cover Page                                            0

                                               rev 01/17/2020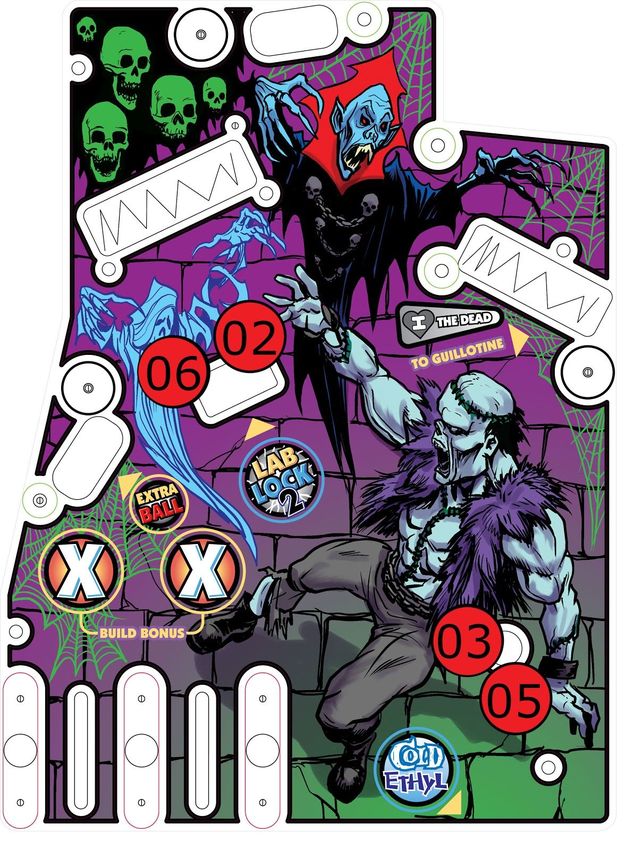
Table of Contents 1
5) Game Parts
1) Introduction 2 6) Troubleshooting and Other Tips
7) Layouts
2) Game Assembly and Setup 7.1 Coil Layout 18-19
7.2 Switch Layout 20-21
2.1 Unboxing and parts inspection 3
7.3 RGB Layout 22-24
2.2 Leg installation and backbox assembly 4
7.4 Rubber Size and Layout 25
2.3 Pitch and Level adjustments 4
2.4 Ball Installation 4
2.5 Tilt Installation and adjustments 4
2.6 Volume and Amp adjustments 5
2.7 Power up and first impressions
3) Game Rules and Features 6-9
4) Menu System
4.1 Basic Menu Functions 10
4.2 Settings
4.2.1. Gameplay Feature 11
4.2.2. Machine (Coils) 11
4.2.3. Machine (Pricing) 12
4.2.4. Machine (Replay) 12
4.2.5. Machine (Standard) 12
4.2.6. Machine (Sound) 12
4.3 Tests
4.3.1. Switch Test 13
4.3.2. Led Test (Single) 13
4.3.3. Led Test (All) 13
4.3.4. Coil Test 13
4.3.5. Music Test 13
4.3.6. Shaker Test 13
4.3.7. Burn-in 13
4.4 Statistics
4.4.1. Audits 14
4.4.2. Coin Op Audits 14
4.4.3. Error Report 14
4.4.4. Last Score Data 14
4.5 Utilities
4.5.1. Clear Credits 15
4.5.2. Reset Audits 15
4.5.3. Reset High Score 15
4.5.4. Clear Error Report 15
4.5.5. Factory Settings 15
4.5.6. Set Date/Time 15
4.6 Software Info 15
1
1) Introduction

At the heart, Alice Cooper’s Nightmare Castle is about tracking down and killing monsters, you know, the usual. The end goal is to survive your encounters with all nine monsters, reaching a finale where you can escape from the castle with a
billion dollar treasure.

          ●   Game Design: Charlie Emery
          ●   Programmer: Fawzma
          ●   Rules Direction: Bowen Kerins
          ●   Animations: David “Bunyip” van Es
          ●   Music: Matt “Piggy D” Montgomery
          ●   Soundtrack: Alice Cooper
          ●   Sounds: Scott Danesi
          ●   Artwork: Jeff Zornow
          ●   Toy Sculpts: Matt / Back Alley Creations

For technical service please reach out to

Service@SpookyPinball.com

For other Spooky Pinball games please visit

SpookyPinball.com

                                                                                                                                                                                                                                                   2
2) Game Assembly and Setup
Thank you for purchasing a game from the smallest, happiest, goofiest little pinball company on the planet! Your support means everything to our family and business.
Here are a few quick notes to help you get your new game set up.
Ideal playfield pitch is 6.5 degrees
2.1 Unboxing and parts inspection
Tools required for initial machine assembly
Utility knife or razor blade
Ratchet with ⅝” socket or ⅝” wrench
Small bubble level (side to side and incline)
Wire cutters
Parts List
1 Set of coin door keys
1 Tilt plump bob
1 Backbox (head) bolt
4 Pinball legs
4 Pinball leg levelers with nut
8 ⅝” Headed pinball leg bolts
4 Pinballs
1 Power cable (line cord) for your country’s electrical system
#1 - Your coin door keys are located inside this leg box. All the pinballs, a power cord, legs, leg bolts, and head bolt & washer, are in the same package. Your backbox key is inside the coin door. Please take a minute to inspect to make sure you
have all the parts and that they are not damaged.
#2 - If your game came in a box then there are a couple of ways to begin. If your game did not come in a box, then continue on to step
#3. Begin by opening the flaps on the top of the box. Be mindful to make sure you remove the staples from the flaps so you don’t get scratched or misplaced any of them. DO NOT CUT THE PLASTIC STRAP JUST YET!
A) With some assistance, lay the machine flat on the floor on the side that is marked “Truck this side only.” Grab the plastic strap and pull the game from the box. Once the game has been removed from the box (and with the assistance of a
helper), stand the game back upright on its back.
OR
B) Using your utility knife, carefully cut down the sides of the box that are labeled “Truck this side only,” making sure that your knife DOES NOT come in contact with the game cabinet itself. Once both sides are cut you will be able to
access the pinball cabinet itself.
#4 - Start by threading the leg leveler nut onto each of the levelers. Once that is complete then you can thread the leg leveler into the bottom of each of the pinball legs. Let’s begin with all of the levelers adjusted to their lowest positions (threaded
all the way in).
3
2.2 Leg installation and backbox assembly

#5 - Using 2 of the ⅝” headed pinball legs bolts per leg, start with either of the front legs. Thread the leg bolts into the corresponding holes on the corners of the front of the cabinet. Using your ratchet or wrench, tighten adequately to make sure the
leg is attached to the machine. With the assistance of a friend or helper slowly tip the game forward until the two from legs are resting on the floor. Now, as a team, pick up the rear of the cabinet and attach the back two legs in the same fashion as
the front. You may want to find a stool or other sturdy support system to rest the game on while attempting this. Once the rear legs bolts are inserted and tightened you can set the game down on its legs.

#6 - Using your wire cutters, cut the plastic strap that runs the length of the game. ATTENTION!, be careful there is some tension on this strap and it may release with some force. Once the strap is free, now you can lift the backbox into position.
Be mindful to make sure none of the wiring gets pinched while lifting the backbox. Use the clasp on the backbox and the cabinet to temporarily hold the backbox upright. This should not be used as a permanent fastener. Using the keys from the
parts box, open the coin door and retrieve the backbox keys. With these keys, unlock the backbox lock and remove the backglass by gently lifting up on the “lift channel” and then swing the glass out and down from the channels it is supported in.
Now, using the head bolt and washer provided, secure the backbox to the base cabinet. At this time thoroughly check for any loose or disconnected connection(s) in your backbox. When you are done, reinstall the backglass and engage the lock.
Place the backbox key back on the hook in the coin door.

#7 - With the coin door open, grasp the lever located at the top right of the door frame and pull it to the left. This will release the mechanism that holds the “lockdown bar” in place. Set the lockdown bar aside in order to remove the playfield glass.
Now close your coin door to keep it out of the way of the playfield glass. In order to remove the playfield glass, simply slide the glass down the front of the machine. This is tempered glass, so please take care not to hit the edges of it on anything
as it may shatter. With the glass safely stored off to the side, we are ready to level the machine.

2.3 Pitch and Level Adjustments

#8 - With your small bubble level you can level the side to side action of your game. Placing the level on the playfield itself will give you the most accurate results. First level the back of the game. With your friend or helper watching the level,
crawl under the machine and rotate the leg leveler counterclockwise to make the leveler “longer.” Do this until your bubble is between the two lines on your level. Repeat this process for the bottom of the playfield. Once that is done, you can use
your pitch level to adjust the pitch of the game. The steeper the pitch, the faster the game will play. We recommend a pitch of 6.5°. The pitch can be increased by raising the back of the game. This is accomplished by making the leg levelers on the
back legs longer. Once the proper pitch is established, recheck the level of the playfield.

2.4 Ball Installation

#9 - Now remove the pinballs from their package. Please take a minute to inspect them for any nicks or scratches. Also, this is a good time to wipe them off before installing them into the game. Once you are satisfied that they are acceptable, place
them on the lower playfield and let them naturally fall into the trough. Please install all 4 balls that come with the game.

2.5 Tilt

#10 - The tilt plump bob is a metal cone, that when makes contact with the ring it is inside of, will issue a “Tilt Warning.” After repeated “tilts” the machine’s coils will shut down and the player will lose their current ball. To install the tilt plump
bob (hereafter referred to as simply tilt bob) open the coin door on the front of the game. Located on the inside left of the base cabinet you will find a long metal rod inside a metal closed hoop. Insert the narrow end of the tilt bob onto the metal rod
and then tighten the nut on the side of the tilt bob. The farther up the metal rod you go, the less movement will be necessary to “tilt” the machine. After playing a couple of games you can adjust this to your liking.

2.6 Volume and Amp Adjustments

#11 - The volume for Alice Cooper's Nightmare Castle is controlled by the two black buttons mounted to the inside of the coin door. The amplifier has been set from the factory. PLEASE DO NOT adjust the amplifier directly.

                                                                                                                                                                                                                                                            4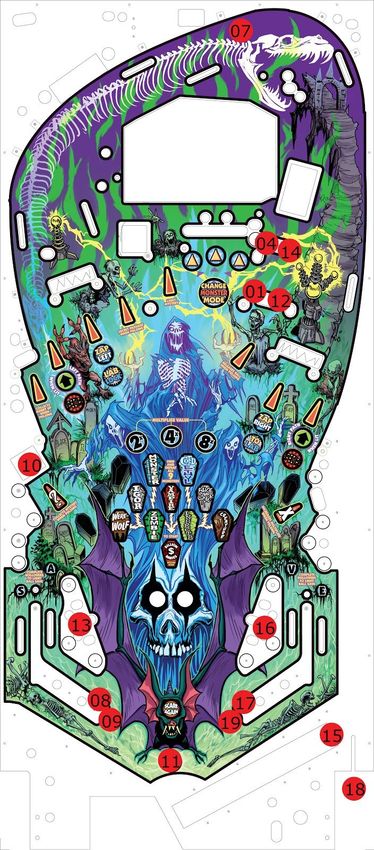
2.7 Power up and First Impressions
NOTE: IMPORTANT! This game auto ranges from 50 to 60 Hz! 110 / 220 switch is on the back of the 48v power supply. DO NOT ADD A CONVERTER / TRANSFORMER!
#12 - Using the line cord from your parts box, plug the female end into the receptacle on the back of the base cabinet and the male end into your wall socket. Turn the switch on (under the bottom of the cabinet, right front side). Please take this
moment to check for proper function for the basics of the machine. If the machine does not seem to function properly see the troubleshooting guide at the end of this manual or contact Service@SpookyPinball.com
#13 - Your game is factory set to free-play... HAVE FUN! :-)
For more information, apron cards you can print, and links to even more technical info/parts... go to:
www.SpookyPinball.com/game-support
FOR TECHNICAL HELP, PLEASE EMAIL: Service@SpookyPinball.com
FOR SALES HELP, PLEASE EMAIL: Squirrel@SpookyPinball.com
You will get a prompt reply.
Thanks from the Entire Spooky Pinball family!
SPOOKY PINBALL LLC
184 Ridge Ave.
Benton, WI 53803
5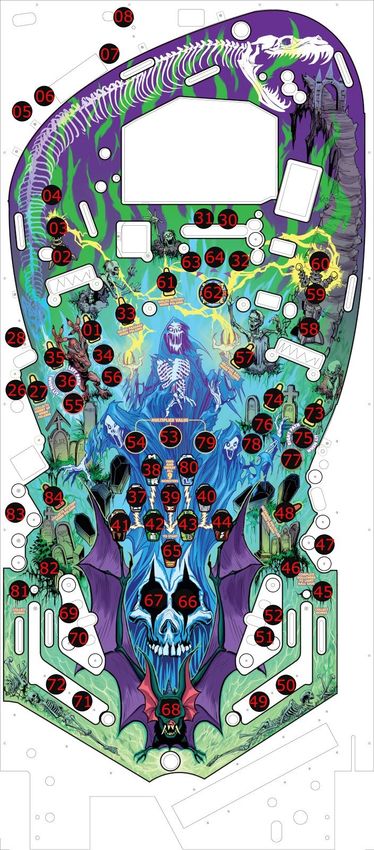
3) Game Rules and Features
Here are a few game walkthroughs from the community.
Tilt Pinball Forum http://tiltforums.com/t/alice-cooper-nightmare-castle-rulesheet/3950
This Week In Pinball https://www.thisweekinpinball.com/alice-coopers-nightmare-castle-deep-dive-in-depth-overview-of-the-machine-features-rules-and-code/
Features:
● 2 ball locking Frankenstein Castle mech
● Left ramp accessible from two directions with a lock diverter
● Working “ball chopping” guillotine ramp
● Three ramp shots
● “Danesi style” “Cold Ethyl” drop target lock system, inline style with subway access
● Four subway access points, including a castle turret from the upper playfield to the subway
● Three drop targets
● 4 ball multiball
● Three flippers
● Balcony drop lock
● Magneat-O Save
● Vortex of Doom habitrail
● Comic book style animations
● Over 700 speech calls from Alice Cooper himself
As of code version 1.07
At the heart, Alice Cooper’s Nightmare Castle is about tracking down and killing monsters, you know, the usual. The end goal is to survive your encounters with all nine monsters, reaching a finale where you can escape from the castle with a
billion-dollar treasure.
Tracking down monsters starts in the foyer, where you can hit the center bank to change the target monster. Shooting left and right orbits advance you through the castle’s rooms, and you can see your position on the map at the bottom of the
screen. The “X” shows your location, and the “M” shows the location of the monster. You can also advance directly to the monster through a mystery award or by opening the secret passage.
Once you’ve reached a monster, you play an untimed battle, and each monster’s battle is different. For example, in the Werewolf battle you must hit a lit shot to load your gun, then hit the center targets to fire. If you defeat the monster you earn a
frenzy bonus, a timed round with unlimited ball save and extra scoring opportunities, followed by a chance to cash in again with a final hurry-up. All of this is meant to celebrate your victory.
Each monster you battle, win or lose, raises the value of all other monsters by 20%. This means you should plan ahead: do you want to play your favorite battle first, or save it for later when it will be worth even more?
SKILLSHOT
Launch the ball and attempt to shoot the ramps, orbits, or crypt lock to light the secret passage and the outlane ball save. The right ramp will award the skill shot even if the ball only goes half way up. Hitting any other shot, or the slings, will fail
the skillshot.
ROOM TRAVEL
At the beginning of the game, and after any monster battle, you start out at the entrance to the castle, in the lowest room of the grid.
6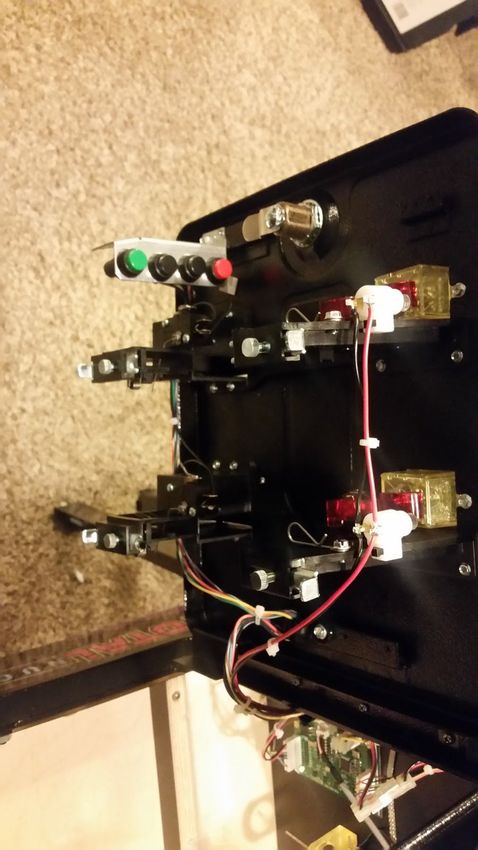
While at the entrance you can select the monster you want to battle by shooting the center 3 target. This will cycle through the available monsters.

Shooting the left or right orbit when strobing will move up+left or up+right, respectively. If there is no room in that direction on the grid, the orbit will not be lit.

As soon as you shoot one of the outside orbits you lock in your monster and get into the first room. Depending on the settings the first orbit may move you two rooms at once.

In each room there are items you can collect that will help with your monster battle later on.

MONSTER BATTLES

There are four ways to start a monster battle:

   1.   Reach the topmost room in the grid via the orbits.
   2.   Shoot the secret passage (to the right of the left ramp) when lit. Shoot the center 3 targets three times once a monster has been selected to light the secret passage. Can also be lit via skillshot or mystery.
   3.   As a mystery award. Early mystery awards have a high tendency of immediately starting the battle, even if the monster isn’t locked in.
   4.   As a pity award on the last ball. If a player doesn’t reach a monster at some point in their game; launching the 3rd ball will put you in the monster room that was currently selected (even if it has not been locked in)

MYSTERY AWARDS

Shoot the middle scoop (left of 3 center targets) to build mystery. When the award is ready the left scoop arrow will do a color cycle animation to indicate its ready to collect. This will commonly award monster progress, such as “move one room”,
“move two rooms”, or “advance to monster”, and sometimes point values. (are there other awards?) If not collected, the mystery will eventually time out and need to be lit again.

MULTIBALLS

CRYPT MB

Lock a ball in the crypt (to the left of right ramp), by either shooting into it from the lower playfield, or by dropping into it via the rightmost of the three upper lanes. Once a ball is locked, the crypt shot will light blue(?), and shooting it again (via
either playfield) will start Crypt Multiball.

During Crypt MB, shoot the crypt for jackpots. This multiball can be stacked with any monster battle (including Frank MB); you can make progress through the rooms while in multiball, or start it while already in a battle.

After you exit multiball, repeated shots (how many?) into the crypt from the lower playfield (upper does not give credit?) will reactivate the lock (note there is no indication that the lock is ready besides that the backdrop target will be up).

FRANK MB

Shoot left via the left ramp into the physical lock. Then get to the upper playfield and knock down the drop target and shoot the upper left ramp behind it to start multiball. This mode will block the start of any other monster and can be started as
many times as you are able to.

During Frank MB, shoot either lower ramp for a jackpot. After three jackpots, the upper right ramp (guillotine) will light for supers. (does it ever unlight?)

ETHYL MB

Ethyl Multiball, a two-ball multiball played during the Cold Ethyl battle.

UPPER LANES

Complete the two ‘X’ lanes to activate light the lower right target (above right lane/outlane) for a bonus multiplier. Use flippers for lane change.

COMBOS

Shooting some shots (which?) will temporarily flash other shots orange for a combo.

SUPER SPINNER

                                                                                                                                                                                                                                                                     7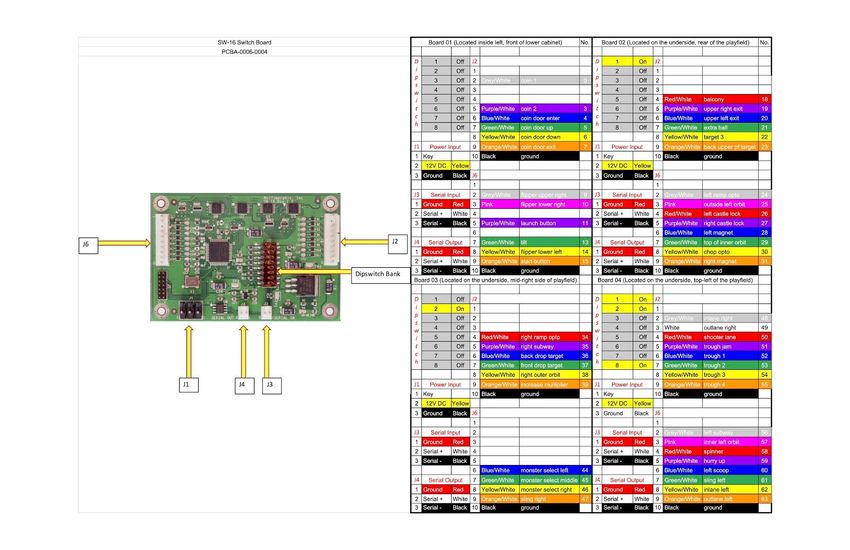
Shoot the spinner, not much to say about that other than its activated after about 40 spines then there it ended after no activity over a certain about of time.

SUPER SLINGS

Same deal as spinners… but you have to hit the slings about 5 times within x amount of seconds for it to activate.

EXTRA BALL

Extra ball can be lit by shooting the upper right ramp 10 times (‘chops’ displayed on display).

Will also be lit after starting third monster battle (including frank)

Extra ball will light at the extra ball target on the left side of the upper playfield.

BALL SAVES

Ball save is activated when you complete the 4 bottom lanes. The outlanes will then light purple for a period of time. Draining on the outside lane when lit activates the drain magnet and will fling the ball back up the playfield, or at least is should.
This mod is being coined Mag-Neat-O save. If you complete the fourth lane as you drain, the ball save will activate and be immediately used. During multiball the magnet is not active, and another ball will be auto-plunged instead.

MONSTER BATTLES

At the beginning of each battle, the ball save will activate. Complete the mode’s objective to start a 25(?) second ‘frenzy’ with unlimited ball save. Sometimes these frenzies seem to be unique modes, sometimes the mode will just run again during
this time (may change with new code?). After the frenzy ends, the left target (above mystery scoop) will light for a hurry-up based on your mode performance (?), then you will be returned to the entrance to begin the next battle.

FRANK

See FRANK MB

ETHYL

From the upper playfield drop ball into the crypt via the rightmost lane. Another ball bill be auto-launched. Shoot first lower drop target or the rightmost lane again to release, then keep shooting the drop targets/scoop to collect jackpots. Mode ends
when you drain one of the balls. (how to win?)

IGOR

Complete three sets of lit shots. First set will be three shots, then four, then five(?)

VAMPIRE

Stake/dismember the vampire by hitting the back target on the upper playfield four (?) times.

ALICE

Get to upper playfield and shoot past guillotine 2 times. The guillotine lowers a bit. Shoot a 3rd time to capture the ball in the guillotine. Theatrics play and Alice's head gets chopped off.

WEREWOLF

Shoot any green shot to load the gun, then shoot the three bank to fire the gun and damage the monster. Shots will light green again, but the ones you’ve already shot will be red instead. Shooting a red shot will damage the player. Health bars are
shown on the screen. Defeat the wolf before it defeats you (usually 5 hits?).

ZOMBIE

One roaming shot will move back and forth across the playfield on the orbits, ramps, center scoop, and inner orbit (secret passage). Value will decrease on a timer until the shot is made. Complete 5 shots to finish the mode.

                                                                                                                                                                                                                                                            8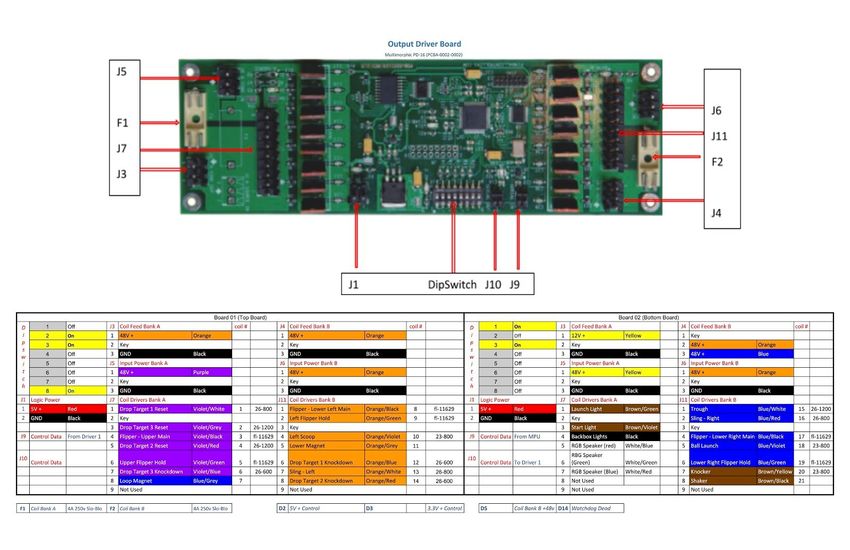
INSECT

Random shots and targets will be lit. Shoot 10 to complete mode.

PIT CREATURE

The mystery scoop, center scoop, and crypt will flash. Behind one (random?) is the pit creature. Once found, most shots will light, and a countdown timer will start. The timer will only count down while the ball is ‘hidden’ from view, such as
being in a scoop/subway, or going through one of the orbits under the upper playfield. Count the timer down to zero to finish the mode.

BILLION DOLLAR BABY

Wizard mode, not implemented yet. But becomes available when you complete all other modes. This mode will be what is says and will have billion point shots.

                                                                                                                                                                                                                                                     9
4) Menu System
4.1 Basic Menu Functions
All settings to the game are done via the menu system.
From left to right
Red - Back out one step
Black (left) - navigate to the left
Black (right) - navigate to the right
Green - “Go” into the menu further
● Home
○ Settings
■ Gameplay (Features)
■ Machine (Coils)
■ Machine (Pricing)
■ Machine (Replay)
■ Machine (Standard)
■ Sound
○ Tests
■ Switch Test
■ Led Test (Single)
■ Coil Test
■ Music
■ Shaker
○ Statistics
■ Audits
■ Coin Op Audits
■ Last Score Data
■ Reactor Audits
○ Utilities
■ Servo Settings
■ Clear Credits
■ Reset Audits
■ Factory Settings
■ Set Date/Time
○ Software Info
104.2 Settings
4.2.1 Gameplay Features 4.2.2 Machine (Coils)
Setting Description Factory Min Max Setting Description Factory Min Max
Match Routine End of game match sequence On On Off Auto Plunger Auto Plunger Coil 20 1
Co-Op Mode Allows the ability to play co-op mode Yes Yes No Trough Ball Trough Coil 25 1
Save Magnet Pattern Different patterns used for the “SAVE” Original Original Pattern 3 Flipper (Lower Left Main) Left Flipper 40 1
magnet
Upper Magnet Pattern Different patterns used for the upper Original Original Spooky Flipper (Lower Right Right Flipper 40 1
magnet Main)
Save Magnet Resistor Check to see if your game has the gold On On Off Flipper (Upper Main) Upper Flipper 13 1
resistors
Allow Extra Balls Allows for the earning of extra balls Yes Yes No Left Scoop Left Scoop 21 1
Adv Secret Passage How many hits for secret passage advance 3 1 Slingshot (Left) Left Slingshot 15 1
Lock Reward On On Off Slingshot (Right) Right Slingshot 15 1
Ball Save Timer Time given to save the ball if drained 13 1 90 Drop Target 1 Knockdown Drop Target 1 50 1
Difficulty Overall difficulty of options Schools Out Easy Action Welcome to My Nightmare Drop Target 2 Knockdown Drop Target 2 50 1
Extra Ball Knocker Enabled Deploys knocker if extra ball earned Yes Yes No Drop Target 3 Knockdown Drop Target 3 50 1
Left Scoop Processing Speed Speed at which scoop returns ball Fast Lame Fast
Lock Reward On On Off
Monster Multi Save No Yes No
Monster Start How monsters are selected Random Random “your choice of monster”
Save Mystery Lit Yes Yes No
Save Player Lane Data Yes Yes No
Shaker Intensity How intense does the shaker vibrate Normal Low Normal
Shaker Motor is the shaker installed On On Off
Skillshot Autoplunge Timer auto-plunge after a period of time 15 1 30
Special earning special awards Normal Audits, Off, Points, Normal
114.2.3 Machine (Pricing) 4.2.4 Machine (Replay)
Setting Description Factory Min Max Setting Description Factory Min Max
Bonus Credit After 0 0 Replay Award Credit Credit Extra Ball
Coins Per Credit 1 1 8 Reply Back Down Amount 500,000 500,000 2,000,000
Free Play Yes Yes No Replay Increase Amount 1,500,000 1,000,000 2,000,000
Left Coin Value 1 1 8 Replay Losing Streak Thresh 3 1
Right Coin Value 1 1 8 Replay Minimum Score 1,000,000 500,000 15,000,000
Replay Score 2,500,000 1,500,000 30,000,000
Replay Score Enabled Yes Yes No
Replay Type Auto-Adjust Auto-Adjust Fixed
4.2.5 Machine (Standard) 4.2.6 Machine (Sound)
Setting Description Factory Min Max Setting Description Factory Min Max
Recycle After Game Disable On, Off, Disable Initial Volume 5 1 20
Flipper Hold Boost Level 3 1 5 Music Volume Offset 0 -0.4 0.4
Start Button Restart Enabled Yes Yes No
Match Boost Percentage 30 10 100
Balls Per Game 3 1
Quick Bonus Mode True True False
Attract-Mode Sounds Off On Off
Attract-Mode Music Off On Off
Tilt Warnings 2 1
Tilt Bob Setting Time (ms) 1500 1000 10000
Tilt Switch Sensitivity (ms) 5 1 30
Language US US UK
124.3 Tests
4.3.1 Switch Test
The switch test will show switch activity on the game. Each switch event will be accompanied by a sound and an indicator at the end of the switch name. The indicator (A) stands for the switch becoming active and the indicator (I) shows when the
switch becomes inactive.
4.3.2 LED Test (single)
The single LED test will cycle through each LED in the system and display its associated name and LED number. This test is useful for identifying any miss-mapped LEDs in case they were plugged back into the wrong LED harness position.
4.3.3 LED Test (All)
This LED test will cycle all LEDs in a Red-Green-Blue-Whitish pattern. This test is useful to see if any LEDs are out or any channels on your LEDs are out.
4.3.4 Coil Test
This is a pretty standard coil test mode used to check the functionality of the game coils. The coil pulses can be started and stopped by pressing the start button or the enter button on the coin door. A coil will continue to pulse until the test is existed
or the start/enter button is pressed to stop the cycle.
4.3.5 Music Test
The music test will play game music and is useful for testing and tuning the audio system. The music can be changed by pressing the start button or the enter button on the coin door. The volume can also be adjusted during this mode by using the
volume up and volume down buttons on the coin door.
4.3.6 Shaker Test
The shaker test will cycle through a few different shaker intensities. This is just used to test the proper functionality of the shaker outside of the coil test. This works better.
4.3.7 Burn-In
The burn-in is used by the Spooky Pinball LLC. Factory to make sure the entire game is physically functioning properly. It will cycle through all the coils, play music, play animations, turn on the backglass LEDs, and make all the LEDs on the
playfield whitish.
134.4 Statistics
The statistics pages are set up to give you important data about your machine. From audits to last score, there is a lot of information available to those that want it.
4.4.1 Audits
The audit screen will give you data on many features of the game. Average ball time to how many drains down each side.
4.4.2 Coin-Op Audits
The coin-op audits screens show information for the operators of the game. This is mainly designed for the coin door use and shows coin count (for each coin slot), service credits, current credits, etc.
4.4.3 Error Report
If you find a “credit dot” on your machine, this is the screen that will explain what is going on.
4.4.4 Last Score Data
The last score data (last scoredata) screen will show you the previous games scores for all 4 players. This is useful for tournaments and casual play alike.
144.5 Utilities
This section is for the utility functions of the game. Clear Credits, Reset Audits, Factory Settings and Set Date/Time.
4.5.1 Clear Credits
If your game is set to coin play, then this is the menu that you would use to clear any remaining credits on the machine.
4.5.2 Reset Audits
If you are in need of clearing your credits (taking your game to a show, having a party, etc) in order to get a more accurate reading for an event, this is where that will be done.
4.5.3 Factory Reset
A factory reset can be useful if you have changed a lot of settings and would like to start fresh, or if you just purchased a used game and would like to get back to the way the game shipped.
4.5.4 Set Date/Time
Your pinball machine has an internal clock. This is used for event logs, errors, etc. You can set the accurate date and time in this submenu.
4.6 Software Info
This is the screen used to give you an up to date display of what version of software you are running. Always check to make sure you are running the latest version in order to have the most up to date system.
155) Game Parts
work in progress
166. Troubleshooting
Here are some links to videos in case you run into any issues. If you need more assistance please contact us at Service@SpookyPinball.com
Basic Spooky Pinball (spans more than one game)
Code updates - https://www.youtube.com/watch?v=e7llE4hbQJQ
Pinball Glass Removal - https://www.youtube.com/watch?v=UJjq6_SpIGg
Playfield Slide Rail Bump - https://www.youtube.com/watch?v=qzrrqX7lleU
Coil Adjustments - https://www.youtube.com/watch?v=OltW0IjTo-M
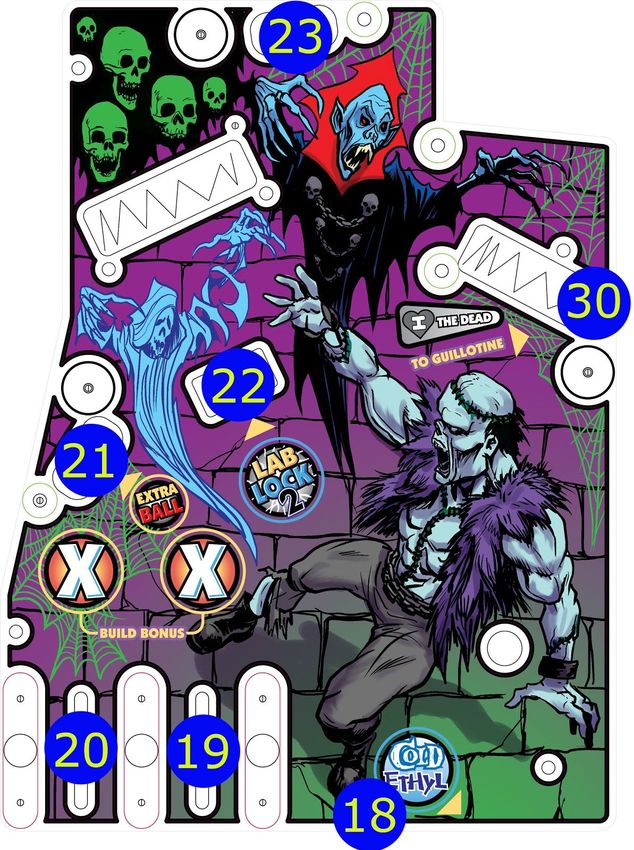
177) Layouts
7.1 Coil Layout
18Number Description
01 Drop Target 1 Reset
02 Drop Target 3 Reset
03 Flipper - Upper Main
04 Drop Target 2 Reset
05 Flipper - Upper Hold
06 Drop Target 3 Knockdown
07 Loop Magnet
08 Flipper - Lower Left Main
09 Flipper - Lower Left Hold
10 Left Scoop
11 Lower Magnet (Save Magnet)
12 Drop Target 1 Knockdown
13 Sling - Left
14 Drop Target 2 Knockdown
15 Trough Eject
16 Sling - Right
17 Flipper - Lower Right Main
18 Ball Launch (Auto-Launch)
19 Flipper - Lower Right Hold
20 Knocker
21 Shaker
197.2 Switch Layout
20No. Description No. Description No. Description
00 Coin 1 24 Left Ramp Opto 47 Sling Right
03 Coin 2 25 Outside Left Orbit 48 Inlane Right
04 Coin Door Enter 26 Left Castle Lock 49 Outlane Right
05 Coin Door Up 27 Right Castle Lock 50 Shooter Lane
06 Coin Door Down 28 Left of Magnet 51 Trough Jam
07 Coin Door Exit 29 Top of Inner Orbit 52 Trough 1
09 Flipper Upper Right 30 Chop Opto 53 Trough 2
10 Flipper Lower Right 31 Right of Magnet 54 Trough 3
11 Launch Button 34 Right Ramp Opto 55 Trough 4
13 Tilt 35 Right Subway 56 Left Subway
14 Flipper Lower Left 36 Drop Target 2 57 Inner Left Orbit
15 Start Button 37 Drop Target 1 58 Spinner
18 Balcony 38 Right Outer Orbit 59 Hurry Up
19 Upper Right Exit 39 Increase Multiplier 60 Left Scoop
20 Upper Left Exit 44 Monster Select Left 61 Sling Left
21 Extra Ball Target 45 Monster Select Middle 62 Left Inlane
22 Drop Target 3 46 Monster Select Right 63 Left Outlane
23 Back Upper PF Target
217.3 RBG Layout (Lighting)
22No. Description No. Description No. Description No. Description
01 left ramp arrow 22 back board 3 43 insect 64 cetner target 2
02 left ramp group 1 23 back board 2 44 pic creature 65 billion dollar baby
03 left ramp group 1 24 back board 1 45 insert e (savE) 66 right eye
04 left ramp group 3 25 ignore 46 insert v (saVe) 67 left eye
05 gi back left 1 26 above left scoop 47 gi lower right 68 save light
06 gi back left 2 27 hurry up 48 multiplier 69 gi sling upper left
07 gi back left 3 28 spinner 49 right gi flipper left 70 gi sling lower left
08 gi back left 4 29 upper playfield flasher 50 right gi flipper right 71 left gi flipper right
09 gi upper lane right 30 gi mode target right 51 gi sling lower right 72 left gi flipper left
10 gi upper lane middle 31 gi mode target left 52 gi sling upper right 73 outer right orbit
11 gi upper lane left 32 center target 3 53 4x multiplier 74 right ramp
12 upper left lane 33 secret passage 54 2x multiplier 75 right path
13 upper right lane 34 zap left 55 special left 76 zap right
14 extra ball 35 left outer orbit 56 lab lock 77 special right
15 lab lock 2 36 left path 57 release ball 78 to lab
16 i love the dead 37 igor 58 right ramp group 1 79 8x multiplier
17 ethyl 38 frank 59 right ramp group 2 80 cold ethyl
18 vampire stake 39 vampire 60 right ramp group 3 81 insert s (Save)
19 back board 5 40 alice 61 build mystery 82 insert a (sAve)
20 back board 6 41 wolf 62 select monster 83 gi lower left o
21 back board 4 42 zombie 63 center target 1 84 collect mystery
23Number Description
09 GI Upper Lane Right
10 GI Upper Lane Middle
11 GI Upper Lane Left
12 Upper Lane Left
13 Upper Lane Right
14 Extra Ball
15 Lab Lock 2
16 I Love the Dead
17 Ethly
18 Vampire Stake
19 Back Board 5
20 Back Board 6
21 Back Board 4
22 Back Board 3
23 Back Board 2
24 Back Board 1
29 Upper Playfield Flasher
247.4 Rubber Ring Size and Layout
● 10x - 3/8" Bumper Post Rings
● 2x - 2-1/2" Rubber Rings
This is for the lower slings. 2” or 2-1/4” can be used to further minimize the risk of balls
getting stuck behind these slingshot rubbers.
● 3x - 2" Rubber Rings
● 1x - 1-1/4" Rubber Ring
● 5x - 1" Rubber Rings
● 3x - 1-1/16" Thin (Stern Compatible) Rubber Post Sleeves
● 1x - 5/16" Bumper Post Ring
● 2x - 3/8" OD Mini Post Rubbers
● 2x - Flipper Rubber - Standard Size – Purple
● 1x - Flipper Rubber - 1" Mini Size – Red
25Spooky Pinball LLC
184 Ridge Ave
Benton, WI 53803
Service@SpookyPinball.com
This manual was made in collaboration with Spooky Pinball.
26You can also read