ARM DS-5 Development Studio - QUICK START GUIDE
←
→
Page content transcription
If your browser does not render page correctly, please read the page content below
ARM DS-5 Development Studio
QUICK START GUIDE

DS-5 supports all ARM® IP, from Cortex®-A, R and M
processors to the latest technologies like                                          Inside:
big.LITTLE™, multi-clusters and ARMv8.                                          Get Started
Crafted to give you everything you need to deal with      IDE, Project Manager & Tutorials
the complexity of modern SoCs, DS-5 lets you take       Target Connection & Debug Units
full advantage of the ARM architecture.                Linux & Android Application Debug
                                                                      Debug Configuration
Use this Quick Start Guide as a reference for your                 DS-5 Debug Perspective
                                                                   Debugger System Views
first steps with DS-5, from installation to
                                                          Instruction, Data & System Trace
launching and using each tool.                                        Performance Analysis
                                                               Streamline Profiling Reports
                                                               Streamline Quick Reference

                                                                  The Architecture for the Digital World®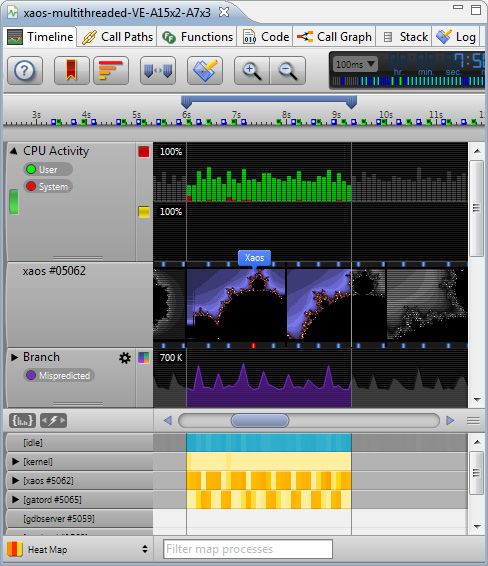
Quick Start Guide
ARM DS-5 DEVELOPMENT STUDIO GET STARTED WITH DS-5

DS-5 Downloads                                                         To license your copy of DS-5, select Help - ARM License
Start your next project with a 30-day free trial of DS-5               Manager and then click Add License. If you already have an
Professional Edition. Download DS-5 from ds.arm.com/                   account at ARM.com, you can use your existing username and
downloads and use your evaluation license to explore the full          password.
features of DS-5 Pro.                                                  To upgrade or change a license, return to the ARM License
The ds.arm.com website also provides documentation,                    Manager and either add a license file, or enter a valid serial
tutorials and blogs to help you learn how to use DS-5 to its           number.
maximum potential.                                                     Environment Variables
First Time Setup                                                       The DS-5 installer does not modify any environment variables
Install DS-5 following the on-screen prompts and launch the            in your system.
Eclipse for DS-5 application. Create a new Workspace                   DS-5 only requires that the path environment variable
folder to store your projects and settings.                            points to the \bin directory. This is
Welcome Screen and Licensing                                           done automatically if you launch the tools from the Eclipse
                                                                       for DS-5 or the DS-5 Command Prompt items in the
Next, you’ll see the Welcome screen, which gives you a quick           Windows Start Menu.
way of importing the included example applications as well as
tutorials, hints and tips. To close the welcome screen, click on       Running the tools from a Linux console requires you to
the Go to Workbench link.You can get back to this screen at            manually set the path environment variable.
any time by selecting Help - Welcome.                                  Eclipse Perspectives and Views
                                                                       A typical Eclipse workbench window contains one or more
                                                                       perspectives, each of them including a set of related views,
                                                                       editors, menus, and toolbars.
Minimum System Requirements                                            The main Eclipse perspectives in DS-5 are:
                                                                       • C/C++: used to import and manage software projects, and
                                                                         to edit source files.
                                                                       • DS-5 Debug: graphical interface for the DS-5 Debugger.
DS-5 is supported on the x86 host platforms listed below
with at least: 2 GHz dual-core host processor, 2 GB RAM (4             DS-5 also includes other perspectives, such as PyDev for
GB recommended), 2 GB hard disk space.                                 coding debugger Jython scripts.
• Windows XP Professional SP3 (32-bit)                                 To open an Eclipse view, go to Window - Show View.
• Windows 7 Professional SP1 (32/64-bit)                               Reposition any view by left-clicking on its tab and dragging it.
• RHEL 5 Desktop & Workstation (32/64-bit)                             Detach (undock) the view to drag it to a second monitor, or
                                                                       right-click on its name to add it to the FastView bar.
• RHEL 6 Workstation (32/64-bit)
                                                                       Import Example Projects
• Ubuntu Desktop Edition 12.04 LTS (32/64-bit)
                                                                       From the C/C++ perspective, select File - Import... -
• Mac OS X 10.7 (DS-5 Community Edition only)
                                                                       General - Existing Projects into Workspace.
                                                                       Activate Select archive file and choose an example .zip from
                                                                       \examples\example.zip.
                                                                       The examples are decompressed into your workbench
                                                                       directory and appear in the Project Explorer view.

                                                                   2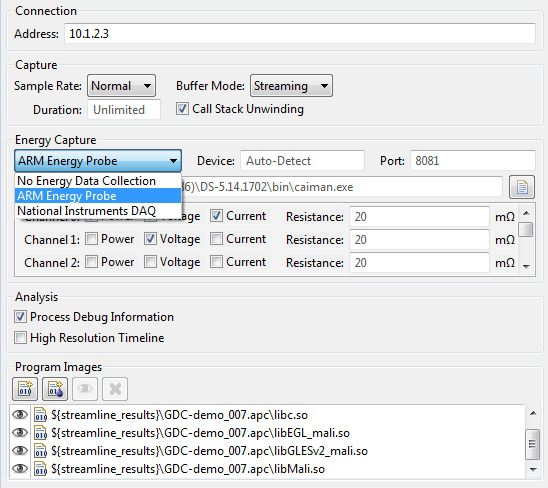
IDE, PROJECT MANAGER & TUTORIALS

                                                                                                                                 .c
Create and Build Projects
Right-click on the Project Explorer and select New - C or                    DS-5 Example Projects
C++ Project.
Select one of the six project templates in the DS-5 project
wizard: bare-metal executable or library, Linux executable,
shared library or static library, and makefile project. This                 DS-5 comes complete with a range of examples to get you
creates a new project with working pre-defined compiler                      started including:
settings.                                                                    • Startup examples include reset, MMU and cache
Template-based source and header files can easily be added to                  initialization code for ARM processors.
a project. Right click on the project in the Project Explorer                • Fireworks is a bare-metal example ported to the
view and select New - Source File.                                             Snowball, Beagle and Panda boards.
The DS-5 IDE includes powerful features to assist coding of                  • Distribution is a complete Linux distribution to enable
C/C++ and assembler files. These include syntax highlighting,                  driver and application development. N.B. requires
code auto-completion, and quick-jump to declaration of                         additional download.
variables and functions (F3 short-cut).
                                                                             • Gnometris is an open source Linux application similar
Find-in-files tools are grouped under the Search menu.                         to the game Tetris.
To make or build a project, select Project - Build.                          • Threads is a simple multi-threaded Linux application that
                                                                               illustrates how the tools handle multiple threads.
                                                                             • Xaos is an example fractal application, which comes with
   Source code editing features in DS-5 include C/C++/asm syntax
  coloring, code autocompletion, refactoring and function, class and           a pre-generated Streamline report.
                          variable definition.                               • Example_library demonstrates how to create a simple
                                                                               shared library in C for ARM Linux.
                                                                             • Application Rewind 1 & 2 allow you to rewind
                                                                               through two simple examples to locate software bugs
                                                                               using reverse debugging techniques.

                                                                           ARM Compiler Tutorials
                                                                           At ds.arm.com/tutorials, you can gain a deeper
                                                                           understanding of the ARM Compiler and the optimization
                                                                           techniques that it uses.
                                                                           By understanding how to control optimizations such as
                                                                           NEON™ autovectorization, instruction scheduling and
                                                                           common subexpression elimination, you can get the most out
                                                                           of your ARM processor and ensure that you have maximum
                                                                           visibility during debug.
                                                                           Other DS-5 tutorials available online include project
                                                                           management and code editing, Streamline performance
                                                                           optimization and bare metal, Linux and Android debugging.

                                                                       3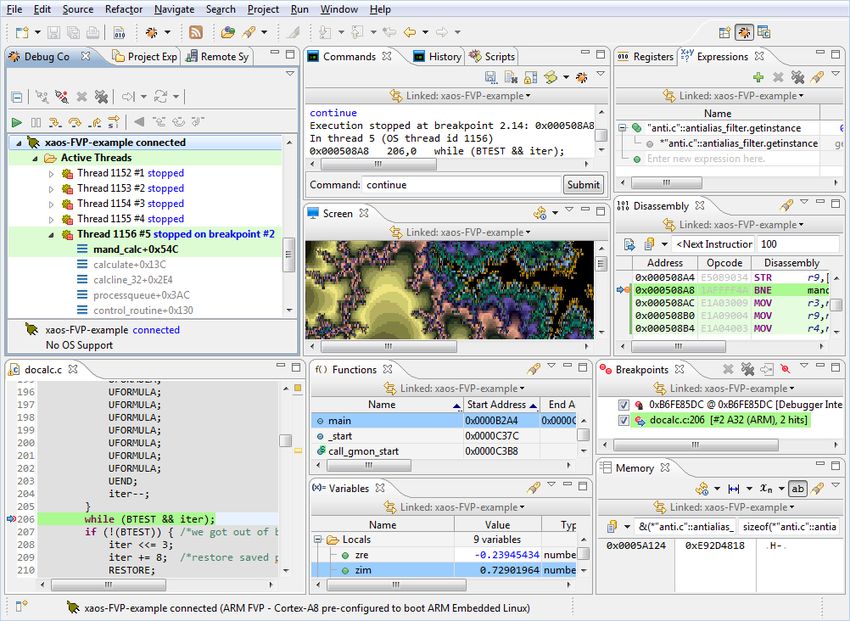
Quick Start Guide
ARM DS-5 DEVELOPMENT STUDIO TARGET CONNECTION & DEBUG UNITS

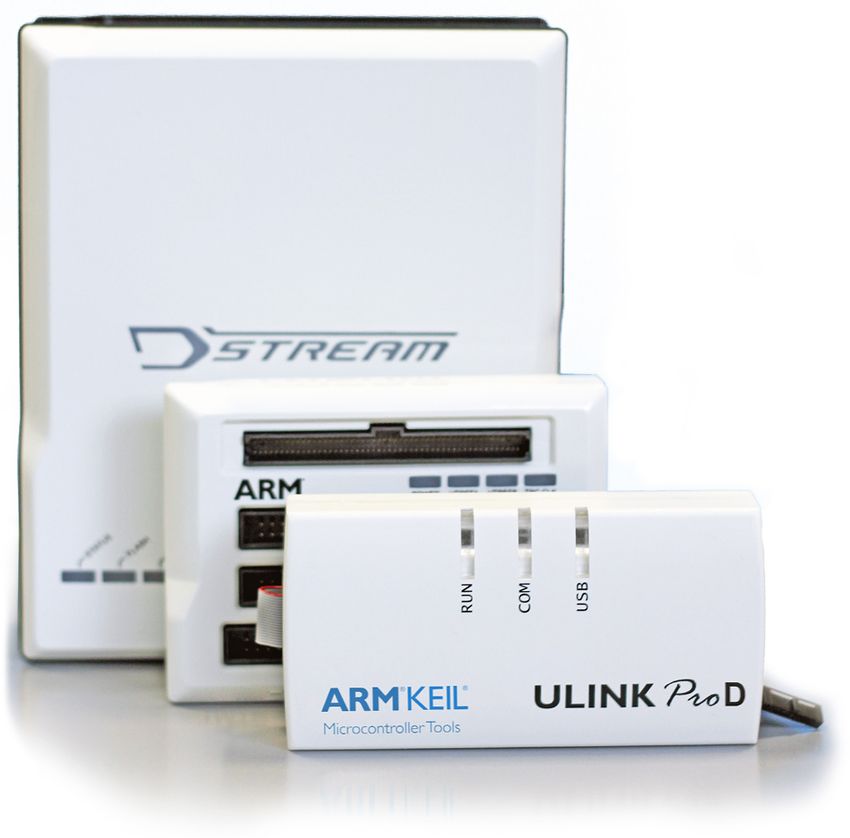
DSTREAM: High-Performance Debug & Trace                                                                     Left: DSTREAM
The DSTREAM™ Debug and Trace Unit provides DS-5                                                             Center: ULINKpro D
Debugger with low-level debug and trace connection to
hardware targets.
DSTREAM enables DS-5 Debugger to bring up a platform and
debug bare metal software in stop-mode, with full access to
the processor and system resources.
Thanks to its large buffer DSTREAM supports long-term
off-chip trace. This enables the debug of complex, time related
software bugs and performance optimization of critical code.
ULINKpro D: Easy Debug
The ARM Keil® ULINKpro™ family can be used with DS-5
for software debug on popular devices based on the ARM
Cortex®-M, Cortex-R and Cortex-A processor series.
An ideal fit for equipment manufacturers using off-the-shelf
processor devices, the ULINKpro family enables cost efficient
run-control debug on devices ranging from MCUs to multicore
application processors.
DS-5 Configuration Database                                           DSTREAM
DS-5 provides pre-configured JTAG and trace for catalog               Debug Interface            JTAG and Serial-Wire Debug
devices. Just choose a device on the Debug Configurations
                                                                      JTAG Speed                 60 MHz
dialog to connect the debugger to one of these targets.
                                                                      Download                   2.5 MB/s
The default DS-5 configuration database is stored on \sw\debugger\configdb.You can also add custom               Trace Buffer               4 GB
configuration databases by selecting Window - Preferences             Trace Speed                600 Mbps/pin (16-bit)
- DS-5 - Target Database.
                                                                      Trace Frequency            300 MHz DDR
Debugging Custom Devices
DS-5 ships with powerful tools for custom device bring-up:                       Learn more: ds.arm.com/dstream/
• CSAT: This command line-based tool enables manual
  control of the registers of a CoreSight™ Debug Access Port
  and script access to the IP blocks connected to it.                 ULINKpro D
• Debug Hardware Configuration: This graphical utility                Debug Interface            JTAG and Serial-Wire Debug
  reads the contents of a CoreSight ROM Table to auto-                JTAG Speed                 50 MHz
  configure the target connection. Manual configuration is also
                                                                      Download                   1 MB/s
  enabled.
                                                                      Trace                      ETB trace support
• ConfigDB Import: Use it to import the new debug
  hardware configuration into a configuration database. This          Supported Devices          Up to quad-core Cortex-A9
  utility outputs DTSL Python scripts (.py), which can be
                                                                                 Learn more: ds.arm.com/ulinkpro/
  used to manually modify the configuration of each IP block
  with a simple scripting language.

                                                                  4
LINUX & ANDROID APPLICATION DEBUG

Connecting to the Target
All you need to debug and analyze Linux applications on an             Application Rewind - Go Back to the Bug
ARM processor-based target is a TCP/IP connection between
the target and the host computer.
Android™ middleware and native application development
normally uses an Android Debug Bridge (ADB)                            User-space Linux application development in DS-5 is
connection over USB.                                                   assisted by Application Rewind, which allows you to
DS-5 Debugger supports both connection types and can use               “reverse debug” your software once an error has occurred.
them to automatically download applications into the target            Application Rewind runs on a lightweight debug agent on
file system, launch the gdbserver debug agent on the target            your target, so there’s no need for JTAG or CoreSight
and connect to it.                                                     instruction trace; simply connect over TCP/IP.
DS-5 includes gdbserver v7.0, which enables debugging                  Read more: ds.arm.com/application-rewind
NEON™ code and multi-threaded Android libraries.
Linux Target File System
DS-5 integrates a Remote System Explorer (RSE) to
access the Linux file system on hardware targets that support
the Secure Shell (SSH). The target must include a secure shell         Fixed Virtual Platforms (FVPs)
daemon (sshd) and sftp-server.
RSE enables the following functionality:
• Automated software image download: DS-5 Debugger                     Start bare metal and Linux software development without a
  uses RSE connections to automate the download of images              hardware target.
  to the target, executing gdbserver and connecting to it.
                                                                       DS-5 includes a sample FVP, which is a fast simulation model
• SFTP Files View: Access the target’s Linux file system using         of a complete ARM-based SoC with a processor, system
  an FTP connection. Navigate, copy, paste, drag and drop, and         memory, and peripherals such as keyboard, mouse, UARTs,
  edit files on the target.                                            Ethernet, and LCD.
• SSH Shell/Terminal View: Opens a shell or a terminal                 FVPs run at speeds comparable to the real hardware and
  window connected to the target in order to execute Linux             significantly cut your development time.
  commands, for example to run an application.
                                                                       To run the example applications, download the ARM Linux
Configure Remote System Explorer                                       distribution. When launched, the model automatically
Open RSE by selecting Window - Show View - Other... -                  boots Linux and enters a state in which you can load and
Remote Systems - Remote Systems.                                       debug your applications.
Click on the New Connection button. Select Linux and click             FVPs are configured to mount a Virtual File System
Next.                                                                  (VFS). The processor running in simulation can access files
                                                                       in the host computer’s file system as if they were part of its
Fill the host name box with the IP address of the target system,
                                                                       ARM Linux file system.
or its network name if it is registered on a DNS server. Define
a name for the connection and click Next.                              For 64-bit applications, the ARMv8 Architecture
                                                                       Envelope Model (AEM) is available for download for
In the next configuration steps choose the Secure Shell
                                                                       Linux, Android and bare-metal development.
(ssh) option, then click Finish.

                                                                   5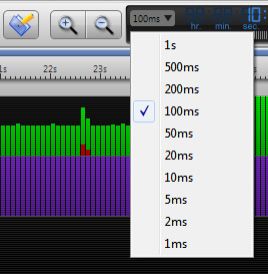
Quick Start Guide
ARM DS-5 DEVELOPMENT STUDIO DEBUG CONFIGURATION

Launching DS-5 Debugger
Click on the down arrow of the Debug button on the menu                  Debug and Trace Services Layer (DTSL)
bar, or right-click on the Debug Control View to open the
Debug Configurations dialog.
Right-click on DS-5 Debugger and select New, or browse
existing debug configurations. If you have imported the DS-5             DTSL is the ‘glue’ between the debugger and the target.
examples into the Workbench, the Debug Configurations                    This layer of the debugger is accessible from python scripts
Dialog is populated with pre-configured target connections.              which are used to configure the debug and trace settings for
Existing debug configurations can be launched by double                  individual components of the SoC and the overall topology.
clicking on the Debug Control View.                                      These scripts are auto-generated by the debugger and can
Add ELF images to the configuration for source level debug.              also be modified to extend debugger functionality or work
                                                                         around broken components on the SoC. Every device in the
Select Linux OS awareness or an RTOS per connection.                     DS-5 database has a corresponding DTSL Python script.
Use the DTSL options dialog to configure target specific                 When used in conjunction with the optional DSTREAM
options like PTM and ETM instruction and data trace, cross-              Template Development Kit (TDK) it is even possible to
triggers, clocks, power and ITM and STM instrumentation                  make the DS-5 debugger work with new user defined IP
trace.                                                                   blocks.

   Create a new DS-5                    Select a target from the
 Debug configuration and              configuration database, or a
   customize its name                    gdbserver connection

                                                                                                          In the Files tab, select an
                                                                                                        application and check “Load
                                                                                                        symbols” to enable source-
                                                                                                                 level debug.

  Customize and control                  Browse through the
  trace options from the               multiple tabs to configure
    DTSL configuration                    different IP blocks

                                                                     6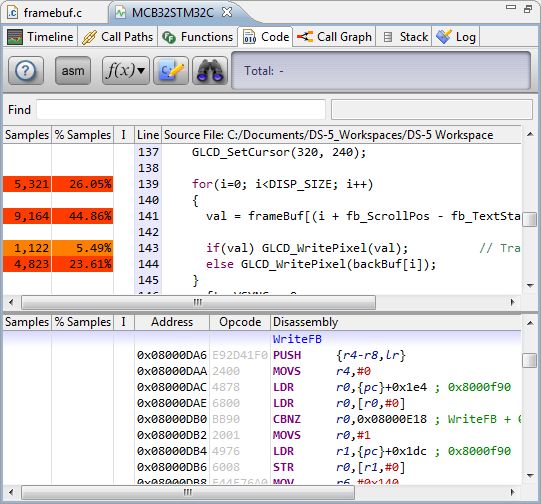
DS-5 DEBUG PERSPECTIVE

DS-5 includes a powerful graphical C/C++ debugger, opened                Each debug view is self-contained, so there is no need to
by launching the debugger from the Debug Configurations                  configure any options using the Eclipse main menu. Note that
dialog, or by clicking Window - Open Perspective -                       some of the debugger views, for example the Trace view, are
Other... - DS-5 Debug. Alternatively, the debugger can be                only enabled for JTAG target connections. Each view has an
used from the host’s command line interface, or driven by a              options toolbar with further functions which can be explored.
Jython script.
 Click to focus the system    Control target execution   Type GDB-style commands     Drag & drop lines from        Switch between C/C++
  views on a connection,      with source and assembly    with auto-completion and history view to scripts view     and DS-5 Debugger
core, thread or stack frame         level stepping                  help                to create a script              perspectives

    Fast View bar for         Source and assembly code    Click the down arrow for     Screen buffer and system   Link the view to the active
  minimizing often-used        views synchronized with   the sub-menu, to freeze and      views have multiple      connection, or to a fixed
      debug views                    color coding               replicate views           formatting options       connection or processor

                                                                     7
Quick Start Guide
ARM DS-5 DEVELOPMENT STUDIO DEBUGGER SYSTEM VIEWS
System Views
The variables view shows the value of all the application’s
variables under three groups: locals, file statics, and globals.
It also displays each variable’s type, size, value, and location
(either register or memory).
If you are interested in a defined set of variables or registers,
just type them or drag them to an expressions view. This
view also offers the flexibility to watch any C-like expression.
For bare metal development, use the register view to view
the processor, co-processor, NEON and peripheral registers
with the same format as in the target’s documentation.
The functions view lists all the functions in the target’s
application, and can be used to set breakpoints and trace
points, or navigate to the source code of a function.
Using the System Views
All the system views use color-coding to highlight content that
has recently changed, and most support drag & drop.
System views can be frozen or replicated for comparing
data between two points in time. Most views also accept C-like
expressions. For example, you can set the value of a register Address Modifiers
with an expression such as (*my_ptr) & 0xffffff.
The way the debugger accesses the memory system is
configured via the memory map.View the memory map with
the info mem command and configure it with mem. You can use address modifiers to select a certain type of
memory. For instance, if you type S:0x0, the debugger reads
Breakpoints and Watchpoints
the memory at address 0x0 in TrustZone™ secure mode.
Set new breakpoints or tracepoints by double clicking on
The following address modifiers are supported in DS-5:
the left column of the source code or disassembly views.
• P: Physical memory (MMU disabled)
Set new watchpoints (data breakpoints) by right-clicking on
a cell of the memory view or a global variable in the variable • S: TrustZone secure mode
or expression view. • N: TrustZone non-secure mode
Edit the properties of breakpoints to assign: • H: Hypervisor mode
• Condition: the breakpoint only stops the execution if the You can also debug a running target with direct access to
condition (a C-like expression) is evaluated true. memory via the CoreSight Debug Access Ports. Use the
• Ignore count: number of times the breakpoint is hit until prefix APB:, AHB: or AXI: to select a particular DAP
the application stops. interface to memory.
• Run script: the debugger performs an action (e.g log a For AArch64, memory spaces can be accessed for EL1N:,
message) automatically when the breakpoint is hit. EL1S:, EL2: and EL3: exception levels.
• Thread and virtual machine-specific breakpoints stop
the processor only when hit from a certain thread.
8INSTRUCTION, DATA & SYSTEM TRACE
Instruction and Data Trace
Instruction trace enables the non-intrusive debug of random CoreSight Library & Snapshot Viewer
time-related issues, which are difficult to replicate by stepping
through the code, and the performance analysis of critical
areas of software.
Data trace optionally records address and register values from The CoreSight on-target access library enables the
load and store instructions. Combined with the instruction software running on your ARM target to interact directly
trace this gives a complete record of execution. with CoreSight devices, enabling “flight-recorder” trace. This
When trace is enabled, DS-5 begins to capture instructions removes the need to attach an external debugger, allowing
and data. Trace can be downloaded from the trace buffer you to debug software crashes in the field. DS-5 includes an
at any time, or once the capture is complete. Trace data is example application to illustrate the use of the CoreSight
synchronized with the code view. library on a hardware target. The collected data can then be
exported for use in DS-5 Debugger.
System Trace
For easy use of the CoreSight on-target access library, DS-5
The Instrumentation Trace Macrocell (ITM) and System Debugger contains DS-5 snapshot viewer, which enables
Trace Macrocell (STM) provide high-bandwidth, low latency you to open register values, memory values and debug
“printf-style” instrumentation links. ITM and STM output is symbols captured from software in the field. For instance,
routed to the on-chip trace bus, and can be collected by the this allows you to analyze trace data collected during a
debugger and displayed in its Event Viewer or exported to a crash dump.
text file. Using the CoreSight Global Timestamp, trace from
all these sources can be synchronized and cross referenced.
Using Tracepoints and Filters Use the Capture Device, Heat map of activity and
Source and Ranges tabs to percentage activity to
By default, DS-5 traces everything executed by a processor configure trace identify local hotspots
into a circular buffer.
Trace start and trace stop points enable you to restrict
trace to certain areas of the code. This is useful to optimize
the analysis of certain functions when tracing to an ETB, or to
prevent ETM FIFO overflows when the trace port is slow.
Ranges (also called filters) can be used in conjunction with
trace start and trace stop points. They enable you to select an
address range outside of which trace is always disabled.
Triggers are highlighted in the trace view and the tools can be
configured to collect trace around, before, or after the trigger.
Just check the ETM Triggers Halt Execution box in the
debug configuration menu to trace around a trigger point.
Trace Requirements
Trace typically requires a JTAG connection to devices featuring
an Embedded Trace Macrocell (ETM) or Program Trace
Macrocell (PTM). Data trace is not available on all cores. The From the Trace view, synchronize other views using
amount of trace recorded is limited by the size of the on-chip timestamps, view address and values for memory
accesses, and view tracepoints and triggers embedded in
Embedded Trace Buffer (ETB). If you need a larger buffer;
the trace list
trace off-chip to the 4GB buffer in DSTREAM.
9Quick Start Guide
ARM DS-5 DEVELOPMENT STUDIO PERFORMANCE ANALYSIS
ARM Streamline Performance Analyzer is a system-level
performance analysis tool for Linux and Android systems. It
uses sample-based profiling, Linux kernel trace and software Streamline for RTOS
annotation techniques.
Setting up your system
To get started with Streamline you need: New to DS-5 is the ability to profile and optimize RTOS
• TCP/IP connection to the target, using WiFi, Ethernet or and bare-metal software on Cortex-M3 and M4 processors
ADB over USB (Android targets). using Streamline.
• Enable Linux kernel config options required by gator. Making use of the Data Watchpoint and Trace (DWT)
and Instrumentation Trace Macrocell (ITM), Streamline
• Build the gator.ko module and gator daemon from
connects through DSTREAM to collect system information
\arm\gator\ with the target’s Linux kernel.
with near-zero intrusion.
In addition you can get more out of Streamline if you:
• Add frame pointers to your application and libraries using
the -fno-omit-frame-pointer compiler flag. This allows Turning on event based sampling is
Streamline to generate call-path reports. reflected in the Streamline report
• Annotate your code with a printf-style interface to the
gator driver, to highlight important software events.
• Add custom counters to the gator driver.
• Connect an ARM Energy Probe or NI DAQ to the
target to measure voltage and current consumption.
Launching Streamline
In Eclipse, open the ARM Streamline Data View. By default
Streamline generates profiling reports by sampling the program
counter at a constant time interval.
When you enable event-based sampling, Streamline takes
samples when an event counter reaches the threshold value
selected. For example, event-based sampling can be used to
explore which parts of the code are causing cache misses.
The simplified
Streamline Data
view generates and
analyzes reports
with a double-click Select energy measurement Streaming data over TCP/
tool and set shunt resistor IP enables long-term data
Counter Configuration values capture
Open the counter configuration panel to view and select Call path and stack reports Streamline generates
from available counters, as well as importing custom counters. are enabled by checking call source-code level reports
For event-based sampling, the event threshold can also be set. stack unwinding for selected images
10STREAMLINE PROFILING REPORTS
Navigating a Streamline report Start from a high-level Isolate and expand on a
analysis and drill down to period of time with the
Streamline provides a comprehensive, intuitive report on source code level caliper tool
overall system performance, from big.LITTLE CPU clusters
to interconnect fabric, GPUs and also MCUs. Streamline
enables analysis of the interaction between software and all the
critical hardware components in complex SoCs.
Start with the Timeline pane which provides a complete time
orientated view of performance and highlights areas of interest.
Drill down to function level using the other views.
Use the tabs to navigate between the panes. Or, right-click on a
function name to highlight it in another pane.
Detailed analysis
Average performance and hot functions can be assessed
immediately in the Call Paths and Code views. Anomalies
can be identified visually from charts, with reference to the
Filmstrip or with a user defined printf-like Annotation.
Once identified, the calipers can be used to isolate a region of
the timeline and recalculate the other reports.
The process heat map can be switched to focus on kernel
scheduling or GPU activity by clicking on the green button.
CPU Wait charts reveal why the Linux kernel rescheduled a
thread, for example, due to blocking a I/O operation.
Switch process/thread heat Heat map of activity can be
map between alternative broken down per cluster or
sources core in X-ray mode
11Quick Start Guide
ARM DS-5 DEVELOPMENT STUDIO
Streamline Quick Reference Hints & Tips
Connect an ARM Use X-ray mode for per Capture GPU activity and Filter threads to Hover over charts to use
Energy Probe for energy core and per cluster thread data from Mali OpenGL ES reconfigure the heatmap the quick access tooltip for
measurements activity and OpenCL drivers and charts data at a glance
Quickly zoom to pre- Blue dashes show CPU Highlight a subset of Expand charts per core and Easily create charts for
defined time levels, or use contention, red show delay processes to focus on their threads per process, and counter ratios with the
the magnifier caused by IO overall impact configure expressions Snippets menu
All brand names or product names are the property of their respective holders. Neither the whole nor any part of the information contained in, or the product described in, this document may
be adapted or reproduced in any material form except with the prior written permission of the copyright holder. The products described in this document are subject to continuous developments
and improvements. All particulars of the product and its use contained in this document are given in good faith. All warranties implied or expressed, including but not limited to implied warranties
of satisfactory quality or fitness for purpose are excluded. This document is intended only to provide information to the reader about the product. To the extent permitted by local laws ARM shall
not be liable for any loss or damage arising from the use of any information in this document or any error or omission in such information. Copyright © 2014 ARM Ltd.
Program examples and detailed technical information are available from your distributor and our web site (ds.arm.com). © ARM Ltd. | DS-5 Quick Start Guide | 02.14You can also read


