Forest Master Direct Drive Garden Mulcher - Model: FM6DD-MUL/FM6DDES-MUL/FM4DDE-MUL - IMPORTANT: Read this manual fully before assembly and use ...
←
→
Page content transcription
If your browser does not render page correctly, please read the page content below
Forest Master Direct
Drive Garden Mulcher
Model: FM6DD-MUL/FM6DDES-MUL/FM4DDE-MUL

                                      FM6DD-MUL

         FM4DDE-MUL

IMPORTANT: Read this manual fully before assembly and
use and observe all safety rules and operating instruc-
tions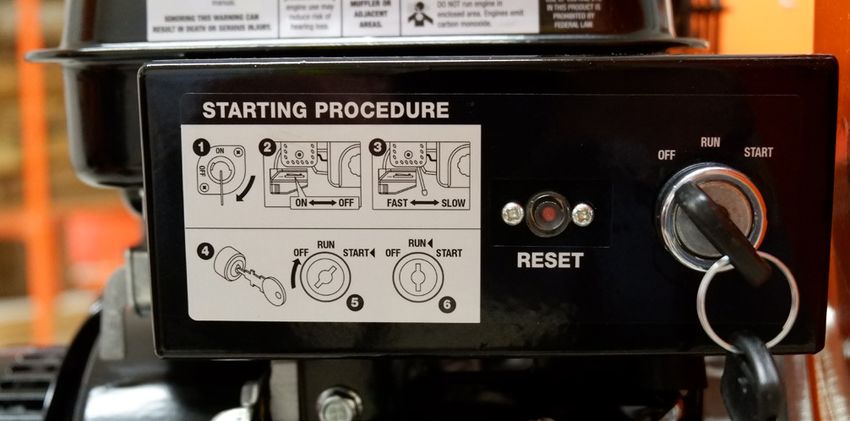
Thank you for purchasing the Forest Master Direct Drive Mulcher. We hope you are
               100% satisfied with your product but if you have any questions or queries, please
               don’t hesitate to contact us:
Your Product

               Forest Master Ltd                                Sales Tel: +44 (0)191 265 5000
               Industry Road                                     Email: info@forest-master.com
               Heaton                                          Website: www.forest-master.com
               Newcastle Upon Tyne                 Technical Enquiries Tel: +44 (0)191 276 6553
               NE6 5XB

               About Your Product
               This manual is for models:
               FM6DD-MUL - 6hp Petrol Engine
               FM6DDES-MUL - 6hp Petrol Engine with Electric Start
               FM4DDE-MUL - 4hp Electric Motor

               The FM6DD-MUL, FM6DDES-MUL and FM4DDE-MUL are garden mulchers designed
               to mulch weeds, greens, leaves, animal fodder, beet, potatoes, carrots, apples,
               etc. They will also mulch cardboard & paper. NOTE: Do not insert garden waste
               that contains stones, plastic, metal or any other objects may damage the blades
               Cardboard and paper must be free of staples.
               Please thoroughly read the safety instructions and guidelines and make sure you
               are familiar with them before use.

               CE Regulation Parts
               To comply with CE regulation (countries within the EU), the Hopper Safety Plate (9)
               must be installed for your own safety (Check exploded diagram for parts).

               For non-CE regulation (e.g. use in the United States or outside of Europe) these
               parts can be removed to make the mulcher easier to use, but at the risk of your own
               safety. Forest Master Ltd will accept no responsibility for injuries caused by using
               the mulcher without these parts installed.

               The drum can be rotated to change the angle of the feed hopper and the discharge
               chute. Note however that for CE regulations the exit of the discharge chute should
               be no more than 30mm from the ground. The chipper is shipped with the drum set
               at the correct position for this.

 2             Forest Master Model: FM6DD-MUL/FM6DDES-MUL/FM4DDE-MUL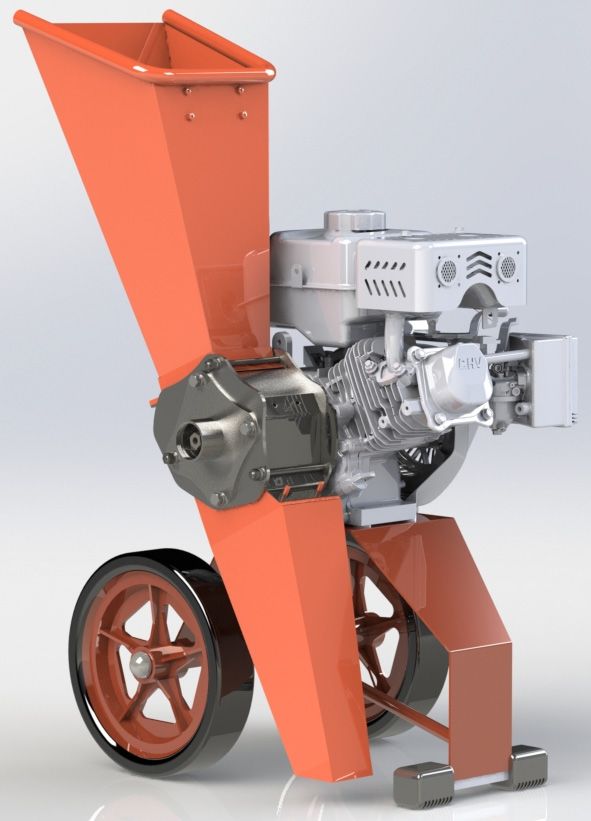
Contents

  Title                                      Page No.

  Specifications                                4

                                                        Contents
  Safety Instructions                           5

  Assembly                                      8

  Operation                                    13

  Maintenance                                  17

  Troubleshooting                              18

  Warranty                                     21

  Exploded Diagram (FM6DD-MUL/FM6DDES-MUL)     22

  Parts List (FM6DD-MUL/FM6DDES-MUL)           23

  Exploded Diagram (FM4DDE-MUL)                24

  Parts List (FM4DDE-MUL)                      25

Forest Master Model: FM6DD-MUL/FM6DDES-MUL/FM4DDE-MUL   3
Specification        FM6DD-MUL / FM6D-                FM4DDE-MUL
                                          DES-MUL
Specifications

                                      LCT Maxx 6hp 208cc 4          Forest Master 4hp
                 Engine/Motor
                                             Stroke                2800W Electric Motor

                 Fuel/Input                    Petrol                      230V

                 Mulcher Blade        Twin Reversible Blades       Twin Reversible Blades

                 Overall Height               780mm                       780mm

                 Overall Length               910mm                       910mm

                 Overall Width                480mm                       390mm

                 Weight                         38kg                       35kg

                 Max Drum RPM                3600rpm                     2800rpm

                 Max Feed Diameter          50mm / 2”                   50mm / 2”

                 Starting Mechanism   Pullstart / Electric Start            N/A

 4               Forest Master Model: FM6DD-MUL/FM6DDES-MUL/FM4DDE-MUL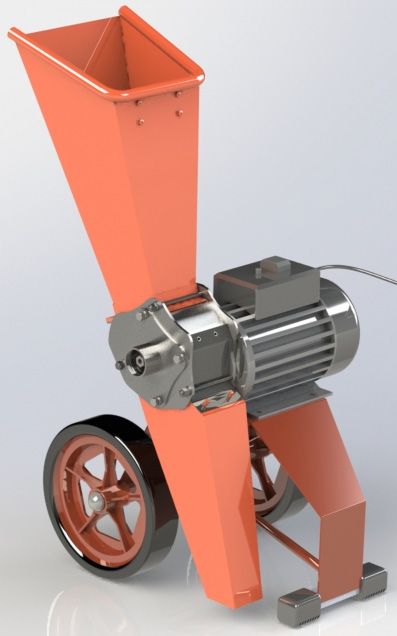
Safety Instructions
General Safety

•   The person using the machine must have adequate knowledge of the functioning
    and operation of the machine and must have read the manual.
•   Operators must be over the age of 18 and must not be under the influence of
    alcohol, drugs or any other substance that has an adverse effect on reaction

                                                                                        Safety
    speed.
•   The material to be fed into the machine should only be garden waste, etc, that is
    free from nails, screws etc.
•   The machine should be positioned on dry, level ground in the proper upright
    position and there must be no tripping or slipping hazards in the vicinity that
    could cause harm to the operator.
•   Make sure the blades are in good condition and secure.
•   Check that all bolts are tight and secure, especially on the hopper and discharge
    chute.
•   Only use the mulcher in adequate lighting (i.e. sunlight or sufficient artificial
    light).
•   Never use either the petrol or electric mulcher in the rain.

Operation Safety

•   When operating the mulcher, always wear gloves, ear defenders, helmet and
    visor or safety glasses and appropriate clothing. Do not wear loose clothing or
    jewellery.
•   The mulcher should be operated by one person only. Any other bystanders must
    always be at least 50 feet from the work area.
•   Do not operate the FM6DD-MUL inside or in a confined space; the exhaust from
    the engine contains carbon monoxide which is poisonous.
•   Never overload or attempt to mulch waste beyond the manufacturer’s
    recommendation. It could result in personal injury or damage to the machine.
•   Never place any part of your body inside the feed hopper or the discharge chute.
    Fragments of garden waste that have not self-fed into the machine should only
    be pushed with other garden waste that you are feeding into the mulcher.
•   If the mulcher gets jammed you must immediately stop the engine or motor.
•   Obstructed fragments inside the hopper should only be removed when the motor
    is turned off and the drum has stopped rotating.
•   Never leave the mulcher unattended while the motor is running.
•   Never move in front of the discharge chute.
•   Ensure no fragments remain inside the mulcher when turning it off.
•   Always take into account the time delay needed from switching the machine off
    for the knife drum to come to a halt.

Forest Master Model: FM6DD-MUL/FM6DDES-MUL/FM4DDE-MUL                                   5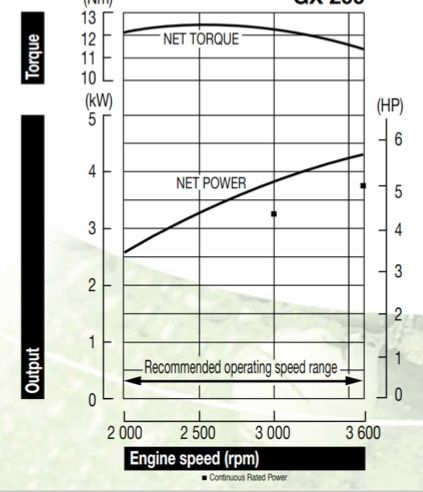
•   If the machine starts to make an unusual noise or vibrate, shut down the engine,
             disconnect the spark plug wire (FM6DD-MUL) or plug socket (FM4DDE-MUL),
             wait 5 minutes for the engine or motor to cool down, then inspect for damage.
             Vibration is generally a warning of trouble. Check damaged parts and clean,
             repair and/or replace as necessary.
         •   If the machine topples over during operation, immediately turn off the engine or
             motor and for the FM4DDE-MUL model, disconnect the power cable.
         •   When using the FM4DDE-MUL, always use on a circuit that has an RCD to prevent
Safety

             the chance of an electric shock.

         Safety with Maintenance

         •   Inspection and maintenance must be done with the motor and driving unit
             switched off and the spark plug cap removed (FM6DD-MUL) or power cable
             (FM4DDE-MUL) disconnected. Wait 5 minutes for the engine or motor to cool
             down.
         •   Any worn or damaged parts must be replaced, to ensure that the mulcher
             is maintained and in a safe state. Only use Forest Master spare parts for
             replacements. Contact us to arrange.
         •   Never use the mulcher with damaged or worn cables.
         •   Never, under any conditions, remove, bend, cut, fit, weld or otherwise
             alter standard parts on the mulcher. This includes all shields and guards.
             Modifications to your machine could cause personal injuries and property
             damage and will invalidate your warranty.
         •   Never use a pressure washer or running water to clean the engine or motor. This
             might lead to water ingress in the engine or the bearings (invalid warranty). Do
             not use any aggressive cleaning products. The inside of the feed and discharge
             chutes and drum can be cleaned with a pressure washer.
         •   Never transport the mulcher with the motor still running.
         •   Prior to transport, use appropriate fixing materials to fasten the mulcher to the
             fixing points on the load surface.
         •   Prior to storing the machine, make sure that it has been restored to a sufficient
             state (i.e. clean and free from debris). Apply oil to the knives, the knife drum
             and the bearings to protect them from corrosion. This is especially the case for
             storage during long periods of inactivity of the appliance.
         •   Store the machine in a dry, closed room, out of children’s reach.

6         Forest Master Model: FM6DD-MUL/FM6DDES-MUL/FM4DDE-MUL
Safety with Petrol (FM6DD-MUL)
Petrol is a highly flammable liquid. Petrol also gives off flammable vapour that can
be easily ignited and cause a fire or explosion. Never overlook the hazards of petrol.
Always follow these precautions:
• Never run the engine in an enclosed area or without proper ventilation as the
exhaust from the engine contains carbon monoxide, which is an odourless,
tasteless and a deadly poisonous gas.
Safety
• Store all fuel and oil in containers specifically designed and approved for this
purpose and keep away from heat, open flame and the reach of children.
• Replace rubber fuel lines and grommets when worn or damaged and after 5
years of use.
• Fill the petrol tank outdoors with the engine off and allow the engine to cool
completely. Don’t handle gasoline if you or anyone nearby is smoking, or if
you’re near anything that could cause it to ignite or explode. Re-install the fuel
tank cap and fuel container cap securely.
• If you spill petrol, do not attempt to start the engine. Move the machine away
from the area of the spill and avoid creating any source of ignition until the gas
vapours have dissipated. Wipe up any fuel to prevent fire hazard and properly
dispose of the waste.
• Allow the engine to cool completely before storing in any enclosure. Never store
a machine that has gas in the tank, or a fuel container, near an open flame or
spark such as a water heater, space heater, clothes dryer or furnace.
• Never make adjustments or repairs with the engine running. Shut down the
engine, disconnect the spark plug wire, keeping it away from the spark plug
to prevent accidental starting, wait 5 minutes before making adjustments or
repairs.
• Never tamper with the engine’s governor setting. The governor controls the
safe operation speed and protects the engine. Over-speeding the engine is
dangerous and will cause damage to the engine and to the other moving parts
of the machine. If required, see your authorised dealer for engine governor
adjustments.
• Keep combustible substances away from the engine when it is hot.
• Never cover the machine while the exhaust is still hot.
• Do not operate the engine with the air cleaner or carburettor air intake cover
removed. Removal of such parts could create a fire hazard. Do not use flammable
solutions to clean the air filter.
• The exhaust and engine become very hot and can cause a severe burn; do not
touch.
This list of warnings and cautions cannot be all-inclusive. If situations occur
that are not covered by this manual, the operator must apply common sense and
operate the mulcher in a safe manner. Contact the dealers for assistance in your
area.
Forest Master Model: FM6DD-MUL/FM6DDES-MUL/FM4DDE-MUL 7Assembly Parts
Part Part
Part Name Qty. Part Name Qty.
No. No.
Engine/Motor with Drum 60 1 M8 Washers 33 8
Assembly
Base 42 1 M8 Spring Washer 30 4
Feed Hopper 1 1 M8 Nut 57 4
Discharge Chute 34 1 M8x110 Bolt 49 2
Axle 46 1 M8 Serrated Washer 55 2
Wheels 43 2 M6x23 Bolt 51 1
Split Pin 45 2 M6 Washer 41 3
16mm Washer 47 2 M6 Spring Washer 59 3
Dome Cap 48 2 M6x12 Bolt 50 2
M8x35 Bolts 56 4 M3 x 60 Bolt 39 2
M3 Nut 40 2
Assembly
Note that the majority of bolts specified are loosely fitted in their correct loca-
tion for shipping.
1. Lay all the parts out flat in a suitable assembly area and check to make sure all
parts are there.
2. Slide the axle (46) into the square tubing of the base (42) and place a 16mm flat
washer (47) on each end of the axle.
3. Next, place the wheels (43) on each end of the axle (46) and secure with a split
pin (45) through the small holes on the outer of the axle (46).
4. Finally, place each dome cap (48) on the ends of the axle (46) and secure the cap
by tapping it with a mallet or hammer.
48 42
45
45
47
43
47
46
43
48
8 Forest Master Model: FM6DD-MUL/FM6DDES-MUL/FM4DDE-MUL5. Place the engine/motor (60) on top of the base (42), lining the engine/motor
mounting holes with the bolt holes of the base.
6. Fastening the engine and motor through the following methods:
Engine (FM6DD-MUL/FM6DDES-MUL)
For the electric start FM6DDES-MUL, see page 10 for instructions on mounting
the battery tray, this is secured using the bolts that also secure the engine so
Assembly
must be attached at the same time.
Fasten the engine (60) with the M8 bolts (56), M8 washers (33), M8
spring washers (30) and M8 nuts (57). The order of assembly is:
[Bolt] – [Washer] – [Base] – [Engine] – [Washer] – [Spring Washer] – [Nut].
Motor (FM4DDE-MUL)
Fasten the motor (60) with the M8 bolts (56), M8 washers (33) and M8 Lock Nuts
(57). The order of assembly is:
[Bolt] – [Washer] – [Base] – [Motor] – [Washer] – [Lock Nut].
57
30
57
33
60 33
60
42 42
33
33
56
56
FM6DD-MUL FM4DDE-MUL
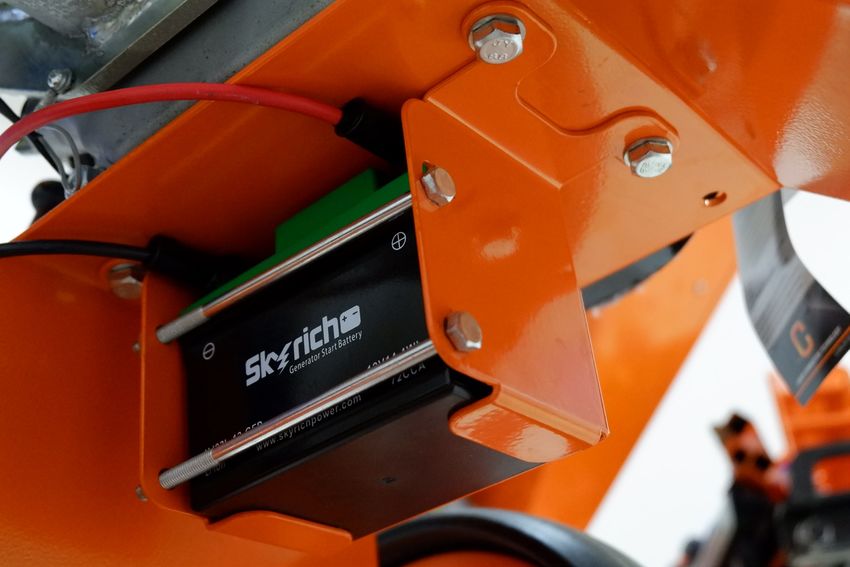
Forest Master Model: FM6DD-MUL/FM6DDES-MUL/FM4DDE-MUL 9FM6DDES-MUL Battery tray attachment
Part
Part Name Qty.
No.
Battery Tray 70 1
M5x125 Bolt 71 2
Assembly
M5 Nut 72 2
Battery 73 1
Ignition Key 74 2
Attach the battery tray (70) to the underside of the base (42) using the 4 M8x35
bolts (56) and 4 M8 washers (33) that also secure the engine to the base.
33
56
71
33
70
56
72
Connect the battery wires to the terminals on the battery (red to positive(+)). Place
the battery on the tray and secure using the two M5 x 125 bolts (71) and nuts (72).
10 Forest Master Model: FM6DD-MUL/FM6DDES-MUL/FM4DDE-MUL7. Place the feed hopper (1) on the drum housing (14) so that the flange on the
upper face of the feed hopper between the top face of the drum housing and the
upper drum mounting bolt.
8. Fasten the bottom of the feed hopper (1) to the drum housing (14) using the
M6 bolts (51) the M6 washer (41) and the M6 spring washer (59). There is a
thread in the drum housing to fasten the bolt into. The order of assembly is:
Assembly
[Bolt] – [Spring Washer] – [Washer] – [Feed Hopper] – [Drum Housing].
1
51
41
59
14
Forest Master Model: FM6DD-MUL/FM6DDES-MUL/FM4DDE-MUL 119. Slide the discharge chute (63) up under the drum housing (14)and insert the
flange on the top edge of the discharge chute between the lower face of the
drum housing and the rearmost lower drum mounting bolt. The two bolts on the
top of the chute should locate through the two holes on the drum flange.
10. Fasten the two bolts on the discharge chute (63) to the top of the drum housing
(14) using the M6 nuts (38), M6 spring washers (59) and M6 washers (41). The
Assembly
order of assembly is: [Nut] – [Spring Washer] – [Washer] – [Discharge Chute] –
[Drum Housing].
38
14
59
41
63
STEP 9
STEP 10
11. If in the EU/UK fit the 2 M3x60
bolts (39) and M3 nuts (40)
through the holes in end of the
discharge chute.
12. The petrol engine is shipped
dry of oil. It must be filled
with 600ml of oil before use.
It must be filled with the
mulcher on level ground, do
not tilt it. It is recommended
to use 5W-30 in winter and
10W-30 in summer. M3x60 BOLTS
12 Forest Master Model: FM6DD-MUL/FM6DDES-MUL/FM4DDE-MULOperation
• Position your mulcher on flat, dry ground and make sure the machine cannot be
moved.
• Before starting, manually turn the drum to make sure it is not obstructed and
moves smoothly. Twist off (anticlockwise) the black plastic cover in the centre of
Operation
the drum housing. Using your forefinger and thumb to grasp the hexagonal part
of the drum shaft (not the black bolt in the centre), rotate the drum both ways,
it should turn easily. With the FM6DD-MUL & FM6DDES-MUL you cannot turn the
drum all the way round but you should be able to turn partially both ways. Do
not use a socket to rotate it.
• Before starting the lower hopper bolt (51) must be nipped tight by hand or the
mulcher will not start. Tighten by a 1/4 turn at a time until it starts.
USE TO TURN
DO NOT TURN
Engine Operation for FM6DD-MUL/FM6DDES-MUL Petrol Mulcher
DO NOT START THE ENGINE FOR THE FIRST TIME WITHOUT FILLING WITH 600 ml
OF OIL. The engine may have oil residue but the engine is not supplied pre-filled.
STARTING THE ENGINE
FM6DD-MUL Pull Start
• Make sure the fuel shut-off valve is in the “ON” position.
• Move the choke control lever to the “CHOKE” position (should only be needed if
the engine is cold or not starting).
• Move the throttle control lever to the “FAST” position.
• Turn the ignition switch to the “ON” position.
• Grasp the recoil starter handle and slowly pull until you feel resistance. If the
pull start is tight on the FM6DD-MUL, the mulcher has a blockage and should be
cleared before starting. Let the cord retract a little bit then pull the cord rapidly
to start the engine. One or two pulls usually starts the engine.
• Move the choke lever (if used for cold engine) slowly back to the “RUN” position
when the engine is running well.
• Warm up the engine by running the engine at half throttle for 1 to 2 minutes,
then advance the engine throttle control to mulching speed.
Forest Master Model: FM6DD-MUL/FM6DDES-MUL/FM4DDE-MUL 13NOTE: Higher revs does not necessarily mean more
torque to the blade drum. As you can see from
the power map, the highest amount of torque is
achieved around the 2500 rpm mark, and therefore
is the most efficient speed to maintain the engine
for mulching. We advise you do not increase the
Operation
revs to the maximum for mulching unless required,
as this works the engine harder for less results and
could shorten the long-term life span of the engine
(and use more petrol).
FM6DDES-MUL Electric Start
• Make sure the fuel shut-off valve is in the “ON” position.
• Move the choke control lever to the “CHOKE” position (should only be needed if
the engine is cold or not starting).
• Move the throttle control lever to the “SLOW/IDLE” position.
• Before starting your FM6DDES-MUL, you should test the pull start to ensure that
the cord isn’t tight.
• Turn the ignition key to the “Start” position. As soon as the engine starts, allow
the key to turn back to the “Run” position. If the engine does not start straight
away, DO NOT HOLD THE KEY IN THE “START” POSITION AS YOU WILL FLOOD
THE ENGINE.
• Move the choke control lever (if used for cold engine) slowly back to the “RUN”
position when the engine is running well.
• Warm up the engine by running the engine at half throttle for 1 to 2 minutes,
then advance the engine throttle control to the maximum speed.
• If the electric start does not turn the engine over then the battery may have
insufficient charge. Start the engine using the pull start. The engine will trickle
charge the battery, 30 minutes of running should provide sufficient charge to
start the next time.
14 Forest Master Model: FM6DD-MUL/FM6DDES-MUL/FM4DDE-MULStopping the Engine
Ensure no fragments remain inside the mulcher when turning it off. Allow to run for
1 min without feeding in any material before stopping the chipper. This will help to
avoid the risk of blockage for the next time you start the machine.
• Move the throttle lever to “IDLE”
• Turn the ignition switch to the “OFF” position.
Operation
Engine Operation for FM4DDE-MUL Electric Mulcher
Starting the Motor
• Plug the power cable into a 230V mains socket or extension cable that is no
longer than 10m and has a wire size of 2.5mm2. The extension cable must be no
thinner than the cable fitted to the mulcher. For the UK the motor plug is fitted
with a 13 amp machine fuse and the motor is protected by a 10 amp trip . EU
models are fitted with a 16 amp plug and a 13 amp trip. Do not use any type of
fuse other than a machine fuse.
• Press the green “ON” button.
• Run the motor for 1 - 2 minutes to ensure the mulcher is running freely before
use.
Stopping
Ensure no fragments remain inside the mulcher when turning it off. Allow to run for
1 min without feeding in any material before stopping the chipper. This will help to
avoid the risk of blockage for the next time you start the machine.
• Press the red “OFF” button.
• Disconnect the power cable from the mains socket.
Mulcher Operation
• Do not place any part of your body into the chute when loading. This is a very
unsafe method and could result in serious injury.
• Do not reach or step across the exit chute whilst the mulcher is running. This is
very unsafe and could result in serious injury.
• The mulcher works best with the discharge chute pointing downwards as it
reduces the chance of the mulched material blocking the discharge chute.
• Do not use the mulcher in wet conditions.
• If mulching wet material the discharge chute should point fully down.
• When loading garden waste, etc, place against the bottom side of the chute
and let the machine take the garden material into the blades. Do not push the
material into the blades as this could damage the machine.
• Do not over load the mulcher. Let previous material go through the blades before
adding more.
Forest Master Model: FM6DD-MUL/FM6DDES-MUL/FM4DDE-MUL 15• Always wear gloves, ear defenders, helmet and visor or safety glasses and
appropriate clothing when operating the mulcher.
• Do not feed the mulcher any foreign materials (stones, metal, plastic, string,
textile etc.)
• Do not use implements (i.e. fork or shovel) to feed the machine, especially not to
push the garden waste through.
Operation
• The mulcher can be used to chop paper, cardboard, cartons, etc. Ensure all
staples and tape are removed.
Removing A Blockage from the Mulcher
• Never attempt to unblock the machine whilst the mulcher is running.
• If the drum stops while mulching, stop the engine IMMEDIATELY and remove the
spark plug (FM6DD-MUL/FM6DDES-MUL) or disconnect the power cable (FM4DDE-
MUL).
• Unhinge either the feed hopper or discharge chute by removing the bolt and
washers on the bottom of chute and lifting it upward to allow access to the
drum. Remove items that are blocking the drum and then restart the machine.
• If the blockage cannot be removed by hand, then it is possible to rotate the drum
in reverse. On the drum side of the mulcher, remove the plastic cap by twisting
off anticlockwise and beneath there is a hexagonal section of the drum shaft that
can be turned (use a 17mm socket) to rotate the drum in reverse.
• If the blockage is cleared you should be able to rotate the drum by grasping the
hexagonal shaft with your thumb and forefinger.
• DO NOT rotate the drum by the smaller inner black bolt.
USE TO TURN
DO NOT TURN
16 Forest Master Model: FM6DD-MUL/FM6DDES-MUL/FM4DDE-MULChanging the Feed and Discharge Angles
To slow down or speed up the feed rate, or to alter the discharge angle, the drum
housing can be rotated to change the angle of the feed hopper and the discharge
chute. The drum housing can be rotated by a maximum of 40 degrees.
Operation
Note however that for CE regulation compliance, the exit of the discharge chute
should be no more than 30mm from the ground. The chipper is shipped with the
drum set at the correct position to comply with this.
Loosen the 3 nuts shown, just Rotate the drum housing to the
sufficiently until the drum housing required angle then tighten the nuts.
is free to rotate. DO NOT remove the The square shoulder of the coach
nuts. bolts must remain located in the slots
in the back plate.
Maximum Hopper Angle Minimum Hopper Angle
CE Position
Forest Master Model: FM6DD-MUL/FM6DDES-MUL/FM4DDE-MUL 17Maintenance
Regular maintenance is the way to ensure the best performance and long life of your
machine. Please refer to this manual and the engine manufacturer’s user manual for
maintenance procedures.
Maintenance
Before performing any maintenance procedure or inspection, stop the engine, wait
five minutes to allow all parts to cool. Disconnect the spark plug wire (FM6DD-MUL/
FM6DDES-MUL) or the power cable (FM4DDE-MUL).
Regular Maintenance Checklist
Before Each Every 25 Every 100
Procedure
Use Hours Hours
Check Engine Oil Level X
Check General Equipment Condition X
Check Blades for Sharpness and Wear X
Clean Engine Exterior and Cooling X
Change Engine Oil X
Replace Air Filter X
Replace Spark Plug X
Engine Oil (FM6DD-MUL/FM6DDES-MUL)
Do not use the dipstick of the engine on the FM6DD-MUL/FM6DDES-MUL to check the
oil level. Due to the conditions under which the mulcher may be used, the dipstick
is not accurate enough, the engine must have 600ml of oil. To ensure the oil level is
sufficient, place the mulcher on level ground, remove the oil cap on the side of the
engine (next to the discharge chute) and make sure that the oil is full to the brim of
the cap. If not, add oil until it flows out of the hole, replace the cap and wipe off any
excess oil. Do not tip the mulcher up to fill with oil.
Engine/Motor Servicing
For the service of the petrol engine (FM6DD-MUL/FM6DDES-MUL) refer to the engine
manufacturer’s user manual. If you need help accessing the manual, contact Forest
Master.
Charging The Battery
The engine will trickle charge the FM6DD-MUL starter battery while it is running.
If however the battery has insufficient charge, use a trickle charger. Fully charged
battery should be more than 12.9 volts. Charging will be easier if the battery is
removed from the battery tray.
18 Forest Master Model: FM6DD-MUL/FM6DDES-MUL/FM4DDE-MULReplacing and Sharpening the Blades
To remove the blades for sharpening or replacement you will need an appropriate
16mm socket with NO LEADING TAPER, as the bolt heads are shallow. If a socket
with a leading taper is used, there is a possibility of rounding the bolt head as the
Maintenance
socket will slip.
Undo the bolt at the bottom of the feed hopper (51) and lift the hopper clear to
access the drum. Loosen the bolts (17) holding the blade to the drum and remove
the blade. There are two blade positions on the drum and both blades will need to be
maintained equally.
Note: The blades are reversible so they can be turned around to use the second side
before they need to be re-sharpened.
If the blades are re-sharpened, you will need to adjust the base block (26) at the
bottom of the drum to close the gap between the edge of the block and the knives.
The base block will need to be moved inwards so that there is a gap of around
0.25mm between the knives and the base block. Make sure the drum rotates freely
by moving it by hand using the nut on the outside of the drum.
When refitting the blades, you should use a small amount of mild thread lock to
secure each bolt.
Cleaning The Hopper
To clean the inside of the hopper of any material adhering to it, the CE plate and
the rubber curtain can be removed. Remove the 4 screws and washers holding the
CE plate and lift it out. Then remove the 2 screws holding the rubber flap, do not
remove the 3 screws joining the flap sections together.
RUBBER FLAP
CE PLATE
Forest Master Model: FM6DD-MUL/FM6DDES-MUL/FM4DDE-MUL 19Troubleshooting
Most problems are easy to fix. Consult the Troubleshooting Table below or the
Troubleshooting
frequently asked questions on our website https://forest-master.com/faq/ (which
is continuously updated) for common problems and their solutions. If you continue
to experience problems, or your problem is not listed, contact our technical line on:
0191 276 6553. For spare parts contact 01912655000.
Before performing any maintenance procedure or inspection, stop the engine, wait
5 minutes to allow all parts to cool. Disconnect the spark plug (FM6DD-MUL) or the
power cable (FM4DDE-MUL).
Symptom Possible Cause
The engine won’t • Is the ignition switch in the “ON” position?
start (Petrol) • Is the fuel shut-off valve on?
• Are you using fresh, clean fuel? If the fuel is old, change
it. Use a fuel stabilizer if you keep fuel longer than 30
days.
• Is the spark plug clean? If the spark plug is dirty or
cracked, change it. If it’s oily, leave it out, hold a rag over
the plug hole and pull the recoil cord several times to
blow out any oil in the cylinder, then wipe off the plug
and reinsert it.
• Is there sufficient oil? Check the engine oil level and if
necessary top up to the correct level.
• Is there dirt in the carburettor? Undo the bolt holding the
float chamber to the carburettor, empty out any fuel and
clean the inside using fresh, clean petrol. Remove the jet
in the bottom of the carburettor and clean it. Refit the jet
and the float chamber.
• Is the pull start stuck or has more resistance? Check the
drum for blockages.
• Is the hopper securing bolt tight. If the lower bolt on the
hopper is not tightened then the safety cutout will be in
operation and the engine won’t start.
Pull cord is tight • drum blocked. Refer to removing blockage on Page 16.
/ starter motor
clicks, does not
turn
The motor won’t • If you press the start button on the mulcher and don’t
start (Electric) feel or hear a click of the button, then this typically
(continued over means that the mulcher isn’t receiving power.
the page) • Is the plug connected to a power outlet?
20 Forest Master Model: FM6DD-MUL/FM6DDES-MUL/FM4DDE-MULSymptom Possible Cause
Troubleshooting
The motor won’t • If you’re using an extension cable, only use a cable of
start (Electric) 2.5mm2 with a maximum length of 10m. Smaller or
longer cables could result in loss of power to the motor.
Check the fuse in the plug. If it has blown, change it. Do
not replace the fuse with anything other than machine /
slow blow fuses.
• Check the power cable, the plug and the switch for dam-
age (both the supplied power lead and any extension
cable being used). If there is damage, change it.
• Is the motor too hot? The motor is protected with a
thermistor if overheating. Wait for it to cool down and try
again.
• Has the motor tripped. Press the reset button under the
clear dome next to the on/off switches
• Is the hopper securing bolt tight. If the lower bolt on the
hopper is not tightened then the safety cutout will be in
operation and the motor won’t start.
Motor is humming • Drum is blocked. Refer to removing blockage on Page 16.
but mulcher isn’t
operating (electric)
The engine lacks • Check that the throttle lever is in the “RUN” position.
power or is not • Is the air filter clean? If it’s dirty change it following the
running smoothly procedure in the engine manufacturer’s manual.
(Petrol). • Is the spark plug clean? If it’s dirty or cracked, change it.
If it’s oily, leave it out, hold a rag over the plug hole and
pull your recoil cord several times to blow out any oil in
the cylinder, then wipe off the plug and reinsert it.
• Are you using fresh, clean unleaded fuel? If it’s old,
change it. Use a fuel stabilizer if you keep petrol longer
than 30 days.
• Does your engine have the right amount of clean oil? If
it’s dirty, change it following the procedure in the engine
manufacturer’s manual.
• Check the oil level and adjust if needed.
Engine smokes • Check the oil level and adjust as needed.
(Petrol). • Check the air filter and clean or replace if needed.
• You may be using the wrong oil – too light for the
temperature. Refer to your engine owner’s manual for
detailed information.
• Clean the cooling fins if they are dirty.
Forest Master Model: FM6DD-MUL/FM6DDES-MUL/FM4DDE-MUL 21Symptom Possible Cause
Troubleshooting
Insufficient draw- • Are the knives blunt or worn? Sharpen or replace if
ing through or needed
bad mulching • Are the stems too thick?
performance. • Is there too much or too little space between the knives
and the base block. Adjust the bolts on the base block
and move it in or out to close or open the gap. Manually
rotate the drum to check if it turns smoothly.
Motor cuts out or • Is the motor too hot or overheating? Wait 10 minutes for
does not start. the motor to cool down and try again.
• Is there a blockage in the drum? Inspect the drum and
remove any potential blockages.
• Does the motor need to be reset? Press the reset button
on the motor (next to the on off switches).
22 Forest Master Model: FM6DD-MUL/FM6DDES-MUL/FM4DDE-MULWarranty
This product carries a limited parts warranty for 1 year from the date of purchase.
Please keep your proof of purchase as this will be required for any claim.
Should this product become defective, contact the store where it was purchased and
either replacement parts will be issued, it will be repaired, or it will be replaced if
Warranty
necessary.
IMPORTANT: NO RESPONSIBILITY IS ACCEPTED FOR INCORRECT USE OF THIS
PRODUCT. MODIFICATION OF THIS PRODUCT (UNLESS SAID MODIFICATION HAS
BEEN AUTHORISED BY FOREST MASTER) WILL VOID THE WARRANTY.
The Warranty Does Not Cover:
1. Any part that has become inoperative due to misuse, abuse, neglect, accident,
improper maintenance or alteration.
2. The unit, if it has not been operated and/or maintained in accordance with the
owner’s manual.
3. Normal wear.
4. Routine maintenance items such as lubricants and blade sharpening.
5. Normal deterioration of the exterior finish due to use or exposure.
Forest Master Model: FM6DD-MUL/FM6DDES-MUL/FM4DDE-MUL 23FM6DD-MUL/FM6DDES-MUL Exploded Diagram (Petrol)
Exploded Diagram
9
60
4
6
5
7 7
2
41 59
54 55 50
61 14 62 59
1 3 8
12 38
30
7 27
59
11 13 17
55 41
57 15
64 33
7 28 30
18 16
12 57 33
57
30 31 26
51
30 30
59 17 16
10
33 29
41 33 22
33
32 56 56 53 30
30
48 52
45 23
24
63 25
43 39
47 42
44
40
46
47
43
45 48
24 Forest Master Model: FM6DD-MUL/FM6DDES-MUL/FM4DDE-MULP ar t N o. De s c r ip t ion Qtv P ar t N o. De s c r ip t ion Qtv
1 Feed Hopper 1 50 Discharge Chute Bolt M6x12 2
2 Rubber Curtain 1 51 Hopper Bolt M6×23 1
3 PP Plate 1 52 Drum Bolt 5/16-24×100 1
4 Rubber Curtain Fixed Plate 1 53 Flat Washer Φ8×3.0 1
5 Rubber Curtain Fixed Bend Steel 1 54 Key 1
6 Rubber Curtain Fixed Bolts M5×12 3 55 Serrated Washer Φ10×1.0 3
Parts List
7 Rubber Curtain Flat Washer Φ5.0 13 56 Engine or Motor Fix Bolt M8×35 4
8 Rubber Curtain Lock Nut M5 3 57 M8 Nuts 4
9 Hopper Safety Plate 1 58 Serrated Washer Φ5×0.6 (see note 1) 1
10 Hopper Rubber Gasket 1 59 Spring Washer Φ6 3
11 Hopper Round Tube End Cap 2 60 Petrol Engine 1
Safety Plate and Rubber Curtain 61 Coach Bolt M8 x 125 3
12 7
Mounting Bolts M5X10 62 Upper Blanking Plate 1
13 Spring Washer M5 3 63 Mulcher Discharge Chute 1
14 Drum Housing 1 64 Drum Rotation Mounting Plate 1
15 Drum 1
16 Drum Blade 2
17 Drum Blade Bolt M10x25 4 Note 1: 1 x part 12, 1 x part 13, 1 x part 7 & 1 x part 58 used to secure the
micro switch ground wire. These are not shown in the exploded view.
18 Hopper Opening Micro Switch 1
22 Drum Housing Outer Plate 1
23 Drum Bearing 20×42×12 1
24 Bearing Circlip 1
25 Drum Housing Outer Plate End Cap 1
26 Bottom Blade 1
27 Drum Spacer Sleeve 1
28 Drum Housing Mounting Bolt 5/16-24×20 4
Drum Housing Outer Plate Mounting
29 Bolt M8x15 3
30 M8 Spring Washer 11
31 M8×10Bottom Blade Flange Lock Bolts 2
32 M4×10 Micro Switch Box Fixed Bolts 2
33 Flat Washer Φ8×1.6 14
38 Nut M6 2
39 M3 x 60 Discharge Chute Safety Bolt 2
40 M3 Discharge Chute Safety Nut 2
41 Flat Washer Φ6×1.0 5
42 Base 1
43 Wheel 2
44 Front Foot Rubber Cap 2
45 Split Pin 1.6×20 2
46 Axle Φ16×2 1
47 Φ16 Flat Washer 2
48 Φ16 Dome Cap 2
Forest Master Model: FM6DD-MUL/FM6DDES-MUL/FM4DDE-MUL 25FM4DDE-MUL Exploded Diagram (Electric)
Exploded Diagram
9
60
4
6
5
7 7
2
41 59
55 50
54 61 14 62 59
1 3 8
12 38
30
7 27
59
11 13 17
55 41
65 15
64 33
7 28 30
18 16
12 57 33
65
31 26
51
30
59 17 16
10 33
33 22 29
41
56 56 33
32 53 30
30
48 52
45 23
24
25
43 63
39
47 42
44
40
46
47
43
45 48
26 Forest Master Model: FM6DD-MUL/FM6DDES-MUL/FM4DDE-MULP ar t N o. De s c r ip t ion Qtv P ar t N o. De s c r ip t ion Qtv
1 Feed Hopper 1 50 Discharge Chute Bolt M6x12 2
2 Rubber Curtain 1 51 Hopper Bolt M6×23 1
3 PP Plate 1 52 Drum Bolt 5/16-24×100 1
4 Rubber Curtain Fixed Plate 1 53 Flat Washer Φ8×3.0 1
5 Rubber Curtain Fixed Bend Steel 1 54 Key 1
6 Rubber Curtain Fixed Bolts M5×12 3 55 Serrated Washer Φ10×1.0 3
Parts List
7 Rubber Curtain Flat Washer Φ5.0 12 56 Engine or Motor Fix Bolt M8×35 4
8 Rubber Curtain Lock Nut M5 3 57 M8 Lock Nuts 4
9 Hopper Safety Plate 1 59 Spring Washer Φ6 3
10 Hopper Rubber Gasket 1 60 Electric Motor 1
11 Hopper Round Tube End Cap 2 61 Coach Bolt M8 x 125 3
Safety Plate and Rubber Curtain 62 Upper Blanking Plate 1
12 6
Mounting Bolts M5X10 63 Mulcher Discharge Chute 1
13 Spring Washer M5 2 64 Drum Rotation Mounting Plate 1
14 Drum Housing 1 65 M8 Nuts 3
15 Drum 1
16 Drum Blade 2
17 Drum Blade Bolt M10x25 4
18 Hopper Opening Micro Switch 1
22 Drum Housing Outer Plate 1
23 Drum Bearing 20×42×12 1
24 Bearing Circlip 1
25 Drum Housing Outer Plate End Cap 1
26 Bottom Blade 1
27 Drum Spacer Sleeve 1
28 Drum Housing Mounting Bolt 5/16-24×20 4
Drum Housing Outer Plate Mounting
29 Bolt M8x15 3
30 M8 Spring Washer 11
31 M8×10Bottom Blade Flange Lock Bolts 2
32 M4×10 Micro Switch Box Fixed Bolts 2
33 Flat Washer Φ8×1.6 14
38 Nut M6 2
39 M3 x 60 Discharge Chute Safety Bolt 2
40 M3 Discharge Chute Safety Nut 2
41 Flat Washer Φ6×1.0 5
42 Base 1
43 Wheel 2
44 Front Foot Rubber Cap 2
45 Split Pin 1.6×20 2
46 Axle Φ16×2 1
47 Φ16 Flat Washer 2
48 Φ16 Dome Cap 2
Forest Master Model: FM6DD-MUL/FM6DDES-MUL/FM4DDE-MUL 27NOTE: It is our policy to continually improve products and as such we reserve the right to alter data, specifications and component parts without prior notice. The latest version of the handbook and FAQ can be found on our website at https://forest- master.com/resources/ Manufactured for Forest Master Limited. Registered Office: Forest Master Ltd, Industry Road, Heaton, Newcastle Upon Tyne, NE6 5XB, United Kingdom. Tel: +44 191 2966939 - email: info@forest-master.com - web: www.forest-master.com
You can also read