AT-HOME PROJECT GUIDE - for students Office365 User 2 - Animal Welfare Society
←
→
Page content transcription
If your browser does not render page correctly, please read the page content below
AT-HOME PROJECT GUIDE
                   for students

Office365 User 2
At-Home Project Guide

Dear Students,

Thank you for your interest in helping the animals at AWS!

At AWS, we believe in fostering a love for animals at a young age. Through our Youth
Programs, we offer a variety of ways for students to learn about and help pets in need.

For students looking to fulfill community service hours or students who just want to lend a
helping hand, we have put together this At-Home Project Guide to help you get started.

We offer suggestions here of projects you can complete at home, some with the
assistance of an adult. Each project will directly support the health and welfare of the pets
at AWS, bringing them more joy, fun and enrichment while they wait to be adopted. The
best part about these projects – they are fun!

Before you begin, please check in with me for more information and encouragement.

Then, when your projects are complete, check in with me again, so that we can plan a
time for you to stop by with your projects. Each student who does an At-Home Project to
help the animals is taken on a very special Hero Tour of AWS. In many cases, you can
deliver your projects right to the animals and see first hand how they benefit.

Thank you for choosing to help AWS! You make a difference to thousands of pets in need
each and every year.

For the animals,

Brie Roche
Humane Educator
(207) 985-3244 ext. 109
brie@animalwelfaresociety.org

**Please note that each project varies in complexity, materials needed and time to complete.   1
Adult supervision and/or guidance may be required.
Wish List Drive
Help the animals in our care by donating much needed pet food and supplies. Ask family
member and friends to bring a gift to the animals to your birthday party or hold a Wish
List Drive to collect a variety of items like:

    •   Canned cat food
    •   Dog treats
    •   Durable dog toys such as Nylabones
    •   Bully sticks or rawhide treats
    •   Cat nip toys
    •   Jingle balls and other cat toys

See AWS’ complete wish list at
http://animalwelfaresociety.org/give/wish-list/

                               Fundraising Drive
One important way students can help our animals is by doing a fundraiser to raise money
for our shelter animals.

Monetary donations are a wonderful way to help animals in need because it provides
AWS with funds to purchase items that are not typically donated, such as specialty diet
food or medication. Through fundraisers, students learn how resources are allocated – to
veterinary care, special training or program support. Students will see first-hand how
much goes into running a busy community shelter and Adoption Center.

To get you started, here are some ideas:
    • Donate money saved or earned from chores
    • Run a lemonade stand or have a bake sale
    • Collect bottles and redeem them for AWS
    • Sell handmade items
    • Ask family and friends to save their change

Be creative when it comes to running donation and fundraising drives! There is so much
you can do and every little bit makes a difference to the pets of AWS!

**Please note that each project varies in complexity, materials needed and time to complete.   2
Adult supervision and/or guidance may be required.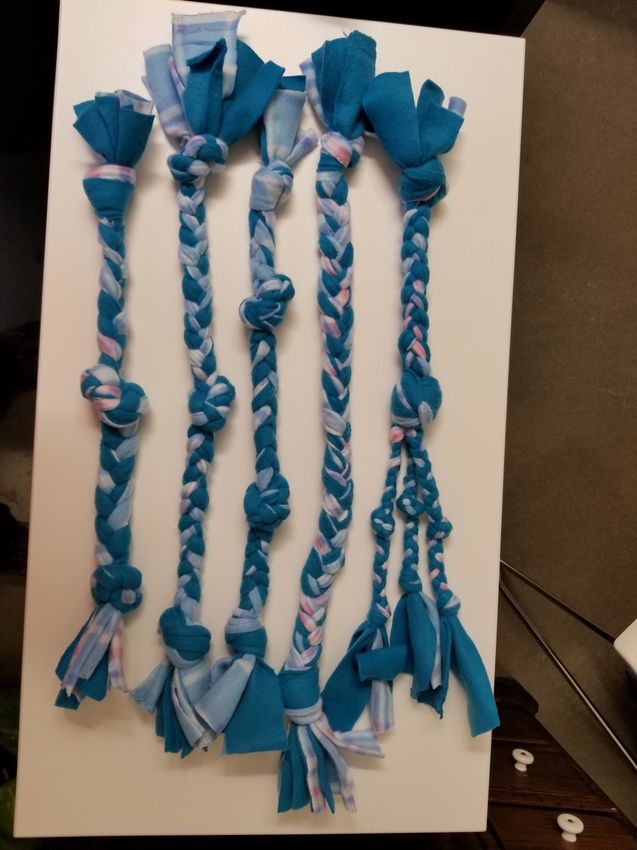
Homemade Dog Treats
                                  (1 batch = 2 hours)
This recipe and photograph are from the food blog pinch of yum

Yield: 30-ish large dog treats

INGREDIENTS

DOG BISCUITS:

   •   1 cup pumpkin
   •   1/2 cup peanut butter
   •   2 eggs
   •   1/4 cup oil* (suggest canola oil)
   •   2 1/2 cups whole wheat flour
   •   1 teaspoon baking soda

GLAZE:

   •   2 tablespoons bacon grease, coconut oil, chicken fat, or any other fat that will
       solidify at room temperature, melted
   •   1/4 cup smooth peanut butter

INSTRUCTIONS

   1. Preheat oven to 350 degrees.
   2. Combine pumpkin, peanut butter, eggs, and oil in a bowl. Add in baking soda and
      whole wheat flour. Stir until a stiff dough forms. Knead dough or mix just until flour
      is incorporated.
   3. Roll out dough with a rolling pin and use a cookie cutter to cut out dog bone
      shapes, or just bake into little circles like cookies. Bake for 15 minutes.
   4. Whisk the bacon grease and peanut butter until very smooth. Drizzle over the
      treats and cool till glaze hardens (it does best in the fridge or freezer)

**Please note that each project varies in complexity, materials needed and time to complete.   3
Adult supervision and/or guidance may be required.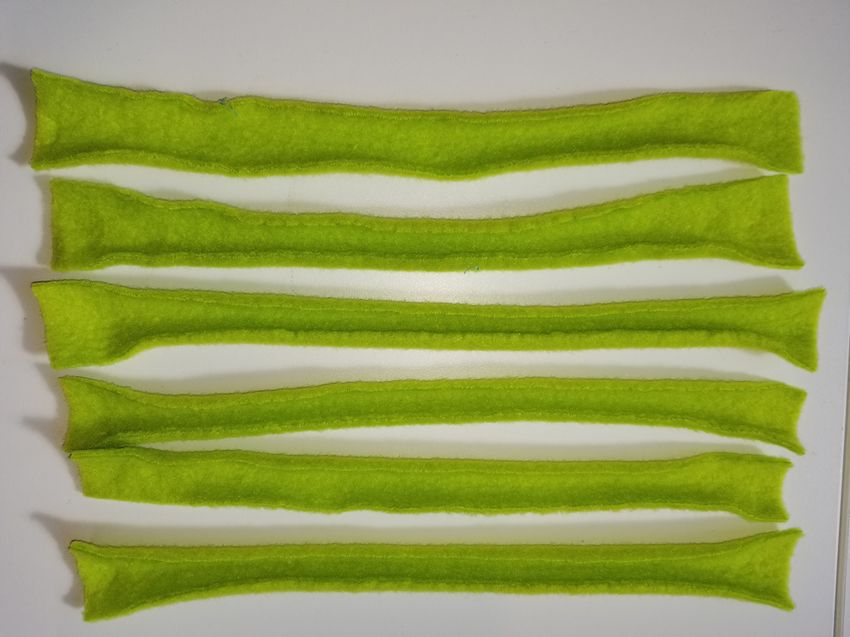
Homemade No-Bake Dog Treats
                                    (1 batch = 2 hours)
   This recipe is from the dog lifestyle website prettyfluffy.com

INGREDIENTS

   •   1/2 Cup Plain Organic Yogurt
   •   1 Cup Natural Peanut Butter
   •   3 Cups Rolled Oats

TO MAKE
1. Whisk the yogurt and peanut butter until it forms a paste.
2. Add the oats 1/4 to 1/2 cup at a time ensuring they are fully coated and no dry spots
form. You will be left with a heavy mixture.
3. Scoop out bite sized pieces with a spoon and roll into little balls.
4. Place on a flat tray lined with baking paper.
5. Pop them in the fridge for one hour to chill, then serve.

HANDY HINTS!
* Makes 25-30 treats.
* Treats can last up to 7-10 days stored in the fridge.
* Use a gentle pressure when rolling the balls. The mixture can be sticky and heavy
handedness can cause it to crumble.

**Please note that each project varies in complexity, materials needed and time to complete.   4
Adult supervision and/or guidance may be required.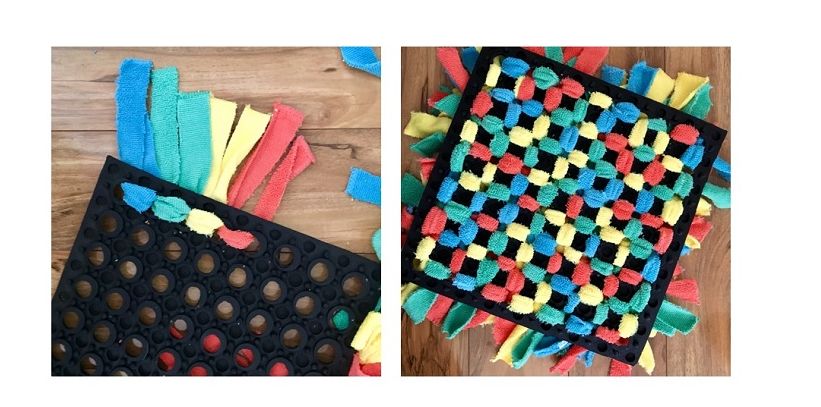
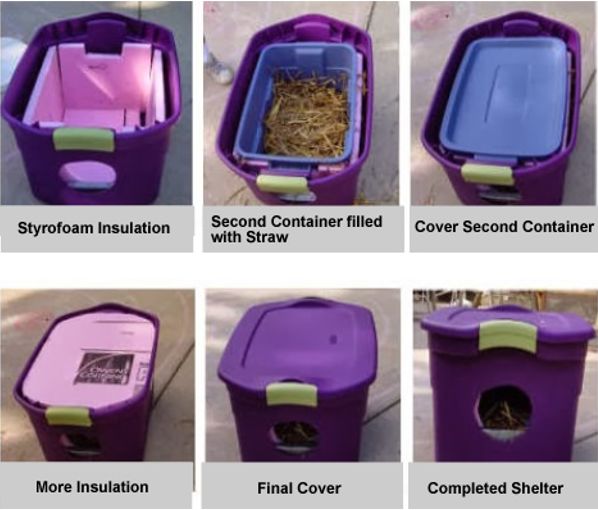
Rubbermaid Cat Shelter
                                  (1 house = 4 hours)
Adapted design by Alley Cat Advocates

This design uses two Rubbermaid storage bins with removable lids. It is important to use
Rubbermaid bin because they hold up to all weather. Other brands may crack in the
cold. Earth tone colors will blend best with environment and make them more natural in
appearance to the cats.

Supplies:
  • 8’ x 2’ sheet of 1” thick rigid Styrofoam
  • A yardstick
  • Box cutter
  • Straw (not hay)
  • 1 Large Rubbermaid Bin (approx. 30 gal)
  • 1 Smaller Rubbermaid Bin (approx. 18 – 25 gal)
      Note: Try placing one bin inside the other allowing room for Styrofoam before you
      purchase.

To Assemble:

   •   Cut a 6”x6” doorway in one of the long sides of the bin towards the corner. Cut the
       opening so that the bottom of the doorway is several inches above the ground to
       prevent flooding into the bin.
   •   Using the yardstick and the cutter, cut a piece of Styrofoam large enough to line
       the floor of the bin.
   •   Line each of the interior walls of the bin leaving a 3” gap between the top of the
       Styrofoam and the upper part of the bin.
   •   Cut out a doorway in the Styrofoam interior wall where the doorway has already
       been cut out in the bin.
   •   Measure the length and width of the interior space and place a second, smaller,
       smaller bin into the interior. This bin should fit as snugly as possible against the
       Styrofoam wall pieces. Cut a doorway into this bin where the doorways have been
       cut into the Styrofoam and outer bin.
   •   Stuff the bottom of the interior bin with straw to provide both insulation and a
       comfortable spot to lie down.
   •   Cut out a Styrofoam roof to rest on top of the Styrofoam wall pieces.
   •   Close the bin with its lid.

**Please note that each project varies in complexity, materials needed and time to complete.   5
Adult supervision and/or guidance may be required.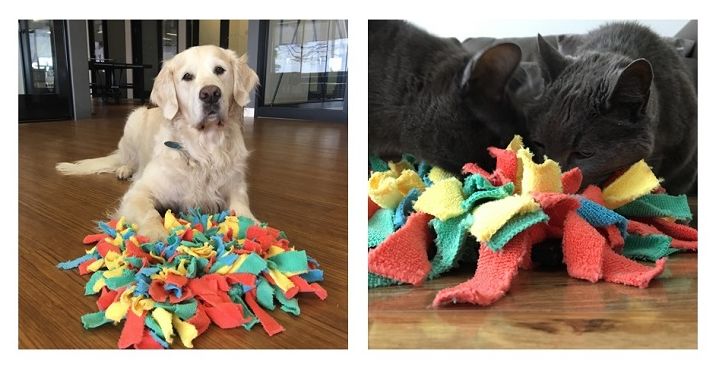
Like to build things with wood? Skilled in carpentry?
Take it up a notch! Check out the instructions for a wooden feral cat shelter – available
online: https://animalwelfaresociety.org/services/feral-cats/feral-cat-shelter-plans/

**Please note that each project varies in complexity, materials needed and time to complete.   6
Adult supervision and/or guidance may be required.
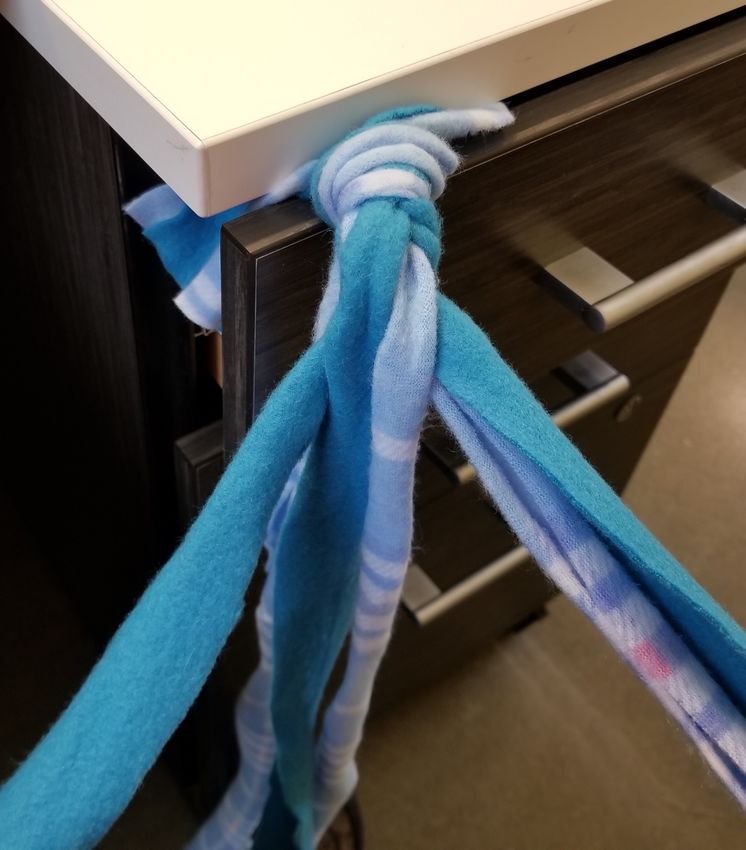
Braided Dog Toys
                                  (10 Toys = 2 hours)
Quick and easy dog toys. If you know how to braid, you can make these simple toys dogs
love.

Skill Level: Easy
Size: Various

Materials:
  • Fleece Material

Instructions
Cut fleece into strips approximately 2” wide. Length of strips can vary. Experiment with
various lengths from 10” to ?

For a thick toy use multiple strands in each braid. Tie the end in a knot and start braiding.
Be creative. Use many strips and tie various knots.

**Please note that each project varies in complexity, materials needed and time to complete.   7
Adult supervision and/or guidance may be required.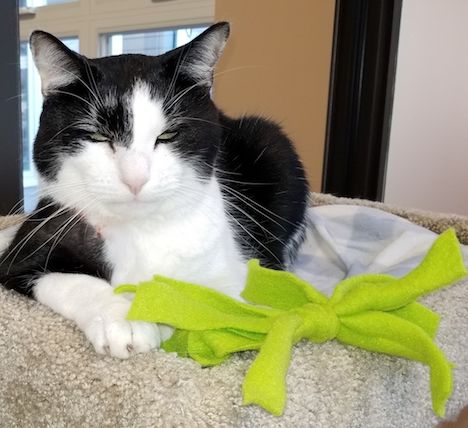
Snuffle Mat
                                    (2 Toys = 1 hour)
   Instructions and photograph are from the blog www.petsplusus.com

A snuffle mat is an easy to make homemade toy that provides your dog or cat with the
opportunity to sniff and search their way through fleece strips in search of kibble or treats.
This is a great way to provide mental stimulation and can also be a slow feeder.

Materials Needed:

   •   Rubber Sink or Door Mat with Holes (cut to desired size)
   •   Washable fleece fabric or cloths
   •   Scissors
Steps:

1.   Cut your mat to desired size.
2.   Cut your fabric into 1 inch wide, 8 - 10-inch length strips.
3.   Take one strip and push one end through a mat hole and then then take the other
end of the fabric strip and feed it through the hold next to the first one. Flip the rubber mat
over and tie the fabric strip into a knot.

4.     Repeat this step until the entire mat is full and there are no empty spots.
5.     Turn the mat over and give it a good shake to remove any fleece particles. Sprinkle
with treats or kibble and let your pet explore, sniff and search!

**Please note that each project varies in complexity, materials needed and time to complete.      8
Adult supervision and/or guidance may be required.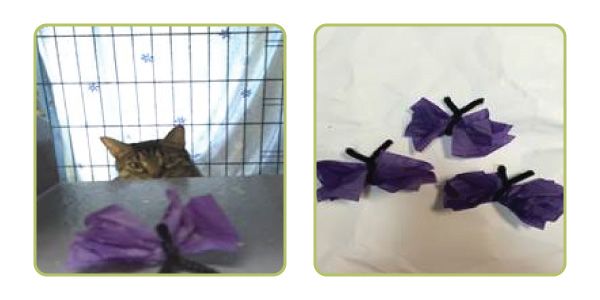
Rolled Feather Toys
                                  (20 Toys = 2 hours)
   Instructions and photograph are from the blog “Thinking outside the Cage.”

A feather is very tempting to a cat. The rolled feather toy moves, is textured and appeals to
the hunter.

Supplies:
▪      Corrugated paper
▪      Feathers
▪      Tape
▪      Non-toxic school glue
▪
Directions:
▪      Cut a 4" x 4" square of corrugated paper.
▪      Tightly roll up the paper and secure with tape.
▪      Glue a feather in each end or multiple feathers in one end of the roll.
Hide the toy so that a feather is peaking out waiting for the cat to discover it!

**Please note that each project varies in complexity, materials needed and time to complete.   9
Adult supervision and/or guidance may be required.
Knotted Fleece Toys
(20 Toys = 2 hours)
Quick and easy dog or cat toys.
Skill Level: Easy
Materials:
• Fleece Material
Instructions:
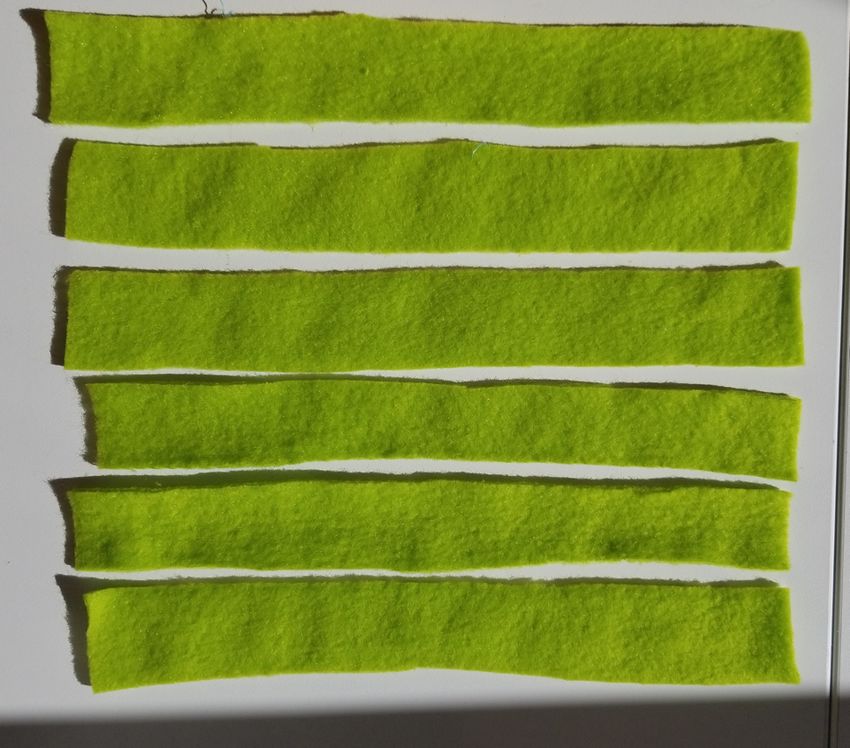
• Cut fleece into 6 strips approximately 1” wide by 10” long.
• Stretch fleece by the ends until fabric rolls.
• Tie the strips together into a knot.
• Trim the ends
**Please note that each project varies in complexity, materials needed and time to complete. 10
Adult supervision and/or guidance may be required.Butterflies for Cats
(20 Toys = 2 hours)
Instructions and photograph are from the blog “Thinking outside the Cage.”
Supplies:
▪ Tissue paper
▪ Pipe cleaners
▪
Directions:
▪ Cut pipe cleaners into thirds.
▪ Cut layers of tissue paper into rectangles (about 2" x 3").
▪ Gather the tissue paper in the center of the rectangle and bend the pipe cleaner
around the tissue. Twist the ends into antennae to secure.
▪ Always supervise your pet with a new toy to ensure that they can play safely.
The tissue butterflies are easily tossed and make a crinkling sound to stimulate the play.
Have a sewing machine at home? Like to knit or
crochet?
There are many more projects you could make! Check out the At-Home Project Guide for
adults for even more ideas! Available online at
https://animalwelfaresociety.org/volunteer/community-service-volunteers/
**Please note that each project varies in complexity, materials needed and time to complete. 11
Adult supervision and/or guidance may be required.You can also read