Raspberry Pi Wifi-Controlled Cat Laser Toy - Adafruit
←
→
Page content transcription
If your browser does not render page correctly, please read the page content below
Raspberry Pi Wifi-Controlled Cat Laser Toy
                 Created by Tony DiCola

       Last updated on 2018-08-22 03:37:24 PM UTC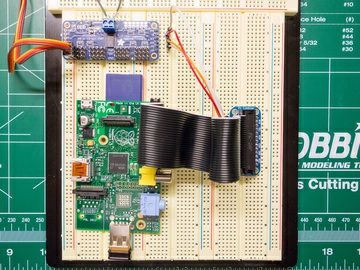
Guide Contents

Guide Contents                                                                                                 2
Overview and Requirements                                                                                      3
  Requirements                                                                                                 3
  Video Streaming Note                                                                                         4
Hardware Setup                                                                                                 5
  Servos and Laser                                                                                             5
  Servo Controller and Raspberry Pi                                                                            5
  Hardware Setup                                                                                               6
Software Setup                                                                                                 7
  Dependencies                                                                                                 7
  Code                                                                                                         7
Calibration and Play                                                                                           9
  Running the Server                                                                                           9
  Servo Control                                                                                               10
  Calibration                                                                                                 10
Future Work                                                                                                  11

© Adafruit Industries        https://learn.adafruit.com/raspberry-pi-wifi-controlled-cat-laser-toy   Page 2 of 11
Overview and Requirements
This project will show you how to create a laser toy for your cat which is controlled over the web with a Raspberry Pi.
The project demonstrates using a web application to control servos with the Raspberry Pi and an excellent way to
keep your cat exercising when you're umm busy playing minecraft.

You can see an early version of the project on the September 7th adafruit Show and Tell show (~12 minutes into the
show) (https://adafru.it/cFL)!

Requirements
To build this project you will need the following:
      Raspberry Pi (either model A (http://adafru.it/1344) or B (http://adafru.it/998) will work).
      Two servos, like these micro servos (http://adafru.it/169).
      Laser diode. You can buy one (http://adafru.it/1054) or scavenge one out of a laser pointer (what I've chosen to
      do in this project).
      PWM/servo controller (http://adafru.it/815) based on the PCA9685 chip.
      Network camera that can output a MJPEG video stream. I use this Wansview camera (https://adafru.it/cFM), but
      check for support (https://adafru.it/cFN) from other brands such as Axis, Foscam, etc. See the note on video
      streaming below to understand why a network camera is used instead of a webcam or other video source.
You will also need basic tools and supplies such as a hot glue gun (or other means of fastening servos and laser
diode), a power supply for your laser diode and servos (your Pi's 5V output is not powerful enough alone--use a battery
pack, wall wart, or bench supply), and wires to connect the Raspberry Pi GPIO to the servo controller board. A
breadboard and Pi Cobbler (http://adafru.it/914) breakout (http://adafru.it/914) are perfect for this project.

This project assumes your Raspberry Pi is running the Raspbian operating system, is connected to your network, and is
setup to enable I2C communication. If you use a distribution such as Occidentalis (https://adafru.it/aNv) much of this
setup is done for you already. However if you need to setup your Raspberry Pi, follow these guides:

 © Adafruit Industries            https://learn.adafruit.com/raspberry-pi-wifi-controlled-cat-laser-toy      Page 3 of 11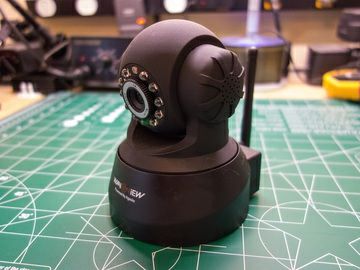
Lesson 1. Preparing an SD Card for your Raspberry Pi (https://adafru.it/aWq)
      Lesson 2. First Time Configuration (https://adafru.it/aUa)
      Lesson 3. Network Setup (https://adafru.it/aUB)
      Lesson 4. GPIO Setup (https://adafru.it/aTH)
Finally, the web application that is used in this project will only work on Chrome, Safari, or Firefox web browsers.
Unfortunately Internet Explorer does not support MJPEG video streams in image tags, which is a required part of using
the application.

                                                                    Video Streaming Note
                                                                    In building this project I found network video cameras,
                                                                    such as those used for security and monitoring, work
                                                                    best for streaming video. I attempted to use a webcam
                                                                    that streamed video to sites such as Ustream or
                                                                    Livestream, but found the latency of those streams was
                                                                    extremely high--on the order of 10-15 seconds. With
                                                                    such high latency it is not possible to control the laser
                                                                    through the web in real time. I even tested setting up my
                                                                    own video streaming server with Amazon EC2
                                                                    CloudFront, but still could not get a low enough latency
                                                                    video stream.

                                                                    In addition to high latency, I also found embedded video
                                                                    streams (such as from video streaming web services) are
                                                                    not easily adapted for the control needs of this project.
                                                                    The problem is that web browsers enforce a strict cross-
                                                                    domain security model which does not allow a video
                                                                    embedded in an iframe or object (the typical means for
                                                                    embedding web video) to expose click and other events
                                                                    to the parent web page. This means targeting the laser
                                                                    with clicks on the video is not possible (at best you
                                                                    could present a 'track pad' target area below the video,
                                                                    or a joystick/direction pad control for manual movement-
                                                                    -neither is as ideal as targeting directly from the video).

                                                                    Using a network video camera that outputs an MJPEG
                                                                    video stream solves both these problems by having low
                                                                    latency encoding (at the expense of higher bandwidth
                                                                    compared to more modern video codecs), and the ability
                                                                    to embed directly in an image tag which is not subject to
                                                                    as strict cross-domain security restrictions.

 © Adafruit Industries          https://learn.adafruit.com/raspberry-pi-wifi-controlled-cat-laser-toy              Page 4 of 11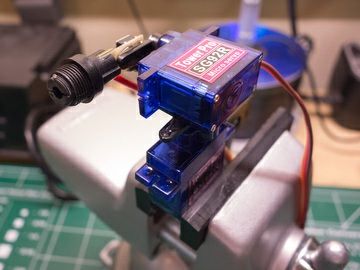
Hardware Setup

                                                            Servos and Laser
                                                            Attach one servo to the other at a 90 degree angle, and
                                                            the laser diode to the arm of the top servo. This setup
                                                            will allow the bottom servo to control laser rotation left
                                                            and right, and the top servo to control laser rotation up
                                                            and down. See the photo on the left for what you want
                                                            to create. Perfect alignment of the servos and laser are
                                                            not critical as the software will calibrate the aim of the
                                                            laser.

                                                            To attach the servos and laser I found hot glue was the
                                                            simplest method. You can later remove the hot
                                                            glue (https://adafru.it/cFO) using rubbing alcohol when
                                                            you're done with the project.

                                                            Mount the servo & laser assembly onto something which
                                                            allows you to angle the setup up and down, such as a
                                                            small vise (http://adafru.it/151). You will want to angle the
                                                            laser assembly down towards the floor at roughly the
                                                            same angle as the camera--this will improve the
                                                            accuracy of target clicks to actual laser position.

                                                            Servo Controller and Raspberry Pi
                                                            Hook up the Raspberry Pi to the servo controller, and
                                                            the servos to the servo controller. Follow this servo
                                                            controller tutorial (https://adafru.it/cFP) if you are unsure
                                                            of the exact steps.

                                                            You will want to hook up the top servo (up/down
                                                            movement) to channel 0, and the bottom servo (left/right
                                                            movement) to channel 1 of the servo controller.

© Adafruit Industries   https://learn.adafruit.com/raspberry-pi-wifi-controlled-cat-laser-toy                 Page 5 of 11
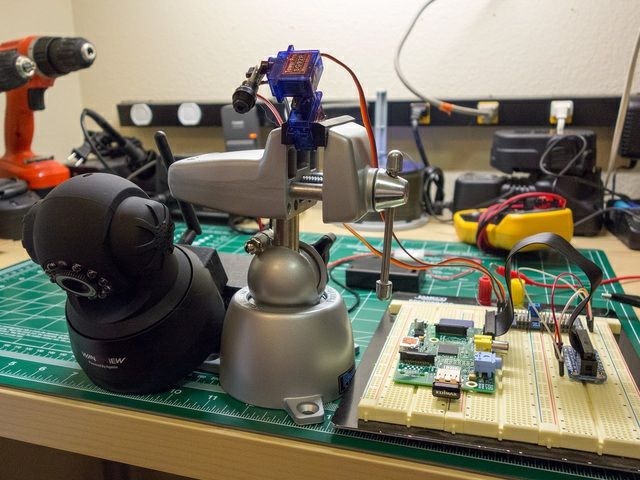
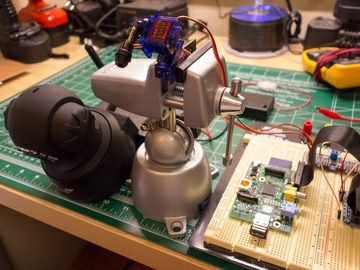
Hardware Setup
                                                            Finally place the laser assembly and camera near each
                                                            other and aimed down at the floor. You will want the
                                                            camera and laser to both be at about the same angle to
                                                            the floor.

                                                            When the servos are in their center position (a value of
                                                            400 pulses high with the 12bit PWM/servo controller) the
                                                            complete setup should look like the image on the left.

© Adafruit Industries   https://learn.adafruit.com/raspberry-pi-wifi-controlled-cat-laser-toy            Page 6 of 11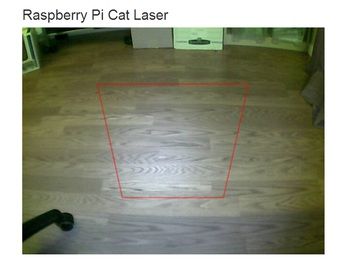
Software Setup
Dependencies
To setup the software you'll need to install the following dependencies on the Raspberry Pi:

      Python (https://adafru.it/cFQ)
      Flask (https://adafru.it/cFR), a python web application framework.
      NumPy (https://adafru.it/cFS), a python library for numeric computing.
      Git (https://adafru.it/cFT), revision control system to download the code used by this project.

Fortunately the installation of these dependencies is easy by installing pre-built packages. To install these packages
connect to your Raspberry Pi in a command line session and execute the following command:

 sudo apt-get install python python-flask python-numpy python-smbus git

        You might already have some of these dependencies installed on your Raspberry Pi. If a command exits with
        an "already the newest version" message you can ignore it and move on.

Code
Now you can download the software for the project from GitHub (https://adafru.it/cFU) by executing the following
command. This will create a 'pi-catlaser' folder in your current directory which will contain the code for the project.

 git clone https://github.com/tdicola/pi-catlaser.git

Navigate inside the newly created pi-catlaser folder to continue the software setup.

For reference some of the important files in the pi-catlaser directory are:
      server.py: The main web application python code. At the top of this file is a small set of configuration values for
      the I2C address of the servo controller, channels for each servo, and min/max/center servo values.
      model.py: The code for moving, targeting, and calibrating the laser.
      modeltests.py: Python unit tests for validating the model's functionality.
      servos.py: Code to interface with the servo controller and move the servos.
      Adafruit_I2C.py & Adafruit_PWM_Servo_Driver.py: Code from the Adafruit Raspberry Pi python code
      library (https://adafru.it/aOg) to interface with the PCA9685 servo controller board.
      templates/main.html: The HTML code for the web application. The image tag which contains the MJPEG video
      stream for the network camera is in this file beneath a comment near line 19.
      static/js/calibration.js: The javascript code to calibrate and overlay graphics on the video.
      calibration.json: This file will initially not exist, but after calibration this file will save the calibration values.

At a minimum you will need to edit templates/main.html to set the URL for your network camera's MJPEG video stream.
Edit this file (using a text editor on the Raspberry Pi such as 'nano') and change the src attribute of the img tag on line
~19 to your camera's MJPEG stream URL. You can usually find the MJPEG stream URL for your camera on the
web (https://adafru.it/cFN).

If your servo controller is not on the default 0x40 I2C address or your servos are not hooked up to channels 0 and 1 of
the servo controller, edit server.py (using a text editor on the Raspberry Pi such as 'nano') and adjust these values at
the top of the file.

With any changes to the code made, you're ready to start the server, test the servo movement, and calibrate the laser.

 © Adafruit Industries            https://learn.adafruit.com/raspberry-pi-wifi-controlled-cat-laser-toy           Page 7 of 11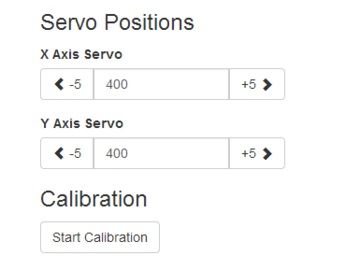
© Adafruit Industries https://learn.adafruit.com/raspberry-pi-wifi-controlled-cat-laser-toy Page 8 of 11
Calibration and Play
Running the Server
Before starting the server, make sure the servos and laser diode are hooked up to power. Then start the server by
executing the following command in the pi-catlaser directory on the Raspberry Pi:

 sudo python server.py

You should see the server start with the following message:

Reseting PCA9685
Setting PWM frequency to 50 Hz
Estimated pre-scale: 121
Final pre-scale: 121
* Running on http://0.0.0.0:5000/
* Restarting with reloader

You can stop the server at any time by pressing Ctrl-C, and restart the server with the same command used to start it.

Now navigate to the web application in a web browser from a computer on your network. You will want to access
http://your_raspberry_pi_IP_address:5000/ (if you don't know the IP address of your Raspberry Pi, run the command
'ifconfig' and look for the 'inet addr' value--likely something within 192.168.1.*).

For example if your Raspberry Pi's IP address is 192.168.1.120, you would access http://192.168.1.120:5000/ in a web
browser.

                                                                    If everything is setup correctly you should see a page
                                                                    with your camera's video stream load.

                                                                    If you see an error message or no response, check that
                                                                    the server started successfully and that the previous
                                                                    steps were completed successfully.

                                                                    Note, you might need to be logged in to your network
                                                                    camera before accessing the web page so the video will
                                                                    load.

 © Adafruit Industries          https://learn.adafruit.com/raspberry-pi-wifi-controlled-cat-laser-toy             Page 9 of 11
Servo Control
In the top right of the page you will see the raw X and Y
axis servo values, and controls to manipulate these
values up and down. You can also type a servo position
value directly into the input control and tab to another
control to update the servo.
Try changing the servo values to verify the servos and
laser move.
Calibration
Click the 'Start Calibration' button to walk through the calibration of the target area and the laser. See this
video (https://adafru.it/cFV) for an example of running the calibration.
The calibration process works by finding a transformation between a quadrilateral on the screen (the red target area)
to a quadrilateral in laser servo coordinate space (the X and Y servo values together define a 2D coordinate system).
Plugging these quadrilaterals into a perspective projection equation and solving for the coefficients allows the server
to transform clicks inside the target area to servo positions that aim the laser. You can find more details on this process
here (https://adafru.it/cFW).
Once the calibration is done you're ready to play! Click inside the red target area and the laser should be moved to aim
at the location of your click. Have fun making your cat chase the laser around over the web!
Remember to demonstrate proper laser safety when playing with the cat laser. Do not shine the laser into
human or animal eyes. Always supervise any animals playing with the toy.
© Adafruit Industries https://learn.adafruit.com/raspberry-pi-wifi-controlled-cat-laser-toy Page 10 of 11Future Work
You can follow and contribute to this project on Github (https://adafru.it/cFU).
Some interesting ways to consider extending the project are:
Automatic calibration by detecting the position of the laser dot on the video and automatically moving the laser
into the position of the corners.
Using a transistor to turn on/off the laser pointer, to extra-confuse-ify the cat!
Limiting the target clicks to only fall within the target area.
Building a public, internet-facing layer on top of the web application which would allow people on the internet to
take turns playing with your cat.
Build the laser toy into a stand-alone enclosure with a servo controlled treat dispenser (https://adafru.it/cFX) to
reward kitty's play.
Integrate cat face detection (https://adafru.it/cFY) to prevent targeting the cat's face.
Use the Raspberry Pi camera and an MJPEG encoder to capture video directly from the Raspberry Pi. Serve the
video through web sockets to add support for IE.
What can you think of to extend the project?
© Adafruit Industries Last Updated: 2018-08-22 03:37:20 PM UTC Page 11 of 11You can also read