Halo Wi-Fi Extender System - Installation and Setup Guide - Pivotel
←
→
Page content transcription
If your browser does not render page correctly, please read the page content below
Halo Wi-Fi Extender
       System
        Installation and Setup Guide

Version 1.0 - May 29, 2020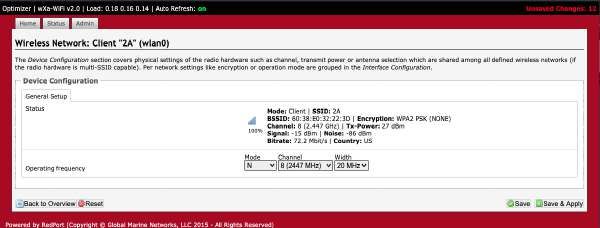
Hazards, Safety and Concerns

               Electrical Hazard Warning - Caution when installing
               and using electrical devices. Electricity can cause
               injury or death.

               Electromagnetic (EM) Radiation Warning - Caution
               when using devices that emit EM or Radio
               Frequency emitting devices such as Wi-Fi. The
               Halo should be installed and operated at least eight
               inches away from people.

               Component Damage Warning - Hard-wiring the
               Halo Extender and associated equipment into the
               vessel electrical system should be accomplished by
               a certified electrician.

               Component Damage Warning - Do not power the
               Halo without the Antenna being attached to the
               Extender Base. Doing so could cause permanent
               damage to the equipment. See pages 5-8 for
               physical setup guidance.

Version 1.0 - May 29, 2020                                        2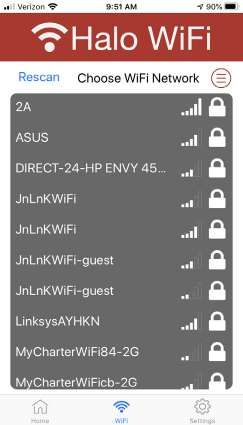
Table of Contents

Hazards, Safety and Concerns . . . . . . . . . . . . . . . . . . . . . . . . . . 2

Product specifications . . . . . . . . . . . . . . . . . . . . . . . . . . . . . . . . 4

Physical setup and configuration . . . . . . . . . . . . . . . . . . . . . . . . 5

Mounting details . . . . . . . . . . . . . . . . . . . . . . . . . . . . . . . . . . . . . 9

Halo App for Apple iOS . . . . . . . . . . . . . . . . . . . . . . . . . . . . . . . 10

Halo App for Google Android . . . . . . . . . . . . . . . . . . . . . . . . . . 13

Halo App additional information . . . . . . . . . . . . . . . . . . . . . . . .16

Mac or PC setup and configuration . . . . . . . . . . . . . . . . . . . . . 17

Frequently asked questions . . . . . . . . . . . . . . . . . . . . . . . . . . . 20

Corporate details and contact information . . . . . . . . . . . . . . . . 24

Version 1.0 - May 29, 2020                                                                3
Specifications

Model Name - RedPort Halo Wi-Fi Extender System
Description - Wi-Fi signal boosting outdoor antenna
Antenna Radio Frequency Range - 2.4 GHz
Antenna Compatibility - 802.11 b/g/n
Antenna Gain - 9 dbi
Antenna Horizontal Beam - 360 degrees
Antenna Directivity - Omni-Directional
Ports - 1x Ethernet/RJ45
Buttons - 1x Factory Reset labeled “Reset”
LED Indicators - 1x Power, 1x Connection, 1x Signal Strength
Browser Support - None, intended to be connected to RedPort
Optimizer hotspot router device
Dimensions - 28 in (L), 3 in (W), 3 in (H)
Weight - 9 oz
Power - 12 V AC
*Operating Range (distance) - Maximum possible - 7 miles
*Operating Throughput - Maximum possible - 72.2 Mbps

*Performance is dependent on many variables including but not
limited to: distance to gaining Wi-Fi signal; strength of gaining
Wi-Fi signal; foliage or obstacles between Halo antenna and
gaining Wi-Fi signal; or weather conditions.

Regulatory Information and Certifications
FCC ID : 2AB879331
CE
ROHS

Product Warranty Information
RedPort hardware carries a 1-year manufacturer warranty
against defects from the date of sale.

Product Support Information
RedPort agrees to provide initial customer assistance, up to
thirty (30) minutes at no charge, for products and services
purchased. It is recommended that a customer has reasonable
knowledge of basic computer and software setup procedures
for the initial installation.

Version 1.0 - May 29, 2020                                      4
Screw the antenna tube onto the
                   extender base.
    1

                             Important!
                             Attach the antenna to the extender
                             FIRST before connecting power.
                             Failing to do so may damage your
                             equipment and VOID warranty.

                                        3

         2
                                             Place the o-ring
                                             around the bottom
                                             part of the middle
Run the Ethernet                             threaded connector.
cable through
the opening of
the metal base.

Version 1.0 - May 29, 2020                                         5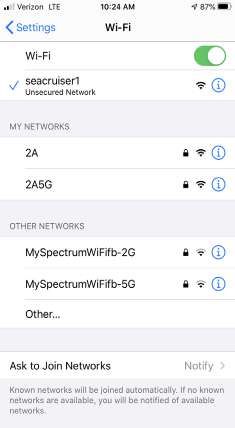
4
                                 Run the Ethernet cable
                                 through the metal base,
                                 threaded connector and
                                 place gray plastic gasket
                                 around Ethernet cable as
                                 shown.

                             5
                                 Push gray plastic gasket
                                 into the hole. To create a
                                 watertight seal, add
                                 silicone if desired.

Version 1.0 - May 29, 2020                                    6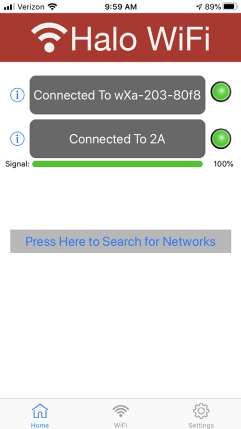
6

                             Plug the
                             Ethernet cable
                             into the
                             Ethernet post
                             on the base of
                             the extender.

                                    7

                  Screw all components
                  together, being careful
                  not to strip the thread
                  on the WiFi extender
                  connectors.

                  The screw in small
                  connector screws into
                  the metal base
                  using provided Allen
                  Wrench.

Version 1.0 - May 29, 2020                    7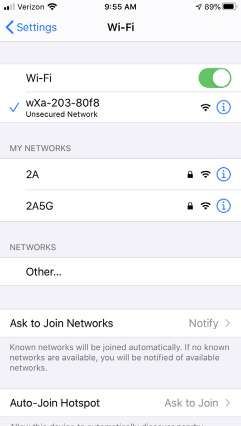
8

                             Screw the 12V AC adapter onto
                                  the Optimizer power port.

     9

 Plug Wi-Fi Extender Ethernet
 cable into Optimizer LAN Port.

Version 1.0 - May 29, 2020                                8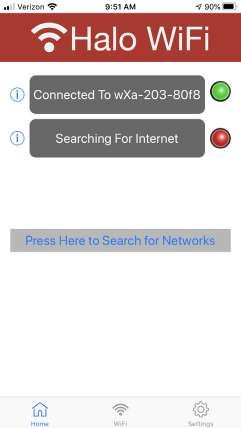
Mounting the Wi-Fi Extender

Install the Wi-Fi Extender on any standard 14 TPI 1” threaded
antenna mount. The Halo does not include a standard antenna
mount. Standard antenna mounts can easily be found online or
at your local marine supply store.

Access to the Extender may be occasionally needed, so
consider mounting in a location that can be reached at all times.

Take caution when transporting or underway as branches and
other objects can cause damage to the Extender and antenna.

Mounting on a Ship

                             The Wi-Fi Extender can be installed
                             in many different locations
                             on-board. For best results, mount
                             the Wi-Fi Extender as high above
                             the water line as possible. This will
                             increase the chances of capturing
                             Wi-Fi via line-of-site.

Mounting on a Vehicle or Building

The Wi-Fi Extender can be installed on vehicles or buildings to
capture long distance Wi-Fi. For best results, mount the Wi-Fi
Extender as high off the ground as possible.

Version 1.0 - May 29, 2020                                        9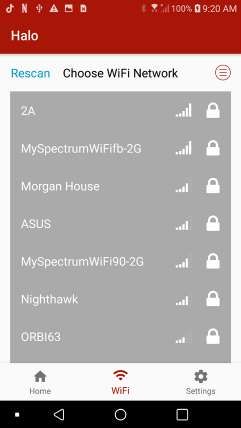
Halo Wi-Fi App

The Halo Wi-Fi App allows control of your Halo system from
your phone or tablet. Available on the Apple App Store & Google
Play Store. Use of the Halo Wi-Fi App is the RECOMMENDED
way to setup and use your Halo Long Range Wi-Fi Extender.

iOS Halo Wi-Fi App Installation and Setup

1. Download the Halo App
For iOS (iPad, iPhone, iPod Touch with iOS 10.3 or later) Search
for “Halo WiFi” in the Apple App Store.

2. Assemble and plug your RedPort Halo into an Optimizer
Reference the diagrams (pages 5-8) for assembly, then power
on all equipment.

3. Connect to the Optimizer
Navigate to Settings on your mobile device and click .
Find the Optimizer which will be displayed as wXa-203-xxxx.
Click .

NOTE: This is making the connection between your iOS
device and the Optimizer.

Version 1.0 - May 29, 2020                                      10
4. Open Halo Wi-Fi App
Click  icon on your device.

5. Configure Halo Wi-Fi
There are two ways to configure the Halo Wi-Fi. 1. You can click
 or 2. You can click
at the bottom of the Halo Wi-Fi App “Home” page.

NOTE: This is making the connection between the
Halo/Optimizer and the Wi-Fi network you are boosting.

6. Select Wi-Fi Source
Connect to the Wi-Fi network of your choice (marina, land-
based hotspot, etc.) by clicking . If required,
enter the password for the selected network, then click .

Optionally you can click  to force a new search.

Optionally you can sort found networks by Wi-Fi strength; Open
Wi-Fi; Closed Wi-Fi (password protected); A-Z (alphabetically);
or Z-A (reverse alphabetically).

Version 1.0 - May 29, 2020                                    11
7. Installation and Setup Complete
At the Halo WiFi App “Home” page the signal strength indicator
will populate into a full green bar. You can now exit the Halo App
and enjoy Internet usage.

Version 1.0 - May 29, 2020                                      12
Android Halo Wi-Fi App Installation and Setup

1. Download the Halo App
For Android (any Android device 5.0 or later) Search for “Halo
WiFi” in the Google Play Store.

2. Assemble and plug your RedPort Halo into an Optimizer
Reference the diagrams (pages 5-8) for assembly, then power
on all equipment.

3. Connect to the Optimizer
Navigate to Settings on your mobile device and click .
Find the Optimizer which will be displayed as wXa-203-xxxx.
Click .

NOTE: This is making the connection between your
Android device and the Optimizer.

Version 1.0 - May 29, 2020                                       13
4. Open Halo Wi-Fi App
Click  icon on your device.

5. Configure Halo Wi-Fi
There are two ways to configure the Halo Wi-Fi. 1. You can click
 or 2. You can click
at the bottom of the Halo Wi-Fi App “Home” page.

NOTE: This is making the connection between the
Halo/Optimizer and the Wi-Fi network you are boosting.

6. Select WiFi Source
Connect to the Wi-Fi source of your choice (marina, land-based
hotspot, etc.) by clicking . If required, enter
the password for the selected network, then click .

Optionally you can click  to force a new search.

Optionally you can sort found networks by WiFi strength; Open
WiFi; Closed WiFi (password protected); A-Z (alphabetically); or
Z-A (reverse alphabetically).

Version 1.0 - May 29, 2020                                     14
7. Installation and Setup Complete
At the Halo Wi-Fi App “Home” page the signal strength indicator
will populate into a full green bar. You can now exit the Halo App
and enjoy Internet usage.

Version 1.0 - May 29, 2020                                      15
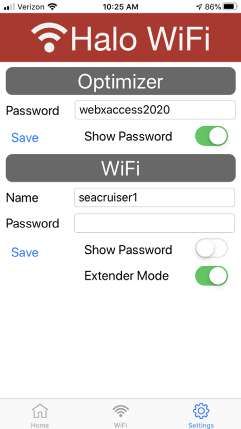
Halo Wi-Fi App Additional Options

Settings - Click

NOTE: The Optimizer will revert to default settings if you
accomplish a Factory Reset by pushing the “RST” button on the
front of the Optimizer.

The Optimizer default password is set to “webxaccess”. This
password permits your Halo App to make changes to the
Optimizer. In the screen shot below, the password has been
changed to “webxaccess2020” and then clicking “Save”.

The “WiFi” name is factory set to a “wXa-203-xxxx” set of
characters. In the screen shot below, the Wi-Fi Name has been
changed to “seacruiser1” and then clicking “Save”. Once the
“WiFi Name” is changed, the new name will appear in a Wi-Fi
Search as shown in the screen shot below.

The “WiFi” password is factory set to be blank (no characters).
Adding a password increases the security of your WiFi network.

If changes have been made to settings, click .

Version 1.0 - May 29, 2020                                    16
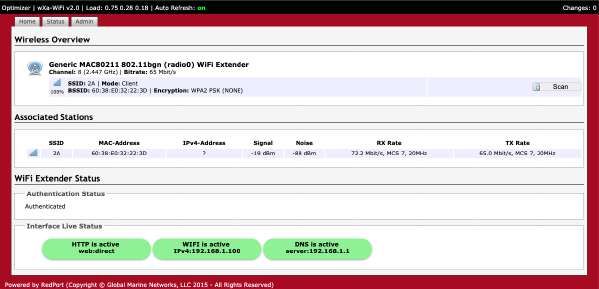
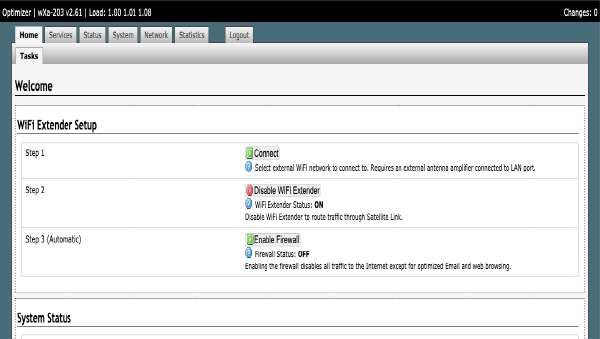
Halo Mac or PC Device Installation and Setup

NOTE: Using the Halo App is the Recommended process for
installation and setup (see page 10).

1. Assemble and plug your RedPort Halo into an Optimizer
Reference the diagrams (pages 5-8) for assembly, then power
on all equipment.

2. Connect to the Optimizer
Navigate to Wi-Fi Settings of your Mac or PC device and click
Find the listed Optimizer network which will be displayed as
wXa-1xx-xxxx. Click .

3. Open a Web Browser
Open a web browser of your preference and enter 192.168.10.1
(Optimizer Interface) in the address bar and press .

4. Login to User Interface (UI)
Username: admin
Password: webxaccess
Click

For initial Installation and Setup, the Halo will be configured from
RedPort with the Wi-Fi Extender Mode enabled, as shown in the
following screen shot.

Version 1.0 - May 29, 2020                                       17
5. Connect WiFi Extender
Click  in the “WiFi Extender Setup”.

NOTE: Your browser will redirect to 192.168.10.177 (Halo
Interface). See next screen shot.

6. Scan for Wi-Fi Network
Click  to Search for available WiFi.

7. Select Wi-Fi Network
Click  for the network of choice.

Version 1.0 - May 29, 2020                                 18
8. Enter Wi-Fi Network Password
Enter password as needed. Click .

9. Accept Network
Click .

The Halo Wi-Fi extender is now configured and is ready for use.
You can now exit the User Interface and enjoy Internet usage.

Version 1.0 - May 29, 2020                                   19
Frequently Asked Questions (FAQ)
(More FAQ located at halowifi.net)

I do not see anything when I go to 192.168.10.1 or halowifi.net?
If you open up a web browser and do not see the UI of the
Optimizer, ensure you are connected to the Optimizer’s Wi-Fi
called “wXa-203-xxxx”. If Wi-Fi connection verified, perform a
factory reset (press the black inset button under “RST” on the
front panel with a pen or paperclip for 15 seconds, then let go).
Wait for the lights on the top of the Optimizer to stop flashing
(30 seconds of flashing).You should now see the Wi-Fi network.

I can’t find the Optimizer’s Wi-Fi name?
The Optimizer’s Wi-Fi is called “wXa-203-xxxx” by default. If you
do not see it in the list of Wi-Fi networks, look at the Optimizer
and see if the lights on top are illuminated. If not, is the
Optimizer plugged in? If the WLAN light is illuminated and the
Wi-Fi network is not viewable, perform a factory reset (press the
black inset button under “RST” on the front panel with a pen or
paperclip for 15 seconds, then let go). Wait for the lights on the
top of the Optimizer to stop flashing (30 seconds of flashing).
You should now see the Wi-Fi network.

I logged into the Optimizer and do not see the connect button?
If you have logged into the Optimizer’s interface and do not see
“steps 1-3” or do not see the  button - Look at the Wi-Fi
extender. Are there any lights on? It requires power through the
Ethernet cable (POE) that is connected to the Optimizer Lan
port. The Halo Wi-Fi extender needs to be plugged into the LAN
port and not the SAT port.

I don’t see any lights on the Halo Wi-Fi Extender?
If you do not see any lights on the Wi-Fi extender, you most
likely have not plugged the Ethernet cable into the bottom of the
Wi-Fi Extender and then plug the Ethernet cable into the LAN
port of the Optimizer.

After I joined a network to repeat, the signal said 0?
If you join a Wi-Fi network and after you click
, the signal drops to 0, this means you have
typed in the password for the Wi-Fi network you are attempting
to repeat, incorrectly.

Version 1.0 - May 29, 2020                                      20
I see a lot of networks, but not the one I want to connect to?
The Halo Wi-Fi Extender will only connect to 2.4 GHz networks.
If the network you want to connect to is 5 GHz, the Halo Wi-Fi
Extender will not see that network.

My connectivity is cutting out over the Halo Wi-Fi Extender
when I am very close the Wi-Fi hotspot I am repeating?
The Halo Wi-Fi Extender is a very powerful antenna. If you are
close enough to connect without using the Wi-Fi extender, you
should not use it. In this scenario, the Wi-Fi extender is over
powering the weaker Wi-Fi network you are attempting to
connect to and most likely causing interference for everyone
around you.

My connectivity is cutting out over the Halo Wi-Fi Extender
when I am not close enough to connect without the Halo Wi-Fi
Extender?
The Halo Wi-Fi Extender should be placed 10-15 feet above the
water or ground level. You are most likely over-shooting the
Wi-Fi networks you want to connect to. Because the Wi-Fi
extender emits Wi-Fi perpendicular in relationship to the
antenna, at a height of 10-15 feet, the horizon is between 4-6
miles away. If you mount your Wi-Fi extender incorrectly, you
will likely overshoot all the Wi-Fi access points you are hoping to
repeat, or at the very least, have very poor performance.

I plugged in the Optimizer and antenna but they won’t power
on?
Ensure that you have fully seated the 12v AC power plug into
the Optimizer and have screwed the security fastner onto the
screw firmly but not too tightly.

How do I update the firmware?
First step is exit Wi-Fi extender mode. You can find out if you
are in Wi-Fi extender mode, by logging into the Optimizer’s
UI, and if the section “WiFi Extender Mode” says “enable WiFi
Extender Mode”, you do not need to do anything and can skip
down to “Update the Optimizer’s WiFi” section. If it says
“Disable WiFi Extender Mode”, continue with the next section.

Version 1.0 - May 29, 2020                                        21
To exit out of Wi-Fi extender mode:

1. Click  tab.
2. Click .
The Optimizer and Wi-Fi extender will reboot. Wait for the lights
on the top of the Optimizer to stop flashing (30 seconds of
flashing). The Optimizer is now available again and you can
reconnect to the Optimizer’s Wi-Fi.

Wi-Fi extender mode does step 2 and 3 for you when not in
Wi-Fi extender mode, so after updating the firmware, you can
simply click “enable Wi-Fi extender mode” to get back to the
original setup you had, where you only have to click scan to
connect to a new Wi-Fi network. But to update the firmware, we
will have to stay out of Wi-Fi extender mode.

Then update the Optimizer’s Firmware:

Download the appropriate firmware for your Optimizer to your
computer (you can find your model number on the bottom of
your Optimizer) from
redportglobal.com/support/technical-downloads/

1. Wi-Fi connect to the Optimizer (wxa-203-xxxx).
2. Open a browser and go to 192.168.10.1
3. Login as Username: superadmin Password: webxaccess.
4. Go to system tab > Backup/Flash firmware.
5. Under “Flash New Firmware image” uncheck “keep settings”,
   if checked (this is very important).
6. Browse for the firmware you downloaded from above link
   “latest-wxa-203.bin” by clicking .
7. Click .
8. Click  (this page will die and never refresh. Close
   web page).
9. Wait for the lights to stop flashing on top of the Optimizer (30
seconds of flashing). The Optimizer’s Firmware is updated.

AS NEEDED...Then update the Wi-Fi Extender Firmware:

Download this firmware for your Wi-Fi extender from
redportglobal.com/support/technical-downloads/

Version 1.0 - May 29, 2020                                       22
1. Wi-Fi connect to the optimizer (wxa-203-xxxx).
2. Open a browser and go to 192.168.10.1
3. Login as Username: superadmin Password: webxaccess
4. Go to system tab > Backup/Flash firmware.
5. Under the pane “WiFi extender”, click
.
6. Check that the URL has 192.168.10.177 and not
   192.168.10.1. If you do not see 192.168.10.177, please go
   back to step 1.
7. Browse for the firmware you downloaded from above link
   “latest-wifiext.bin” by clicking . Do not confuse
   with Optimizer firmware (“latest-wxa-203.bin”).
8. Click , then click  (this page will die and
   never refresh. Close web page.)
9. Wait for 2 minutes, and then check in the Optimizer’s web
   page (192.168.10.1) to see if your Wi-Fi extender has
   updated the firmware. You will see steps 1, 2, 3 under “WiFi
   extender setup” pane, if Wi-Fi extender has successfully
   booted up.

The Optimizer and Halo are now up to date. You can click
 to have the same setup as when
you started. Your Optimizer will reboot, to enable Wi-Fi extender
mode.

Version 1.0 - May 29, 2020                                      23
Additional Halo FAQ, Help, and Information
• halowifi.net
• redportglobal.com/support/documentation-manuals/
• redportglobal.com/support/technical-downloads/

RedPort Company Information
For product orders, support or returns, please contact:
Phone: International: +1 865.379.8723
        USA: 877.379.8723
Email: info@redportglobal
Sales: sales@redportglobal.com
Web: redportglobal.com

RedPort Address
RedPort
3224 Wrights Ferry Road
Louisville, TN 37777

             © 2020 RedPort Global | Powered by
             Pivotel America Inc. | All Rights Reserved.

Version 1.0 - May 29, 2020                                 24
You can also read