Infinity Connect Mobile App User Guide - Software Version 1.7 Document Version 1.7.a January 2021
←
→
Page content transcription
If your browser does not render page correctly, please read the page content below

Infinity Connect Mobile App

        User Guide

        Software Version 1.7

       Document Version 1.7.a

           January 2021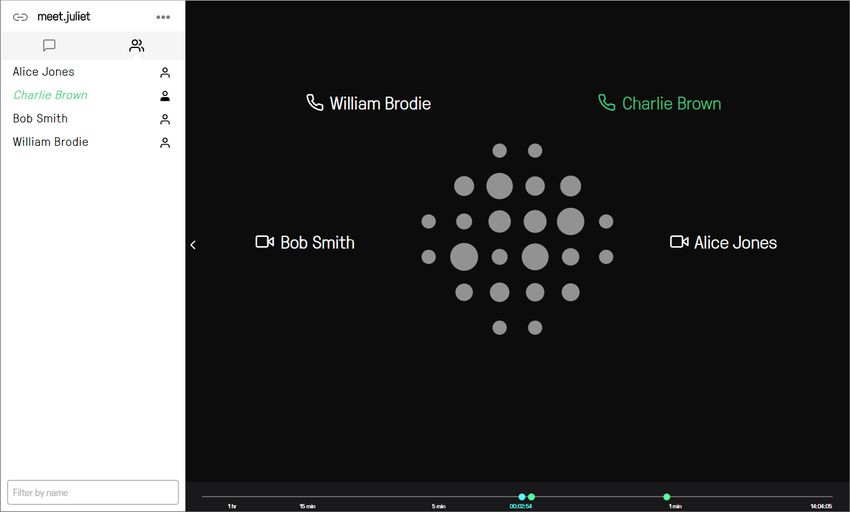
Infinity Connect Mobile App User Guide

Contents
Introduction                                                                                       3
Installing the Infinity Connect mobile client                                                      3
Allowing Infinity Connect to access your device                                                    3
Integrating with your Calendar                                                                     4
Getting started                                                                                    4
Configuring your client                                                                            4
Making a call                                                                                      6
Switching between the loudspeaker and a headset                                                    9
Using in-call controls                                                                             9

© 2021 Pexip AS                                            Version 1.7.a January 2021   Page 2 of 15

Infinity Connect Mobile App User Guide                                                                             Introduction

Introduction
All you need to do to make a call into a Pexip Infinity environment using the Infinity Connect mobile client is install it, enter your
name, and then enter the alias of the person or conference you want to call. This guide tells you how to do this, as well as
providing information on using all the other available features.

Installing the Infinity Connect mobile client

Android
The Infinity Connect mobile client for Android is available for free from the Google Play store at
https://play.google.com/store/apps/details?id=com.pexip.infinityconnect. Follow the instructions to download and install the
Infinity Connect mobile client on your device.
    If you search for "Pexip" in the Google Play store, you will see two apps. The version labeled Pexip Infinity Connect with the
       icon is the one you should download for use with Pexip Infinity deployments. You will also see an app called Pexip (My
    Meeting Video); this is for use by customers of the Pexip Service and should not be used in Pexip Infinity deployments.
The Infinity Connect mobile client for Android requires Android 7.0 or later.

iOS
The Infinity Connect mobile client for iOS is available for free from the Apple Store at
https://itunes.apple.com/us/app/pexip/id1195088102. Follow the instructions to download and install the client on your device.
    If you search for "Pexip" in the Apple Store, you will see both the legacy and the latest versions of the app. The version labeled
    Pexip Infinity Connect with the     icon is the latest version and the one you should download. You will also see an app called
    Pexip (My Meeting Video); this is for use by customers of the Pexip Service and should not be used in Pexip Infinity
    deployments.
The Infinity Connect mobile client for iOS is compatible with any iOS device running iOS 10.x or later.

Allowing Infinity Connect to access your device
When you use the Infinity Connect mobile client, it will request permission to access the camera, microphone and certain
applications on your device. The following permission are required:

 Permission/Description                                    Use

 Camera / Take pictures and record video                   Access is required if you want to send video.

 Microphone / Record audio                                 Access is required if you want to send audio.

 Calendar                                                  Allows you to integrate your meeting invitations with Infinity Connect.

If you deny any of these requests, you can change the permissions at a later time by going to your device's permissions settings for
the Pexip Infinity Connect app.

© 2021 Pexip AS                                                  Version 1.7.a January 2021                                          Page 3 of 15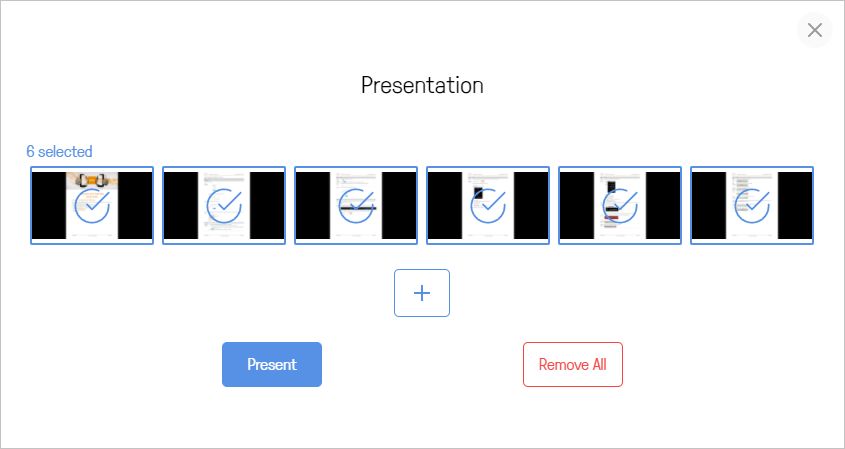
Infinity Connect Mobile App User Guide                                                                 Integrating with your Calendar

Integrating with your Calendar
The Infinity Connect mobile client for Android and iOS automatically integrates with your calendar:

 l   Any appointments with a Location in the form of a URI (for example meet.sales@example.com) will automatically appear as
     an upcoming event on the Call page.
 l   If the location URI is followed by the word PIN and then the meeting PIN, this will be used automatically when you join the
     meeting.

To join the conference, simply select the event from the Call page:

Getting started
When you open Infinity Connect for the first time, you are presented with a Welcome screen:

Enter your name (this will be seen by all the other meeting participants) and select OK .

Configuring your client
 Setting                      Description

 Home page

 Name                         The name that will appear to other conference participants.

                              You'll be asked to enter your name the first time you use the client, but you can change your name from the
                              home page by clicking on it.

        Settings

                              Shows the currently selected camera. Select this option to change the camera to use.

 (Camera)                     When the selected camera is working properly, your self view will be shown in the main video window.

                                   If you select None, you will join the meeting without a camera, but you will still be able to see everyone else's
                                   video.

© 2021 Pexip AS                                               Version 1.7.a January 2021                                                   Page 4 of 15
Infinity Connect Mobile App User Guide Configuring your client
Setting Description
Shows the currently selected microphone. Select this option to change the microphone to use.
When the selected microphone is working properly, a green bar will appear under the main video window when
(Microphone) audio is detected. The length of the bar represents the level of audio volume being picked up by the microphone.
If you select None, you will join the meeting without a microphone, but you will still be able to hear everyone
else's audio.
Shows the currently selected speakers or headset. Select this option to change the speakers to use.
(Speakers) To check that the selected speakers are working properly, select the speaker icon from the bottom left of the
main video window and then select the speaker to use. A tone will be played from that speaker.
The maximum bandwidth for the call, and the bandwidth at which the initial call attempt will be made. Note that
calls may be temporarily downspeeded due to network conditions.
Bandwidth * The default is Medium (up to 576kbps), but if you are on a cellular connection or slow Wi-Fi connection you may
wish to reduce this to Low (up to 256kbps).
You should also reconnect using a lower bandwidth if you experience slow or low-quality video.
(Only applies if additional languages have been enabled by your administrator.)
Languages * Allows you to select from a drop-down menu the language to use in your Infinity Connect client.
If your browser or device's default language is supported by the Infinity Connect client, that language will be
used automatically. Alternatively, your administrator may have specified a default language to use.
Advanced settings
Confirm when When this option is selected, you must confirm each time you wish to disconnect from a meeting. This prevents
disconnecting * you from accidentally disconnecting yourself. This is on by default.
Send anonymous When this option is selected, anonymous information about how the client is being used is sent to Pexip. This is
statistics * on by default.
High contrast * When this option is enabled, there is a higher contrast between foreground and background elements of the
user interface, making them more legible. This is off by default.
Device pairing This setting toggles the availability of the option to pair with an alternative device when placing a call.
This is off by default.
About this app
Reset app The Reset option clears the app storage.
Logs If you are having issues with your Infinity Connect client, your administrator may ask you to Copy to clipboard
to obtain logging information about the last call.
* The administrator can provide a first-time default for this option.
© 2021 Pexip AS Version 1.7.a January 2021 Page 5 of 15Infinity Connect Mobile App User Guide Making a call
Making a call
What How
Joining a call 1. Ensure that your camera and microphone are enabled and working correctly:
with audio o You should see your own image in the video window.
and video
o The microphone icon should be green and you should see a green bar under the video image indicating the
volume of audio being detected.
2. Select .
3. In the box at the top right of the window, enter the address of the person or meeting you wish to join:
4. Either click on the icon to the right of the box, or press enter.
Joining a call 1. Ensure that your microphone icon is green and you see a green bar under the video image indicating the volume of
with audio
audio being detected.
only
2. Select .
3. In the box at the top right of the window, enter the address of the person or meeting you wish to join:
4. Either click on the icon to the right of the box, or press enter.
When you have joined the call, you will be able to hear other participants and they will be able to hear you, and you will be
able to send and receive content, but you will not send or receive any video. Instead, in the main video window you will see
an infographic of the participants in the call:
© 2021 Pexip AS Version 1.7.a January 2021 Page 6 of 15Infinity Connect Mobile App User Guide Making a call
What How
Joining a
meeting as a
1. Select .
presentation
and control- 2. In the box at the top right of the window, enter the address of the meeting you wish to join:
only
participant
3. Either click on the icon to the right of the box, or press enter.
You will join the meeting as a presentation and control-only participant - you will not be sending any audio or video, and
you will not receive any audio or video from other participants. However, you will be able to view content that others are
sharing, and share content with others. You will also have access to the participant list and events, and be able to control
the conference (if you are a Host).
Entering the For some meetings, you will be offered the ability to enter a PIN. If this is your VMR, enter your Host PIN. If not, the meeting
PIN organizer should have told you the PIN to use. If you haven't been given a PIN, select Join to join as a Guest:
The PIN determines whether you join the meeting as a Host or Guest. Hosts can control the meeting and the other
participants; Guests can't control the meeting but can still see and hear the other participants, and share content.
Other ways to select the person or meeting to call
Favorites You can add the addresses of people or meetings you call frequently to your Favorites list.
To do this:
1. Select the add icon to the right of the Favorites section.
2. Enter the address of the person or meeting room, and the name you want to remember it by:
3. Select the icon or press enter.
You can also add a favorite from the Recents list (see below).
Recents The addresses of any people or meetings you have previously called, or received calls from, will appear in the Recents list.
l To call anyone in this list again, simply click on the address.
l To use an address in the list as a basis for a new address to call (for example if you have mis-typed an address), select the
edit icon to the right of the address. The existing address will appear in the box at the top of the list; from here you
can edit it before placing the call.
l To add an address in the list to your Favorites (see above), select the star icon to the right of the address.
© 2021 Pexip AS Version 1.7.a January 2021 Page 7 of 15Infinity Connect Mobile App User Guide Making a call
What How
Advanced options
Pairing with You can use your Infinity Connect client to pair with another video (or audio) device. When paired, your Infinity Connect
an alternative client will join the meeting as a presentation and control-only participant, and the paired device will join with video (or
video/audio audio). Paired devices are added automatically to any Virtual Meeting Room or Virtual Auditorium you join as a Host from
device your Infinity Connect client. The paired device will be disconnected automatically from the meeting when you disconnect
your client.
Pairing is useful if, for example, you often make calls from a dedicated meeting room with a videoconferencing endpoint
that you use for the main video, but you also want to use your Infinity Connect client to control the meeting and view
content.
To pair with an alternative device:
1. From the bottom of the call panel, select Pair with a device.
2. From the Device Pairing panel, select the + icon in the top right corner.
3. Enter the address of the device, and the name that you want to remember it by.
By default, the paired device will be set to Showing presentation on this device, meaning that any content being
shared, as well as the main video, will be shown. If you don't want content to be sent to the device (for example, if
you intend to view content on your Infinity Connect client), click on the option; it will change to Presentation
hidden on this device, meaning that the device will only show the main video stream. Click the option again to
toggle back to showing content.
4. Select the icon or press Enter.
5. The new device will appear in the list. To use it for your next call, click on it - the selected device will appear in blue:
6. To return to the main call page, select the icon at the bottom left of the panel.
Now, at the bottom left of the home screen you'll see Calling using followed by the name of the selected paired device:
When a paired device is selected, whenever you place a video (or audio-only) call to a VMR, the selected device will be added
to that VMR as a video (or audio-only) participant, and your connect client will join the VMR as a presentation and control-
only participant.
To stop using the additional device:
1. Click on the Calling using ... link at the bottom left of the home screen.
2. From the list of devices, select Default.
The button at the bottom of the call panel will change to Pair with a device — this means that only your connect client will
be used the next time you place a call.
© 2021 Pexip AS Version 1.7.a January 2021 Page 8 of 15Infinity Connect Mobile App User Guide Switching between the loudspeaker and a headset
Switching between the loudspeaker and a headset
The Infinity Connect mobile client for Android and iOS will automatically use a headset if one is plugged in to your device.
Otherwise, your device's loudspeaker is used.
Using in-call controls
What How
Enter Host PIN (if joined as From the toolbar at the bottom of the screen, select Enter Host PIN.
Guest)
Change your camera, 1. From the top of the side panel, select Control .
microphone or speakers 2. Select Select media devices.
during a call
3. Select the camera, microphone or speakers/headset, and then choose a new one from the list of
available options.
Share images or PDFs with all 1. From the toolbar at the bottom of the screen, select Present files.
other participants
The Presentation screen appears:
2. Select +, or drag and drop the file(s) you want to share into the Presentation window. You can add
multiple files, and they can be a combination of images (JPEG, BMP, PNG or GIF) and PDFs (if
supported by your device). Each image and PDF page is converted into an individual slide.
3. By default, every slide is selected for presenting, but you can click on individual slides to select and
deselect them:
4. When you have selected all the slides you want to share, select Present. Use the left < and right > on-
screen controls to scroll through the slides. You also have the option to View presentation in a
separate window.
5. To stop sharing the slides, from the toolbar select Stop presenting.
Note that the ability to present into a conference may have been restricted to Hosts only.
© 2021 Pexip AS Version 1.7.a January 2021 Page 9 of 15Infinity Connect Mobile App User Guide Using in-call controls
What How
View a presentation being When a participant starts a presentation, you will automatically see the content they are sharing as your
shown by another participant main image, and the image of the participants will reduce to a small thumbnail at the top left corner.
You can toggle between viewing the presentation and viewing the participants by clicking on the
thumbnail.
You can also click and drag this window to move it.
Stop/start sending (Requires Host privileges)
presentation to a participant When a participant is sharing a presentation, other participants receive both
the presentation and the main video. However, you may want to receive
just the main video on a particular endpoint (for example, if you are using a
meeting room system for audio and video, but you are already viewing the
presentation on your Infinity Connect client, you could stop sending
presentation to the meeting room system). To do this, from the Participant
list, select the participant and then select Hide presentation here.
Start sending and receiving (For users who have initially joined without audio and video)
video
From the toolbar at the bottom of the window, select Start Video.
Start sending and receiving (For users who have initially joined without audio and video)
audio
From the toolbar at the bottom of the window, select Start audio.
Stop/start sending your video From the toolbar at the bottom of the window, select Turn my camera off or Turn my camera on.
to other participants
Other participants will no longer be able to see you, but you will be able to see them.
Stop/start sending your audio From the toolbar at the bottom of the window, select Turn my microphone off or Turn my microphone
to other participants on.
Other participants will no longer be able to hear you, but you will be able to hear them.
Stop/start viewing the video of The video of yourself that is being sent to other participants is shown in a thumbnail at the top right of the
yourself screen. To hide this, click on the image. It will be replaced by a small Show self view icon; select this to view
your image again.
View details of events To see a list of conference events that have occurred during the course of
the call (participants joining, leaving, presenting etc.), from the top of the
side panel select the Events tab:
© 2021 Pexip AS Version 1.7.a January 2021 Page 10 of 15Infinity Connect Mobile App User Guide Using in-call controls
What How
View a list of other conference When using Infinity Connect, a list of all other conference participants will be
participants shown in the Participant list tab of the control panel (which is to the left
of or at the bottom of the screen, depending on the screen width). You can
scroll through this list to view the names of other participants. You can also
search for a particular participant using the Filter by name box at the
bottom of the list.
The /filter command lets you filter the participant list based on certain criteria such as the
participants' role.
View an individual participant's Each person in the Participant list has an icon next to their name, representing their role:
role
Hosts, who can control the meeting and other participants
Guests
External Guests, who connected directly to an externally-hosted conference, such as a
Microsoft Teams or Skype for Business meeting, or Google Meet.
Change a participant's role (Requires Host privileges; you cannot change your own role to Guest.)
From the Participant list, select the participant and then select Make Host
or Make Guest.
You cannot change the role of External Guest participants (those who are
connected directly to an externally-hosted conference, such as a
Microsoft Teams or Skype for Business meeting, or Google Meet).
View individual participant's From the Participant list, select the participant and then select Show Info.
details This brings up an overlay dialog containing details of the participant,
including their avatar or image if available (otherwise a placeholder image is
shown).
Control another participant's (Requires Host privileges. This feature must be enabled by an Administrator;
camera not all endpoints can be controlled remotely.)
From the participant list, select the participant whose camera you want to
control, and then select Camera control (for person-to-person calls, this
option is also available via the Camera control button on the toolbar).
The Camera Control overlay will appear. Use the buttons to pan, tilt and
zoom the camera at the far end. For calls in a Virtual Meeting Room or Virtual
Auditorium you can also select Spotlight to bring the participant into the
main video window for as long as the Camera Control overlay is open.
© 2021 Pexip AS Version 1.7.a January 2021 Page 11 of 15Infinity Connect Mobile App User Guide Using in-call controls
What How
Send and receive chat (Available when chat has been enabled by the administrator)
messages, and share online
All events, including chat messages, are shown in the Events tab of the side panel (which is to the left of
videos and images
or at the bottom of the screen, depending on the screen width).
To send a message, type it in the text box at the bottom of the panel:
Messages are visible to everyone else in the conference with a chat-capable client (such as Skype for
Business / Lync or Infinity Connect).
You can also share videos and images by pasting their URL into the text box.
Prevent/allow others from (Requires Host privileges)
joining the meeting From the top of the side panel, select Control and then select Lock
meeting or Unlock meeting:
The impact of locking depends on whether or not the meeting has a Host
PIN.
Allow a participant to join a (Requires Host privileges)
locked conference Participants who are waiting to join a locked conference are shown in the
Participant list with a tick and cross next to their names. To allow these
participants to join the conference, select the green tick. If you do not want
them to join, select the red cross.
Allow waiting Guests to join a (Requires Host privileges)
new meeting without a Host If a Guest joins a meeting without a Host, they will be kept waiting to join
until the first Host joins, at which point all waiting Guests will automatically
be allowed in to the meeting. However, this only applies if the Host has
joined with audio or video; presentation and control-only Hosts will not
automatically trigger Guests to join.
If you have joined a meeting as a presentation and control-only Host and
want Guests to join, from the top of the side panel, select Control and
then select Start the meeting.
© 2021 Pexip AS Version 1.7.a January 2021 Page 12 of 15Infinity Connect Mobile App User Guide Using in-call controls
What How
Add a participant to the (Requires Host privileges)
conference 1. From the toolbar at the bottom of the screen, select Add participant.
2. At the prompt, enter the address of the person you want to dial.
3. Select whether you want the participant to have Host or Guest
privileges.
4. Select Call in.
The call is placed from the conference to the participant and they will appear in the participant list with a
green line under their name while their endpoint is ringing. If and when the participant answers the call
they will join the conference; if they do not answer, or do not accept the call, they will disappear from the
participant list.
Cancel a call to a participant (Requires Host privileges)
Outbound calls are placed from a Virtual Meeting Room to a participant
when a Host uses the Add participant option, or if the Virtual Meeting
Room has an automatically dialed participant configured.
To cancel an outbound call, from the Participant list, select the participant
and then select Cancel Dialout.
Share a link to the meeting If you want to send a link to the meeting to someone so that they can join
you, select the Share icon at the top left of the screen and then select Copy
meeting link.
You can then send this link to other participants who can paste it into their
browser to join the meeting.
Mute/unmute another (Requires Host privileges)
participant
From the Participant list, select the participant and then select Mute or Unmute.
When muted, a icon is shown next to the participant's name.
Mute all Guest participants (Requires Host privileges)
From the top of the side panel, select Control and then select Mute all
Guests.
Keep a participant in the main (Requires Host privileges)
video
From the Participant list, select the participant and then select Spotlight.
For more information, see Spotlighting a participant.
Indicate that you wish to (Virtual Auditoriums only)
speak
From the toolbar at the bottom of the screen, select Raise my hand. The meeting Host will be alerted that
your hand is raised. If you no longer wish to speak, you can select the button again to Lower my hand.
The meeting Host can also lower your hand.
© 2021 Pexip AS Version 1.7.a January 2021 Page 13 of 15Infinity Connect Mobile App User Guide Using in-call controls
What How
View all participants with (Virtual Auditoriums only; requires Host privileges)
raised hands
From the top of the side panel, select
Control and then select Show hands
raised.
Participants will be listed in the order that
they raised their hand.
Lower a participant's raised (Virtual Auditoriums only; requires Host privileges)
hand
From the Participant list, select the participant and then select Hand
down.
A participant can also lower their own hand.
Send DTMF tones to another (Requires Host privileges; you must be joined over audio, or video and audio)
participant (when in a VMR)
From the Participant list, select the participant and then select Open dialpad. This will open a keypad:
This feature is generally used to communicate with external systems (such as audio bridges, automated
switchboards, and recording devices) after they have been added to the conference.
Send DTMF tones to the other From the toolbar at the bottom of the window, select Open dialpad. This
participant (when in a person- will open a keypad.
to-person call)
Transfer a participant to (Requires Host privileges)
another VMR From the Participant list, select the participant and then select Transfer
Participant.
Enter the alias of the conference you wish to transfer the participant to, the
PIN (if applicable) and whether they should join as a Guest or Host, and then
select Transfer.
You can transfer any participant, including yourself.
Disconnect another (Requires Host privileges)
participant
From the participant list, select the participant's name and then select Disconnect.
© 2021 Pexip AS Version 1.7.a January 2021 Page 14 of 15Infinity Connect Mobile App User Guide Using in-call controls
What How
Disconnect all participants (Requires Host privileges)
(including yourself) From the top of the side panel, select Control and then select
Disconnect all.
Disconnect yourself from the From the toolbar at the bottom of the screen, select Disconnect.
conference
Change the volume of the Use your device's volume controls.
audio coming from the
conference
View diagnostic information (Available when connected with audio or video)
about your call and client From the top of the side panel, select Control and then select Get
media stats.
This brings up an overlay dialog that displays statistics such as the codec
being used, incoming and outgoing audio and video bitrates, and how many
data packets have been lost and received.
It also shows the software version of the client and the Pexip Infinity
deployment it is connected to.
Use a text-based interface to Some tasks can be performed using a command-line-style text input from within the Filter by name box at
filter participants and control the bottom of the Participant list.
the conference
Hosts and Guests can filter the list of participants based on criteria such as their role or who is currently
speaking. Hosts can also perform other conference control functions such as muting and unmuting
participants, spotlighting a participant, and turning the text overlay on and off.
To view a full list of available commands, type / into the Filter by name box.
© 2021 Pexip AS Version 1.7.a January 2021 Page 15 of 15You can also read