Battletech Debug Guide & Instructions
←
→
Page content transcription
If your browser does not render page correctly, please read the page content below
Battletech Debug Guide & Instructions

Battletech Debug Guide & Instructions
       Build Access & Tools Activation
       Display the Build Version
       Build Branch Codes
       Debug Menus, Campaigns, and Checkpoints
       Adding Mechs and Money
       Contract Selection and Injection
       Faster Travel
       Combat Debug Tools
       Getting a Log File for the Current Mission/Contract/Map
       Getting AI Log Files
       Getting Dump files
       Screenshot & Footage Tools
       Save Game Locations:
       Full System Reset “Clean State” Instructions

Build Access & Tools Activation
For all BATTLETECH builds beyond Build 222 we have disabled and hidden debug tools by
default. This will mean that in order to access the debug tools, you will have to take an extra
step prior to launching the game. You will need to manually re-enable the test tools yourself
for each new release build.

There are two ways to re-enable the test tools in release builds:
   1. Alter the settings.json by adding the new key/value pair: "testToolsEnabled": "true",
           a. This file is found in the Battletech steam directory:
              DRIVE:\SteamLibrary\steamapps\common\BattleTech\BattleTech_Data\Streamin
              gAssets\data\debug\settings.json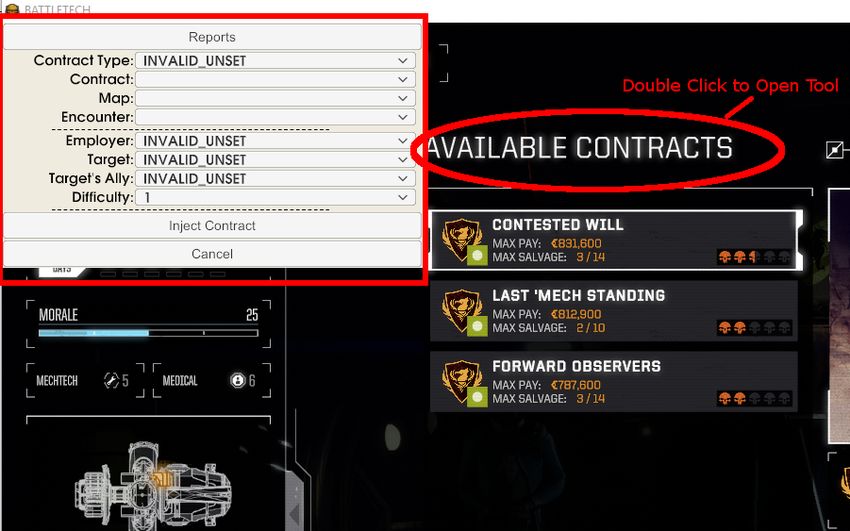
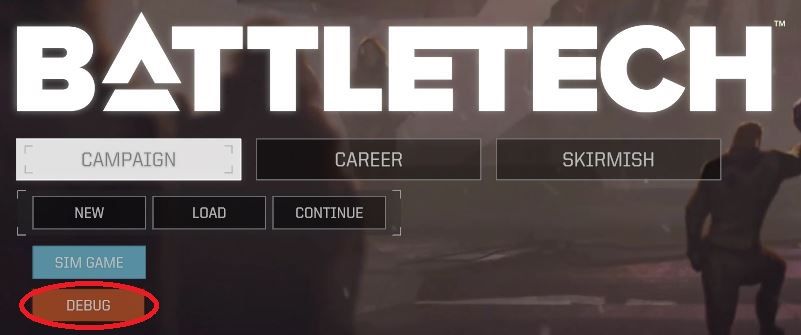
Once the test tools have been re-enabled, you will be able to use them in the game at this point.

Display the Build Version
To display the version of the game you are playing, press Ctrl-Shift-v at the main menu. You
should see a new line of text in the upper right corner of the screen:

Debug Menus, Campaigns, and Checkpoints
Depending on what type of content you are trying to see, it will require you to load into a
Skirmish or Campaign. If you plan on accessing multiple missions or segments of the game, we
recommend starting a debug campaign. This can be achieved by selecting Campaign from the
game’s menu, and select the red ‘Debug’ button.

Start a Campaign and wait for the debug menu to load.
Once the debug menu has loaded you have the ability to select your starting point for the game.

You can now use milestones and debug tags to set a checkpoint for where you will play the
game from. We have several checkpoints set up.
This is done by selecting “Update Tags” in the first dropdown and “Company” in the second
dropdown. Entering the checkpoint name into the text field, clicking the “+” button, then clicking
the “close” button launches the game at that checkpoint.

Our most common debug checkpoint is: debug_start_argo

There are a list of others for use, but if there is no specific mission that is being captured, we
recommend the debug_start_argo.

 Quick Start Tag                   Description                 Milestone

quickstart_leopard_intro           leopard intro scenes        111

quickstart_leopard                 start of leopard phase      114

quickstart_m3                      before mission 3            131

quickstart_m4                      before mission 4            210

quickstart_argo_intro              Argo intro scenes           222

quickstart_argo                    start of argo phase         306

quickstart_panzyr_attack           Before Panzyr attack        310

quickstart_smithon_attack          Before Smithon attack       330

quickstart_m5                      before mission 5            342

quickstart_m6                      before mission 6a           400

quickstart_smithon_defense         Before Smithon defense      501

quickstart_itrom_attack            Before Itrom attack         520

quickstart_panzyr_defense          Before Panzyr defense       540

quickstart_m7                      Before mission 7            522

quickstart_tyrlon_attack           Before Tyrlon attack        610

quickstart_m8                      before mission 8            622

quickstart_ending                  post-9 cinematics, etc.     641

Other checkpoints and other debug options can be accessed through the Sim Game Debug
Menu, this menu is accessed by using the cheat hotkey:

CTRL + SHIFT + MINUS
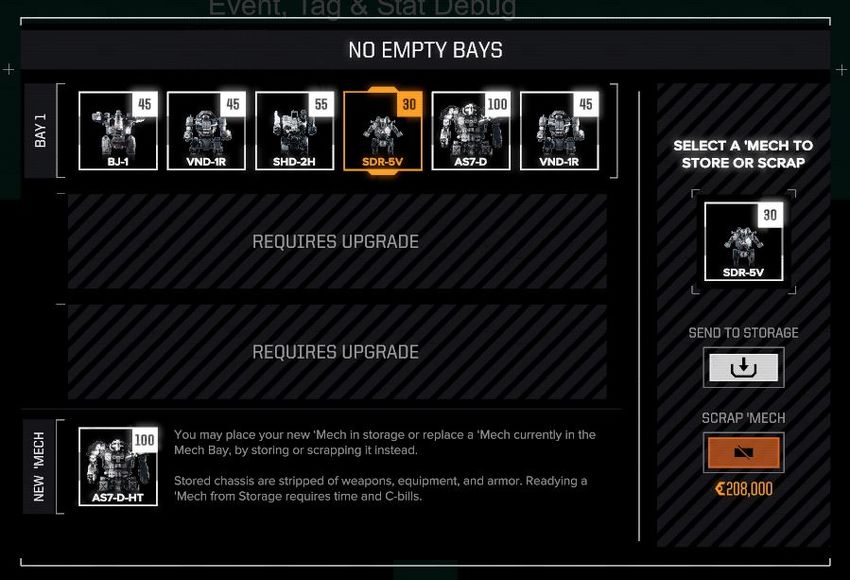
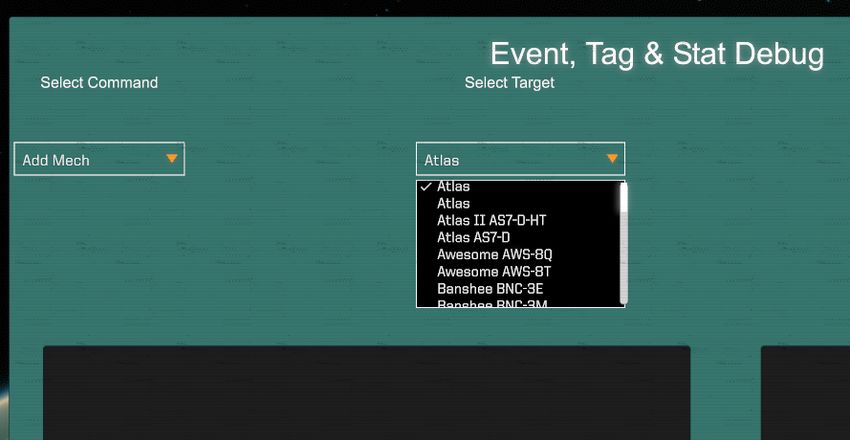
Hitting those keys simultaneously will re-open the debug menu for use in the sim game.

Adding Mechs and Money
Once you have reached the checkpoint in the game that you want to be at, you can add mechs
to your company in order to see them in the Mech Bay or deploy them into combat for use and
footage in those contexts.
This can be done using the Sim Game Debug Menu, after opening the sim game debug menu
the you will be able to select “Add Mech” from the first Dropdown and then you can select the
type of mech (example: Atlas AS7-D) in the second dropdown menu. And then Clicking Submit
on the bottom of the debug menu.

When doing this you will have to select where to place it into the mech bay (there are a limited
numbers of slots for mechs). This is done but selecting (highlighting) the mech you want your
new one to replace. See the below picture for an example.
NOTE: the Mechs dropdown includes testing and special mechs, generally don't choose
anything that looks like it has a nonstandard name.

Money can also be added through the same process. However, this is done by selecting “Add
Funds” in the first dropdown of the Sim Game Debug Menu instead of selecting “Add Mech”.
In this case, simply input the number of CBills you would like to have into the text field on the
right side of the menu, and hitting “Submit”. Most mechs cost several million CBills, so when
adding debug money, don’t be afraid to add millions!

Contract Selection and Injection
Now that you are in the right place in the game, you have the mechs you need, and you have
cash, we can start to play missions.

Story missions have special set ups that require using milestones and checkpoints through the
debug menu we’ve described above.

However if you are in the normal debug sim game state (debug_start_argo) you will also be able
to take on any contracts that are available in the game at that point. Simply go to the Argo
command center and take a contract as if you were playing the game normally.

If you are trying to test a specific mission type, map, or contract, you can Inject a Contract. This
is done through our Contract Injection Tool. To access the Tool, go to the CMD Center and
select the Contracts sub menu. When you are at the Contracts menu, hover the mouse over the
large header that reads: “AVAILABLE CONTRACTS”. Double click this to bring up the Contract
Injection tool in the upper left hand corner of the screen.
Using this Injection tool, you can select the type of Contract (Escort, Rescue, Battle,etc), the
specific Contract, the Map, and the specific version of that mission on that map (some maps
have multiple of the same mission type). You can also set the difficulty and Factions involved.
Faction changes will result in the Color and Paint schemes of those units to change to whatever
Faction you’ve selected. Difficulty will influence the type and challenge of the enemy units that
are spawned.

Once you have the settings you want, click the Inject Contract button, this will place the contract
you have set up into the List of Available Contracts. At that point you can select, negotiate, and
accept that contract.

You can pick your lance and deploy into the mission.

Faster Travel
Travel from system to system can be greatly accelerated by entering the command “supertravel”
into the debug command line (only available in debug mode) while in the Sim Game. To open
the command line hit CTRL-SHIFT-~ a few times until the white command line box appears in
the lower left. Enter the command supertravel into that text box and hit enter. You still need to hit
“escape” during the dropship animated transitions to cancel out of those. Click somewhere else
and hit CTRL-SHIFT-~ one or two more times to exit out of the debug console.
Combat Debug Tools
Once you have deployed into a mission, you now can play the game with your mechs and take
advantage of our different Combat Debug Tool set.
When playing in the combat game, you access the debug tools with the same cheat hotkey:
CTRL + SHIFT + MINUS
This will open our Combat Debug Tool, this has different options that may be useful to you as
you go through your test. You can make your mechs invincible (“P1 God”) you can turn up the
speed of the mechs movements and animations(“Speed”), and more.
Important Debug Options:
● P1 God: This makes your mechs impossible to kill, and it increases their damage output
so that they will instant kill enemies when they shoot at them.
● Kill Target: If you have a player mech selected, and you target an enemy (they are
selected but you haven’t hit “Fire” button yet) this button will kill the targeted enemy.
● Free Cam: This will unhook the camera and allow you to move and pan around freely.
WASD will move the camera, Right Click to Tumble will pan and move the camera.
Mouse Scroll with allow you to zoom in and out.
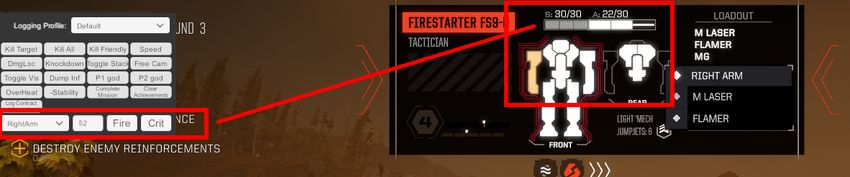
● DmgLoc: You must have a unit targeted, but if you do, you can have the tool apply
damage to specific locations on a mech. This can help show off the destruction in the
game. Example: Target a mech > use “DmgLoc” on “RightArm” for 100 points > click fire,
and it will blow off the arm of the targeted Light ‘Mech. You’ll have to examine how much
Armor and Structure the enemy unit has to tabulate the appropriate amount of damage
to get the desired result however.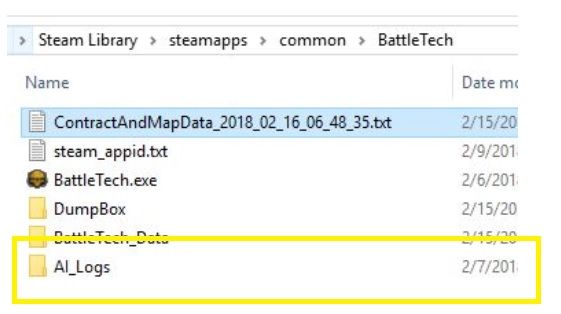
● Speed: This increases the speed of all units in the game so that they move more quickly.
● Complete Mission: This auto-completes the mission and ends the combat game state,
and returns you to the Sim Game.
● Knockdown: Will knockdown targeted enemy unit.
● Overheat: Will overheat and shutdown an enemy mech.
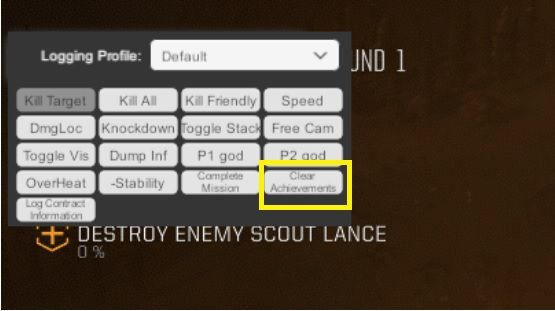
● Clear Achievements: Critical for achievements testing, this will reset all earned
achievements associated with your Steam or GOG account.
Getting a Log File for the Current Mission/Contract/Map
If you encounter issues on a mission, getting this log file for us can be very helpful. Just click the
"Log Contract Information" button in the Ctrl + Shift + Minus debug panel, then locate the
generated Log file at: ..\Steam Library\steamapps\common\BattleTech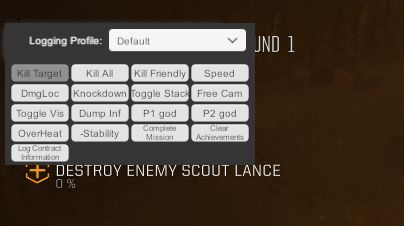
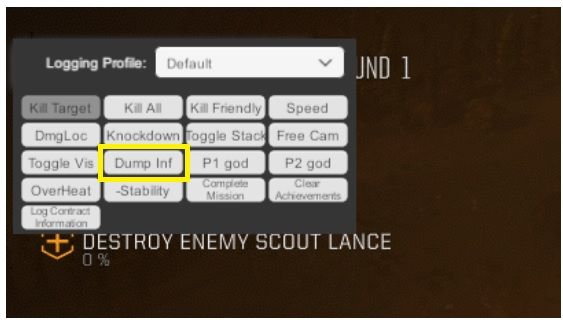
Getting AI Log Files
In cases where the AI exhibits unexpected or unusual behavior, it may be useful to get the AI
logs. Similar to the process for dumping and retrieving the contract & map data log above, use
the Ctrl + Shift + Minus debug panel and click the “Dump Inf” button.

Then locate the generated Log file directory at: ..\Steam
Library\steamapps\common\BattleTech
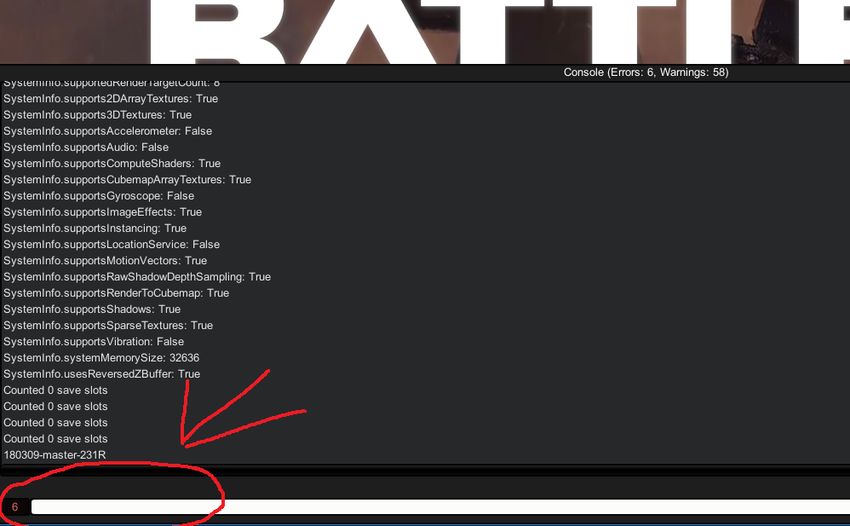
Getting Dump files
    1. Hit Ctrl + Shift + ~ Until the "Dump.zip.open" button appears in the lower-right hand
       corner of the screen.
    2. Click that button.
    3. A Windows folder should open. (If it doesn't, head to ..\Steam
       Library\steamapps\common\BattleTech\DumpBox)
           ○ OSX: ~/Library/Logs/Unity/Player.log (Editor log only)
           ○ Right click on BattleTech.app and select show package contents. Dump files will
               be in a subfolder inside.
    4. Grab the .zip file with the latest timestamp, that should contain all the dump files.

Screenshot & Footage Tools
These following shortcuts can be used for manipulating the camera and the UI for desired
screenshot and footage needs.

 Ctrl + Shift + I                                 Toggles the Debug / Fly Camera

 Ctrl + Shift + U                                 Toggles through All / InWorld / None for UI

 Left Ctrl + K                                    Takes a 4k screenshot with no UI (Note that
                                                  screenshots will always be 4k regardless of
                                                  current screen resolution.)

 Left Ctrl + Left Shift + K                       Takes a 4k screenshot with the entire UI

 Left Ctrl + Right Shift + K                      Takes a 4k screenshot with just the in world
                                                  UI (WIP)

Screenshot Save Location
WIN: C:\Users\\AppData\LocalLow\Harebrained Schemes
MAC: Users\\Library\Application Support\Harebrained Schemes\BattleTech

Note that there is a bug where screenshots from each new play session will override
screenshots from previous sessions - so if you want to keep your screenshots, move them out
of this folder before starting a new game!

You can also plug in an XBOX Controller to control the camera with a controller. You’ll want to
toggle the debug/fly camera with Ctrl+Shift+I when using the controller
Save Game Locations
Steam -
WIN: 'C:\Program Files (x86)\Steam\userdata\USER_ID\ 637090\remote\C#\SGS#'
MAC: ‘/Users/"USER_ID"/Library/Application
Support/Steam/userdata/"ACCOUNT_ID"/637090/remote/C#/SGS#’
LINUX: TBD
GOG -
WIN:
‘C:\Users\USER_ID\AppData\Local\GOG.com\Galaxy\Applications\50593543263669699\Storag
e\Shared\Files\C#\SGS#’
MAC: ‘~\Library\Application
Support\GOG.com\Galaxy\Applications\50593543263669699\Storage\Shared\Files\C#\SGS#’
LINUX: NA / Not Supported
Everything Else
WIN: 'C:\Users\USER_ID\AppData\LocalLow\Harebrained Schemes\BattleTech\C#\SGS#'
MAC: ‘~\Library\Application Support\Harebrained Schemes\BattleTech\C#\SGS#'
LINUX: TBD
Loading Pre-Made Saves
When given a save for the built version of Battletech, it is possible to insert that save into the
Steam Directory and load it.
Navigate to the above mentioned Save Game Locations to find the appropriate location for your
dev environment.
Once in that location you can paste the provided .sav file, which will have an alphanumeric
string as it’s identifier. (e.g. 01299726-60e5-4506-ae4d-aea48d404b56.sav )
The next time you load Battletech, you will see the save available from the menu.
Important Notes:
● Campaign (Sim Game Debug) Saves and Career Mode Saves are DIFFERENT, they will
be loaded from separate menus, Campaign and Career respectively. Make sure you are
attempting to load it from the correct location.
● STEAM, if that is the client you are using, must be closed/exited before Battletech will
recognize the file after it is added. If you want to close Steam before you attempt adding
the new save, that is is preferred for the most reliable outcome.Full System Reset “Clean State” Instructions
1. Alter the settings.json by adding the new key/value pair: "testToolsEnabled": "true"
a. This file is found in the Battletech steam directory:
DRIVE:\SteamLibrary\steamapps\common\BattleTech\BattleTech_Data\Streamin
gAssets\data\debug\settings.json
2. Launch the game in Steam.
3. Skip the intro cinematic using [ESC]
4. Select Skirmish->Single Player->Play->Begin Mission
5. Bring up the debug menu: CTRL + SHIFT + MINUS
6. Click the “Clear Achievements” button
Fun
7. Launch the command line console at the Main Menu by pressing CTRL and the tilde ("~") key three
times, or until you see the white input box at the bottom left.)1. Type in the following commands. There will be a success message in green text if successful, red
errors will indicate a failure.
1. console.deleteplayerprefs
2. Delete all files in storage
i. GOG
1. storage.deleteallfiles
2. There’s a work around to delete all the gog cloud files. Navigate to the
cloud storage folder while the game is still running (see Save
Game Location above). You’ll want to delete everything in the the
FILES folder (2 up from where save games are). When you close the
game all the files will also be deleted locally and on the cloud.
ii. Steam / Vanilla
1. storage.deleteallfiles
3. firstrun.clear1. Alt-Tab to another window, or press Ctrl-Alt-Delete.
2. Open Task Manager.
a. Force quit (End Task) BattleTech.exe to prevent any new settings from being written. Do not
Alt-F4 or exit out of the game using in-game commands.
3. (optional) For the “new user” experience, re-open the settings.json file you did in the first step
and set "testToolsEnabled": "false" or delete the line you entered entirely.
4. Launch BATTLETECH.You can also read