Manual Extension for Shop System Virtuemart 3 - Version 1.2.20 | 25. April 2019 - VR Payment
←
→
Page content transcription
If your browser does not render page correctly, please read the page content below
Manual – Extension for Shop System Virtemart 3

Manual
Extension for Shop System Virtuemart 3

Version 1.2.20 | 25. April 2019

                                          Manual | Extension for Shop System Virtuemart 3 | 2019-04 | 1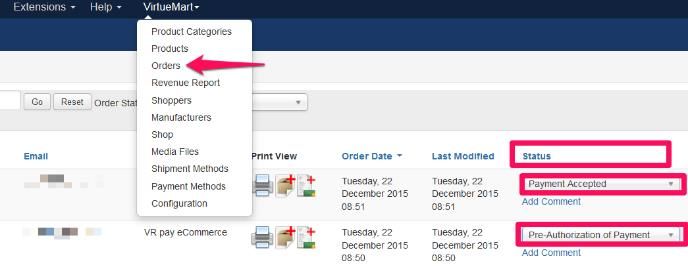
Manual – Extension for Shop System Virtemart 3

Content
1    Introduction ........................................................................................................................................................................ 3

2    Installation .......................................................................................................................................................................... 3
     2.1     Installation via zip file provided by VR pay eCommerce ......................................................................................................... 3
     2.2     Additional Instruction to add Customer Date of Birth .............................................................................................................. 3
     2.3     Additional Instruction to add Account Maintenance menu in shoper frontend .......................................................... 3
     2.4     Additional Instruction to add My Payment Information .......................................................................................................... 4

3    Configuration...................................................................................................................................................................... 4
     3.1   Basic configuration ...................................................................................................................................................................................... 4
     3.2   Configuration of payment methods ................................................................................................................................................... 4
     3.3   Additional configuration options for cards and SEPA ............................................................................................................... 5
     3.4   Direct Debit (SEPA) ...................................................................................................................................................................................... 5
     3.4.1 How to configure Direct Debit (SEPA) .............................................................................................................................................. 5
     3.4.2 How to configure Direct Debit (SEPA) Recurring ........................................................................................................................ 6
     3.4.3 Enable Direct Debit (SEPA) in shipping method configuration ........................................................................................... 6
     3.5   easyCredit ......................................................................................................................................................................................................... 7
     3.5.1 How to configure easyCredit .................................................................................................................................................................. 7
     3.5.2 How to pay using easyCredit ................................................................................................................................................................. 7

4    Usage ................................................................................................................................................................................... 8
     4.1   Order status .................................................................................................................................................................................................... 8
     4.2   Manual posting of pre-authorized amounts .................................................................................................................................. 8
     4.3   Cancellations and credits.......................................................................................................................................................................... 9

5    Plugin-Features .................................................................................................................................................................. 9
     5.1   Easy Checkout ................................................................................................................................................................................................ 9
     5.2   Visa Merchant location disclosure ..................................................................................................................................................... 10

6    Miscellaneous ...................................................................................................................................................................10
     6.1   Error Analysis ................................................................................................................................................................................................ 10
     6.2   Installation...................................................................................................................................................................................................... 10
     6.3   Database ......................................................................................................................................................................................................... 10
     6.4   Configuration................................................................................................................................................................................................ 11

7    Version Tracker ................................................................................................................................................................11

Copyright © 2019 VR Payment GmbH
This document including its attachments, if any, is confidential and may contain information subject to legal privilege. The information contained in this
document remains property of VR Payment GmbH. Any unauthorized copying of this document or unauthorized distribution of the information
contained herein is prohibited.

                                                                                                                        Manual | Extension for Shop System Virtuemart 3 | 2019-04 | 2
Manual – Extension for Shop System Virtemart 3

1     Introduction                                         • Log out from the backoffice area of your VirtueMart
                                                             shop and log in again to update the rights
                                                             management for the back-office user.
Many online shops use one of the leading shop
systems. For them, VR pay eCommerce offers ready-to-
                                                           2.2 Additional Instruction to add Customer Date of
use extensions which make integration much easier.
                                                           Birth
Unless special requirements have to be mapped, these
                                                           1. Select Menu Virtuemart > Configuration > Shopper
extensions suffice to use the services of VR pay
                                                           Fields
eCommerce.
                                                           2. Create new one with click New button
The present extension for the shop system VirtueMart
                                                           3. Input form
supports the following payment methods:
                                                             Field type : Date
                                                             Field name : dob
• Cards (Visa, MasterCard, AMEX, JCB, Diners)
                                                             Field title : Date of Birth
• Direct Debit (SEPA)
                                                             Default :
• PayPal
                                                             Required : No
• SOFORT Banking
                                                             Show in cart form : No
• Giropay
                                                             Show in account maintenance : Yes
• PayDirekt
                                                             Show in shipment form : No
• EasyCredit
                                                             Read-Only : No
The extension is optimized for:
                                                             Published : Yes
• VirtueMart v. 3.0.12 – 3.2.14
                                                             Ordering : 10 password
• Joomla v. 3.4.5 – 3.9.4
                                                           4. Save
•
The following chapters explain:
                                                           2.3 Additional Instruction to add Account
• How to install the extension.
                                                           Maintenance menu in shoper frontend
• Which configuration possibilities exist.
                                                           1. Select Menu Menus
• How to use the extension.
                                                           2. Select where you want to add menu (Example : Fruit
• Which further items have to be observed.
                                                           Shop)
                                                           3. Click Add new menu item.
2     Installation
                                                           4. Input form
                                                             Menu Title : Account Maintenance
The extension is installed via a zip file.
                                                             Menu Item Type : Select
2.1 Installation via zip file provided by
                                                             Virtuemart > Account Maintenance
VR pay eCommerce
                                                             Target Window : Parent
After successful download of the zip file, the extension
                                                             Template Style : Use Default
is installed as follows:
                                                             Menu Location : Fruit Shop
• Unzip the zip file (into a temporary directory).
                                                             Parent Item : Menu Item Root
• Upload the .zip file within the “src” directory in
                                                             Ordering : Login
    Extensions > Manage > Upload Package File
                                                             Status : Published
• Delete complete VirtueMart cache under “System” >
                                                             Default Page : No
    “Clear cache”.
                                                             Access : Registered
                                                             Language : All
                                                           5. Save

                                                           Manual | Extension for Shop System Virtuemart 3 | 2019-04 | 3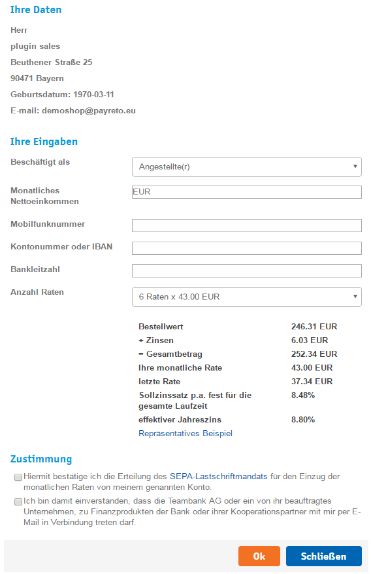
Manual – Extension for Shop System Virtemart 3

2.4 Additional Instruction to add My Payment            3.2 Configuration of payment methods
Information                                             In order to configure a payment method, the
                                                        configuration tab must be opened at first by choosing
1. Select Menu Menus                                    “Configuration” next to “Payment Method Information”
2. Select where you want to add menu (Example : Fruit   under the same path as above. The following items can
Shop)                                                   be configured:
3. Click Add new menu item.                             • Field “Sort Order”: determines the order in which the
4. Input form                                             payment methods are shown in the order process;
  Menu Title : My Payment Information                     sequence is specified by numbering in ascending
  Menu Item Type : Select                                 order beginning with “1”.
  VR pay eCommerce > My Payment Information             • Drop-down list “Enabled”: determines whether the
  Target Window : Parent                                  payment method is active or inactive.
  Template Style : Use Default                          • Drop-down list “Server”: determines whether
  Menu Location : Fruit Shop                              transactions are processed via the TEST or LIVE server.
  Parent Item : Menu Item Root                          Drop-down list “Cards type”: determines which cards
  Ordering : Account Maintenance                        types are available.
  Status : Published                                    • Field “Amount for Registration”: If a stand-alone
  Default Page : No                                       registration is performed, a minimum amount must
  Access : Registered                                     be captured, so that the payment data for recurring is
  Language : All                                          available. The amount will be credited immediately
5. Save                                                   after execution. The merchant is able to set this
                                                          amount in the recurring channels. We recommend
3 Configuration                                           0.05 EUR.
                                                        • Field “Multichannel”: If activated, repeated recurring
3.1 Basic configuration                                   payments are handled by the alternative channel (not
The individual payment methods can be configured in       recommended).
the back-office area                                    • Field “Entity-ID”: determines the Entity-ID.
“VirtueMart” > “Payment Methods” >                      Field “Entity-ID MOTO”: determines the Entity-ID
“VR pay eCommerce”.                                     MOTO. Alternative channel (e.g. without 3D secure) for
Under the Drop-down list “Payment Method” all           recurring payments. Only applied when multichannel
payment methods are depicted.                           active.

                                                        Manual | Extension for Shop System Virtuemart 3 | 2019-04 | 4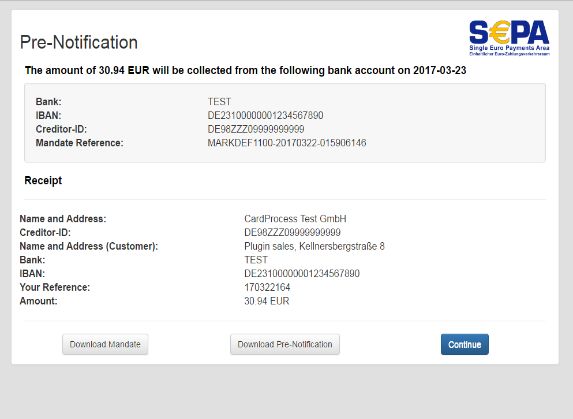
Manual – Extension for Shop System Virtemart 3

The general information about “User-ID“, “Password”,         3.4 Direct Debit (SEPA)
“Recurring”, “Merchant Email”, “Merchant No. (VR Pay)”
and “Shop URL” can be set under the same path                3.4.1 How to configure Direct Debit (SEPA)
“VirtueMart” > “Payment Methods” >                           1.    On Joomla, open Components > VirtueMart >
“VR pay eCommerce” > “Configuration” and are                 Payment Methods
mandatory. Thus, the information will be “inherited” to      2.
the respective payment methods, which makes the                           Find the GENERAL SETTINGS configuration
repeated entry of this information unnecessary.              (see Figure below)

                                                             3.     User-ID field, User-ID used for your Direct Debit
                                                             (SEPA) payment method.
                                                             4.     Password field, Password used for your Direct
                                                             Debit (SEPA) payment method.
3.3 Additional configuration options for cards,
                                                             5.     After that, scroll until you find Direct Debit (SEPA)
Paydirekt and SEPA
For cards and SEPA transactions, there is an additional
configuration option. The drop-down list “Transaction-
Modus” determines whether transactions are to be
debited or only pre-authorized at first.

                                                             6.    Enabled field, set YES if you want to enable Direct
                                                             Debit (SEPA) or set NO if you want to disable Direct
                                                             Debit (SEPA).
                                                             7.    Server field, if you use TEST no real money will be
                                                             charged, if you use LIVE real money will be charged.
• Pre-Authorization: This mode means that the                8.    Transaction-mode field to set transaction mode
  payment transaction is only reserved at first. After the   that will be used.
  merchant has confirmed the transaction manually,           9.     Entity-ID field, Entity-ID used for your Direct Debit
  payment will be concluded successfully.                    (SEPA) payment method.
• Debit: In this mode, payment transactions are              10.    Click Save button.
  effected successfully at once and the transaction
  amount is debited against the customer’s card
  immediately.

                                                             Manual | Extension for Shop System Virtuemart 3 | 2019-04 | 5
Manual – Extension for Shop System Virtemart 3

3.4.2    How to configure Direct Debit (SEPA)                   8.    Transaction-mode field to set transaction mode
Recurring                                                       that will be used.
Recurring is used for storing a user card information. If       9.      Entity-ID field, Entity-ID used for your Direct Debit
recurring is activated/enabled, the user/customer will no       (SEPA) payment method.
longer need to re-type all the card details that was            10.     Click Save button.
entered for the first transaction. The user/customer can
now just select on which of the stored user/customer            3.4.3      How to pay using Direct Debit (SEPA)
card details will be used for the next transactions.            1. Select Direct Debit (SEPA) payment options by
                                                                clicking Direct Debit (SEPA) logo (see Figure below).
The following are the steps to configure Direct Debit           After that click Check Out Now button.
(SEPA) Recurring:
1. On Joomla, open Components > VirtueMart >
Payment Methods
2. Find the GENERAL SETTINGS configuration (see                 2.    You will see Direct Debit (SEPA) payment widget

Figure below)                                                   (see Figure below)

3.      User-ID field, User-ID used for your Direct Debit
(SEPA) payment method.
4.      Password field, Password used for your Direct
Debit (SEPA) payment method.
5.      After that, scroll until you find Direct Debit (SEPA)

                                                                3.      Account holder field, Account holder used for
                                                                your Direct Debit (SEPA) payment method.
                                                                4.      IBAN or account number field, IBAN or account
                                                                number used for your Direct Debit (SEPA) payment
                                                                method.
                                                                5.      BIC or bank code field, BIC or bank code field
                                                                used for your Direct Debit (SEPA) payment method
                                                                6.      Click Pay Now button then you will be redirected

6.   Enabled field, set YES if you want to enable Direct        to Direct Debit (SEPA) page (see Figure below)

Debit (SEPA) or set NO if you want to disable Direct
Debit (SEPA).
7.   Server field, if you use TEST no real money will be
charged, if you use LIVE real money will be charged.

                                                                Manual | Extension for Shop System Virtuemart 3 | 2019-04 | 6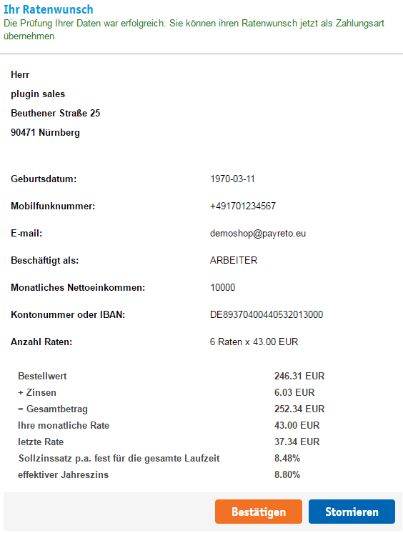
Manual – Extension for Shop System Virtemart 3
3. Enabled field, set YES if you want to enable
easyCredit or set NO if you want to disable easyCredit.
4. Server field, if you use TEST no real money will be
charged, if you use LIVE real money will be charged.
5. Entity-ID field, Entity-ID used for your easyCredit
payment method.
6. Click Save Configuration button.
7. Bank field should be set name of Bank that used.
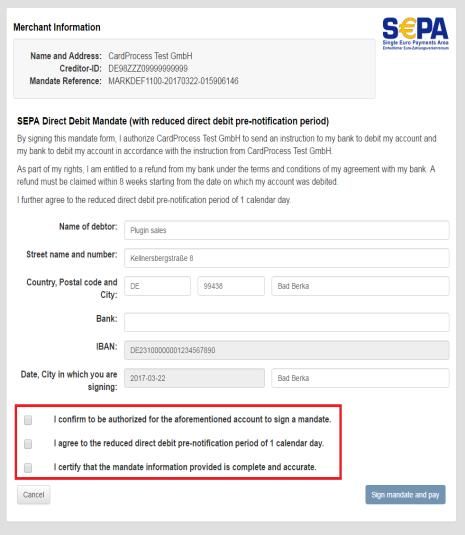
8. Check the three statements which marked by red 3.5.2 How to pay using easyCredit
rectangle (see Figure above) if you agree. Some notes you need to make sure before you pay
9. Click Sign mandate and pay button then you will using easyCredit:
be redirected to the next page (see Figure below). • Amount of order must be greater than EUR200
and lower than EUR3000
• Duration between 6 and 36 months
• Currency used must be EURO
• It’s mandatory to fill customer’s date of birth
• Customer’s billing address must be equal to
customer’s shipping address.
• It’s mandatory to fill customer’s gender
1. Select easyCredit payment method by clicking
easyCredit logo like Figure below. After that click Order
with Obligation to Pay button.
10. Click Continue button then Direct Debit (SEPA)
payment is finish.
3.5. easyCredit
2. You will be redirected to the first of Ratenkauf
3.5.1 How to configure easyCredit payment pages (see Figure below)
1. Open VR pay eCommerce configuration tab in
admin page of osCommerce.
2. Find the easyCredit configuration (see Figure
below)
Manual | Extension for Shop System Virtuemart 3 | 2019-04 | 7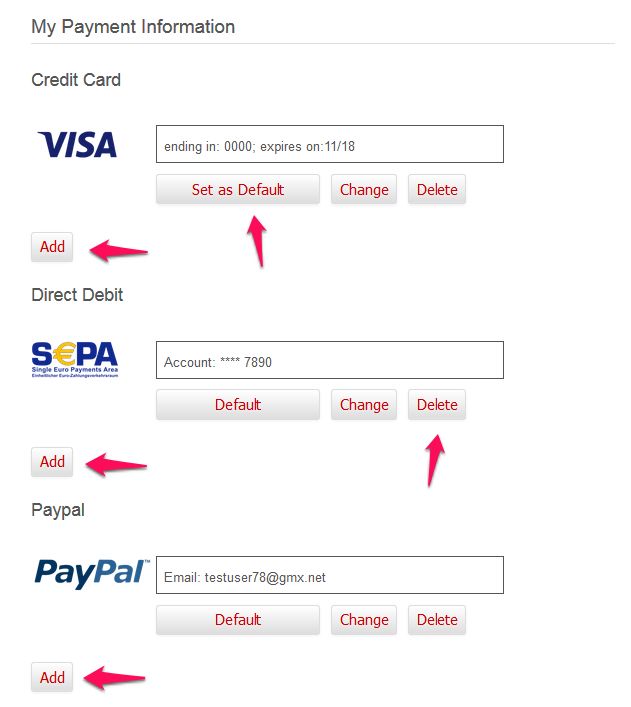
Manual – Extension for Shop System Virtemart 3

3.   Check easyCredit terms and conditions then click     4     Usage
Ok button then you will be redirected to the next page.
                                                          After payment methods have been installed and
4.   You must fill the mandatory fields (see Figure
                                                          activated successfully, they are displayed in the order
below).
                                                          process of the VirtueMart shop. Before using the
5.    Check two statements in the Zustimmung
                                                          module in live operation, detailed tests should be
agreement.
                                                          performed on a test system to ensure smooth
6.    Then click Ok button then you will be redirected
                                                          processes.
to the next page of Ratenkauf payment pages. If want
to cancel a payment then click Schließen button.
                                                          4.1 Order status
                                                          The order status can be seen under “VirtueMart” >
                                                          “Orders” > “Status”. The following status messages are
                                                          the most frequent ones:
                                                          • “Payment Accepted”: Order and payment were
                                                              executed properly.
                                                          • “Pre-Authorization of Payment”: Final confirmation
                                                              of the payment process is pending and must be
                                                              triggered manually by the merchant.

7.   Click Bestätigen button (see Figure below) then
you will be redirected to the confirmation page. If you
                                                          4.2 Manual posting of pre-authorized amounts
want to cancel the payment then click Stornieren
                                                          If transactions are pre-authorized, the transaction
button.
                                                          amount is only reserved on the customer’s credit or
                                                          debit card at first. In order to conclude the payment
                                                          process, the transaction amount must be posted. This is
                                                          done automatically, as soon as the transaction is
                                                          accepted in the VirtueMart back-end under
                                                          “VirtueMart” > “Orders” > “Status” by changing the
                                                          status to “Payment Accepted”. The new status needs to
                                                          be saved through clicking the “Update Order Status”
                                                          button.

8.   Click Confirmation button then easyCredit
payment is finish.

                                                          Manual | Extension for Shop System Virtuemart 3 | 2019-04 | 8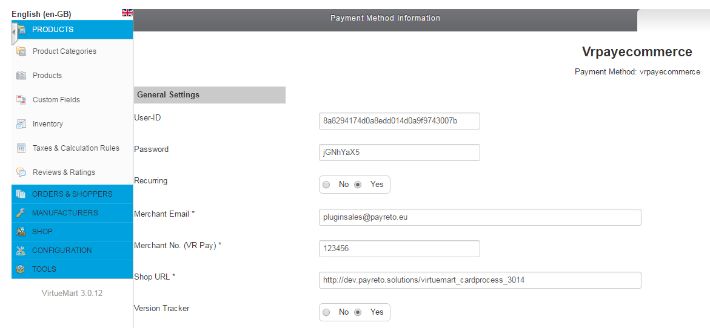
Manual – Extension for Shop System Virtemart 3

4.3 Cancellations and credits
If an order is credited or cancelled in the JTL back-end,
the payment transaction is not credited or cancelled
automatically. This must be done separately in the VR
pay backoffice.

• The merchant is able to carry out refunds under
“VirtueMart” > “Orders” > “Status” by changing the
status to “Refunded”.

Afterwards, the new setting must be saved by clicking
the “Update Order Status” button.                              Attention: Before processing the following steps,
                                                               readme.txt instruction must be executed.

                                                                 Stored payment information are displayed at the
                                                                 shoppers account under “My Payment Information”
                                                                 and can be managed and complemented even
                                                                 without checkout in this area.
5     Plugin-Features

                                                               • The shopper is able to determine via the “Default”
5.1 Easy Checkout
                                                                 button in the “My Payment Information” area a
• Card information / bank details and PayPal accounts
                                                                 credit card as a standard-card. This credit card is
    are automatically saved in the checkout area for
                                                                 displayed as default option during the checkout.
    future shop visits in case Recurring is activated in the
                                                               • Once created card information and bank details may
    back-end.
                                                                 be be used for one-click checkouts (Recurring, no
                                                                 additional data entry required). For this purpose, the
                                                                 default
                                                                 payment methods are displayed in the checkout area
                                                                 the shopper can view all stored payment options and
                                                                 select them for usage by pushing the “Change”
                                                                 button. Furthermore, the shopper is also able to add
                                                                 new data.

                                                               Manual | Extension for Shop System Virtuemart 3 | 2019-04 | 9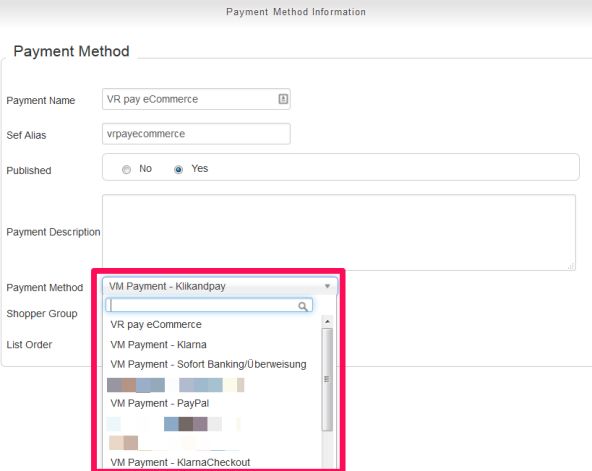
Manual – Extension for Shop System Virtemart 3

                                                                    •     Field should be named as EN: “Merchant
                                                                          Location” or DE: “Firmensitz”
                                                                    •     Disclaimer EN: principal place of business
                                                                          (Company Name, Adress including the Country)
                                                                    •     Disclaimer DE: Firmensitz lt. Handelsregister
                                                                          (Firmenname, Adresse inklusive Land)
                                                               Cardprocess will actively monitor the merchants who do
                                                               not successfully comply with the changes implemented
                                                               by Visa.

                                                               6    Miscellaneous

                                                               6.1 Error Analysis
                                                               Possibly, errors may occur when installing or
                                                               configuring the module. The most common errors and
5.2        Visa Merchant location disclosure
                                                               their analyses are described in the following.

Since the release of Visa's merchant location disclosure
                                                               6.2 Installation
compliance.
                                                               In the VirtueMart back-end, the menu
Upon payment, the Merchant's shop location is now
                                                               “VirtueMart” > “Payment Methods”. > “VR pay
displayed under the Credit Card payframe.
                                                               eCommerce” can be used to check whether the
                                                               files were installed properly. Should not all
                                                               payment methods be listed as shown below, the
                                                               files must be reinstalled.

The field under the payframe is configurable via the
shop plugin backend setting.

Note: This field is mandatory and should always have           6.3 Database
a value.                                                       In addition, it must be checked whether the VirtueMart
The entry in the backend would also be displayed in the        database contains the following statuses:
CardProcess plugin administration interface for further         “Payment Accepted” and
monitoring.
                                                               “Pre-Authorization of Payment“. If the code is
      •    Note that the appearance of the field will differ
                                                               not there, the installation failed, and the files must
           per shop system
                                                               be reinstalled.

                                                               Manual | Extension for Shop System Virtuemart 3 | 2019-04 | 10
Manual – Extension for Shop System Virtemart 3
6.4 Configuration If you don't want to provide VR pay with this
information you may deactivate the tracker when
In the VirtueMart back-end, the detailed configuration installing the plugin. Please do so under the general
of the individual payment methods and payment settings.
settings can be checked via the menu “VirtueMart” > Once the plugin is installed, it regularly sends the
“Payment following information to a secure and dedicated
Methods” > “VR pay eCommerce” > “Configuration”. database of VR pay.
• Merchant id entered at the plugin
Error Solution approach • E-mail-address entered at the plugin configuration
Customer transactions Check whether the data in the entry • URL of the shop system entered at the plugin
are not shown in the fields “User-ID”, “Password”, configuration
Online Administration “Recurring”, “Merchant Email” and • External IP-address of the shop system
Tool of “Merchant No. (VR Pay)” are correct.
• Shop system
VR pay eCommerce.
• Shop version
In the check-out of the Check whether all payment methods
• Plugin version
online shop (front-end) are activated.
• Plugin mode (TEST / LIVE)
no or not all payment
methods are shown. • Date and time
No purchases can be 1. Check whether valid payment details
executed in the online (bank, cards, etc.) are used.
shop although all 2. Check whether the server setting
payment methods are “LIVE” is activated. If the server is set
shown correctly in the to “TEST”, no transactions can be
checkout. handled.
The sequence of the Check whether the activated payment
payment methods in the methods in the field “Sort Order” have
checkout is not correct. a consecutive numbering in the
desired order. This means, if there are
seven active payment methods, the
values “1” to “7” must be allocated
under “Sort Order”.
7 Version Tracker
For providing the best service to you, to inform you
about newer versions of the plugin and also about
security issues, VR pay is gathering some basic and
technical information from the shop system as listed
below. The information will under no circumstances be
used for marketing and/or advertising purposes. VR pay
is also not gathering information underlying German
Federal Data Protection Act regarding personal data (§
3 Abs. 1 BDSG).
Manual | Extension for Shop System Virtuemart 3 | 2019-04 | 11You can also read