Bome's Midi Translator - Tutorial: MT Pro with Ableton
←
→
Page content transcription
If your browser does not render page correctly, please read the page content below
Bome's Midi Translator
       Tutorial: MT Pro with Ableton

Notes:
   1. These help documents were created for the Windows version of Midi
      Translator. The concepts are the same, but the screenshots look a little
      different. Sorry for the inconvenience.

   2. This is a tutorial made by a user of an older version of Midi Translator Pro.
      The screenshots will look slightly different, but it will work just the same for
      current versions of Midi Translator.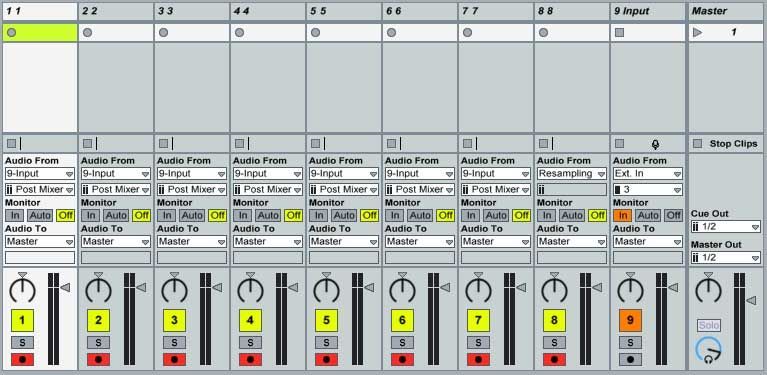
Bome's Midi Translator: Tutorial: MT Pro with Ableton           1 Introduction

1 Introduction
Like many people, I was blown away by the Kid Beyond video on the
Ableton site, and seeing as I've been using Ableton for years I thought I'd
give it a whirl and try and duplicate the elegant simplicity of his rig. The
challenge was this: to keep to an absolute minimum the need for button (or
pedal) presses, to keep everything automatically synced and to remove the
need for a screen. As an added bonus, I want to be able to save everything
I record, and to resample whatever is looping in the same easy way as I
record layers.

The rig I've developed has 8 buttons, for 8 tracks. Hit 1 to start recording
on track one at the start of the next bar. Hitting 2 will start recording on
track 2 at start of the next bar while track 1 continues playing back what
you've just recorded. You can continue this for any track, simply hit the
next destination, and at the end of the bar, you'll start recording on the new
destination track. Hitting the same button as the track you are recording
will stop the recording process, and leave all the clips you just recorded
looping cleanly.

Doing this on channel 8 is different. Channel 8 will resample the result, stop
all the other clips, insert a new layer, copy the stopped clips in to save
later, and empty out all the recording slots so you can continue adding stuff
in. I usually have a high pass and low pass filter ready on this channel to
allow me to remove the tops or bottoms to give some sonic space for more
layering.

It would be pretty poor form of me to brag about what a great setup I've
got without showing you *exactly* how to do it yourself, so that's what I'll
do next. Hopefully you'll learn some useful tips and tricks along the way.
With some of the techniques used here you can really take control of
ableton and make live setups that finally free you from the dreaded mouse,
bane of electronic musicians everywhere. If you take everything that's cool
about a guy on stage with a load of noise screaming out of an electric
guitar, and then try and imagine its polar opposite, it's the sight of a mouse
and a laptop.

(c) 2010 by Bome Software                                            Page 2/11
Bome's Midi Translator: Tutorial: MT Pro with Ableton             2 Preparation

2 Preparation
You will need:

      Ableton Live (obviously)
      Bome's Midi Translator Pro or Author
      (free for 30 days , but once you learn how to use it in this tutorial
      you'll want it all year round) – you can use the Classic version if you
      like, but you will not be able to completely automate the cleanup
      macro that I use for the resampling without assigning an extra button
      and remembering to press it after the bar ends. Timers in MT
      Pro/Author are incredibly useful tools.
      You can also use the free MT Player, but you won't be able to adapt
      the preset to your MIDI (foot) controller.
      An external midi controller with a free key or button per track.
      I developed this using a Tascam US-428 (in 'four control banks'
      mode) so my 8 track buttons send the Midi notes E0 - B0. In the
      following setup screens, whenever you see [Note On #1:F#0, vel
      127] replace it with whatever midi information your midi controller
      squirts out. I have also developed a version of this rig specifically for
      the US-428 which controls the on-board LEDs to show you which
      channel is recording (flashing red) and which have been recorded to
      already (steady red). I will release a further tutorial at a later date if
      there is demand.
      A modicum of technical knowledge about your PC and MIDI is
      required.
      I'll document in reasonable detail, but If I write so a chimp could do
      it, it will make for very boring reading...

(c) 2010 by Bome Software                                             Page 3/11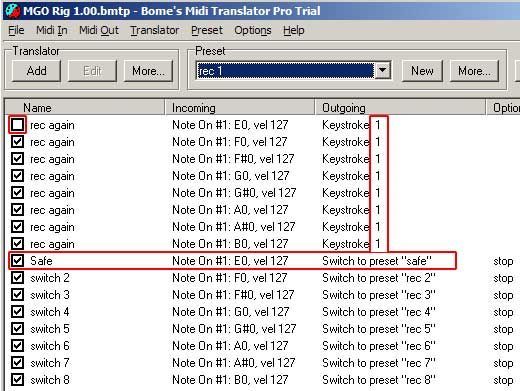
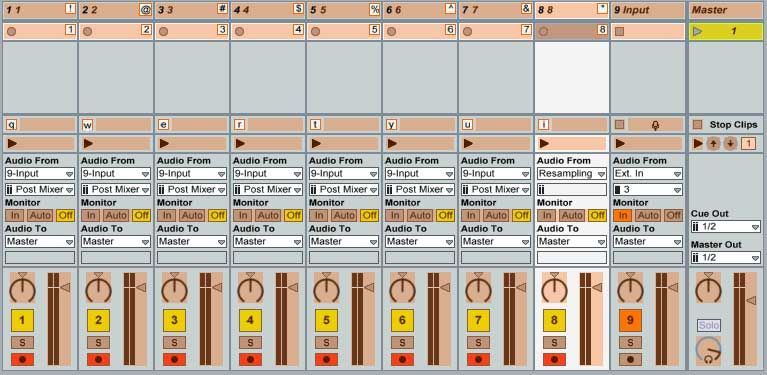
Bome's Midi Translator: Tutorial: MT Pro with Ableton    3 The Ableton Setup

3 The Ableton Setup
Preparation:

Important: Turn off the Options/Computer MIDI Keyboard, as it will
prevent you from accessing keys you need to use for automation.

In Preferences/Record Warp Launch and make sure Exclusive/Arm is
deselected as we will have to arm 8 tracks at once.

Set quantize to 1 bar

Creating the Ableton Rig:
We're going to create 9 audio tracks and set them up as follows:

Create 9 audio tracks & name them. Track 9 will be used as an input strip.

For tracks 1-7:
Choose '9-Input' as the input source, turn monitoring to 'off' and arm for
recording.

Track 8:
Choose 'resampling' as the input source, turn monitoring to 'off' and arm for
recording.

Track 9:
Choose your external audio source as input, set monitoring to 'in'.

Finally, set up the keyboard assignments as follows, placing the number
keys into the top row of cells on tracks 1-8 and the top row of letters q-i
into the 'stop' buttons on the first 8 clips and SHIFT+1 through 8 into the
channel selection cell.

(c) 2010 by Bome Software                                             Page 4/11

Bome's Midi Translator: Tutorial: MT Pro with Ableton   3 The Ableton Setup

Now save that template. You can play with it just using the number keys if
you like, the basic functionality is all there and even on it's own, this
template can be useful. For troubleshooting purposes , I recommend
turning off all Midi input at this point until you have everything running.

(c) 2010 by Bome Software                                          Page 5/11
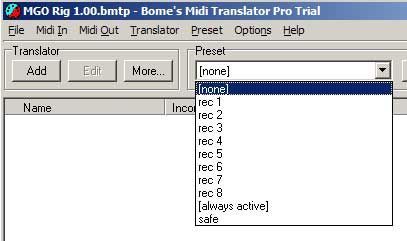
Bome's Midi Translator: Tutorial: MT Pro with Ableton         4 Bome's MIDI
Translator Pro/Author (MTPro)

4 Bome's MIDI Translator
Pro/Author (MTPro)
4.1 Preparation & Theory
Set the Midi In to come from your Midi device.

We are going to set up several MTPro presets, and switch between them.
The basic theory is that when recording on channel x, we need to add an
extra keystroke to turn that channel off when we're done. There are 4
distinct types of preset, one of which will be copied & amended 7 times for
tracks 1-7.

(c) 2010 by Bome Software                                          Page 6/11
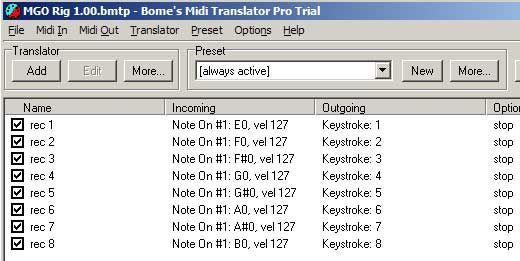
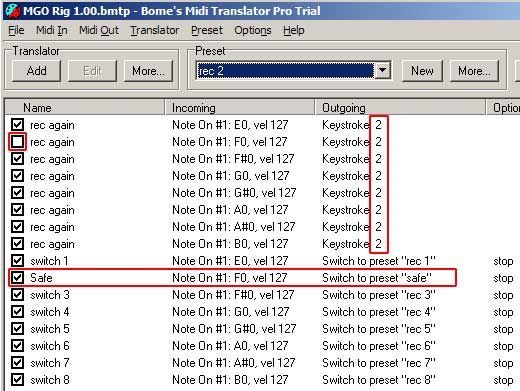
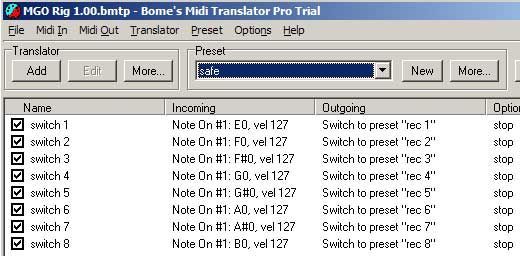
Bome's Midi Translator: Tutorial: MT Pro with Ableton         4 Bome's MIDI
Translator Pro/Author (MTPro)

4.2 Preset [Safe]
This is the preset we need to select before we start recording in Ableton. It
simply captures your 8 incoming Midi notes and changes preset accordingly.

4.3 Preset [Always Active]
Now go to Preset/Edit "Always Active" Preset and add these translators
(remember, you can cut & paste these from preset [safe] to copy those
incoming note assignments).

With Preset [safe] selected, when we press 1-8, two things will happen. The
keypress '1-8' will be sent through to ableton, starting recording on that
channel, and MTPro will flip to a new preset:

(c) 2010 by Bome Software                                           Page 7/11
Bome's Midi Translator: Tutorial: MT Pro with Ableton          4 Bome's MIDI
Translator Pro/Author (MTPro)

4.4 Preset [rec 1]
Here's the active preset for recording on channel 1. The first bank of 8
translators add an additional keystroke of '1' to stop recording on this
channel – note that this translator is turned off for channel 1.

The second bank of translators deals with preset switching. In all cases
apart from the first this can be copied & pasted from [safe], but notice that
preset 1 switches back to safe.

(c) 2010 by Bome Software                                           Page 8/11
Bome's Midi Translator: Tutorial: MT Pro with Ableton          4 Bome's MIDI
Translator Pro/Author (MTPro)

4.5 Presets [rec 2] – [rec 7]
These are variants on the above. You can copy and paste [rec 1] and simply
change the following 3 properties:

Make sure that the translator 'rec again' is turned off for the channel you
are currently editing.

Change the keystroke to match.

Only switch to [safe] on the channel you are editing.

If you examine the red highlighted areas from the two graphics it should be
fairly obvious how the rest pan out.

(c) 2010 by Bome Software                                            Page 9/11
Bome's Midi Translator: Tutorial: MT Pro with Ableton            4 Bome's MIDI
Translator Pro/Author (MTPro)

4.6 [rec 8]
This final channel is used for resampling. I have split the final timer-
triggered key command into several parts for ease of reading, but it could
be done with a single translator.

The first bank of translators tells clips 1-7 to stop playing at the end of the
bar.

The second bank will start a timer called mixdown. This needs to last longer
than 1 bar at the tempo you are recording at – my choice of 3.5 seconds
allows me to safely record as low as 75 bpm. Any lower and there's a small

(c) 2010 by Bome Software                                             Page 10/11
Bome's Midi Translator: Tutorial: MT Pro with Ableton          4 Bome's MIDI
Translator Pro/Author (MTPro)

[possibility my cleanup could be triggered before the end of the bar. If you
plan on recording slower than this you may need to increase this delay
time, or you may wish to speed it up for better response.

The final sequence of commands are triggered from the timer in top- down
order. It starts by capturing and inserting the current scene
(CTRL+SHFT+I), selects the next track (SHFT+1-7) then copies and pastes
the now stopped clips 1-7 into the new slots created for them (Up CTRL+X
Down CTRL+V), deletes a stray on 8(Up Del), leaves the resample playing
on track 8 and finally shifts back to [safe].

5 In Use
We should be ready to go. Fire up MTPro, select the [safe] preset.

Fire up Ableton and load the scene we created earlier.

Hit play.

From now on, all your recording is managed through the 8 buttons/keys
we've assigned. Hit 1 and start recording, hit it again when you're finished
(before the end of the last bar), or hit another channel to immediately start
recording on that channel instead. If you want to resample that to a single
loop, hit button eight to start resampling and any button again to stop, thus
allowing you to easily set any loop size for your resampled loop.

That's it. Couldn't be simpler in operation.

6 Project Files
The project file of this tutorial is installed with Midi Translator in the My
Documents\Bome's Midi Translator\Presets folder under the name "Ableton
Live MGO Rig 1.00". Also included is a .als file to set up Ableton.

7 Contact
I hope this tutorial has been of help. If anyone can think of ways to
streamline this, make it better, or just abuse it in cool ways, let me know!
Please send any feedback to chelfyn@gmail.com.
Cheers.

(c) 2010 by Bome Software                                            Page 11/11
You can also read