Colorado Utilization Management (UM) and Physician Administered Drug (PDA) Provider Manual
←
→
Page content transcription
If your browser does not render page correctly, please read the page content below
Colorado Utilization Management (UM) and
     Physician Administered Drug (PDA)
               Provider Manual
 For the Colorado Department of Health Care Policy & Financing
      Colorado Prior Authorization Request (PAR) Program1

                        Colorado UM and PAD Provider Manual
                               04/30/2021 – Version 6.1

                                                                                                           1
1The Department of Health Care Policy & Financing administers Health First Colorado (Colorado’s Medicaid
program), Child Health Plan Plus (CHP+) and other health care programs for Coloradans who qualify.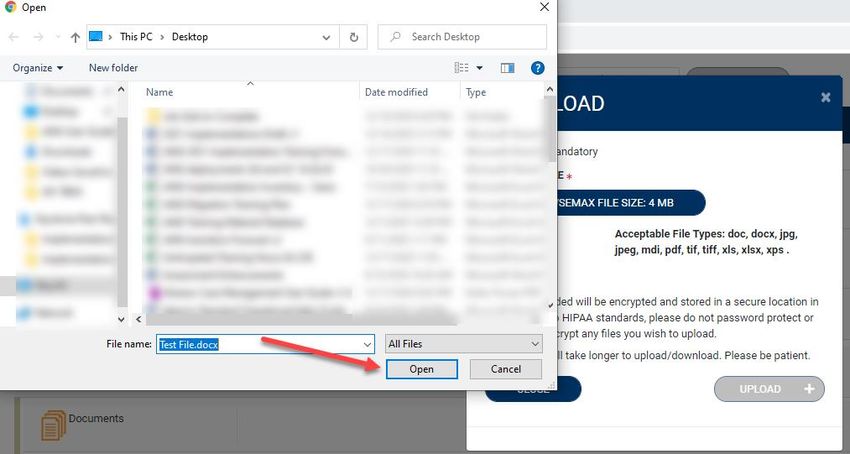
Table of Contents
AN INTRODUCTION TO KEPRO ................................................................................................................ 4
   Kepro Colorado ....................................................................................................................................... 4
CALL CENTER AND CONTACT INFORMATION ....................................................................................... 5
MANAGEMENT TEAM AND ESCALATION ............................................................................................... 7
SERVICES KEPRO REVIEWS..................................................................................................................... 7
PROVIDER RESPONSIBILITIES ................................................................................................................. 8
   PAR Submission – General Requirements ........................................................................................... 8
   Forms ....................................................................................................................................................... 9
REQUESTS FOR ADDITIONAL INFORMATION ...................................................................................... 10
   Expedited and Rapid Reviews ............................................................................................................. 11
KEPRO’S UM PROVIDER WEB PORTAL: ATREZZO ............................................................................. 12
   Access & Registration .......................................................................................................................... 12
   New Provider Registration & Multi-Factor Authentication (MFA) Registration .............................. 13
   Phone Verification ................................................................................................................................. 16
   Email Verification .................................................................................................................................. 20
   System Navigation ................................................................................................................................ 24
   General System Features ..................................................................................................................... 25
   Home Screen View ................................................................................................................................ 26
   Cases ...................................................................................................................................................... 27
   Search by Case ID ................................................................................................................................. 28
   UM Case Status ..................................................................................................................................... 29
   Create Case (How to Submit a Request) ............................................................................................ 30
   Outpatient Request ............................................................................................................................... 32
   Inpatient Request .................................................................................................................................. 35
   Consumers............................................................................................................................................. 43
   Set Up ..................................................................................................................................................... 44
   Add New User ........................................................................................................................................ 44
   Message Center ..................................................................................................................................... 45
   Reports ................................................................................................................................................... 47
   Producing a Report of your Cases ...................................................................................................... 47
   Help Guide ............................................................................................................................................. 49
   How to Complete a ‘Saved But Not Submitted’ Request .................................................................. 49
   How to View Status of a Submitted Request...................................................................................... 51
   View Status by Case ID......................................................................................................................... 52
   View Status by Member ........................................................................................................................ 53
   Email Notification .................................................................................................................................. 54
   How to View a Determination Letter .................................................................................................... 54
   How to Add Additional Clinical Documentation ................................................................................ 57
                                                                                                                                                                2
How to Add Submit Revisions to a Submitted Request ................................................................... 58
   How to Submit a Concurrent Review (IHRP) ...................................................................................... 59
   How to Set Procedure or Diagnosis Code Preferences .................................................................... 59
PROVIDER OPTIONS FOLLOWING ADVERSE DECISIONS .................................................................. 61
   How to Request a Peer-to-Peer Review .............................................................................................. 61
   How to Request a Reconsideration ..................................................................................................... 61
   How to File an Appeal ........................................................................................................................... 62
   Troubleshooting Tips and Tricks ........................................................................................................ 62
   Inactivity Warning ................................................................................................................................. 63
   Internet Browser .................................................................................................................................... 63
   How to Add Google Chrome to Computer .......................................................................................... 63
   How to set Chrome as Default Browser .............................................................................................. 67
   How to Set Atrezzo Bookmark in Chrome .......................................................................................... 68
   How to Set Disable Pop Up Blockers in Chrome ............................................................................... 69
   Password Requirements ...................................................................................................................... 71
   Updating User Profile ........................................................................................................................... 71
   Informational Error/Warning Messages .............................................................................................. 72
   Atrezzo Help: Accessing Technical Assistance ................................................................................ 73
PROVIDER PORTAL TOOLS AND RESOURCES ................................................................................... 73
UTILIZATION REVIEW TURNAROUND TIMES........................................................................................ 75
   Clinical Review Criteria ........................................................................................................................ 77
   How to Know what Requires a PAR .................................................................................................... 77
   Outpatient PAR Billing Manual, Regulatory, and Resource Links ................................................... 77
REQUIREMENTS FOR OUT-OF-STATE PARS........................................................................................ 80
INPATIENT HOSPITAL REVIEW PROGRAM (IHRP) ............................................................................... 81
QUALITY IMPROVEMENT AND APPROPRIATE UTILIZATION ............................................................. 81
   Identifying Improvement Areas ........................................................................................................... 82
   The Role of Providers in Quality Improvement .................................................................................. 82
   Fraud, Waste and Abuse ...................................................................................................................... 83
FILING A COMPLAINT .............................................................................................................................. 83
KEPRO AND CONFIDENTIALITY ............................................................................................................. 83

                                                                                                                                                         3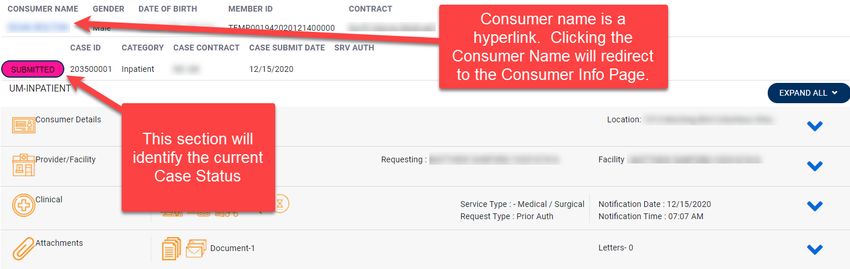
An Introduction to Kepro

KEPRO is a specialty healthcare company that offers customized, integrated healthcare
solutions across three major areas:
   •   Care Management
   •   Quality Oversight
   •   Assessments, Eligibility and Enrollment
KEPRO has extensive experience developing innovative, collaborative models of
utilization management, care management, provider relations and quality improvement
which emphasize community partnerships, training, and technical assistance. We have
served the Centers for Medicare and Medicaid Services (CMS) for 30+ years and 27
state Medicaid agencies for 20+ years. Kepro is responsible for over 1.4 million reviews
per year, as the medical necessity, utilization management, and quality improvement
contractor for more than 30 different federal and Medicaid agencies across the nation.

Kepro delivers care management and quality oversight solutions using clinical expertise
and technology-driven solutions to improve quality and clinical outcomes for vulnerable
populations. We are a certified Quality Improvement Organization (QIO), are accredited
by the Utilization Review Accreditation Commission (URAC) and licensed to perform
reviews in every state. We are one of the largest and most experienced federal, state,
and local government review vendors in the nation, supporting government programs
for over one billion covered individuals since 1985.

Kepro Colorado
In 2021, Kepro was awarded the Colorado Department of Health Care Policy and
Financing (HCPF) contract with the state of Colorado for Utilization Management and
Physician Administered Drug (PAD) UM review, including outpatient, inpatient,
specialty, and PAD UM. In addition, Kepro will administer or assist the Department and
partners with:
   •   Client Overutilization Program (COUP)
   •   Annual HCPCS code review
   •   Quality Program
   •   Reporting
   •   Provide clinical expertise, recommendations and guidance to support quality
       PAR Program.
   •   PAR Customer Service Line for Providers
   •   Peer-to-Peer, and Reconsiderations
                                                                                         4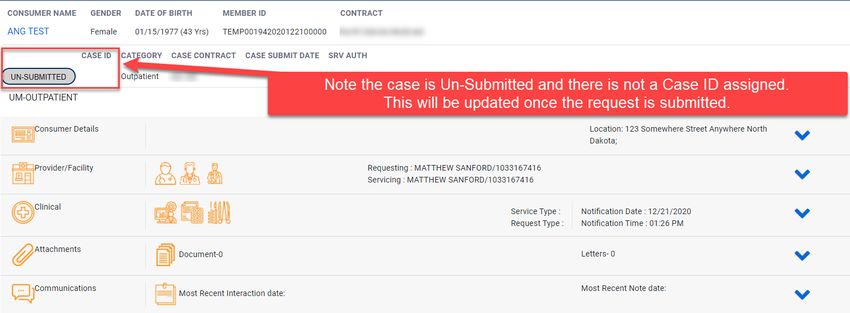
•   Provider Education
   •   Supporting the Department with Member Appeals

Call Center and Contact Information

Kepro provides access to Health First Colorado Providers to its review Employees and
Contractors by a toll-free telephone line, staffed by customer service agents specifically
trained on Health First Colorado, the Colorado PAR program and Physician
Administered Drugs (PAD), Monday through Friday from 8 a.m. until 5 p.m. Mountain
Time. After 5:00 p.m. and before 8:00 a.m. Monday through Friday, and throughout the
day on Saturday and Sunday and all Company holidays, an automated attendant will
direct callers to leave a message in the confidential general delivery mailbox. All
voicemails will be returned within one business day. After-hours PAD requests will be
directed to an after-hours mailbox for timely response by PAD staff.
Kepro Offices will be closed in observance of the legal state holidays including:
   •   New Year’s Day
   •   Dr. Martin Luther King Jr. Day
   •   President’s Day
   •   Memorial Day
   •   Independence Day
   •   Frances Xavier Cabrini Day
   •   Labor Day
   •   Veteran’s Day
   •   Thanksgiving
   •   Day after Thanksgiving
   •   Christmas Day

Telephone Number: 720-689-6340
Fax Number: 800-922-3508
PAD Fax Number: 833-923-2359
Mailing Address: 2810 N. Parham Rd, Suite 305, Henrico, VA 23219
Website: ColoradoPAR.com
Providers will continue to use the ColoradoPAR program website to access:

                                                                                             5
•   General information
      •   Program updates
      •   Member Services
      •   Training Resources and User Guides
      •   Link to Kepro’s Atrezzo Provider Portal

Helpful links:

Claims Questions (Gainwell Technologies)

Colorado Health Care Policy & Financing

Colorado Health Care Policy & Financing Provider Resources

Physician Administered Drugs (PAD) website

Drug Utilization Review Board

Important Email Addresses:

Colorado UM Inbox: hcpf_um@state.co.us
Provider issues email address: COproviderissue@kepro.com
Provider Training Registration email address: coproviderregistration@kepro.com

                                                                                 6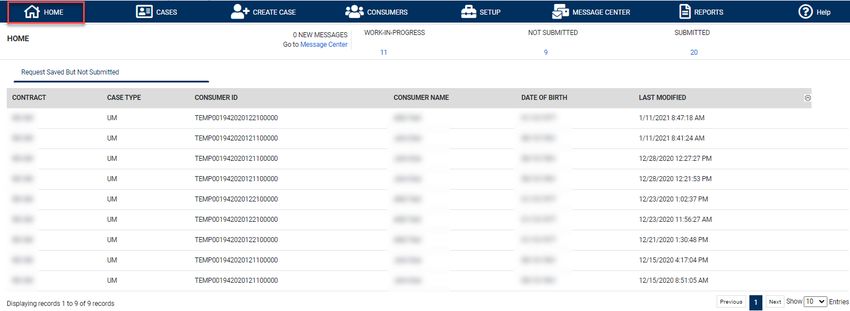
Management Team and Escalation

Members of Kepro’s Management Team are as follows:
   •   Executive Director: Chantal Hunt, PhD, RN
   •   UM Manager: Amy Brintzinghoffer, RN
   •   PAD Program Lead: Scott Donald, PharmD
   •   Clinical Supervisors: Aimee Mosher, RN and Jennifer Davis, RN
   •   Provider Education and Relations Coordinator: Shannon Sheppard, MPH
   •   Quality Manager: Holli Masci, DNP, RN
   •   Call Center Supervisor: Tujuana Staples
   •   Call Center Director: Tiffany Brooks
   •   UM Medical Director: Dena Ross, MD
   •   PAD Medical Director: Susan Brashear, MD

Kepro customer service staff will acknowledge all requests for a supervisor and
immediately escalate to the appropriate department Supervisor. If the Supervisor is
unable to resolve or de-escalate the issue at hand, or if the caller demands to speak
with a manager the Supervisor will escalate to the Manager. If a Manager is not readily
available, the Supervisor will document the contact information and advise the caller
that follow up will be provided within one (1) business day. The Supervisor will provide
the Manager with a summary of the communication and issue identified, along with the
caller’s contact information. A Manager will then return the call immediately, or at least
within one (1) business day of the request. Supervisors and Managers will work to
resolve all escalated concerns until full resolution.

Services Kepro Reviews

Kepro performs Outpatient Review determinations no later than 10 Business Days
following the receipt of the request for the following services:
   •   Audiology
   •   Diagnostic Imaging
   •   Durable Medical Equipment (DME)
   •   Medical Services including, but not limited to, select surgeries such as bariatric,
       solid organ transplants, transgender services, and elective surgeries
   •   Out-of-State (OOS) Inpatient Services
   •   Personal Care Services
   •   Molecular/Genetic Testing                                                             7
   •   Physical and Occupational Therapy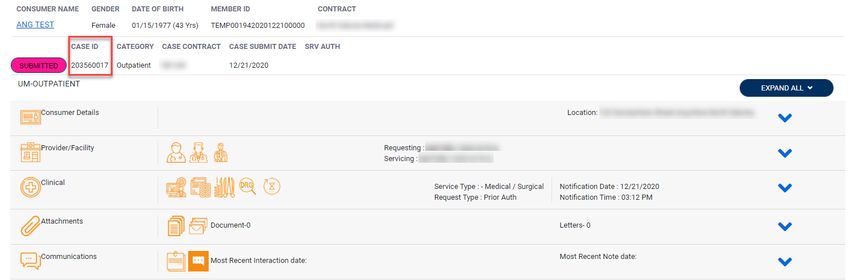
•   Speech Therapy
   •   Pediatric Behavioral Therapy (PBT)
   •   Pediatric Long-Term Home Health (re-start date TBD)
   •   Pediatric Private Duty Nursing (re-start date TBD)
   •   Select Physician Administered Drugs (PAD; start date TBD)
   •   EPSDT exceptions
At a later date, yet to be defined, Kepro will also administer an Inpatient Hospital
Review Program (IHRP) which may include:
   •   Admission Review
   •   Concurrent Review
   •   Complex Case Review
   •   Retrospective Review
   •   APR-DRG validation

Provider Responsibilities

Providers may request prior authorization for services through our direct data entry
portal, Atrezzo. Utilization of this portal allows the provider to request prior authorization
for services, upload clinical information to aid in review of prior authorization requests,
and submit reconsideration and/or peer-to-peer requests for services denied. Atrezzo is
also a good tool for checks and balances of some of the patient’s medical history; the
system will give warnings if services requested have been previously authorized, or if a
PAR is not required.

PAR Submission – General Requirements

PAR submissions will require providers to provide the member ID, name, and DOB.
Providers should be prepared to provide the Service Type, Rev Code, Current
Procedural Terminology (CPT) or Healthcare Common Procedure Coding System
(HCPCS) code(s) being requested, any appropriate modifiers, and the ICD10 code for
the diagnosis. Providers should be prepared to identify the servicing provider if different
than the ordering provider. The number of units requested, i.e. visits, number of items,
etc. should be entered by the provider.

                                                                                              8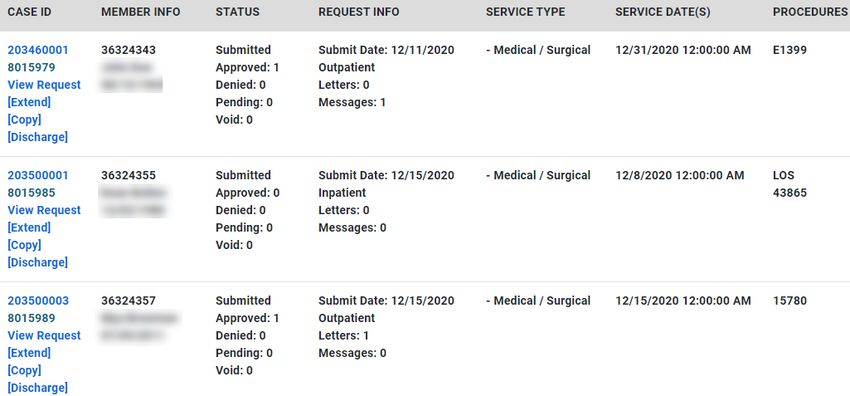
Forms
   •   Kepro Form: eQHealth PAR Change/Cancellation Request
   •   FAX Exemption Form
   •   Change of Provider (COP) Form
   •   Prior Authorization Request (PAR) Forms
          o   Inpatient PAR Form
          o   Outpatient PAR Form

A detailed step by step process for submitting both outpatient and inpatient requests
follows (See Create Case: How to Submit a Request, below).
Timelines

 Review Type                                     Response Time
 Expedited UM                                    4 business hours
 Rapid UM                                        Same day when submitted by 2:00PM
 Standard Outpatient UM                          10 business days
 Inpatient Prospective UM                        1 business day
 UM-After Additional Information is Received     2 business days
 Urgent PAD                                      4 hours
 Prospective Non-Urgent PAD                      24 hours

Timely Submission means entering the request in compliance with Colorado Rule and
Regulation. For most benefits and services, this means before services are rendered
and with enough advanced notice for the review to be completed. Requests for some
benefits may be accepted when a member's eligibility is determined after the date that
the service is performed. When Kepro pends a review for additional information, you will
have up to seven (7) business days to provide the requested information.

                                                                                        9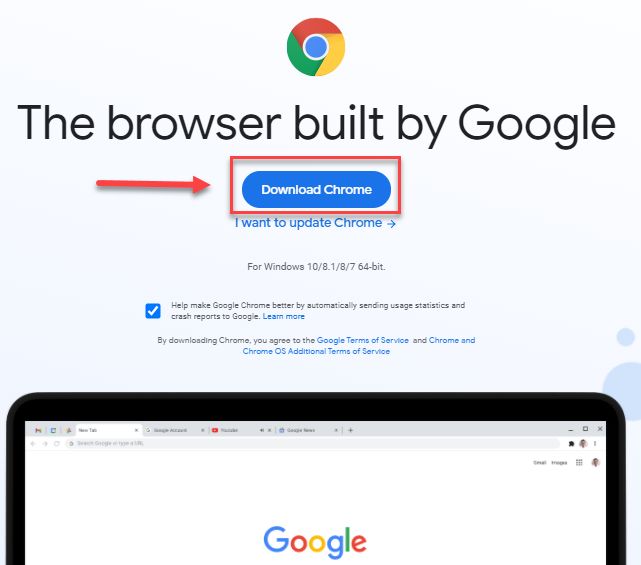
Review Type                             Retroactive PAR requests
Audiology                               Are not accepted*
Behavioral Therapy                      Are not accepted*
Diagnostic Imaging                      Are not accepted*
DME                                     Are allowed up to 90 calendar days
Speech Therapy                          Are not accepted*
Long-Term Home Health (LTHH)            Are allowed up to 10 business days
Inpatient                               N/A
Molecular Testing                       Are allowed up to 15 business days
Private Duty Nursing                    Are allowed up to 10 business days
PT/OT                                   Are allowed up to 2 business days
Surgical                                Are not accepted*
Transplants                             Are not accepted*
Vision                                  Are not accepted*

*Requests reviewed by the Department on a case-by-case basis to bypass timeliness
requirements.

Requests for Additional Information

Requests for Additional Information will be initiated by Kepro if/when there is not
substantial supporting documentation to complete a review. You must provide the
requested additional information to Kepro within seven (7) business days of the request.
Supporting Documentation: It will be necessary to provide supporting documentation
with your submission. Supporting documentation may include but are not limited to
office visit notes, laboratory results, imaging results, etc. Some benefits may have
additional document requirements, and the UM Vendor may request additional
supporting documentation as needed to determine medical necessity.

                                                                                       10
Expedited and Rapid Reviews
Requests for Expedited or Rapid Case Reviews may be made during the Prospective
review authorization process when the Case involves medical services deemed to be
urgent in nature.
Expedited Review: A Prior Authorization Request review that is required to be done on
an expedited basis because a delay could: seriously jeopardize the life or health of the
Member or the ability of the Member to regain maximum function, or in the opinion of a
physician with knowledge of the Member’s medical condition, would subject the Member
to severe pain; and cannot be adequately managed without the care or treatment that is
the subject of the claim. Expedited Case Reviews are conducted within four (4)
business hours of the request.
Rapid Review: Prior Authorization Request that is requested because a longer Turn-
Around-Time could result in a delay in the Member receiving care or services that would
be detrimental to their ongoing, long-term care. A Rapid Review may be requested by
the provider in very specific circumstances which may include, for example:
• A service or benefit that requires a PAR and is needed prior to a Member’s
inpatient hospital discharge,
• Lack of DME supplies that immediately and adversely impact a Member’s ability
to perform activities of daily living (ADL),
• Same day diagnostic studies required for cancer treatment, genetic testing
requiring amniocentesis,
• Genetic or Molecular testing requiring amniocentesis.
Rapid Case Reviews are conducted on the same day as submitted, when received by
2:00 p.m. MT, when Rapid Case Review criteria are met.
When entering a case for Expedited or Rapid Review, providers will select the correct
option from the Request Type dropdown in the Procedures (Request) ribbon and enter
a note as to the reason the request meets one of the above the above definitions.
11Kepro’s UM Provider Web Portal: Atrezzo
The purpose of this section is to provide an overview of the Provider Portal for Atrezzo,
the Kepro proprietary system. Atrezzo is a person-centered, web-based care
management solution that transforms traditional, episodic-based care management into
proactive and collaborative population healthcare management. Providers will use this
system to participate in the Colorado PAR UM and PAD Review program.
Atrezzo is a web-based system that works across numerous internet browsers;
however, Chrome is preferred, and system functionality is enhanced using this
platform.
Access & Registration
All providers will designate a Provider Group Administrator for their facility. This person
will need to add and manage all other users of the Provider Portal.
The Provider Administrator will register the Provider Group Account using the National
Provider Identifier (NPI) and Medicaid ID for the facility or clinic.
The Provider Portal is accessible at https://portal.kepro.com.(Helpful hint: Bookmark the
Provider Portal URL for future reference.)
Upon initial login, the Provider Administrator should follow the below steps to
complete registration.
12Click REGISTER HERE under the Login section and enter the facility NPI. The Provider
Registration Code is the facility or clinic Medicaid ID. Facilities or clinics without an NPI
will utilize the Medicaid ID as both the NPI and Provider Registration Code.
New Provider Registration & Multi-Factor Authentication (MFA) Registration
The below instructions will guide the Provider Group Administrator through registering
for the Atrezzo Provider Portal and completing the Multi-Factor Authentication (MFA)
Registration. Both registration and MFA registration are a one-time process.
From the login screen, click the link to register for a Kepro Account.
Enter NPI and Registration Code, then click Next.
13Create Username, and enter all required fields under Contact Information, then click
Next.
14A message will display confirming the Registration is complete. To complete the Multi-
Factor Authentication registration, you must click the link in your email within 20
minutes.
15Select the best multi-factor authentication method for you. A phone registration will
require a direct line with 10-digits; extensions are not supported.
NOTE: When choosing an authentication method, you will be required to enter an email
address for both options. Only choose the Email option if you do not have access to a
direct phone line (landline or mobile).
Phone Verification
Click the PHONE button
16Enter your work email address, then click Send Verification Code. A code will be sent to
your email.
Enter the verification code sent to the email address entered; then click Verify Code.
IMPORTANT: Do NOT enter anything in the Password section (this is not needed
at this step).
Enter the verification code sent to the email address entered; then click Verify Code.
17IMPORTANT: Do NOT enter anything in the Password section (this is not needed
at this step).
After email verification is complete, enter a new password, confirm the password, and
click Create. This is creating a password for the Multi-Factor Authentication
Registration.
18Enter your phone number and select Send Code or Call Me.
When phone call is selected, the user will receive a phone call on the registered phone
number and will be prompted to press the # key to complete authentication.
For SMS text authentication, enter the verification code received.
As a new user, you will need to read and agree to the Terms of Use.
19The system will automatically authenticate and display the home page.
Email Verification
Click the EMAIL button
20Enter your work email address, then click Send Verification Code. A code will be sent to
your email.
IMPORTANT: Do NOT enter anything in the Password section (this is not needed
at this step).
Enter the verification code sent to the email address entered; then click Verify Code.
21IMPORTANT: Do NOT enter anything in the Password section (this is not needed
at this step).
After email verification is complete, enter a new password, confirm the password, and
click Create. This is creating a password for the Multi-Factor Authentication
Registration.
As a new user, you will need to read and agree to the Terms of Use.
22The system will automatically authenticate and display the home page.
23System Navigation
The navigation pane will remain in place regardless of navigation through the system.
This functionality allows for quick and easy navigation from any screen.
Utilize the below legend for a brief overview of each area within Atrezzo. For a more
detailed description, and for all available workflows, click the icon hyperlink.
Home This is the default page upon successful login and will
enable you to view submitted cases and any pending
submissions.
Cases This section will enable you to search cases based on
specific parameters including case type, case status
and request type
To identify specific cases and ensure efficient search
results, try selecting specific information in each drop
down to narrow search results.
Create Case This section will enable you to create a new case for a
consumer. Required fields include the case type,
Member information, and case parameters. Some fields
will auto populate based on user role.
Additional fields appear based on selections made.
Consumers This section will enable you to search for Member
specific information utilizing the Member ID or last
name and date of birth.
Member specific data will render based on information
entered.
Setup Visible to Provider Administrator users only.
This section will enable Provider Administrators to
manage, edit, and add provider users for the facility.
Message This section will enable users to communicate directly
Center with the team at Kepro regarding specific Members
and/or cases.
24Reports Reports are visible only to users with report access. At
this time, there will not be any provider reports to view.
Preferences Preferences is where providers can set specific codes
to narrow down their code search to codes they
commonly use.
Help This section will display available information including
User Guides, Frequently Asked Questions (FAQs),
Latest Release Notes, and Password Guidelines.
General System Features
The ability to search and view profile information will appear on all pages throughout the
system, regardless of navigation.
After successful login, the system will default to the Home Screen. See below for the
features present on all pages throughout the system to assist with navigation.
A) To search a Case #, Program #, or Authorization #, enter specified information in
this box and click Search (see Searching by Case ID for step-by-step instructions).
B) This section will identify the user logged in. Click on the icon in the upper right
corner to open menu options where you can Update Security Question & Answer,
Change Password, Edit User Profile, or Logout.
25Home Screen View
Once successfully logged in, the user will be taken to the Atrezzo Home Screen which
will default to display all “Request Saved But Not Submitted”. This will provide a list of
Members with cases that have been started but are incomplete and have not been
submitted to Kepro.
To complete an un-submitted case, you can click the edit icon that will appear when
hovering over the specified Consumer (Member) line, or complete a full search for un-
26submitted cases with specific parameters (see the Cases section for the steps to
complete a full search).
Cases
This section will identify the steps to search for cases based on selected search
parameters. This section is searchable by Case or Consumer (Member). Select the
specific search on the top.
To search By Case, select Case Type UM from the drop down. Once the Case Type is
specified, additional search parameters will appear. To identify specific cases and
ensure efficient search results, try selecting specific information in each drop down to
narrow search results.
Note: You must enter a submitted or service date span for search results to render.
27To search By Consumer (Member), enter the required Member information. For results
to render, user must enter Last Name and DOB or Member ID.
Search results will render below. The Case ID is a hyperlink which will open the
specified Case page.
Search by Case ID
To search directly for a case, enter the Case ID in the search box on the top left of any
page, then click SEARCH to be directed to the specified case.
28The visible information within the Case will vary by contract and user role, but will be in
Read-Only format.
UM Case Status
The UM case will display the case status at the top. The UM program status options are
color coded for quick and easy identification.
This identifies a case that has been started, but has not been
completed or officially submitted. This case will not have an
associated Case ID until it is submitted. Once all information is
entered, the case will move to Submitted or Insufficient Information if
any required information is incomplete or missing.
This identifies a case that has been submitted, but has not yet been
reviewed. Once the case is assigned to a clinical reviewer, the status
will change to Active Review.
29This identifies a case that has been submitted, reviewed, a
determination made, and is complete. A Complete case status does
not identify the outcome of the clinical review (ie. Approved, denied,
partial approval, etc).
Create Case (How to Submit a Request)
To submit an inpatient or outpatient UM or PAD review, you will need to create a case
by following the below steps.
In the navigation pane, click Create Case.
The Case Type will default to UM. To search the Member, you must enter the Member
ID or Last Name and Date of Birth, then select .
Click the radio button to select the Member. If the Case Parameters section does not
open automatically, click NEXT to proceed with the case.
30After selecting the proper Member, Select the proper case parameters for the request
being made. Then click
The next page that renders will be the shell of the case and will reflect Un-Submitted.
This means the case request has been started, but not yet submitted to Kepro for
review. Enter the rest of the clinical information pertaining to the request. Follow the
instructions below to submit an Out-of-State (OOS) inpatient or an outpatient request.
31Outpatient Request
To submit an Outpatient request, expand the Clinical section, then expand Service
Details to enter required information. Select the appropriate Service Type and Request
Type based on the request being submitted for review.
In most cases, you will select the Service Type pertinent to your request type (e.g.,
DME, Imaging Studies, Physical Therapy, etc.) and the Request Type Prior
Authorization.
32After entering Service Details, expand Diagnosis to enter all applicable diagnosis codes
for the requested service (pertinent to the reason for the PAR). Click Add Diagnosis and
search by diagnosis code or description. Select the needed diagnosis by clicking the
Select Box. The diagnosis will be added to the Selected Records section.
Once all diagnosis codes are entered, select .
Once all diagnosis codes have been added, expand Procedures. Enter all applicable
procedure codes, this process is similar to adding a diagnosis.
Enter CPT or ICD10 Procedure Code or description, then click SEARCH. Select the
appropriate procedure codes to be added. Once all codes are listed, select ADD
PROCEDURES.
33After entering the procedure codes, an outpatient request will require detailed
information for each requested code. Once all the codes are entered, they will be
displayed in a stacked layout.
To enter details for each procedure code, expand the line for each code entered and
complete required fields.
34Inpatient Request
To submit an Inpatient request, expand Clinical, then expand Service Details to enter
required information. Select the appropriate Service Type and Request Type based on
the request being submitted for review, then enter the Admit Date.
After entering Service Details, expand Diagnosis to enter all applicable diagnosis codes.
Click Add Diagnosis and search by diagnosis code or description. Select the needed
diagnosis by clicking the Select Box. The diagnosis will be added to the Selected
Records section.
35Once all diagnosis codes are entered, select .
Once all diagnosis codes are entered, expand Procedures and enter required fields
under Length of Stay (LOS).
36After completing LOS, enter all applicable procedure codes, this process is similar to
adding a diagnosis. Enter CPT/ICD10 Procedure Code or description, then click
SEARCH. Select the appropriate procedure codes to be added. Once all codes are
listed, select ADD PROCEDURES.
If the requested start date entered under LOS will not be applicable to all procedure
codes, expand the procedure code section to update the date. Once the date has been
changed, it will automatically save.
37If no changes to the requested start date are needed, continue to complete request.
38Once all clinical information is added, expand Attachments, then expand Documents to
upload any supporting documentation. Click . A pop up will
display, click Browse to search for the supporting documentation.
Select the file, and click Open.
39Repeat the above steps until all supporting documentation is uploaded. Then click
UPLOAD.
All uploaded documents will be visible in the Documents section for review.
40Once all supporting documentation has been added, expand Communications, then
expand Notes to enter any additional supporting information or notes for Kepro to
review. To add a note, click ADD NOTE, then enter documentation and click SAVE.
After all information is entered and uploaded, read and check the box of the disclaimer
at the bottom of the page. Then click SUBMIT.
41The case will be assigned a Case ID and the status will change from Un-Submitted to
Submitted. If any errors or warnings are found, a pop up will display. Click OK to
acknowledge.
If no errors or warnings are noted, the case will be submitted. A Case ID will be
generated which is a unique numerical identifier that can be used for identification
purposes and status updates. (The Case ID will replace the Review ID previously used.)
The Case Page will identify the status along with an overview of the request submitted.
NOTE: For information on the types of messages received, see the Informational
Error/Warning Messages section under Tips & Tricks.
42Consumers
To search by Member, click “Consumer” on the navigation pane. The Consumer default
screen will appear providing options to search for a Member. This process is the same
as searching the Member when creating a case.
To search By Consumer (Member), enter the required Member information. For results
to render, user must enter Last Name and DOB or Member ID.
Search results will render below. To view the Consumer page, click on the Member’s
Name, which is a hyperlink.
43Set Up
This section will identify the steps for Provider Group Administrators to add and manage
additional users within the portal. Only users set up as Provider Administrators will
see this tab. For all other users, the tab will be hidden.
Add New User
As a Provider Group Administrator, users within your facility can be added and
managed locally once the group account has been registered.
Click Setup in the navigation pane. Always stay within the Manage Provider Groups
tab/section to add users. Click the caret in the far right to expand the group section.
Create username complete the contact information, click CREATE.
44The user role will default to Provider Staff Account. This is the general account user. To
change the user role, under Manage Provider Groups, select the Role the user should
have. All accesses with Admin listed will have the ability to add and manage user roles
for the provider group.
NOTE: The new user will receive an email with a link to complete the MFA registration
process. The user must click the link in the email and follow the MFA registration
process in order to complete the access request.
Message Center
To send messages, you must be inside a specified case.
New available messages are displayed in the navigation index menu.
45Indicates there are unread and non-responded messages available.
Indicates all messages are read and/or responded; no messages
available to view.
Available messages will display in the Message Center.
To open/view the message, click the caret in the right had corner of the selected
message. To view the selected case, click . You will be directed to the
specified case related to the message.
To reply to the message, directly in the Message Center, type text in the Message
section, click .
46Reports
Not all users will have access to reports and availability will vary by user role. Clicking
the Reports icon in the navigation pane will open all available reports. The report name
will be a hyperlink and open the desired report in a new tab within the internet browser.
At this time, Colorado does not have reports configured under this link for providers.
Producing a Report of your Cases
As seen below, providers can produce a listing of their cases based upon several
different parameters such as status, service type, dates of service, etc.)
47Upon search, Atrezzo will display for you a report of cases based upon the parameters
selected above.
48Help Guide
Clicking the Help icon will open a menu of options including the User Guide, FAQ,
Latest Release Notes, and Password Guidelines. These items are updated regularly
and may change over time.
How to Complete a ‘Saved But Not Submitted’ Request
After logging in, the Home page will display any “Saved But Not Submitted Requests”.
These are requests that have been started but are incomplete. These are viewable to
the submitting provider but have not been sent to Kepro for review.
To complete the saved request, hover over the request line and click the edit icon.
49The case creation page will display. To continue adding required information, expand
Clinical and review Service Details, Diagnosis, and Procedure sections to identify
information necessary to submit request.
If uncertain which required information is missing, clicking Submit will generate an
error/information pop up which will identify what information is missing. Review the pop
up and click OK to continue.
50The case creation page will display which will identify which section’s required
information is missing. Expand each section with a displayed.
Once required information is added, the indicator will disappear and case can be
submitted. If additional information is needed, refer to other sections for more
information on attaching clinical documentation, creating note documentation, and other
options.
Once the case has been submitted, it will no longer appear on the Home page under
“Saved But Not Submitted Request”.
How to View Status of a Submitted Request
Once a request has been submitted, there are different ways the status can be
reviewed. A status check can be completed with a Case ID or Member Name and DOB.
Below you will find step by step instructions for each method.
51The UM program status options are color coded for quick and easy identification.
This identifies a case that has been started, but has not been
completed or officially submitted. This case will not have an
associated Case ID until it is submitted. Once all information is
entered, the case will move to Submitted or Insufficient Information if
any required information is incomplete or missing.
This identifies a case that has been submitted, but has not yet been
reviewed. Once the case is assigned to a clinical reviewer, the status
will change to Active Review.
This identifies a case that has been submitted, reviewed, a
determination made, and is complete. A Complete case status does
not identify the outcome of the clinical review (ie. Approved, denied,
partial approval, etc).
View Status by Case ID
To view the status of a request using a Case ID, you will enter the Case ID in the search
bar at the top of the screen and click SEARCH.
The case page will display and provide the status at the top. For cases that display as
Completed, you can review the determination letter by following the steps in the section
titled: How to View a Determination Letter.
52View Status by Member
To view the status of a request by Member, you will search by the individual name. Click
Consumers in the navigation pane and enter Consumer (Member) ID or Last Name and
Date of Birth, then click SEARCH.
The result will render below. Click the Member Name to view available requests. The
case count will identify how many requests have been submitted.
The member requests will display. To view the details of the request, click View
Request. For a quick snapshot of the request, you will see the number of codes
Approved, Denied, Pending, Void, or Appeal. If a determination letter is available,
follow the steps on How to View a Determination Letter.
53Email Notification
When a change has been made to a submitted request, you will receive an email
notification to the email address provided when setting up the user account. The email
notification will provide the Case ID to direct you to the specified request. For this
reason, it is incredibly important all users ensure their contact information is up to date
and accurate, and that these emails are not redirected to your SPAM folder.
Below is a sample of the email you would receive when a change is made to a
submitted request.
How to View a Determination Letter
This section will identify how to view a determination letter once a decision has been
entered. When a change has been made to the submitted request, you will receive an
54email notification. The email notification will provide the Case ID to direct you to the
specified request. To view the determination letter, enter the Case ID once logged into
the provider portal. You may also find the case by searching for the Member ID and
selecting the applicable case.
Once the case displays, expand Attachments, then expand Letters. The available
determination letters will be hyperlinks.
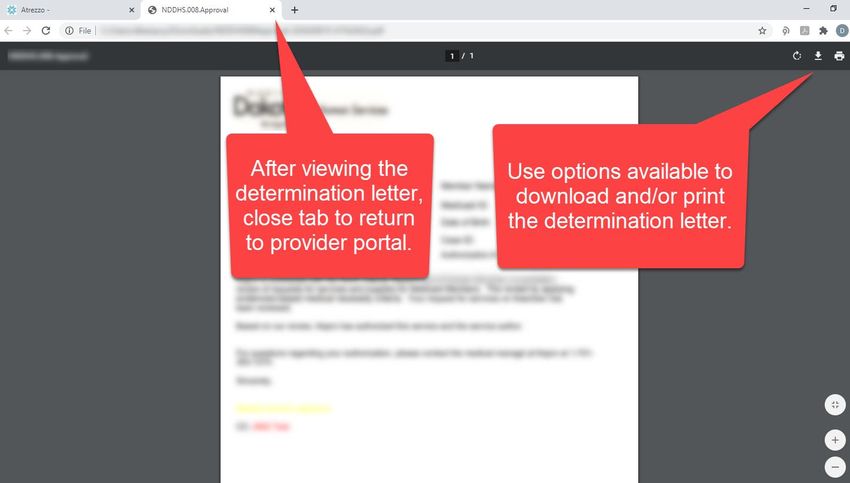
To view the determination letter, click the file name hyperlink. The file will open outside
of the provider portal for viewing, downloading/saving, and/or printing if needed. In most
instances, the file will be visible in the bottom banner, you will need to click the file to
view the document.
55After clicking link, the document will be viewable in an internet browser tab separate
from the Provider Portal. Once view is complete, close tab to return to the Provider
Portal.
56How to Add Additional Clinical Documentation
If additional supporting documentation needs to be uploaded after the request has been
submitted, you will need to return to the specified request.
Within the request, expand Attachments, expand Documents, and then click
. A pop up will display, click Browse to search for the supporting
documentation. Please make sure that your browser’s pop-up blocker is disabled for
Atrezzo.
Select the file, and click Open.
Repeat the above steps until all supporting documentation is uploaded. Then click
UPLOAD.
57All uploaded documents will be visible in the Documents section for review.
How to Add Submit Revisions to a Submitted Request
Once a request has been submitted, you will not be able to make changes or additions
manually. You will need to add a Communication – Note to the submitted request and
Kepro will update the request for you.
To make revision or add an additional code, you will need to open the request. On the
request page, expand Communications, then expand Notes and click ADD NOTE.
58Once the note section expands, enter a note with what information is requested (i.e.
what code(s) to add, what needs to be changed). Then click SAVE. This will send a
note to Kepro to make the revision(s) to the submitted request.
How to Submit a Concurrent Review (IHRP)
This section will identify the steps to submit a concurrent review once an IHRP program
is re-started at a later date TBD by HCPF.
How to Set Procedure or Diagnosis Code Preferences
This feature is used for providers to narrow down their search parameters for diagnosis
and procedure codes to those they use most frequently. This will allow you to see your
preferred code lists when entering cases, thereby allowing you to bypass the need for
searching for the codes on every case entry.
59To begin, select Preferences at the upper right side of the home screen.
Expand the Procedure Codes and/or Diagnosis Codes ribbons by clicking the blue
arrow to the right.
Enter the code type, and a code you wish to add to your preferred code list and click
Search. The code will be placed in your preferred code list for future use. If you wish to
remove a code from your list, simply click the trash can icon next to it.
60Provider Options Following Adverse Decisions
How to Request a Peer-to-Peer Review
After an adverse decision, an ordering provider may request a Peer-to-Peer review
within 10 business days from the date of the medical necessity adverse determination.
To request a Peer-to-Peer review in the provider portal, go to the specified case.
Expand Communication, expand Notes, click ADD NOTE, select which request the
Peer to Peer is being requested, and then enter a note requesting a peer-to-peer
review. The not must include:
• Requesting providers name and contact information
• A minimum of 3 preferred dates and times for the Peer-to-Peer conversation.
How to Request a Reconsideration
A Reconsideration request must be submitted to Kepro within 10 business days of the
initial denial. To request a Reconsideration, go to the specified case. Expand
Communication, expand Notes, click ADD NOTE, select which request the
Reconsideration is being requested, and then enter a note requesting a
Reconsideration. Additional supporting clinical documentation must be uploaded to the
provider portal.
61How to File an Appeal
A member has the right to file an appeal on any PAR determination, and their Appeal
Rights will be included in their determination letters. A member will file an appeal with
the Office of Administrative Courts, and the Department will be notified.
Before an appeal can be submitted, the provider should request reconsideration and/or
peer-to-peer (exhaust all efforts with Kepro before filing appeal).
All member appeals should be submitted in writing to:
Office of Administrative Courts
1525 Sherman Street, 4th Floor
Denver, Colorado 80203
Phone: 303-866-2000
FAX: 303-866-5909
Troubleshooting Tips and Tricks
This section will identify a few troubleshooting tips and tricks to help make navigation of
the system easier.
62Inactivity Warning
Important Note:
After a period of time of inactivity (15 minutes), a pop up will appear with a 2-minute
countdown to logging out. As long as you are actively working within the system, you
will not receive this pop-up warning.
To continue working, select CONTINUE.
If you do not select continue before the countdown reaches 0, you will be required to log
in again to continue utilizing the system. The system AutoSaves as you navigate and
complete fields. Completed work will not be lost; however, any unsaved work will be
lost, if the system times out due to inactivity.
Internet Browser
Atrezzo is configured to function in all internet browsers; however, Chrome is best.
Chrome users will have the best system and functionality performance over other
browsers.
How to Add Google Chrome to Computer
Google Chrome is the preferred internet browser for Atrezzo. A user can do a search for
“Google Chrome Download” or click Download to access the available link.
63On the Google Chrome Download page, click Download Chrome, then follow the
prompts.
6465
Once installed, Chrome can be set as a default browser for all applications, or you can
simply create a shortcut for Atrezzo within the application.

                                                                                          66
How to set Chrome as Default Browser
To set as the default browser, click the in the three dots in the upper right-hand corner,
then select Settings from the drop down.
Select Default browser from the menu options on the left side of the page.
67Select Make Default under Default browser.
How to Set Atrezzo Bookmark in Chrome
After entering the Atrezzo portal link https://portal.kepro.com/ into the browser and click
the star in the address bar. Enter the name of the bookmark (be sure to keep the name
simple so you remember it), choose a folder or add to the bookmarks bar, and click
Done. This will set a bookmark for easy navigation and future user.
68How to Set Disable Pop Up Blockers in Chrome
1. With
Chrome
open,
right click
the three
dots in
the upper
right hand
corner for
More.
2. Select
Privacy
and
Security.
3. Select
Site
Settings.
694. Scroll
down and
select
Pop-ups
and
redirects.
5. If your
toggle is
in this
position,
it means
that pop-
ups are
blocked.
To allow
pop-ups,
click on
the
toggle.
6. When
the toggle
is in this
position,
pop-ups
will be
allowed
on your
computer.
70Password Requirements
For all Kepro provider accounts, you will be required to change your password every 90
days. The system will warn you, starting 10 days before the password expires, after you
logon. The new password cannot be identical to the expiring password.
Passwords must be a minimum of 8 characters and a maximum of 16 characters.
Passwords must have a least one of each of the following:
• One upper case letter
• One lower case letter
• One number
• One special character. The allowable special characters are the following:
Symbol Description
@ At sign
% Percent sign
+ Plus sign
\ Backslash
/ Slash (or forward slash)
‘ Single quotation mark
! Exclamation point
# Number sign (pound sign, or hashtag symbol)
$ Dollar sign
^ Caret
? Question mark
: Colon
, Comma
( Left parenthesis
) Right parenthesis
{ Left brace
} Right brace
[ Left bracket
] Right bracket
~ Tilde
- Hyphen
_ Underscore
Updating User Profile
To update user profile information once an account has been created, click on the
icon in the upper right corner. Once the menu opens, click Edit User Profile.
71Once the profile screen displays, update information and include all required fields, then
click SAVE.
Informational Error/Warning Messages
This section will identify the different types of informational and error/warning messages
that a user may see while using this platform.
72Informational Message Explanation
Servicing Provider Type Not Allowed for This message displays when the
Service Type servicing provider does not match with
the requested service type. The servicing
provider must be corrected to be a
provider that can bill for the requested
service type.
Missing Information The case cannot be submitted until all
required information is submitted. Review
specific fields with missing information,
then click Submit.
Member does not have an active Title 19 This message displays when the selected
Plan member does not have an active Title 19
Plan and would not be eligible for
services.
Atrezzo Help: Accessing Technical Assistance
For technical assistance, please contact the Colorado Customer Support Center at
720.689.9630 or via email COproviderissue@kepro.com.
Provider Portal Tools and Resources
The following tools and resources are available to answer questions and provide
additional support for the Atrezzo Provider Portal.
Document Name Description
Atrezzo Provider Portal MFA Process This document includes all instructions
and steps the Provider Group
Administrator will need in order to
successfully register the group account,
and complete Multi-factor Authentication.
73Document Name Description
Provider Group Administrator Quick This document is a quick reference guide
Reference Guide - How to Add and with steps to add a new user to the group
Manage Group Users account.
Quick Reference Guide – How to Reset This document will provide steps to reset
Password or Unlock Account a user password or to unlock an account
after several unsuccessful login
attempts.
Quick Reference Guide – How to Update This document will provide detailed steps
User Profile Information on how to update the user profile. This
will include only basic demographic
information specific to the user, not the
group account.
Quick Reference Guide – How to Make This document will provide detailed steps
Revisions to a Submitted Request on how to make revisions, such as
adding a code, to a submitted request.
Quick Reference Guide – How to This document will provide detailed steps
Complete a Saved Request on how to complete a request started but
not submitted.
Quick Reference Guide – How to Add This document will provide detailed steps
Supporting Documentation on how to add supporting documentation
once a request has already been
submitted.
Quick Reference Guide – How to Add This document will provide detailed steps
Google Chrome to Computer on how to add Google Chrome Browser,
which is the preferred browser for the
Atrezzo Provider Portal.
Quick Reference Guide – How to View This document will provide steps to view
Determination Letter the determination letter once notification
has been received.
74You can also read