Curling Instructional Program - Weekly Sessions Manual 4th Edition (2012)
←
→
Page content transcription
If your browser does not render page correctly, please read the page content below
Pointe Claire Curling Club

          Curling
       Instructional
         Program
           4th Edition (2012)
 Weekly Sessions Manual
THIS MANUAL IS NOT TO BE
REMOVED FROM THE POINTE
  CLAIRE CURLING CLUB
               Edited by Jerome Gazdewich
 Level 3 Certified Coach – Canadian Curling Association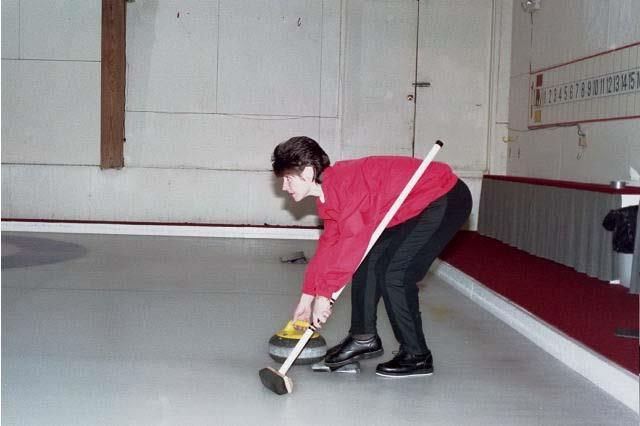
Pointe Claire Curling Club                    Instructional Program Manual – 4th Edition                                           page 2

Pointe Claire Curling Club
Instructional Program Manual
(Fourth Edition – September 2012)

This fourth edition of the manual is an update to the Third edition prepared by Keith Mallette. It is
designed to be used by both new and experienced curlers, retaining the third edition’s question and
answer format to deal with individual and specific skills or information related to the Sport of Curling.
Weekly sessions have been prepared in order to introduce a specific topic in a brief 5 to 10 minute
presentation which can be practiced in the subsequent curling sessions.

                                                             I encourage your feedback – Jerome Gazdewich.

Table of Contents

Ethics and Fair Play

         Week 1              Curlers Code of Ethics ........................................................................ page 4
                             Declaration of Fair Play ...................................................................... page 4

Pre Game Preparation

         Week 1              Warm-up ............................................................................................ page 5

Etiquette

         Week 2              A Review of the Common Rules of Etiquette ..................................... page 6

Rules

         Week 3              A Few Rules to Remember ............................................................ page 7 - 8

Free Guard Zone

         Week 4              Understanding the Free Guard Zone Rules .................................pages 9 -10

The Delivery

         Week 5              Element 1 – The Grip ......................................................................... page 11

         Week 6              Element 2 – The Stance Position....................................................... page 12

         Week 7              Element 3 – The Backward Motion ................................................... page 13

         Week 8              Element 4 – The Forward Motion .....................................................page 14

         Week 9              Element 5A – The Slide ..................................................................... page 15

         Week 10             Element 5B – Body Height During the Slide and Release ................page 16

         Week 11             Element 6A – The Release ................................................................. page 17

         Week 12             Element 6B – Stone Rotation ........................................................... page 18

         Week 13             Element 7 – The Follow Through ......................................................page 19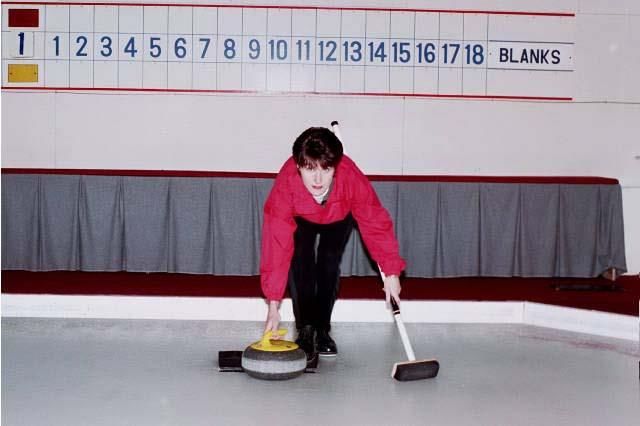
Pointe Claire Curling Club                    Instructional Program Manual – 4th Edition                                        page 3

         Week 14             The Two-Step vs Three-Step Deliveries ........................................... page 20

Brushing (Sweeping)

         Week 15             Part 1 – Stance and Direction of Motion ........................................... page 21

         Week 16             Part 2 – Sweeping for Maximum Effect ........................................... page 22

         Week 17             Part 3 – Legal vs Illegal Sweeping .................................................... page 23

         Week 18             Part 4 – Past the Far Hog Line ......................................................... page 24

Types of Shots

         Week 19             Part 1 – Draw Shots .......................................................................... page 25

         Week 20             Part 2 – Takeout Shots ..................................................................... page 26

Timing of Stones

         Week 21             Part 1 – Fast Ice vs Slow Ice.............................................................. page 27

         Week 22             Part 2 – Judging How Far the Stone Will Travel ............................. page 28

Communication

         Week 23             Basic Signaling of Shots .................................................................... page 29

Strategy

         Week 24             Strategy – An Introduction......................................................... page 30 -31

         Week 25             Basic Strategy ............................................................................ page 32 - 33

         Week 26             Four Rock Rule Opening Strategies .......................................... page 34 - 35

Fault Correction

         Annex A             Common Curling Delivery Faults .............................................. pages 36-37

         Annex B             CCA Delivery Fault Correction Guide........................................ pages 38-39

References                   ......................................................................................... page 40

Note. The terms rock and stone are both used in this manual and are interchangeable.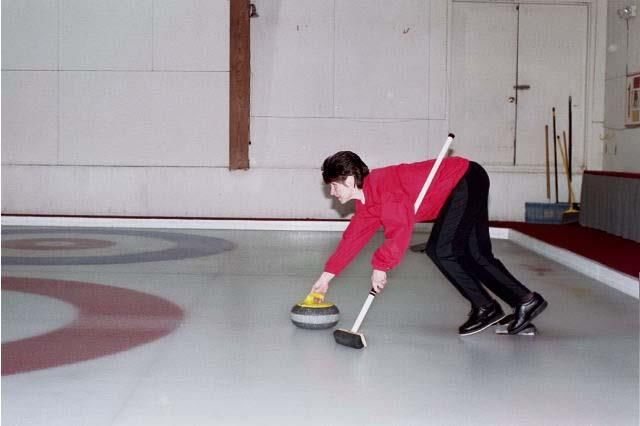
Pointe Claire Curling Club       Instructional Program Manual – 4th Edition                page 4

Week 1 – Curlers’ Code of Ethics and Declaration of Fair Play
As Curling for General Play relies on the players to police themselves, the Canadian Curling
Association has adopted the following Code of Ethics and Declaration of Fair Play as an
official supplement to the Rules of Curling. All players should read and agree to abide by
these regulations.

Curlers' Code of Ethics

I will play the game with a spirit of good sportsmanship.

I will conduct myself in an honourable manner both on and off the ice.

I will never knowingly break a rule, but if I do, I will divulge the breach.

I will take no action that could be interpreted as an attempt to intimidate or demean my
opponents, team-mates or officials.

I will interpret the rules in an impartial manner, always keeping in mind that the purpose of
the rules is to ensure that the game is played in an orderly and fair manner.

I will humbly accept any penalty that the governing body at any level of curling deems
appropriate, if I am found in violation of the Code of Ethics or rules of the game.

Declaration of Fair Play

Fair Play begins with the strict observance of the written rule; however, in most cases,

Fair Play involves something more than even unfailing observance of the written rule.

The observance of the spirit of the rules, whether written or unwritten, is important.

Fair Play results from measuring up to one's own moral standards while engaged in
competition.

Fair Play is consistent demonstration of respect for team-mates and opponents, whether they
are winning or losing.

Fair Play is consistent demonstration of respect for officials, an acceptance of their decisions
and a steadfast spirit of collaboration with them.

Sportsmanlike behaviour should be demonstrated both on and off the ice. This includes
modesty in victory and composure in defeat.
Pointe Claire Curling Club Instructional Program Manual – 4th Edition page 5
Week 1 (continued) - Pre-Game Preparation
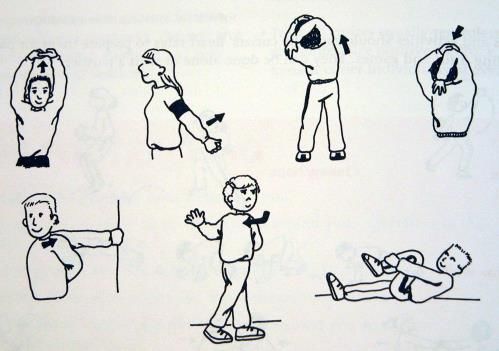
Warm-up
Before any practice or game, time should be made to
Warm-up and stretch the muscles that come into play.
A proper warm-up has three components:
1. Aerobic exercise
2. Dynamic stretching exercises
3. Simulation exercise
These are summarized as
“step-stretch-slide”.
1. Aerobic exercise serves the purpose of generating body heat and raising the level of
function of the cardio-vascular system. It should be done for approximately 5 minutes just
prior to 10 minutes of stretching before going on the ice. It should be done in full curling
uniform to increase body warming but not to the point of breaking a sweat.
Examples of this type of exercise are “high-stepping” and “jogging-on-the-spot”.
2. The purpose of dynamic stretching is to overcome stretch reflexes which would normally
prevent us from moving comfortably through the range of motion required for delivering
stones and sweeping and they should be done for 5 to 10 minutes shortly before going
onto the ice.
This type of stretching could include: arm circles/swings, lunges, high knee steps, leg
swings, hip rotations, neck rotations, ankle hoppers, jumping jacks, squats, etc. Work out
the major muscle groups and joints progressing from one end of the body to the other.
3. The final phase of the curling warm-up is done on the ice using the sliding movements
associated with the delivery skills. Before taking their first slides from the hack, players
should first cool down their sliders by moving it around directly on the ice, preferably
behind the back line or by moving up and down the ice, along the side of the sheet.
Players can also simulate the sliding motion by getting down on the ice facing and holding
onto the backboard or side boards and simply stretching out and/or slightly pushing and
pulling themselves backward and forward.
Slides from the hack can progress from an initial easy leg drive and upper body position to
a full take-out drive, stretching out the back through its full range of motion.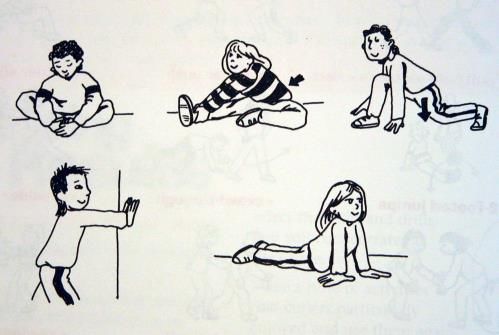
Pointe Claire Curling Club        Instructional Program Manual – 4th Edition               page 6

Week 2 - Etiquette

While there are numerous rules of the game of curling, much of how the game is played is
controlled by an understanding of the etiquette of the game. Know the rules – a copy of the
rule book can be found on the Canadian Curling Association website.

What should your team be doing when the opposition is delivering?

    1. Only the skip and vice-skip may be positioned inside the hog line at the playing end.
       They shall position themselves behind the back line when the delivering team is in the
       process of delivery. Both players shall be motionless with their brooms positioned in a
       manner not to interfere with or distract the attention of the player who is in the
       process of delivery.

    2. The player who is next to deliver may take a stationary position to the side of the sheet
       behind the hacks at the delivery end. The player shall remain silent and motionless
       when the delivering team player is in the process of delivery.

    3. The players not taking the positions in (1) or (2) shall position themselves between
       the hog lines and to the extreme sides of the sheet when the opposing team is
       delivering a stone. The players positioned in this area shall remain in single file
       when the delivering team player is in the process of delivery.

    4. The non-delivering team members shall not take any position or cause such motion
       that would obstruct, interfere with or distract any member of the delivering team.

What should you be doing after the last rock has been delivered?

    1. At the conclusion of an end, all players should remain outside of the rings until the
       thirds have agreed upon the score.

    2. Players should be careful when pushing stones into the corners in preparation for the
       next end, making other players aware of any stone being pushed in their direction.

What can be done to speed up the game?

    1. Always be prepared to deliver when it is your turn to throw – clean your stone before
       receiving the shot call from the skip.

    2. Once the thirds have determined the outcome of the end, help to carefully push the
       stones into the corner.

    3. If you use your own stabilizer, be sure that it is at the correct end of the ice.

    4. Time allocated for non-officiated play is 15 min per end (or two hours for an eight
       end game). It is considered a violation of the fair play rule to purposely slow a game
       down so that the full eight ends cannot be played in the allocated two hours.
Pointe Claire Curling Club Instructional Program Manual – 4th Edition page 7
Week 3 – A Few Rules to Remember
When is a delivered stone not in play?
A stone must be fully over the hog line at the playing end to be considered in play. A
stone staying outside of play after striking a stone in play shall remain where it stopped
including any subsequent stones striking that particular stone. A stone which crosses
the hog line but spins such that it comes to rest biting the hog line is considered out of
play.
A stone which clearly crosses the back line is removed from play immediately.
A stone that touches a sideline, hits a divider or comes to rest biting a sideline shall be
immediately removed from play. If a stone in motion hits a stationary stone and a
sideline or divider at the same time, the stationary stone shall be allowed to take its
course as if it had been hit first.
What options do you have after winning the coin toss?
The winner of the coin toss has the option of playing the first or second stone of the
first end. The team that plays the first stone of the end has choice of handle colour.
Are you allowed to deliver from either hack?
Right hand players shall deliver from the left hack and vice-versa.
When do you have to release the stone?
The stone shall be released before it reaches the hog line at the delivering end.
When can you safely abort your delivery?
A stone can be replayed if it has not reached the nearer tee line.
What happens if a player misses a turn?
If an error in a team’s delivery rotation causes a player to miss a turn, the player who
missed a turn will then deliver the last stone for their team in the end. If it cannot be
determined who had missed a turn, the lead will deliver the last stone.
What must you do if you or your equipment touched a stone in motion?
A stone in motion must not be touched by any player, their equipment or personal
belongings.
If a stone is touched between the hog lines:
- By the team to which it belongs, it is removed from play immediately by that team.
- By the opposition or an external force, it is re-delivered.Pointe Claire Curling Club Instructional Program Manual – 4th Edition page 8
If a stone is touched inside the hog line at the playing end:
- By the team to which it belongs, all stones are allowed to come to rest, after
which the non-offending team has the option to remove the touched stone and
replace all stones that were displaced after the infraction to their original positions;
or leave all stones where they came to rest; or place all stones where it reasonably
considers the stones would have come to rest had the moving stone not been
touched.
- By the opposition, all stones are allowed to come to rest, after which the non-
offending team places the stones where it reasonably considers the stones would
have come to rest had the moving stone not been touched.
What happens if you displace a stationary stone?
Displaced stationary stones shall be replaced as close as possible to where the opposing
skip considers they originally lay.
Who decides the score of an end?
A team scores one point for each eligible stone that is nearer to the pin (or tee) than is
any stone of the opposing team. An end is decided when the skips or vice-skips in
charge of the house at the time agree upon the score for that end.
If a stone which may have affected the points scored in an end, is displaced prior to the
final determination of the score, the team displacing the stone shall forfeit the point(s)
involved.
When is the measuring device used?
No physical device to aid visual observation shall be used in measuring prior to the
last stone delivered in the end coming to rest (except as noted below).
Measurements shall be taken from the tee to the nearest part of the stone. A measure
that results in stones being an identical distance from the tee shall be declared tied.
If two or more stones are so close to the tee that a measuring device cannot be used,
and if a visual comparison cannot determine which stone is closest to the tee, the
stones shall be considered tied.
Decisions on whether a stone is in or out of play at the hog line, sidelines and back line
shall be visual (except as noted below).
What is the exception to the rules?
The only exceptions are that the 6 foot stick may be used to determine whether a stone
is in the free guard zone (for the first three stones) or whether a stone is on the back
line in proximity to the centre line to determine whether or not it is in play.Pointe Claire Curling Club Instructional Program Manual – 4th Edition page 9
Week 4 - Free Guard Zone
What is the Free Guard Zone?
The area from between the far hog line and the far tee line, excluding the house,
makes up the Free Guard Zone.
What is the Four Rock Free Guard Zone Rule?
Any stationary stone[s] belonging to the opposition that is/are located within the free
guard zone shall not be removed from play by the delivering team prior to the delivery
of the 5th stone of the end.
What is the advantage of the four rock free guard zone rule?
The four rock FGZ rule enables the team without last rock to establish 2 guards with its
lead stones and the team with last rock to establish 1 guard with its first lead stone.
Can a team remove its own stone from the free guard zone?
The FGZ rule does allow a team to remove their own stone located in the FGZ from
play prior to the delivery of the 5th stone of the end (provided that it does not cause an
opposition stone in the FGZ to be removed from play).
What if a stone makes contact with a stone just over the hog line and remains
on or in front of the hog line?
A stone which comes to rest biting or in front of the hog line after making contact with
a stone in the free guard zone is considered to be in the free guard zone. A stone which
comes to rest outside the house but biting the tee line is not in the free guard zone.
What happens if an opponent’s stone is removed from play prior to the delivery
of the fifth stone of the end?
If an opposition’s stone(s) located in the FGZ is removed from play prior to the
delivery of the 5th stone of the end, directly or indirectly, the delivered stone mustPointe Claire Curling Club Instructional Program Manual – 4th Edition page 10
be removed from play and any other displaced stationary stone(s) replaced as close as
possible to its original position(s).
Note: A delivered third or fourth stone of an end may hit an opposition
stone(s) in the free guard zone onto a stone(s) not in the free guard zone. The
play stands if the opposition’s original free guard zone stone(s) remains in
play. If the opposition’s original free guard zone stone(s) is removed from
play, then the delivered stone is removed and the stones place in their original
positions.
What happens if a delivered third or fourth stone of an end hits a stone not in
the FGZ and as a result an opponent’s stone in the FGZ is removed from play?
If the delivered third or fourth stone of an end initially hits a stone(s) not in the free
guard zone and as a result an opposition’s stone in the free guard zone is removed from
play, the delivered stone must be removed from play and the displaced stone(s)
returned to their original positions.
What happens if the delivered third or fourth stone of an end simultaneously
hits a stone(s) eligible to be removed from play and an opposition’s stone(s) in
the free guard zone and as a result the opposition’s stone(s) in the free guard
zone is removed from play?
See answer above.
How is it determined whether a stone is in the free guard zone?
After the delivery of each of the first three stones of an end it is the responsibility of the
skip of the team who is about to deliver to ensure agreement with the opposing skip as
to whether or not any of the stones in play have come to rest in the free guard zone. If
they cannot agree, they may make the determination by using the six foot measuring
stick. If the position of another stone(s) hinders the use of the six foot measure they
may reposition the stone(s), complete the measurement and replace the stone(s) to its
original position.
A visual agreement by the opposing skips as to whether or not one of the first three
stones of the end was in the FGZ, does not preclude a measurement occurring at the
conclusion of the end involving the same stone(s).Pointe Claire Curling Club Instructional Program Manual – 4th Edition page 11
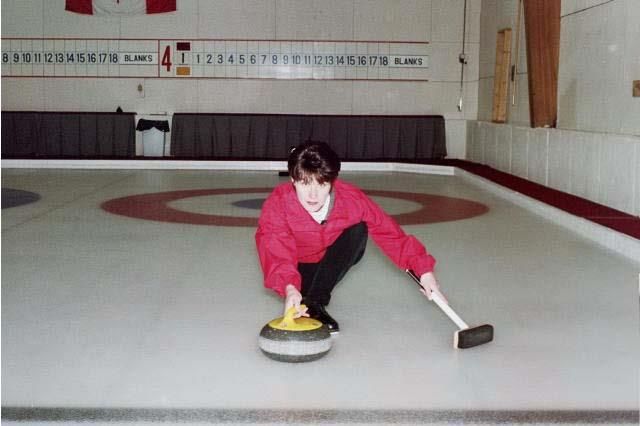
Week 5 - Delivery Element # 1 – The Grip
(This lesson is best given with a rock present. You may carefully bring up one of the Junior
rocks, being sure not to damage the running surface.)
How should the handle be gripped?
Hold the handle so that the middle finger is over the center of rotation of the stone
with all fingers together. The handle should be resting on the pads of the fingers.
Close the thumb around the other side of the handle. The sides of the handle should be
held between the middle joint of the thumb and the second joint of the finger. The
wrist should be held in a high position above the handle.
The second joint of the fingers should not be underneath the handle, nor off of the
handle. Do not hold the handle tightly in a “death grip”. Do not hold the handle lightly
with the fingertips only.
In a proper grip, the “V” formed by the thumb and index finger will point to the
shoulder that is on the side of the ice that you want the rock to curl towards.
Where should the handle point on an in-turn?
The handle at 10 o’clock for right-hander’s in-turn (2 o’clock for left-hander’s in-turn)
Where should the handle point on an out-turn?
The handle at 2 o’clock for right-hander’s out-turn (10 o’clock for left-hander’s out-
turn)
Where should the handle point on release? Why?
The handle should be at 12 o’clock upon release. This insures that the rock will be
delivered in the direction of the release and avoids turning the rock to either side.
When should the handle move to 12 o’clock? Why?
This movement should start roughly 3 feet before release of the handle.
This insures that a rotation or “turn” is applied to the release. Bring the rock to 12
o’clock too early will result in little or no turn - a “lazy” handle.Pointe Claire Curling Club Instructional Program Manual – 4th Edition page 12
Week 6 - Delivery Element # 2 – The Stance Position
How to approach the hack? Why?
Always walk into the hack from the rear.
This enables you to get the body (feet, knees, hips, shoulders, etc.) in the right position.
It also helps you visualize the imaginary line that runs from the broom at the other end
to the stone you are about to deliver.
Where do you place the hack foot and sliding foot? Why?
Place the ball of the hack foot squarely on the cross-hairs of the hack, with the toe
pointed in direction of the forward slide.
If the foot is too low, it may slide back when pushing off and reduce the weight that you
can potentially generate.
The slider foot should be flat on the ice parallel to the hack foot and aligned heel to toe
of the hack foot.
How do you position the body?
The thigh of the hack leg should be pointed at the skip’s broom along the line of
delivery.
The hips and shoulders should be square to the broom. If the stance is not square to
the broom, you won’t slide out to the target.
The throwing arm should be comfortably extended over the hack foot knee. Keep the
throwing arm elbow over the hack thigh.
Sit up straight in the hack – no slouching, twisting, or leaning forward to grab the
stone.
Where do you position the stone?
The stone should be placed in front of the hack toe, along the line of delivery, or
slightly towards the center line from this position, with the proper turn in place.
Where should your eyes be focussed?
ALWAYS keep your head up with your eye on the skip’s broom. Don’t look down.
Practical Drill: Place two cones just inside the near hog line. Line up and slide between
the cones with the stone kept on the line of delivery. If the hack foot is not pointed along the
line of delivery, you won’t hit the cone. Try it with your eyes closed – did you slide between
the cones?Pointe Claire Curling Club Instructional Program Manual – 4th Edition page 13
Week 7 - Delivery Element # 3 – The Backward Motion
What is the purpose of the backward motion?
The purpose of the backward motion is to help develop power in the delivery.
What is the first step in the backward motion? What are the subsequent steps?
It can start with an (optional) forward press to break the stone/ice friction – avoid
playing with the stone by moving it back and forth before you start your delivery.
The backward motion starts by raising the hips, rotating about the shoulders until the
hack leg makes about a 90° angle about the knee. The shoulders should not rise. At
this point the back should be roughly parallel with the ice surface.
With the stone starting to move first, the stone, hips and sliding foot are then moved
straight back roughly 15 cm (typical).
At the end of this motion, the toe of the sliding foot is roughly aligned with the heel of
the hack foot.
How far back can you go?
The further back you move your hips, the more weight you will be able to generate.
Note that the sliding foot should never go back further than the hips.
Some players will not need to go back at all unless they are playing heavier take-out
shots.
How do you know if your sliding foot is going too far back?
If you cannot take your foot out of the hack when you are at the end of your backward
motion your sliding foot has gone too far back.Pointe Claire Curling Club Instructional Program Manual – 4th Edition page 14
Week 8 - Delivery Element # 4 - The Forward Motion
What is the first step in the forward motion? What are the subsequent steps?
The forward motion begins with a forward push on the stone. This is accomplished by
a slight “falling forward” or “rocking forward” body motion, along the line of
delivery (i.e. towards the skip’s broom).
As the body falls forward, the sliding foot moves straight forward coming to rest
behind the stone and underneath the body’s center of gravity (i.e. about the end of the
sternum or center of the chest). Most of the body’s weight should come to rest on the
sliding foot. Step towards the skip’s broom on the line of delivery.
It is acceptable to move the sliding foot early behind the rock before there is significant
forward motion of the body.
At what point in the forward motion is the maximum weight generated?
As the body moves forward and the sliding foot comes into place, the hack leg
approaches a 90° angle about the knee. This is where the maximum push is made with
the hack leg out of the hack. (Pushing either earlier or later than this point reduces the
maximum weight that can be generated).
A slightly longer hesitation in bringing the sliding foot underneath the body will
increase the maximum weight that can be generated.
What else should you remember in the forward motion?
During the entire forward (and backward) motion, the grip and position of the brush
(or stabilizer) should remain unchanged. The head should remain up with eyes on
target.
Strive for smooth fluid motions. Do not jump out of the hack.
When can you abort your forward motion without losing your shot?
A player can recommence the delivery as a result of his/her own team’s action, the
player may do so providing the stone has not reached the near tee line.Pointe Claire Curling Club Instructional Program Manual – 4th Edition page 15
Week 9 - Delivery Element # 5A – The Slide
What is the key to a proper slide?
Balance and a slide along the line of delivery.
How should the throwing arm be positioned?
The arm should be bent with elbow down and
comfortably against the body.
Where does the line of delivery start and end?
The line of delivery extends from the hack foot toe to the skip’s broom.
What is the importance of the line of delivery?
The stone and the sliding foot should move along the line of delivery to insure “hitting
the broom”.
How should the body be positioned?
The head and body should be in a relaxed upright position, with the hips low. The
shoulders should be higher than the hips with the back straight or slightly arched up.
The shoulders and hips need to remain square to the ice – no twisting.
Where should the sliding foot be positioned?
The sliding foot should be behind the stone, on the line of delivery, and directly below
the body’s center of gravity. It should be flat on the ice. Pointing the toe out (or in)
about 15° or so will help with balance. The sliding knee should be under the shoulder
holding your brush (stabilizer).
How do you keep the whole foot flat on the ice and avoid the “toe-only” slide?
By keeping it under the body center of gravity. Simply by pushing the foot forward or
by bringing the knee (or body) back will bring the heel down.
What is the advantage of having the foot flat on the ice?
This provides a much larger platform in order to help you maintain balance, which is
the key to a proper slide. It also reduces stress on the knee.
Where should the trailing leg and foot be?
The trailing leg & foot should be extended behind the body along the line of delivery.
The trailing foot can be straight, turned-in or turned-out, whichever is comfortable
while still keeping alignment on the line of delivery.Pointe Claire Curling Club Instructional Program Manual – 4th Edition page 16
Week 10 - Delivery Element # 5B – Body Height during the Slide
Is it better to be high or low in the slide?
The best height is the one that you are most comfortable with and that best works for
you.
The higher the slide, generally the better the feel for speed and draw weight.
The lower the slide, generally the more hit weight can be generated, since the weight
generated is affected by the extension of the back leg. Also, getting your chin in close
behind the stone can help with accuracy.
How far should the back leg be extended?
In a high delivery the knee of the trailing leg may be just behind the hips. In a low
delivery the trailing leg may be extended almost straight back. In all cases the knee of
the trailing leg should be behind the hips.
The Slide The Release
What is the body position for proper alignment to the broom?
The stone, the sliding foot, and the trailing foot must all be sliding along the line of
delivery. In this position the chin should also be directly behind the stone.
What is the non-throwing arm doing?
The position of this arm, and your brush (stabilizer), should be unchanged from the
set-up/stance position.
Make sure that the brush head stays about even with the rock – do not let it drift
backwards thus opening your shoulders and reducing your accuracy.
If you use a stabilizer, make sure that it does not drift backwards thus opening your
shoulders and reducing your accuracy.
What about the grip?
The grip remains unchanged. Once in the slide the body remains relatively motionless.Pointe Claire Curling Club Instructional Program Manual – 4th Edition page 17
Week 11 - Delivery Element # 6A – The Release
To refresh, how should you be holding the rock through the slide?
You should be holding the handle between the joints of your fingers and thumb with
the handle at either a 2 o’clock or 10 o’clock position depending on the desired turn.
When should you start to apply the rotation to the stone?
You should start to apply the rotation to the stone about 3 feet (1 meter) before the
release point (i.e. where you let go of the stone).
Should you hold on to the rock as long as you can?
There is no “right” release point (as long as it is before the hog line). It is up to you to
find the point that works best for you. However, whatever your release point it is
important that you maintain a consistent release point for all of you shots.
Generally the longer that you can wait, the more time that you would have to make an
last minute adjustments. But if you have trouble with balance in your slide, or with
generating weight, it is better to release earlier (say about the top of the house).
What part of the body is used to put the turn on the stone?
Only the wrist should be used to put the turn on the stone. This is done by rotating the
wrist about the center of rotation of the stone.
Why not use the rest of the arm or fingers?
The forearm should be along the line of delivery, with the elbow pointing down. If the
elbow moves from side to side, or if the wrist is low, you run the risk of introducing a
sideways motion to the stone which takes it off the line of delivery.
What does the throwing arm and/or body do during the release?
As you start to apply the rotation there should be a slight extension of the throwing
arm towards the skip’s broom, along the line of delivery. This extension allows you to
make a fine adjust to the stone’s speed. Alternatively, this can be accomplished by
slightly dropping the body (i.e. height of the slide).
How do you know if you released the rock along the line of delivery?
After release of the stone your hand should be extended in a handshake position
During the release, where should you be looking?
You should always have your head up and eye’s focussed on the skip’s broom.Pointe Claire Curling Club Instructional Program Manual – 4th Edition page 18
Week 12 - Delivery Element # 6B - Stone Rotation
On a draw, how many times should the stone rotate down the sheet?
A stone should rotate approximately 2 1/2 to 3 times from release to stop. This is
called a “positive” rotation.
On a take-out, how many times should the stone rotate down the sheet?
Regardless of delivery weight, the stone should always be given the same rate of
rotation. In other words the release does not change with weight.
How do you prevent a stone from having little or no rotation?
Always start your delivery with the handle at the 2 o’clock or the 10 o’clock position
and maintain this position until approximately one metre before your release point.
The handle should be pointing at the 12 o’clock position at the release point. Releasing
past this position can cause an over-rotation and loss of accuracy.
What happens if the stone has little rotation, and why?
A stone that has little or no rotation will not curl or may curl erratically at the mercy of
the ice conditions.
The stone requires a positive rotation to cause it to curl in the direction of rotation (i.e.
to the left for a counter-clockwise rotation and to the right for a clockwise rotation). A
stone with no rotation will run straight or snake as it grips flat sections of ice or debris.
What happens if you put too many rotations on the stone?
A stone that spins rapidly will generally run straight down the ice.
What causes a rock to lose its rotation?
A “lazy” or weak handle (i.e. little rotation) can easily lose its rotation as it grips debris
or flat ice caused by pebble wear or hand and knee prints.
What can you do to prevent a rotating stone from losing its turn?
Keep the ice ahead of the path of the stone clean with light brushing.
Can you reposition your hand on the handle of the stone after letting go?
No, you can no longer “double-clutch” the stone. If you let go of the stone after it has
passed the tee line, you may no longer re-grip it and release again prior to the hog line.
This action is now considered to be a touched moving stone.Pointe Claire Curling Club Instructional Program Manual – 4th Edition page 19
Week 13 - Delivery Element # 7 - The Follow-Through
What are the elements of a proper follow-through?
At the point of release the throwing hand should be extended in a handshake position
towards the skip’s broom with the palm of the hand perpendicular to the ice surface.
The head is up and the eyes focussed on the broom. The body should be sliding along
the line of delivery.
This position should be held for approximately 3 seconds after release.
What is the importance of the follow-through?
A proper follow-through helps to ensure that proper mechanics were followed through-
out the delivery, particularly during release where it ensures fluid and complete arm,
hand, and body motion through this critical part of the delivery.
The follow-through also gives the thrower confirmation that they released the stone at
the skip’s broom along the line of delivery. It also helps the skip see whether the
thrower was sliding out to the broom and had a clean release or whether the thrower
was off the broom and tried to compensate by throwing back at the broom.
It also shows whether the slide was well balanced. Dropping the hand immediately on
the ice after release is a sure sign of an unbalanced slide, possibly caused by leaning on
the stone or by a push of the stone.
Remember that hands and knees on the ice cause flat spots – not good.
Why is it a bad habit to immediately get up to sweep the stone?
If you feel you need to immediately get up to sweep the stone you are already telling
yourself that you will be throwing too little weight – better to concentrate on your
delivery and throw the correct weight from the start.
By attempting to get up right away you lose benefits of the follow-through which
usually results in a rushed and improper release.
By feeling that you need to get up to sweep right away you are sending a signal to your
sweepers that you lack confidence in them. A third sweeper does not add much more
distance than two sweepers and is not worth the risk of burning the stone as you get
into sweeping position.
How can you help your sweepers and skip during the follow-through?
At release you are in the best position to know if you feel that you threw the correct
weight and that you delivered at the broom along the line of delivery. Communicate
this to your sweepers and you skip. This is important information for them.Pointe Claire Curling Club Instructional Program Manual – 4th Edition page 20
Week 14 – The Two-Step vs Three-Step Deliveries
What are the three-steps of a delivery?
The first step of a delivery is the raise of the hips motion.
The second step is the backward motion (see week 7).
The third step of a delivery is the forward motion (see week 8).
Th to the drive out of the hack and can be summarized as “up and forward” or “up,
backward and then forward”, which had been the standard up to here in this manual.
What are the 2-step and 3-step deliveries?
The 3-step delivery employs all three steps of a delivery (i.e. “up, back, and away”).
The 2-step omits the second step backward motion (i.e. “up and away”). (Note that a
2-step may have a slight backward motion of the sliding foot.)
What are the advantages of both types of deliveries?
The 2-step delivery seeks to minimize the amount of motion in the delivery mainly so
as to improve delivery accuracy. Weight is generated mainly by the push of the hack
leg with an adjustment from the arm extension on release. Note that the “falling or
rocking forward” motion is part of the forward motion of the delivery and hence is
still part of the 2-step delivery.
The 3-step delivery seeks to generate more power in the delivery, particularly for take-
out shots, by increasing the motion of the delivery. Note that the two basic ways to
increase power are increase speed or increased motion. The movements of the 3-step
delivery also help some players with timing of their delivery.
Are there other variations in the types of delivery?
Many competitive curlers are starting to use a modified 2/3-step delivery where they
omit the first step (i.e. the raising of the hips). In this delivery they start in the “hips
up” position.
Many will then proceed into the second step backward motion from where they
proceed with the standard delivery.
Others will proceed directly into the third step forward motion from where they
proceed with the standard delivery.
What is the best delivery?
All of these are legitimate deliveries. The best is the one that works for you.Pointe Claire Curling Club Instructional Program Manual – 4th Edition page 21
Week 15 - Brushing (Sweeping) Part 1 – Stance and Direction of
Motion
What is the purpose of sweeping?
To affect the stone’s trajectory by causing it to travel further and to extend the point
where is starts to curl (i.e. to extend the break point). This is done by reducing the
friction between the stone and the ice by:
Polishing the pebble
Raising the temperature of the ice
Cleaning frost & debris from in front of the stone
What should the sweepers do before the delivery of the stone?
Know the shot being called. If not sure, ASK! Know who sweeps closest to the stone.
Check the intended path of the stone prior to delivery to remove visible debris.
Where should sweepers stand when the stone is being delivered? And why?
The sweepers should start near the back line or tee line, moving forward as the player
delivering starts the delivery. This ensures that the sweepers are moving forward with
the stone and are ready to sweep as soon as the stone is released. It also gives them a
better feel for the speed of the stone at release.
What are the standard sweeping positions/techniques for brushing?
There are two standard sweeping positions/techniques for brushing: open and closed.
In both positions the sweepers should be one on either side of the stone to allow both
to get close to the stone while avoiding collisions.
In both positions, the sweepers should hold their brushes at about 1/3 way from the
top and bottom of the brushes. The top end of the brush is locked against the body by
the elbow of the outside arm. The lower arm is fairly stiff for effective weight transfer.
In the open position, the sweepers face forward using a walking/step-slide motion.
The lower part of the brush is held by the hand that is inside or closest to the stone
while the top part of the brush is held by the hand that is outside or furthest from the
stone. Grippers must be worn on both feet. The sweep is typically perpendicular to
the path of the stone.
In the closed position, the sweepers face sideways towards the stone (i.e. hips parallel
to the centerline). A slider must be worn on the lead foot which is kept flat on the ice
the entire time. The sweepers push off of their back foot, on which they wear a gripper.
The hands holding the brush reverse their positions such that the lower hand is on the
same side of the body as the sliding foot. The sweep is typically at 45° to the path of
the stone.Pointe Claire Curling Club Instructional Program Manual – 4th Edition page 22
Week 16 - Brushing (Sweeping) Part 2 – Sweeping for Maximum
Effect
What are the THREE elements of effective brushing?
1. Good technique:
a. Apply pressure on the brush head
b. Generate brushing stroke speed
c. Sweep in front of the path of the stone
2. Good judgement:
a. Develop your ability to judge the weight of the stone
b. Stopwatches can be used to help develop weight judgement
c. Develop your ability to read the ice
3. Good communication:
a. Judge the weight of the stone early and communicate it to the skip
b. Skip/shooter should communicate the line to the sweepers
c. The lead sweeper should occasionally look up to assist in communication
with the skip and check the stone’s path
d. Everyone should know the shot called and if the call is changed during the
shot
How should you hold the brush for maximum effect?
The brush should be held at an approximate 45° angle with the ice.
It is generally up to the preference of the sweeper whether to sweep with the brush
head either parallel or perpendicular to the center line.
By combining consistent fast and hard strokes across the running surface of the
stone, you will have the maximum effect.
Where should you concentrate the brushing of the rock?
Remember that only the approximately 6 inches across the running surface of the
stone needs to be brushed. Don’t waste your effort with very wide strokes.
You should brush in close proximity to the rock.
More than one foot away from the stone for the first sweeper on the stone
significantly reduce the effect of the sweeping.
Anything else you can do to help maximize your sweeping power?
Keep your brush heads clean. Dirty or worn fabric significantly reduces your brushing
power.Pointe Claire Curling Club Instructional Program Manual – 4th Edition page 23
Week 17 - Brushing (Sweeping) Part 3 – Legal vs Illegal Sweeping
Forget what you see on TV and remember your Curling Code of Ethics.
Brushing rules have been put into place to ensure fairness of play and to prevent
cheating, however they are also the most difficult to enforce. Curlers must take it upon
to respect these rules the same way they would the other rules of the game.
In what direction must the brushing motion be?
The brushing motion may be in any direction relative to the stone’s movement, as
long as there is brush head movement in the sweeping motion.
Do you have to sweep the entire width of the stone?
You do not have to sweep the entire width of the stone. You may now “corner sweep” a
stone as long as there is brush head motion.
Where should the final sweeping motion end?
The final sweeping motion shall finish outside the path of the stone.
Why is this?
The sweeping motion shall not leave any debris in front of a moving stone.
What is the penalty for illegal sweeping?
In club play, the sweeping team must declare its own violation, all stones shall be
allowed to com to rest before any action is taken. At this time the non offending team
has the option of:
a) allow the play to stand
b) remove the unfairly swept stone from play and replacing all affected stones
as close as possible to their original position
c) placing the unfairly swept stone and stone(s) it would have affected where
they would have come to rest had the sweeping violation not occurred.Pointe Claire Curling Club Instructional Program Manual – 4th Edition page 24
Week 18 - Brushing (Sweeping) Part 4 – Past the Far Hog Line
Who can sweep one of your stones up to the tee line?
Between the tee lines, all members of the delivering team may sweep any of their
team’s stones in motion.
Who can sweep one of your stones past tee line?
Behind the tee line at the playing end, only one player form each team may sweep at
any one time. This may be any player of the delivering team, but only the skip or vice-
skip of the non-delivering team.
Behind the tee line, a team has first privilege of sweeping its own stone but it must not
obstruct or prevent their opponent from sweeping.
Who on the non-delivering team can sweep a stone set in motion?
Only the skip or vice-skip of the non-delivering team may sweep their team’s stone(s)
after it is set in motion.
Important: Remember that the vice-skip is the player designated to take
the skip’s place in the house, not necessarily the third.
When can a non-delivered stone be swept?
A stationary stone must be set in motion before any sweeping can occur.
When can the lead or second sweep beyond the tee line?
The only time a lead or second of the delivering team may brush behind the tee line is
when sweeping/brushing their team’s stones that are in motion.
When can you sweep an opponent’s stone?
An opponent’s moving stone shall not be swept until the front end of the stone
reaches the farther tee line and sweeping shall only take place behind the tee line.
Can you change your brush during a game?
At the start of each game, each player shall declare what type of sweeping device that
they will be using for the duration of the game (brush, synthetic straw style broom or
corn/straw broom). Players may change or exchange brushes, brush heads and
synthetic straw style brooms during a game. Players shall use the same corn/straw
broom for the duration of the game and shall not exchange with another player for a
brush or synthetic straw style broom.Pointe Claire Curling Club Instructional Program Manual – 4th Edition page 25
Week 19 -Types of Shots Part 1 – Draw Shots
Define the following types of draw shots:
Guard A stone that is placed in a position so that it may protect another stone.
Corner guard A corner guard is a guard that is short of the house and off to the side of
the centerline.
Come around A come around is any draw shot that curls around another stone.
Raise The tapping back of a stationary stone, generally closer to the tee.
Tap back A raise not necessarily intended to promote the stationary stone closer to
the tee.
Freeze A freeze is a draw that comes to rest touching another stone.
Corner-freeze A corner-freeze is a freeze that comes to rest off center of another stone.
Why does draw weight change during a game?
Ice conditions will change during a game. Freshly pebbled ice will be slower and will
require some extra weight for a given draw. After a couple of ends, the ice will speed
up and less weight will be required for that shot. After a few more ends the ice may
wear and more weight will be required again.
What can cause draw weight to differ from day to day?
The ice temperature, the air temperature and humidity, and the pebbling technique.
Why is the ice faster when the ice or air temperature is higher?
For the same reason that vigorously brushing a stone will make it go further, the
friction of ice decreases when its temperature is higher.
How do you determine the weight of a tap back?
When throwing tap backs, remember that to tap a stone back a given distance, your
shooter must be thrown hard enough to travel that distance all by itself plus a little
more. The greater the angle of the tap back, the greater the additional weight required,
since a straight tap back will transfer more energy to the stationary stone than one hit
on an angle where the shooter retains some of its energy as it rolls away.
What is the secret to establishing consistent draw weight?
Practice, practice, practice!Pointe Claire Curling Club Instructional Program Manual – 4th Edition page 26
Week 20 - Types of Shots Part 2 – Takeout Shots
Define the following types of takeout shots:
Peel A peel weight shot is a takeout thrown with very hard weight to remove
stones from play and the shot stone is not expected to stick around.
(Undisturbed peel weight shots should hit the back wall and bounce back
several feet – but catch them anyways.)
Normal Normal weight is a takeout thrown with enough weight to firmly remove
another stone. (It takes about 9.5 – 9.8 seconds for a normal take-out
weight shot to travel between the hog lines.)
Board Board weight is a takeout thrown with enough weight to firmly remove
another stone. Because it has less weight than normal weight, it is more
likely to stick around if it hits the target stone off centre. (A board weight
takeout undisturbed should come to rest at the back board.) This weight
is also sometimes called “bumper weight”.
Hack Hack weight is a takeout thrown with enough weight to gently remove
another stone. (A hack weight takeout undisturbed should come to rest at
the hack.)
Tick A shot intended to make a glancing contact with another stone so as to
move it sideways but to keep it in play. For example, this shot could be
used to move a free guard stone out of the way without removing it from
play (which would require its replacement.)
Hit & Roll A hit and roll is a takeout that, after making contact with another stone,
rolls to a designated place.
What if your skip asks for control or regular weight? What does he mean?
There is no set definition of normal, control or regular weight. This must be
established between the skip and his team mates before the game to avoid confusion.
This is why using the distances above helps to establish the asked for weight.
What extra responsibility do the sweepers have when playing take-outs?
When take-outs are played, especially high weight take-outs, it is the sweepers’
responsibility to catch any stones that travel off to the sides “out of play” so that they
do not bounce off of the side boards and hit stones that are in play, or if there are no
side boards, so that they do not travel into the game on the adjacent sheet.Pointe Claire Curling Club Instructional Program Manual – 4th Edition page 27
Week 21 - Timing of Stones Part A – Fast Ice vs Slow Ice
How can you judge the speed of the ice?
The time it takes a draw shot to travel down the ice is a measure of the speed of the ice.
Often stopwatches are used to help gauge the speed of the ice. By measuring the time it
takes the stone to travel the length of the ice or between specific lines, you can
determine how fast or slow the ice is and judge relative changes in the ice speed.
Is 27 second ice faster or slower than 25 second ice?
The higher the number, the faster the ice (i.e. 27 seconds is faster ice than 25 seconds).
This may seem counter-intuitive but the terms fast and slow refer to the ice conditions
and not the rock speed.
(When the ice is slow it means that the friction is high and the stones decelerate
quickly. Therefore to throw a stone a given distance one needs to release it with a
relatively high speed. Because the initial speed is higher the stone travels the distance
quickly and slows to a stop quickly. On fast ice the friction is lower and the stones do
not decelerate as quickly. Therefore, in order to cover the same distance the stone
can be released with a much lower speed since it will take a longer time to slow down
and come to a stop. Hence low times mean slower ice and high times mean faster
ice.)
What would cause ice speed to be different?
In the early ends of a game, the ice may be frosty or may have a fresh uneven and
irregular pebble. This means more friction.
As the game continues, the pebble becomes more regular and the sweeping removes
most of the frost so the ice gets faster.
Draw times (backline to tee line) at the beginning of a game may be 19 to 24 seconds
and increase to 22 or 27 seconds toward the middle ends.
Later in the game the draw times may get slower again due to wear, or flattening, of the
pebble caused by foot and stone traffic and sweeping. Flat ice equals higher friction.
Why is the ice speed sometimes different across the sheet?
A faster track is created down the centre of the sheet. An area approximately three feet
on either side of the centreline is usually faster than the outer edges. The reason for
this is that most stones travel down this fast-track area, smoothing out the pebble as
they go. This effect is further magnified by the polishing of the ice due to sweeping.
Shots thrown on the outer edges can be several seconds slower than the centre track.Pointe Claire Curling Club Instructional Program Manual – 4th Edition page 28
Week 22 - Timing of Stones Part B – Judging How Far the Stone will
Travel
How can you use a stopwatch to determine the speed of the ice?
Timing helps judge relative ice speed and thus helps you respond to changes in the ice
surface during a game. It also helps you judge ice speed at other club's relative to your
own club. Try to get a "sense" of draw weight first. Use stopwatch times to enhance
your skills.
What would you time to judge the speed of the ice?
Measuring the time that draw shots take from back line to stop can help to determine
changes in the ice condition.
Pointe Claire ice is typically about 27 seconds from back line to tee line draw.
A time of 24 seconds would indicate slower ice implying that more weight is
needed for this shot.
A time of 30 seconds would indicate faster ice implying that less weight is
needed for this shot.
How can brushers use a stopwatch to know whether to sweep?
For brushers, back line to near hog line can help determine whether a stone needs to
be swept or not. These are called split times.
Typical back line to near hog line times on normal Pointe Claire ice:
3.3 seconds - Back line
3.5 seconds - Draw Weight
3.7 seconds - Guard Weight
4.0 seconds - “Sweep”
What factors affect accurate split timing?
Consistent split times depend on consistent releases and release points. A push or pull
back on a release could invalidate the split time. Also, delivery variations between
players means that one split time does not fit all. So use the split time as an aide but
also develop an innate sense of judging the speed of the stone.
Can you use timing to help with take-out shots?
Yes. Time take-out shots between the hog lines. If you do this in practice it will help
your team develop consistent take-out weight. Depending on the team and ice
conditions a typical time for normal take-out weight is between 9.5 and 9.8 seconds.
Control weight is over 10 seconds and peel can get below 9 seconds.Pointe Claire Curling Club Instructional Program Manual – 4th Edition page 29
Week 23 - Signalling (courtesy of Norm Danylo)
A rink can be a noisy place so you and your team should agree to a few signals. There are no
rules that say that signals must be given a certain way. Many teams will make their own
signals to suit their needs. But there are a number of standard signals that all curlers will
recognize. Here are a few:
How can you be sure that everyone understands what shot is being called?
You should tell the members of your team that if they are unsure as to what shot you
have just called for, they should stand up in the hack; when the shooter does stand up
in the hack, repeat your request. The two sweepers should converse with the thrower
and ensure they all know what the call is.
As skip, what can you do to visually explain your requested shot?
The first part of your signal should be a "pantomime" description of the results you
expect from the shot; the second part of your signal, not required at all times, should
indicate the force or weight you expect the shooter to use.
How would you call for a draw or guard?
First, pat the ice where you expect the stone to come to rest, then move the broom to
where you think the shooter should aim for and indicate the turn to use by raising the
appropriate hand. The shooter should know the weight to use or discuss it with the
sweepers.
How would you call for a raise?
A raise is used to promote one of your rocks. Tap the stone that you wish to promote,
and signal a raise by holding the broom in two hands and parallel to the ice surface.
You can then indicate where the raised stone should end up. Finally place the broom
where the shooter should aim and indicate the turn.
How would you call for a takeout?
First touch the target stone and indicate a take out with a sweeping motion towards the
back. If you want the shooter to stay, roll behind a guard or even go out of the house,
indicate that too with the appropriate motions. Place the broom where the shooter
should aim and indicate the turn.
What additional information is required for the takeout shot?
Since this is a take out, there is a second part to the request, the weight or force of the
stone. Indicate this by yelling the weight (hack, board, regular, control or peel) or, by
touching your arm at the shoulder (heavy), the elbow (medium) or the wrist (light).
You'll soon develop your own signals for weight.You can also read