CUTTERS COMBI TOOLS Operating instructions Hydraulic rescue equipment
←
→
Page content transcription
If your browser does not render page correctly, please read the page content below

Operating instructions
Hydraulic rescue equipment

CUTTERS
COMBI TOOLS

S 50, S 220-54, S 270, C 100-31, S 33-14, S 140-26 LIGHT,
SPS 270 MK2, SPS 360 MK2, SPS 370 MK2, SPS 400 MK2, SPS 270 H, SPS 270 LIGHT,
RSX 105, RSX 160, RSX 165-65, RSX 180-80, RSX 175, RSX 185 ALL NINE,
RSX 200-107, RSU 180 PLUS, RSU 210 PLUS

8142610

               tested according to
               EN 13204 and NFPA 1936

                                                 www.weber-rescue.com
2 | Table of Contents

Table of Contents

1     General information                                            4
1.1   About the operating manual                                     4
1.2   Explanation of symbols                                         5
1.3   Limitations of liability                                       6
1.4   Copyright                                                      6
1.5   Warranty conditions                                            7
1.6   Customer service                                               7

2     Safety                                                         8
2.1   Intended use                                                   8
2.2   Responsibility of the customer                                 10
2.3   Operating personnel                                            11
2.4   Personal protective equipment                                  12
2.5   Specific hazards                                               13
2.6   Safety devices                                                 15
2.7   How to respond in the event of danger or accidents             16
2.8   Signage                                                        17

3     Technical data                                                 18
3.1   Cutters                                                        18
3.2   Combi tools                                                    21
3.3   Operating conditions                                           22
3.4   Type plate                                                     22

4     Structure and function                                         23
4.1   Overview                                                       23
4.2   Brief description                                              23
4.3   Hydraulic supply                                               24
4.4   Equipment connections                                          26
4.5   Use of the control handle                                      28
4.6   Changing the spreader tips (combi tools)                       29
4.7   Replacement of blade inserts (PLUS-cutters)                    29
4.8   Upgrade Set for RS 170, RSX 165-65, S 270-71 und RSX 200-107   31

Table of Contents | 3

5     Possible applications                            32
5.1   Safety information                               32
5.2   Cutting                                          32
5.3   Spreading (combi tools)                          34
5.4   Pulling (combi tools)                            34
5.5   Crushing (combi tools)                           36
5.6   Lifting (combi tools)                            36
5.7   Continuous cuts (C 100-31)                       37
5.8   Pressing (combi tools with RZM)                  37

6     Transport, packaging and storage                 38
6.1   Safety information                               38
6.2   Transport inspection                             38
6.3   Symbols on the packaging                         39
6.4   Disposal of packaging                            39
6.5   Storage                                          39

7     Installation and commissioning                   40
7.1   Safety information                               40
7.2   Checking                                         41
7.3   Installation                                     41
7.4   Shutting down (end of work)                      42

8     Service                                          43
8.1   Safety information                               43
8.2   Care and maintenance                             43
8.3   Maintenance schedule                             44

9     Malfunctions                                     45
10    Decommissioning / recycling                      46
11    EC Declaration of Conformity                     47

4 | General information

1   General information

1.1       About the operating manual
This operating manual provides important information on using the hydraulic rescue cutters
and combi tools. Proper compliance with all specified safety instructions and guidelines is a
prerequisite for safe work.

Furthermore, adhere to the local accident prevention guidelines and general safety regulations
for the region in which the devices are used.

These operating instructions must be carefully read prior to starting any work! They are an
inherent part of the product and must be kept in a place that is known and accessible to
personnel at all times.

This documentation contains information for operating your equipment. However,
you may also find information which may not directly apply to your specific equipment.

All information, technical data, graphics and diagrams contained in these operating instructions
are based on the latest data available at the time of the document‘s creation.

We recommend that, in addition to carefully reading through the operating manual, you be
trained on handling the rescue equipment (possible applications, application tactics, etc.) by
our qualified trainers.

General information | 5

1.2        Explanation of symbols

Warnings
Warnings are marked by symbols in this operating manual.
The individual instructions are introduced by signal words that express the severity of the
hazard.

It is essential to comply with the instructions in order to prevent accidents, injuries and damage
to property.

		DANGER!
		 … indicates an imminently dangerous situation that can result
		 in death or serious injury if not avoided.

                   WARNING!
		                 … indicates a potentially dangerous situation that can result in
		                 death or serious injury if not avoided.

                   CAUTION!
		                 … indicates a potentially dangerous situation that can result in
		                 minor or light injuries if not avoided.

                   ATTENTION!
		                 … indicates a potentially dangerous situation that can result in
		                 material damage if not avoided.
6 | General information

Tips and recommendations

                    NOTE!
		                  ... highlights useful tips and recommendations, as well as
		                  information for efficient, trouble-free operation.

1.3         Limitations of liability
All information and instructions in this operating manual have been compiled in keeping with
applicable standards and guidelines, the current state of technology, and our many years of
knowledge and experience.

The manufacturer assumes no liability for damage due to:

        •    Failure to comply with the operating manual
        •    Unintended use
        •    Assignment of untrained personnel
        •    Unauthorised modifications
        •    Technical changes
        •    Use of non-approved replacement parts
        •    Use of non-original replacement parts

The actual scope of delivery can vary from the explanations and graphic
representations provided in this manual in the case of special versions
or due to technical changes.

1.4         Copyright
All text, diagrams, drawings and images in this operating manual may be used without
restriction and without any prior approval.
General information | 7

                   NOTE!
		                 Further information, images and drawings can be found on our
		                 website www.weber-rescue.com

1.5       Warrenty conditions
The guarantee conditions can be found as a separate document in the sales
documentation.

1.6       Customer service
Our customer service is available to you for technical information.

Germany
Name:          Mr. Bernd Dürr
Telephone:     + 49 (0) 7135 / 71-10530
Fax:           + 49 (0) 7135 / 71-10396
E-Mail:        bernd.duerr@weber-rescue.com

Austria
Name:          Mr. Matthias Schmid
Telephone:     + 43 (0) 7255 / 6237-12473
Fax:           + 43 (0) 7255 / 6227-12461
E-Mail:        matthias.schmid@weber-rescue.com

                   NOTE!
		                 When contacting our customer service department please state
		                 your equipment‘s designation, type and production year.
		                 These details can be found on the equipment type plate.
8 | Safety

2 Safety
This section of the operating manual provides a comprehensive overview of all the important
safety aspects for optimal protection of operating personnel, as well as for safe and trouble-free
operation.

Significant hazards can occur if the handling and safety instructions in this manual are not
complied with.

2.1          Intended use
The hydraulic cutters are designed and tested exclusively for the appropriate designated
purposes described here. All other activities are fundamentally prohibited.

Cutters
S 50, S 220-54, S 270, C 100-31, S 33-14, S 140-26 LIGHT, RSX 105, RSX 160, RSX 165-65,
RSX 180-80, RSX 175, RSX 185 ALL NINE, RSX 200-107, RSU 180 PLUS, RSU 210 PLUS

        •     All of the cutters are designed as one-man devices and may therefore
              be operated by one person only.
        •     The devices serve exclusively for the cutting of doors and roof pillars,
              posts and sills, the rims and spokes of steering wheels.
        •     The rear cutter section should be used whenever possible for separating
              solid material as this is equipped with special round material cutters.
        •     In industrial applications the equipment can also be used for cutting pipes,
              construction steel, profiles, sheets and cables.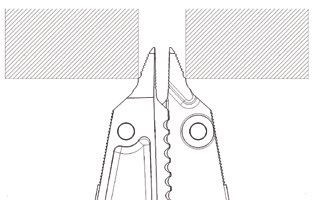
Safety | 9

Combi tools
SPS 270 MK2, SPS 360 MK2, SPS 370 MK2, SPS 400 MK2, SPS 270 H, SPS 270 LIGHT

       •   All combi tools are designed as one-man devices and therefore may be
           operated by one person only.
       •   The devices serve exclusively for the cutting of doors and roof pillars,
           posts and sills, the rims and spokes of steering wheels.
       •   The rear cutter section should be used whenever possible for separating
           solid material as this is equipped with special round material cutters.
       •   In industrial applications the equipment can also be used for cutting pipes,
           construction steel, profiles, sheets and cables.
       •   In addition, the combi tools can be used for opening doors, lifting vehicles,
           pushing away vehicle parts and squeezing tubes.
       •   The chain set is to be used exclusively for pulling.

                   WARNING!
                   Improper use can be dangerous!

		                 Any improper or unintended use of the devices can be hazardous!

		                 Therefore, make absolutely sure that:
                   »» The devices are used only for the applications stated above.
                   »» All other information on proper use of the devices in chapter 5
                      (Possible applications) is observed.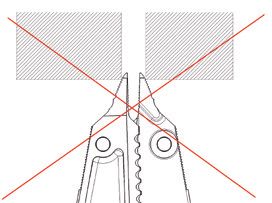
10 | Safety

2.2         Responsibility of the customer
In addition to the health and safety instructions in this operating manual, one must adhere to
the safety, accident prevention, and environmental protection guidelines for the region in which
the equipment is used. Particularly applicable in this regard:

        •     The customer must be familiar with the applicable health and safety
              provisions and in a hazard analysis identify other hazards that may
              exist at the equipment‘s installation site due to the special working
              conditions.
        •     The customer must clearly regulate and specify responsibilities
              for installation, operation, maintenance and cleaning.
        •     The customer must ensure that all personnel who handle the equipment
              have fully read and understood the operating manual.
        •     In addition, at regular intervals, the operator must train personnel and
              inform them of the hazards of working with the equipment.

Moreover, the customer is responsible for ensuring that the equipment is always in technically
faultless condition. Consequently, the following applies:

        •     After each use, and at least once a year, a visual inspection of the
              equipment must be carried out by a trained individual (according to
              DGUV 305-002 or country-specific guidelines).
        •     Every three years, or if you have doubts about the safety or reliability
              of the equipment, functional testing and stress testing must be carried out
              (according to DGUV 305-002 or country-specific guidelines).
Safety | 11
2.3 Operating personnel
The following qualifications are cited in the operating manual for the various activity areas:
• Trained individual
is informed through training offered by the customer about the tasks
assigned to him and the possible dangers of improper conduct.
• Specialist
is someone who, due to specialised training, skills and experience, as
well as knowledge of the applicable stipulations by the manufacturer, is
capable of executing the tasks assigned to him or her and of
independently recognising possible hazards.
WARNING!
Inadequate training can result in injuries!
Improper handling of the equipment can lead to serious
injury or material damage.
Therefore, make absolutely sure to:
»» allow particular tasks to be carried out only by the persons
stated in the relevant chapter of this manual.
»» When in doubt, call in specialists immediately.
NOTE!
The equipment may not be used by personnel who have
consumed alcohol, medication or drugs!12 | Safety
2.4 Personal protective equipment
Wearing personal protective equipment (PPE) is essential to minimize the risks to operating
personnel when working with the hydraulic rescue devices.
It is essential to wear the following protective clothing for all work:
Protective work clothing
Tight-fitting work clothing with tight sleeves and no protruding parts
must be worn when working. It mostly serves to protect against
entanglement by moving equipment parts.
Safety shoes
Steel-toed safety shoes must always be worn as protection
against heavy falling parts and from slipping on slick surfaces.
Work gloves
Work gloves must be worn when working with the equipment
to provide protection from sharp edges and shards of glass.
Helmet with face shield
A helmet with face shield must be worn for protection against flying
or falling parts and shards of glass.
Protective goggles
Protective goggles must also be worn in addition to the face
shield in order to protect the eyes from flying objects.
The following must also be worn for certain work:
Ear protectors
In addition to the basic protective equipment, ear protectors
must also be worn to protect your hearing.Safety | 13
2.5 Specific hazards
The hazards arising from the risk analysis are listed in the following section.
Follow the safety instructions listed here and the warnings in the other sections of this manual
to minimise potential health hazards and avoid dangerous situations.
Electricity
DANGER!
Danger of fatal electric shock!
There is an imminent life-threatening danger if live parts are
touched. Damage to insulation or to specific components can
pose a fatal hazard.
Therefore:
»» If the insulation is damaged, immediately disconnect the
power supply and arrange for repairs.
»» Allow only qualified electricians to work on the electrical
equipment.
»» For all work on the electrical equipment, it must be
disconnected from the power source, and it must be checked
that the device is de-energised.
»» Prior to maintenance, cleaning and repair work, the power
supply must be switched off and secured to prevent it from
being switched back on again.
»» Do not bypass or disable fuses.
When changing the fuses, ensure that they have the correct
amperage.
»» Keep moisture away from live parts.
This can lead to a short-circuit.14 | Safety
Noise
WARNING!
Noise can damage hearing!
The noise occurring in the work area can cause severe hearing damage.
Therefore:
»» You should also wear ear protectors when carrying out
certain noise-producing tasks.
»» Do not stay in the hazardous area longer than necessary.
Hydraulic power
WARNING!
Hydraulic power hazard!
Serious injury can result due to the released hydraulic forces and escaping
hydraulic oil.
Therefore:
»» Constantly monitor the device during the work procedure and
set down if necessary.
»» Inspect the hose lines and devices for damage after every use.
»» Avoid skin contact with the hydraulic oil (wear protective gloves).
»» Immediately remove the hydraulic oil from wounds and consult
a doctor.Safety | 15 2.6 Safety devices Safety valve for SKS couplings If the return line is not correctly coupled such that the oil cannot return then a safety valve integrated into the control handle actuates in order to protect the equipment and the operator. This causes hydraulic oil to seep harmlessly from the end of the handle. Move the switching valve on the hydraulic power unit immediately to the „0“ position and connect the coupling parts together correctly.
16 | Safety

2.7         How to respond in the event of danger or accidents

Preventative measures
        •     Always be prepared for accidents
        •     Keep first aid equipment (first-aid box, blankets etc.) at hand
        •     Familiarise personnel with accident alarms, first-aid gear and
              emergency equipment
        •     Keep entryways clear for emergency vehicles

In the event of an accident
        •     Shut down equipment immediately
        •     Initiate first aid measures
        •     Get people out of the danger zone
        •     Inform the responsible parties at the site of the incident
        •     Notify a doctor and/or the fire brigade
        •     Clear entryways for emergency vehicles
Safety | 17
2.8 Signage
The equipment bears the following symbols and instructional signs.
They refer to the immediate vicinity in which they are affixed.
Comply with the operating manual
Do not use the marked equipment until you have read the operating
manual.
Hand injury warning
When working with the equipment, take care to avoid hand injuries through
trapping or sharp edges.
WARNING!
Danger of injury due to illegible symbols!
Over time, stickers and symbols on the equipment can become soiled or
otherwise illegible.
Therefore, make absolutely sure to:
»» Keep all safety, warning and operating information on the
device easily legible.
»» Replace damaged signs and stickers immediately.18 | Technical data
3 Technical data
3.1 Cutters
RSX 105 S 140-26 LIGHT
RSX 160 RSX 165-65 RSX 175-105 RSX 185 ALL NINE
RSX 105 S 140-26 LIGHT RSX 160 RSX 165-65 RSX 175 RSX 185 ALL NINE
Length 575 mm 642 mm 718 mm 711 mm 819 mm 866 mm
Width 183 mm 172 mm 236 mm 225 mm 298 mm 298 mm
Hight 157 mm 143 mm 158 mm 202 mm 225 mm 225 mm
Weight 9,2 kg 7,9 kg 14,5 kg 16,3 kg 21,9 kg 22,4 kg
Opening width 100 mm 140 mm 160 mm 165 mm 170 mm 265 mm
Nominal pressure 700 bar 700 bar 700 bar 700 bar 700 bar 700 bar
AC100D-9,2 AC115D-7,9 BC160H-14,5 BC165F-16,3 BC178K-21,9 CC240K-22,4
EN class
1E-2E-3E-4D-5G 1F-2D-3D-4D-5G 1I-2K-3H-4J-5H 1J-2F-3G-4J-5G 1K-K-3K-4K-5K 1K-2K-3K-4K-5K
A5-B4-C5- A8-B6-C6- A8-B9-C8- A9-B9-C9-
NFPA class A5-B3-C4-D6-E7 A7-B8-C6-D7-E8
D6-E6-F2 D7-E9-F3 D9-E9-F5 D9-E9-F5
ID No. 1096350 1075652 1093226 5932068 1096171 1093248Technical data | 19
RSU 180 PLUS RSX 180-80
RSX 200-107 RSU 210 PLUS
RSX 180-80 RSU 180 PLUS RSX 200-107 RSU 210 PLUS
Length 740 mm 737 mm 833 mm 833 mm
Width 232 mm 236 mm 265 mm 260 mm
Hight 206 mm 159 mm 217 mm 221 mm
Weight 17,6 kg 16,7 kg 19,7 kg 19,6 kg
Opening width 180 mm 185 mm 200 mm 210 mm
Nominal pressure 700 bar 700 bar 700 bar 700 bar
BC180I-17,6 BC185J-16,7 CC200J-19,7 CC200K-19,6
EN class
1J-2K-3I-4J-5J 1J-2K-3K-4K-5K 1J-2K-3K-4K-5K 1K-2K-3K-4K-5K
NFPA class A7-B9-C7-D9-E9 A8-B9-C7-D9-E9-F4 A8-B9-C8-D9-E9 A8-B9-C8-D9-E9-F4
ID No. 1059226 1093279 5935849 109329820 | Technical data
C 100-31 S 50 S 33-14
S 220-54 S 270
C 100-31 S 50 S 33-14 S 220-54 S 270
Length 585 mm 362 mm 388 mm 728 mm 765 mm
Width 205 mm 138 mm 71 mm 236 mm 236 mm
Hight 243 mm 71 mm 129 mm 196 mm 161 mm
Weight 19,5 kg 4,2 kg 3,9 kg 14,4 kg 16,7 kg
Opening width 120 mm 50 mm 30 mm 220 mm 280 mm
Nominal pressure 700 bar 700 bar 700 bar 700 bar 700 bar
AC120D-19,5 AC50B-4,2 - BC170H-14,4 CC218I-16,7
EN class
1D-2D-3E-4F-5F 1C-2D-3B - 1I-2H-3H-4K-5I 1I-2K-3I-4K-5J
NFPA class A4-B3-C5-D6-E6 A4-B3-C2-D4-E3 A3-B2-C1-D2-E2 A7-B7-C6-D8-E8 A7-B8-C7-D8-E9-F6
ID No. 5935199 1093906 2836661 1063372 1096170Technical data | 21
3.2 Combi tools
SPS 270 H SPS 270 MK2 SPS 270 LIGHT
SPS 360 MK2 SPS 370 MK2 SPS 400 MK2
SPS 270 H SPS 270 LIGHT SPS 270 MK2 SPS 360 MK2 SPS 370 MK2 SPS 400 MK2
Length 682 mm 708 mm 649 mm 765 mm 771 mm 807 mm
Width 192 mm 190 mm 192 mm 236 mm 236 mm 236 mm
Height 161 mm 196 mm 152 mm 158 mm 158 mm 161 mm
Weight 9,8 kg 8,9 kg 9,7 kg 14,2 kg 15,4 kg 17,2 kg
Opening width 270 mm 270 mm 270 mm 360 mm 370 mm 405 mm
Pulling path 380 mm 380 mm 395 mm 440 mm 405 mm 450 mm
Spreading force in
26 – 534 kN 31 - 561 kN 31 – 591 kN 36 – 783 kN 35 – 783 kN 35 – 1.071 kN
working range*
Max. pulling force* 32 kN 36 kN 36 kN 53 kN 57 kN 58 kN
Nominal pressure 630 bar 700 bar 700 bar 700 bar 700 bar 700 bar
BK26/270G-9,8 BK31/270G-8,9 BK31/270G-9,7 CK36/360I-14,2 CK35/370H-15,4 CK35/405I-17,2
EN class
1H-2G-3G-4H-5G 1H-2G-3G-4H-5G 1H-2G-3G-4H-5G 1I-2K-3J-4K-5J 1I-2J-3H-4J-5I 1I-2K-3J-4K-5J
A6-B7-C6- A7-B8-C7- A7-B8-C7- A7-B9-C7-
NFPA class A6-B7-C6-D7-E7 A6-B7-C6-D7-E7
D7-E7-F3 D9-E8-F5 D8-E8-F5 D9-E9-F6
ID No. 1084065 1086181 1093263 1096646 1096648 1096650
* per EN 1320422 | Technical data
3.3 Operating conditions
The permissible operating temperature range for the cutters lies between -20° C and +55° C.
Reliable functioning of the equipment cannot be guaranteed outside this range.
Underwater operation
The cutters (exception: SPS 270 H) can also be used under water. Do not exceed the maximum
submersion depth of 40 metres with this. At this depth the water pressure still has no
influence on the hydraulic pressure in the equipment and the hoses.
NOTE !
After underwater use in saltwater, the equipment must be completely
disassembled and cleaned. With fresh water complete cleaning is
sufficient.
3.4 Type plate
The type plate can be found on the device body of all cutting devices. Here you can find the
serial number, manufacturing date, nominal pressure, equipment designation and the EN
standard.Structure and function | 23
4 Structure and function
4.1 Overview
1 Blades
2 Protective cover
3 Handle
4 Pushbutton
5 Body
6 Control handle
7 Hoses
8 Coupling
4.2 Brief description
Hydraulic cutters are specially designed rescue equipment for cutting bodywork parts.
They are used for rescuing trapped or enclosed accident victims.
Driven by a hydraulic power unit it is possible to cut door and roof pillars, posts and sills etc.
with the cutters.
The speed of movement of the shearing blades is controlled by the greater or lesser degree
of force applied to the pushbutton on the handle. The maximum cutting force is only
applied when the pushbutton is fully depressed.24 | Structure and function
4.3 Hydraulic supply
Power units and pumps
Only WEBER-HYDRAULIK power units and hand pumps may be used to drive the cutters.
Equipment from other manufacturers can only be used under certain conditions.
Therefore always consult with us before operating a device with a power unit from another
manufacturer!
ATTENTION !
Before using pumps and power units from other manufacturers always
contact WEBER-HYDRAULIK or an authorised dealer.
Incorrect application can lead to hazardous situations for which we cannot
accept any liability!
Hoses
The connection of the device with the power unit is carried out via high pressure hoses.
Hoses are available in lengths of 5 m, 10 m, 15 m and 20 m. As the length of the hoses
increases so too does the associated pressure loss. With a line length of 50 metres this
pressure loss remains acceptable and has no significant effect.
CAUTION !
Do not use damaged hoses !
With damaged hoses there is a danger of escaping hydraulic medium under
pressure, or of the hoses whipping around.
Therefore:
» » The hoses should be subjected to a visual inspection
(leak-tightness, surface damage such as kinks) after
every use and at least once per year.Structure and function | 25
»» Every three years, or in the event of doubts about the safety
or reliability, carry out an additional functional and load test (as
per DGUV 305-002 or specific national directive).
»» Replace hoses every 10 years! The date (code letters or
quarter/year) is specified on the hose bonding.
»» Ensure that the hoses are not exposed to tension or torsion
(turning).
»» Do not kink the hoses or draw them over edges (smallest
bend radius 40 mm).
»» Do not subject the hoses to high temperatures.
»» Protect hoses from contact with materials that can cause
damage to the outer covering e.g. acids, alkalis, or solvents.
Hydraulic oil
All cutters are designed and tested for WEBER hydraulic oil ID No. 804932. This oil possesses a
particularly high purity level and also works flawlessly at temperatures below zero, down
to -20° C.
With limitations in the low temperature range (low output), however, a standard oil (mineral
based) of viscosity class HLP 10 or HVLP 10 can be used in keeping with DIN 51502.
NOTE !
We recommend the following hydraulic oils for trouble-free operation of
WEBER rescue devices:
»» AERO Fluid 41 (Shell)
»» Univis HVI-13 (Esso)
»» Aero-hydraulic 520 (Total)
»» Hydraulik DB (Castrol)
»» Renolin/MR310 (Fuchs)
»» HVI Extra 380 (Maier & Korduletsch)
»» Hydrex Arctic 15 (Petro Canada)
»» Naturelle HFE 1526 | Structure and function
4.4 Equipment connections
SINGLE coupling
Connecting:
Remove the protective cap from the coupling male and the coupling female (Fig. 1).
Conflate SINGLE coupling male and female in the bayonet catch (Fig. 2). Hold coupling female
on the black slew ring and turn clockwise until the coupling snaps in (Fig. 3). Put protective caps
together (Fig. 4). You don’t have to switch the power unit to position 0 to connect or disconnect
the coupling!
Disconnecting:
Remove the protective caps. Hold coupling female on the black slew ring and turn
anticlockwise direction. Turn the black slew ring until you can release the coupling easily. Put
protective caps to coupling male and the coupling female.
Fig. 1 Fig. 2
Fig. 3 Fig. 4
NOTE !
When using the SINGLE coupling, pressure relief connectors are no longer
required.Structure and function | 27
Plug-in coupling (SKS)
Remove the protective cap from the coupling male. Take hold of the coupling female by
the knurled sleeve cover and pull out the protective plug. With one hand take hold of sleeve
cover of the coupling female, with the other grasp the coupling male (black) by the hex nut,
and press the sleeve cover slightly against the coupling male until the ball bearings engage.
Twisting the male coupling slightly when pressing togehter eases the coupling process.
Grasp the coupling male (black) by the hex nut with one hand and with the other take
hold of the sleeve cover and draw it back. The disconnecting will cause a few drops of hydraulic
oil to escape. Plug in the protective caps immediately.
CAUTION !
When coupling SKS connections the power unit operating lever must be in
the „0“ position.
DANGER due to incompletely coupled SKS return line!
If the return line (T) on the SKS coupling system is not connected correctly
the tool can be moved independently until the safety valve responds!
Therefore:
Always check SKS couplings for correct locking, do not hold hands or other
parts of the body within the working range of the moving components.
Ensure that the couplings, especially the return line (T), are locked correctly!
NOTE !
A pressure relief connector is fitted to the hydraulic power units and
the hand pump, with which a few drops of oil can be discharged from
the hoses. This permits re-coupling following pressure increases in
de-coupled equipment. In this case simply insert the pressure relief
connector into the coupling sleeve and turn the knurled screw to the
right until oil leaks out.28 | Structure and function
NOTE !
The following section only pertains to the SINGLE coupling. When
connecting SKS couplings first ensure that the control lever is in the „0“ position!
4.5 Use of the control handle
The cutter can be operated by the pushbutton on the control handle. The speed of
movement of the shearing blades is controlled precisely by the greater or lesser degree of force
applied to the pushbutton.
The maximum cutting force is only applied when the pushbutton is fully depressed.
Closing the cutters
The primary motion direction of the device (closing) is triggered by pressing the lower
tapered (convex) end of the button.
The direction of movement is marked on the equipment with the symbol:
Opening the cutters
The cutters are opened with the upper curved (concave) end of the button, which is marked
with the following symbol:
Dead-man‘s switching
If the pushbutton is released then it returns to the neutral position automatically. With this, the
device stops still in any position (including under load).Structure and function | 29
4.6 Changing the spreader tips (combi tools)
The SPS 370 MK2 and SPS 400 MK2 spreader tips are secured with pivot pins in the
spreader arms. In order to change, press out the pins secured by a spring-loaded ball.
After changing the tips, push the pivot pins back in again. When doing this ensure that
the pins are correctly fitted (completely pressed in).
Fitting the bracket for the chain set is identical, however an appropriate pulling adapter
must also be fitted before. The chain lock must be fitted with the lock facing upwards.
NOTE !
Fitting the chain lock to the SPS 270 H, SPS 270 MK2 and SPS 360 MK2
is exactly the same. However, in this case it is not necessary to remove
spreader tips beforehand.
4.7 Replacement of blade inserts (PLUS-cutters)
During blade replacement, the cutter is fixed in place. Any slipping should be avoided. Replacing
the blade requires a soft-face hammer, the roll pins supplied, a punch and the blade inserts
themselves. It makes sense to replace both blade inserts so that the cutting behaviour is not
impaired.
NOTE!
The blade inserts should not be reground, simply cleaning off any soiling is
recommended.30 | Structure and function Procedure: The cutter is positioned with the type plate pointing upward and is fixed in place. A clamping device, as shown in the illustrations, is not obligatory. When the blade insert is being changed, the battery must be removed from the cutter and not under load. This means that the shear is not completely open or closed. The blade insert for the cutter blade with the smooth surface can now be replaced. The roll pins are knocked out and downward from the punch (see figure 1). Fig. 1 After the roll pins have been knocked out of their position, the blade insert can be pulled out. The use of a forked screwdriver is recommended. If the blade insert cannot be loosened immediately, it can be gently levered out using a punch in the holes. (see figure 2). Fig. 2 Next, the cutter is rotated and the blade insert is placed in the cutter blade with no insert. When inserting, make sure that the blade insert does not twist. If the blade inserts cannot be inserted by hand, use the soft-head hammer (see figure 3). Fig. 3
Structure and function | 31

		                                The roll pins are located using a punch and light
		                                blows of a hammer from above into the position
		                                holes provided for this purpose. Roll pins should be
		                                pushed into position until they are flush with the top
		                                surface of the blade (see figure 4).

Fig. 4

4.8        Upgrade Set for RS 170, RSX 165-65, S 270-71
           and RSX 200-107

Upgrade to RSX 180-80 PLUS                                  Weight       ID No.
RS 170-105         Upgrade set                              8,3 kg       1062138
RSX 165-65
                   Upgrade set                              8,3 kg       1062134
S 270-71
Upgrade to RSX 200-107 PLUS
                   Blade without insert                     3,6 kg       1050397
                   Blade insert                             0,3 kg       1056095
RSX 200-107
                   Complete blade (with insert)             3,9 kg       1052563
                   Sleeve                                   0,4 kg       1056418
Upgrade to RSU 200-107 PLUS
                   Blade without insert                     3,3 kg       1072763
RSX 200-107 /
                   Blade insert                             0,3 kg       1075983
RSX 200-107 PLUS
                   Complete blade (with insert)             3,6 kg       1078502
32 | Possible applications
5 Possible applications
5.1 Safety information
WARNING !
Never reach between the cutter arms!
WARNING !
During all work with the cutters, parts which are tensioned can break off or
be blown off and thus endanger personnel.
Uninvolved parties must therefore remain a safe distance away or stay in
the danger zone only as long as necessary.
5.2 Cutting
The devices‘ cutting capabilities can only be used optimally if they are placed as near
as possible to the blades‘ pivot point (Figure 1).
This means it may be necessary to readjust the device.
The device only achieves full cutting performance when the rocker lever is pressed all the way
through. In addition, it can take several seconds for the unit to reach full operating pressure.
Fig. 1 Fig. 2Possible applications | 33
To prevent the blades from being damaged, they must always be placed at right angles to the
material to be cut.
Also, the tips of the blades must not be more than 5 mm (3 mm for S 50) apart during the
cutting process. If this value is exceeded, the cutting process must be stopped and then started
again.
CAUTION !
Do not sever any parts with loose ends, because this can result in personal
injury due to parts flying off.
ATTENTION !
When cutting high-strength vehicle body parts, such as shock absorbers,
hinges or steering columns, the shear blades (arms) may cause severe
damage.34 | Possible applications 5.3 Spreading (combi tools) The spreading function‘s uses include opening doors, lifting vehicles and other movable loads, pushing vehicle parts away, and squashing tubes and beams. For this, the vehicle must be stably stabilized and supported. To prevent any sliding during spreading, the arms and tips are fluted inside and out. Whenever possible, the tips should be used only to enlarge a gap, because repositioning the spreader prevents slipping. 5.4 Pulling (combi tools) After the chain set (as explained in chapter 4.6) has been mounted on the spreader tips, the combi device can also be used for pulling. For this, the chains must be tightly tensioned and must be tensed only in the pulling direction. To tension the chain, only one lock can be pressed in, so that the chain can be pulled through the holder. If the range of movement is not sufficient, tension chains or other means must be used so that the spreader can be reopened and the chain retensioned.
Possible applications | 35

ATTENTION !
It is necessary to ensure that the lock has latched into the bracket securely.

ATTENTION !
Store the pulling chains with the chain locks fitted approx. 10 - 20 cm from
the end. Check the chains before each use. Check that the weight does not
load the point of the hook but rather lies in the middle of the hook.

»» Do not make any repairs on your own.
»» Do not stress the chains beyond the permitted load carrying
   capacity.
»» Do not load with a jerking movement.
»» Do not galvanize or paint the chains.
»» Do not shorten the chain by knotting it.
»» Do not subject the chains to heat stress.
»» Use the chains and accessories only between
   –40°C and +200°C.
»» During all maintenance work, observe the applicable
   German accident prevention regulations (UVV) as well as the
   specifications of DIN EN 818-7 and DIN 685-5.
»» Chains must only be used for lashing. Lifting loads is not
   permitted.

Chains must not be used if:
»» Deformations, cracks, signs of corrosion are present.
»» The wire diameter of the chain link has decreased by 10%
   of the nominal thickness.
»» An individual chain link has been permanently stretched.
»» An individual link has been enlarged by more than 2%.
»» The internal chain pitch over a measuring distance of
   11 chain links has increased by more than 2%.
36 | Possible applications

5.5       Crushing (combi tools)
Pipes and other hollow profiles are crushed by closing the spreader arms.
With combi devices, however, crushing is only to be performed in the tip area.

                    ATTENTION !
                    Material to be crushed can suddenly jump away.
                    Do not remain in the work area of the spreading and combi devices!

5.6       Lifting (combi tools)
The combi device can also be used for lifting vehicles or other movable loads.
Care must be taken to secure the load against slipping away and to position the spreader tips far
enough apart under the load to prevent slipping.

The load being lifted must be constantly monitored (tipping, rolling away or changing position).
Also, the lifted load must immediately be propped up and supported in a suitable way.
Possible applications | 37
5.7 Continuous Cuts (C 100-31)
Continuous Cuts are possible with the C 100-31 without the need for time-consuming V-cuts.
Here the special cutting device is set at right angles to the object to be cut (drive in from
above) and the cutter driven closed.
It is necessary to ensure that the cut-out piece falls from the ejection aperture. Then open
the cutter again and re-insert it into the same cut. It is possible to continue to work vertically
downwards in this way.
5.8 Pressing (combi tool with RZM)
In order to further increase the spreading path of the combi tools, it is optionally possible to
fit a mechanical rescue cylinder to these two devices. These are inserted in the shear blades
with spring-loaded bolts (see page 29, „4.6 Changing the spreader tips“). In order to ease
insertion of the RZM, the blades should be slightly opened!
If the shear blades of the combi tool are now driven apart, the RZM also opens up to a final
length.
ATTENTION!
Whilst pressing with the RZM, the combi tool moves towards the vehicle.
Therefore avoid standing in the direct working area of the combi tool!38 | Transport, packaging, and storage
6 Transport, packaging and storage
6.1 Safety information
CAUTION!
Incorrect transport can cause damage!
Improper transport can cause significant material damage.
Therefore:
»» Proceed with caution when unloading the packages, and
observe the symbols on the packaging.
»» Do not fully open and remove the package until it has reached
its actual storage location.
6.2 Transport inspection
Upon receipt, the delivery should be checked immediately for completeness and damage
during transport so that a quick remedy can be performed, if necessary.
If there is visible external damage, please proceed as follows:
• Do not accept the delivery, or only accept it with reservation.
• Note the extent of the transport damage on the transport documents
or on the transport company‘s delivery note.
• File a complaint.
NOTE!
Report any defect as soon as it is detected.
Claims for damages can be directed to our customer service department
(see Chapter 1.6).Transport, packaging, and storage | 39
6.3 Symbols on the packaging
Caution, fragile !
Handle the package carefully - do not drop, throw, strike or tie up.
This way up !
The package must be transported and stored strictly so that the arrows
point upward. Do not roll or tilt.
6.4 Disposal of packaging
All packaging materials and disassembled parts (transportation
protection) must be disposed of properly in accordance with applicable
local regulations.
6.5 Storage
The equipment should be stored in a dry and dust-free environment where possible. Avoid
direct UV radiation to the hoses.
CAUTION !
The equipment must be stowed securely in the mountings provided in order
to avoid damage during transit, etc.40 | Installation and commissioning
7 Installation and commissioning
7.1 Safety information
WARNING !
Danger of injury due to improper operation !
Improper operation can cause serious injury or material damage.
Therefore, make absolutely sure to:
»» All operating steps are executed in keeping with the information
in this operating manual.
»» All covers and protective devices are installed and in proper
working order prior to starting work.
Personal protective equipment
Wear the protective equipment detailed in chapter 2.4 for all work!
NOTE !
Special reference is made where it is necessary to wear additional protective
equipment for certain work with or on the device.Installation and commissioning | 41
7.2 Checking
Inspect the cutter devices for damage. If the cutting device is not in pristine condition, it must
not be used! In this case, immediately contact your supplier.
• Check the blades (damage)
• Check the control handle including pushbutton (function)
• Check the couplings (damage, dirt)
• Check the hand grip (securely fastened)
• Check the protective cover (damage)
• Check the hoses (damage)
7.3 Installation
Move both control levers on the hydraulic power unit to the „0“ position (Fig. 1), pull
off the dust protection cover on the coupling and connect the hydraulic hoses with the cutter as
described in chapter 4.4. In order to avoid contamination then re-couple the protective caps.
When using the SINGLE coupling, coupling can also be carried out without pressure („0“
position on power unit not necessary).
When operating a hydraulic power unit observe the operating instructions for the equipment!
Fig. 142 | Installation and commissioning
7.4 Shutting down (end of work)
After work is over, the blade tips must be placed one above the other to prevent
injury. The blades of the cutting device must not be completely closed, as otherwise
tension will build up in the device.
NOTE !
With combi tools, drive the spreader arms to within a few millimetres of
each other in order to relieve the hydraulics.
Then the equipment can be disconnected providing that the power unit control lever is
in the „0“ position. Care must be taken to ensure that no dirt ends up on the coupling and that
the protective caps are immediately fitted.Service | 43
8 Service
8.1 Safety information
WARNING !
Risk of injury due to improperly performed maintenance work!
Improper maintenance of the equipment can cause serious injury
or material damage.
Therefore, make absolutely sure to:
»» Only let qualified personnel carry out maintenance work.
»» Make sure the installation site is organised and clean! Loose
components and tools lying around are sources of danger.
»» Wear protective gloves for all work!
8.2 Care and maintenance
In the interest of permanent operational readiness, the following measures are
essential:
• Each time the device is subjected to a load, but at least once a year,
the equipment and the accessories must be visually inspected.
Special attention must be paid to spreader tips, joints, blades, hoses,
and coupling halves.
• Every three years, or if there are doubts about the safety or reliability
of the equipment, functional testing and stress testing must also be
carried out (according to DGUV 305-002 or country-specific guidelines).
• After every loading, the lubrication of the movable parts
and pins must be inspected and sprayed with a suitable grease.
• The hydraulic oil in the cutting and combi tools must be completely
replaced every three years.44 | Service
ATTENTION !
Prior to all maintenance work, the equipment must be cleaned of any dirt so
that it does not get into the hydraulic system.
The cleaning can be carried out using a conventional citrus cleaner.
8.3 Maintenance schedule
A precise maintenance plan with testing intervals, regulations and results can be found in the
GUV – G 9102 Point 18 (hydraulically operated rescue equipment).
NOTE !
If there are any problems with the maintenance of the devices, our
customer service is available (see Chapter 1.6).Malfunctions | 45
9 Malfunctions
Fault Possible cause Remedial measures
Device does not reach full performance Control buttons not fully depressed Fully depress control buttons
Equipment delivers no power or Pressure line (P) and return line
Change round in accordance with the
moves in the opposite direction to that (T) were transposed when hoses or
repair instructions
commanded couplings were replaced
Pressure build-up due to heating
Drain a little oil out of the equipment
(only SKS coupling)
Cutter cannot be coupled with the pressure relief plug, see
Coupling halves are damaged or
chapter 4.3 (only SKS coupling)
heavily soiled
Move power unit control lever to the
Oil escaping at the control handle (hole Return hose is not correctly coupled
"0" position and couple correctly (only
between the hoses) (only SKS coupling)
SKS coupling)
Move power unit control lever to the
Equipment non-functional despite
Pressure hose is not coupled "0" position and couple correctly (only
actuating the control buttons
SKS coupling)
Combi tool exhibits movement in the Have the equipment checked by
Check non-return valve
opposite direction under load authorised customer services
Oil discharge on the hoses or their
Hoses leaking, possibly due to damage Replace hoses, see repair instructions
bondings
Degradation of the surfaces of the
Contact with aggressive chemical fluids Replace hoses, see repair instructions
hoses
Replace coupling, see repair
Oil escaping at the coupling halves Coupling leaking
instructions
Attachment of blades to the shearing
Blades loose and gaping apart when
head not in accordance with Repair by authorised customer service
cutting
specifications
Tip spread of cutter below target value Shearing head settings incorrect Repair by authorised customer service
Tip spread of combi tool below target
Shearing head settings incorrect Repair by authorised customer service
value
Pressure build up despite movement Hex nut / central bolt too firmly
Repair by authorised customer service
(open - closed) without any load tightened
Can be reground up to approx. 2 mm
Blade damaged e.g. through cutting
Nick or gouge in blade (see repair instructions), otherwise
hardened materials
replace
Blade damaged e.g. through cutting Have the blades replaced by authorised
Chip or groove
high-strength materials customer services46 | Decommissioning / recycling
10 Decommissioning / Recycling
After the end of the normal service life, the equipment must be professionally disposed of.
Individual parts can, however, certainly be used again.
The hydraulic oil must be completely drained and collected. Make sure that the hydraulic oil is
disposed of separately!
For disposal of all device components and packaging materials, the disposal conditions of the
specific location apply.
NOTE !
Please ask your supplier about disposing of the device.EC Declaration of Conformity | 47 11 EC Declaration of Conformity
Edition 2021A

WEBER-HYDRAULIK GmbH

Heilbronner Straße 30           Emil Weber Platz 1
74363 Güglingen / Germany       4460 Losenstein / Austria
Telefon +49 (0) 7135/71-10270   Telefon +43 (0) 7255/6237-120
Telefax +49 (0) 7135/71-10396   Telefax +43 (0) 7255/6237-12461   www.weber-rescue.com
info@weber-rescue.com           info@weber-rescue.com
You can also read