DESKTOP PUBLISHING Information & Communications Technology (ICT) - INTRODUCTION - DepED Bataan
←
→
Page content transcription
If your browser does not render page correctly, please read the page content below
Information & Communications Technology (ICT)

        DESKTOP PUBLISHING
               INTRODUCTION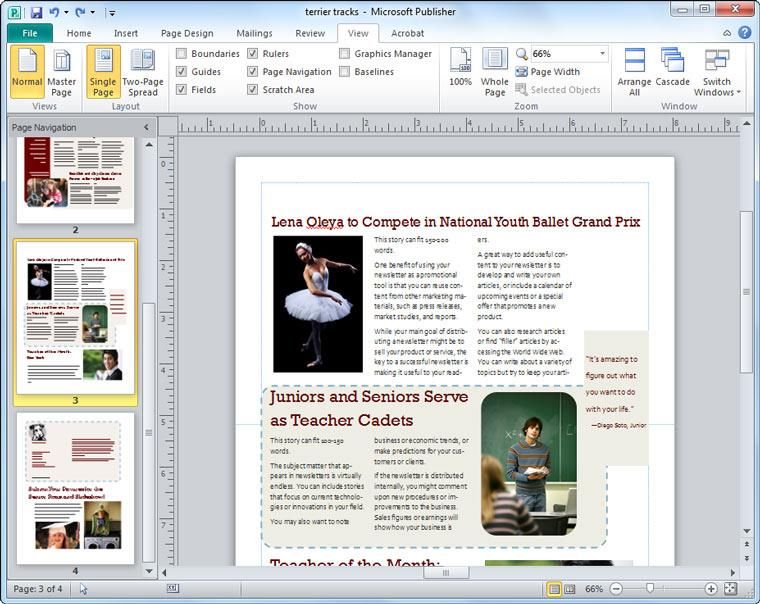
Information and Communication Technology(ICT) is one of the components of
Technology and Livelihood Education(TLE). It offers a lot of skills appropriate for the
jobs offered by the different companies nowadays.
       Desktop Publishing(DTP) is the use of the computer and software to create
visual display of ideas and information.
       This module is divided into three lessons namely: Desktop Publishing and the
Microsoft Software, Common Tasks in Publisher and Creating A New Publication.
These lessons will help you produce creative and innovative business cards,
letterheads, newsletters, booklets, manuals, brochures, advertisements, business
forms, reports, magazines, catalogues, programs, flyers, posters and invitations.
.      Moreover, you will be trained to create pages using imported text and graphics,
modify text and graphics within a page and link pages and text boxes. You will identify
and choose appropriate fonts for your project, select, import, and manipulate graphics
and format pages appropriate for presentation.
     MS Publisher will be the specific program/software in creating your publication.
Hence, you may also use other software, such as: Corel Draw, Adobe Page Maker and
Adobe InDesign to help you in creating your design.
     So, explore and experience the K to 12 TLE modules and be a step closer to
becoming a successful graphic designer.

                                             ***

ICT- Desktop Publishing                                                          Page 2
OBJECTIVES
At the end of this module, you are expected to:
explain the basic concept and features of Desktop Publishing(DTP),
use Desktop Publishing Softwares such as Microsoft MS Publisher, Indesign,
Adobe Page Maker, Corel Draw, etc.
create designs using Desktop Publishing
PRE ASSESSMENT
To test your prior knowledge on Desktop Publishing, answer the Pre Assessment
below. This will give you an idea of the lessons that you will come across within this
subject.
A. Directions: In your activity notebook, answer the following questions to
test your understanding on Desktop Publishing.
1. What is Desktop Publishing?
2. As a budding/new layout artist, a client asks you to design a flyer/event
program/business card/report cover for his online marketing business. How are
you going to satisfy his need? Enumerate your ideas:
____________________
____________________
____________________
3. What computer application/software are you going to use?
____________________
____________________
____________________
____________________
ICT- Desktop Publishing Page 3
4. What are the different kinds of documents that you can produce to display your
      ideas and information using Desktop Publishing?

       ____________________
       ____________________
       ____________________
       ____________________
       ____________________
       ____________________

ICT- Desktop Publishing                                                         Page 4
LEARNING GOALS/TARGET

       After reading the introduction and carefully answering the pre-assessment test,
you now have an idea on what to learn in this module. In your notebook, write your
goals and targets by completing the sentences below:

My goals are:
                                                         Goal 4
                                               Goal 3
                                       Goal 2
                                 Goal 1

My targets are:

                          Target 1

                          Target 2

                          Target 3

ICT- Desktop Publishing                                                         Page 5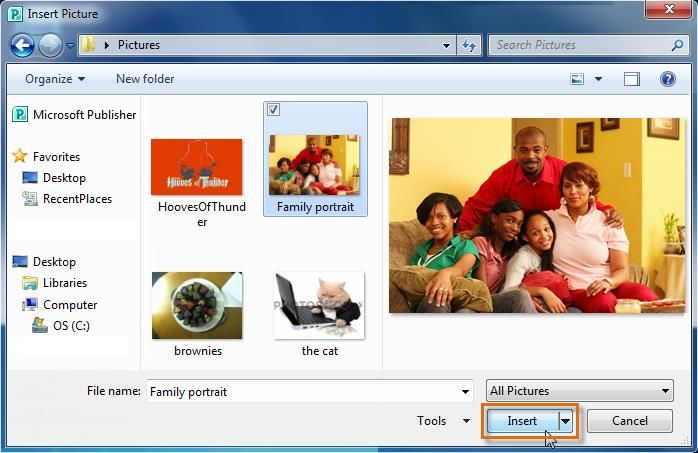
Process and Delivery
This part of the module will help you learn and acquire innovative skills in
creating different kinds of publication needed in making Desktop Publishing as a career.
Discover the exciting lessons below.
Know
Lesson 1:
DESKTOP PUBLISHING AND THE MS PUBLISHER SOFTWARE
Desktop Publishing
Desktop publishing is the process of using the computer and specific
types of software to combine text and graphics to produce documents such as
newsletters, brochures, books, Web pages and many other printed documents.
This lesson focuses on the use of MS Publisher 2010 in creating a
publication. You can also use other softwares such as: Corel Draw, Adobe Page
Maker and Adobe Indesign.
Things to Do with Desktop Publishing
Desktop publishing is or can be:
designing print communications such as brochures, flyers, ads and
posters
designing print communications such as catalogues, directories and
annual reports
designing logos, business cards, and letterhead
designing and publishing newsletters, magazines, and newspapers
designing books and booklets
converting print communications to formats including Web and smart
devices such as tablets and phones
creating resumes and business forms (including invoices, inventory
sheets, memos and labels)
self-publishing (books, newsletters, ebooks, etc.)
designing and publishing blogs and Web sites
designing slide shows, presentations and printing handouts
ICT- Desktop Publishing Page 6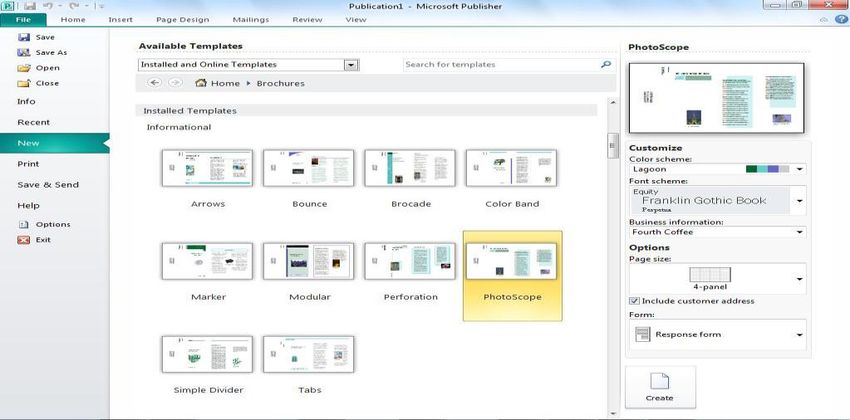
creating and printing greeting cards, banners, postcards, candy wrappers,
and iron-on transfers
making digital scrapbooks and print or digital photo albums
creating decorative labels, envelopes, trading cards, calendars, and charts
designing packaging for retail merchandise from wrappers for bars of soap
to software boxes
designing store signs, highway signs and billboards
taking work designed by others and putting into the correct format for
digital or offset printing or for publishing online
Steps and procedures when using Desktop Publishing Software
Desktop publishing software doesn't work in the same way as word
processing software. It is different from graphics software. From setting up a
basic document to complicated arrangements of text and graphics you learn how
to use desktop publishing software by following this step-by-step plan.
Step 1 applies to anyone who is new to using page layout programs.
Steps 2 and 8 apply to everyone. Pick and choose from among steps 3 to7 to
find the learning techniques that work for you.
1. Have a plan, make a sketch
2. Choose a template
3. Up your document
4. Place text in your document
5. Format your text
6. Place graphics in your document
7. Tweak your graphics placement
8. Apply the rules of desktop publishing
9. Print a draft and proofread it
10. Print your project
ICT- Desktop Publishing Page 7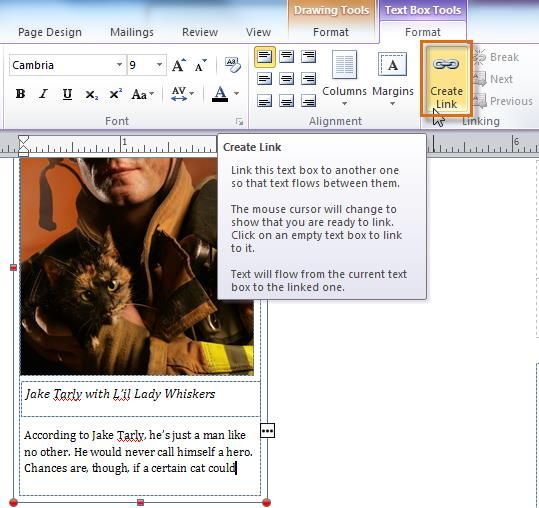
Lesson 2: THE MS PUBLISHER
One of the most common Desktop
Publishing software is the Microsoft
Publisher. It allows you to manipulate
features such as page size, text, graphics
and borders to create professional quality
printed documents.
WORKING WITH MS PUBLISHER
Opening MS Publisher may vary
depending on the computer you are working
on.
1. Click on the Start button, select All Programs menu » Microsoft Office »
Microsoft Office Publisher. You will see an icon on your desktop that looks similar to this
. Double click on this icon to open MS Publisher.
2. Publisher start up in the Getting Started with the Microsoft Office Publisher
window offering many pre-formatted designs to use in creating your publication.
The MS Publisher Window
The Publisher Window contains many parts that work together to make creating
documents easier. Understanding these elements will help you become comfortable
with the application.
Publisher Window Components
Publisher appears as displayed below when a new blank Publication file is
created. You have on your left the navigation pane to allow you to navigate through the
pages of your publication and on the right the individual page or pages selected in the
navigation pane. This is the area to place the objects that make up your publication. It is
either textual or graphical in nature.
ICT- Desktop Publishing Page 8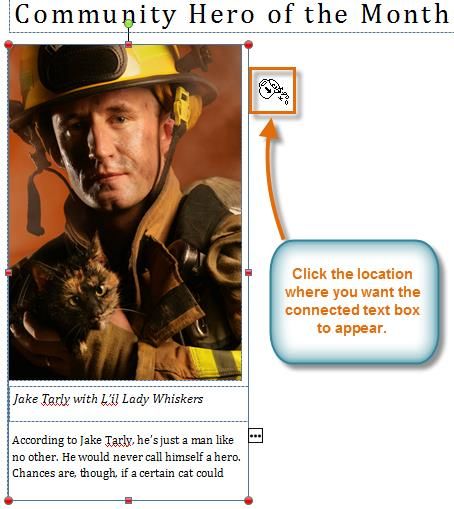
Navigation Pane

                     Figure 1: The Navigation Pane

As soon as a publication type is chosen, the window displays more specific choices for
that publication type.

                                                            At the top of the middle
                                                            section will be links
                                                            (“breadcrumbs”) to
                                                            different publications
                                                            within the publication type
                                                            chosen.

                                                            The middle section also
                                                            displays thumbnails of
                                                            different publications
                                                            within the category.

                                                            An orange frame engulfs
                                                            the chosen publication

    Figure 2: Types of Publication

ICT- Desktop Publishing                                                           Page 9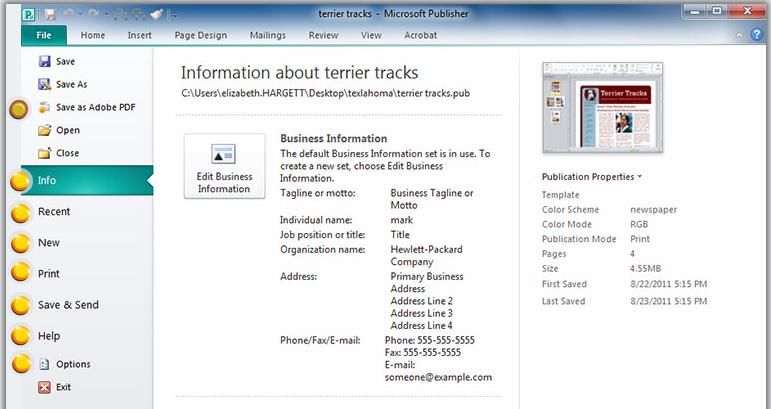
Basic Parts and Functions of MS Publisher
The illustration below consists of the important tool bars in working with MS
Publisher
Quick Access Toolbar Ribbon
Page Navigation
Ruler
Guides
Page Sorter View and zoom
Figure 3: The Tool Bars
ICT- Desktop Publishing Page 10Quick Access Toolbar
The Quick Access Toolbar lets
you access common commands, no
matter which tab you are using in the
Ribbon. By default, it shows the Save,
Undo, and Redo commands.
Figure 4: Quick Access Toolbar
The Page Navigation pane allows you to view and work with the
pages in your publication. You can add, delete, rearrange, and
duplicate pages in the Page Navigation pane. You can also
organize your pages into Sections.
Figure 5: Page Navigation
The Ribbon
The Ribbon contains multiple tabs, each with several groups of commands.
Some tabs, like "Text Box Tools" or "Picture Tools," may appear only when you are
working with certain items like text boxes or images.
Figure 6: The Ribbon
ICT- Desktop Publishing Page 11Viewing Tools
Publisher offers a group of viewing tools to help you control the layout of your text,
images and objects on the page. These viewing tools are for your editing purposes only.
They can be turned on and off and will not appear in your printed publication.
To access and choose viewing tools, select the View tab and locate the Show
group. Click the checkboxes of the various view options to turn them on and off.
Figure 7: Viewing Tools
Publication viewing tools
The publication viewing tools include:
Rulers
You can use the rulers to the left and top of your publication to help you line
up text, images and other objects and get a clearer idea of exactly where
those objects will appear on the printed page. When you select an object in
your publication, a white space will appear on the rulers to show the object's
location.
Figure 8: The Rulers
ICT- Desktop Publishing Page 12 Baselines
Baselines are evenly-spaced horizontal lines that you can use to line
up text. You'll learn about automatically aligning text to your baselines
in the Working with Text lesson.
Figure 9: The Baselines
Boundaries
Boundaries are dark blue dashed borders that appear around your
objects. Viewing object boundaries can be useful when you are
aligning objects or wrapping text.
Figure 10: The Object Boundaries
ICT- Desktop Publishing Page 13 Guides
Guides are thin lines that help you align various objects. There are
two types of guides:
Margin guides, which are blue lines that mark the edges, or
margins, of the printable area on each page of your publication.
Margin guides are automatically created when you set your page
margins.
Figure 11: The Guides
Customizable guides, which are green lines that you can add
anywhere in your publication.
Figure 12: Customizable Guides
ICT- Desktop Publishing Page 14To Add Green Guides:
1. Click either the horizontal or vertical ruler.
Figure 13: Creating Vertical Guide
2. Drag your mouse to your publication, and release to add the guide in the desired
location.
Dragging the guide to the desired location
Figure 14: The move caption
3. Your guide will be placed. You can move it any time by clicking and dragging it.
Figure 15: The added guide
ICT- Desktop Publishing Page 15The Task Pane
The right task pane shows a larger thumbnail of the
selected design and any available settings which can
be changed.
Make changes in the color scheme, font scheme,
business information, page size, layout, etc.
Some publication types do not allow for editing of
some of the options. In this case, they will be grayed
out.
When all settings are chosen, click the Create button
to create the publication.
If the default setting fits the needs for a publication,
just double click on the type of publication.
Once the Publication is created, the main Publisher window will be displayed.
The menu bar and other toolbars have several the same choices that are used in Office
2003 applications. This is a desktop publisher 2010, so an Object toolbar has been
added to the left side of the Publisher window.
Backstage View
In Publisher 2010, options for saving, printing and creating publications are all
located in Backstage view. It is similar to the Office Button Menu from Publisher 2007
or the File Menu from earlier versions of Publisher. However, unlike those menus, it is a
full-page view, which makes it easier to work with.
To access Backstage view, click the File tab.
ICT- Desktop Publishing Page 16Study the different commands numbered 1 to 8 in figures below.
1
1
2
3
4
5
6
7
8
Figure 1: The Save, Save As, Open and Close Command
Figure 2: The Info Command
ICT- Desktop Publishing Page 17Figure 3: The Recent View Command
Figure 4: The New Command Figure 5: The Print Command
ICT- Desktop Publishing Page 18Figure 6: The Save and Send Command
Figure 7: The Help Command
ICT- Desktop Publishing Page 19Figure 8: The Option Command
Process
Try to explore the Desktop Publishing software to familiarize yourself with the
different tools to be used in doing creative designs.
Do the following to test your understanding
1. Open Publisher on your computer. A new blank publication will be created. (You'll
need to exit Backstage view to view it.)
2. Click through all of the tabs and notice how the Ribbon options change.
3. Try turning on and off various viewing tools.
4. Add a green guide.
5. Return to Backstage view to view your publication info.
6. Close Publisher without saving the publication.
ICT- Desktop Publishing Page 20Reflect and Understand
Understand
Observe the different tools used in working with desktop publisher on the
video then discuss your observation by groups.(Note: Downloaded copies of
video is provided in CDs/DVDs)
How to Create a Banner in Microsoft Publisher for Your Library Website
www.youtube.com
Answer the following questions:
1. What are the tools used in the video that will help you in
creating creative designs in desktop publishing?
2. Cite the importance of the tools used in creating the design.
Transfer
Hands on Activity
Demonstrate your knowledge on the use of tools in desktop
publishing and cite some benefits of it to be able to determine your ability
of understanding the lessons ahead.
ICT- Desktop Publishing Page 21Lesson 3: Common Task in Publisher
Know
I. WORKING WITH TEXT
To create and design effective publications,
you need to present text in a readable and visually
interesting way. For this reason, Publisher offers a
number of tools that let you customize and control
the layout and appearance of the text in your
publication.
In this lesson, you'll learn how to add and
arrange text boxes, as well as how to format them
and the text they contain.
As you enter text in Publisher, you'll need to
adjust it to fit your publication. While most of Publisher's text tools are the same as
those in other Office programs, a few are specifically designed to handle Publisher's
unique publication tasks.
Text Basics
In order to use MS Publisher, you must have the knowledge in using the
Microsoft Word application. If you find yourself having trouble working with text in
Publisher, review your Word course, especially the following lessons:
Text Basics - Reviews basic topics like inserting, deleting, copying, and
moving text
Formatting Text - Includes text formatting tasks like changing font style, size,
and color
Checking Spelling and Grammar - Presents tools you can use to proofread
your text
Working with Lists - Guides you through creating and formatting lists
Line and Paragraph Spacing - Explains how to adjust spacing
ICT- Desktop Publishing Page 22II. WORKING WITH TEXT BOXES
In Publisher, text is contained in text boxes, which are blocks of text that you
can place on the page. When you create or select a text box, the Text Box Tools tab
will appear on the Ribbon. On this tab are commands that let you adjust and format your
text box and the text it contains.
The Ribbon
Insert a Text Box:
1. On the Ribbon, select the Insert tab and locate the Text group.
The Insert Command
2. Click the Draw Text Box command.
The Draw Text Box command
ICT- Desktop Publishing Page 233.The cursor will turn into a crosshairs . Click anywhere on your publication and
drag your mouse to create the text box.
4.You can now start typing inside the text box.
III. WRAPPING TEXT
If you place a text box near an image or another object, you may notice that the
text is overlapping with the object or doesn't appear exactly where you want it, to fix this
problem you'll need to change the object's text wrapping settings.
ICT- Desktop Publishing Page 24IV. WRAPPING TEXT AROUND THE OBJECT
1. Select the object, then click the Format tab that appears on the Ribbon.
2. Locate the Arrange group and click the Wrap Text drop-down command.
3. Select the desired wrap option. The text will adjust based on the option you have
selected.
4. If necessary, reposition the object and adjust the image until the text wraps
correctly.
ICT- Desktop Publishing Page 25 If you can’t get your text to wrap the way you wish, click the Wrap Text
command and select More Layout Options from the menu. You can make more
precise changes in the Advanced Layout dialog box that appears.
V. CONNECTING TEXT BOXES
As you work with text boxes, you might find that a text box isn't large enough to
contain all of the text you want to include. When you run out of room for text, you can
use the Link command to connect text boxes. Once two or more text boxes are
connected, text will flow or continue from one text box to the next.
Connect to a New Text Box
1. Select your text box.
ICT- Desktop Publishing Page 262. Click the Text Box Tools Format tab and locate the Linking group. 3. Click the Create Link command. 4.The Link icon will appear in place of your cursor. Click the spot on your publication where you would like to add the linked text box. ICT- Desktop Publishing Page 27
5.Continue typing your text. Any text that overflows from the original text box will now
appear in the connected box.
VI. MODIFYING TEXT BOXES
The Text Fit options allow you to format text boxes that automatically adjust
font or text box size to get a good fit. There are four text fit options that you can apply to
any text box:
Best Fit, which makes the text larger or smaller to fit the text box.
Shrink Text on Overflow, which automatically shrinks the font size when the
text box has no room for additional text.
Grow Text Box to Fit, which automatically enlarges your text box based on text
size and length.
Do not Autofit, which makes no automatic changes to your text or text box size.
This is the default option.
For instance, if your text box is too small for your text, you may apply Shrink
Text on Overflow or Grow Text Box to Fit.
ICT- Desktop Publishing Page 28Examples of text fit options
On the other hand, if you have a certain amount of space for your text box and
want your text to fill the entire area, you may select Best Fit.
To modify text fit, select the text box, then click the Text Fit drop-down command
in the Text group of the Text Box Tools tab. Select the desired option.
Text fit options
ICT- Desktop Publishing Page 29VII. FORMATTING TEXT
Publisher includes various typography commands designed to help you
embellish your text. Although Publisher's developers have touted this as a significant
feature, it is important to note that many of these effects only work with a small
number of fonts, such as Calibri, Cambria, and Gabriola. Still, if you are using these
fonts, the typography commands can enhance the appearance of your text.
Typography commands can be found in the Text Box Tools tab. To apply any
command, simply select your text, then click the desired command. Certain commands,
like Stylistic Sets, will include a drop-down list of choices.
Typography commands
There are six Publisher typography commands:
Drop Cap, which enlarges the first letter of the selected text.
ICT- Desktop Publishing Page 30Number Style lets you choose between four different styles for number spacing and alignment. Ligatures -connect certain combinations of letters to make them easier to read. Stylistic Sets- lets you choose between various embellishments for your fonts, usually in the form of exaggerated serifs or flourishes. Various stylistic sets ICT- Desktop Publishing Page 31
Swash- embellishes capital letters

Stylistic Alternates- offer alternate versions of specific letters such as g.

VIII. WORKING SHAPES AND OBJECTS

       In Publisher, the components of any
publication are called objects. You have already
worked with text boxes, which is one type of object.
Publisher offers decorative objects as well, including
shapes and Building Blocks. Using these objects is
an easy way to add graphic design elements to your
publication.

       In this lesson, you'll learn how to create and
modify shapes and Building Blocks. You'll also
learn how to align, group and arrange objects of all
types.

To Insert a Shape:

   1. Select the Insert tab and locate the Illustrations group

ICT- Desktop Publishing                                                         Page 32
2. Click the Shapes drop-down command
Select a shape from the drop-down menu.
ICT- Desktop Publishing Page 33Arranging Objects
Publisher offers a number of tools to help you arrange and order your objects. These
tools work for any object, and can help you lay out your pages quickly and precisely.
Aligning
You can click and drag objects to align them manually, but this can be difficult and
time-consuming. Publisher includes several commands that allow you to align your
objects quickly and precisely. Objects can be aligned to each other or to the page.
To Align Two or More Objects:
1. Click and drag your mouse to form a selection box around the objects you want
to align. All of the objects will now have sizing handles to show that they are
selected.
2. Click the Format tab and locate the Arrange group.
3. Click the Align drop-down command.
ICT- Desktop Publishing Page 344. Select one of the six alignment options.
5. The objects will align to each other based on the option that you have selected.
To Align Objects to the Page:
1. Select the object or objects you want to align.
2. Click the Format tab and locate the Arrange group.
3. Click the Align drop-down command.
4. Select one of the six alignment options.
The objects will align to the page based on the option that you have selected
ICT- Desktop Publishing Page 35Grouping
At times you may want to group multiple objects into one object so that they will
stay together if they are moved. This can be easier than selecting all of the objects
every time you want to move them.
To Group Objects:
1. Select the objects you wish to group.
2. Click the Format tab and locate the Arrange group.
3. Click the Group command.
4. The selected objects will now be grouped. There will be a single box with sizing
handles around the entire group to show that they are one object.
Moving Objects Backwards and Forwards
In addition to aligning and grouping objects, Publisher gives you the ability to
arrange objects in a specific order. The ordering is very important when two or more
objects overlap, as it will determine which objects are in the front or the back.
To Change the Ordering by One Level:
1. Select the object you wish to move.
2. Click the Format tab and locate the Arrange group.
ICT- Desktop Publishing Page 363. Click the Bring Forward or Send Backward command to change the object's
ordering by one level. If the object overlaps with more than one other object, you
may need to click the command several times to achieve the desired ordering.
To Bring an Object to the Front or Back:
If you want to move an object behind or in front of several objects, it is usually faster
to bring it to front or send it to back rather than clicking the ordering commands
multiple times.
1. Select the object you wish to move.
2. Click the Format tab and locate the Arrange group.
3. Click the Bring Forward or Send Backward drop-down command
ICT- Desktop Publishing Page 37IX. WORKING WITH PICTURES
Pictures are great way
to add visual interest to your
publication. Depending on the
type of publication you're
creating, adding pictures can
even be essential. For
instance, you wouldn't create
a brochure for a product
without including at least one
picture of it. The picture tools
make it easy to incorporate
images into your documents
and modify those images in
interesting ways.
In this lesson, you'll
learn how to insert, fit, and
format pictures, including Clip Art. You'll also learn about preparing your pictures
for publication and using other Office programs to make advanced edits to your
pictures.
To Insert a Picture from a File:
1. Select the Insert tab and locate the Illustrations group.
2. Click the Picture command.
ICT- Desktop Publishing Page 38The Insert Picture dialog box will appear. Locate and select the picture you
would like to insert, then, click Insert.
To Insert Clip Art:
1. Select the Insert tab and locate the Illustrations group.
2. Click the Clip Art command.
3. The Clip Art pane will appear on the right. Use the search tools to search for a
suitable image.
o Enter keywords in the Search for: fields that are related to the image you
wish to find.
o Click the drop-down arrow in the Results should be: field, then, deselect
any types of media you do not wish to see.
4. Click Go to begin your search.
5. Publisher will display pictures that meet your search terms. When you have
found a picture you wish to use, click it.
ICT- Desktop Publishing Page 39Fitting Pictures in Your Publication
To get your picture to fit well on the page, you may have to adjust it by resizing,
cropping and rearranging it.
To Resize a Picture:
1. Select the picture.
2. Click one of the corner sizing handles and drag your mouse until the picture is
the desired size.
To Crop a Picture:
1. Select the picture, then click the Picture Tools Format tab and locate the Crop
group.
2. Click the Crop command.
3. The black cropping handles will appear. Click and drag a handle to crop the
picture. The areas that will be cropped will appear to be semi-transparent.
4. When you are satisfied with the appearance of your picture, click the Crop
command again.
5. The picture will be cropped.
ICT- Desktop Publishing Page 40X. SPACING OF CHARACTERS, LINES AND PARAGRAPHS
Tracking -The spacing between all selected text characters.
Kerning -The space between any two specific characters.
Leading - (pronounced ledding) – The amount of white space between lines of
text.
To Adjust Tracking or Kerning
1. Select the text you want to reformat.
2. Choose Format.
3. Select Character Spacing.
4. Under Tracking, choose the space to apply to the text.
5. Under Kerning, select the options to define the space between any two
characters
To adjust the Leading or Line Spacing
1. Select the text to reformat.
2. Choose Format.
3. Select Paragraph.
4. Click the Indents and Spacing tab.
5. Set the paragraph and line spacing.
XI. INSERTING TABLES
To Insert a Table:
1. Click the Insert tab and locate the
Tables group.
2. Click the Table drop-down command.
The Table drop-down command
3. Hover your mouse over the diagram
squares to select the number of
columns and rows in the table, then
click your mouse
4. Apply your knowledge in the
manipulation of tables in Word Processing.
ICT- Desktop Publishing Page 41XII. SAVING FILES
It is a good rule of thumb to save a publication every 10 to 15 minutes, after the
publication is completed, before it is printed or when a major change is made.
Therefore, if the computer loses power, the information has been retained.
Saving a File
Save as is used to save a file for the first time or to save it with a different name
or to a different location.
1. Click File.
2. Chose Save As.
3. In the File Name text box, type in the desired filename.
4.Press Enter or click Save.
Save is used to save a file using its current name and replace the existing file.
This command is used to update a file.
1. Click File.
2. Select Save.
- or -
Click on the Save icon on the Standard toolbar.
Auto Recovery
You can set the system up to save your publication every so many minutes so
that if your system crashes or goes down for some reason, you will be able to retrieve
the publication later. Make sure to save the file initially so that this feature will work for
you. This is not a guarantee because the most recent changes may not be retrieved so
it is still important to save often.
Set up Auto Recovery
1. Click Tools.
2. Select Options.
3. Choose the Save tab.
4. Make sure the box next to Save Auto Recovery info every: is checked.
5. Set the number of minutes.
6.Click OK.
ICT- Desktop Publishing Page 42XIII. OPENING, CLOSING AND PRINTING PUBLICATION
Even though you can open several publications at the same time, this practice
takes up valuable memory on the computer. It is a good practice to close publications
when you finish working with them.
Opening Existing Files
1. Click File.
2.Select Open.
3. Find and select the file.
4. Click Open.
Closing a File
1. Click File..
2. Select Close.
3. If the file has been changed since the last time it was saved, a dialog box
appears. To save the file click, Yes. To close the file without saving click No.
To return to the file without closing it , click Cancel.
XIV. PRINTING YOUR PUBLICATION
The new Backstage view for printing looks like this:
On the left are the print settings and on
the right the preview pane. The settings
on the left will affect the printed
publication, while the settings on the
right only affect your view of the
publication.
Note: Some of these controls are
dependent on other settings. For
example, the color control will only be
available if your printer can print in color
and the front/back transparency slider
will only be available if you choose print
on both sides of the paper.
ICT- Desktop Publishing Page 43The print settings allow you to configure:
1. Print: Enter the number of
copies of the print job you want to
print and press Print to send the
job to your printer.
2. Printer: In addition to selecting
from a list of available printers,
you can also add a new printer,
access the Advanced Output
Settings and print to a file.
3. Settings:The settings section
gives you control over:
Pages: Allows you to select specific pages or page ranges to print.
Print imposition: Here you can specify where on a sheet of paper
your publication will print and how the pages of your publication will
be laid-out on the sheets of paper.
Paper size: Select the size and style of the sheets of paper you
will use to print your publication.
One sided/two sided printing: Choose whether to print on one or
both sides of the paper, and which edge to use in flipping the
paper.
Color: If your printer supports color this control will allow you to
choose color or grayscale printing.
Save settings with publication: If selected this check box will
save your Settings selections with this publication.
Note: In Office Publisher, page size refers to a working area of your publication. Paper,
or sheet size is the size of the paper that you use for printing. A sheet of paper may
contain multiple pages, and a large page may be imposed across multiple sheet
ICT- Desktop Publishing Page 44The preview pane reflects changes made in the print settings. It also allows you to:
1. Sheet navigation: Move
through the sheets of your
publication.
2. Front and Back
buttons: These buttons are
available when printing on both
sides of the paper, click to view
the front or back of the sheet.
3. Zoom slider: Slide to the left
to zoom out and slide to the right
to zoom in on your publication.
4. Fit to sheet: If you are viewing
more than one sheet this button
will zoom to view one sheet.
5. View multiple sheets: If you publication will be printed on multiple sheets of paper,
you can use this button to preview more than one sheet at a time.
6. Show/hide page numbers: This slider will show you the order of the pages being
imposed on the sheet(s) of paper. This is particularly useful when you are printing a
publication with more than one page on the sheet, like a greeting card.
7. Show/hide the rulers: Show or hide the rulers for the height and width of the
currently selected sheet of paper. If you change the paper size in Settings, the ruler will
change accordingly.
8. Transparent view slider: If you are printing on two sides of the sheet, this slider will
allow you to see through to the other side of the sheet, like holding the printed paper
over a light table. This allows you to be sure that your publication lines up correctly on
both sides of the sheet of paper.
Print your publication
1. Click the File button to open the Backstage view.
2. Click Print to open the print settings page.
ICT- Desktop Publishing Page 45Note : You may have to wait a moment while Publisher connects to your printer.
3. In the Print section, set the number of copies to print in Copies of print job.
4. In the Printer section, make sure that the correct printer is selected.
Note : The preview window will display in black and white, regardless of whether your
publication(s) includes color, unless you have selected a color printer.
5. In the Settings section:
a. Make sure that the correct set of pages or sections is selected.
b. Select the format for imposing your pages on the sheet.
c. Set the paper size.
d. Set whether to print on one side of the sheet of paper or both, and when
printing on both sides whether to flip the sheet of paper on the long or short side.
e. If your printer is capable of color printing, choose if you want to print color or
grayscale.
6. Click the Print button to send the publication to your printer.
Printing more than one copy of a publication
1. Click the File button to open the Backstage view.
2. Click Print to open the print settings page.
Note : You may have to wait a moment while Publisher connects to your printer.
3. In the Print section, set the number of copies to print in Copies of print job.
4. Click the Print button to send the publication to your printer.
Print specific pages of a publication
1. Click the File button to open the Backstage view.
2. Click Print to open the print settings page.
Note : You may have to wait a moment while Publisher connects to your printer.
3. In the Settings section, click in the Pages text box.
4. In the text box, type the page number of the first page that you want to print, type
a hyphen and then type the last page of the range that you want to print. For
example: 2-4.
5. Click the Print button to send the publication to your printer.
ICT- Desktop Publishing Page 46Print individual pages
1. Click the File button to open the Backstage view.
2. Click Print to open the print settings page.
Note: You may have to wait a moment while Publisher connects to your printer.
3. In the Settings section, click in the Pages text box.
4. In the text box, type the page number of the first page that you want to print, type
a comma and then type the next page that you want to print. Repeat for each
page number that you want to print. For example, 2,4,6,8.
5. Click the Print button to send the publication to your printer.
Print multiple copies of each page
If you are printing labels or business cards, the default option will be Multiple
copies per sheet. This will print more than one copy of each page of your publication,
with each set of pages on separate sheets of paper. When you choose this option, the
Layout Options button becomes available allowing you to adjust the margin guides to
increase or decrease the number of copies of your publication that can fit on a single
sheet of paper. For example, if your business card publication contains two pages —
each page contains a different business card — and you select Multiple copies per
sheet and 10 copies, then a total of 20 copies — 10 copies of each of the two different
business cards — will be printed on two sheets of paper, one sheet for each page.
1. Click the File button to open the Backstage view.
2. Click Print to open the print settings page.
3. In the Settings section, select Multiple copies per sheet and then select the
number of copies.
4. Click the Print button to send the publication to your printer.
If you click One page per sheet, your publication will be printed in the center of
the sheet of paper.
If you want to print one page of your publication per sheet at a specific position
on the sheet, click Multiple copies per sheet, click Layout Options and then
change your publication's position on the sheet by adjusting the row options,
column options and horizontal and vertical gap values under More print options.
This option is available for publications with page sizes that are smaller than the
paper sizes, such as Advertisements, Business Cards and Compliments Cards.
ICT- Desktop Publishing Page 47Print multiple pages on each sheet
When you want to print labels, name tags, or business cards, it is usually most
efficient to print a whole series on a single sheet. You can do that in Publisher from the
Multiple pages per sheet option in the Print page. When you choose this option, the
Layout Options button becomes available allowing you to adjust the margin guides to
increase or decrease the number of copies of your publication that can fit on a single
sheet of paper. For example, if you have a set of 10 post-cards with different information
on each and you select Multiple pages per sheet and one copy, then all ten pages will
print on the one sheet of paper.
Note:This option is available only when the publication page size is smaller than the
sheet that the publication is set to print on.
1. Click the File button to open the Backstage view.
2. Click Print to open the print settings page.
Note : You may have to wait a moment while Publisher connects to your printer.
3. In the Settings section, select Multiple pages per sheet and then select the
number of copies.
4. Click the Print button to send the publication to your printer
Process
Perform the following activities.
Activity No. 1
1. Open an existing Publication given by the teacher.
2. Create a text box and add text.
3. Change the text box fit settings to see the effect on your text.
4. Connect an existing text box to a new one.
Activity No. 2
1. Open a publication.
2. Insert a shape, then, rotate it.
ICT- Desktop Publishing Page 483. Insert another shape, then change the fill and outline color of the
shape
4. Change the order of the two shapes you inserted.
5. Align two shapes.
6. Group the shapes you just aligned, then, align the group to the center
of the page.
Activity No. 3
1. Create or open a publication.
2. Insert a Clip Art picture. Use the search tools in the Clip Art pane to
find a photograph of a family.
3. Crop the picture, then, resize it so that it fits well on the page.
4. Align the picture to the center of the page.
5. Recolor the picture.
6. Apply a picture style.
7. Add a caption.
8. Compress the picture, then, close the publication and save.
Activity No. 4
1. Open a publication.
2. Create a table with two columns and eight rows.
3.Add text to the table. If you're using the example, you can simply copy
and paste some of the text from the existing table.
4. Insert an additional column to the left of the first column.
5. Merge two cells, then, split them again.
6. Align the text in the far right column to the bottom left.
7. Apply a table style.
8. Select a row of cells and apply a border and fill color.
ICT- Desktop Publishing Page 49Reflect and Understand
Watch a video on how to do cards on Desktop Publishing.
Create a Greeting Card in MS Publisher 2010
http://www.youtube.com/watch?v=BDNM6B54YOs
Answer the following questions.
1. What are the common tasks in publisher that are applied to create the
project?
2. What are the reasons for choosing specific tasks in publisher to create
a design?
3. Can you now make your own design in Desktop Publishing?
Transfer
Choose a partner and demonstrate one task in Desktop Publishing in front
of the class. Make sure that you will be able to do the step by step procedure in
doing the task to test your preparedness for the next lesson.
ICT- Desktop Publishing Page 50Lesson 4: CREATING A NEW PUBLICATION
Know
( Note: In this lesson you will be allowed to explore the MS Publisher )
Introduction
In the previous lesson, you
learned about planning and
designing a publication. With
that knowledge, you're now
ready to create a new
publication.
In this lesson, you'll learn how
to create a new publication
using either a template or a
blank page. You'll also learn
how to customize your
publication by modifying page
layout, applying a new
template and adding,
deleting and rearranging
pages.
Publisher offers dozens of
templates for almost any type of publication you want to create, including brochures,
newsletters, greeting cards and more. Of course, if you can't find a template that you
like, you can always modify one to suit your needs, or even create a publication from a
blank page. Understanding Publisher's templates and layout tools will help you create
publications that look the way you want.
To Create a New Publication from a Template
1. Click the File tab to go to Backstage view, then select New. The Available
Templates pane will appear.
ICT- Desktop Publishing Page 512. Select the type of publication you wish to create.
3. A selection of templates will appear in the Available Templates pane. Choose
from one of two categories:
Office.com templates, which
include templates created by other
users. User-created templates are
indicated with a User icon .
Although Microsoft does review
these templates, you should use
caution when downloading them, as
they are not guaranteed to be free
from viruses and other problems.
Installed templates created by Microsoft.
ICT- Desktop Publishing Page 52A preview of the selected template will
appear in the Preview pane on the right.
Review the template and modify the
template options as desired.
When you are satisfied with the
template, click Create.
The Create button
The new publication will be created.
ICT- Desktop Publishing Page 53Depending on the type of publication you create, your template may offer more
customization options than shown in the example above.
Creating Blank Publications
If you do not want to use a template or you cannot find a template that suits your
needs, you can also create a blank publication. Remember, when you create a blank
publication, you will have to set up page margins, add guides and make all layout and
design decisions on your own.
To create a blank publication, click the New tab in Backstage View and select a
blank page size in the Available Templates pane.
Customizing Your Publication Layout
Whether you choose to create a publication from a template or from a blank
page, you may decide to change the publication layout. Three components that you
can change are margins, size and orientation. Although you can modify these settings
at any time, you should be careful if your publication already contains objects like text,
images and shapes, as you'll have to adjust them to fit the new layout.
ICT- Desktop Publishing Page 54To Modify Page Margins:
1. On the Ribbon, select the Page Design tab and locate the Page Setup group.
2. Click the Margins drop-down command.
A drop-down list will appear.
Select the desired margins.
Margin width options
ICT- Desktop Publishing Page 55The new margins will be applied.
The new, narrower margins have been applied
ICT- Desktop Publishing Page 56If you are not satisfied with any of the margin options, select Custom margins to
open the Layout Guides dialog box. There, you can specify margin widths.
To Change Page Size:
1. On the Ribbon, select the Page Design tab and locate the Page Setup group.
2. Click the Size drop-down command.
The size drop- down command
3. Select the desired page size from the
drop-down list that appears. Remember,
you to be sure that your printer is capable
of handling paper of that size.
Page size options
ICT- Desktop Publishing Page 574. Your publication's page size will be changed.
Preset Page Size to view a larger list of page sizes.
If the desired page size is not included in the drop-down list, select More
To Change Page Orientation:
1. On the Ribbon, select the Page Design tab and locate the Page Setup group,
then click the Orientation drop-down command.
2. Select Portrait orientation to make your publication taller than wide, or
Landscape to make it wider than tall.
Page orientation option
ICT- Desktop Publishing Page 583. Your publication's page orientation will be changed.
Depending on the template you choose, changing the page orientation may have
a negative effect on your presentation. While some templates work equally well in both
orientations, others do not.
Objects in this template fit poorly with the landscape orientation
Changing or Adding a Template
If you create a publication from a template and later decide that the chosen
template doesn't quite suit your needs, you can always change it. You can also apply
templates to publications that were originally created from blank pages.
To Apply a New Template to an Existing
Publication
1. On the Ribbon, select the Page Design
tab and locate the Template group.
2. Click the Change Template command.
The change Template Command
ICT- Desktop Publishing Page 593. The Change Template dialog box will appear. Select a template to preview it in
the Preview pane.
4. Modify the template options as desired.
5. When you are satisfied with the new template, click OK.
Selecting and modifying a template
6. A dialog box will appear asking you
how you wish to use the template.
You can either:
Apply the template to the
current publication.
Create a new publication
that includes the text and
images you have added.
7. Click OK.
The template option command
ICT- Desktop Publishing Page 608. The new template will be applied to your publication.
How to Create Business Cards
Most business cards have at
least the name of a person or company
1. Name of Business or
Organization
A business card always has a
business or organization name
on it. The name of the individual
or the name of the business or
organization is usually the most important text element of a business card. An
organization with a highly recognizable logo might de-emphasize the business
name (size and/or placement) but it is usually an essential piece of information.
2. Address
-A physical address or a mailing address or both are typical parts of a business
card. If the company does business exclusively online or by mail, a physical
address might not be a key element to include. If both a physical and a mailing
address are included, it is desirable to label each one.
ICT- Desktop Publishing Page 613. Phone Number(s)
Multiple numbers are typically listed in order of voice, fax, cell but you can omit
any numbers that are not the preferred method of phone contact. Don't forget the
area and/or country codes and extension, if required. Using parentheses,
hyphens, periods, spaces, or other characters to separate numbers in a phone
number are generally a matter of preference and custom but be consistent in
whatever method is chosen.
4. Email Address
An important element for Web-based businesses, but other businesses or
organizations might omit this form of contact unless it is one of their preferred
methods of contact.
5. Web Page Address
Web addresses can be listed with or without the http:// preceding the URL. As
with email addresses, it is an essential element for Web-based businesses.
6. Job Title of Individual
Refers to the position of the person in the company or organization, e.g.
“President” or “CEO” or some other title to give the appearance of a larger
organization.
7. Tagline or Description of Business
A tagline or brief description can be useful when the business name is somewhat
ambiguous or doesn't clearly convey what the business does. Taglines can also
convey benefits and features.
8. Logo
This helps establish the identity of the company.
9. Graphic Image(s) (including purely decorative elements)
Small companies without a logo may choose to use generic or stock images or
custom illustrations that help reinforce what the company does. Small graphic
embellishments or boxes might be used to separate blocks of information.
10. List of Services or Products
A long list will usually clutter up a standard size business card, but when using
two-sided or folded business cards, a bullet list of services offered or main
product lines can extend the usefulness of the business card.
ICT- Desktop Publishing Page 62How to Create a Newsletter
Most newsletters have at least a nameplate, body text
and headlines, but usually there will be many more of these
twelve parts of a newsletter layout.
1. Nameplate
The banner on the front page of a newsletter that
identifies the publication. It contains the name of the
newsletter, possibly graphics or a logo and perhaps a
subtitle, motto and publication information including
volume and issue or date.
2. Body
The bulk of the text excluding the headlines and decorative text elements. It's the
articles that make up the newsletter content.
3. Table of Contents
Usually appears on the front page. The table of contents briefly lists articles and
special sections of the newsletter and the page number for those items.
4. Masthead
The section of a newsletter layout — typically found on the second page (but
could be on any page) — that lists the name of the publisher and other pertinent
data. May include staff names, contributors, subscription information, addresses,
logo, etc.
5. Heads/Titles
o Headline - After the nameplate, the headline identifying each article in a
newsletter is the most prominent text element.
o Kicker - Often seen in newsletter design, the kicker is a short phrase set
above the headline. The kicker can serve as an introduction or section
heading to identify a regular column.
o Deck - One or more lines of text found between the headline and the
body of the article. The deck elaborates or expands on the headline and
topic of the accompanying text.
o Subhead - Appears within the body of articles to divide the article into
smaller sections.
o Running Head - More familiarly known as a header, a running headline is
repeating text - often the title of the publication - that appears, usually at
the top of each page or every other page in a newsletter design. The page
number is sometimes incorporated with the running headline.
o Continuation Heads (see below)
6. Page Numbers
Can appear at the top, bottom, or sides of pages. Usually page one is not
numbered in a newsletter.
ICT- Desktop Publishing Page 637. Bylines
A short phrase or paragraph that indicates the name of the author of an article in
a newsletter. The byline commonly appears between the headline and start of
the article, prefaced by the word "By" although it could also appear at the end of
the article.
8. Continuation Lines
When articles span two or more pages, a newsletter editor uses continuation
lines to help readers find the rest of the article.
o Jumplines - Also called continuation lines, typically appear at the end of a
column, as in continued on page 45. Jumplines at the top of a column
indicate where the article is continued from, as in continued from page 16.
o Continuation Heads - When articles jump from one page to another,
continuation heads identify the continued portion of the articles. The
continuation headlines, along with jumplines, provide continuity and cue
the reader as to where to pick up reading.
9. End Signs
A dingbat or printer's ornament used to mark the end of a story in a newsletter is
an end sign. It signals the reader that they have reached the end of the article.
10. Pull-Quotes
Used to attract attention, especially in long articles, a pull-quote is a small
selection of text "pulled out and quoted" in a larger typeface.
11. Photos / Illustrations
A newsletter design layout may contain photographs, drawings, charts, graphs,
or clip art.
Mug Shots - The most typical people photograph found in newsletter design is
the mug shot a more or less straight into the camera head and shoulders picture.
Caption - The caption is a phrase, sentence, or paragraph describing the
contents of an illustration such as a photograph or chart. The caption is usually
placed directly above, below, or to the side of the picture it describes.
12. Mailing Panel
Newsletters created as self-mailers (no envelope) need a mailing panel. This is
the portion of the newsletter design that contains the return address, mailing
address of the recipient and postage. The mailing panel typically appears on
one-half or one-third of the back page so that it faces out when folded.
ICT- Desktop Publishing Page 64How To Make Brochures
The first step in creating an effective
brochure begins with the planning. These five
important steps show exactly what you need to
do before writing the first word of your brochure:
1. Know Your Brochure's Function in the
Buying Process
Your product, the market, even your approach
on how you wanted to make the sale are all
major factors in creating your brochure.
Determine where your brochure functions in the
buying process:
Leave-Behinds - Named for the type of brochure you leave behind after meeting
a potential customer.
Point-of-sale - The type of brochure you may pick up while waiting in line at the
bank.
Respond to Inquiries - Someone asks about a specific product and you drop a
brochure in the mail for them to follow up.
Direct Mail - Your sales letter sells but you can also include your brochure into
your direct mail package.
Sales Support Tool - Similar to leave-behinds, but you use this type as a selling
aid through a sales pitch.
2. Know If Your Brochure Stands Alone
Some companies have one brochure for one product. Others use their brochure in
combination with other advertising mediums (commercials, print ads, direct mail, etc.). If
you are writing a brochure to be used with other forms of advertising, your content will
be determined by the ad campaign.
For example, you have written the perfect direct mail package. Your sales letter covers
the reasons your prospect has to buy your product now.
Don't follow up your direct mail masterpiece with a repetitious brochure. You've already
convinced your potential customer that you have a great product. Now show them the
benefits and features your product offers.
ICT- Desktop Publishing Page 653. Know Your Audience You have to determine the type of audience whom you will address your brochure. All information must fit to the needs of your audience. 4. Organizing Your Selling Points Think of your brochure as a book. It tells a story about your product/service. Your brochure should have a beginning, middle and an end. Just like a book, most people will look at the front cover, back cover and even flip through the pages to see if it is worth reading. How you determine the organization of your selling points depends on #3 - Know Your Audience. Once you've determined who is going to read your brochure, then you choose the approach that will best fit these readers. For example, say you own a car dealership. You might want to write a helpful brochure like, "10 Things to Look for When Buying a Car." Now you can go into the details of what a customer should look for and how your company can help in the buying process. This adds credibility to your company and the fact that you have this type of brochure could make the difference in whether you get the sale or your competitor does. After all, you were the one who wrote a helpful brochure your customer needed and used. 5.Complete, Accurate and Thorough Information Before you start hammering away at the copy in your brochure, take the time to really think about the information you want to include. Open up most brochures and you'll find lots of words. That is because brochures need to contain as much information as possible to get your potential customer to the next step - the purchase or the business. ICT- Desktop Publishing Page 66
Process
Before doing the tasks, watch some videos in making creative designs
using desktop publishing to activate your understanding and motivate you in
doing different activities in the lesson learned.
(Note: Videos are available in CDs/DVDs or you can browse on the
recommended sites.)
Creating Brochures Using MS Publisher
http://www.youtube.com/watch?v=fA1Ap2iIb-8
Creating Business Card in Publisher
http://www.youtube.com/watch?v=pptJ1PWWxWc
Creating Newsletter Using MS Publisher
http://www.youtube.com/watch?v=SN8dDf6_9I0
Task 1:
Create a business card. Your card should help others know and remember you.
It should convey who you are and what you do and can offer as a student
knowledgeable in desktop publishing.
Checklist:
Your Name
ICT- Desktop Publishing Page 67You can also read